CSE111 Introduction toComputer Applications
Lecture 7
Introduction to MS PowerPoint 2010-Part 1
Prepared by Asst. Prof. Dr. Mohamed KURDI
Revised and presented by Asst. Prof. Dr. Samsun M. BAŞARICI
2.
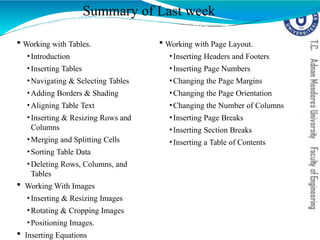
Summary of Lastweek
Working with Tables.
•Introduction
•Inserting Tables
•Navigating & Selecting Tables
•Adding Borders & Shading
•Aligning Table Text
•Inserting & Resizing Rows and
Columns
•Merging and Splitting Cells
•Sorting Table Data
•Deleting Rows, Columns, and
Tables
Working With Images
•Inserting & Resizing Images
•Rotating & Cropping Images
•Positioning Images.
Inserting Equations
Working with Page Layout.
•Inserting Headers and Footers
•Inserting Page Numbers
•Changing the Page Margins
•Changing the Page Orientation
•Changing the Number of Columns
•Inserting Page Breaks
•Inserting Section Breaks
•Inserting a Table of Contents
3.
Learning Objectives
Apply thefollowing skills:
1. Creating a Title Slide
2. Inserting a New Slide
3. Inserting a Slide with a Different Layout
4. Changing the Layout of a Slide
5. Inserting a Text Box to a Slide
6. Inserting a Table to a Slide
7. Inserting an Image to a Slide
8. Inserting a Clip Art to a Slide
9. Inserting a Screenshot to a Slide
10. Inserting a Shape to a Slide
11. Inserting a Smart Art to a Slide
12. Inserting a Video to a Slide
13. Inserting an Audio to a Slide
14. Inserting a Symbol to a Slide
15. Inserting an Hyperlink to a Slide
4.
Outlines
Introduction
MSPowerPoint 2010 Interface
The Ribbon
Creating a Title Slide
Inserting a New Slide
Inserting a Slide with a Different Layout
Changing the Layout of a Slide
Inserting a Text Box to a Slide
Inserting a Table to a Slide
Inserting an Image to a Slide
Inserting a Clip Art to a Slide
Inserting a Screenshot to a Slide
Inserting a Shape to a Slide
Inserting a Smart Art to a Slide
Inserting a Video to a Slide
Inserting an Audio to a Slide
Inserting a Symbol to a Slide
Inserting an Hyperlink to a Slide
5.
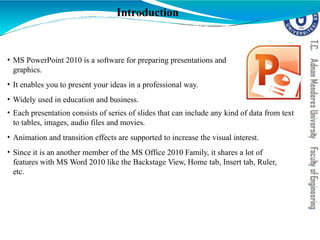
Introduction
• MS PowerPoint2010 is a software for preparing presentations and
graphics.
• It enables you to present your ideas in a professional way.
• Widely used in education and business.
• Each presentation consists of series of slides that can include any kind of data from text
to tables, images, audio files and movies.
• Animation and transition effects are supported to increase the visual interest.
• Since it is an another member of the MS Office 2010 Family, it shares a lot of
features with MS Word 2010 like the Backstage View, Home tab, Insert tab, Ruler,
etc.
6.
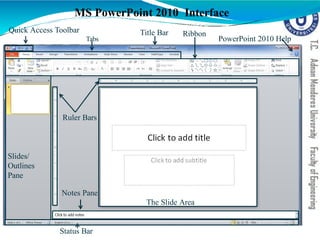
MS PowerPoint 2010Interface
Quick Access Toolbar Title Bar Ribbon
Ruler Bars
Status Bar
Tabs PowerPoint 2010 Help
Slides/
Outlines
Pane
The Slide Area
Notes Pane
7.
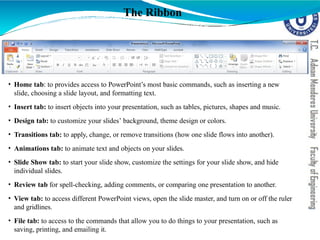
The Ribbon
• Hometab: to provides access to PowerPoint’s most basic commands, such as inserting a new
slide, choosing a slide layout, and formatting text.
• Insert tab: to insert objects into your presentation, such as tables, pictures, shapes and music.
• Design tab: to customize your slides’ background, theme design or colors.
• Transitions tab: to apply, change, or remove transitions (how one slide flows into another).
• Animations tab: to animate text and objects on your slides.
• Slide Show tab: to start your slide show, customize the settings for your slide show, and hide
individual slides.
• Review tab for spell-checking, adding comments, or comparing one presentation to another.
• View tab: to access different PowerPoint views, open the slide master, and turn on or off the ruler
and gridlines.
• File tab: to access to the commands that allow you to do things to your presentation, such as
saving, printing, and emailing it.
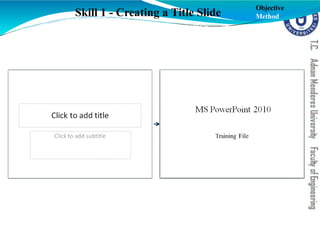
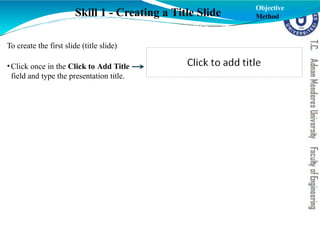
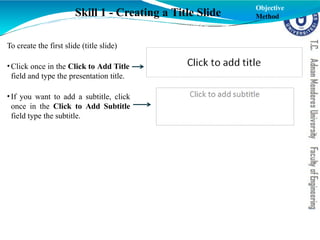
To create thefirst slide (title slide)
•Click once in the Click to Add Title
field and type the presentation title.
Skill 1 - Creating a Title Slide
Objective
Method
10.
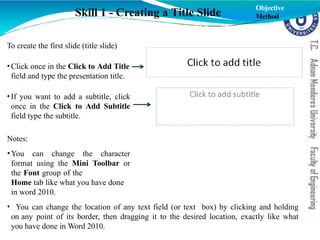
To create thefirst slide (title slide)
•Click once in the Click to Add Title
field and type the presentation title.
•If you want to add a subtitle, click
once in the Click to Add Subtitle
field type the subtitle.
Skill 1 - Creating a Title Slide
Objective
Method
11.
To create thefirst slide (title slide)
•Click once in the Click to Add Title
field and type the presentation title.
•If you want to add a subtitle, click
once in the Click to Add Subtitle
field type the subtitle.
Notes:
•You can change the character
format using the Mini Toolbar or
the Font group of the
Home tab like what you have done
in word 2010.
• You can change the location of any text field (or text box) by clicking and holding
on any point of its border, then dragging it to the desired location, exactly like what
you have done in Word 2010.
Skill 1 - Creating a Title Slide
Objective
Method
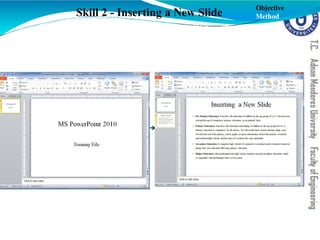
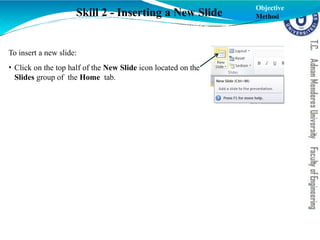
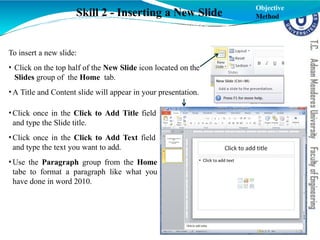
To insert anew slide:
• Click on the top half of the New Slide icon located on the
Slides group of the Home tab.
Skill 2 - Inserting a New Slide
Objective
Method
14.
To insert anew slide:
• Click on the top half of the New Slide icon located on the
Slides group of the Home tab.
•A Title and Content slide will appear in your presentation.
•Click once in the Click to Add Title field
and type the Slide title.
•Click once in the Click to Add Text field
and type the text you want to add.
•Use the Paragraph group from the Home
tabe to format a paragraph like what you
have done in word 2010.
Skill 2 - Inserting a New Slide
Objective
Method
15.
To insert anew slide:
• Click on the top half of the New Slide icon located on the
Slides group of the Home tab.
•A Title and Content slide will appear in your presentation.
•Click once in the Click to Add Title field
and type the Slide title.
•Click once in the Click to Add Text field
and type the text you want to add.
•Use the Paragraph group from the Home
tabe to format a paragraph like what you
have done in word 2010.
Skill 2 - Inserting a New Slide
Objective
Method
16.
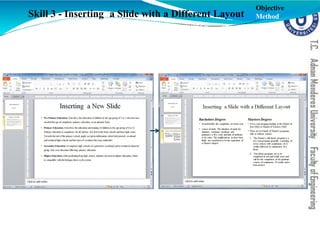
Skill 3 -Inserting a Slide with a Different Layout
Objective
Method
17.
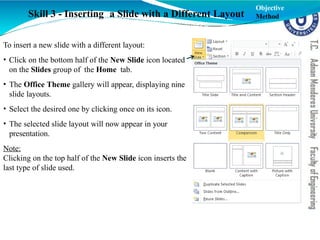
To insert anew slide with a different layout:
• Click on the bottom half of the New Slide icon located
on the Slides group of the Home tab.
• The Office Theme gallery will appear, displaying nine
slide layouts.
• Select the desired one by clicking once on its icon.
• The selected slide layout will now appear in your
presentation.
Note:
Clicking on the top half of the New Slide icon inserts the
last type of slide used.
Skill 3 - Inserting a Slide with a Different Layout
Objective
Method
18.
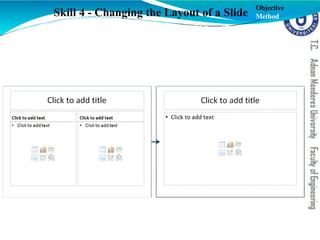
Skill 4 -Changing the Layout of a Slide
Objective
Method
19.
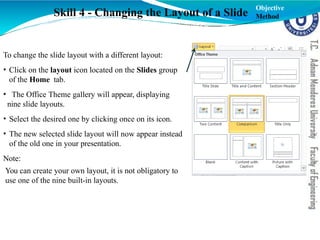
To change theslide layout with a different layout:
• Click on the layout icon located on the Slides group
of the Home tab.
• The Office Theme gallery will appear, displaying
nine slide layouts.
• Select the desired one by clicking once on its icon.
• The new selected slide layout will now appear instead
of the old one in your presentation.
Note:
You can create your own layout, it is not obligatory to
use one of the nine built-in layouts.
Skill 4 - Changing the Layout of a Slide
Objective
Method
20.
Skill 5 -Inserting a Text Box to a Slide
Objective
Method
21.
Skill 5 -Inserting a Text Box to a Slide
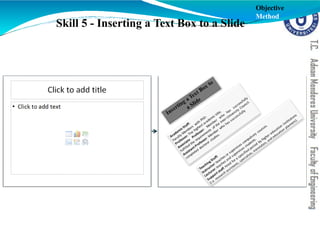
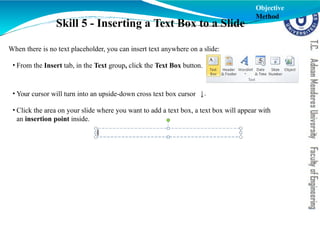
When there is no text placeholder, you can insert text anywhere on a slide:
• From the Insert tab, in the Text group, click the Text Box button.
Objective
Method
22.
Skill 5 -Inserting a Text Box to a Slide
When there is no text placeholder, you can insert text anywhere on a slide:
• From the Insert tab, in the Text group, click the Text Box button.
• Your cursor will turn into an upside-down cross text box cursor .
Objective
Method
23.
Skill 5 -Inserting a Text Box to a Slide
.
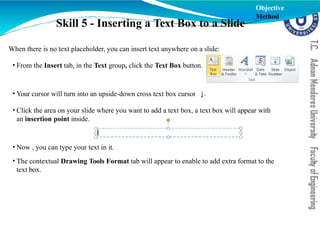
When there is no text placeholder, you can insert text anywhere on a slide:
• From the Insert tab, in the Text group, click the Text Box button.
• Your cursor will turn into an upside-down cross text box cursor
• Click the area on your slide where you want to add a text box, a text box will appear with
an insertion point inside.
Objective
Method
24.
Skill 5 -Inserting a Text Box to a Slide
.
When there is no text placeholder, you can insert text anywhere on a slide:
• From the Insert tab, in the Text group, click the Text Box button.
• Your cursor will turn into an upside-down cross text box cursor
• Click the area on your slide where you want to add a text box, a text box will appear with
an insertion point inside.
• Now , you can type your text in it.
• The contextual Drawing Tools Format tab will appear to enable to add extra format to the
text box.
Objective
Method
25.
Skill 6 -Inserting a Table to a Slide
Objective
Method
26.
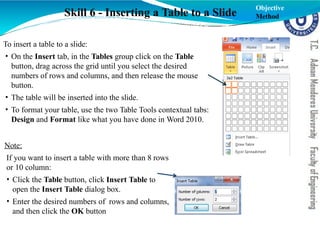
Skill 6 -Inserting a Table to a Slide
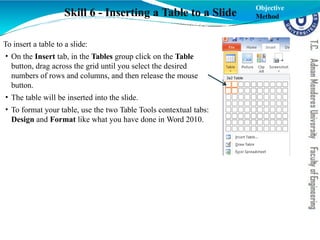
To insert a table to a slide:
• On the Insert tab, in the Tables group click on the Table
button, drag across the grid until you select the desired
numbers of rows and columns, and then release the mouse
button.
• The table will be inserted into the slide.
• To format your table, use the two Table Tools contextual tabs:
Design and Format like what you have done in Word 2010.
Objective
Method
27.
Skill 6 -Inserting a Table to a Slide
To insert a table to a slide:
• On the Insert tab, in the Tables group click on the Table
button, drag across the grid until you select the desired
numbers of rows and columns, and then release the mouse
button.
• The table will be inserted into the slide.
• To format your table, use the two Table Tools contextual tabs:
Design and Format like what you have done in Word 2010.
Note:
If you want to insert a table with more than 8 rows
or 10 column:
• Click the Table button, click Insert Table to
open the Insert Table dialog box.
• Enter the desired numbers of rows and columns,
and then click the OK button
Objective
Method
28.
Skill 7 -Inserting an Image to a Slide
Objective
Method
29.
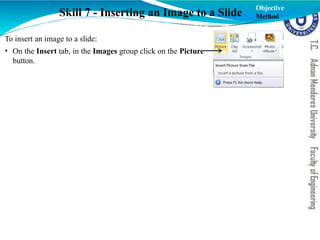
Skill 7 -Inserting an Image to a Slide
To insert an image to a slide:
• On the Insert tab, in the Images group click on the Picture
button.
Objective
Method
30.
Skill 7 -Inserting an Image to a Slide
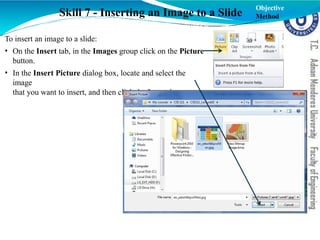
To insert an image to a slide:
• On the Insert tab, in the Images group click on the Picture
button.
• In the Insert Picture dialog box, locate and select the
image
that you want to insert, and then click the Insert button
Objective
Method
31.
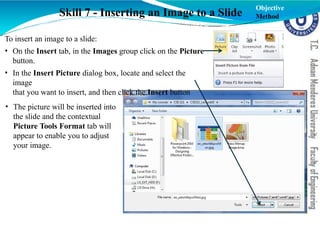
Skill 7 -Inserting an Image to a Slide
To insert an image to a slide:
• On the Insert tab, in the Images group click on the Picture
button.
• In the Insert Picture dialog box, locate and select the
image
that you want to insert, and then click the Insert button
• The picture will be inserted into
the slide and the contextual
Picture Tools Format tab will
appear to enable you to adjust
your image.
Objective
Method
32.
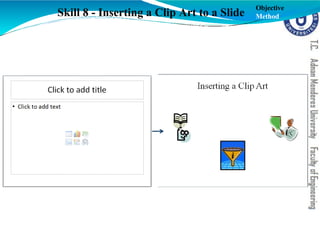
Skill 8 -Inserting a Clip Art to a Slide
Objective
Method
33.
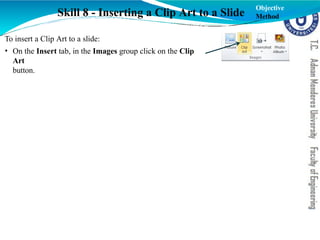
Skill 8 -Inserting a Clip Art to a Slide
To insert a Clip Art to a slide:
• On the Insert tab, in the Images group click on the Clip
Art
button.
Objective
Method
34.
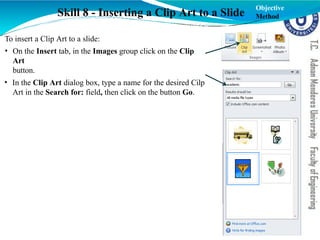
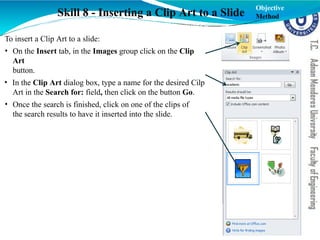
Skill 8 -Inserting a Clip Art to a Slide
To insert a Clip Art to a slide:
• On the Insert tab, in the Images group click on the Clip
Art
button.
• In the Clip Art dialog box, type a name for the desired Cilp
Art in the Search for: field, then click on the button Go.
Objective
Method
35.
Skill 8 -Inserting a Clip Art to a Slide
To insert a Clip Art to a slide:
• On the Insert tab, in the Images group click on the Clip
Art
button.
• In the Clip Art dialog box, type a name for the desired Cilp
Art in the Search for: field, then click on the button Go.
• Once the search is finished, click on one of the clips of
the search results to have it inserted into the slide.
Objective
Method
36.
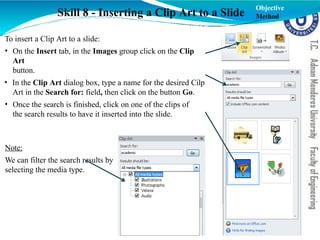
Skill 8 -Inserting a Clip Art to a Slide
To insert a Clip Art to a slide:
• On the Insert tab, in the Images group click on the Clip
Art
button.
• In the Clip Art dialog box, type a name for the desired Cilp
Art in the Search for: field, then click on the button Go.
• Once the search is finished, click on one of the clips of
the search results to have it inserted into the slide.
Note:
We can filter the search results by
selecting the media type.
Objective
Method
37.
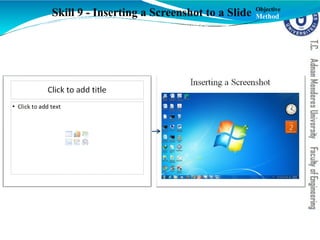
Skill 9 -Inserting a Screenshot to a Slide Objective
Method
38.
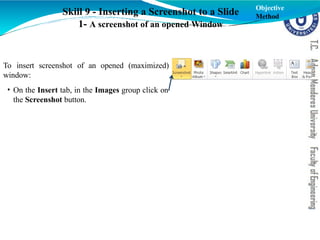
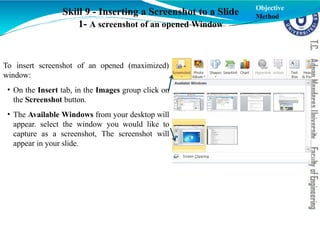
To insert screenshotof an opened (maximized)
window:
• On the Insert tab, in the Images group click on
the Screenshot button.
Skill 9 - Inserting a Screenshot to a Slide
1- A screenshot of an opened Window
Objective
Method
39.
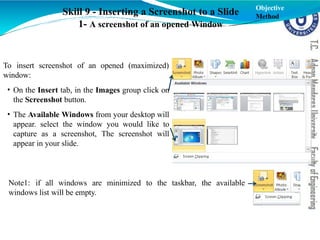
To insert screenshotof an opened (maximized)
window:
• On the Insert tab, in the Images group click on
the Screenshot button.
• The Available Windows from your desktop will
appear. select the window you would like to
capture as a screenshot, The screenshot will
appear in your slide.
Skill 9 - Inserting a Screenshot to a Slide
1- A screenshot of an opened Window
Objective
Method
40.
To insert screenshotof an opened (maximized)
window:
• On the Insert tab, in the Images group click on
the Screenshot button.
• The Available Windows from your desktop will
appear. select the window you would like to
capture as a screenshot, The screenshot will
appear in your slide.
Skill 9 - Inserting a Screenshot to a Slide
1- A screenshot of an opened Window
Note1: if all windows are minimized to the taskbar, the available
windows list will be empty.
Objective
Method
41.
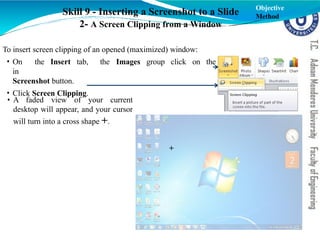
Skill 9 -Inserting a Screenshot to a Slide
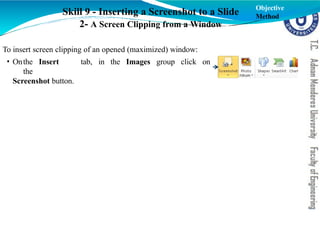
2- A Screen Clipping from a Window
To insert screen clipping of an opened (maximized) window:
• Onthe Insert tab, in the Images group click on
the
Screenshot button.
Objective
Method
42.
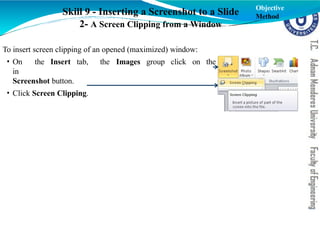
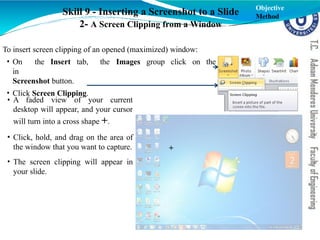
Skill 9 -Inserting a Screenshot to a Slide
2- A Screen Clipping from a Window
To insert screen clipping of an opened (maximized) window:
the Images group click on the
• On the Insert tab,
in
Screenshot button.
• Click Screen Clipping.
Objective
Method
43.
Skill 9 -Inserting a Screenshot to a Slide
2- A Screen Clipping from a Window
To insert screen clipping of an opened (maximized) window:
the Images group click on the
• On the Insert tab,
in
Screenshot button.
• Click Screen Clipping.
Objective
Method
• A faded view of your current
desktop will appear, and your cursor
will turn into a cross shape +.
+
44.
Skill 9 -Inserting a Screenshot to a Slide
2- A Screen Clipping from a Window
To insert screen clipping of an opened (maximized) window:
the Images group click on the
• On the Insert tab,
in
Screenshot button.
• Click Screen Clipping.
• A faded view of your current
desktop will appear, and your cursor
will turn into a cross shape +.
• Click, hold, and drag on the area of
the window that you want to capture.
• The screen clipping will appear in
your slide.
Objective
Method
+
45.
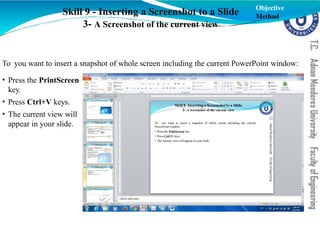
Skill 9 -Inserting a Screenshot to a Slide
3- A Screenshot of the current view
To you want to insert a snapshot of whole screen including the current PowerPoint window:
• Press the PrintScreen
key.
Objective
Method
46.
Skill 9 -Inserting a Screenshot to a Slide
3- A Screenshot of the current view
To you want to insert a snapshot of whole screen including the current PowerPoint window:
• Press the PrintScreen
key.
• Press Ctrl+V keys.
Objective
Method
47.
Skill 9 -Inserting a Screenshot to a Slide
3- A Screenshot of the current view
To you want to insert a snapshot of whole screen including the current PowerPoint window:
• Press the PrintScreen
key.
• Press Ctrl+V keys.
• The current view will
appear in your slide.
Objective
Method
48.
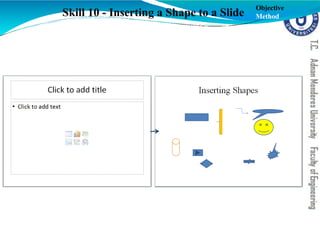
Skill 10 -Inserting a Shape to a Slide
Objective
Method
49.
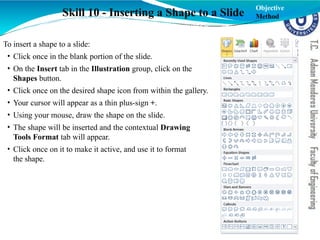
Skill 10 -Inserting a Shape to a Slide
To insert a shape to a slide:
• Click once in the blank portion of the slide.
• On the Insert tab in the Illustration group, click on the
Shapes button.
• Click once on the desired shape icon from within the gallery.
• Your cursor will appear as a thin plus-sign +.
• Using your mouse, draw the shape on the slide.
• The shape will be inserted and the contextual Drawing
Tools Format tab will appear.
• Click once on it to make it active, and use it to format
the shape.
Objective
Method
50.
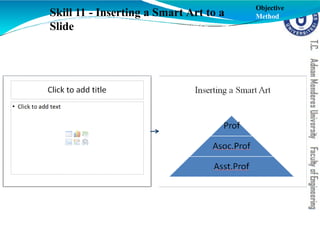
Skill 11 -Inserting a Smart Art to a
Slide
Objective
Method
51.
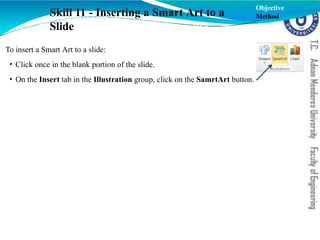
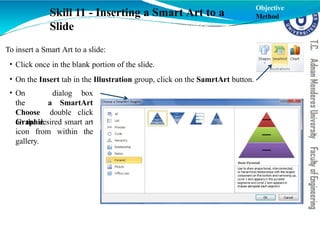
To insert aSmart Art to a slide:
• Click once in the blank portion of the slide.
• On the Insert tab in the Illustration group, click on the SamrtArt button.
Skill 11 - Inserting a Smart Art to a
Slide
Objective
Method
52.
To insert aSmart Art to a slide:
• Click once in the blank portion of the slide.
• On the Insert tab in the Illustration group, click on the SamrtArt button.
dialog box
a SmartArt
• On
the
Choose
Graphic
double click
on the desired smart art
icon from within the
gallery.
Skill 11 - Inserting a Smart Art to a
Slide
Objective
Method
53.
To insert aSmart Art to a slide:
• Click once in the blank portion of the slide.
• On the Insert tab in the Illustration group, click on the SamrtArt button.
dialog box
a SmartArt
• On
the
Choose
Graphic
double click
on the desired smart art
icon from within the
gallery.
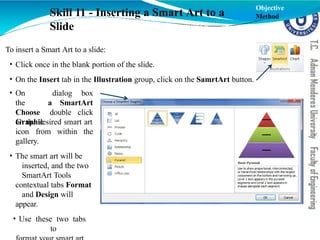
• The smart art will be
inserted, and the two
SmartArt Tools
contextual tabs Format
and Design will
appear.
• Use these two tabs
to
Skill 11 - Inserting a Smart Art to a
Slide
Objective
Method
54.
Skill 12 -Inserting a Video to a Slide
Objective
Method
55.
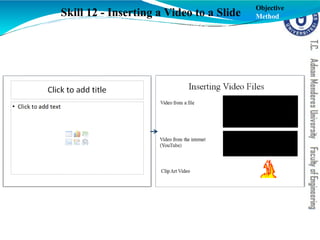
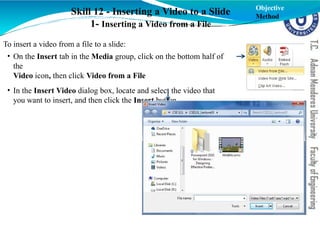
Skill 12 -Inserting a Video to a Slide
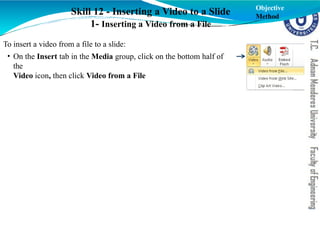
1- Inserting a Video from a File
To insert a video from a file to a slide:
• On the Insert tab in the Media group, click on the bottom half of
the
Video icon, then click Video from a File
Objective
Method
56.
Skill 12 -Inserting a Video to a Slide
1- Inserting a Video from a File
To insert a video from a file to a slide:
• On the Insert tab in the Media group, click on the bottom half of
the
Video icon, then click Video from a File
• In the Insert Video dialog box, locate and select the video that
you want to insert, and then click the Insert button.
Objective
Method
57.
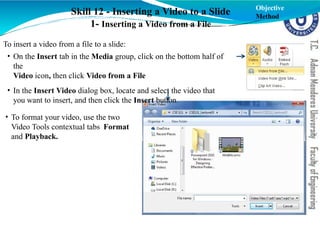
Skill 12 -Inserting a Video to a Slide
1- Inserting a Video from a File
To insert a video from a file to a slide:
• On the Insert tab in the Media group, click on the bottom half of
the
Video icon, then click Video from a File
• In the Insert Video dialog box, locate and select the video that
you want to insert, and then click the Insert button.
• To format your video, use the two
Video Tools contextual tabs Format
and Playback.
Objective
Method
58.
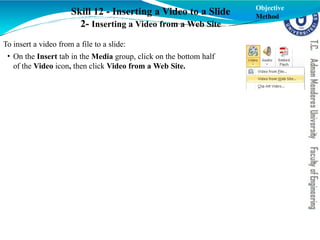
Skill 12 -Inserting a Video to a Slide
2- Inserting a Video from a Web Site
Objective
Method
To insert a video from a file to a slide:
• On the Insert tab in the Media group, click on the bottom half
of the Video icon, then click Video from a Web Site.
59.
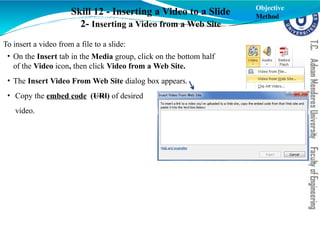
Skill 12 -Inserting a Video to a Slide
2- Inserting a Video from a Web Site
Objective
Method
To insert a video from a file to a slide:
• On the Insert tab in the Media group, click on the bottom half
of the Video icon, then click Video from a Web Site.
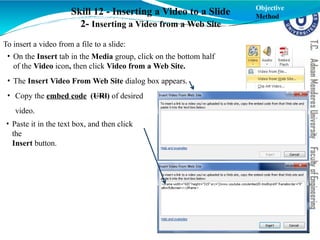
• The Insert Video From Web Site dialog box appears.
• Copy the embed code (URl) of desired
video.
60.
Skill 12 -Inserting a Video to a Slide
2- Inserting a Video from a Web Site
Objective
Method
To insert a video from a file to a slide:
• On the Insert tab in the Media group, click on the bottom half
of the Video icon, then click Video from a Web Site.
• The Insert Video From Web Site dialog box appears.
• Copy the embed code (URl) of desired
video.
• Paste it in the text box, and then click
the
Insert button.
61.
Skill 12 -Inserting a Video to a Slide
2- Inserting a Video from a Web Site
Objective
Method
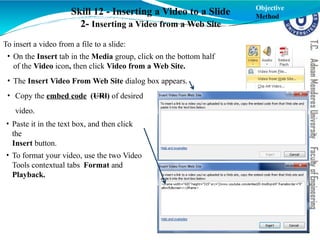
To insert a video from a file to a slide:
• On the Insert tab in the Media group, click on the bottom half
of the Video icon, then click Video from a Web Site.
• The Insert Video From Web Site dialog box appears.
• Copy the embed code (URl) of desired
video.
• Paste it in the text box, and then click
the
Insert button.
• To format your video, use the two Video
Tools contextual tabs Format and
Playback.
62.
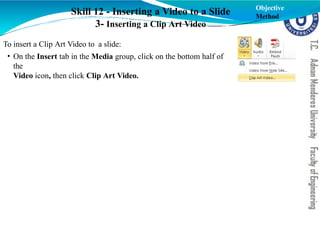
To insert aClip Art Video to a slide:
• On the Insert tab in the Media group, click on the bottom half of
the
Video icon, then click Clip Art Video.
Skill 12 - Inserting a Video to a Slide
3- Inserting a Clip Art Video
Objective
Method
63.
Skill 12 -Inserting a Video to a Slide
3- Inserting a Clip Art Video
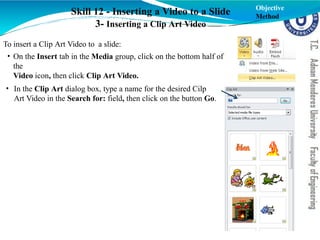
To insert a Clip Art Video to a slide:
• On the Insert tab in the Media group, click on the bottom half of
the
Video icon, then click Clip Art Video.
• In the Clip Art dialog box, type a name for the desired Cilp
Art Video in the Search for: field, then click on the button Go.
Objective
Method
64.
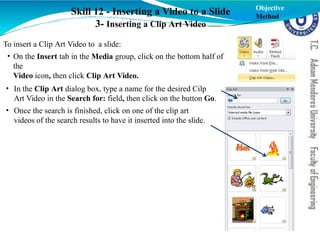
Skill 12 -Inserting a Video to a Slide
3- Inserting a Clip Art Video
To insert a Clip Art Video to a slide:
• On the Insert tab in the Media group, click on the bottom half of
the
Video icon, then click Clip Art Video.
• In the Clip Art dialog box, type a name for the desired Cilp
Art Video in the Search for: field, then click on the button Go.
• Once the search is finished, click on one of the clip art
videos of the search results to have it inserted into the slide.
Objective
Method
65.
Skill 13 -Inserting an Audio to a Slide
Objective
Method
66.
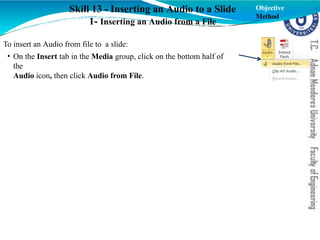
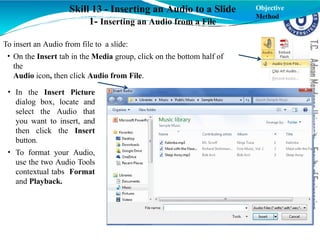
Skill 13 -Inserting an Audio to a Slide
1- Inserting an Audio from a File
To insert an Audio from file to a slide:
• On the Insert tab in the Media group, click on the bottom half of
the
Audio icon, then click Audio from File.
Objective
Method
67.
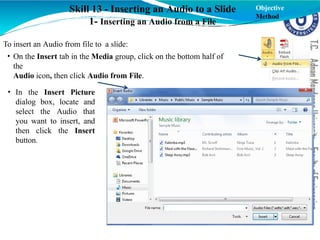
Skill 13 -Inserting an Audio to a Slide
1- Inserting an Audio from a File
To insert an Audio from file to a slide:
• On the Insert tab in the Media group, click on the bottom half of
the
Audio icon, then click Audio from File.
• In the Insert Picture
dialog box, locate and
select the Audio that
you want to insert, and
then click the Insert
button.
Objective
Method
68.
Skill 13 -Inserting an Audio to a Slide
1- Inserting an Audio from a File
To insert an Audio from file to a slide:
• On the Insert tab in the Media group, click on the bottom half of
the
Audio icon, then click Audio from File.
• In the Insert Picture
dialog box, locate and
select the Audio that
you want to insert, and
then click the Insert
button.
• To format your Audio,
use the two Audio Tools
contextual tabs Format
and Playback.
Objective
Method
69.
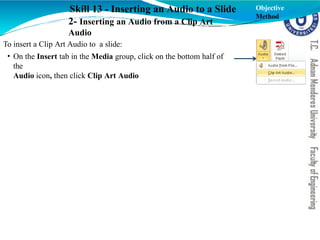
Skill 13 -Inserting an Audio to a Slide
2- Inserting an Audio from a Clip Art
Audio
To insert a Clip Art Audio to a slide:
• On the Insert tab in the Media group, click on the bottom half of
the
Audio icon, then click Clip Art Audio
Objective
Method
70.
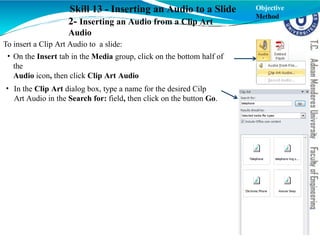
Skill 13 -Inserting an Audio to a Slide
2- Inserting an Audio from a Clip Art
Audio
To insert a Clip Art Audio to a slide:
• On the Insert tab in the Media group, click on the bottom half of
the
Audio icon, then click Clip Art Audio
• In the Clip Art dialog box, type a name for the desired Cilp
Art Audio in the Search for: field, then click on the button Go.
Objective
Method
71.
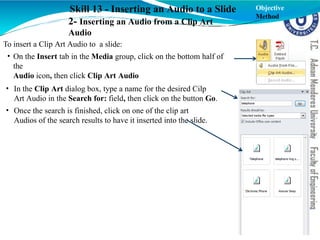
Skill 13 -Inserting an Audio to a Slide
2- Inserting an Audio from a Clip Art
Audio
To insert a Clip Art Audio to a slide:
• On the Insert tab in the Media group, click on the bottom half of
the
Audio icon, then click Clip Art Audio
• In the Clip Art dialog box, type a name for the desired Cilp
Art Audio in the Search for: field, then click on the button Go.
• Once the search is finished, click on one of the clip art
Audios of the search results to have it inserted into the slide.
Objective
Method
72.
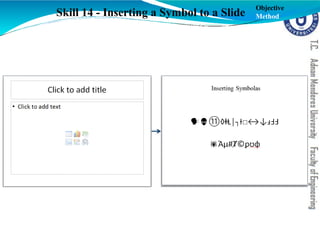
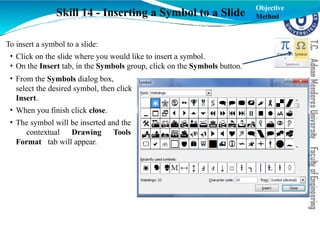
Skill 14 -Inserting a Symbol to a Slide
Objective
Method
73.
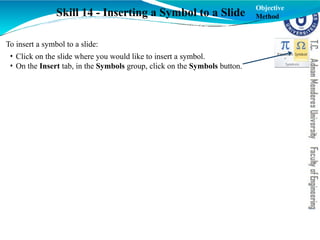
Skill 14 -Inserting a Symbol to a Slide
To insert a symbol to a slide:
• Click on the slide where you would like to insert a symbol.
• On the Insert tab, in the Symbols group, click on the Symbols button.
Objective
Method
74.
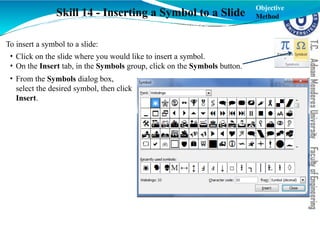
Skill 14 -Inserting a Symbol to a Slide
To insert a symbol to a slide:
• Click on the slide where you would like to insert a symbol.
• On the Insert tab, in the Symbols group, click on the Symbols button.
• From the Symbols dialog box,
select the desired symbol, then click
Insert.
Objective
Method
75.
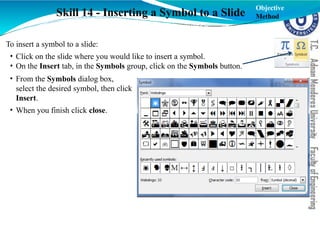
Skill 14 -Inserting a Symbol to a Slide
To insert a symbol to a slide:
• Click on the slide where you would like to insert a symbol.
• On the Insert tab, in the Symbols group, click on the Symbols button.
• From the Symbols dialog box,
select the desired symbol, then click
Insert.
• When you finish click close.
Objective
Method
76.
Skill 14 -Inserting a Symbol to a Slide
To insert a symbol to a slide:
• Click on the slide where you would like to insert a symbol.
• On the Insert tab, in the Symbols group, click on the Symbols button.
• From the Symbols dialog box,
select the desired symbol, then click
Insert.
• When you finish click close.
• The symbol will be inserted and the
contextual Drawing Tools
Format tab will appear.
Objective
Method
77.
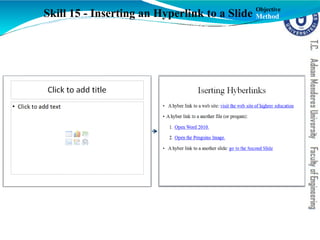
Skill 15 -Inserting an Hyperlink to a Slide Objective
Method
78.
Skill 15 -Inserting an Hyperlink to a Slide
1- A Hyperlink for a Web site
To insert a Hyperlink for a web site:
• Go to the slide where you want to add a link, type the text that you want to turn into a
link.
Objective
Method
79.
Skill 15 -Inserting an Hyperlink to a Slide
1- A Hyperlink for a Web site
To insert a Hyperlink for a web site:
• Go to the slide where you want to add a link, type the text that you want to turn into a
link.
• Open your web browser, browse to the desired web site, then copy the URL.
Objective
Method
80.
Skill 15 -Inserting an Hyperlink to a Slide
1- A Hyperlink for a Web site
To insert a Hyperlink for a web site:
• Go to the slide where you want to add a link, type the text that you want to turn into a
link.
• Open your web browser, browse to the desired web site, then copy the URL.
• Return to your presentation, select the text that you want to turn into a link.
Objective
Method
81.
Skill 15 -Inserting an Hyperlink to a Slide
1- A Hyperlink for a Web site
To insert a Hyperlink for a web site:
• Go to the slide where you want to add a link, type the text that you want to turn into a
link.
• Open your web browser, browse to the desired web site, then copy the URL.
• Return to your presentation, select the text that you want to turn into a link.
• On the Insert tab, in the Links gorup, click on the Hyperlink button.
Objective
Method
82.
Skill 15 -Inserting an Hyperlink to a Slide
1- A Hyperlink for a Web site
To insert a Hyperlink for a web site:
• Go to the slide where you want to add a link, type the text that you want to turn into a
link.
• Open your web browser, browse to the desired web site, then copy the URL.
• Return to your presentation, select the text that you want to turn into a link.
• On the Insert tab, in the Links gorup, click on the Hyperlink button.
• The Insert Hyperlink dialog box will open, on the left side of it, click Existing File
or Web Page, paste the URL into the Address field.
• Click on the OK button, the text that you selected will now be a link that is usable
during your show.
Objective
Method
83.
Skill 15 -Inserting an Hyperlink to a Slide
1- A Hyperlink for a Web site
To insert a Hyperlink for a web site:
• Go to the slide where you want to add a link, type the text that you want to turn into a
link.
• Open your web browser, browse to the desired web site, then copy the URL.
• Return to your presentation, select the text that you want to turn into a link.
• On the Insert tab, in the Links gorup, click on the Hyperlink button.
• The Insert Hyperlink dialog box will open, on the left side of it, click Existing File
or Web Page, paste the URL into the Address field.
• Click on the OK button, the text that you selected will now be a link that is usable
during your show.
Note: Hyperlinks only work
when you are displaying your
PowerPoint show. They do not
work in the Normal view.
Objective
Method
84.
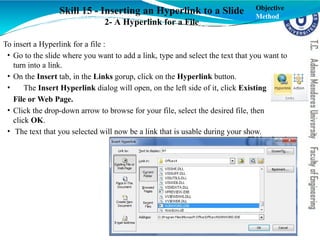
Skill 15 -Inserting an Hyperlink to a Slide
2- A Hyperlink for a File
To insert a Hyperlink for a file:
• Go to the slide where you want to add a link, type and select the text that you want to
turn into a link.
Objective
Method
85.
Skill 15 -Inserting an Hyperlink to a Slide
2- A Hyperlink for a File
To insert a Hyperlink for a file :
• Go to the slide where you want to add a link, type and select the text that you want to
turn into a link.
• On the Insert tab, in the Links gorup, click on the Hyperlink button.
Objective
Method
86.
Skill 15 -Inserting an Hyperlink to a Slide
2- A Hyperlink for a File
To insert a Hyperlink for a file :
• Go to the slide where you want to add a link, type and select the text that you want to
turn into a link.
• On the Insert tab, in the Links gorup, click on the Hyperlink button.
• The Insert Hyperlink dialog will open, on the left side of it, click Existing
File or Web Page.
• Click the drop-down arrow to browse for your file, select the desired file, then
click OK.
• The text that you selected will now be a link that is usable during your show.
Objective
Method
87.
Skill 15 -Inserting an Hyperlink to a Slide
3- A Hyperlink for another Slide
To insert a Hyperlink for a file :
• Go to the slide where you want to add a link, type and select the text that you want to
turn into a link.
Objective
Method
88.
Skill 15 -Inserting an Hyperlink to a Slide
3- A Hyperlink for another Slide
To insert a Hyperlink for a another slide:
• Go to the slide where you want to add a link, type and select the text that you want to
turn into a link.
• On the Insert tab, in the Links gorup, click on the Hyperlink button.
Objective
Method
89.
Skill 15 -Inserting an Hyperlink to a Slide
3- A Hyperlink for another Slide
To insert a Hyperlink for a file :
• Go to the slide where you want to add a link, type and select the text that you want to
turn into a link.
• On the Insert tab, in the Links gorup, click on the Hyperlink button.
• The Insert Hyperlink dialog will open, on the left side of it, click Place in
this Document.
• A list of the other slides in your presentation will appear, click the name of the slide
you would like to link to, then click on the OK button.
• The text that you selected will now be a link that is usable during your show.
Objective
Method
90.
References
California StateUniversity, Los Angelos, Information Tecnonlogy
Services, Microsoft PoerPoint 2010 Part 1: Introduction to PowerPoint.
https://www.calstatela.edu/its/training/pdf/powerpoint2010p1.pdf
Georgetown University Law,Washington, Online Tutorials, Microsoft
PowerPoint 2010.
https://www.law.georgetown.edu/campus-
services/ist/support-training/online-
tutorials/microsoft-office/upload/PowerPoint2010.pdf
www.gcflearnfree.org
Microsoft PowerPoint 2010 Help.