PHOTOSHOP CS6 TUTORIAL
OBJECTIVE:
 Be familiar with Photoshop
 Understand the concept and use of the Photoshop
 Create graphics and manipulate images using
different tools of Photoshop
REQUIREMENTS:
 Software needed to use Photoshop: Adobe Photoshop.
 The version of Photoshop: CS6
 Space needed for Photoshop: 1 GB of available hard-disk
space for installation; additional free space required during
installation.
 Image source: All the image used in the graphics are free
images from Google Images.
 Graphics format: The format of the images is in JPG/JPEG.
 Additional text and brushes used: MORVA text and smoke
brushes.
PHOTOSHOP INTERFACE
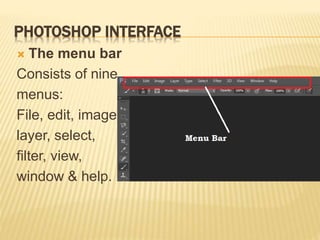
 The menu bar
Consists of nine
menus:
File, edit, image,
layer, select,
filter, view,
window & help.
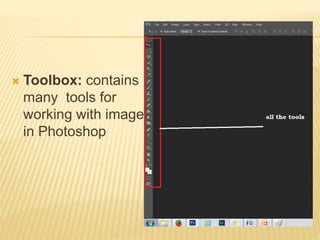
 Toolbox: contains
many tools for
working with images
in Photoshop
 Layers: one layer
on top of another,
all of which can be
edited
independently of
each other and
then combined to
form a single flat
image.
GRAPHIC FILE FORMATS
 GIF( Graphic Interchange Format): Limited to
8 bit, 256 colors. Used for large areas of
uniform color.
 JPEG: Joint photographers Experts group:
used for photographic images, textures and
gradations. File size 96kb=32 kb
 TIFF: Tagged Image File Format: High
quality mostly used for print.
 PSD: Photoshop’s native file format.
LEARN TO MAKE A BOOK COVER IN PHOTOSHOP CS6
List of things used to make book cover
page:
1. Dimension: 1358 pixel X 2000 pixel
2. Resolution: 300 dpi (vertical and
horizontal)
3. Brush- soft big brush
4. Tools- move tool, selection tool, big soft
brush, hue/saturation, text tool, eraser
tool, from Menu bar FILTER.
5. Text type/font-
For text “Novel, Jonhy Willson”
 Text type: MV Boli
 Text font: 8.1 pt
 Effect given to the text: no effect
For text “Twilight Of The Darkness”
 Text type: Jadefedga[08]
 Text font: 48 pt
6. Effects given to the text: Outer glow,
Drop shadow(to the title)
7. Model image: Google images
8. Image effect: -Animation Effect (high
pass)
IMAGES USED TO CREATE THE BOOK COVER:
(Bar code is dummy)
Barcode. Digital image. N.p., n.d. Web. 12 Sept. 2016.
http://barcode-
list.com/barcodeImage.php?barcode=4974019726434
Moon. Digital image. N.p., n.d. Web. 12 Sept. 2016.
http://abramsplanetarium.org/nightskynotes/moon5day
big.jpg
Moon Sky Wallpaper. Digital image. Wallpaper Free Download.
N.p., n.d. Web. 12 Sept. 2016.
Http://bknpk.com/
Girl standing on ladder. Digital image. N.p., n.d. Web. 12
Sept. 2016.
http://www.shutterstock.com/pic-21933355/stock-photo-
beautiful-and-sexy-girl-standing-on-alluminium-ladder.html
Sparkel. Digital image. N.p., n.d. Web. 1 Oct. 2016.
http://catherinejohns.com/wp-
content/uploads/2014/12/12032014-1.jpg
STEPS TO MAKE THE BOOK COVER: -
 Step 1:create new
document for
background:
 Select FILE from the
menu bar and go to
NEW.
 Change the dimension
of the background layer
as required.
 Select the background
content as transparent.
Step 2: Import the
image
 To import the image of
the girl into the
document created;
select the image saved
in the file from the
menu bar.
 click on the move tool
and drag the image at
the place required.
 TIP: don’t open all the images at
one time it will become difficult to
organize the layer.
 Step 3: Applying
high pass filter for
animation:
 Right Click on the Layer
and duplicate it, the
background layer will be
formed.
 Select filter from the
menu bar, go to OTHER
and choose HIGH PASS.
 Change the RADIUS to
5.0 pixel to sharpen the
image.
 Step 4: Under layer change the blending option
from NORMAL to VIVID LIGHT.
It will look like this 
 Step 5:To increase the
amount of details go to
LAYER<CREATE
CLIPPING MASK.
 Go to LAYER on the
MENU BAR then
select LAYER and
then click on CREATE
CLIPPING MASK.
 This will sharpen the
detailing of the image
of girl.
 Step 6: Add a LAYER
at the top of LAYER
STACK.
 To do so click on the
icon of layer which will
create a NEW LAYER.
 Step 7: Select the new
layer in the LAYER STACK
then select the LAYER on
the MENU BAR and create
CLIPPING MASK (as
described before on slide no. 14).
 Tip: For every layer created you
Note: before we import the image of moon on the
working document, we need to create space
on the layer of girl’s image for the shine of the
moon to fall on her.
Step 8:To make the GIRL
touch the moon you
need to:
 Select BRUSH TOOL
and rub it over the girl on
her face and arms
except other body parts.
Tip: The SIZE of the brush to match the size if the
image. The OPACITY of the brush should be
100% and the HARDNESS should be 0%.
 The image will look like
this:
 Step 9:To ADJUST the
girl for MOON LIGHT:
 Go to LAYER on the MENU
BAR select NEW
ADJUSTMENT LAYER and
then select GRADIENT
MAP.
 After you follow these steps
change the blending mode
to SOFT LIGHT.
 Add clipping mask to
the adjustment layer
(procedure given before on slide no. 14)
 Step 10: importing
image of moon:
 Create a NEW
LAYER by clicking
on FILE on the
MENU BAR
 Select OPEN and
then add the moon’s
image from the
folder where the
image is saved.
 Step 11:To make the
MOON bluer:
 Go to
IMAGE<ADJUSTMENT<HUE
/
SATURATION.
 Select COLORIZE and
make the MOON bluer
by moving the hue and
saturation till the moon
gets BLUER.
 Then click OK.
 Then add the image of
shine (following same steps
given for importing moon’s
 Step 12: Creating Background:
 First create a new document, the
layer will be without clipping
mask.
 Go to Image on the Menu bar <
select ADJUSTMENT and then
BRIGHTNESS/ CONTRAST and
INCREASE the BRIGHNESS to
54 and the CONTRAST to 51.
 Using gradient map choose the
style circle.
 The colour box should contain
colour blue and purple.
 The image should look like this 
 Step 13: add the
background:
 Hide the moon and the
girl by clicking on the
EYE on the layer stack
and go to FILE<OPEN,
choose the folder
where the image is and
open it.
 Open the EYE of the
layers and the image
should look like this
 Step 14: Add GLOW on the
moon:
 To compile all the layers:
select the first layer and right
click on it and select MERGE
DOWN.
 Go to
FILTER<BLUR<GAUSSAIN
BLUR and set the radius of
20 pixel.
 Select the area of moon and
rub the mouse on the MOON.
 The image should look like
this
 Step 15: Adding
BAR CODE :
 Go to FILE<OPEN
and open the bar
code.
 Drag the image on
the cover page and
adjust it down.
 The cover page
should look like
this
 Step 16: Adding TEXT:
 To add TEXT choose the
TEXT TOOL and type the
title.
 After you type the title
change the font by
selecting the type of font
and make sure it is
sharp.
 Follow the same steps to
add another text (authors
name) and
 your book cover page is ready
LEARN TO MAKE A MAGAZINE COVER IN PHOTOSHOP CS6:
List of things used to make Magazine
cover page:
1. Dimension: 1946 pixel X 3066 pixel
2. Resolution: 300 dpi (vertical and
horizontal)
3. Tools- move tool, selection tool, text
tool, paint tool, eraser tool.
4. Text type/font-
 Times New Roman
 MORVA
 Palatino Linotype
4.Text effect: -
 Outer glow
 Drop shadow
5. Model image : Google images
6.Image effect: Morava text type
ELEMENTS USED TO MAKE THIS MAGAZINE COVER PAGE:
Note: volume number is not added and bar code is dummy!
Barcode. Digital image. N.p., n.d. Web. 12 Sept. 2016.
http://barcode-list.com/barcodeImage.php?barcode=4974019726434
Kriti Sanon Hot Photoshoot The Juice Magazine December 2015
– Pics Set. Digital image. Talkingmoviez. N.p., n.d. Web. 12
Sept. 2016.
< http://www.talkingmoviez.com/kriti-sanon-hot-photoshoot-the-juice-
magazine-december-2015-pics-set/>
STEPS TO MAKE A MAGAZINE COVER:
 Step 1: create new file:
 Go to file on the menu bar
and select new.
 This document will open
where change the settings
as 1946 pixel X 3066 pixel
for width and height.
 The background content
should be Background
colour which is White.
 Step 2: open the
image of the model.
 Go to FILE on the
MENU BAR and click
FILE<OPEN
 Open the folder
where the image is
saved and drag the
image to the
document created
and import it.
 Step 3: After the
image is imported to
the document and
the color of the
background is same
right click on any
LAYER (out of 2) in
the LAYER STACK
and choose the
option merge.
 The layer will merge
down and get locked
too.
 Step 4: Locking the
Background layer:
 Go to LAYER which
is on the MENU
BAR, then select
NEW and choose the
option
BACKGROUND
FROM LAYER.
 The layer will get
locked, this will help
you to add text.
 Step 5: To Add TEXT and giving EFFECT to text:
Choose TEXT TOOL and type the text where ever you
want.
 To change the size and font below menu bar you
can change the type and font too.
 then double click the layer of text written and a
document will open.
 choose any effect given on the right side of the
document.
 Step 6: To add
BORDER:
 You need to merge
all the layers by right
clicking on the first
layer and select the
option MERGE
DOWN
 An easy way to do this
is
“Control+Shift+Alt+E”
or
 Step 7: Adding Borders:
 go to FILTER on the menu bar and select NIK COLLCETION<color
Efex Pro4.
 After you do this a document will open.
 Choose “IMAGE BORDERING” on the left side of your screen.
 Then click ok and your cover page for magazine is ready!
List of things used to make Advertisement
cover page:
1.Dimension: 1946 pixel X 1946 pixel
2.Resolution: 300 dpi (vertical and horizontal)
3.Brush- smoke brush
4.Tools- move tool, quick selection tool, text
tool, paint tool, eraser tool.
5.Text type/font- Segoe Print, Walt Disney
Script
5. Model image- Google images
6.Image effect- creating Background with the
use of COLOUR
LEARN TO MAKE A ADVERTISEMENT PAGE IN PHOTOSHOP CS6:
ELEMENT USED IS: -
Note: brand name is not added in the cover page!
Coffee cup. Digital image. N.p., n.d. Web. 12 Sept. 2016.
http://www.photoaxe.com/how-to-photograph-a-hot-steaming-cup-of-coffee-or-tea/
STEPS TO MAKE A ADVERTISEMENT COVER:
 Step 1: Open a
background layer:
 Go to file on menu bar
and select new; a
document will pop up
where you need to
change the settings ;
width and height 1946
pixel X 1946 pixel,
background content
Transparent.
 Step 2: Selecting the image of
Coffee:
 Go to file and select open; select
the image of the coffee from the
folder saved.
 Using Quick selection tool select
only the full area of cup.
 using move tool drag the image
of the cup selected to the
document created.
 Tip: While selecting the image of the cup don’t
select the smoke because while the creation of
background the Smokey effect will overlap on
the background . We will add the smoke effect
with using brush tool as given ahead
 Step 3:
 Set the foreground in
colour box as
red/black.
 Using stamp tool put
clouds effect of red
and black colour.
 The image will look
like this 
 Step 4: Then use gradient do right click on the
layer and select Gradient<choose the pattern
 Step 5: Keep the style Radical so that a
patchy (light and dark)effect comes.
 It will look like this:
 Step 6: add the text :
 import the image of coffee selected on the
background document.
 Adjust the image on the background and then
select the text tool; type your text on the document
on the top and bottom of the coffee image.
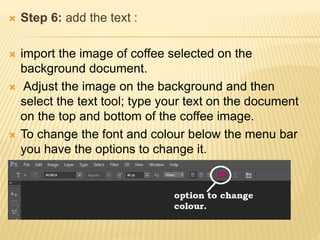
 To change the font and colour below the menu bar
you have the options to change it.
 Step 7 :To add the smoky effect :
 Note: you need to download the brush of smoke from the given URL at the end of
the slide.
 select the Brush tool and choose the type of
smoke you want.
 Apply the brush of smoke on the top of the cup
as per you wish.
 The smoke shall look like this
Brush tool
STEP 8: YOUR FINAL ADVERTISEMENT PAGE
 After adding the smoke your final Advertisement
page is ready!
BIBLIOGAPHY:
Barcode. Digital image. N.p., n.d. Web. 12 Sept. 2016.
http://barcodelist.com/barcodeImage.php?barcode=4974019726434
Coffee cup. Digital image. N.p., n.d. Web. 12 Sept. 2016.
http://www.photoaxe.com/how-to-photograph-a-hot-steaming-cup-of-coffee-or-tea/
Girl standing on ladder. Digital image. N.p., n.d. Web. 12 Sept. 2016.
http://www.shutterstock.com/pic-21933355/stock-photo-beautiful-and-sexy-girl-standing-on-alluminium-ladder.htm
Kriti Sanon Hot Photoshoot The Juice Magazine December 2015 – Pics Set. Digital image. Talkingmoviez. N.p., n.d. Web. 12 Sept.
2016.
< http://www.talkingmoviez.com/kriti-sanon-hot-photoshoot-the-juice-magazine-december-2015-pics-set/>
Moon. Digital image. N.p., n.d. Web. 12 Sept. 2016.
http://abramsplanetarium.org/nightskynotes/moon5daybig.jpg
Moon Sky Wallpaper. Digital image. Wallpaper Free Download. N.p., n.d. Web. 12 Sept. 2016.
Http://bknpk.com/
Sparkel. Digital image. N.p., n.d. Web. 1 Oct. 2016.
http://catherinejohns.com/wpcontent/uploads/2014/12/12032014-1.jpg
Additional text and tools
Morava text:
"66 . Text Effects PSD, 70 Free PSD Files - Freepik." N.p., n.d. Web. 21 Oct. 2016
http://www.freepik.com/free-psd/text-effects
Smoke brush
"25 Hi Res Smoke Brushes - Brusheezy.com." N.p., n.d. Web. 21 Oct. 2016.
https://www.brusheezy.com/brushes/48403-25-hi-res-smoke-brushes
 I hope you enjoyed my creativity.
 Meet you next time with such more fun
Slide Shares!!

TUTORIAL ON PHOTOSHOP

  • 1.
  • 2.
    OBJECTIVE:  Be familiarwith Photoshop  Understand the concept and use of the Photoshop  Create graphics and manipulate images using different tools of Photoshop
  • 3.
    REQUIREMENTS:  Software neededto use Photoshop: Adobe Photoshop.  The version of Photoshop: CS6  Space needed for Photoshop: 1 GB of available hard-disk space for installation; additional free space required during installation.  Image source: All the image used in the graphics are free images from Google Images.  Graphics format: The format of the images is in JPG/JPEG.  Additional text and brushes used: MORVA text and smoke brushes.
  • 4.
    PHOTOSHOP INTERFACE  Themenu bar Consists of nine menus: File, edit, image, layer, select, filter, view, window & help.
  • 5.
     Toolbox: contains manytools for working with images in Photoshop
  • 6.
     Layers: onelayer on top of another, all of which can be edited independently of each other and then combined to form a single flat image.
  • 7.
    GRAPHIC FILE FORMATS GIF( Graphic Interchange Format): Limited to 8 bit, 256 colors. Used for large areas of uniform color.  JPEG: Joint photographers Experts group: used for photographic images, textures and gradations. File size 96kb=32 kb  TIFF: Tagged Image File Format: High quality mostly used for print.  PSD: Photoshop’s native file format.
  • 8.
    LEARN TO MAKEA BOOK COVER IN PHOTOSHOP CS6 List of things used to make book cover page: 1. Dimension: 1358 pixel X 2000 pixel 2. Resolution: 300 dpi (vertical and horizontal) 3. Brush- soft big brush 4. Tools- move tool, selection tool, big soft brush, hue/saturation, text tool, eraser tool, from Menu bar FILTER. 5. Text type/font- For text “Novel, Jonhy Willson”  Text type: MV Boli  Text font: 8.1 pt  Effect given to the text: no effect For text “Twilight Of The Darkness”  Text type: Jadefedga[08]  Text font: 48 pt 6. Effects given to the text: Outer glow, Drop shadow(to the title) 7. Model image: Google images 8. Image effect: -Animation Effect (high pass)
  • 9.
    IMAGES USED TOCREATE THE BOOK COVER: (Bar code is dummy) Barcode. Digital image. N.p., n.d. Web. 12 Sept. 2016. http://barcode- list.com/barcodeImage.php?barcode=4974019726434 Moon. Digital image. N.p., n.d. Web. 12 Sept. 2016. http://abramsplanetarium.org/nightskynotes/moon5day big.jpg Moon Sky Wallpaper. Digital image. Wallpaper Free Download. N.p., n.d. Web. 12 Sept. 2016. Http://bknpk.com/ Girl standing on ladder. Digital image. N.p., n.d. Web. 12 Sept. 2016. http://www.shutterstock.com/pic-21933355/stock-photo- beautiful-and-sexy-girl-standing-on-alluminium-ladder.html Sparkel. Digital image. N.p., n.d. Web. 1 Oct. 2016. http://catherinejohns.com/wp- content/uploads/2014/12/12032014-1.jpg
  • 10.
    STEPS TO MAKETHE BOOK COVER: -  Step 1:create new document for background:  Select FILE from the menu bar and go to NEW.  Change the dimension of the background layer as required.  Select the background content as transparent.
  • 11.
    Step 2: Importthe image  To import the image of the girl into the document created; select the image saved in the file from the menu bar.  click on the move tool and drag the image at the place required.  TIP: don’t open all the images at one time it will become difficult to organize the layer.
  • 12.
     Step 3:Applying high pass filter for animation:  Right Click on the Layer and duplicate it, the background layer will be formed.  Select filter from the menu bar, go to OTHER and choose HIGH PASS.  Change the RADIUS to 5.0 pixel to sharpen the image.
  • 13.
     Step 4:Under layer change the blending option from NORMAL to VIVID LIGHT. It will look like this 
  • 14.
     Step 5:Toincrease the amount of details go to LAYER<CREATE CLIPPING MASK.  Go to LAYER on the MENU BAR then select LAYER and then click on CREATE CLIPPING MASK.  This will sharpen the detailing of the image of girl.
  • 15.
     Step 6:Add a LAYER at the top of LAYER STACK.  To do so click on the icon of layer which will create a NEW LAYER.  Step 7: Select the new layer in the LAYER STACK then select the LAYER on the MENU BAR and create CLIPPING MASK (as described before on slide no. 14).  Tip: For every layer created you
  • 16.
    Note: before weimport the image of moon on the working document, we need to create space on the layer of girl’s image for the shine of the moon to fall on her. Step 8:To make the GIRL touch the moon you need to:  Select BRUSH TOOL and rub it over the girl on her face and arms except other body parts. Tip: The SIZE of the brush to match the size if the image. The OPACITY of the brush should be 100% and the HARDNESS should be 0%.  The image will look like this:
  • 17.
     Step 9:ToADJUST the girl for MOON LIGHT:  Go to LAYER on the MENU BAR select NEW ADJUSTMENT LAYER and then select GRADIENT MAP.  After you follow these steps change the blending mode to SOFT LIGHT.  Add clipping mask to the adjustment layer (procedure given before on slide no. 14)
  • 18.
     Step 10:importing image of moon:  Create a NEW LAYER by clicking on FILE on the MENU BAR  Select OPEN and then add the moon’s image from the folder where the image is saved.
  • 19.
     Step 11:Tomake the MOON bluer:  Go to IMAGE<ADJUSTMENT<HUE / SATURATION.  Select COLORIZE and make the MOON bluer by moving the hue and saturation till the moon gets BLUER.  Then click OK.  Then add the image of shine (following same steps given for importing moon’s
  • 20.
     Step 12:Creating Background:  First create a new document, the layer will be without clipping mask.  Go to Image on the Menu bar < select ADJUSTMENT and then BRIGHTNESS/ CONTRAST and INCREASE the BRIGHNESS to 54 and the CONTRAST to 51.  Using gradient map choose the style circle.  The colour box should contain colour blue and purple.  The image should look like this 
  • 21.
     Step 13:add the background:  Hide the moon and the girl by clicking on the EYE on the layer stack and go to FILE<OPEN, choose the folder where the image is and open it.  Open the EYE of the layers and the image should look like this
  • 22.
     Step 14:Add GLOW on the moon:  To compile all the layers: select the first layer and right click on it and select MERGE DOWN.  Go to FILTER<BLUR<GAUSSAIN BLUR and set the radius of 20 pixel.  Select the area of moon and rub the mouse on the MOON.  The image should look like this
  • 23.
     Step 15:Adding BAR CODE :  Go to FILE<OPEN and open the bar code.  Drag the image on the cover page and adjust it down.  The cover page should look like this
  • 24.
     Step 16:Adding TEXT:  To add TEXT choose the TEXT TOOL and type the title.  After you type the title change the font by selecting the type of font and make sure it is sharp.  Follow the same steps to add another text (authors name) and  your book cover page is ready
  • 25.
    LEARN TO MAKEA MAGAZINE COVER IN PHOTOSHOP CS6: List of things used to make Magazine cover page: 1. Dimension: 1946 pixel X 3066 pixel 2. Resolution: 300 dpi (vertical and horizontal) 3. Tools- move tool, selection tool, text tool, paint tool, eraser tool. 4. Text type/font-  Times New Roman  MORVA  Palatino Linotype 4.Text effect: -  Outer glow  Drop shadow 5. Model image : Google images 6.Image effect: Morava text type
  • 26.
    ELEMENTS USED TOMAKE THIS MAGAZINE COVER PAGE: Note: volume number is not added and bar code is dummy! Barcode. Digital image. N.p., n.d. Web. 12 Sept. 2016. http://barcode-list.com/barcodeImage.php?barcode=4974019726434 Kriti Sanon Hot Photoshoot The Juice Magazine December 2015 – Pics Set. Digital image. Talkingmoviez. N.p., n.d. Web. 12 Sept. 2016. < http://www.talkingmoviez.com/kriti-sanon-hot-photoshoot-the-juice- magazine-december-2015-pics-set/>
  • 27.
    STEPS TO MAKEA MAGAZINE COVER:  Step 1: create new file:  Go to file on the menu bar and select new.  This document will open where change the settings as 1946 pixel X 3066 pixel for width and height.  The background content should be Background colour which is White.
  • 28.
     Step 2:open the image of the model.  Go to FILE on the MENU BAR and click FILE<OPEN  Open the folder where the image is saved and drag the image to the document created and import it.
  • 29.
     Step 3:After the image is imported to the document and the color of the background is same right click on any LAYER (out of 2) in the LAYER STACK and choose the option merge.  The layer will merge down and get locked too.
  • 30.
     Step 4:Locking the Background layer:  Go to LAYER which is on the MENU BAR, then select NEW and choose the option BACKGROUND FROM LAYER.  The layer will get locked, this will help you to add text.
  • 31.
     Step 5:To Add TEXT and giving EFFECT to text: Choose TEXT TOOL and type the text where ever you want.  To change the size and font below menu bar you can change the type and font too.  then double click the layer of text written and a document will open.  choose any effect given on the right side of the document.
  • 32.
     Step 6:To add BORDER:  You need to merge all the layers by right clicking on the first layer and select the option MERGE DOWN  An easy way to do this is “Control+Shift+Alt+E” or
  • 33.
     Step 7:Adding Borders:  go to FILTER on the menu bar and select NIK COLLCETION<color Efex Pro4.  After you do this a document will open.  Choose “IMAGE BORDERING” on the left side of your screen.  Then click ok and your cover page for magazine is ready!
  • 34.
    List of thingsused to make Advertisement cover page: 1.Dimension: 1946 pixel X 1946 pixel 2.Resolution: 300 dpi (vertical and horizontal) 3.Brush- smoke brush 4.Tools- move tool, quick selection tool, text tool, paint tool, eraser tool. 5.Text type/font- Segoe Print, Walt Disney Script 5. Model image- Google images 6.Image effect- creating Background with the use of COLOUR LEARN TO MAKE A ADVERTISEMENT PAGE IN PHOTOSHOP CS6:
  • 35.
    ELEMENT USED IS:- Note: brand name is not added in the cover page! Coffee cup. Digital image. N.p., n.d. Web. 12 Sept. 2016. http://www.photoaxe.com/how-to-photograph-a-hot-steaming-cup-of-coffee-or-tea/
  • 36.
    STEPS TO MAKEA ADVERTISEMENT COVER:  Step 1: Open a background layer:  Go to file on menu bar and select new; a document will pop up where you need to change the settings ; width and height 1946 pixel X 1946 pixel, background content Transparent.
  • 37.
     Step 2:Selecting the image of Coffee:  Go to file and select open; select the image of the coffee from the folder saved.  Using Quick selection tool select only the full area of cup.  using move tool drag the image of the cup selected to the document created.  Tip: While selecting the image of the cup don’t select the smoke because while the creation of background the Smokey effect will overlap on the background . We will add the smoke effect with using brush tool as given ahead
  • 38.
     Step 3: Set the foreground in colour box as red/black.  Using stamp tool put clouds effect of red and black colour.  The image will look like this 
  • 39.
     Step 4:Then use gradient do right click on the layer and select Gradient<choose the pattern
  • 40.
     Step 5:Keep the style Radical so that a patchy (light and dark)effect comes.  It will look like this:
  • 41.
     Step 6:add the text :  import the image of coffee selected on the background document.  Adjust the image on the background and then select the text tool; type your text on the document on the top and bottom of the coffee image.  To change the font and colour below the menu bar you have the options to change it.
  • 42.
     Step 7:To add the smoky effect :  Note: you need to download the brush of smoke from the given URL at the end of the slide.  select the Brush tool and choose the type of smoke you want.  Apply the brush of smoke on the top of the cup as per you wish.  The smoke shall look like this Brush tool
  • 43.
    STEP 8: YOURFINAL ADVERTISEMENT PAGE  After adding the smoke your final Advertisement page is ready!
  • 44.
    BIBLIOGAPHY: Barcode. Digital image.N.p., n.d. Web. 12 Sept. 2016. http://barcodelist.com/barcodeImage.php?barcode=4974019726434 Coffee cup. Digital image. N.p., n.d. Web. 12 Sept. 2016. http://www.photoaxe.com/how-to-photograph-a-hot-steaming-cup-of-coffee-or-tea/ Girl standing on ladder. Digital image. N.p., n.d. Web. 12 Sept. 2016. http://www.shutterstock.com/pic-21933355/stock-photo-beautiful-and-sexy-girl-standing-on-alluminium-ladder.htm Kriti Sanon Hot Photoshoot The Juice Magazine December 2015 – Pics Set. Digital image. Talkingmoviez. N.p., n.d. Web. 12 Sept. 2016. < http://www.talkingmoviez.com/kriti-sanon-hot-photoshoot-the-juice-magazine-december-2015-pics-set/> Moon. Digital image. N.p., n.d. Web. 12 Sept. 2016. http://abramsplanetarium.org/nightskynotes/moon5daybig.jpg Moon Sky Wallpaper. Digital image. Wallpaper Free Download. N.p., n.d. Web. 12 Sept. 2016. Http://bknpk.com/ Sparkel. Digital image. N.p., n.d. Web. 1 Oct. 2016. http://catherinejohns.com/wpcontent/uploads/2014/12/12032014-1.jpg Additional text and tools Morava text: "66 . Text Effects PSD, 70 Free PSD Files - Freepik." N.p., n.d. Web. 21 Oct. 2016 http://www.freepik.com/free-psd/text-effects Smoke brush "25 Hi Res Smoke Brushes - Brusheezy.com." N.p., n.d. Web. 21 Oct. 2016. https://www.brusheezy.com/brushes/48403-25-hi-res-smoke-brushes
  • 45.
     I hopeyou enjoyed my creativity.  Meet you next time with such more fun Slide Shares!!