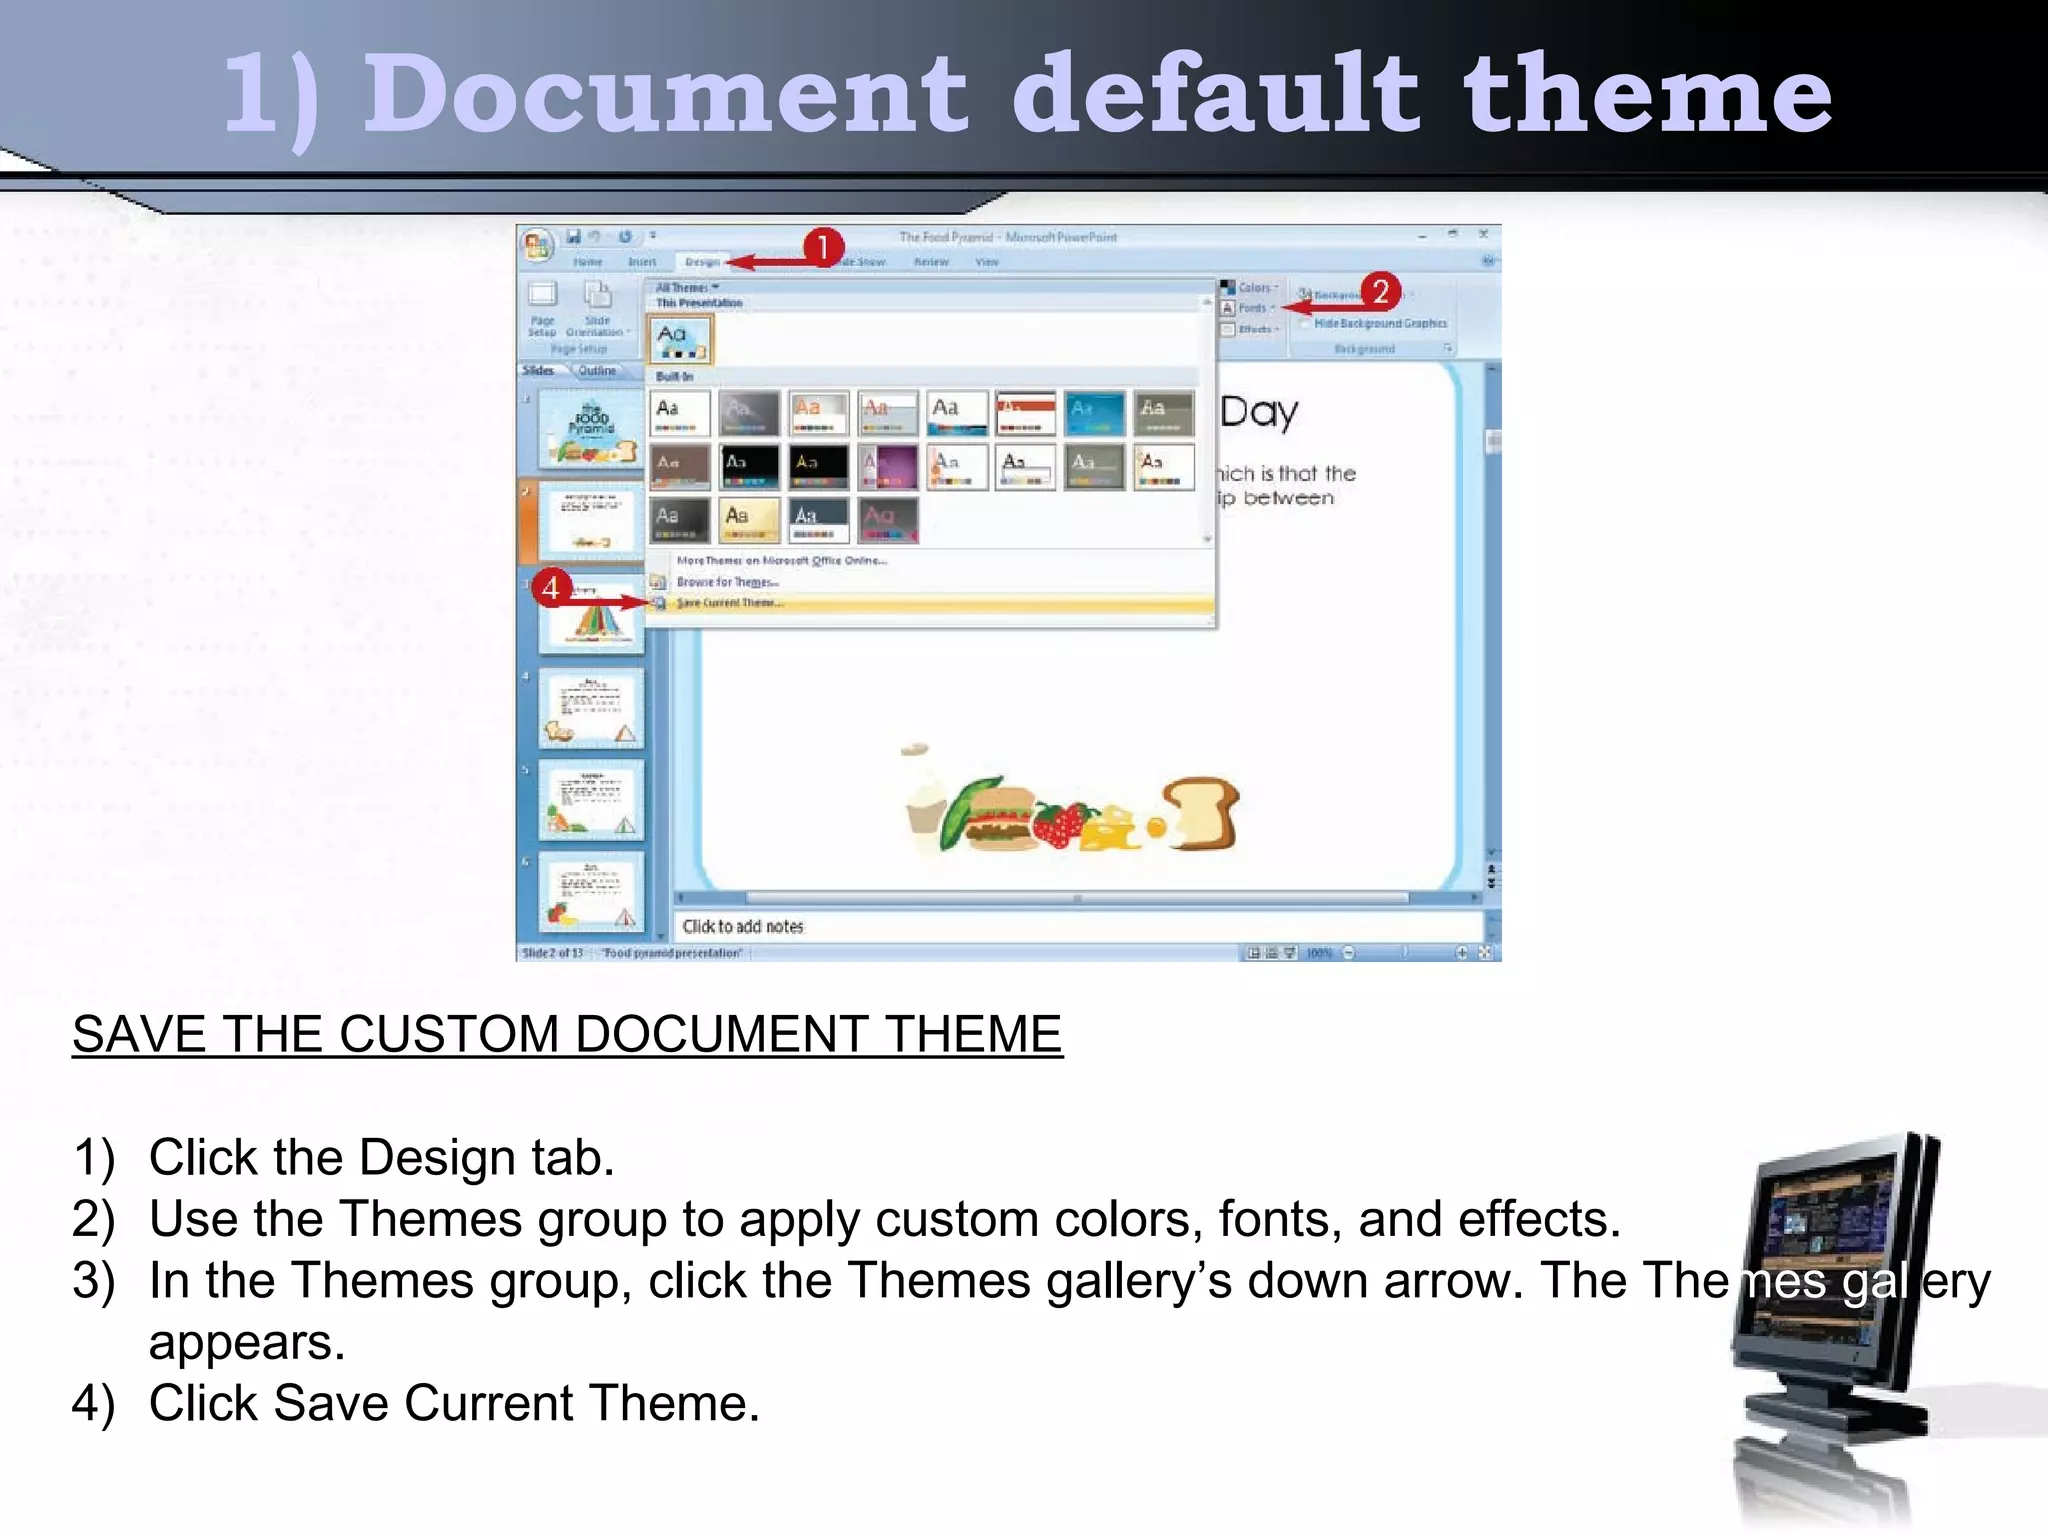
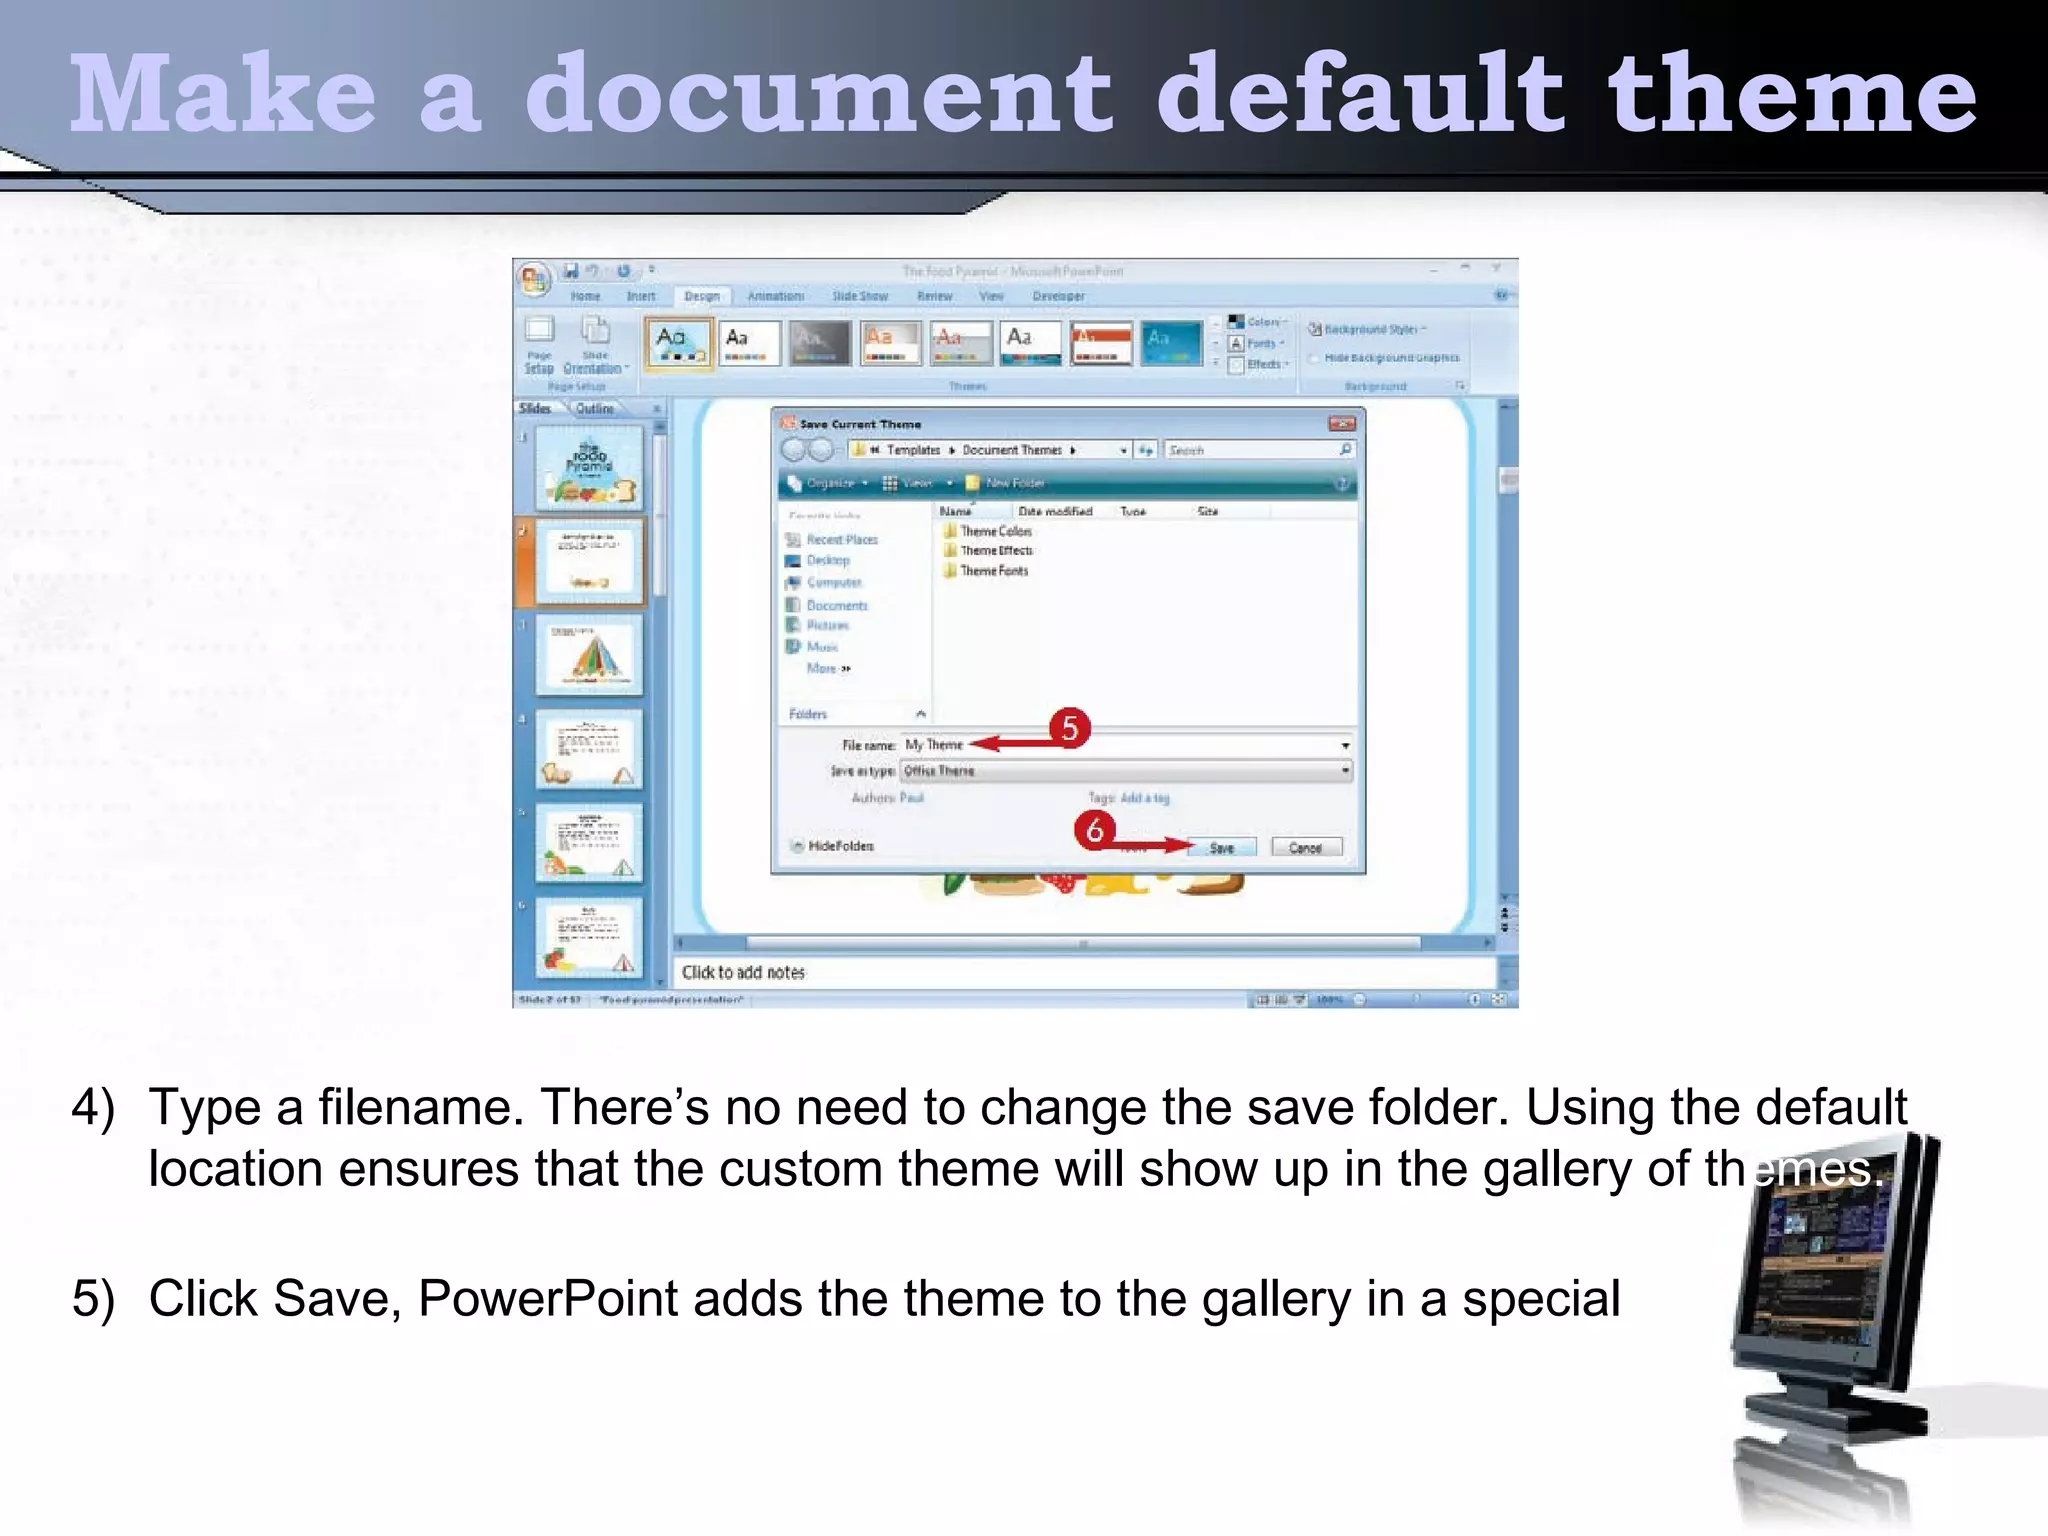
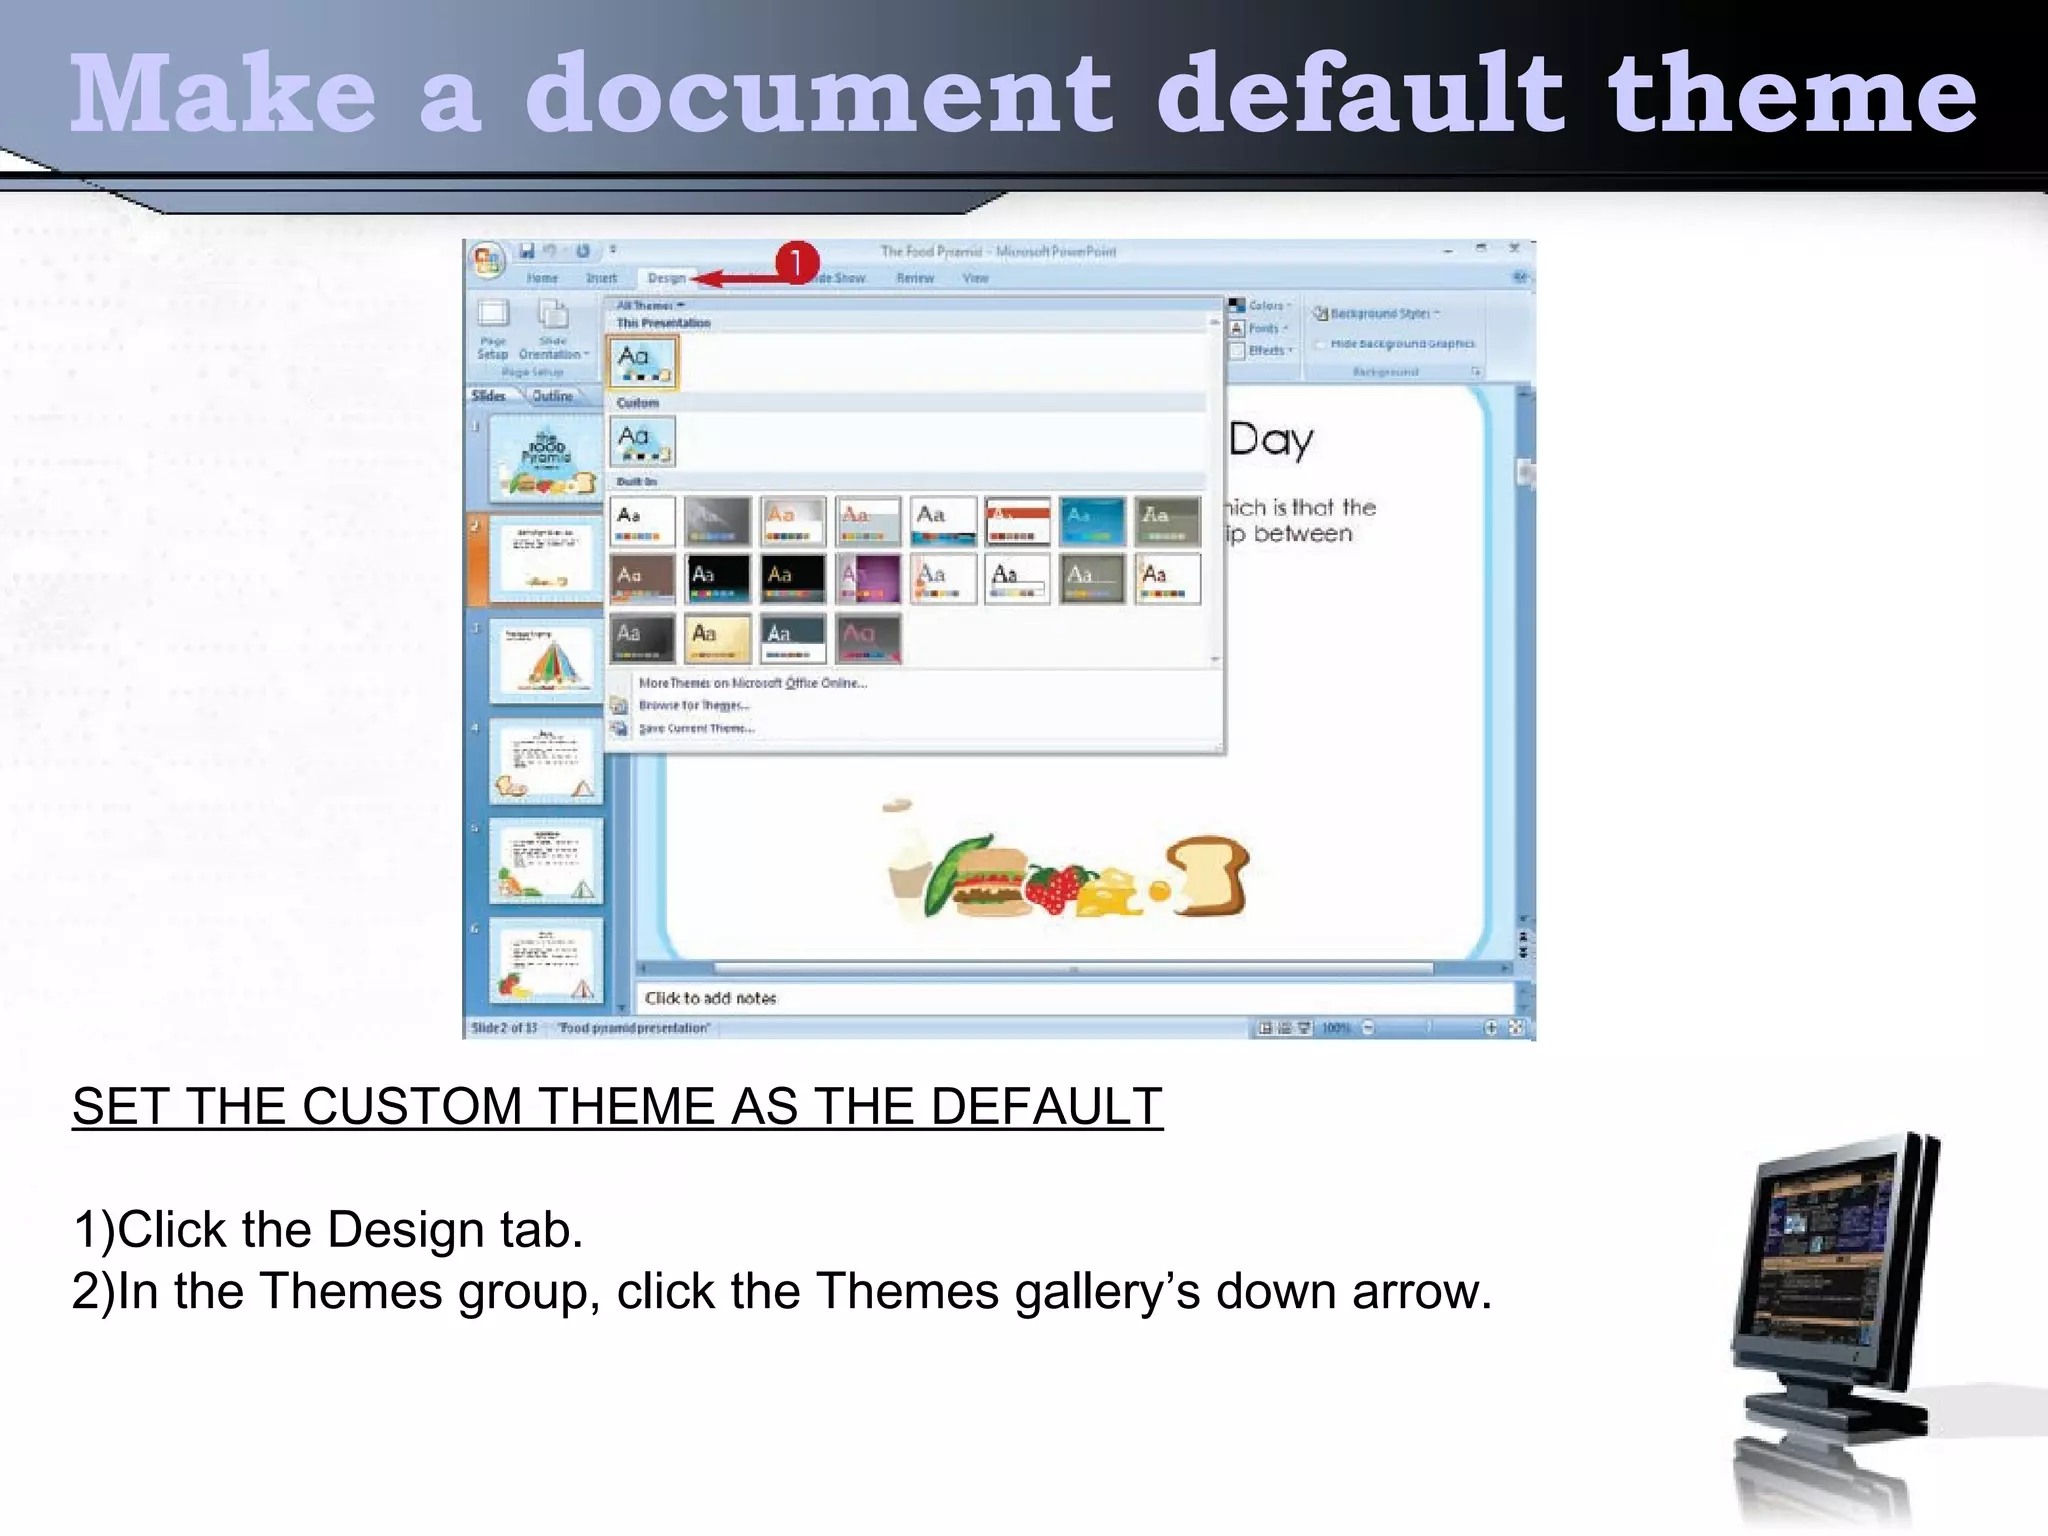
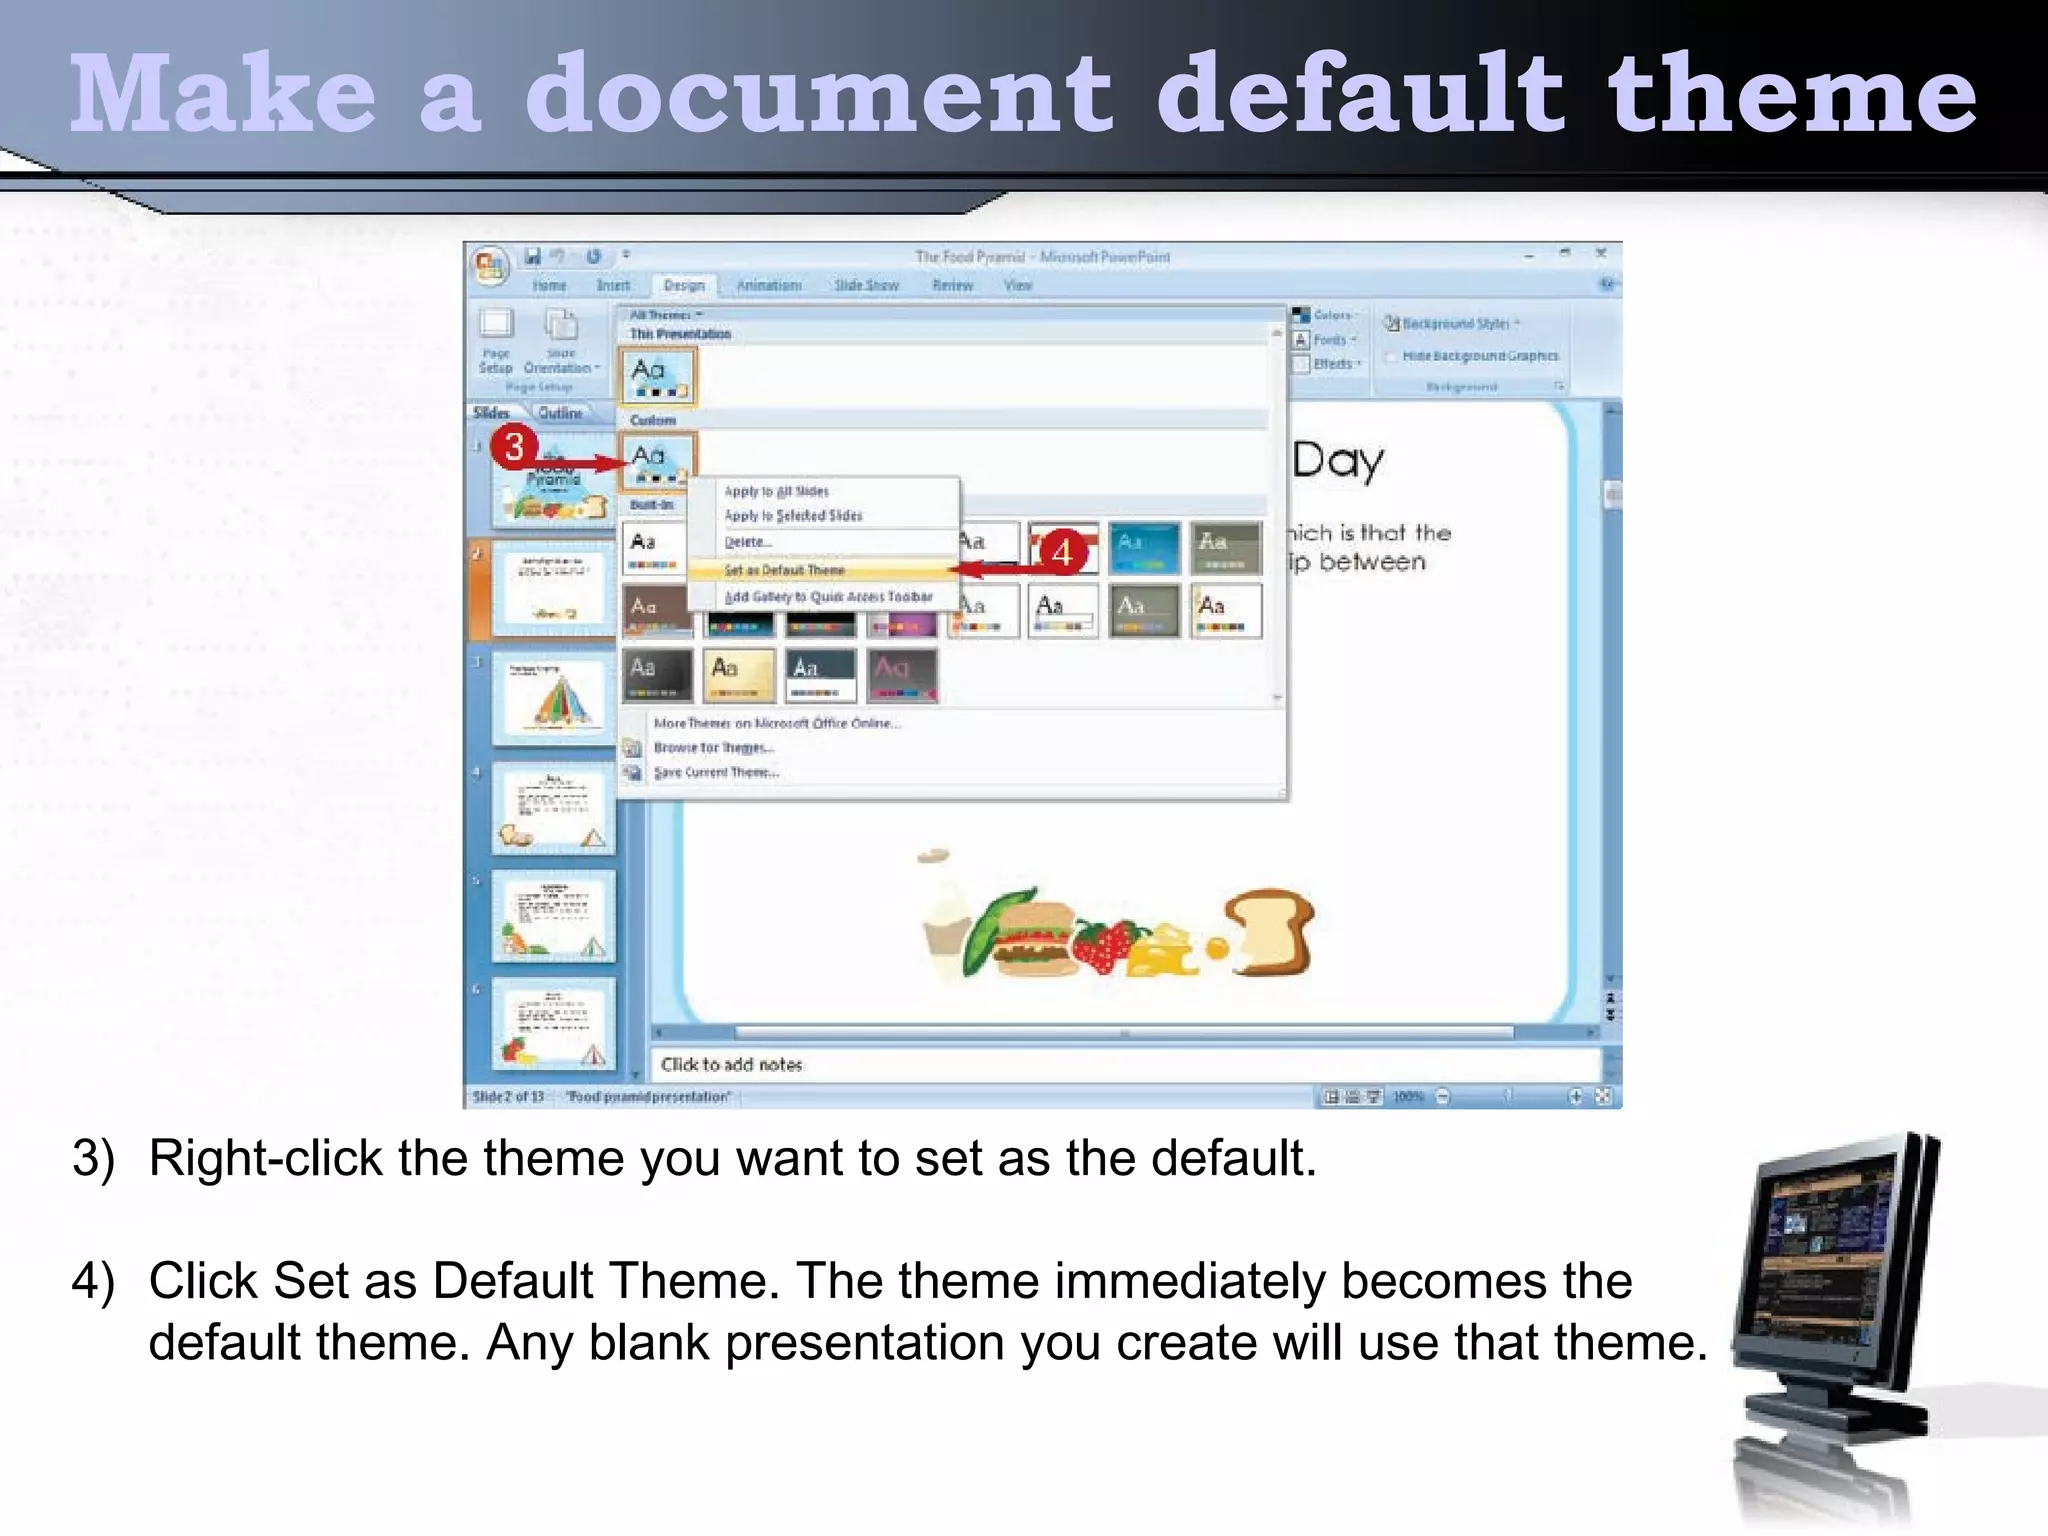
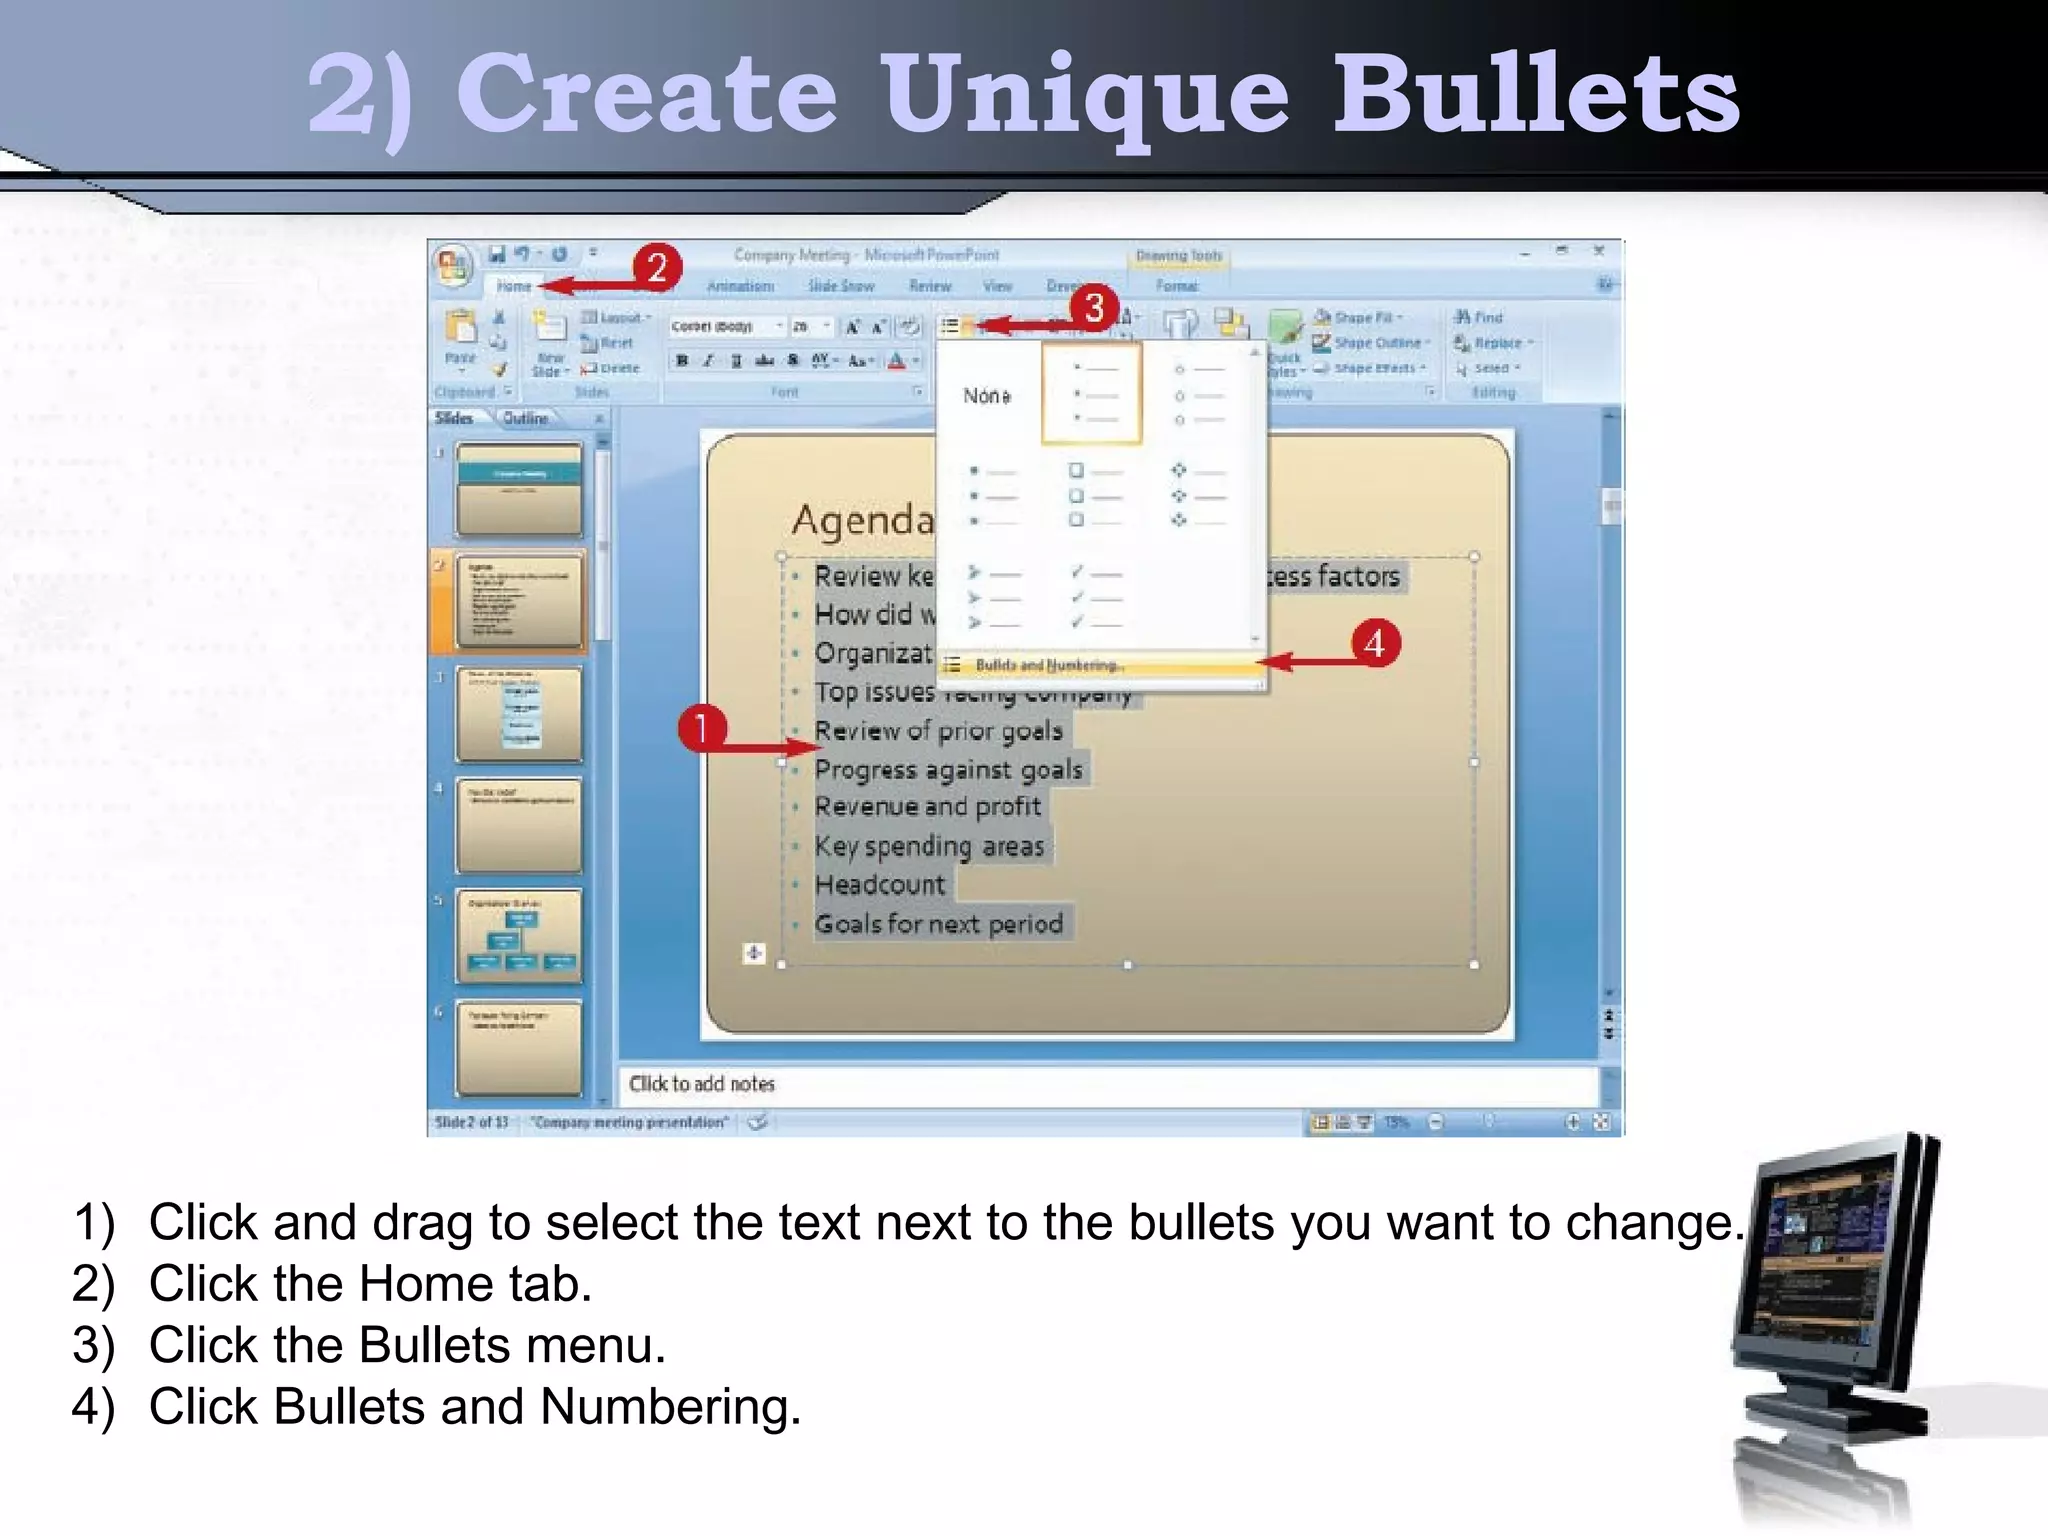
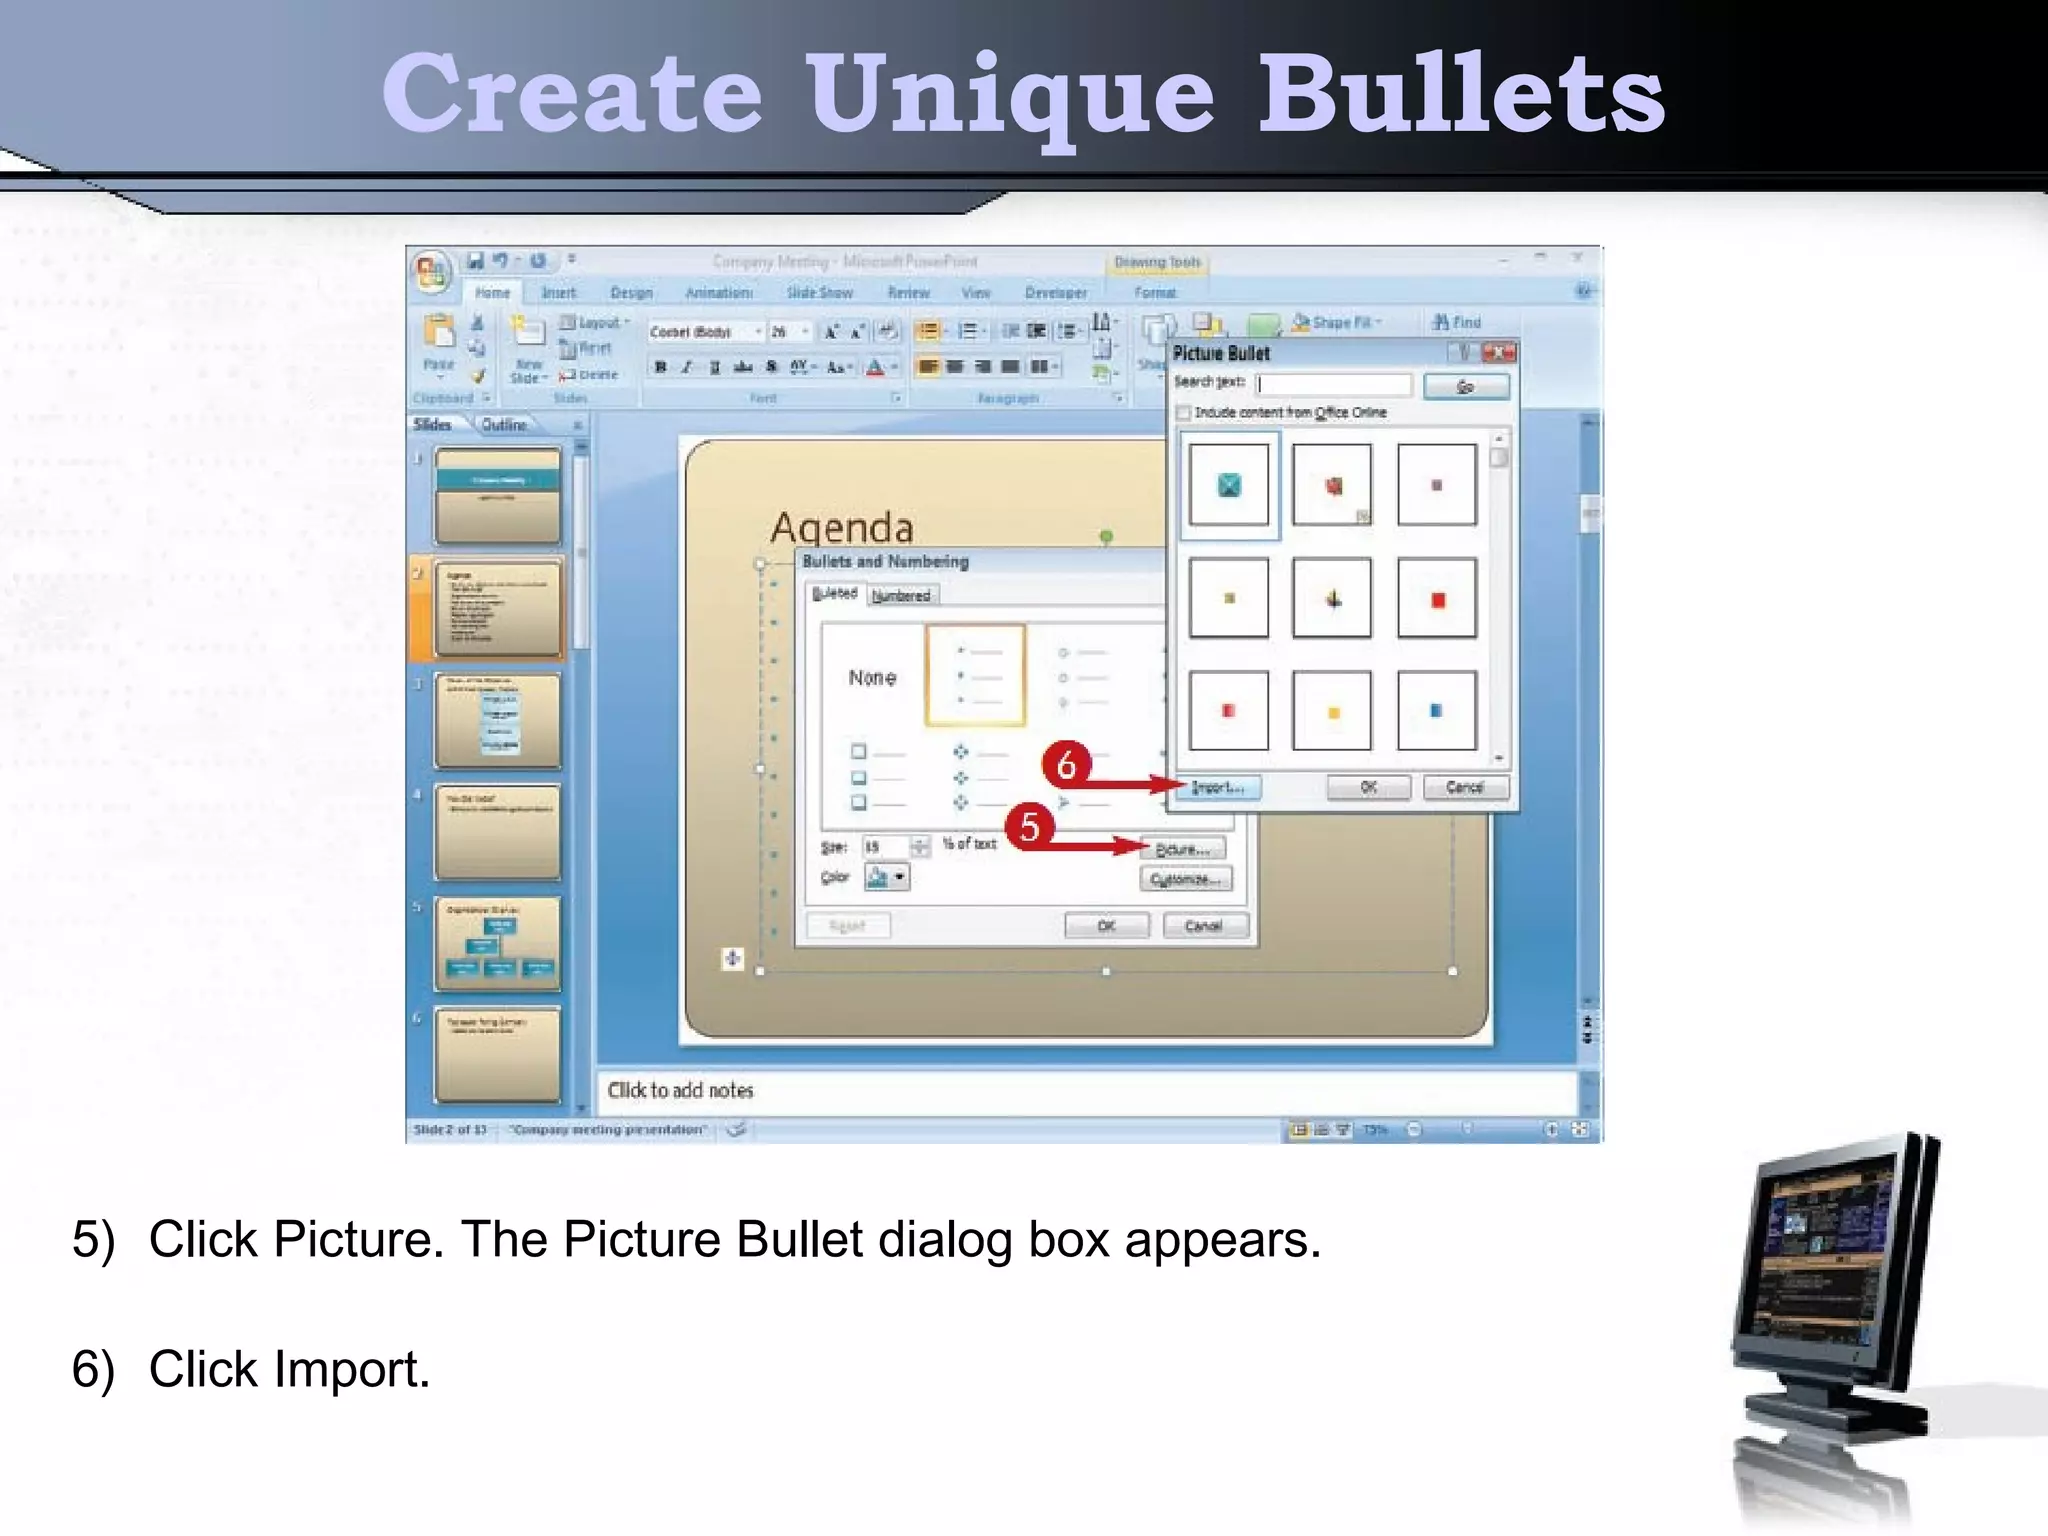
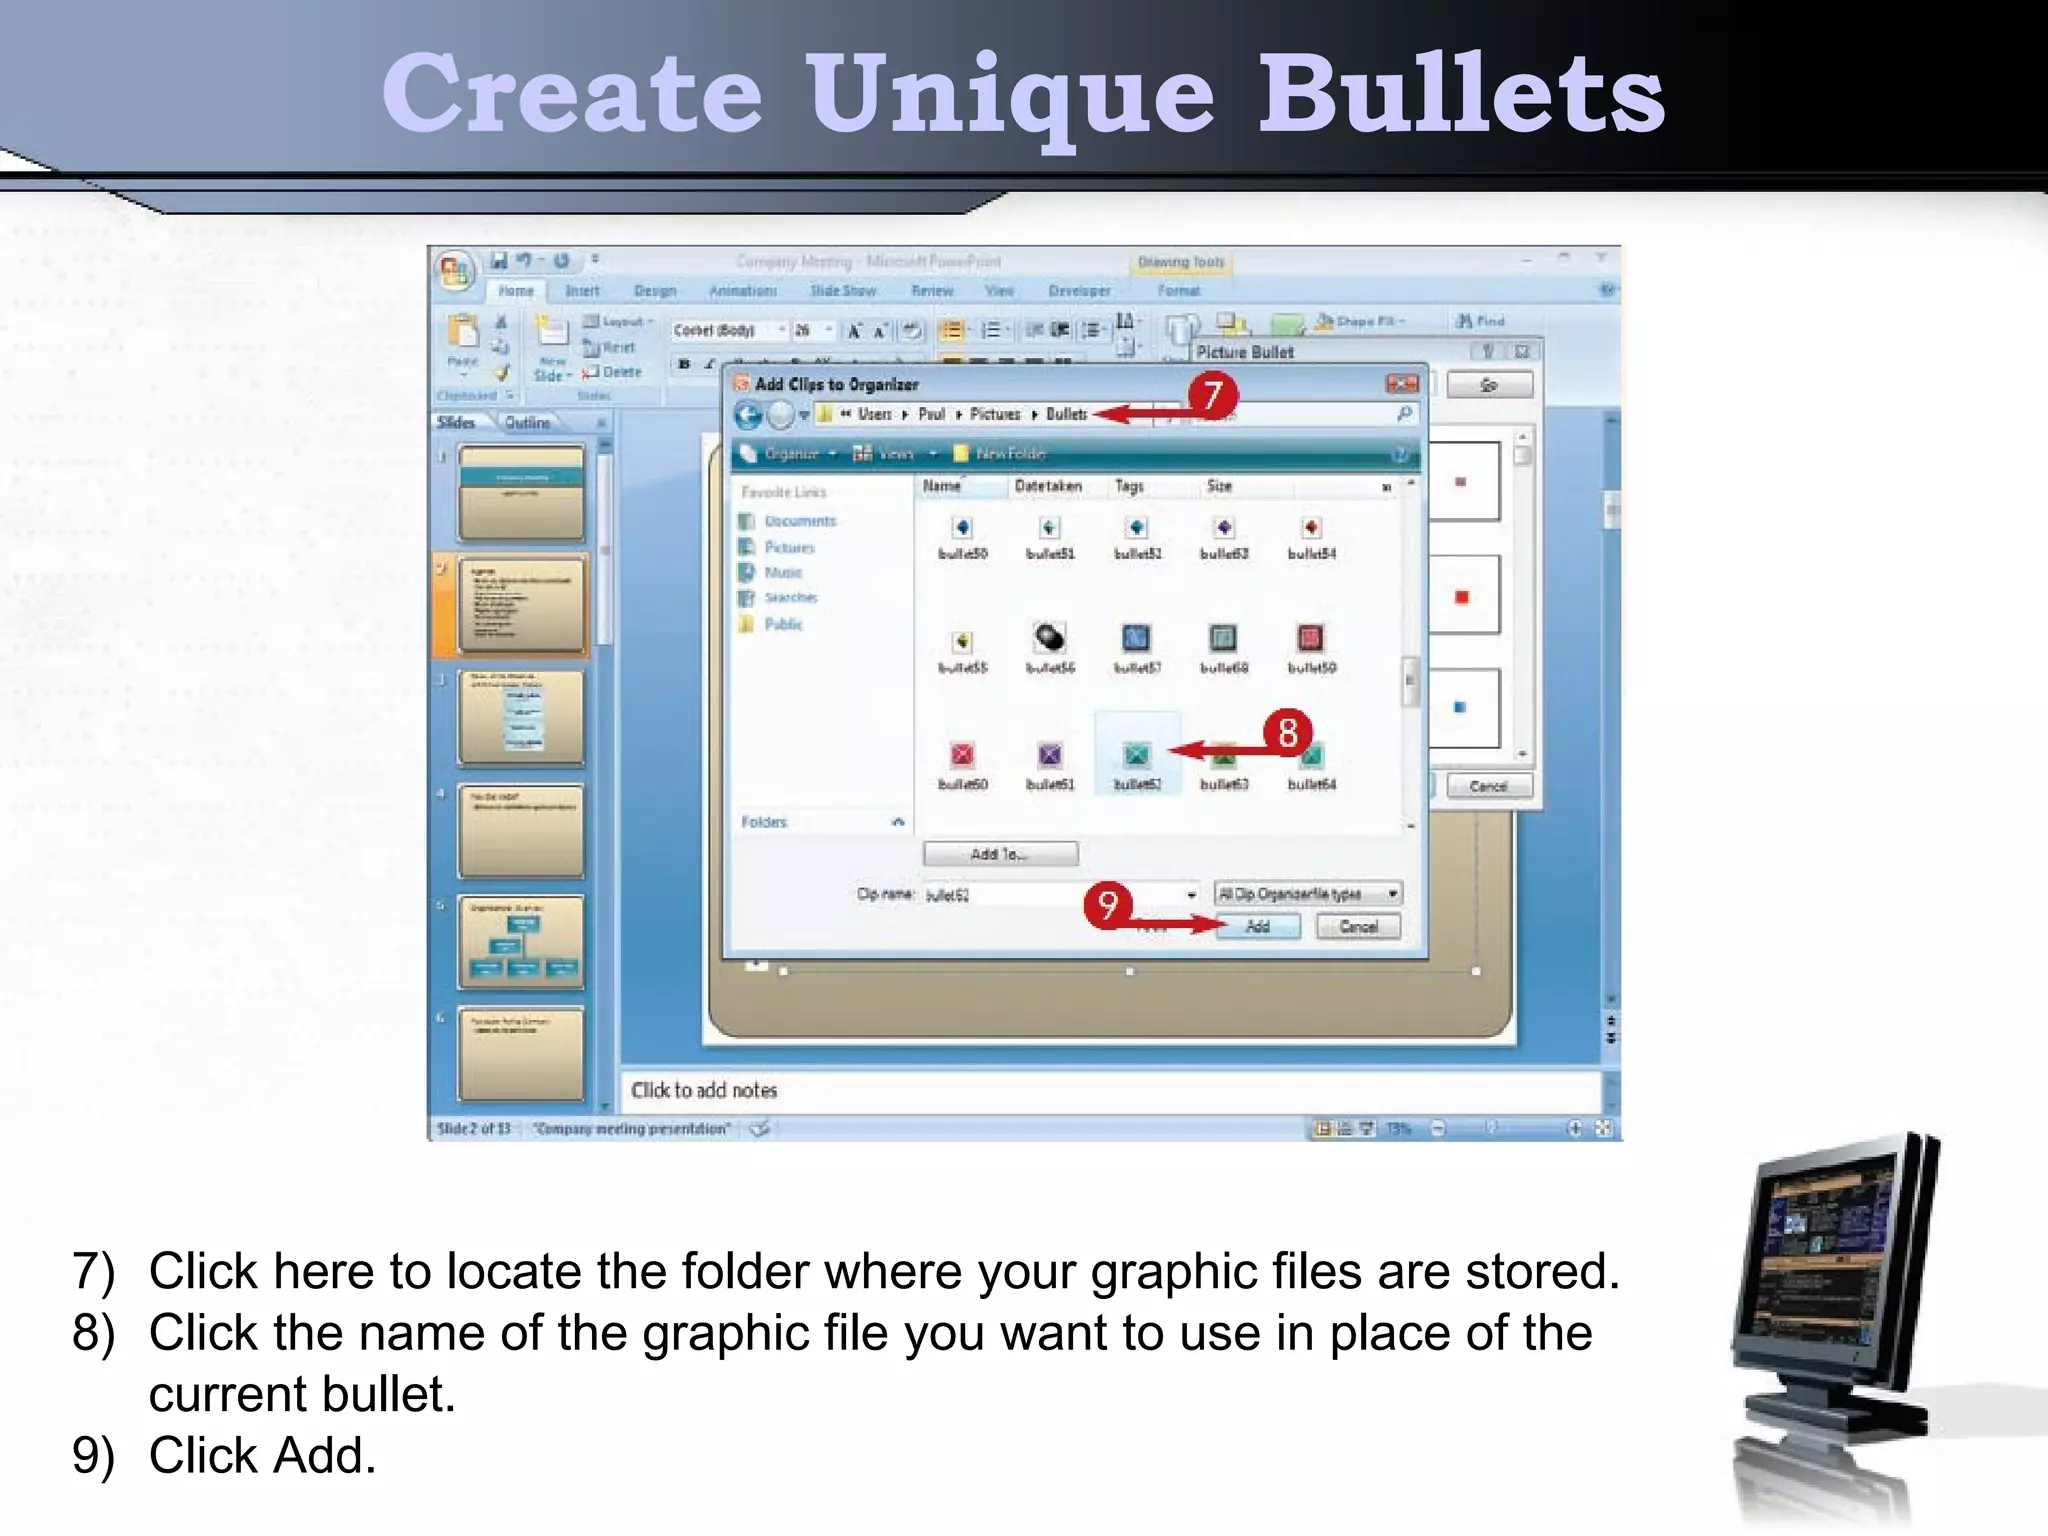
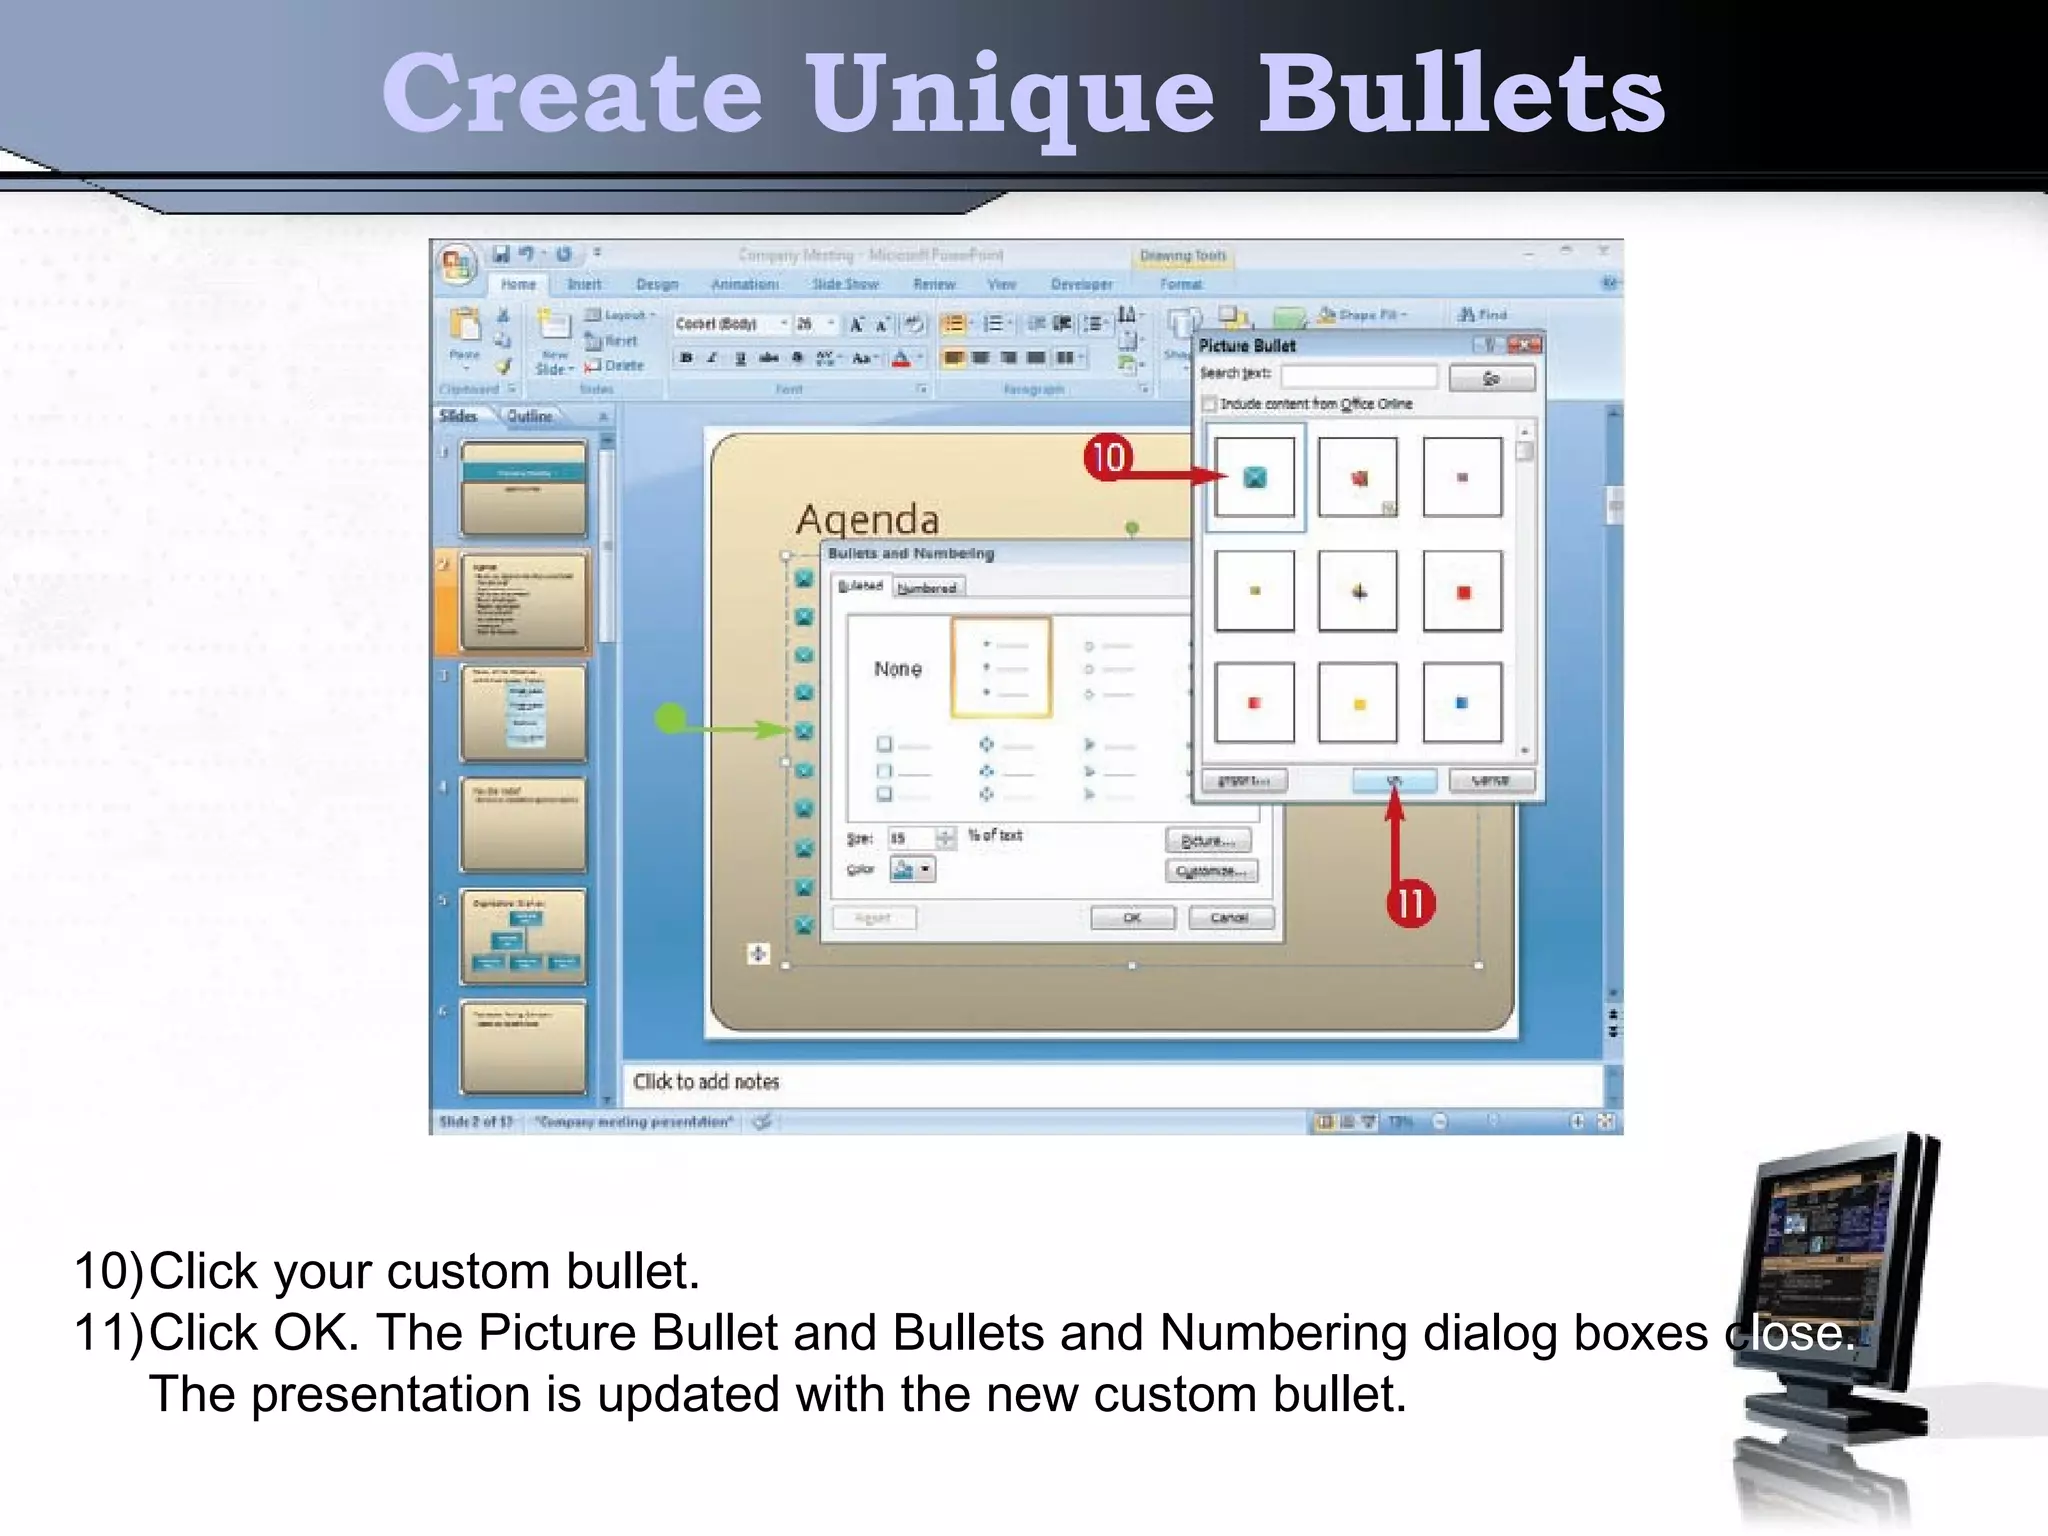
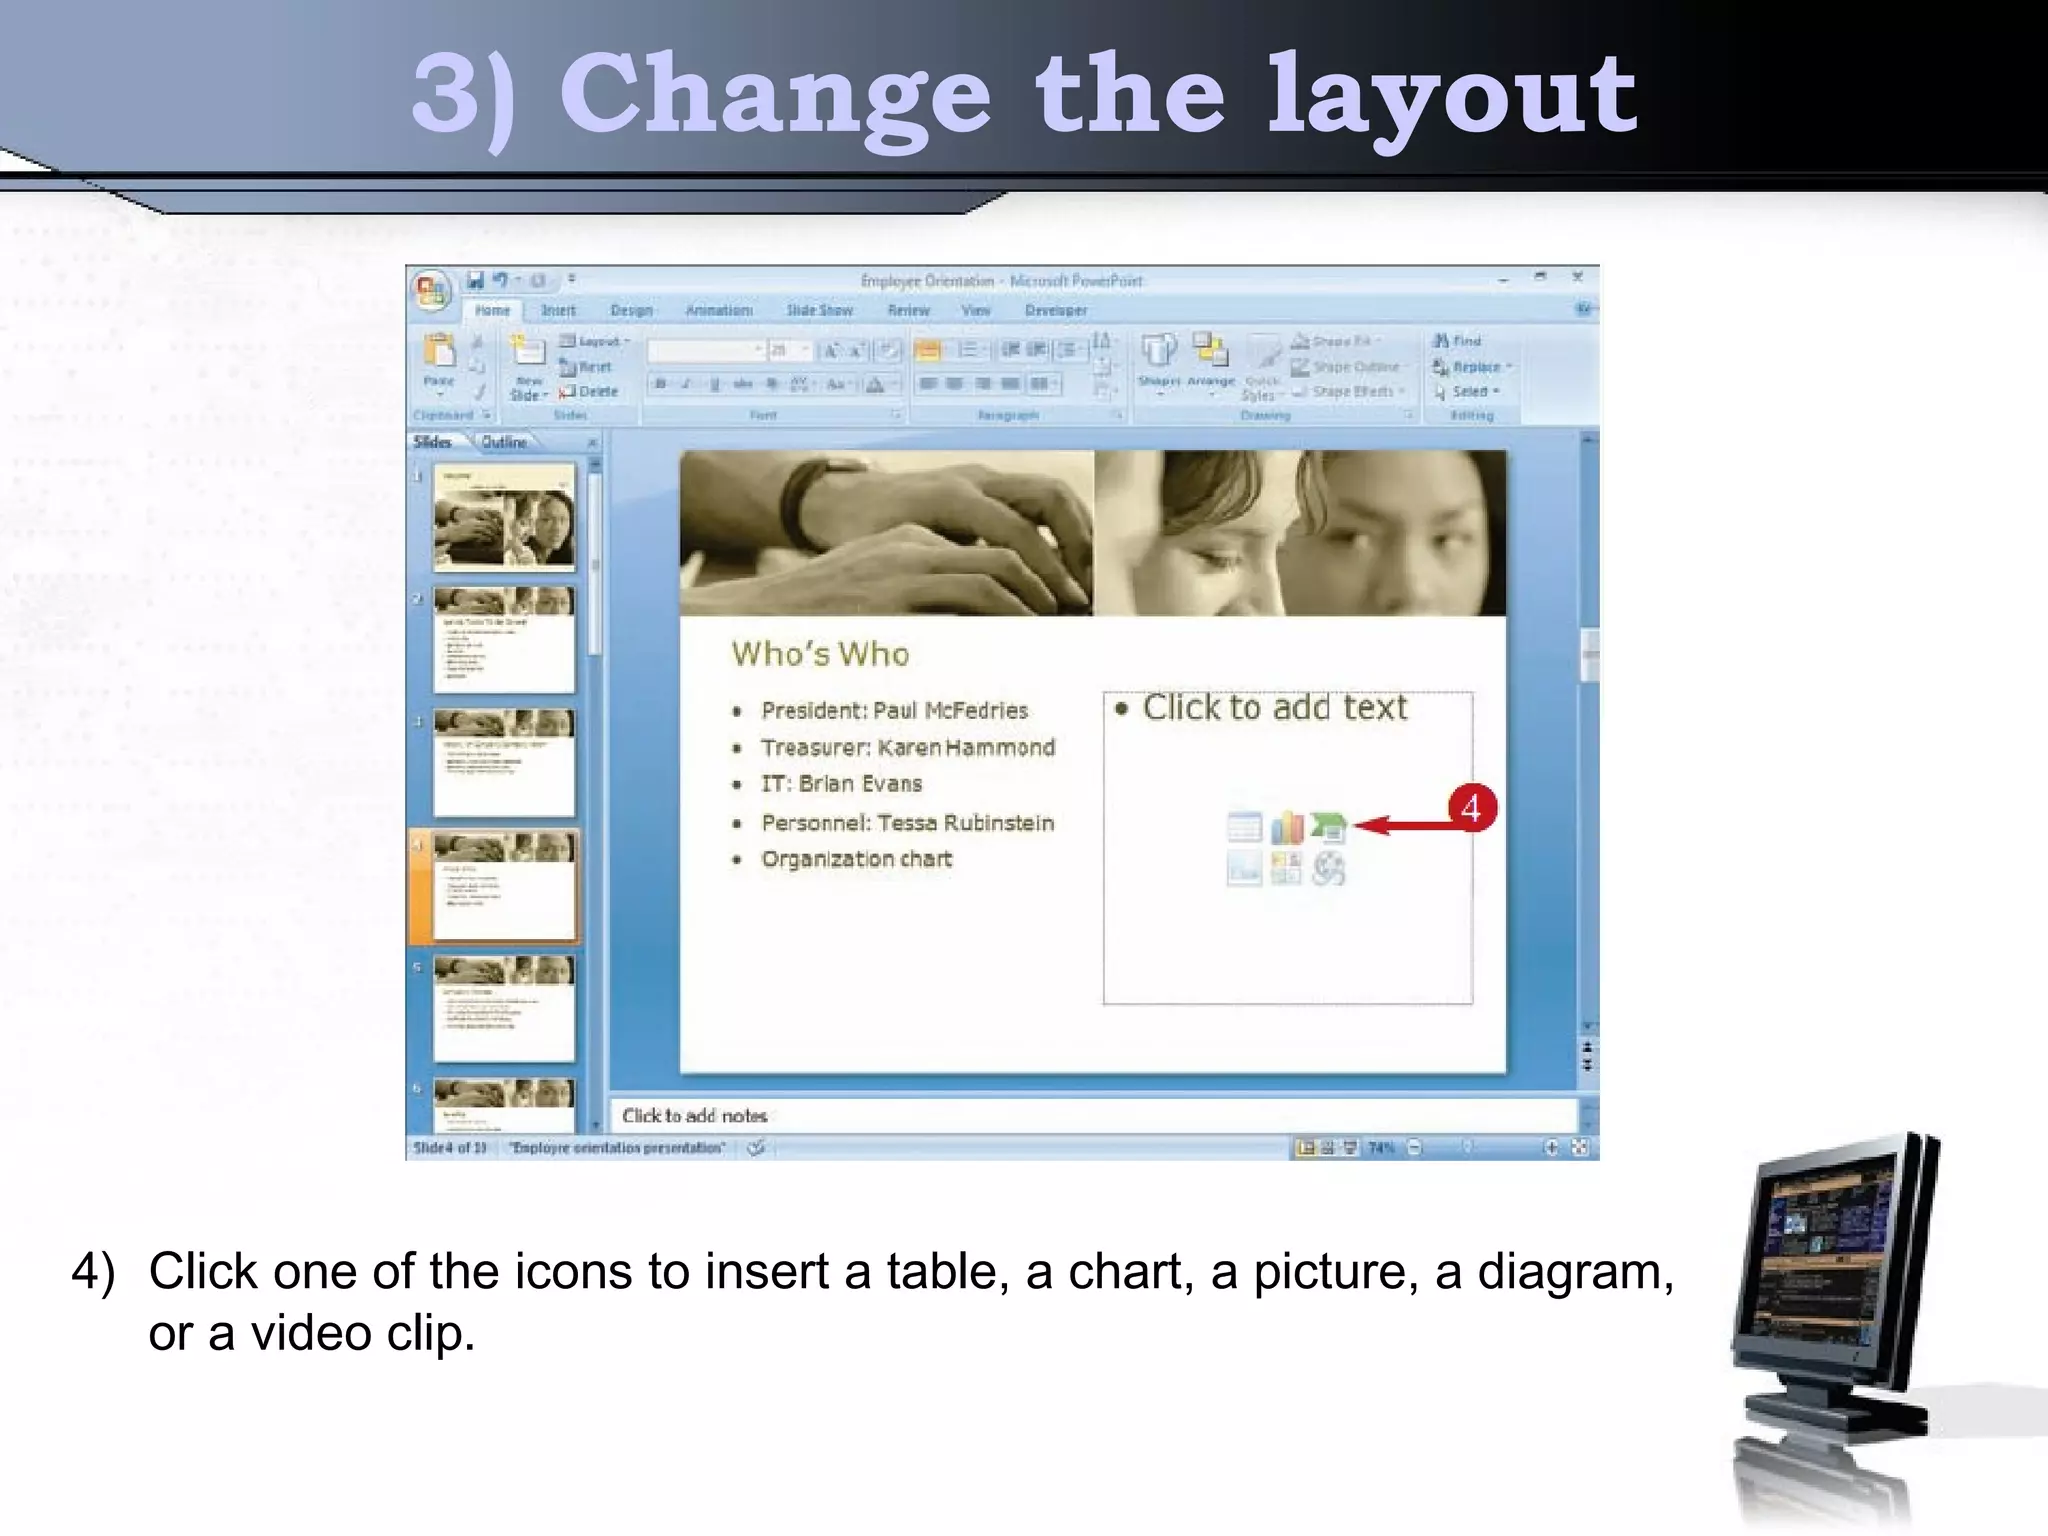
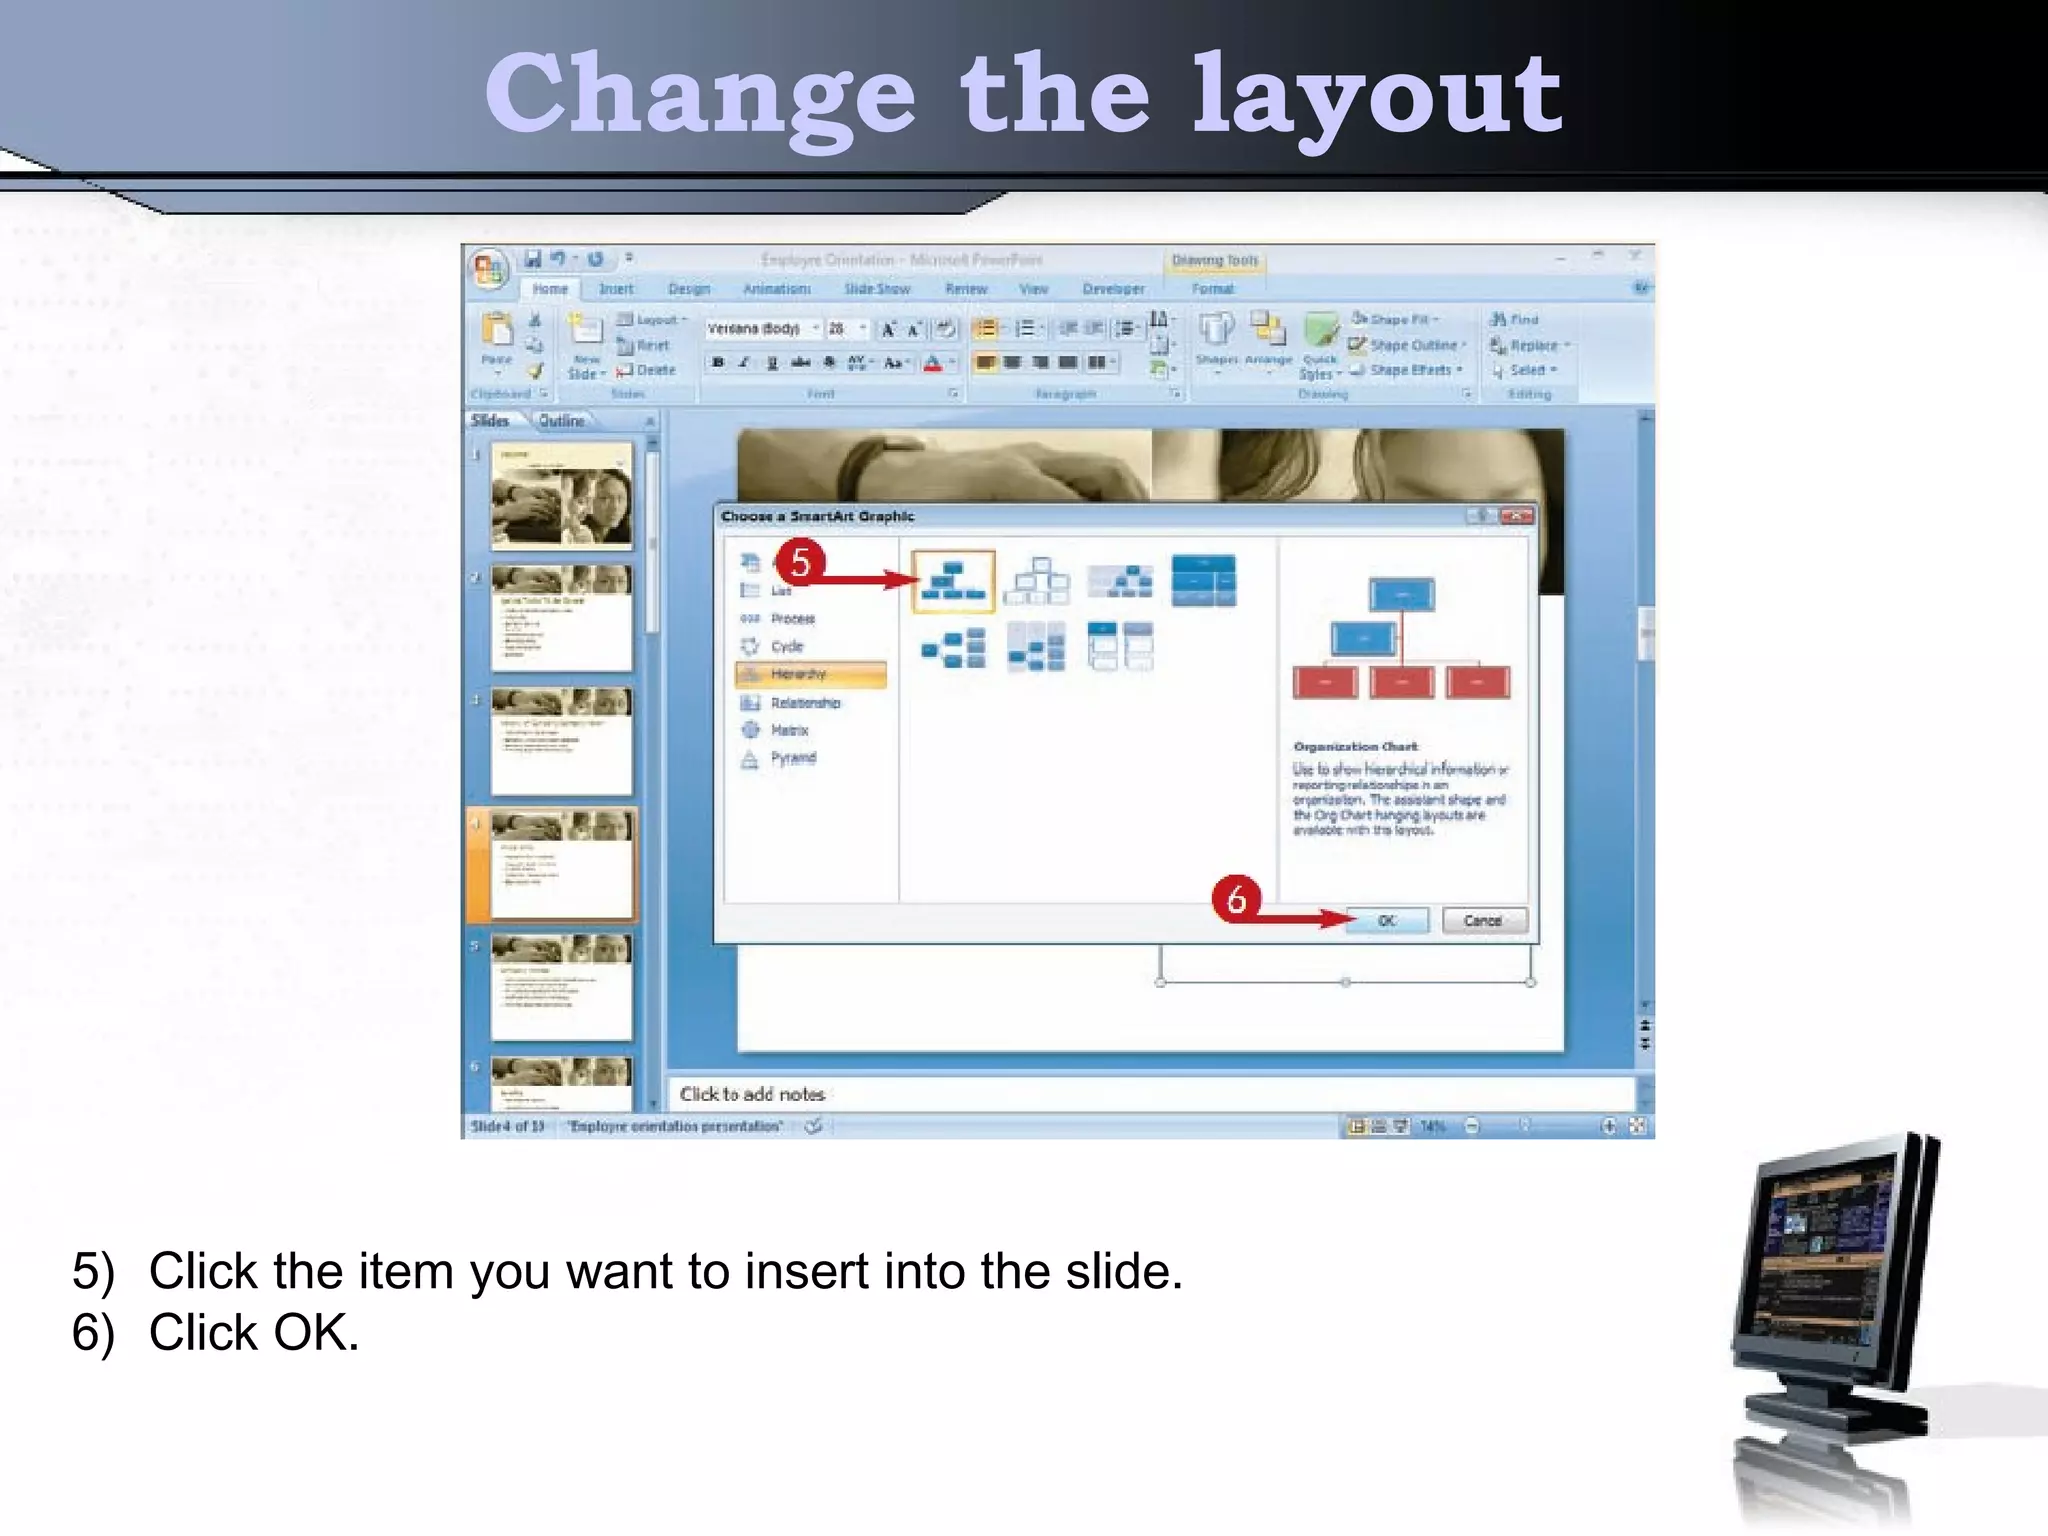
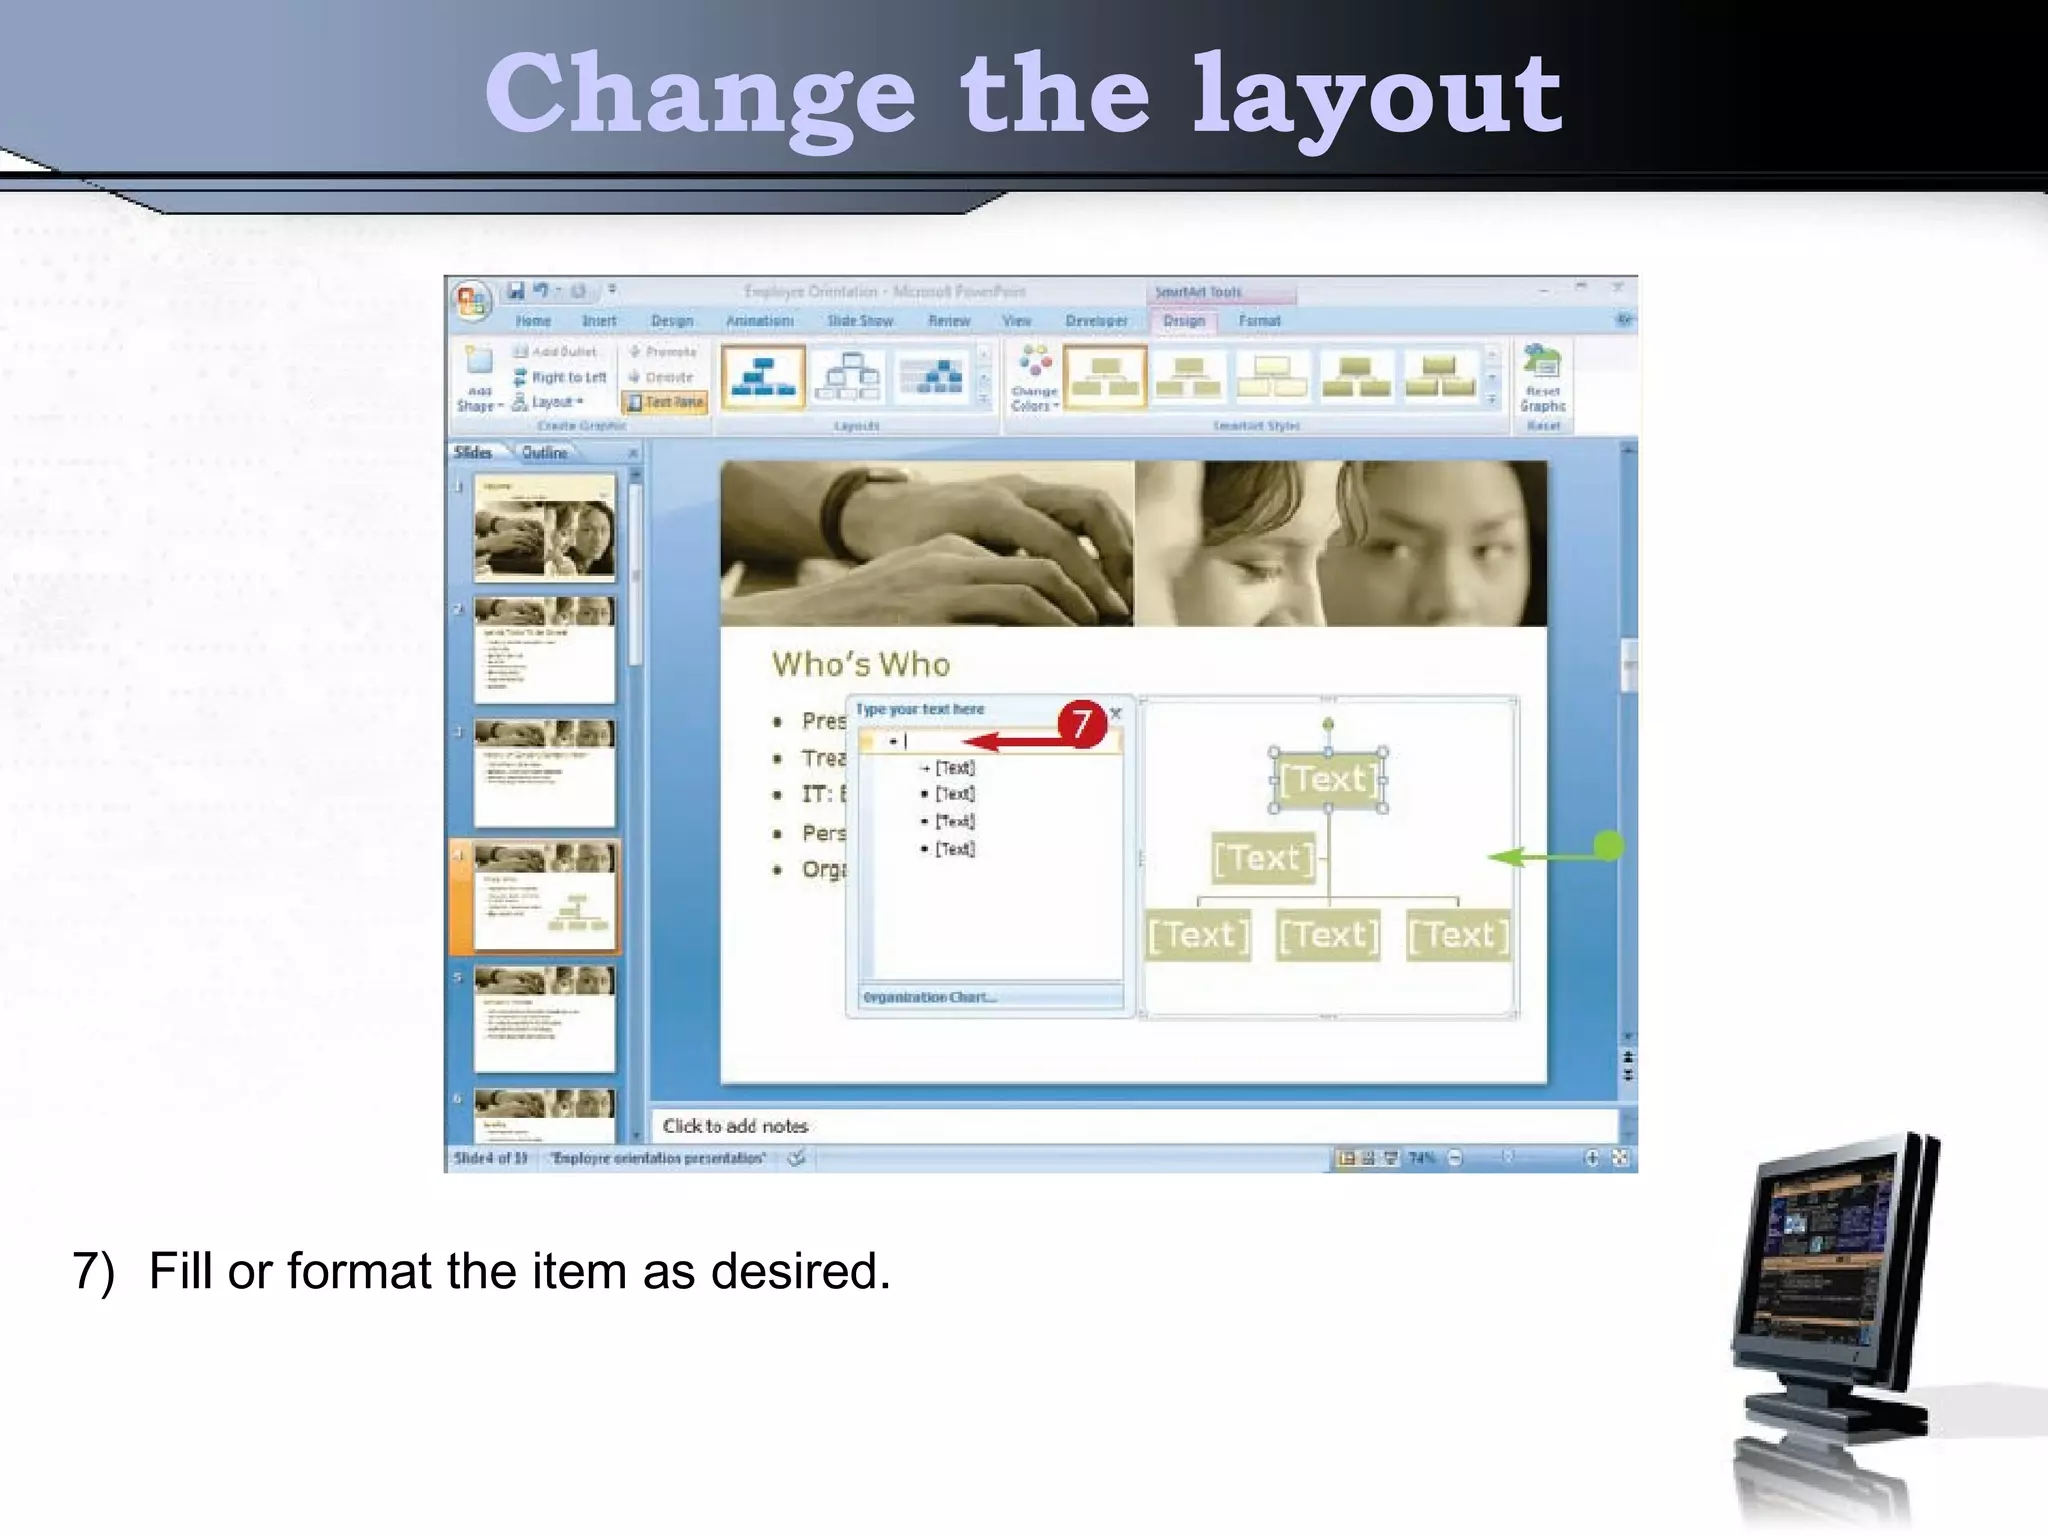
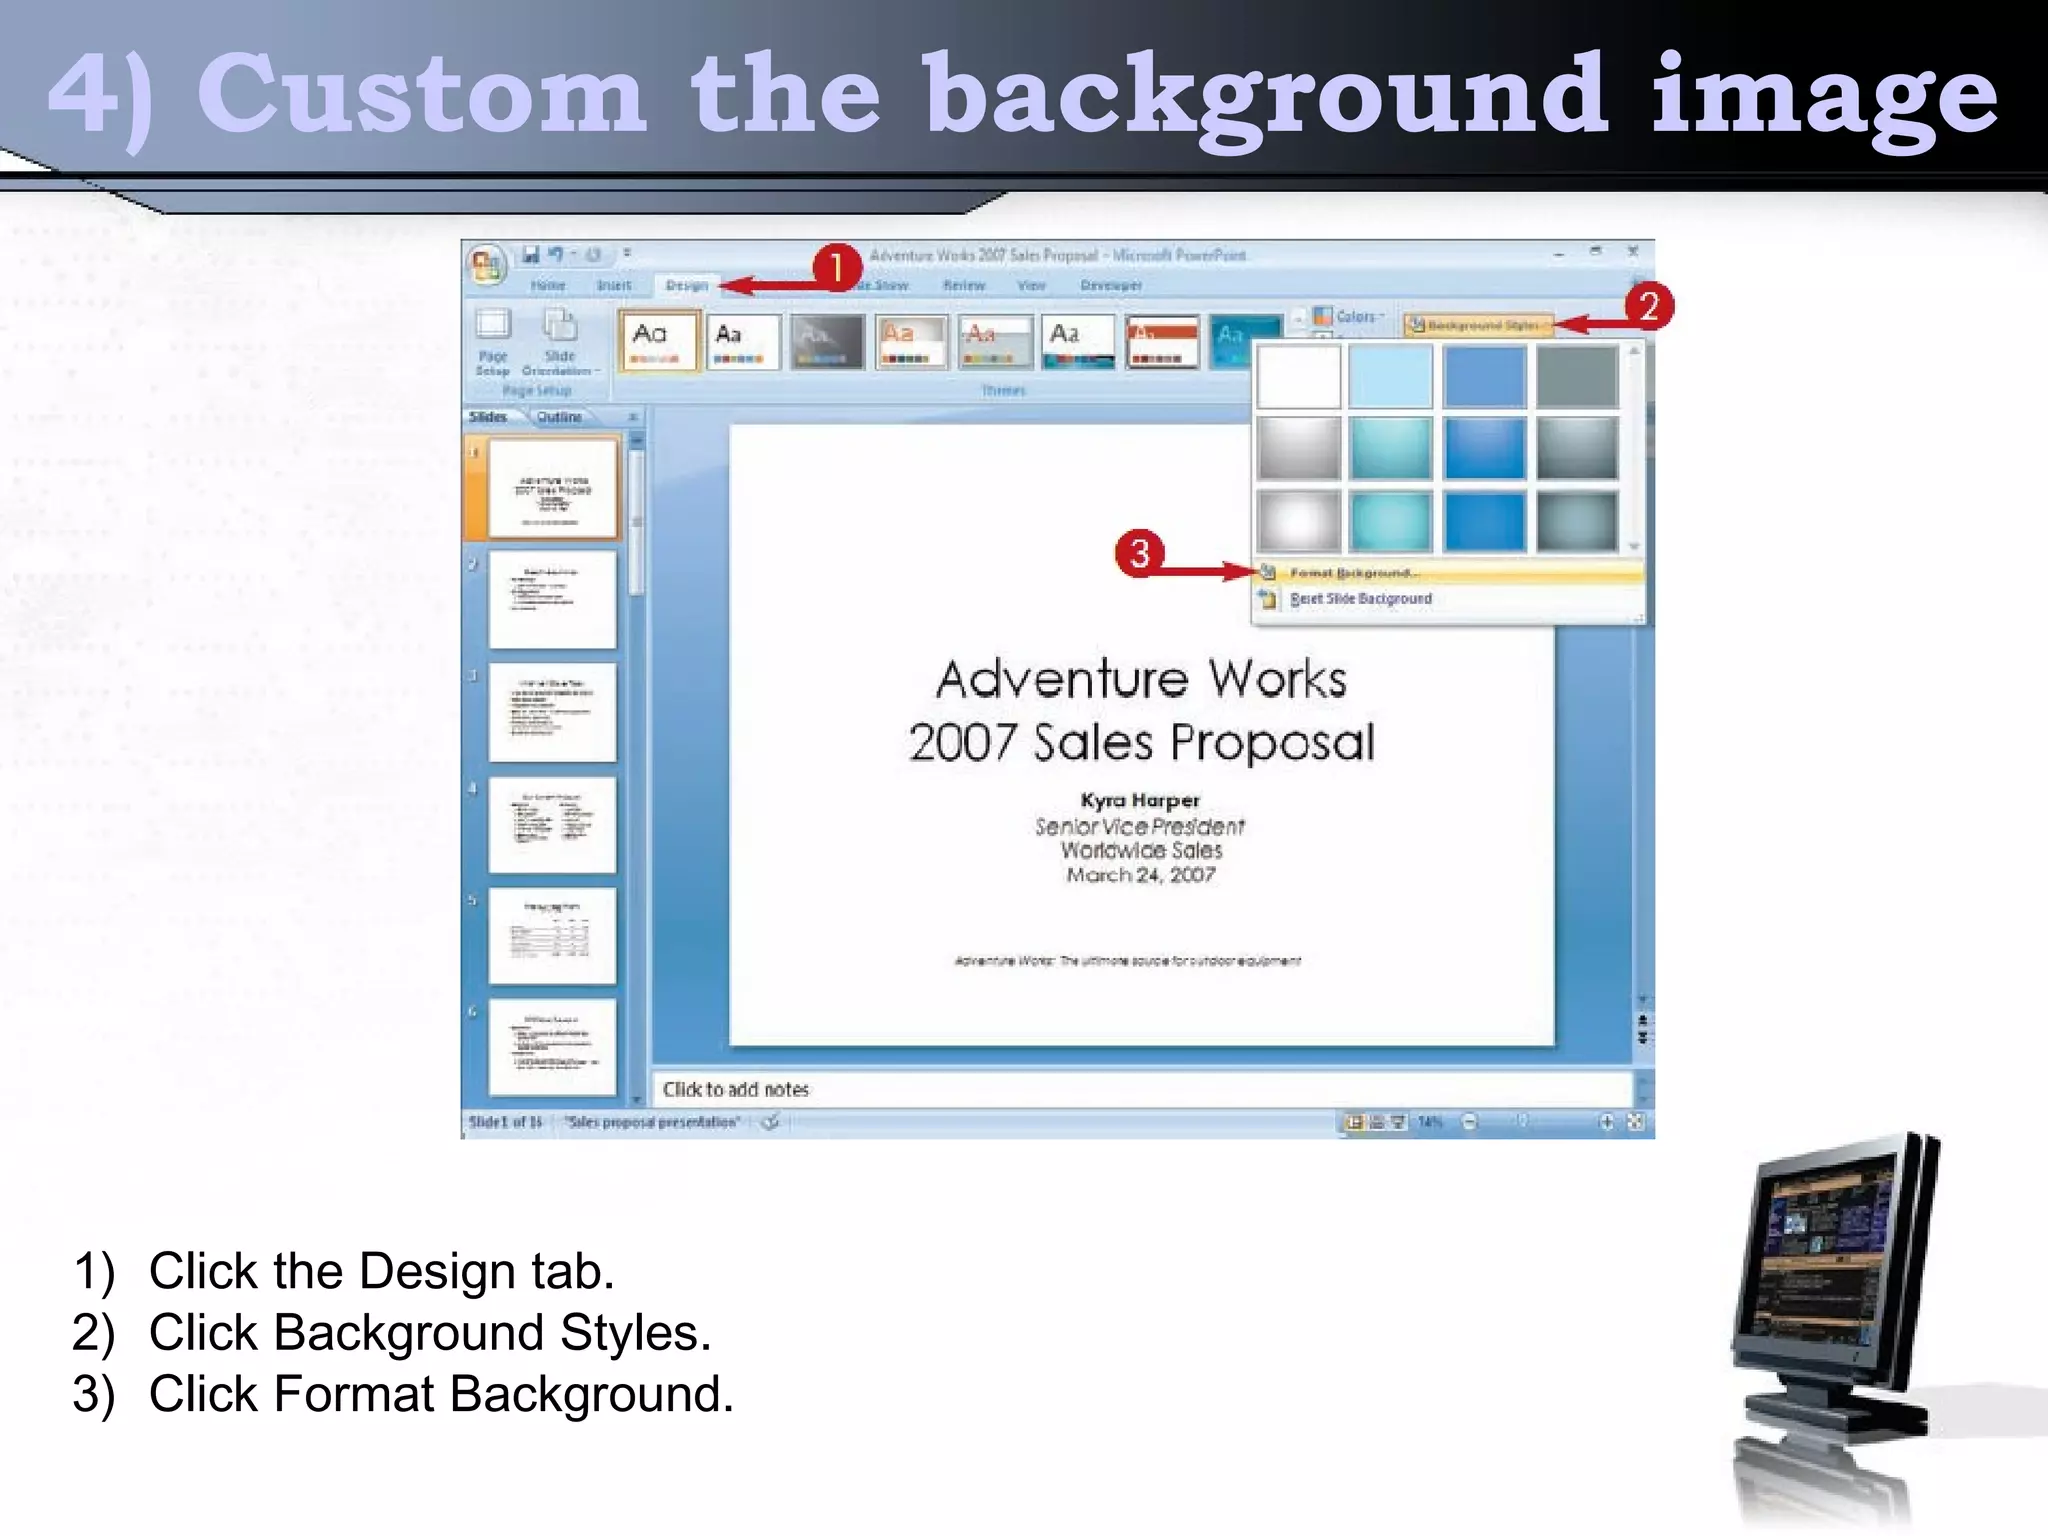
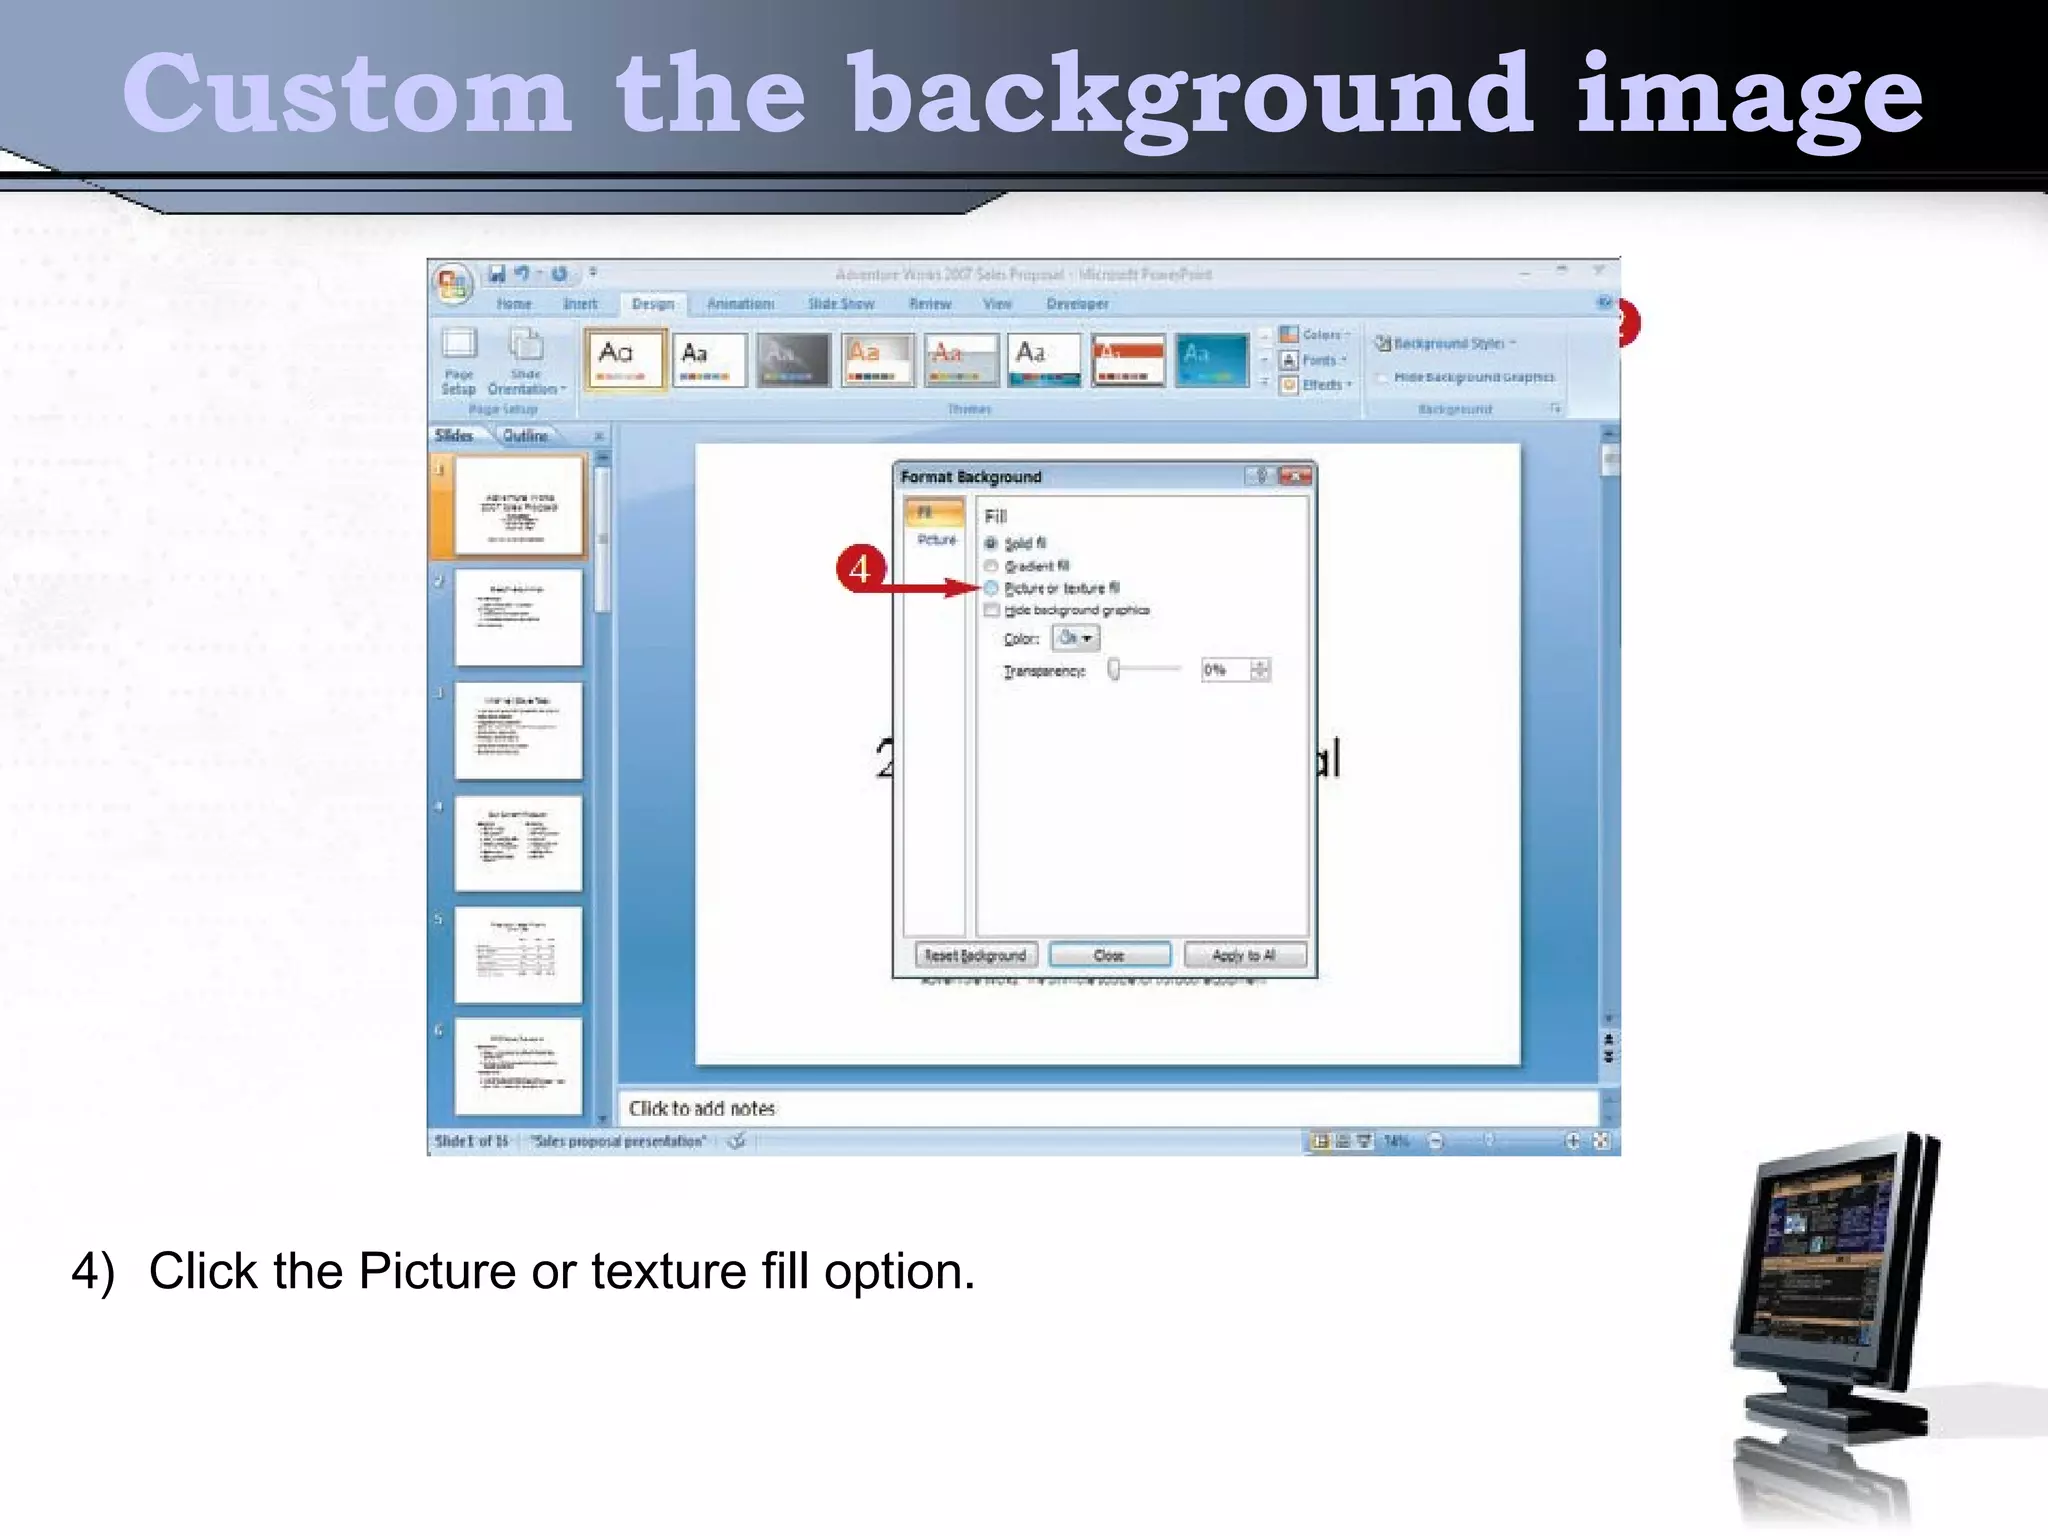
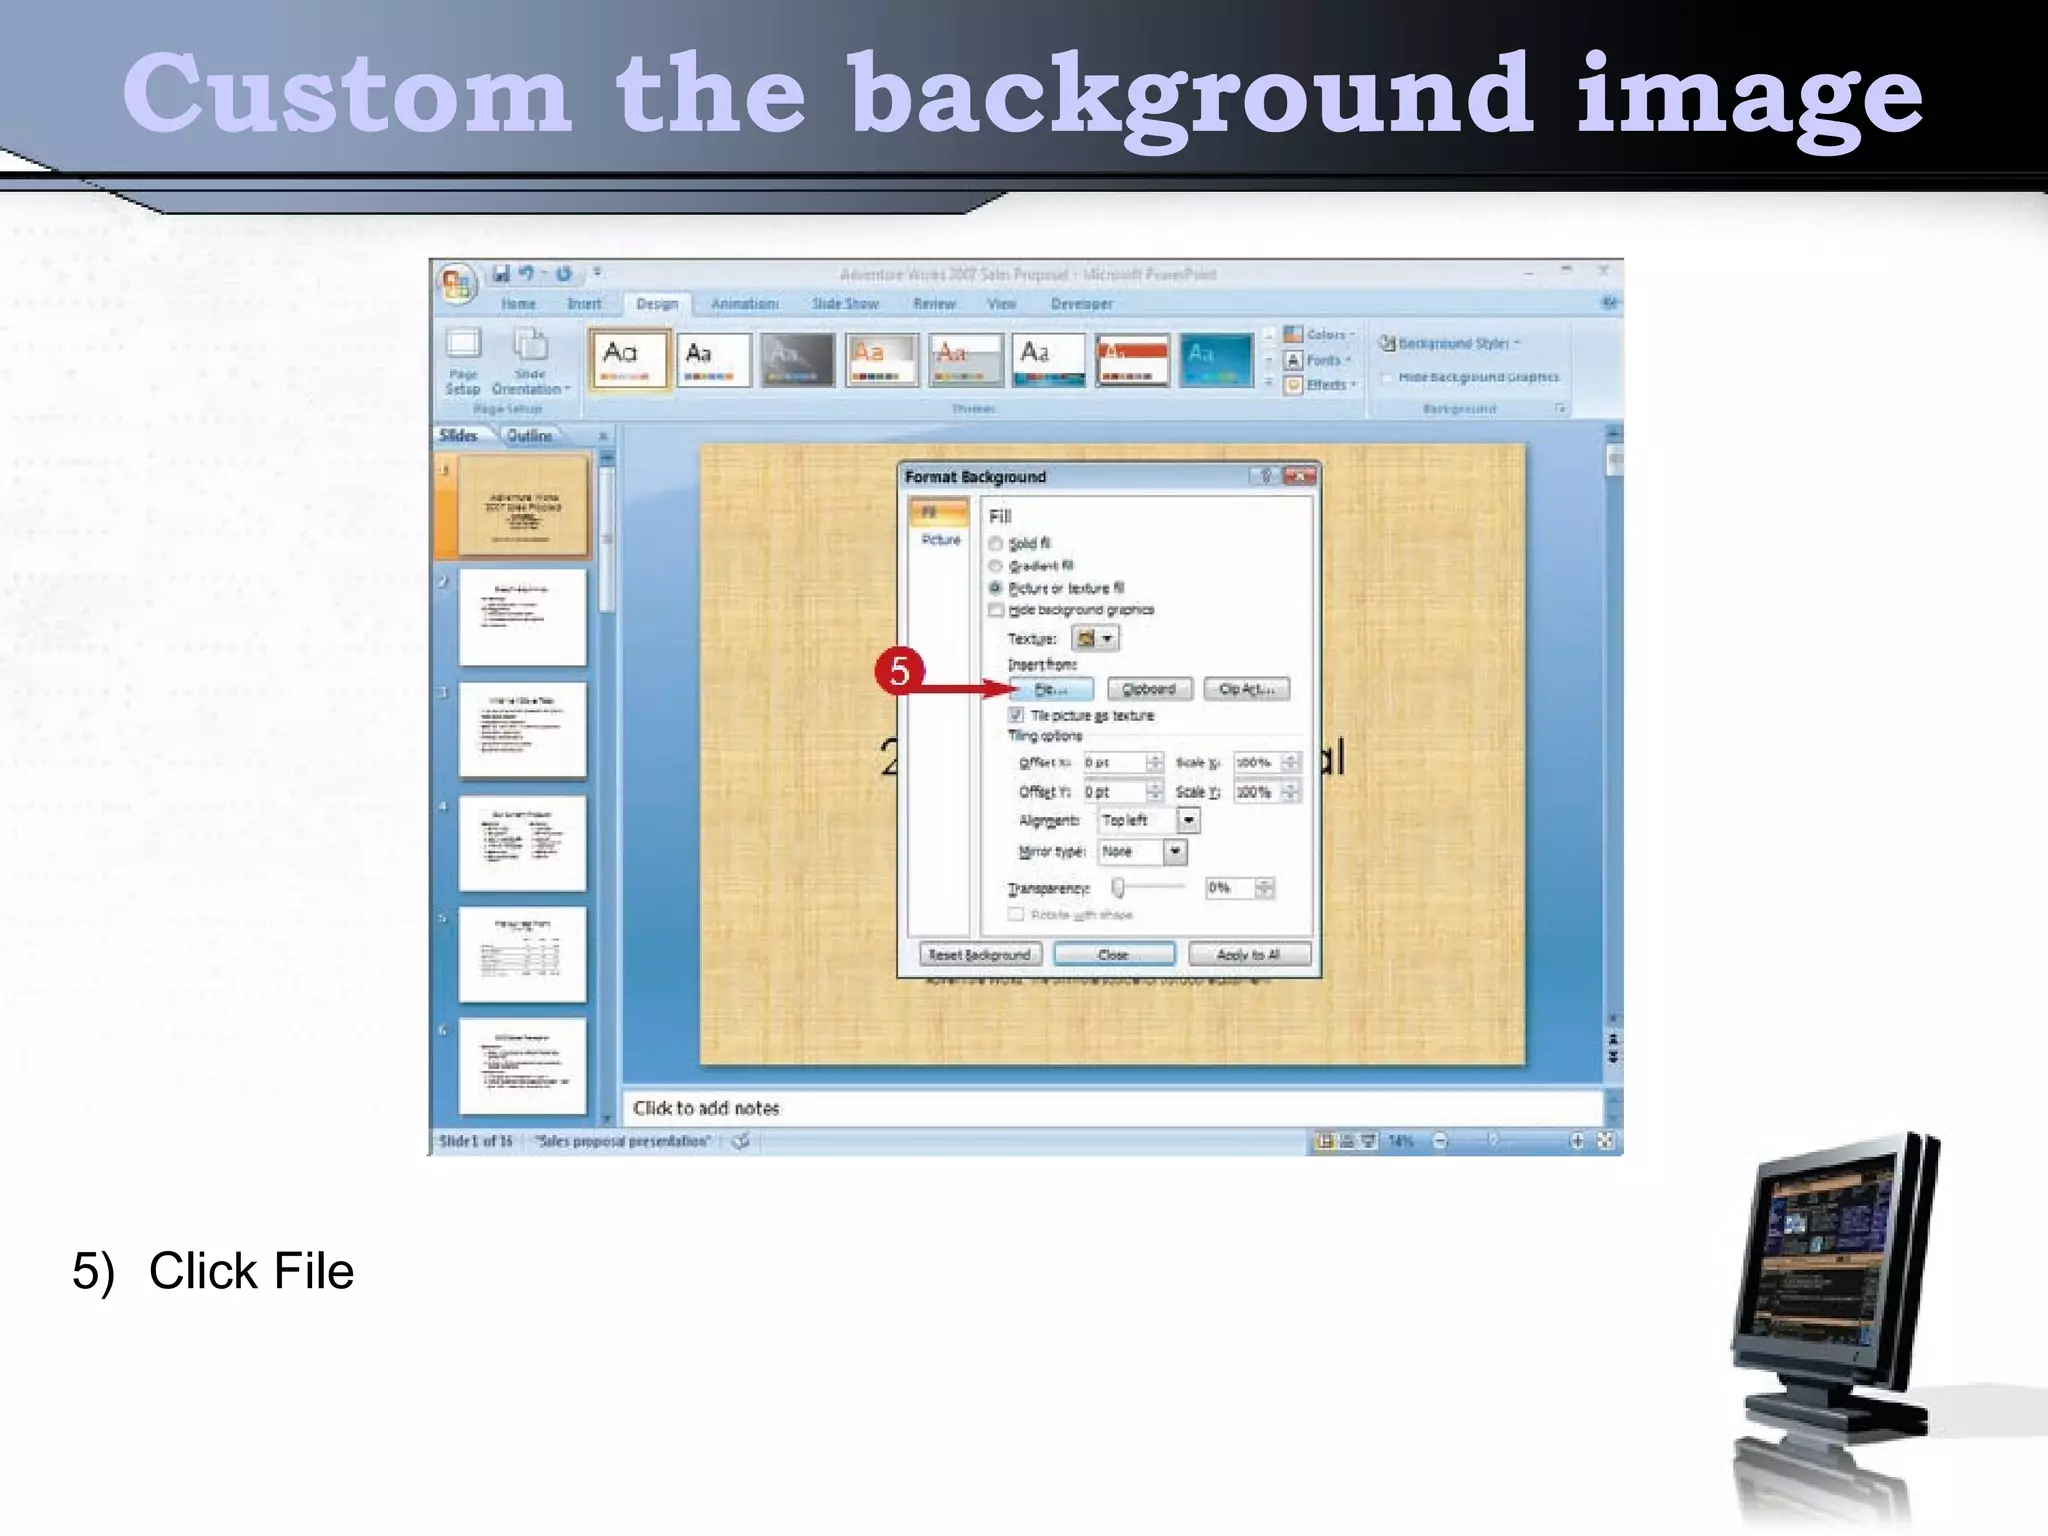
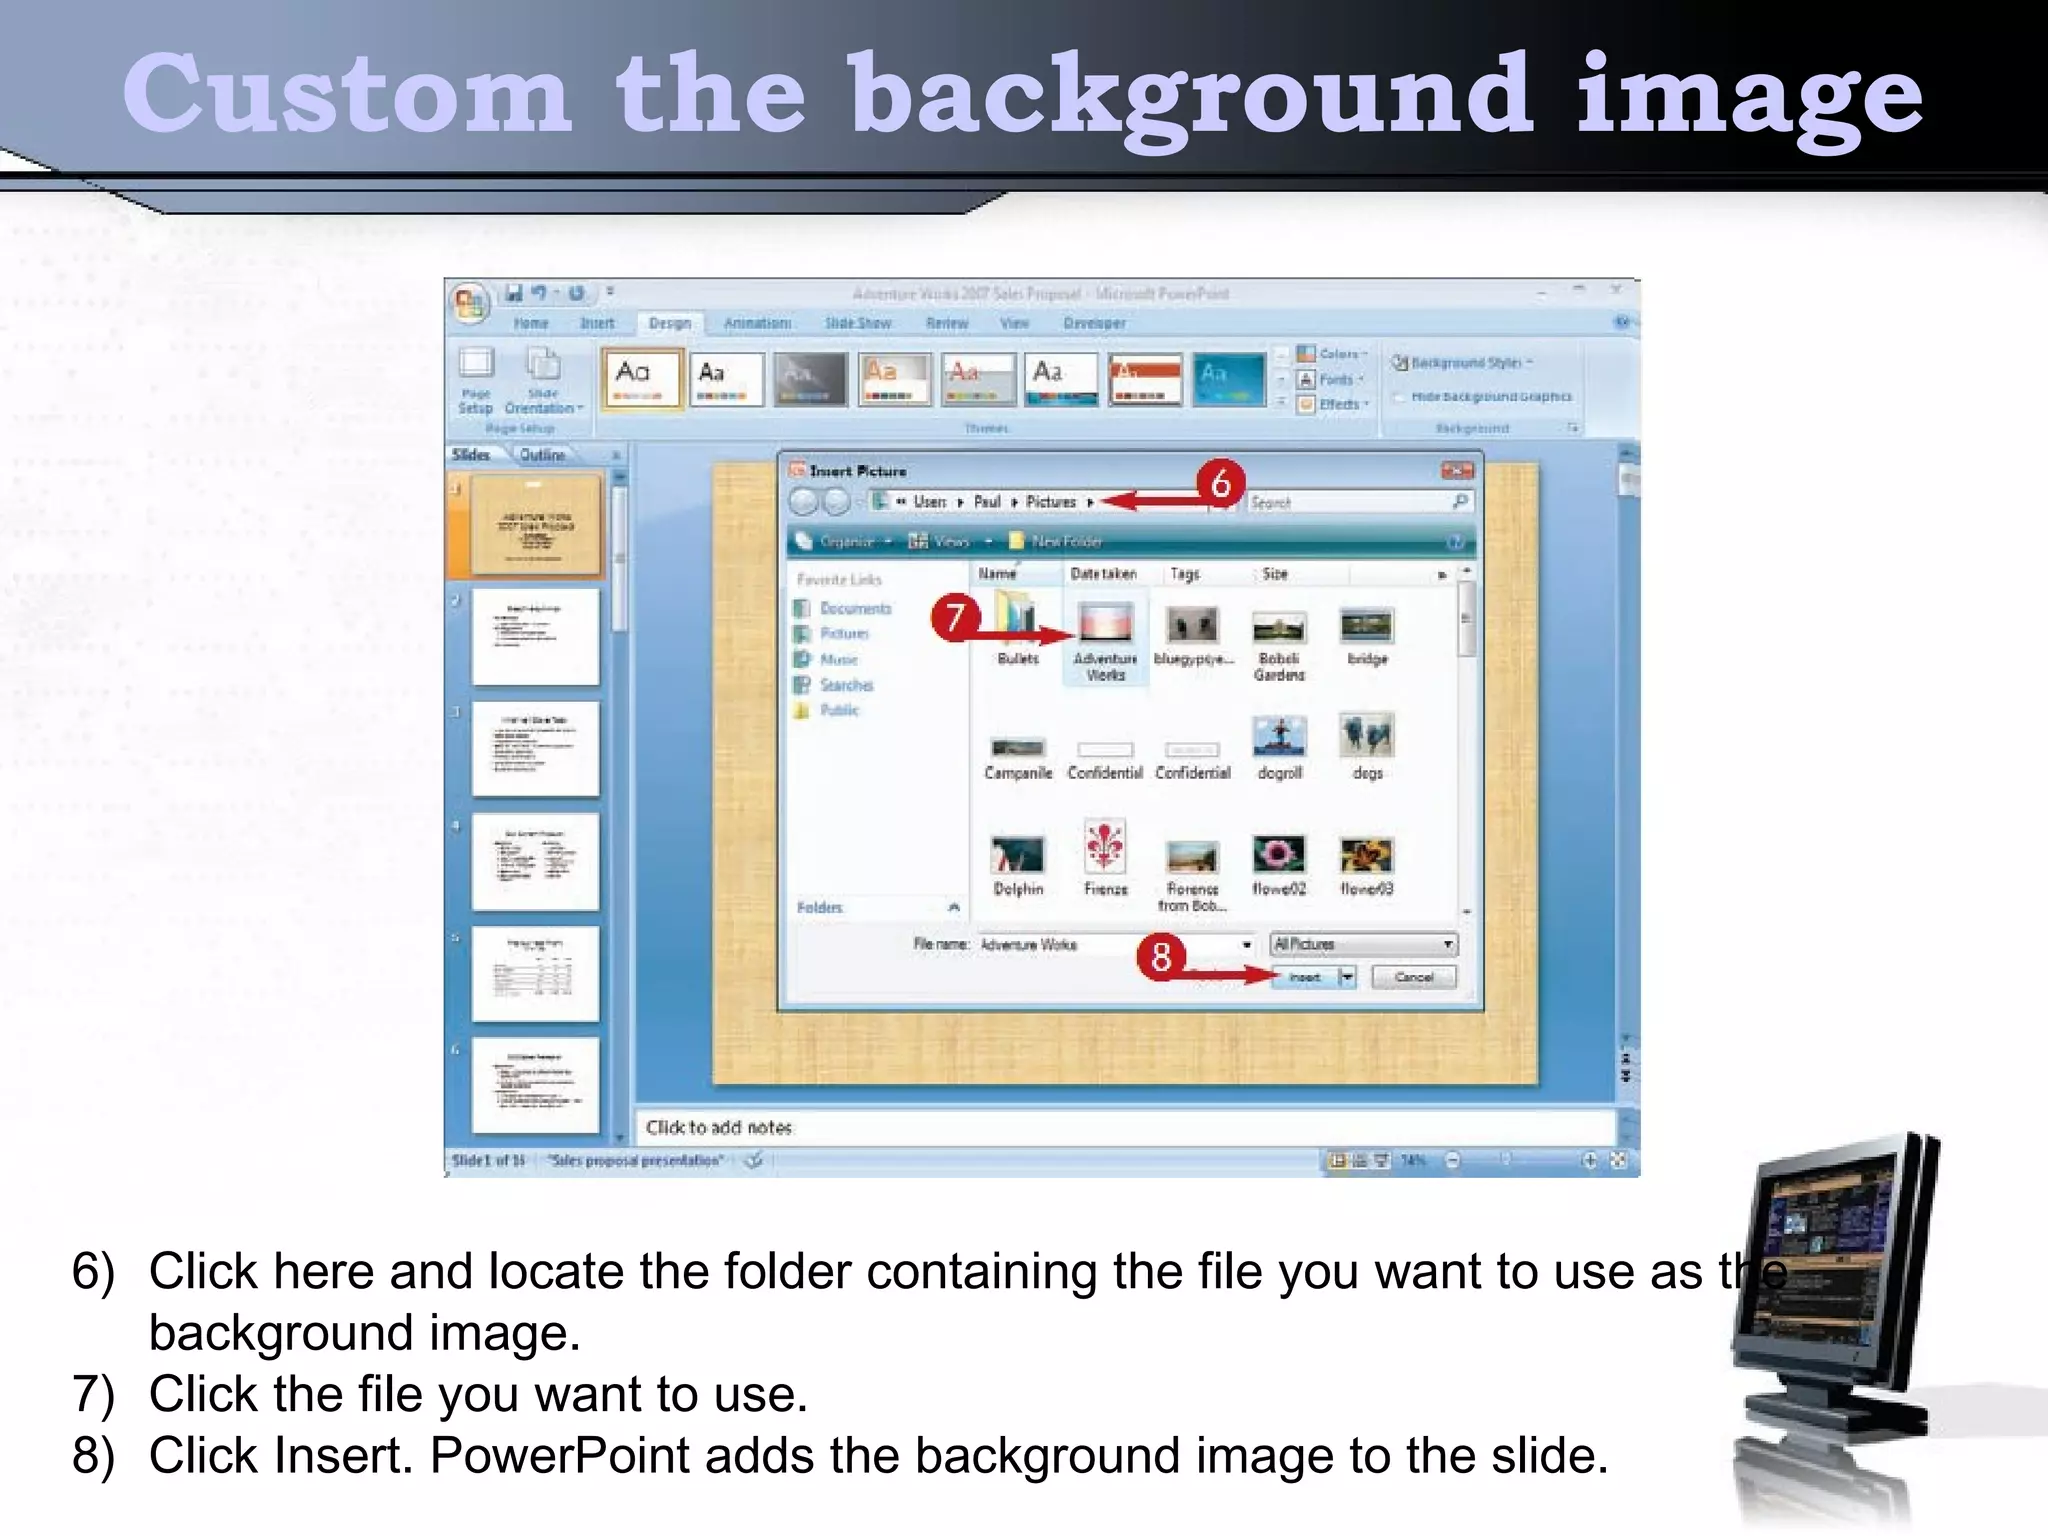
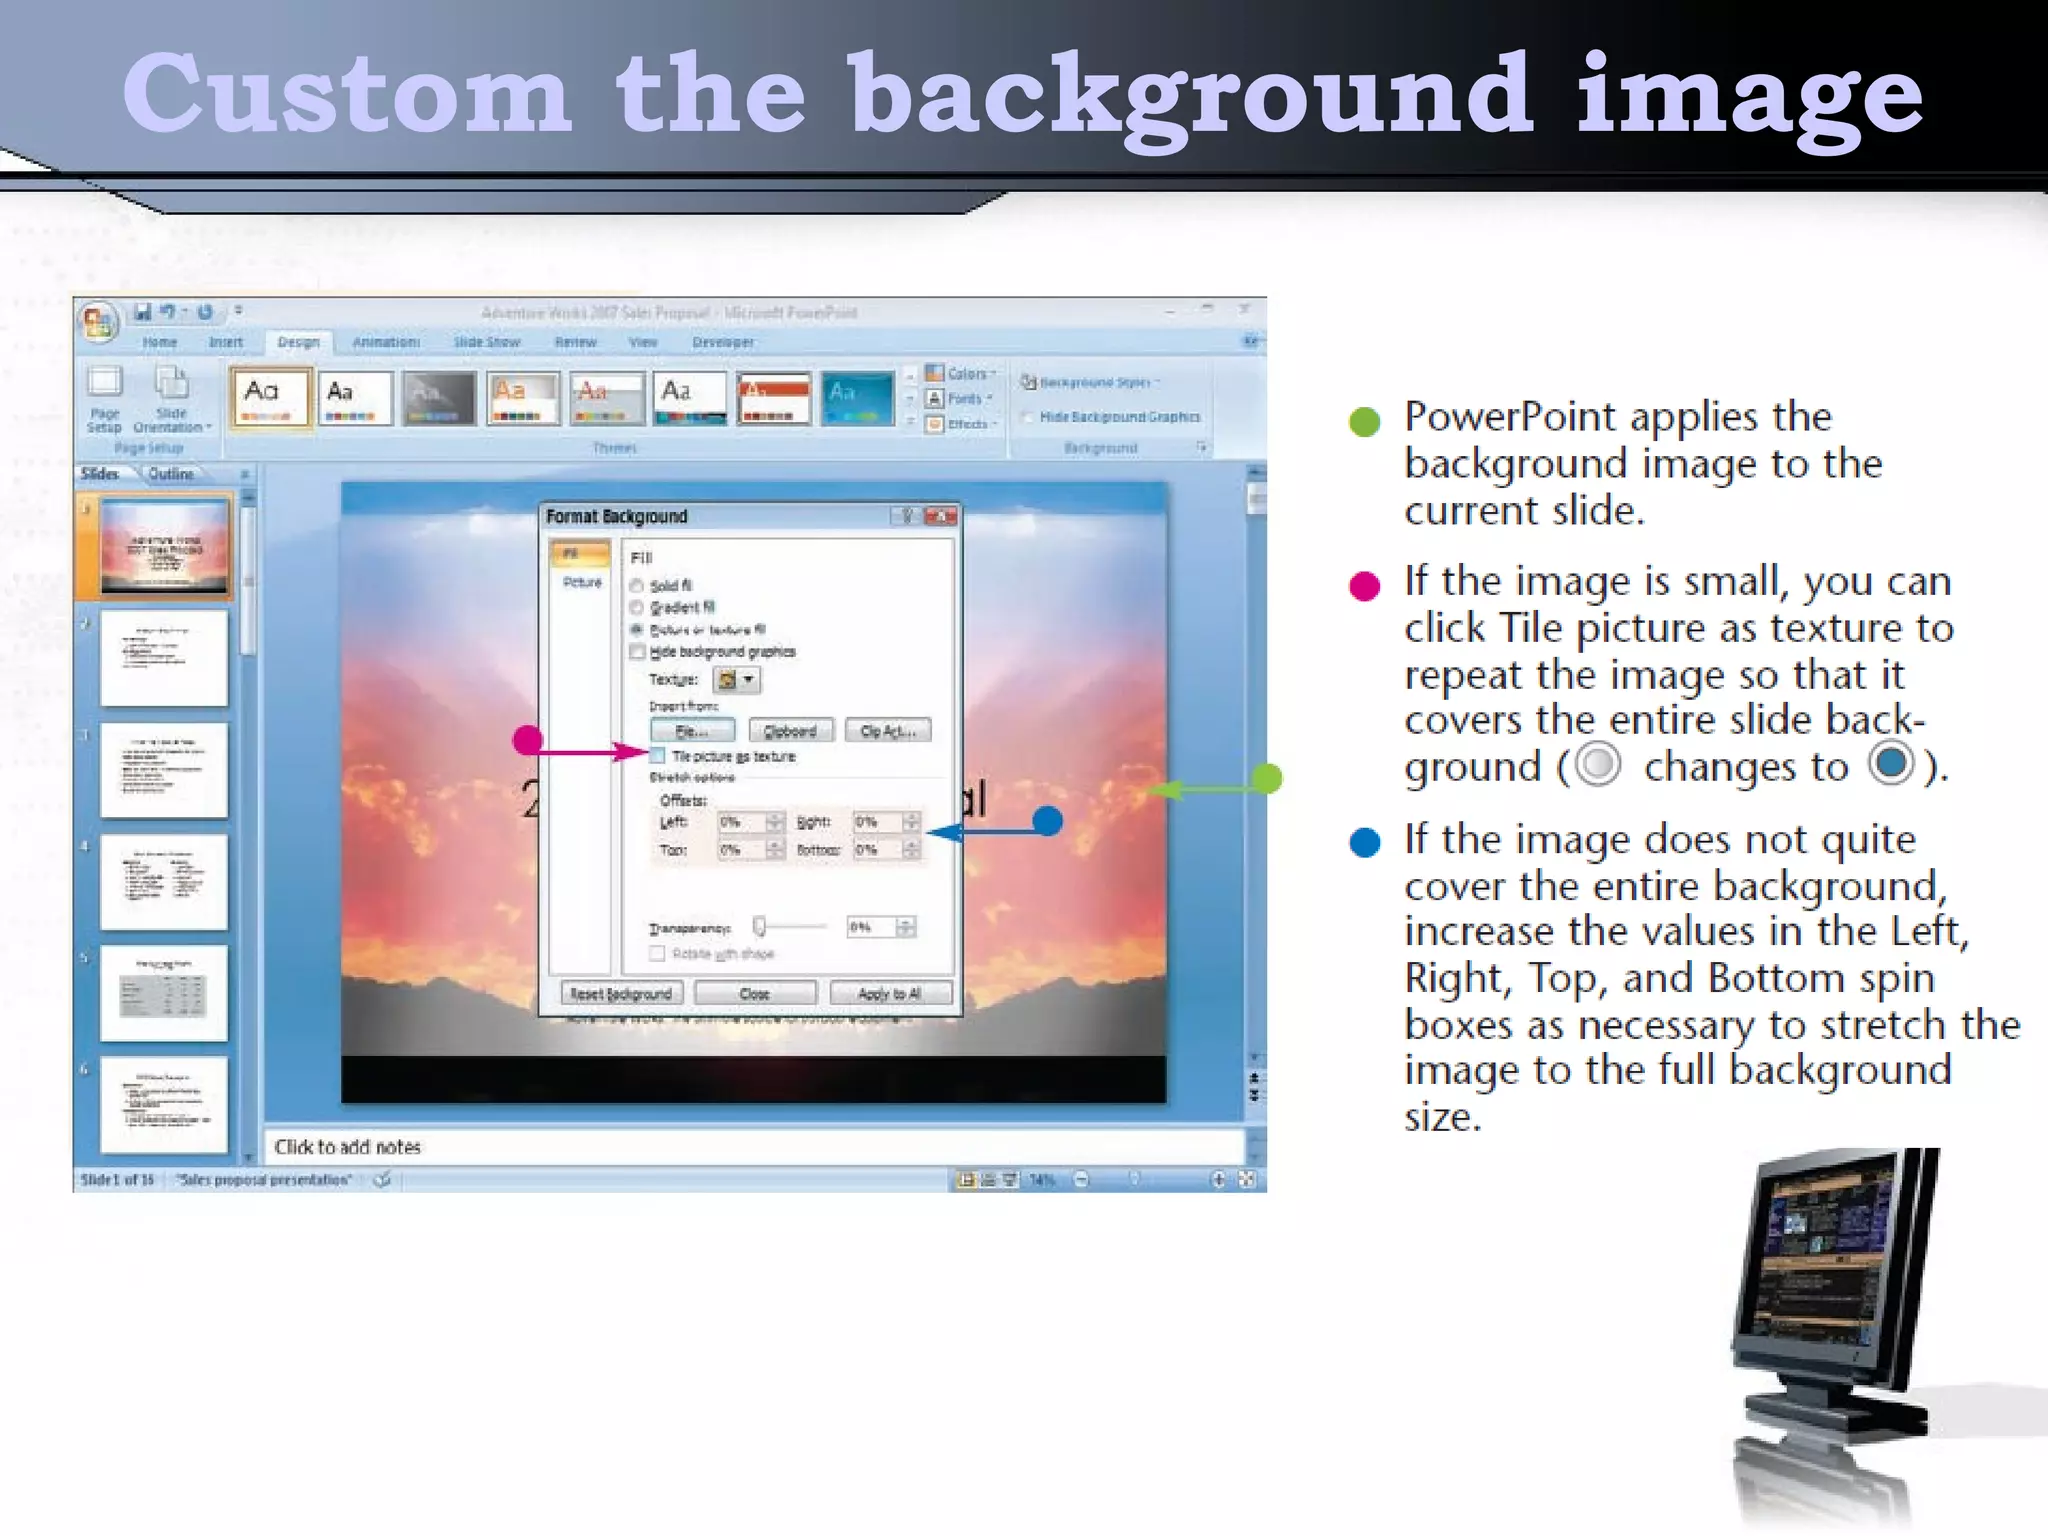
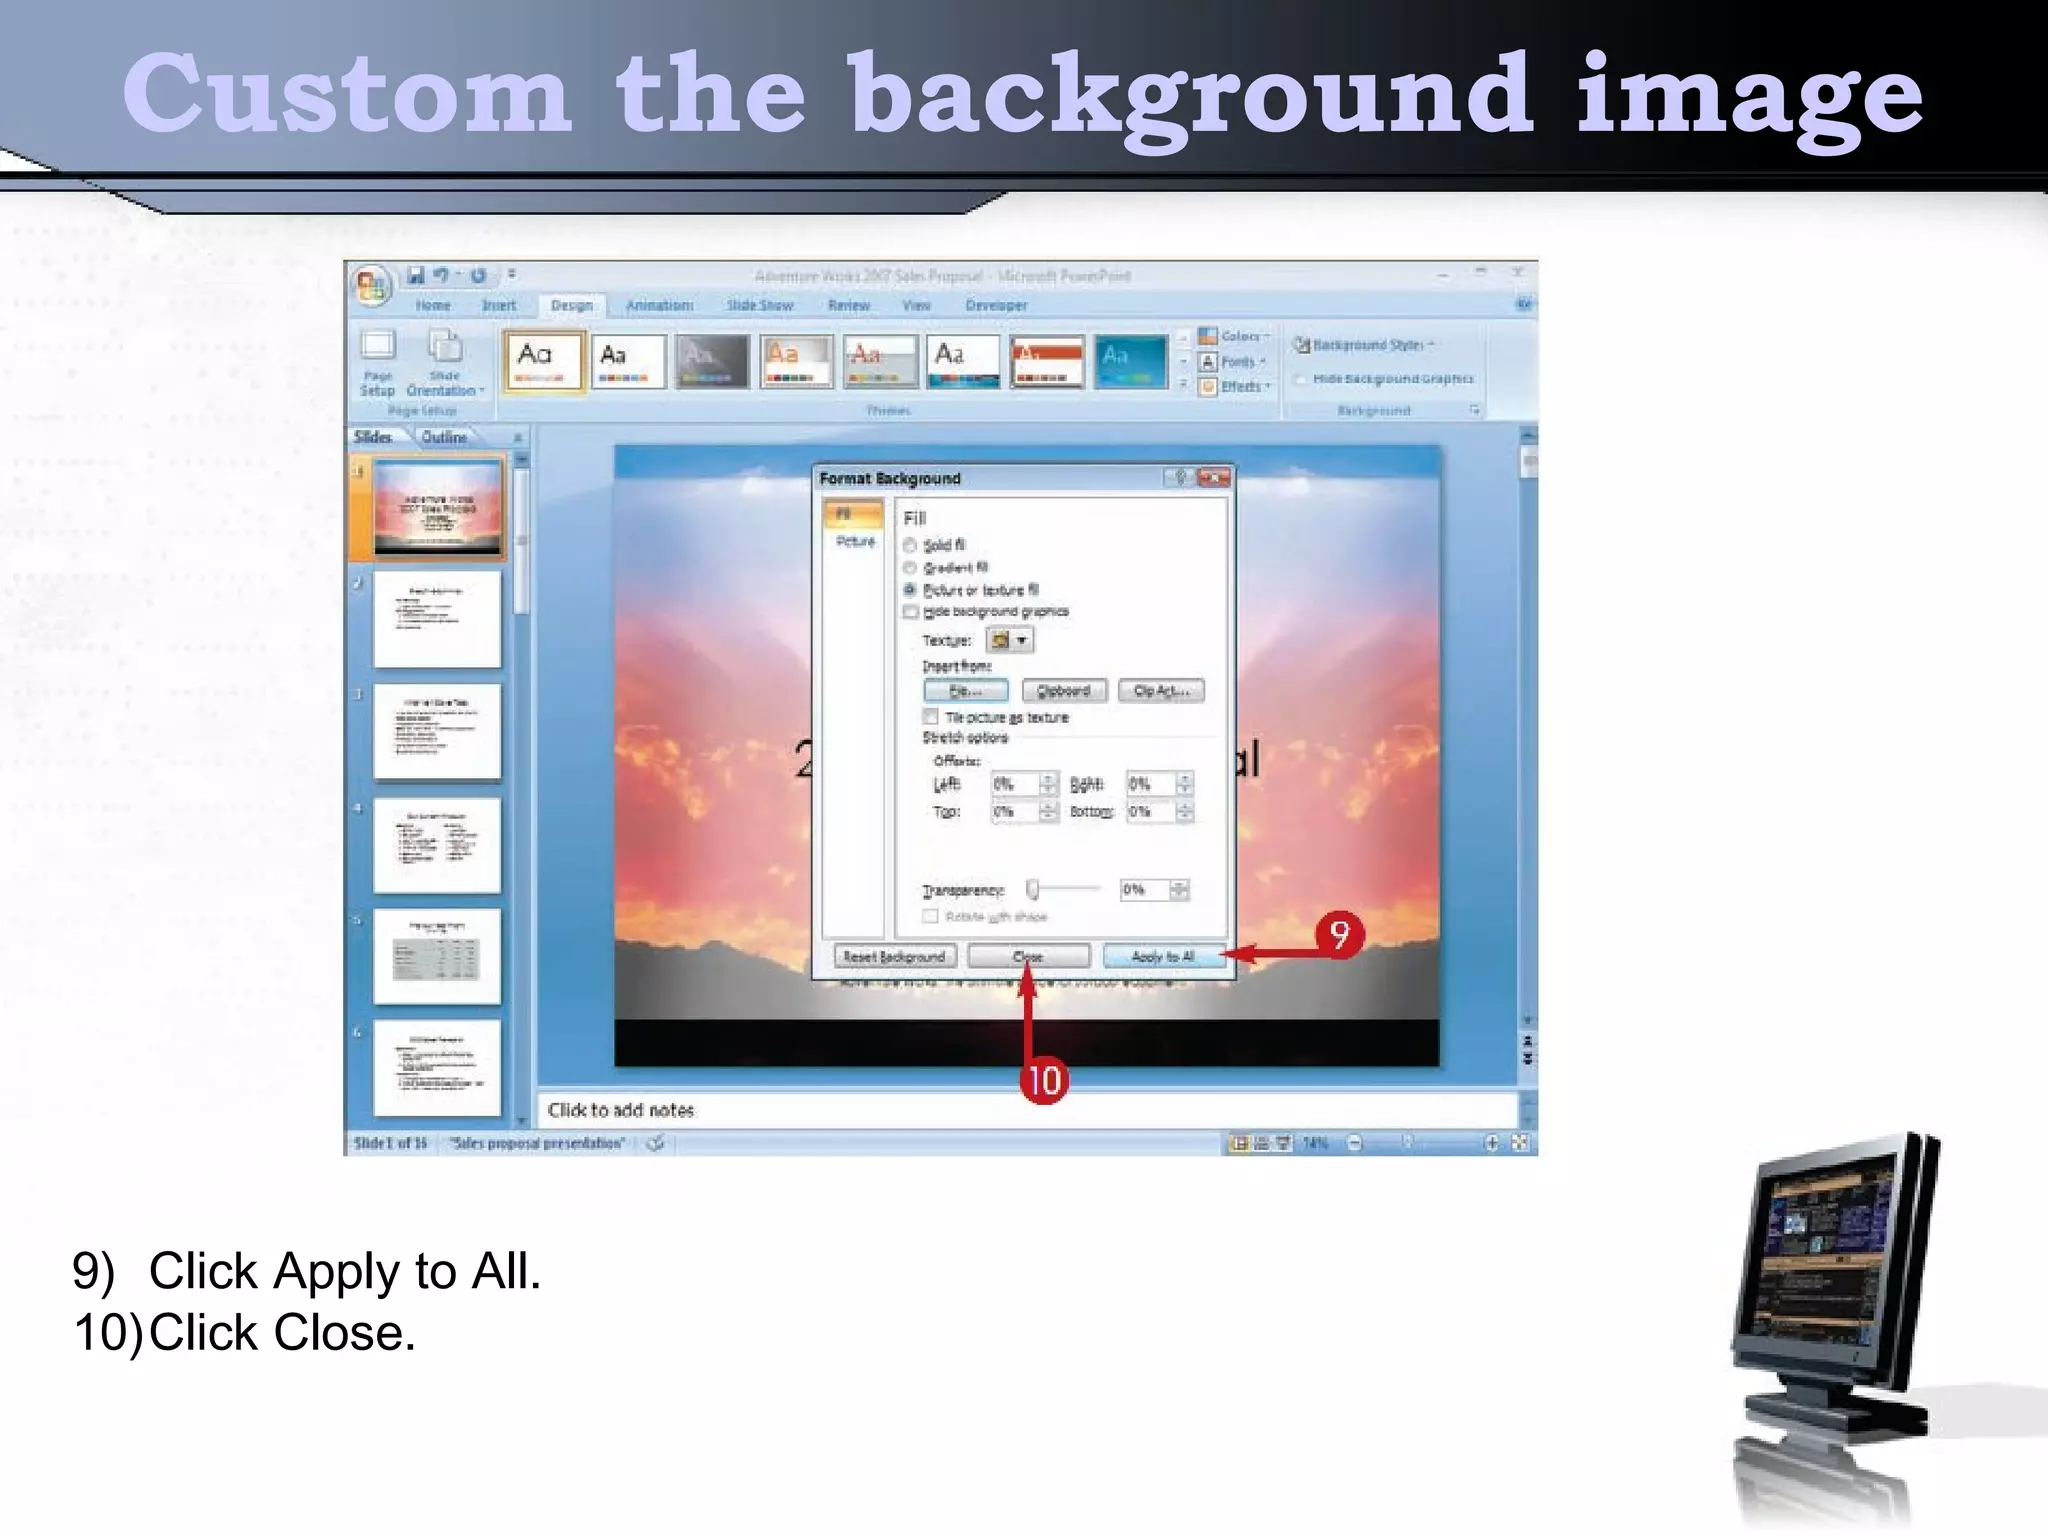
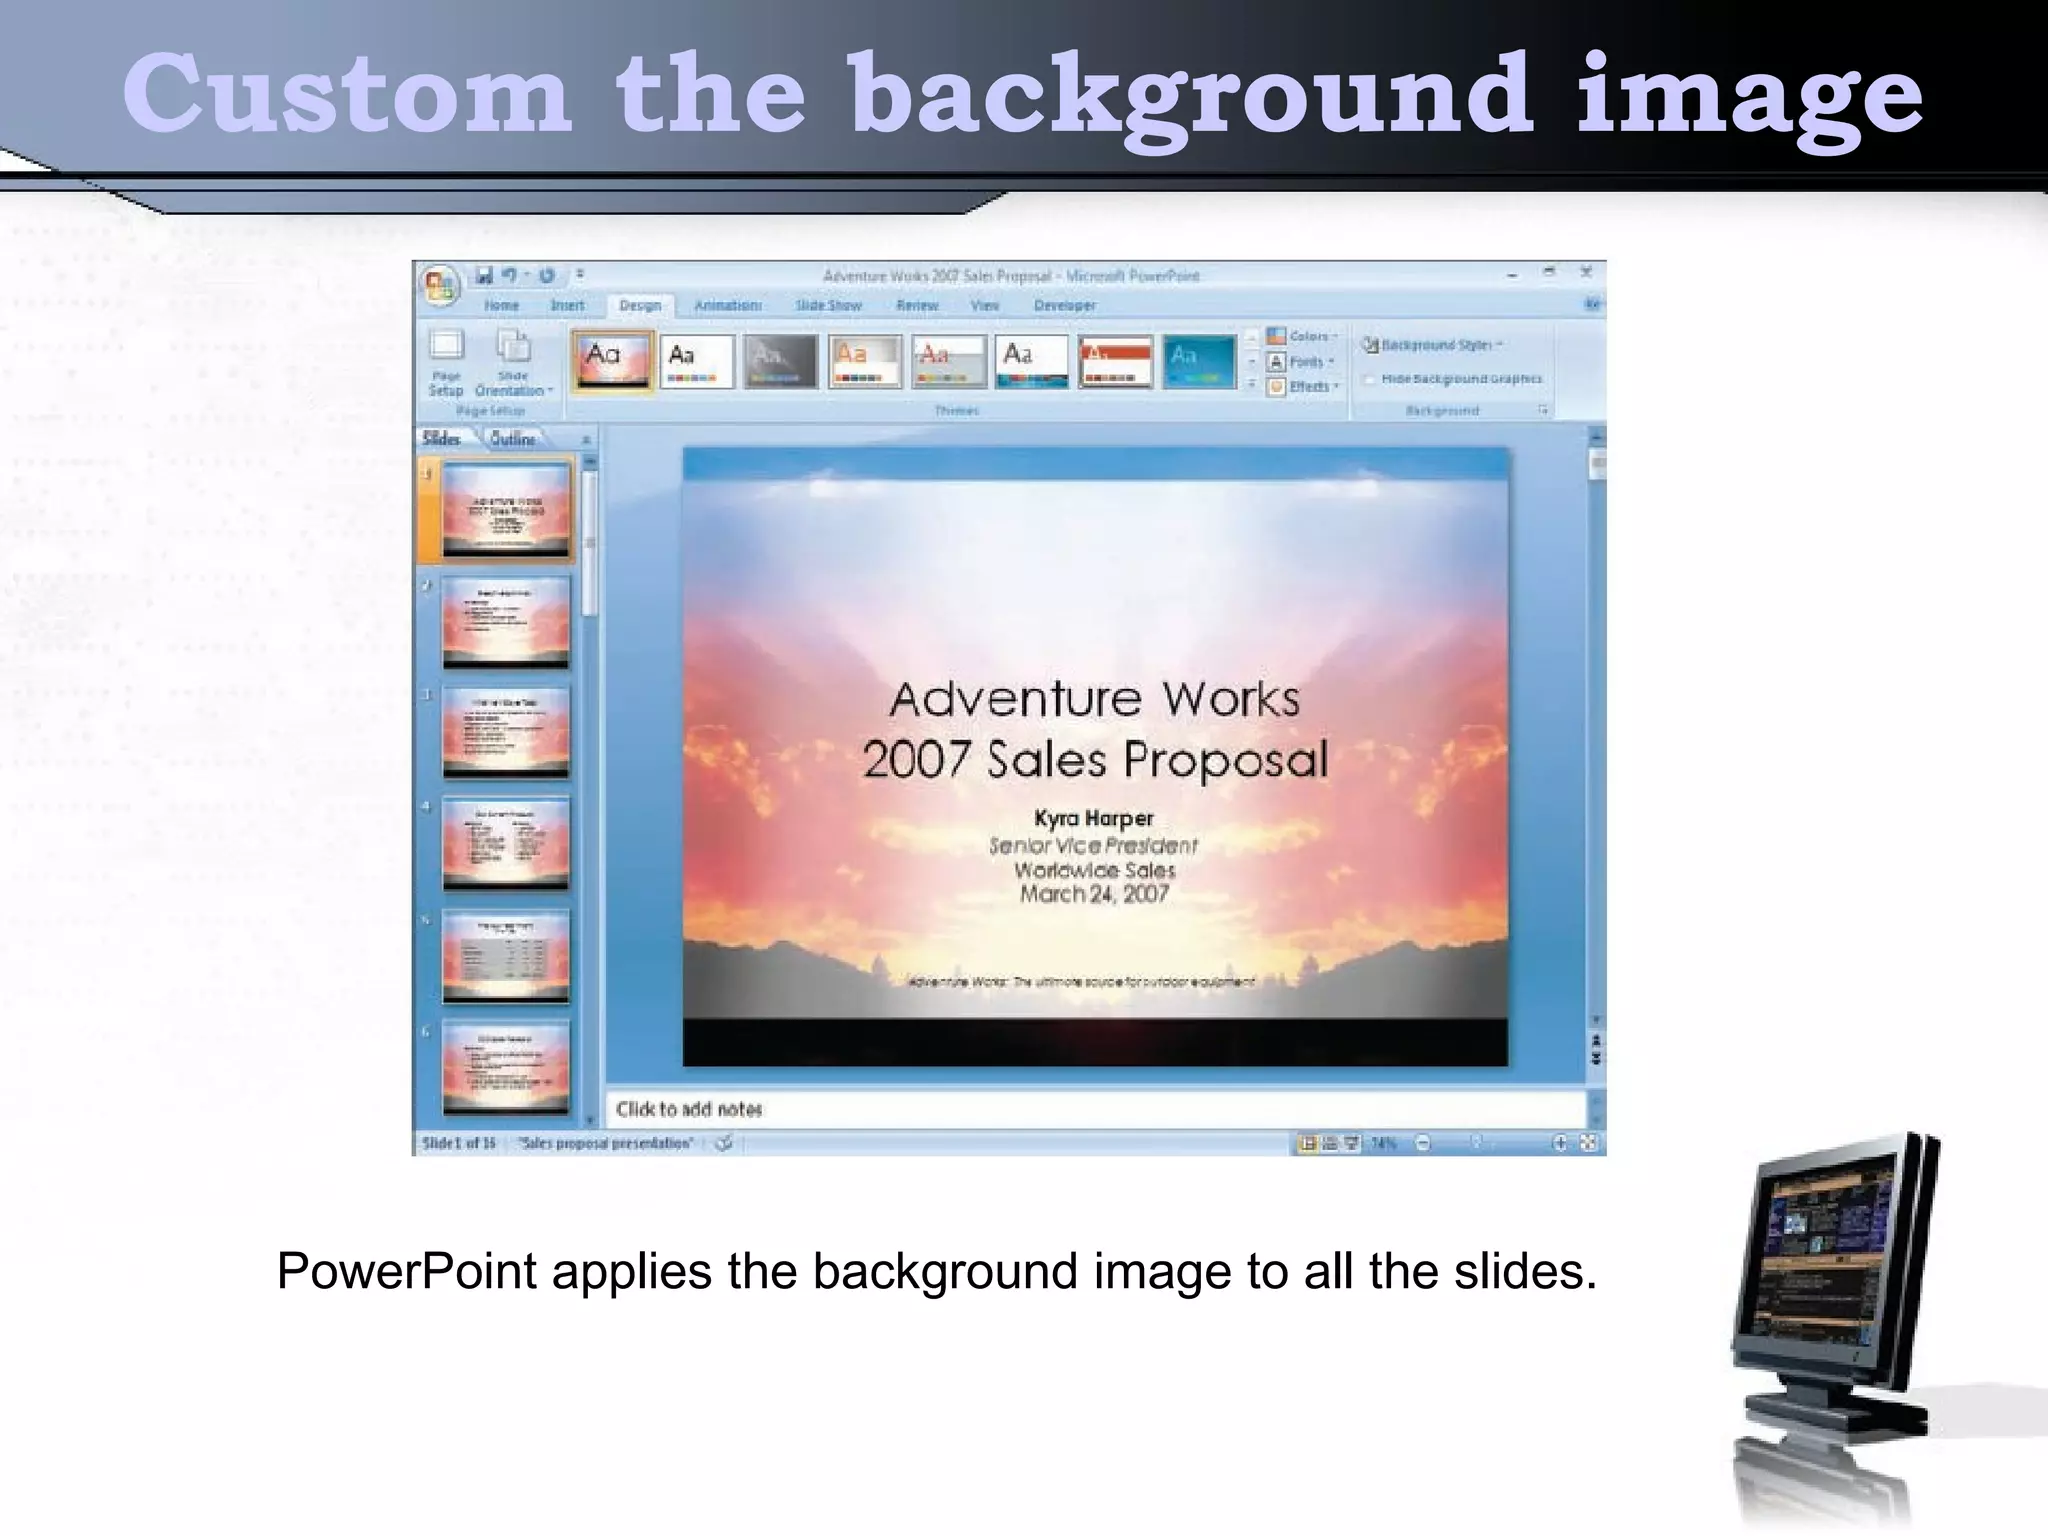
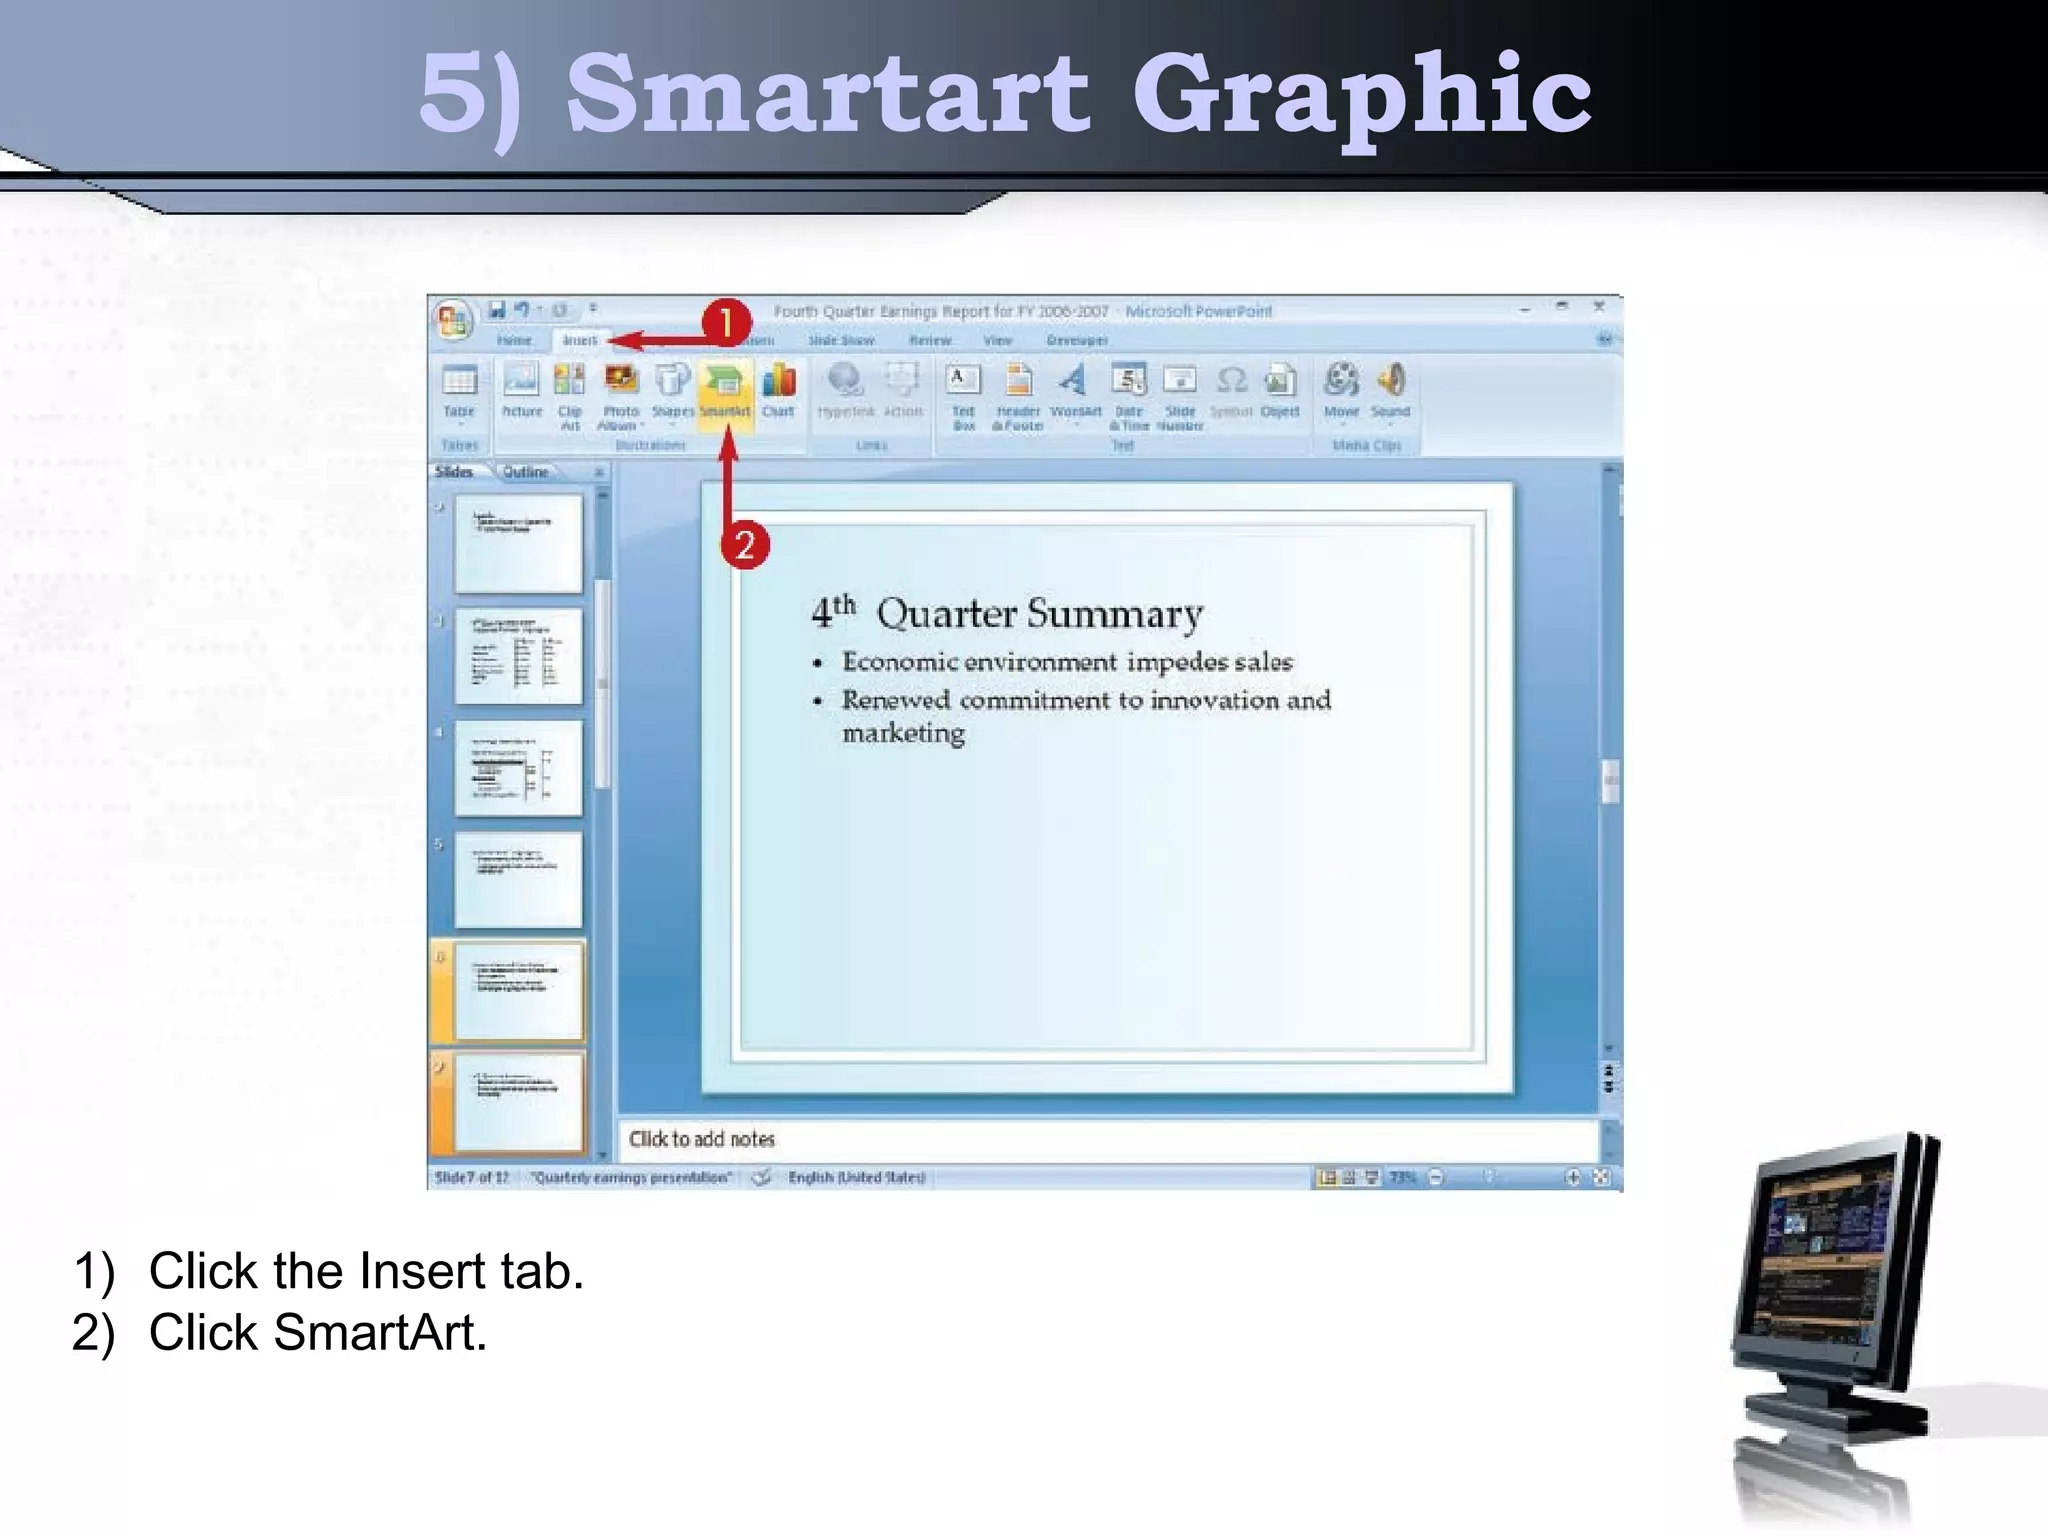
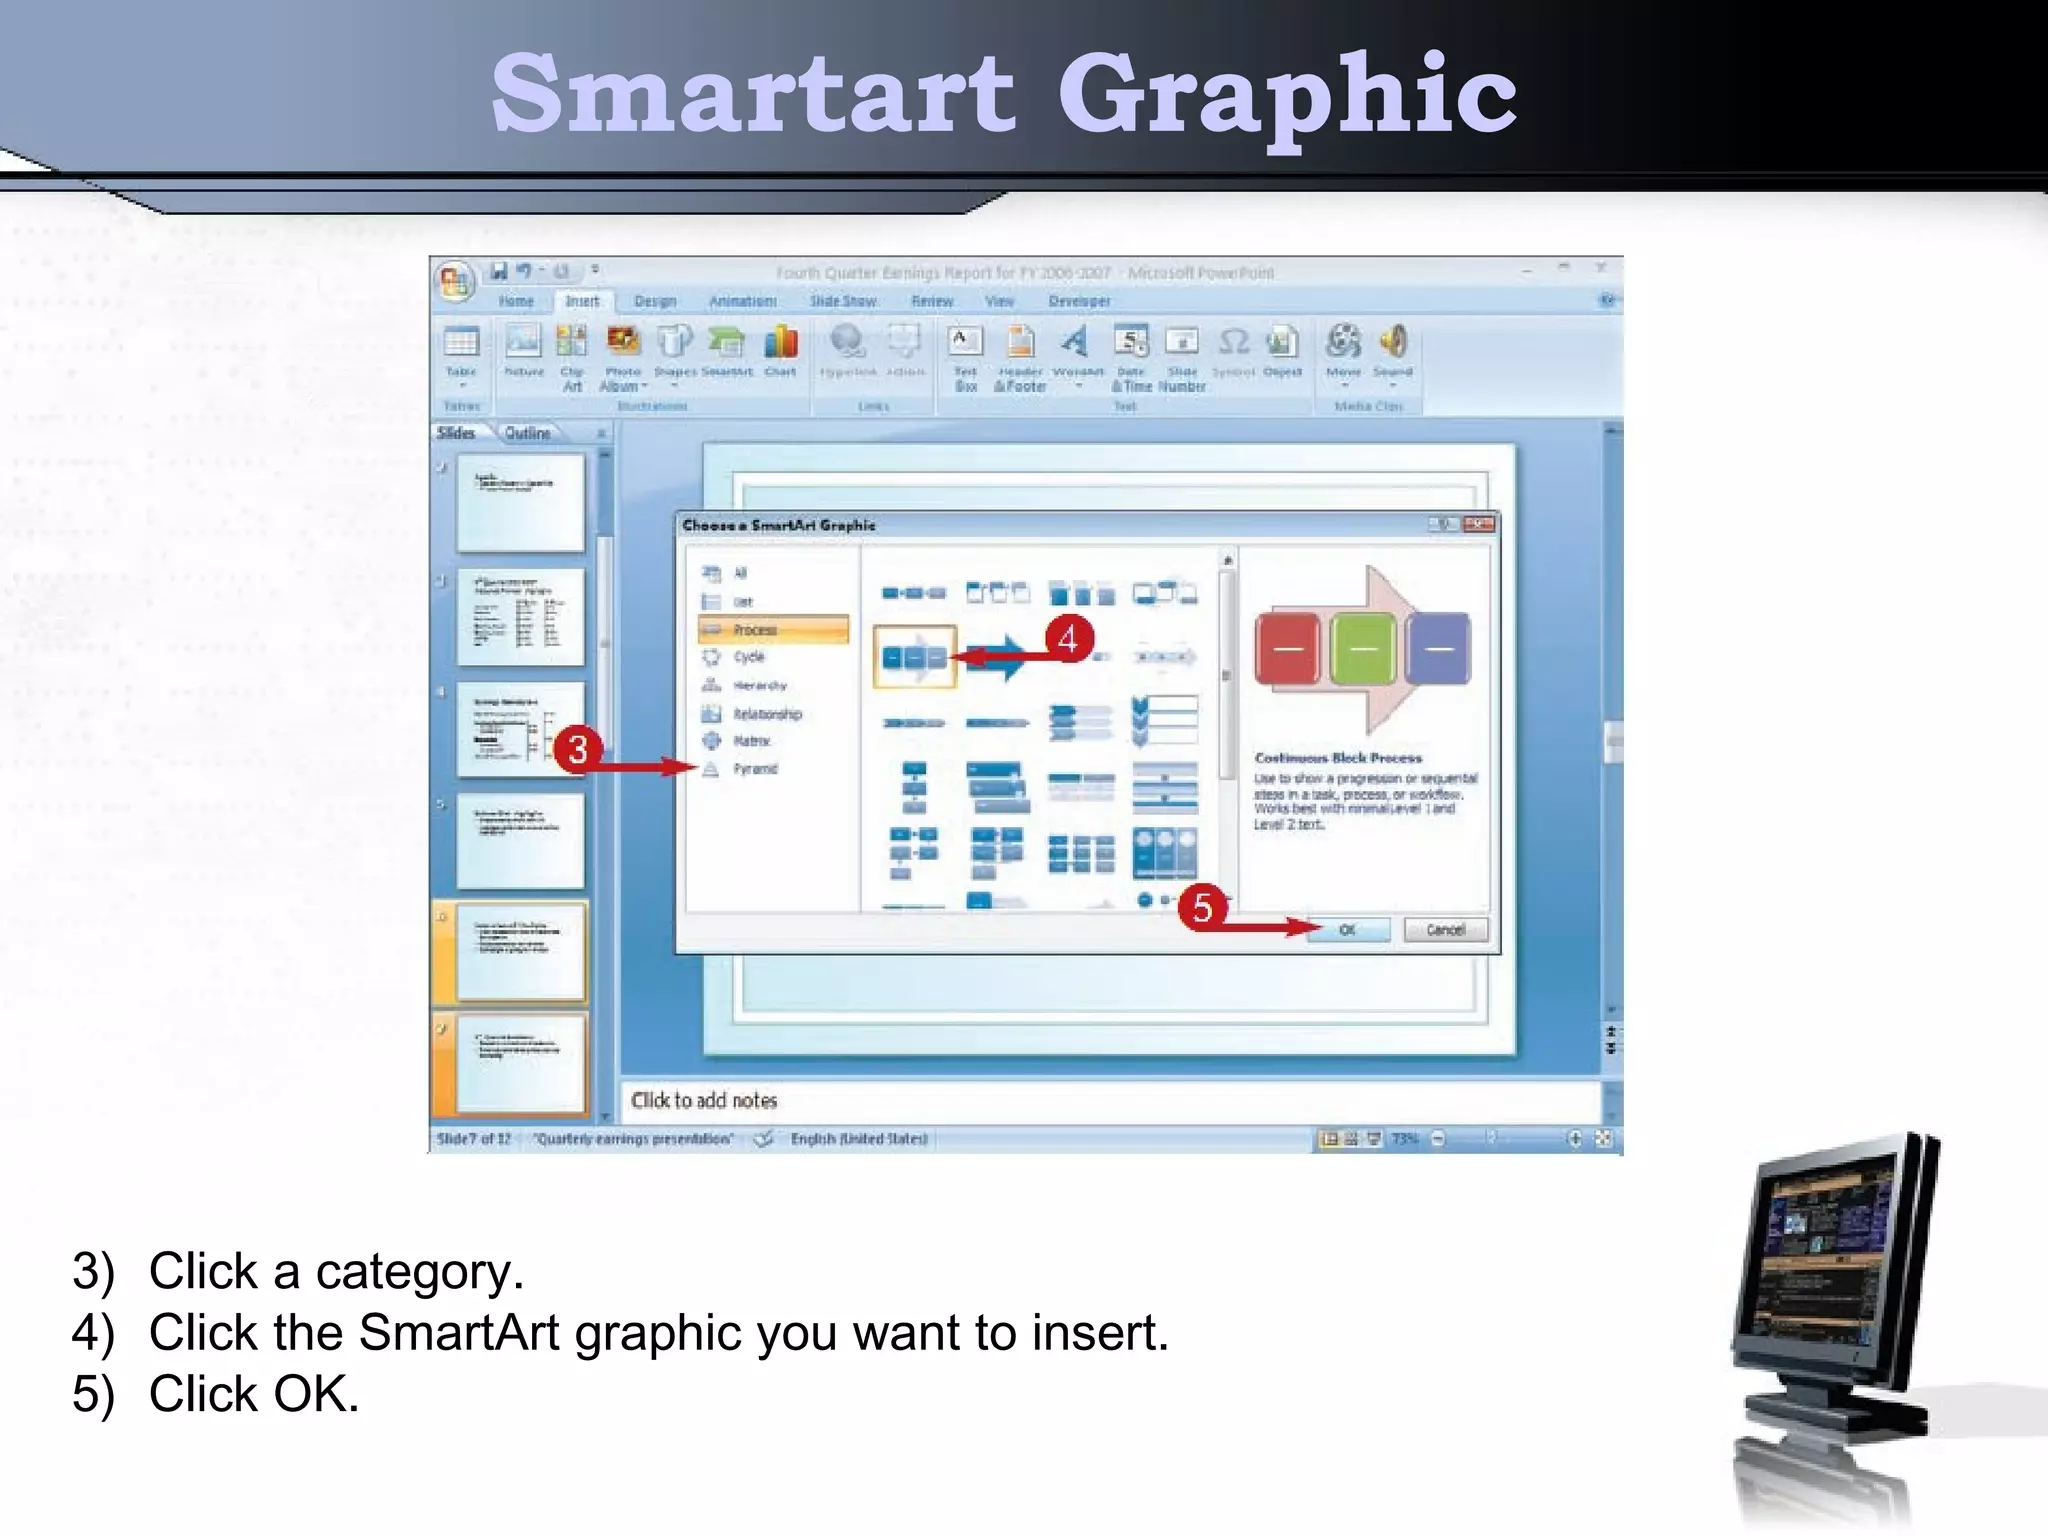
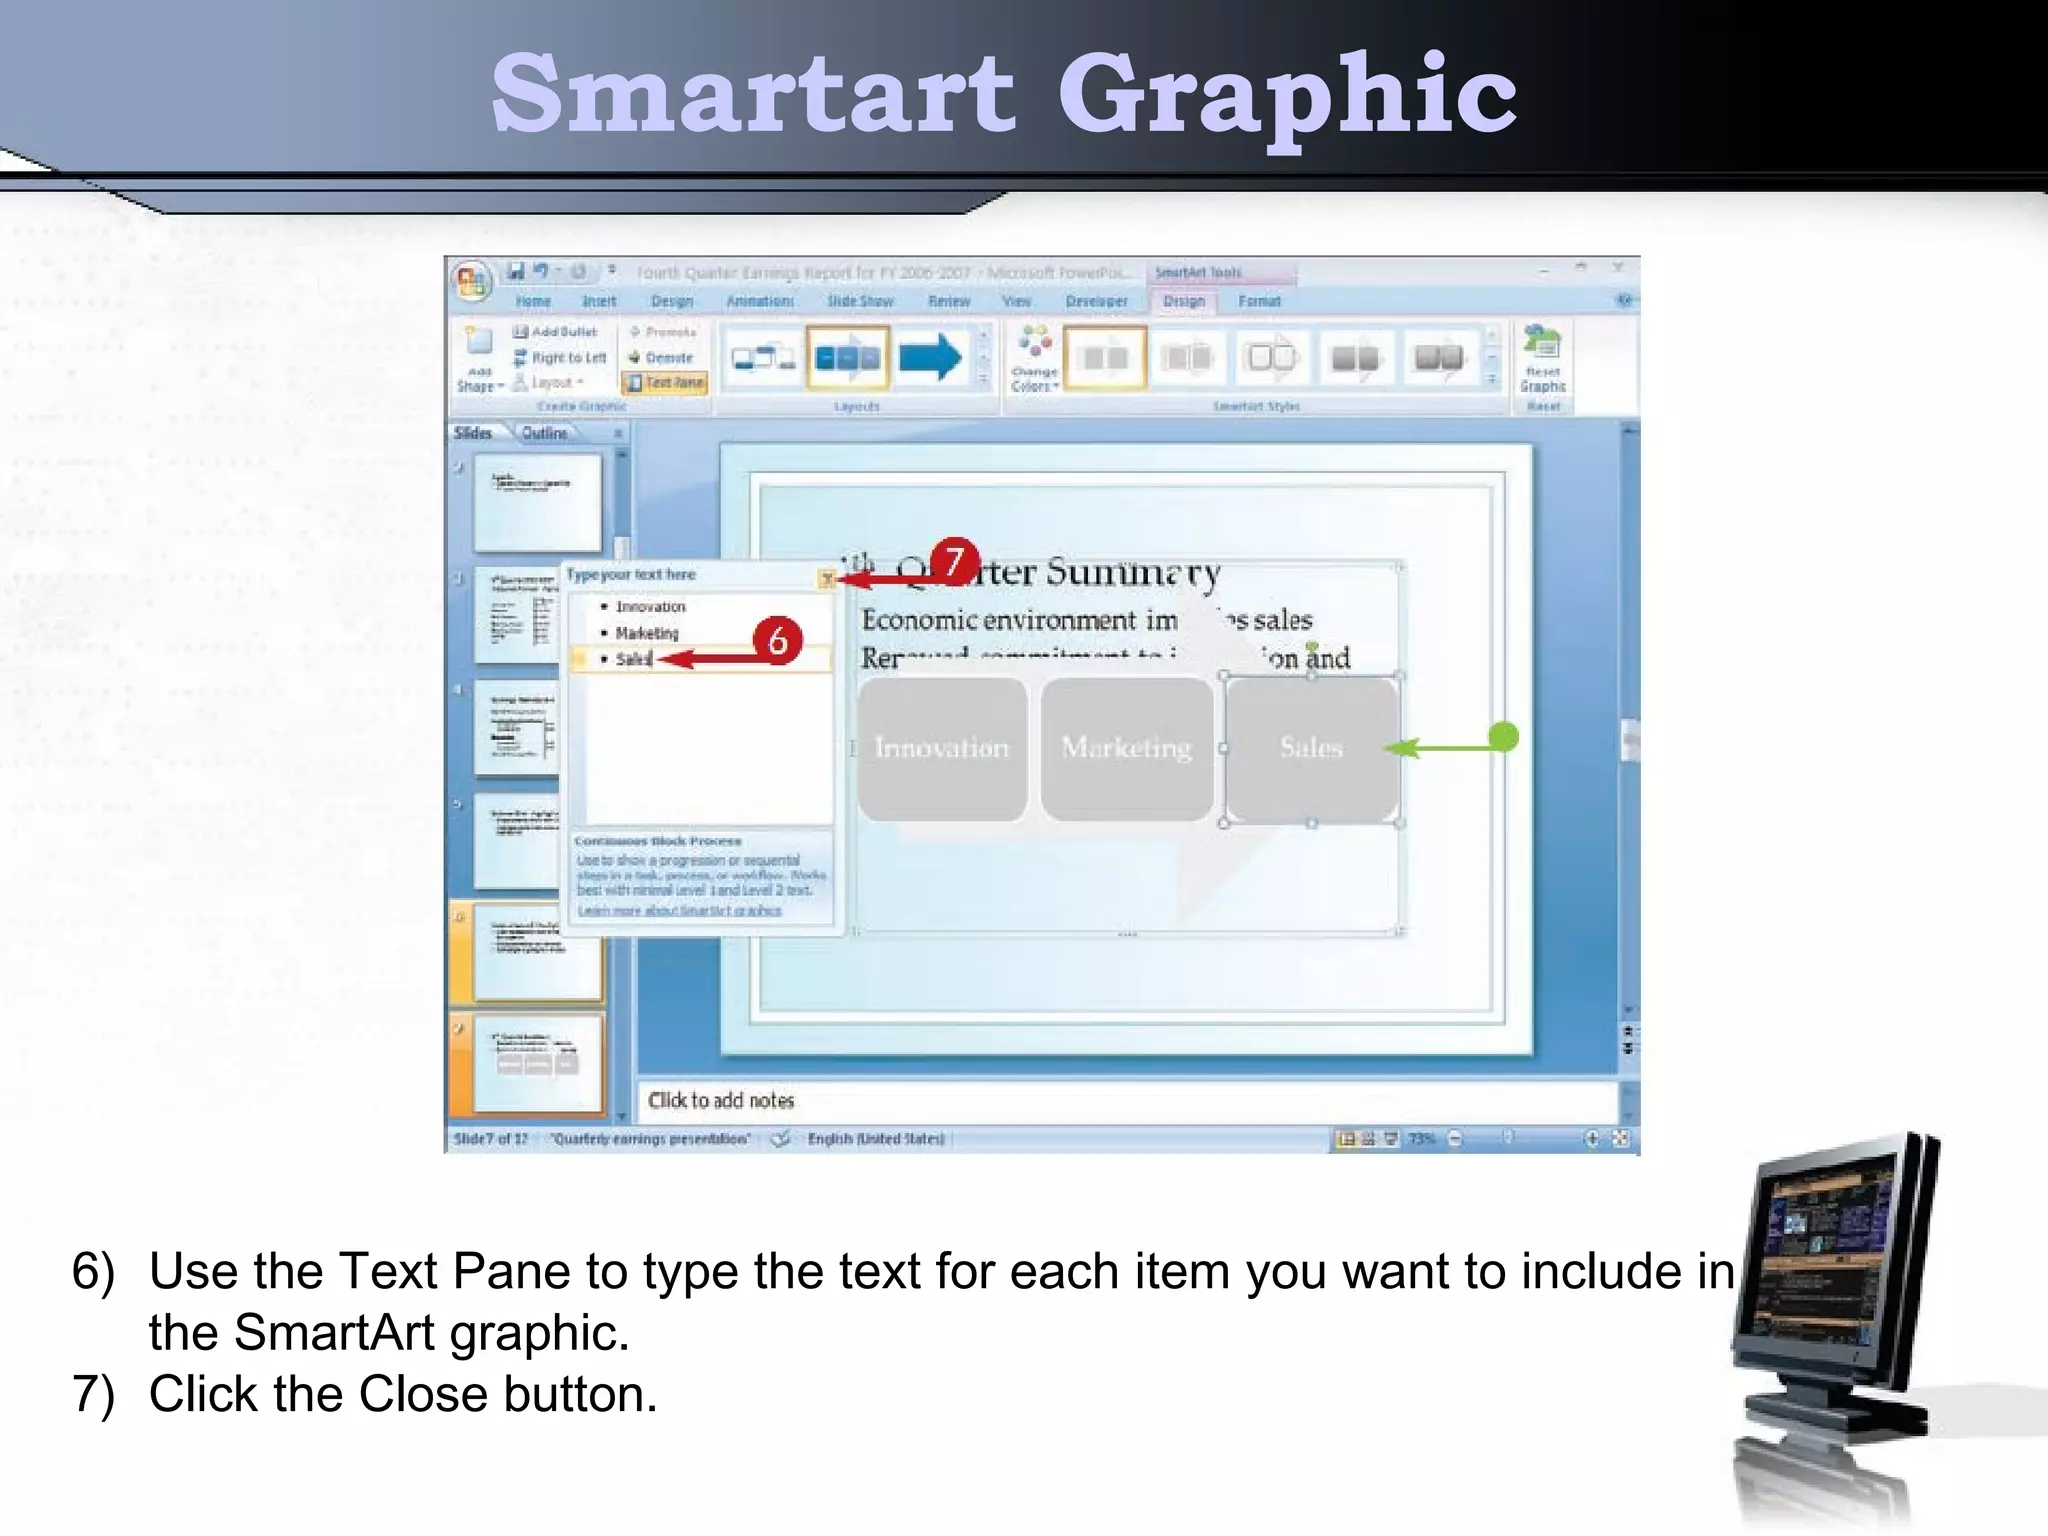
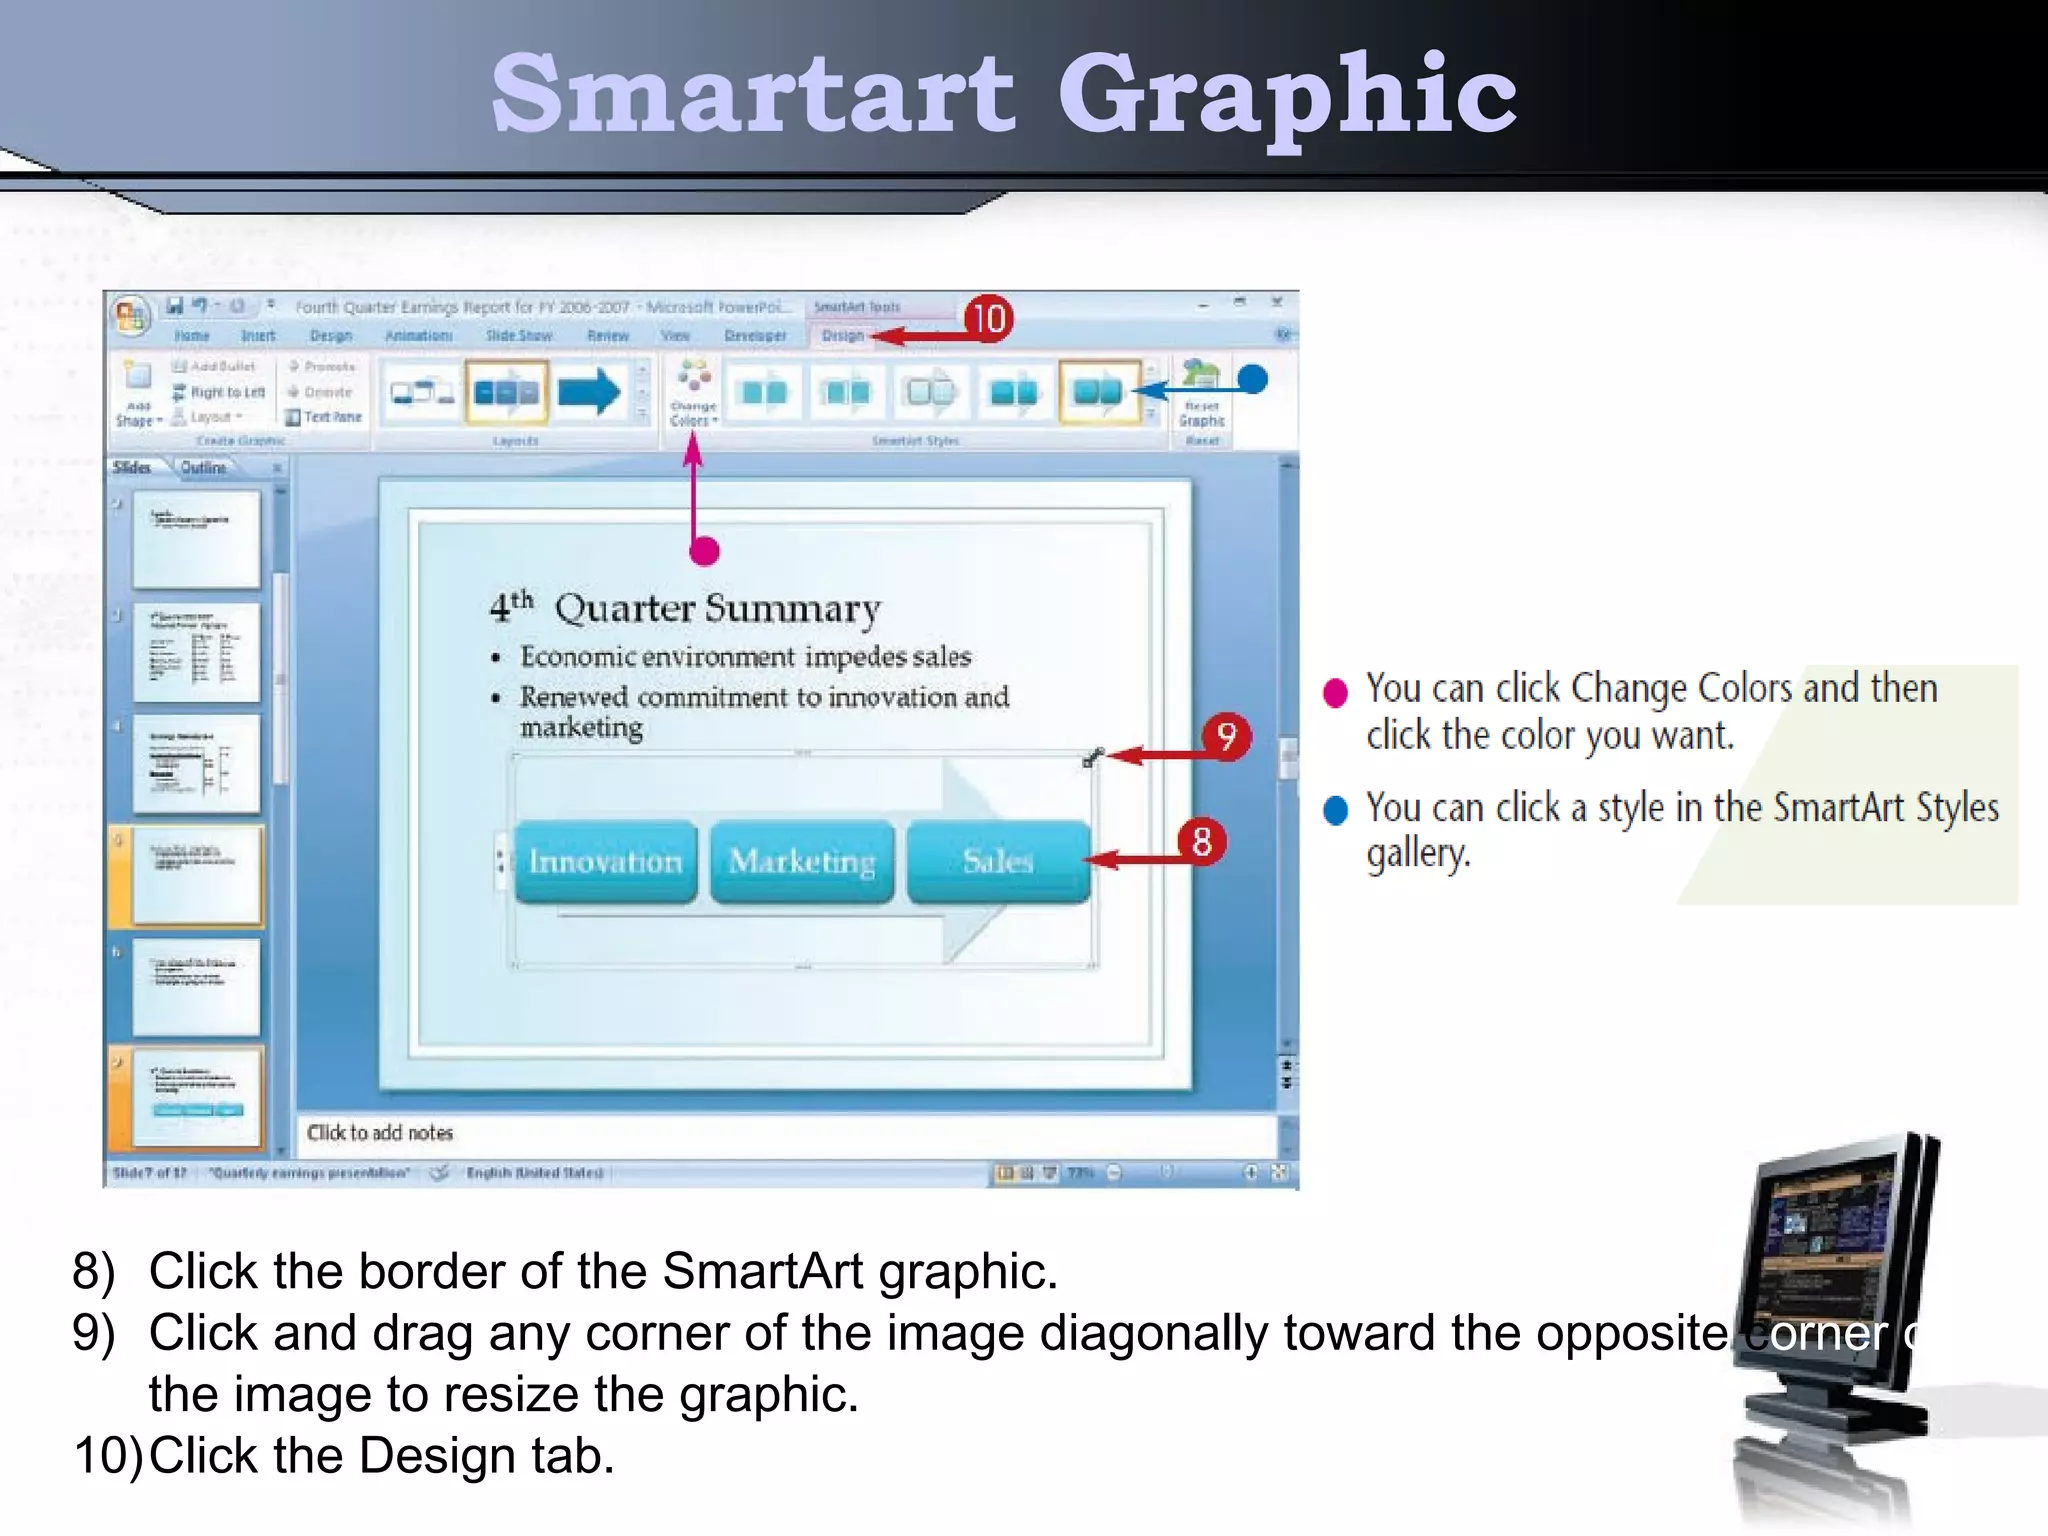
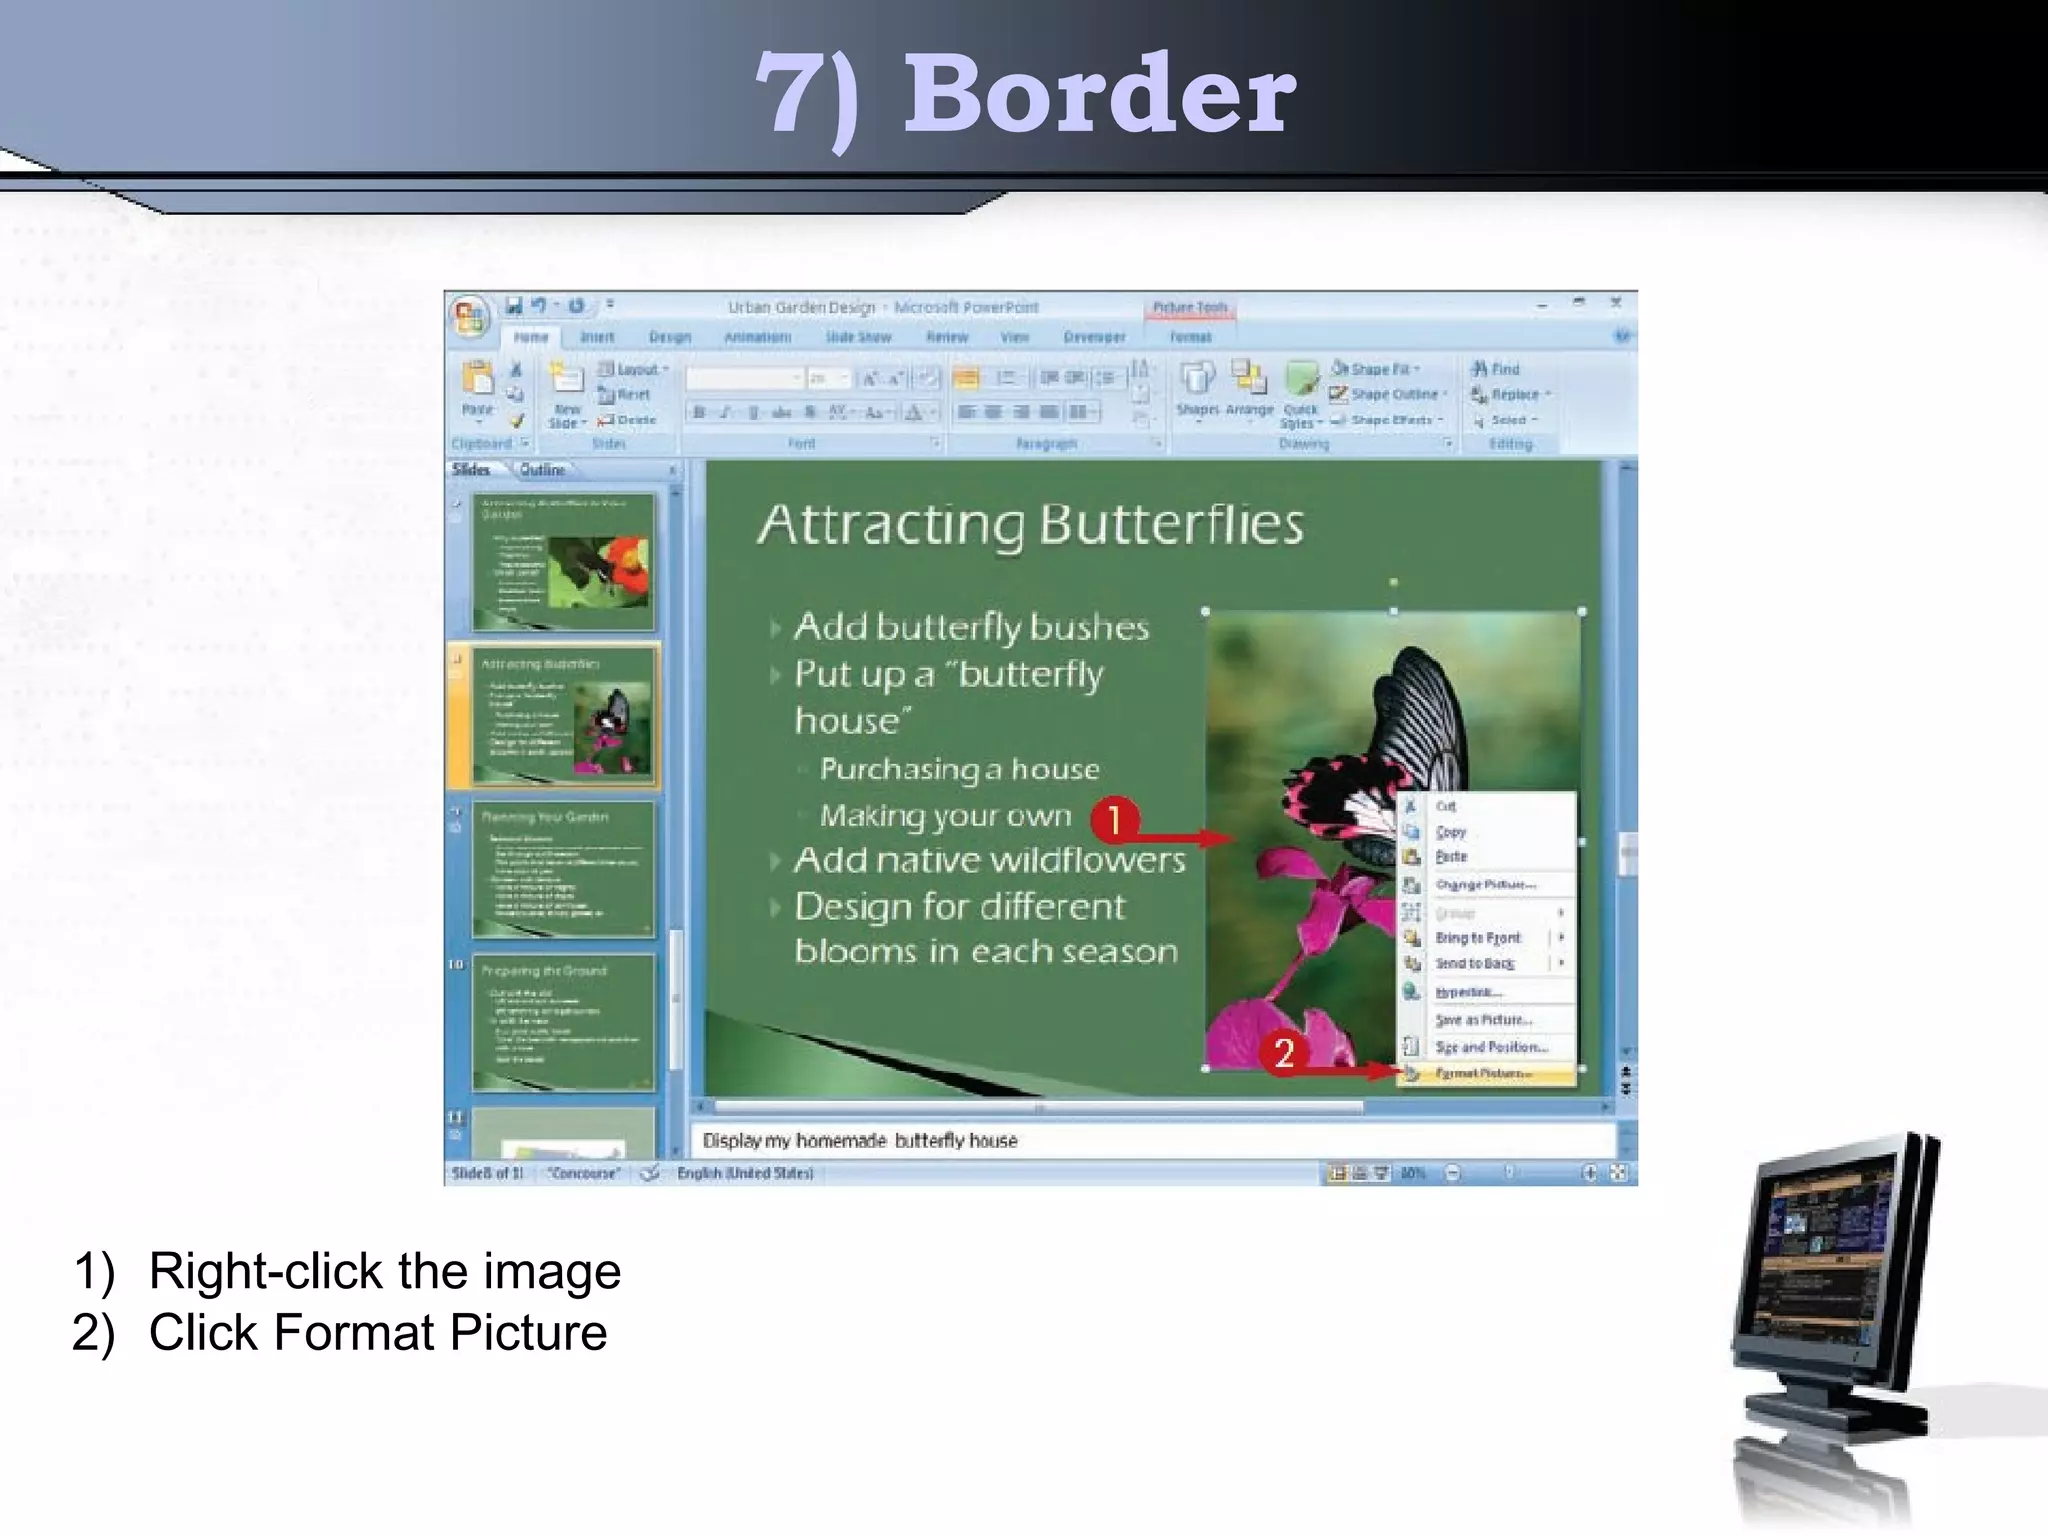
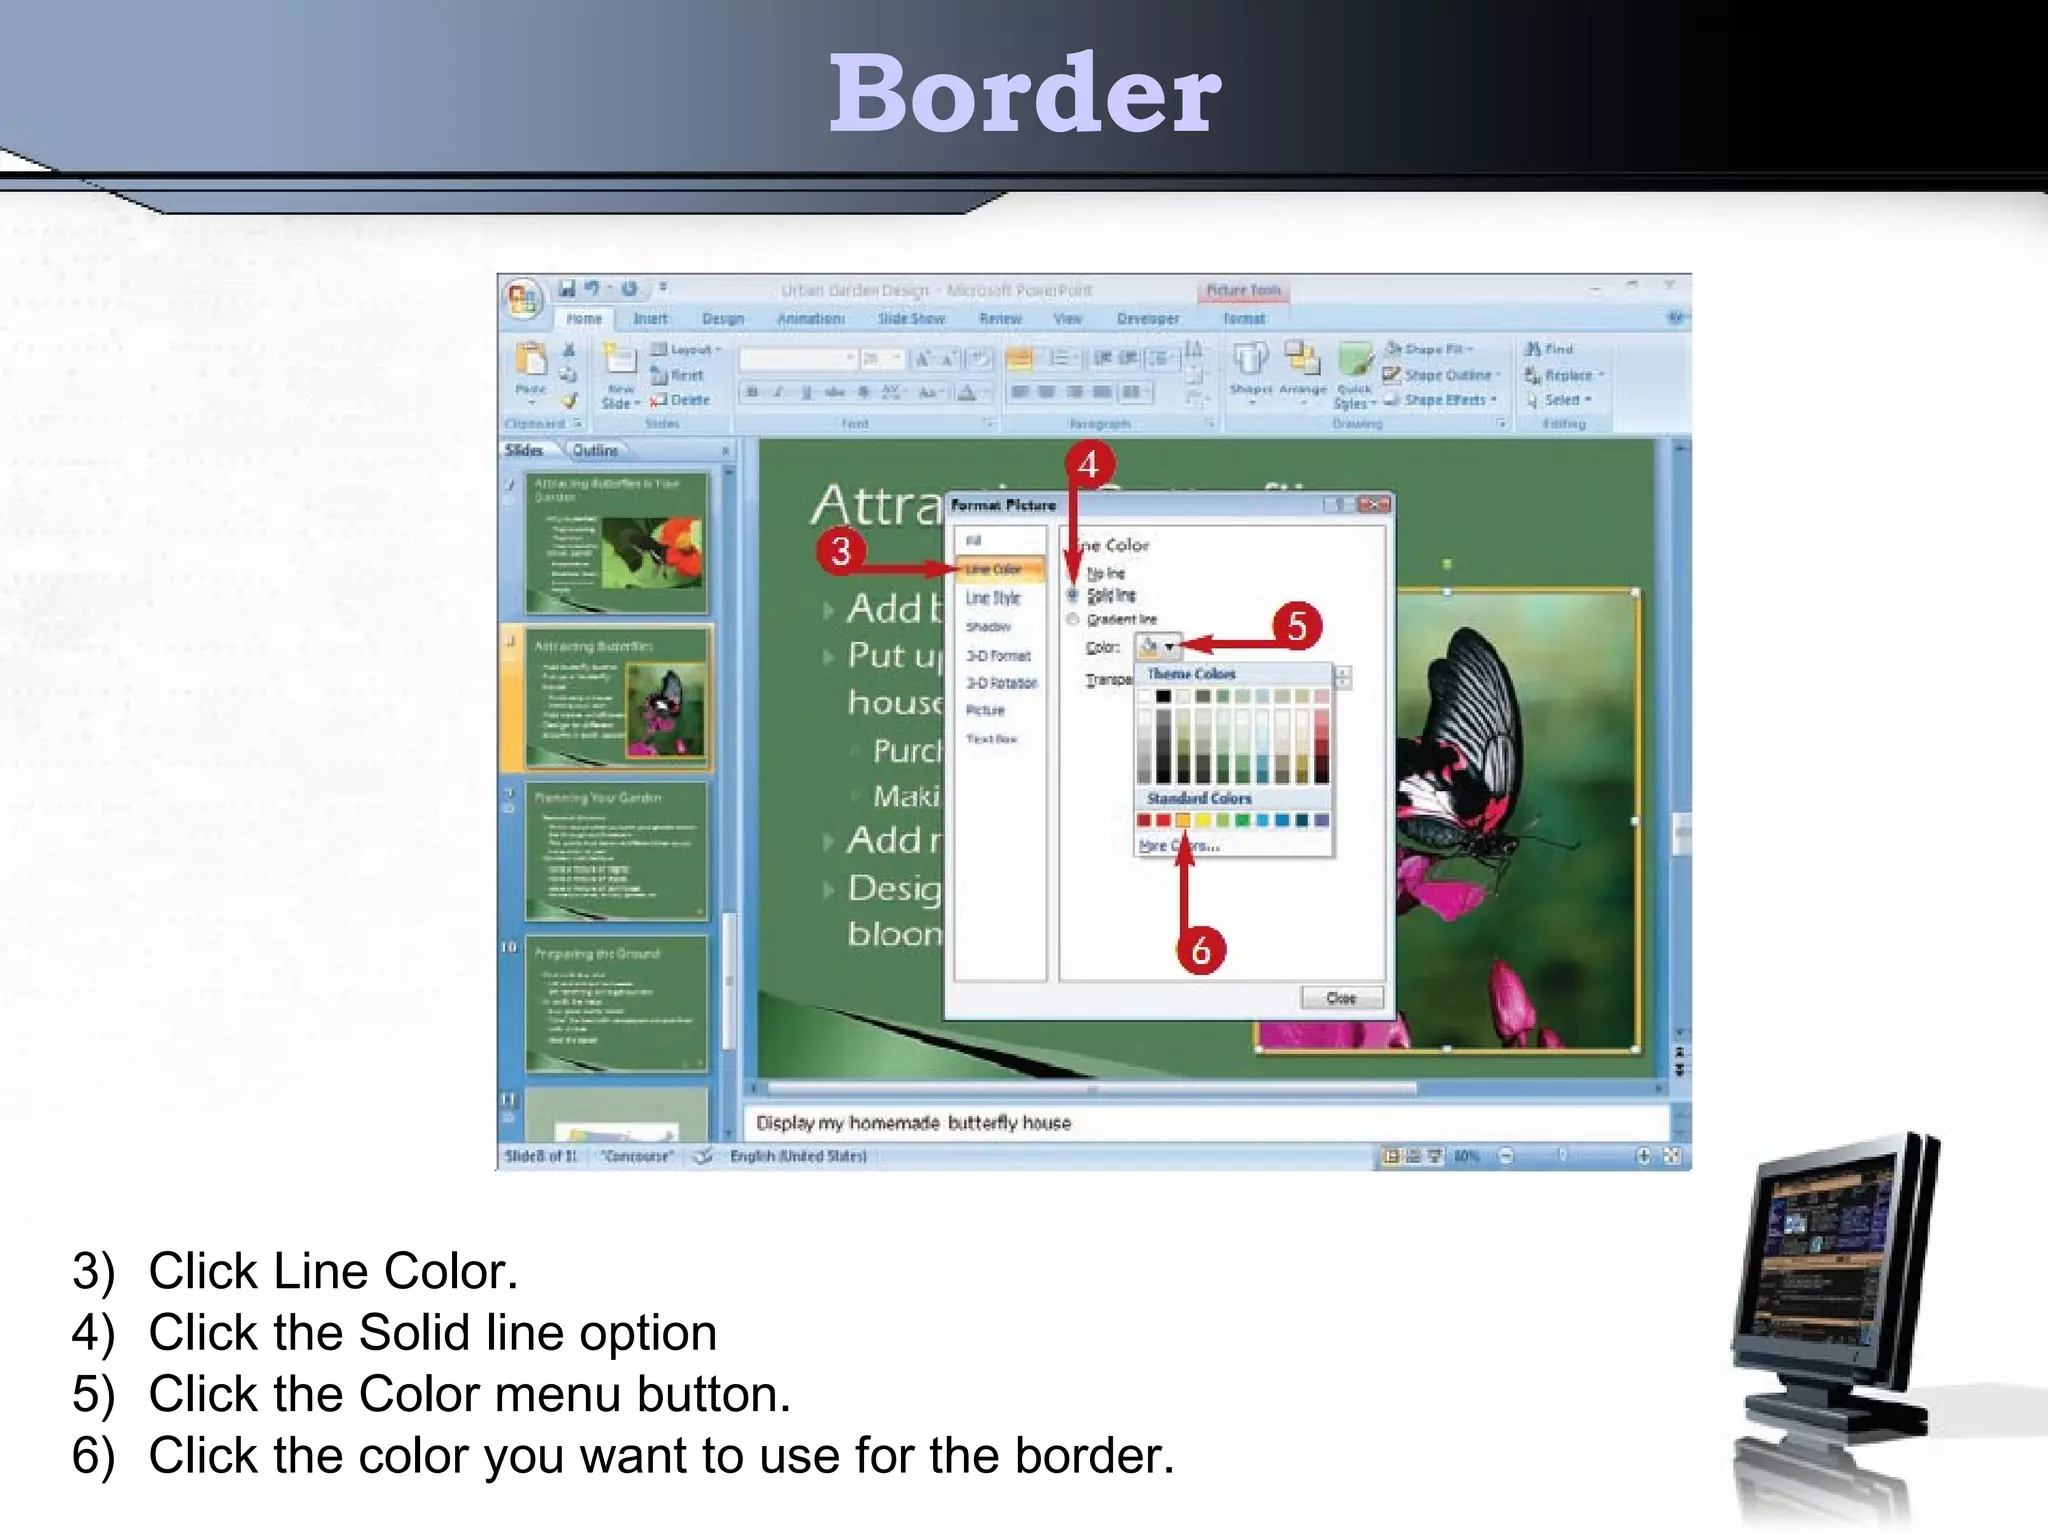
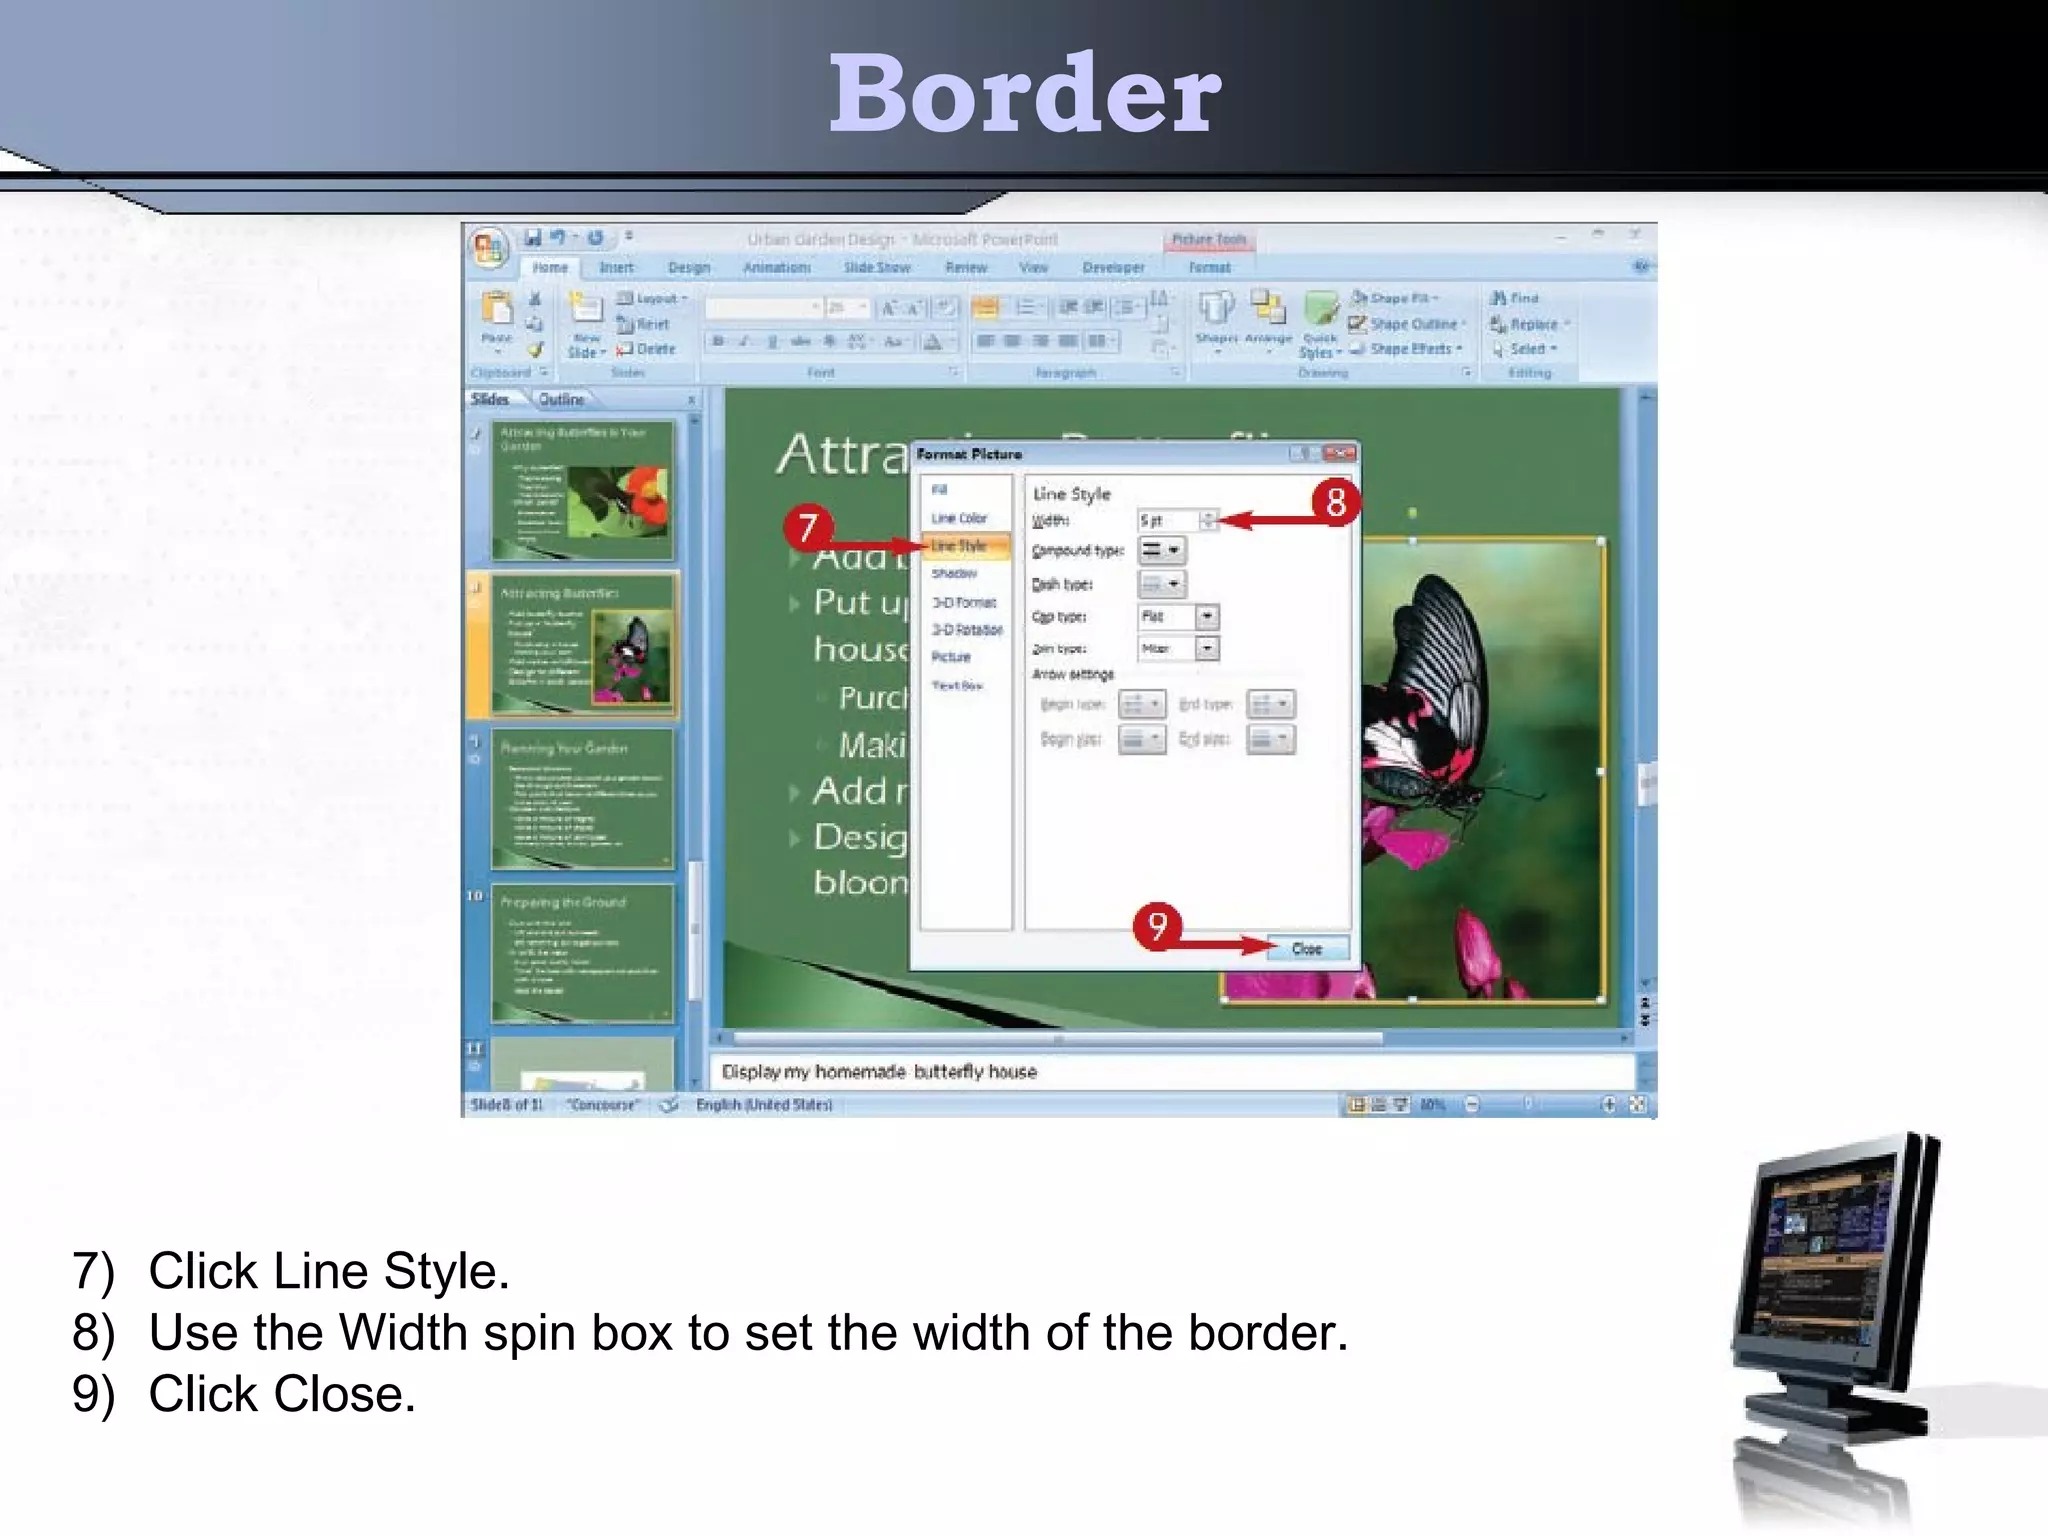
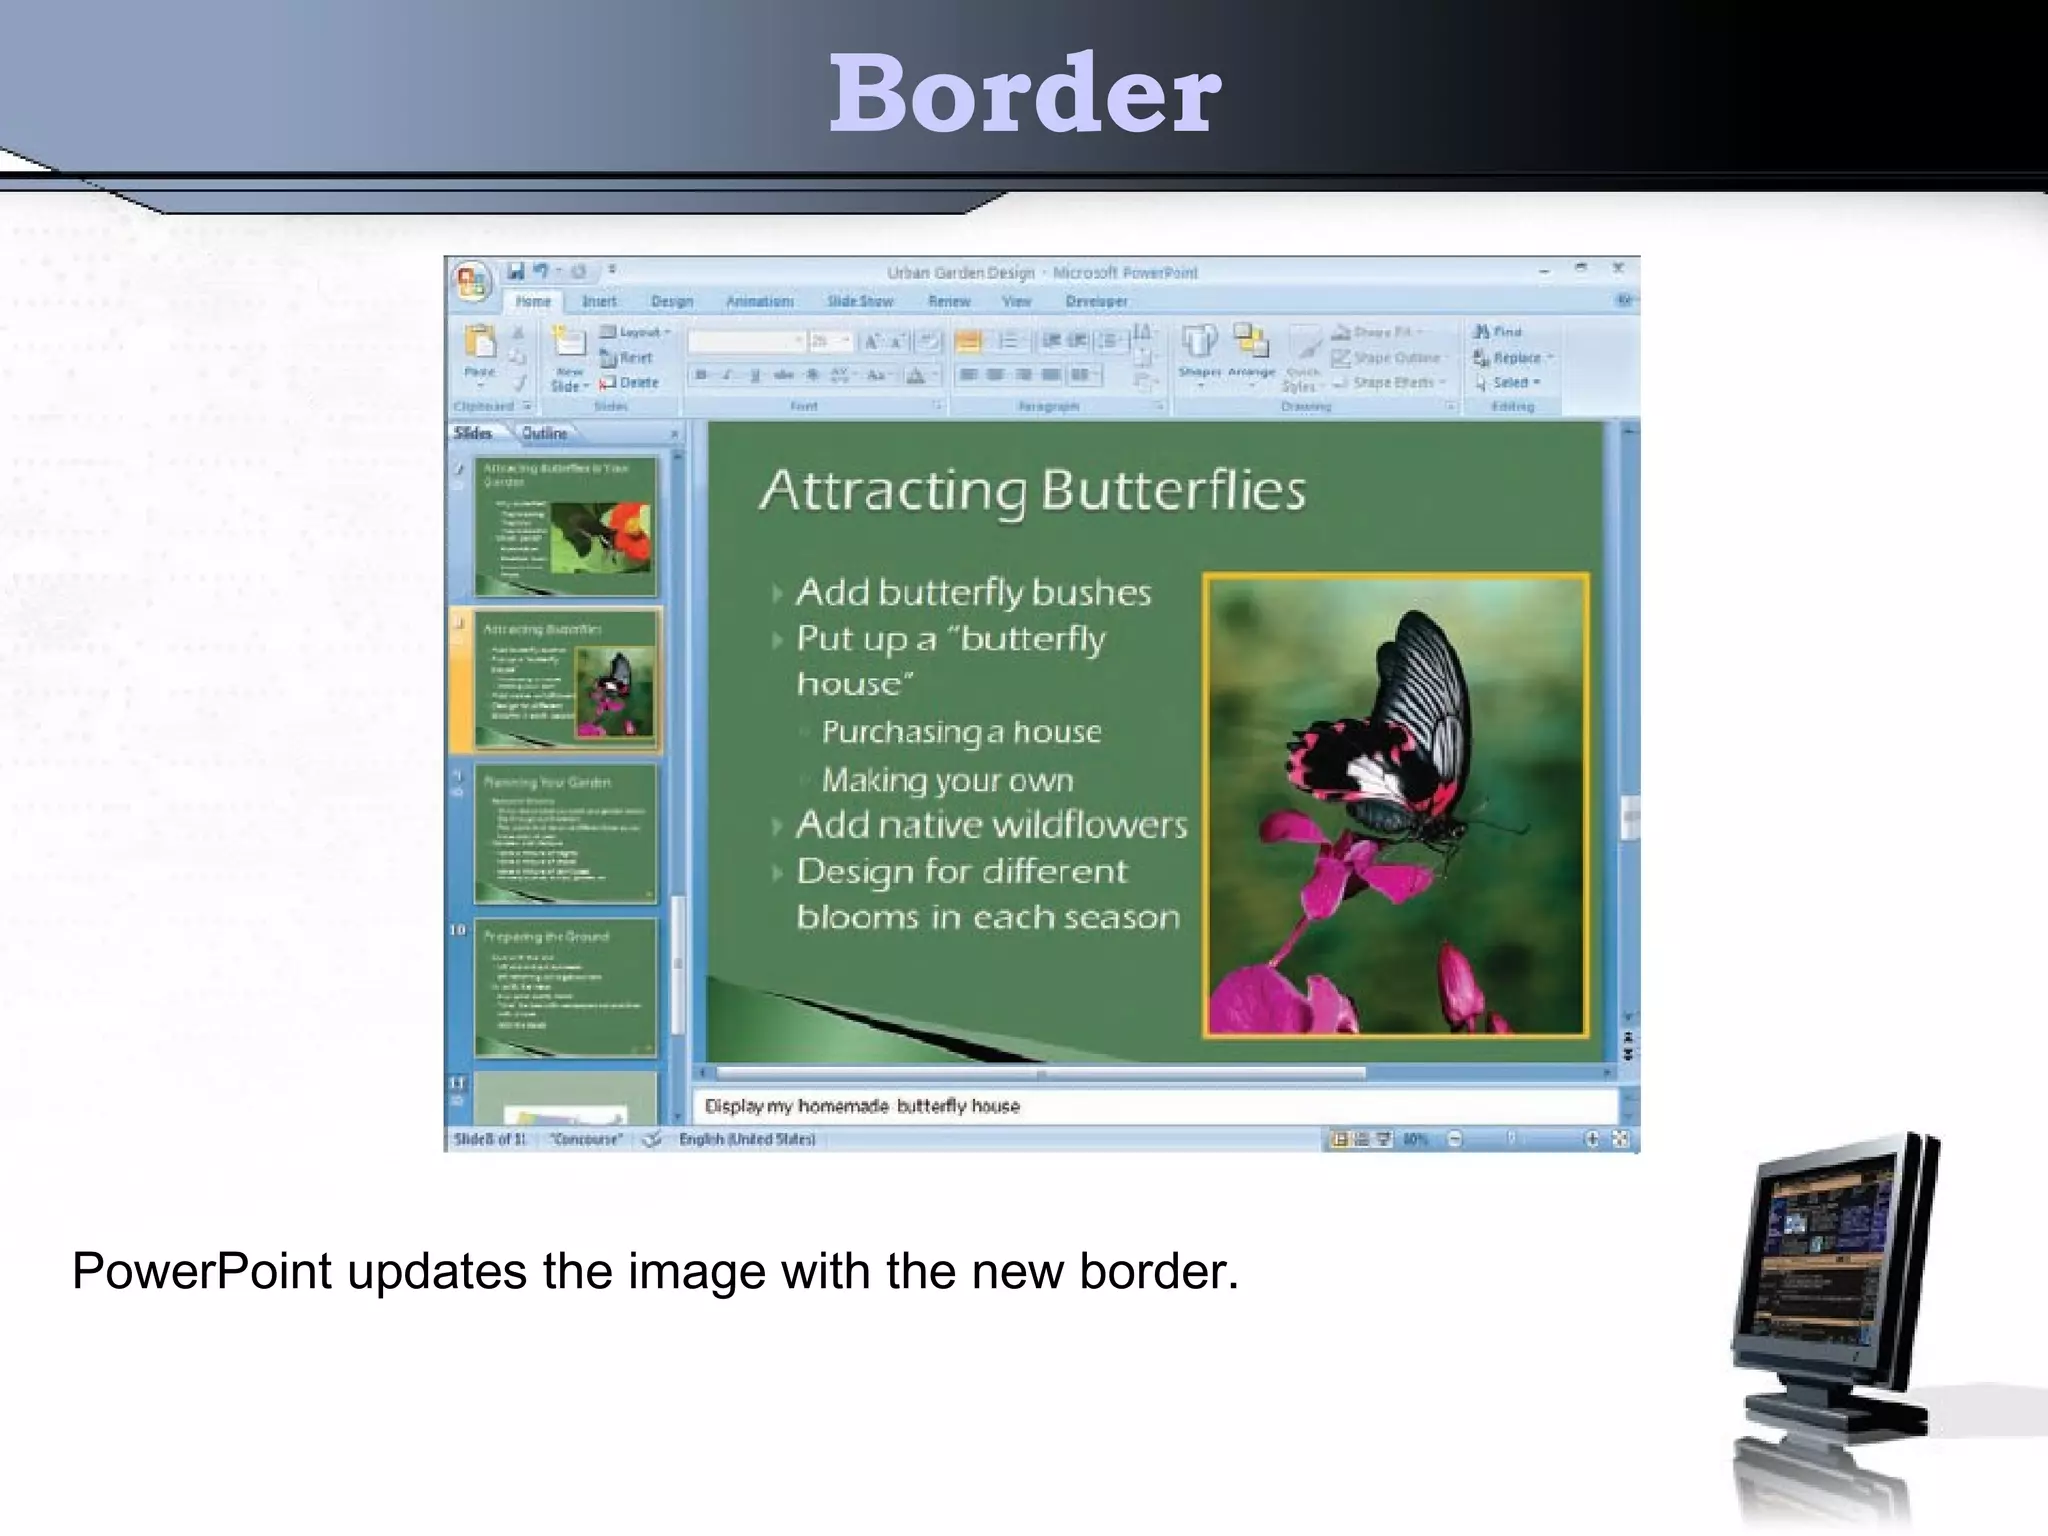
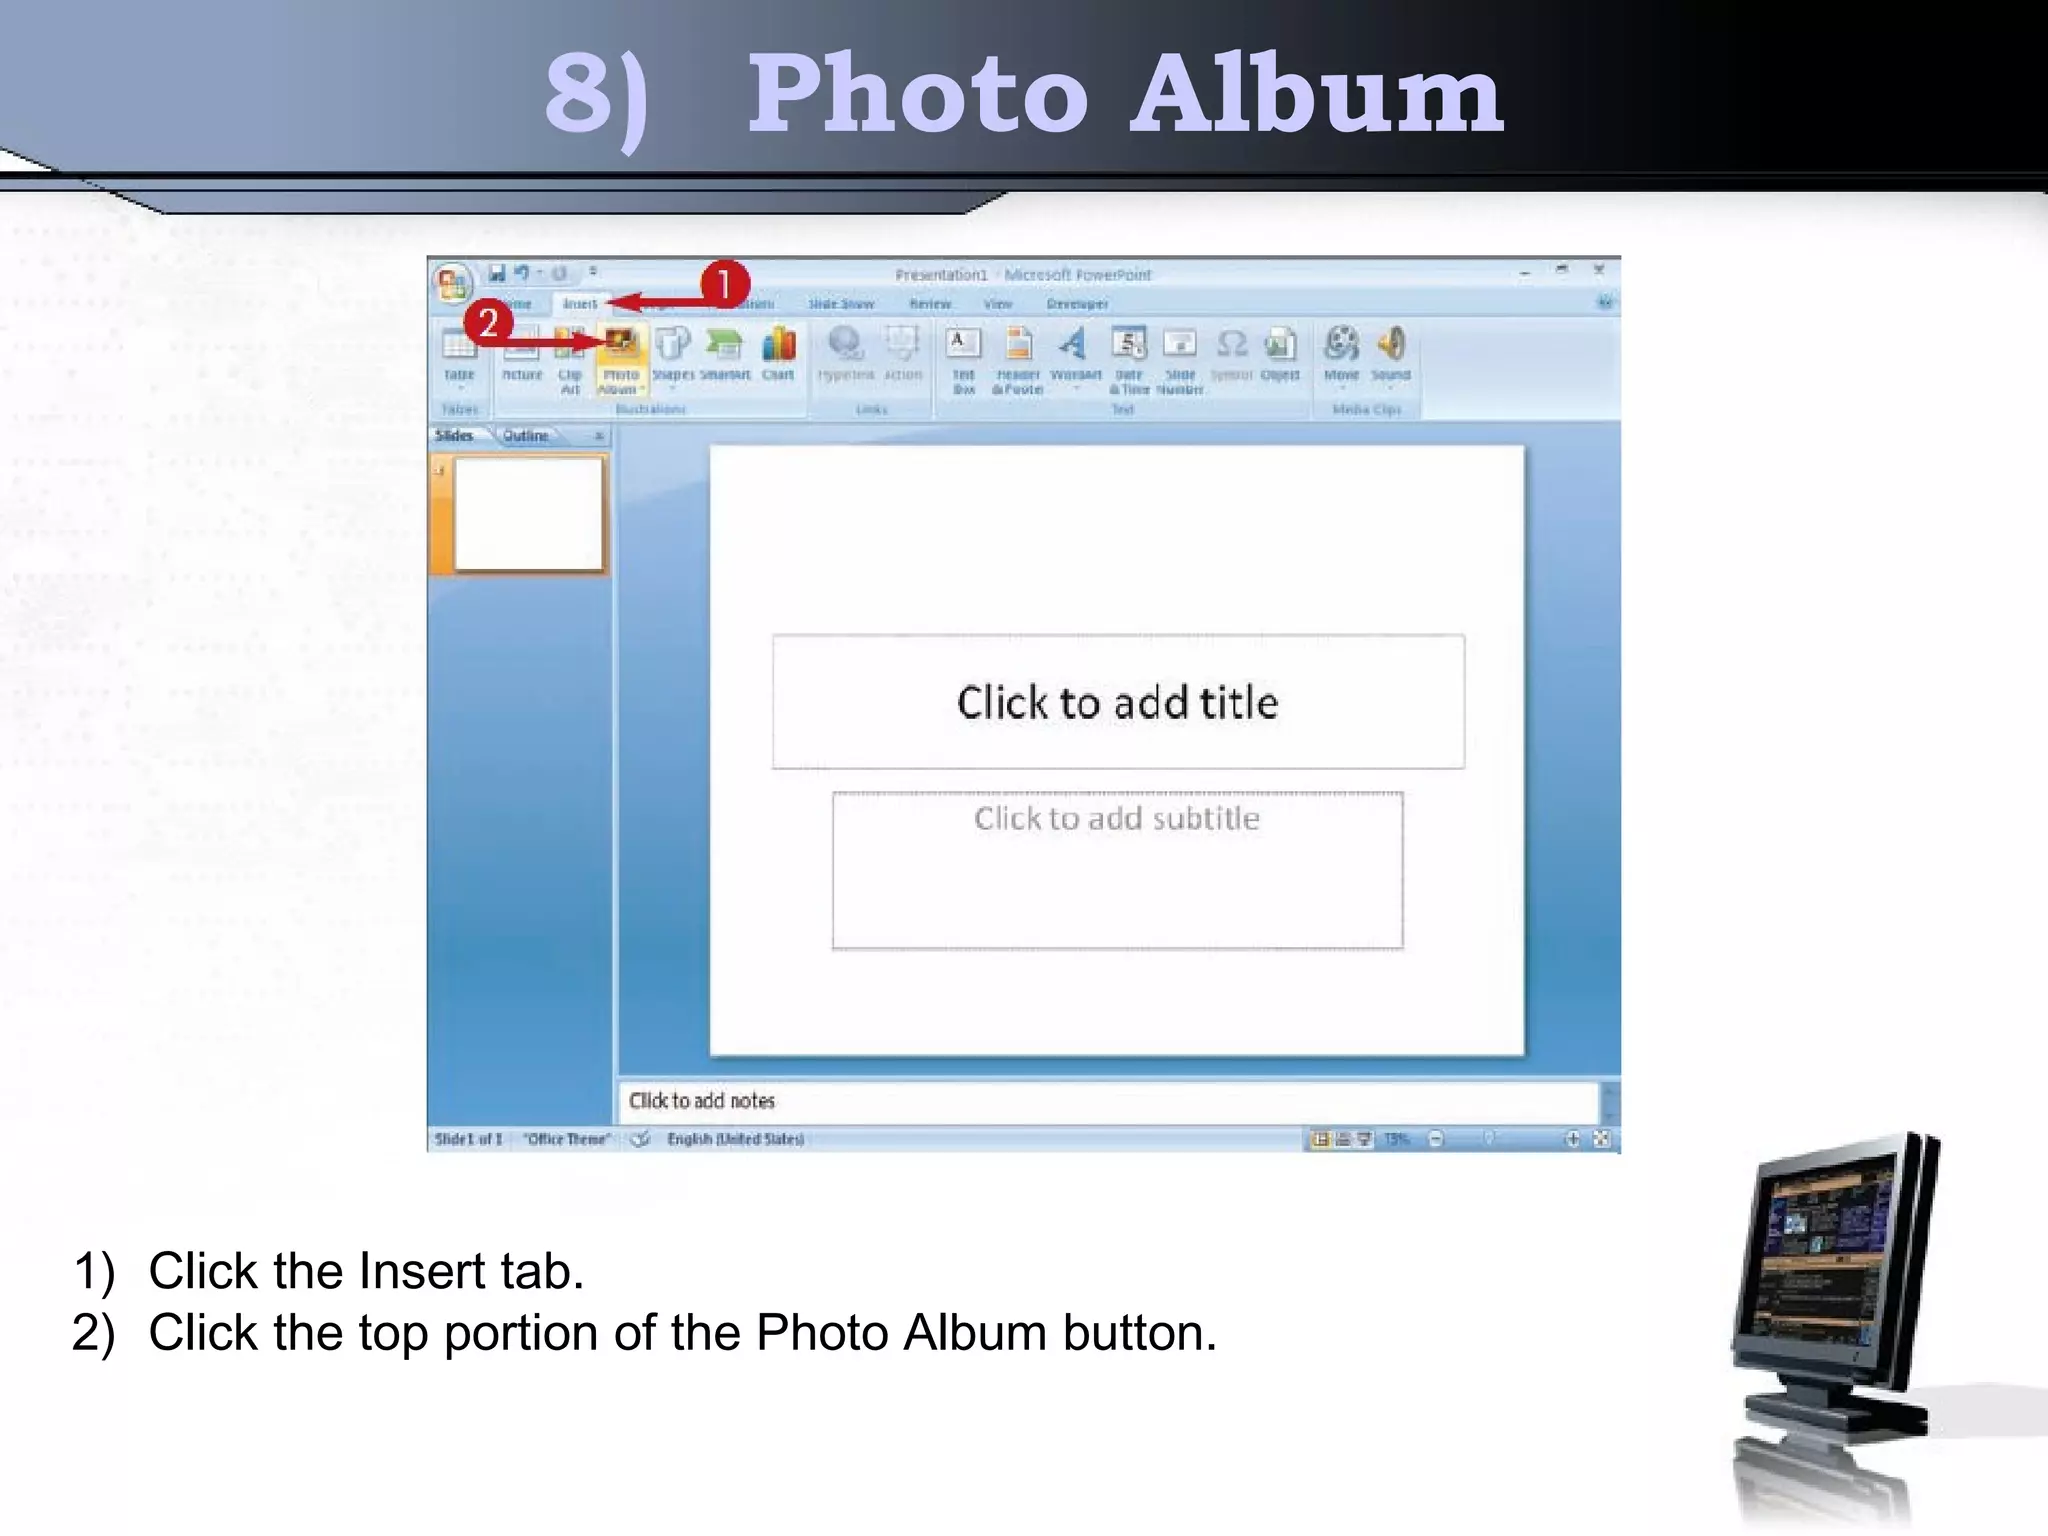
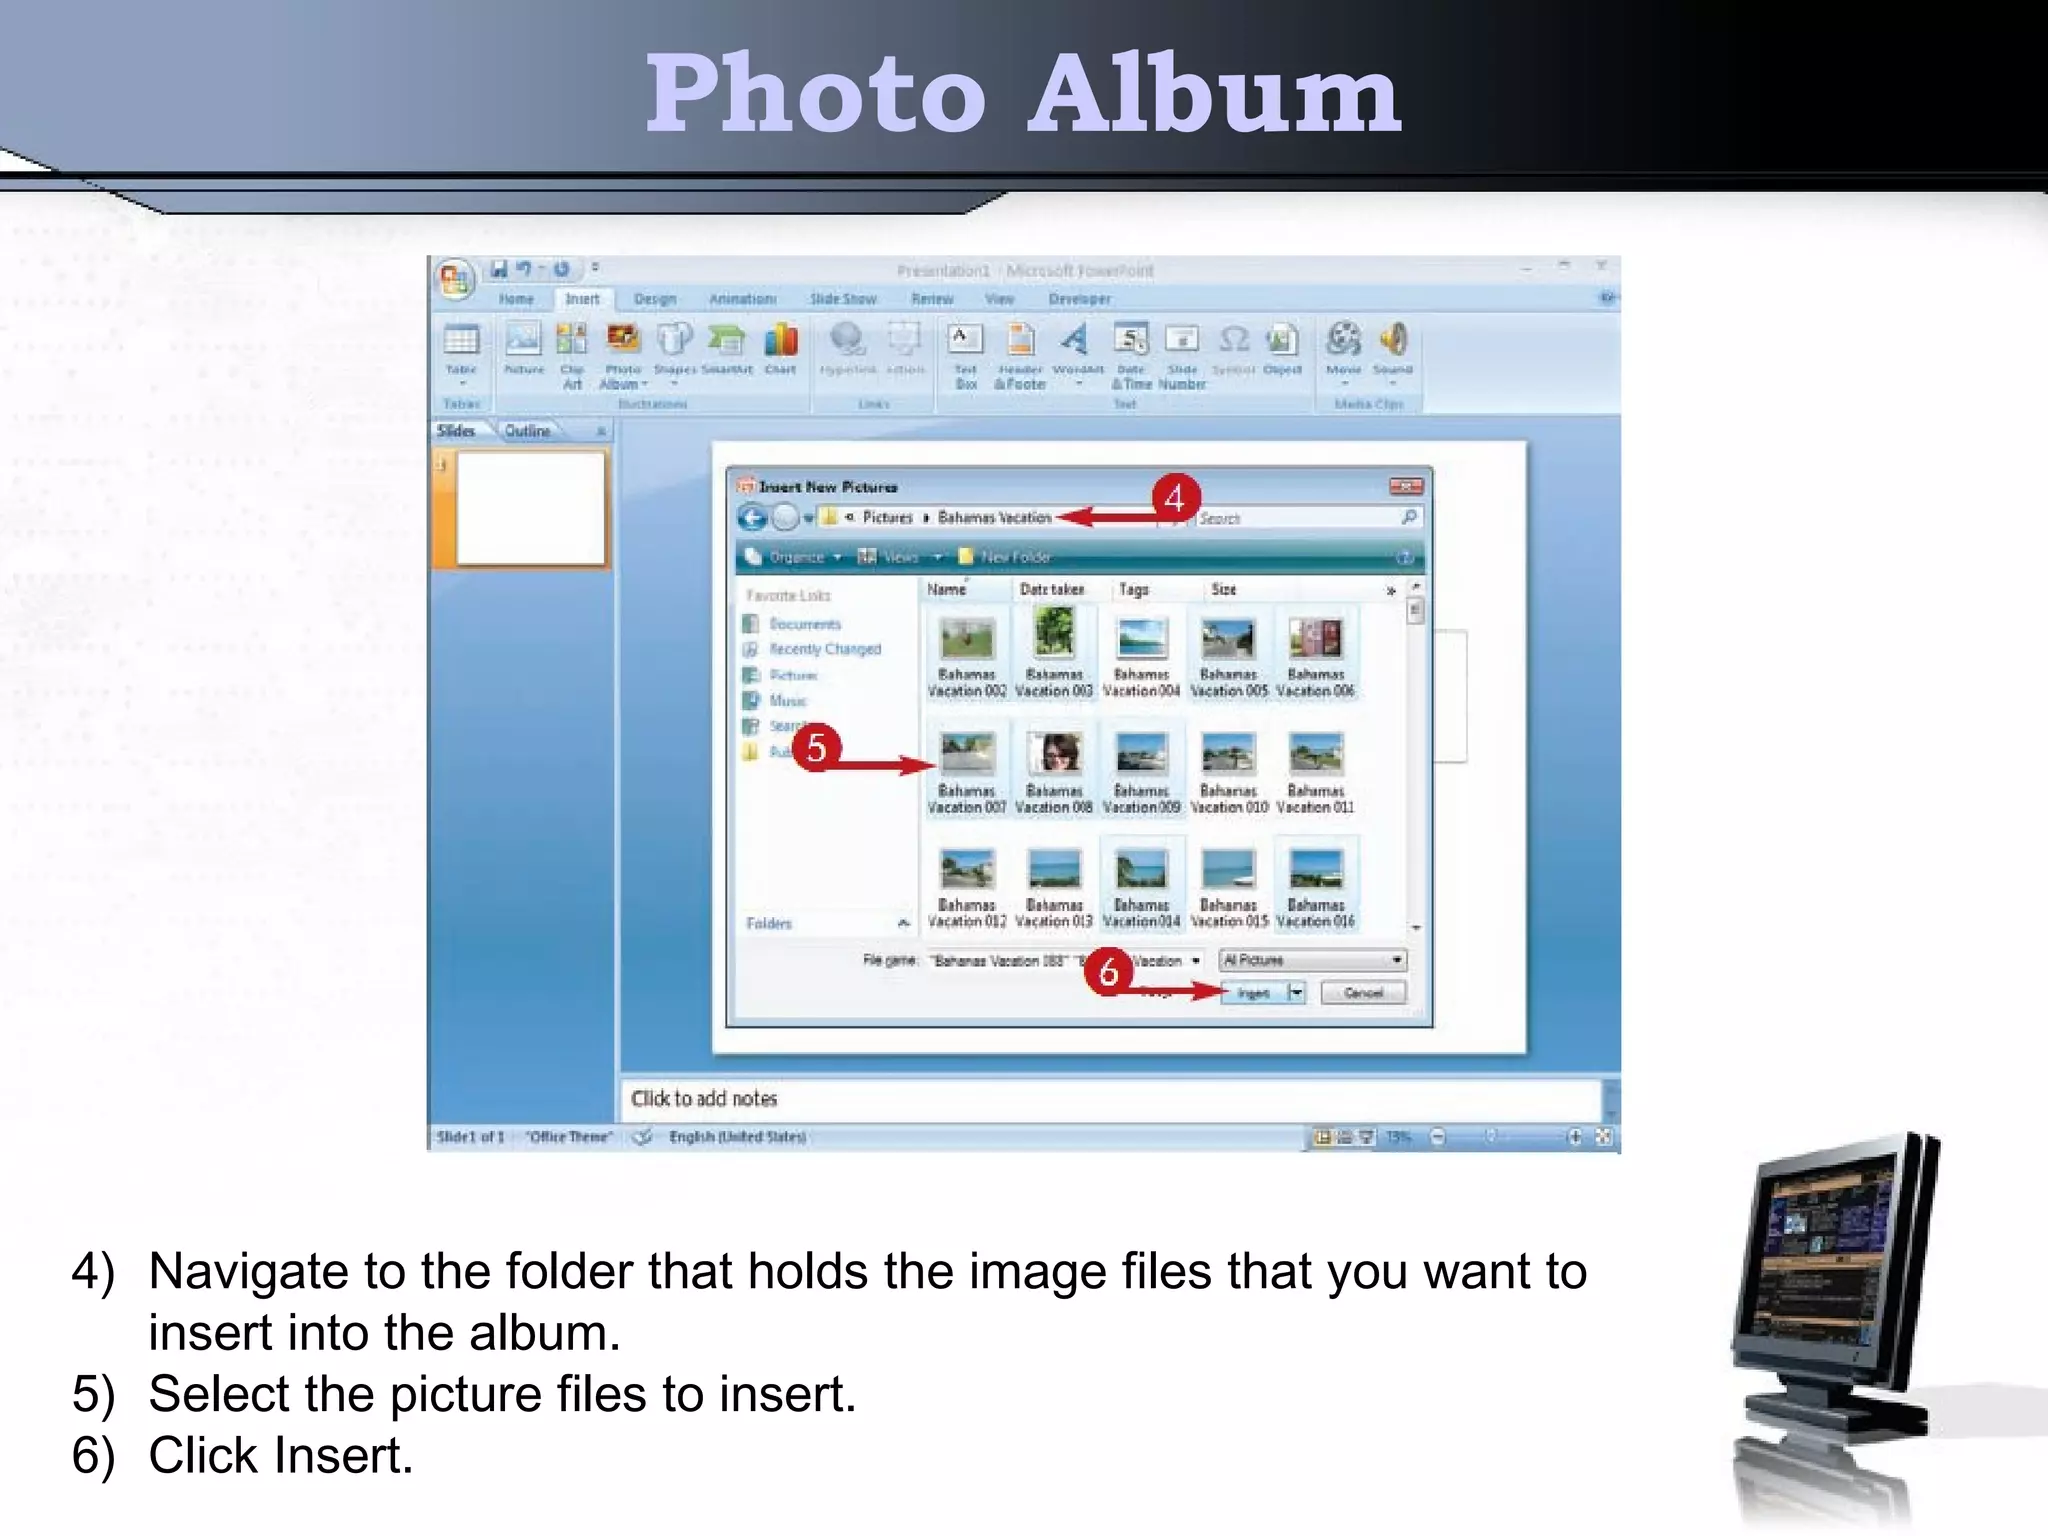
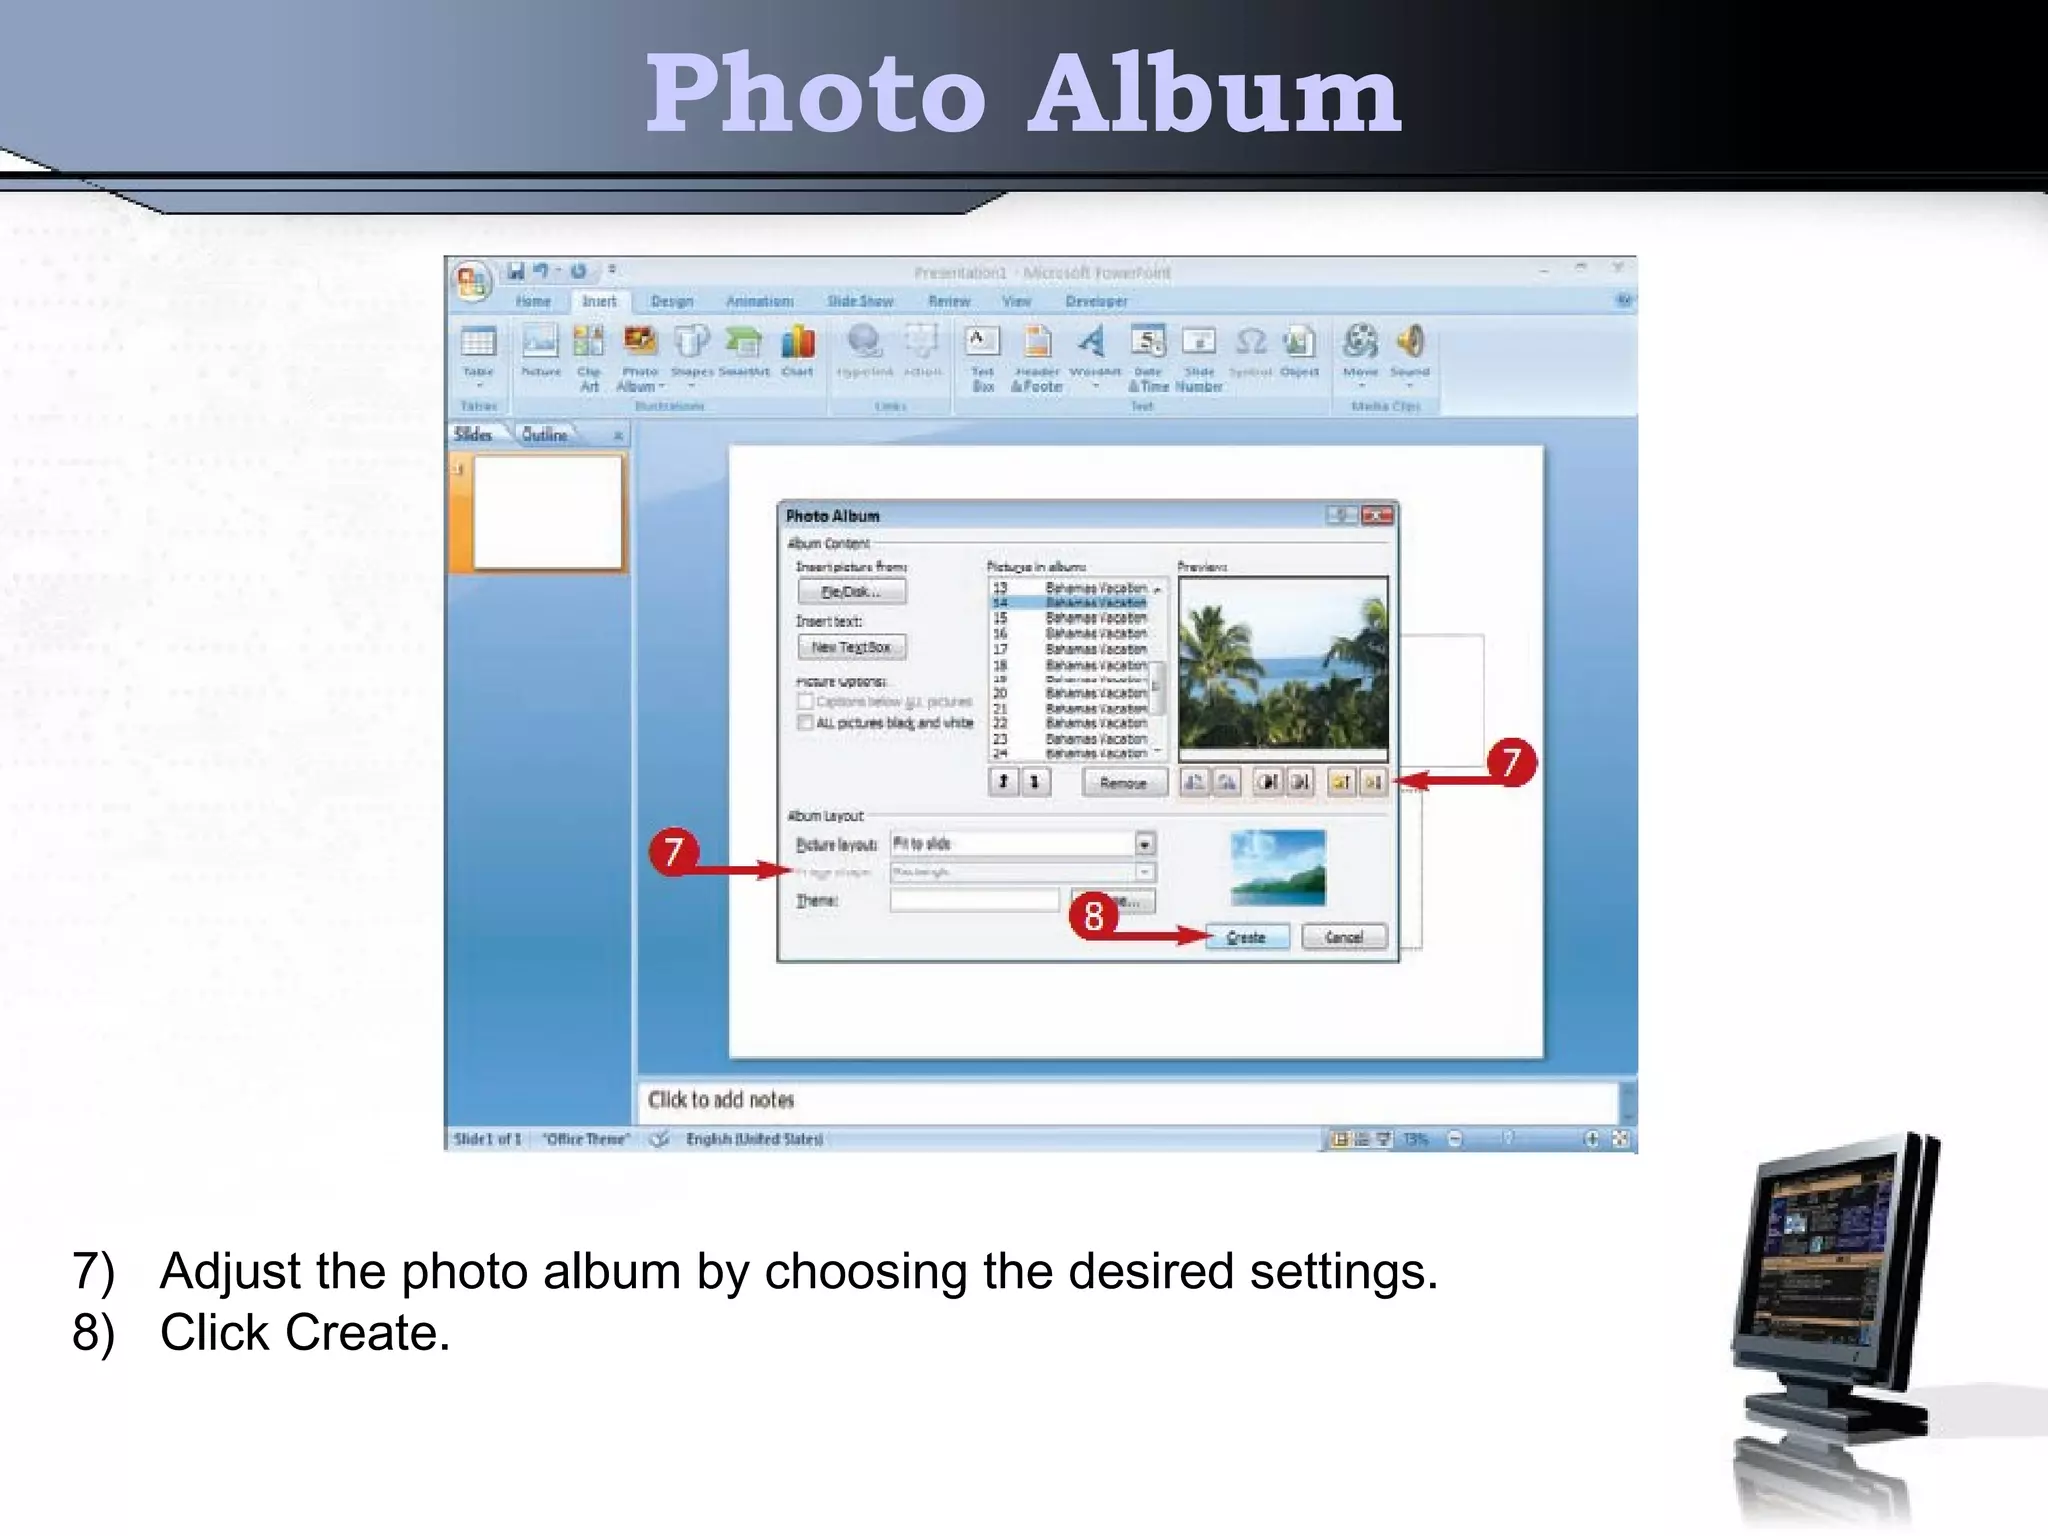
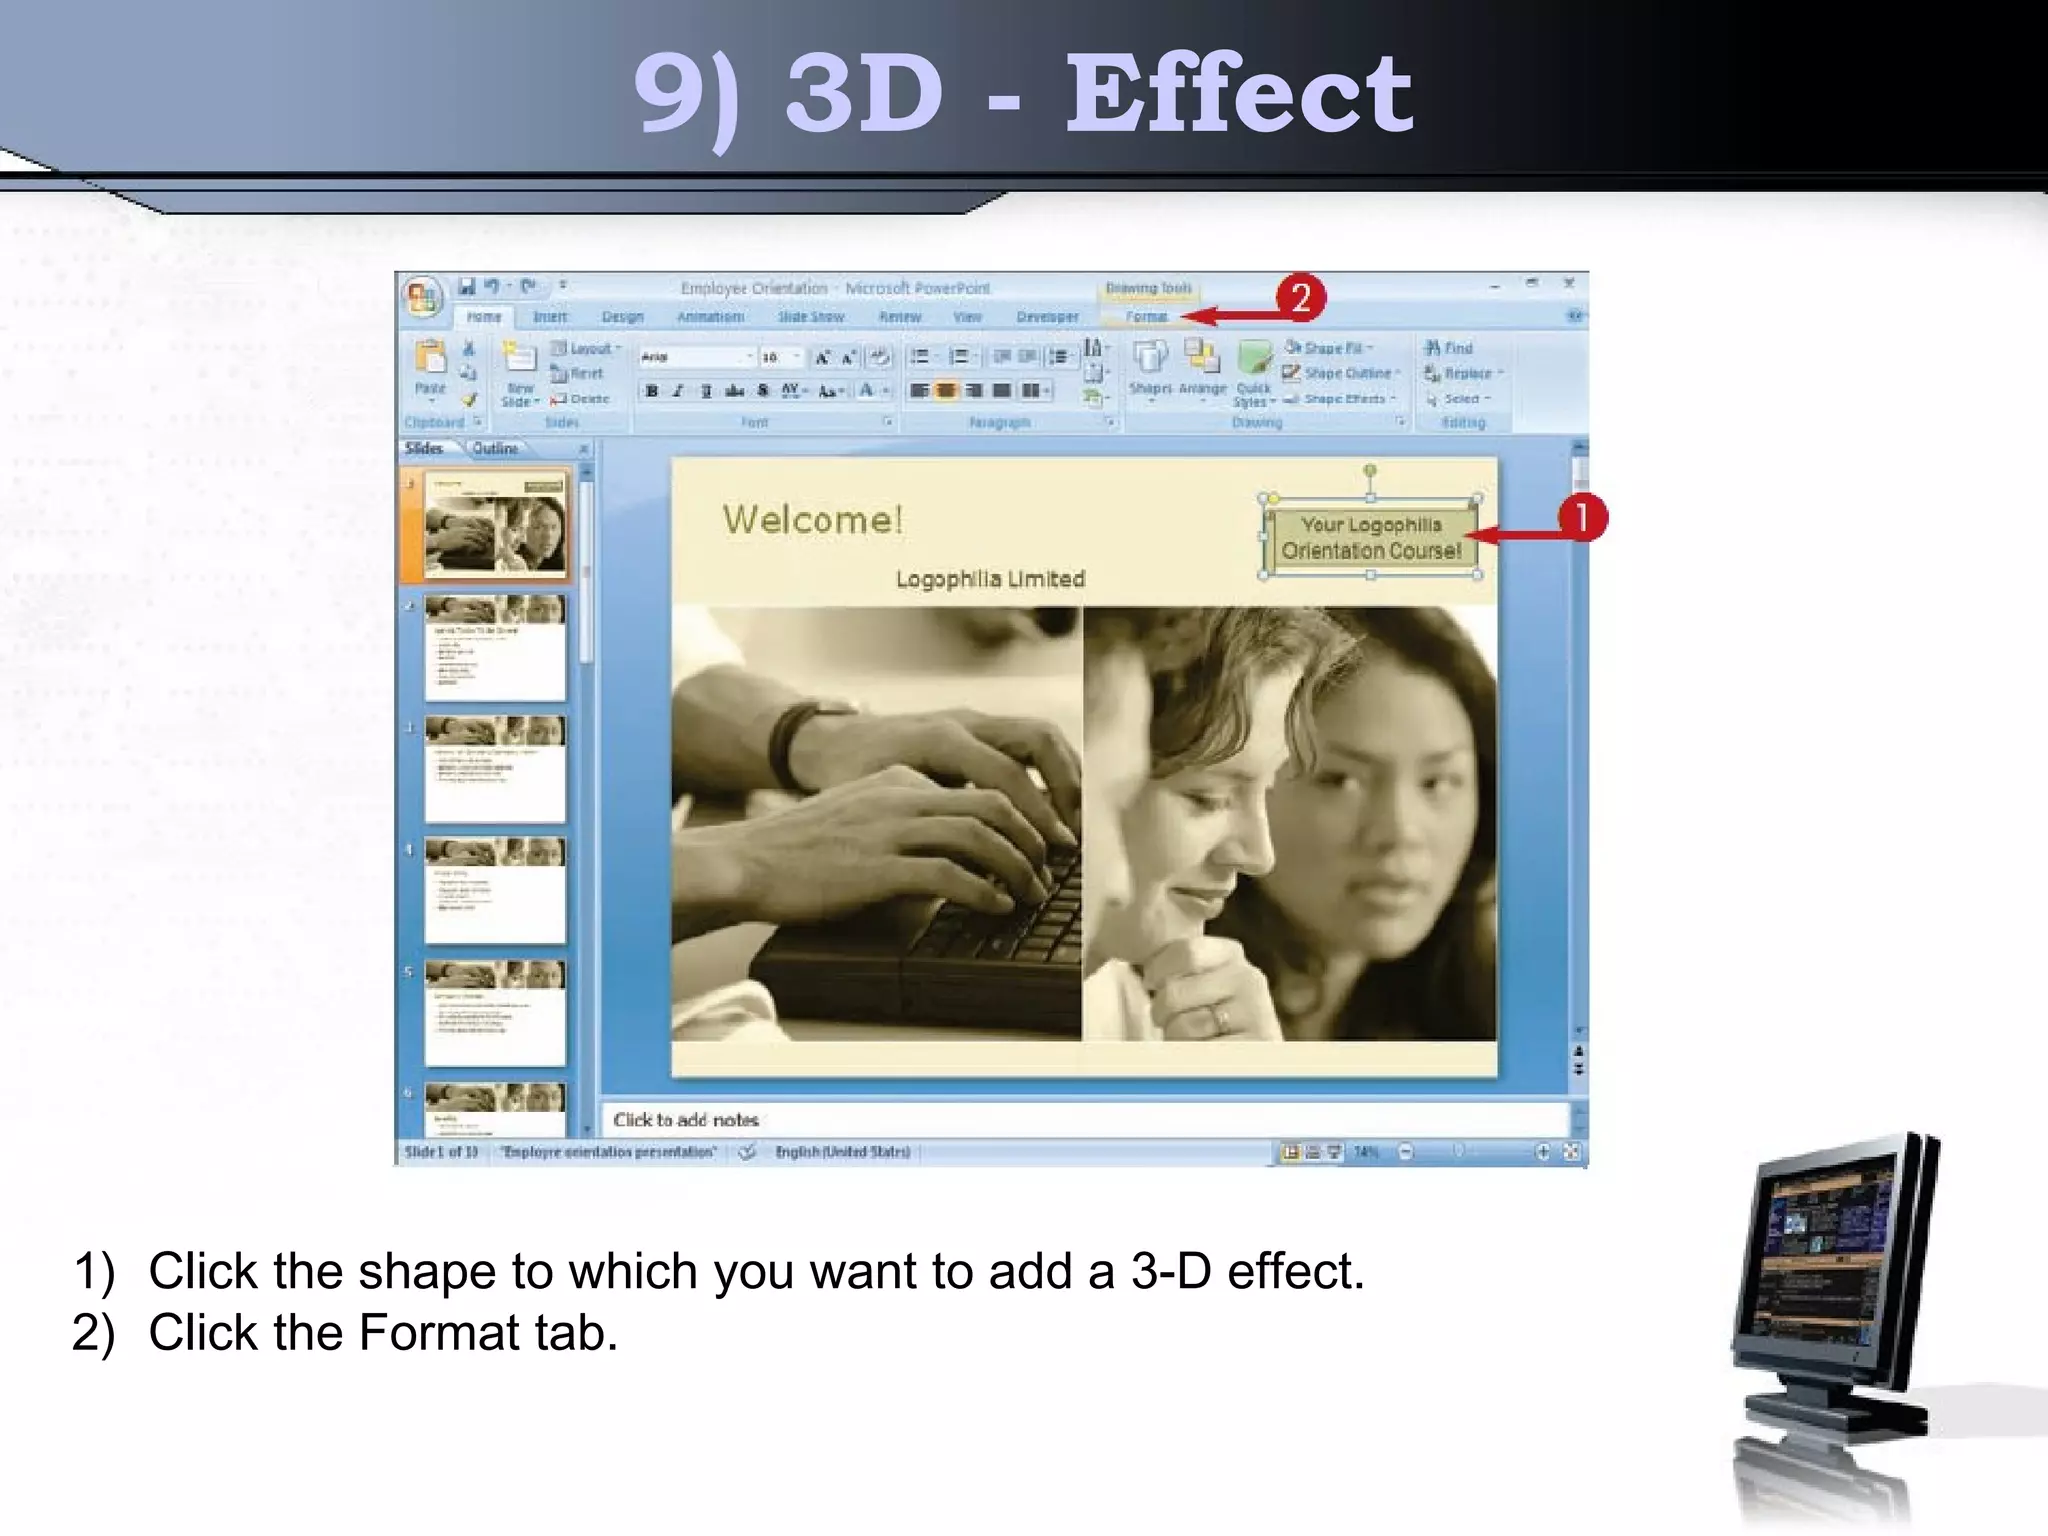
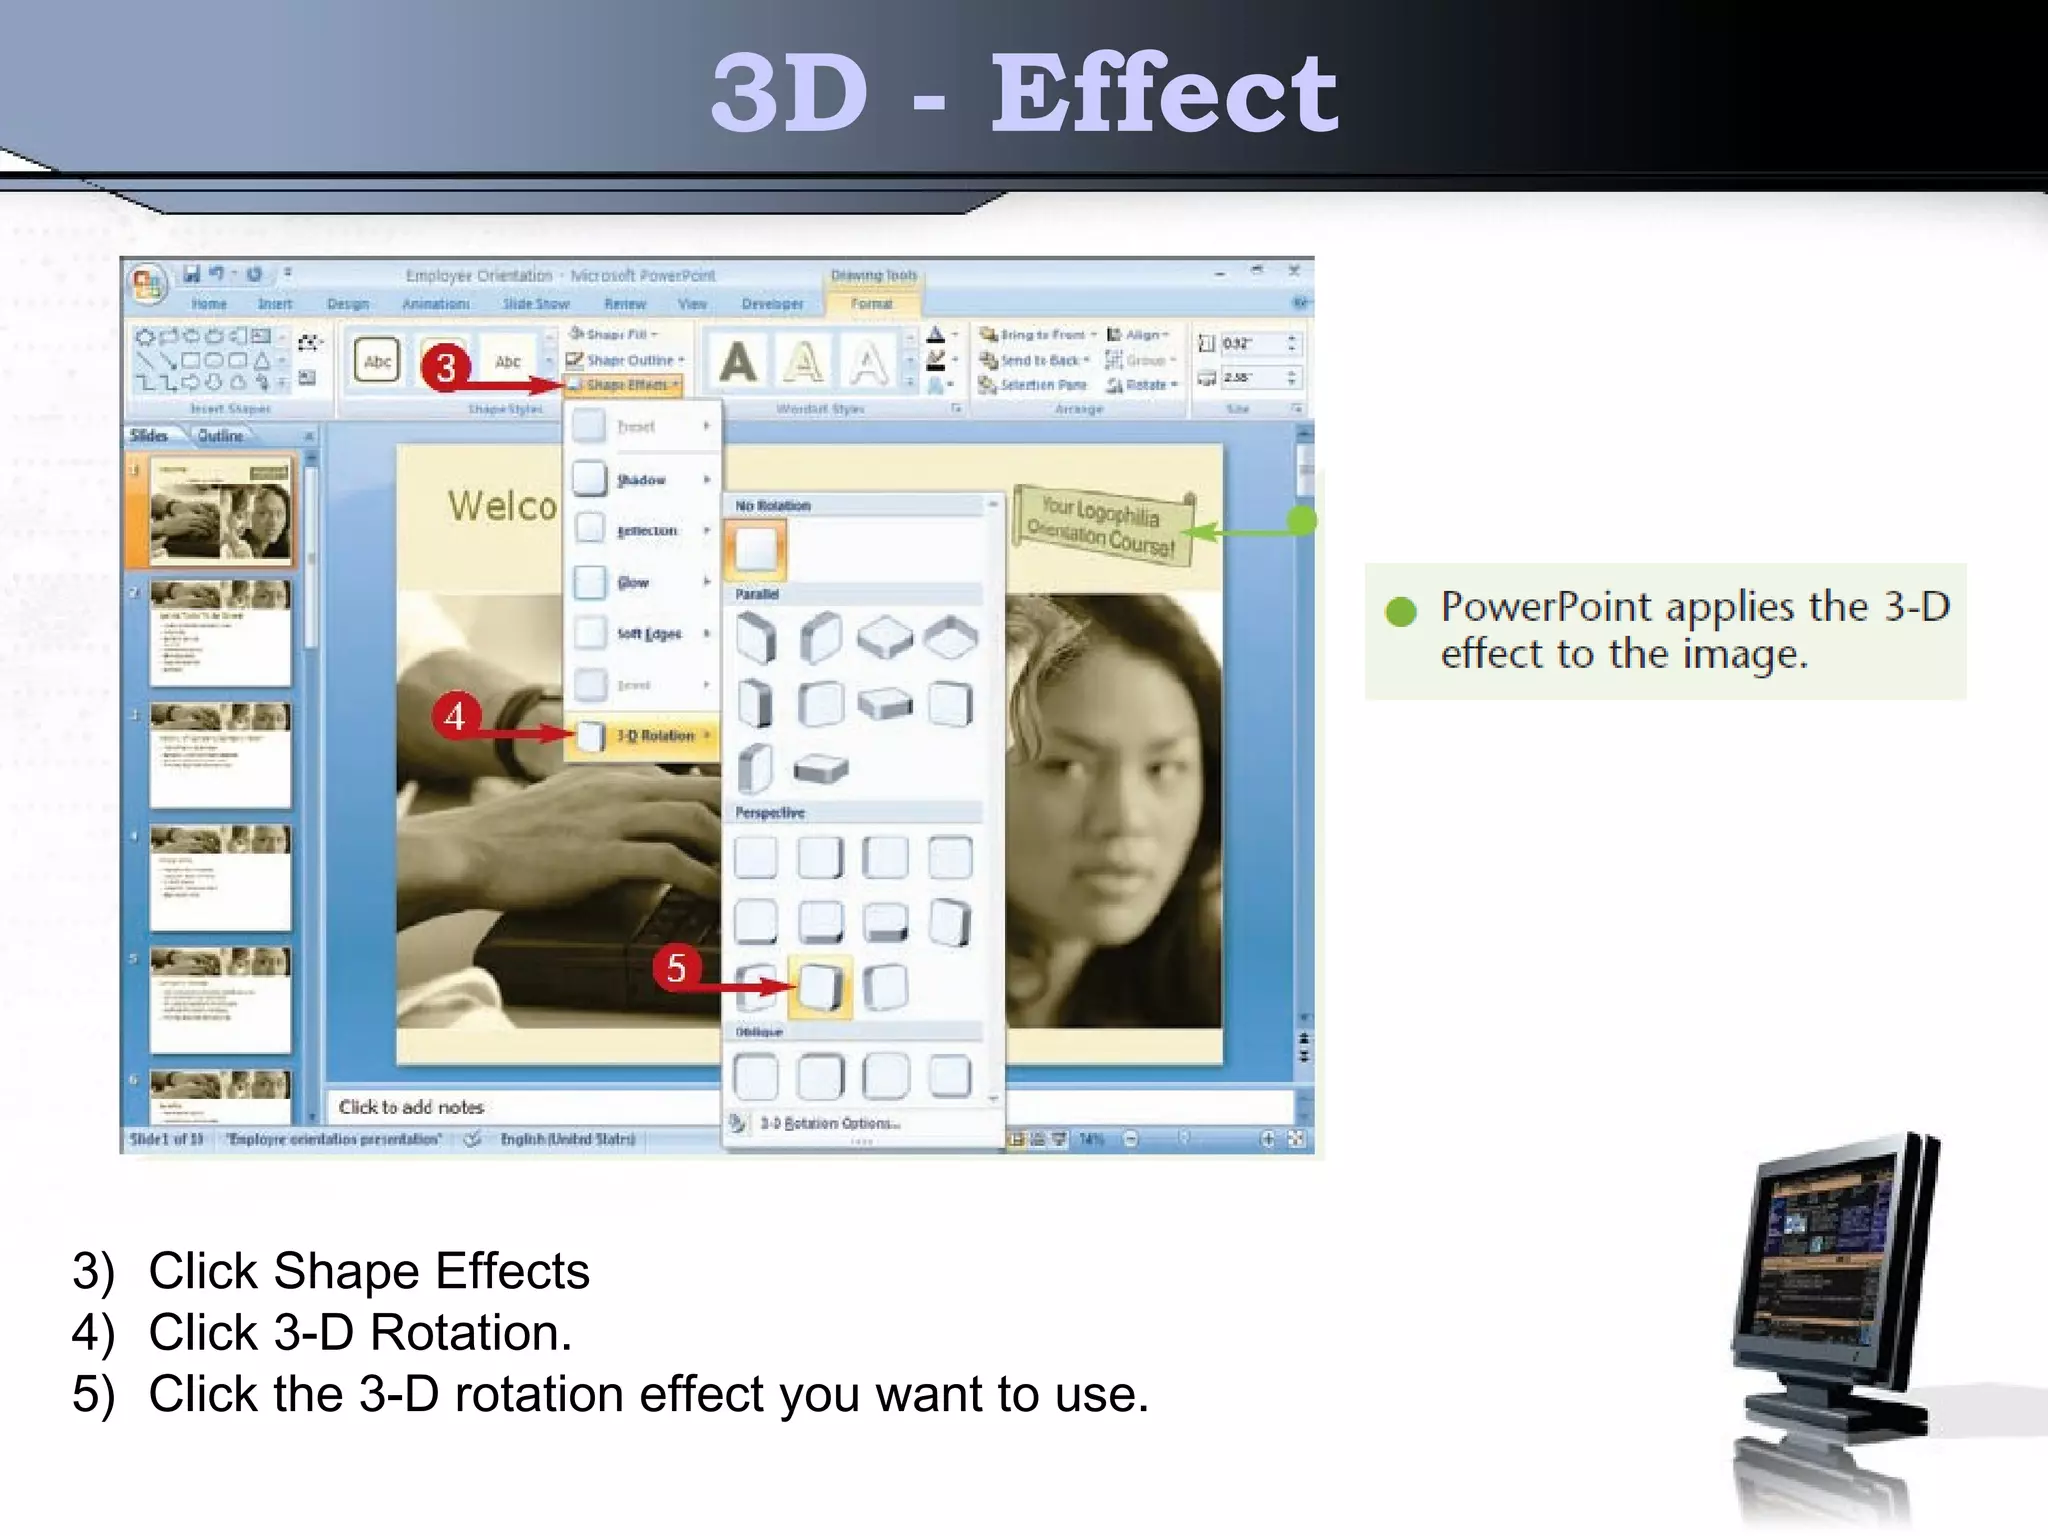
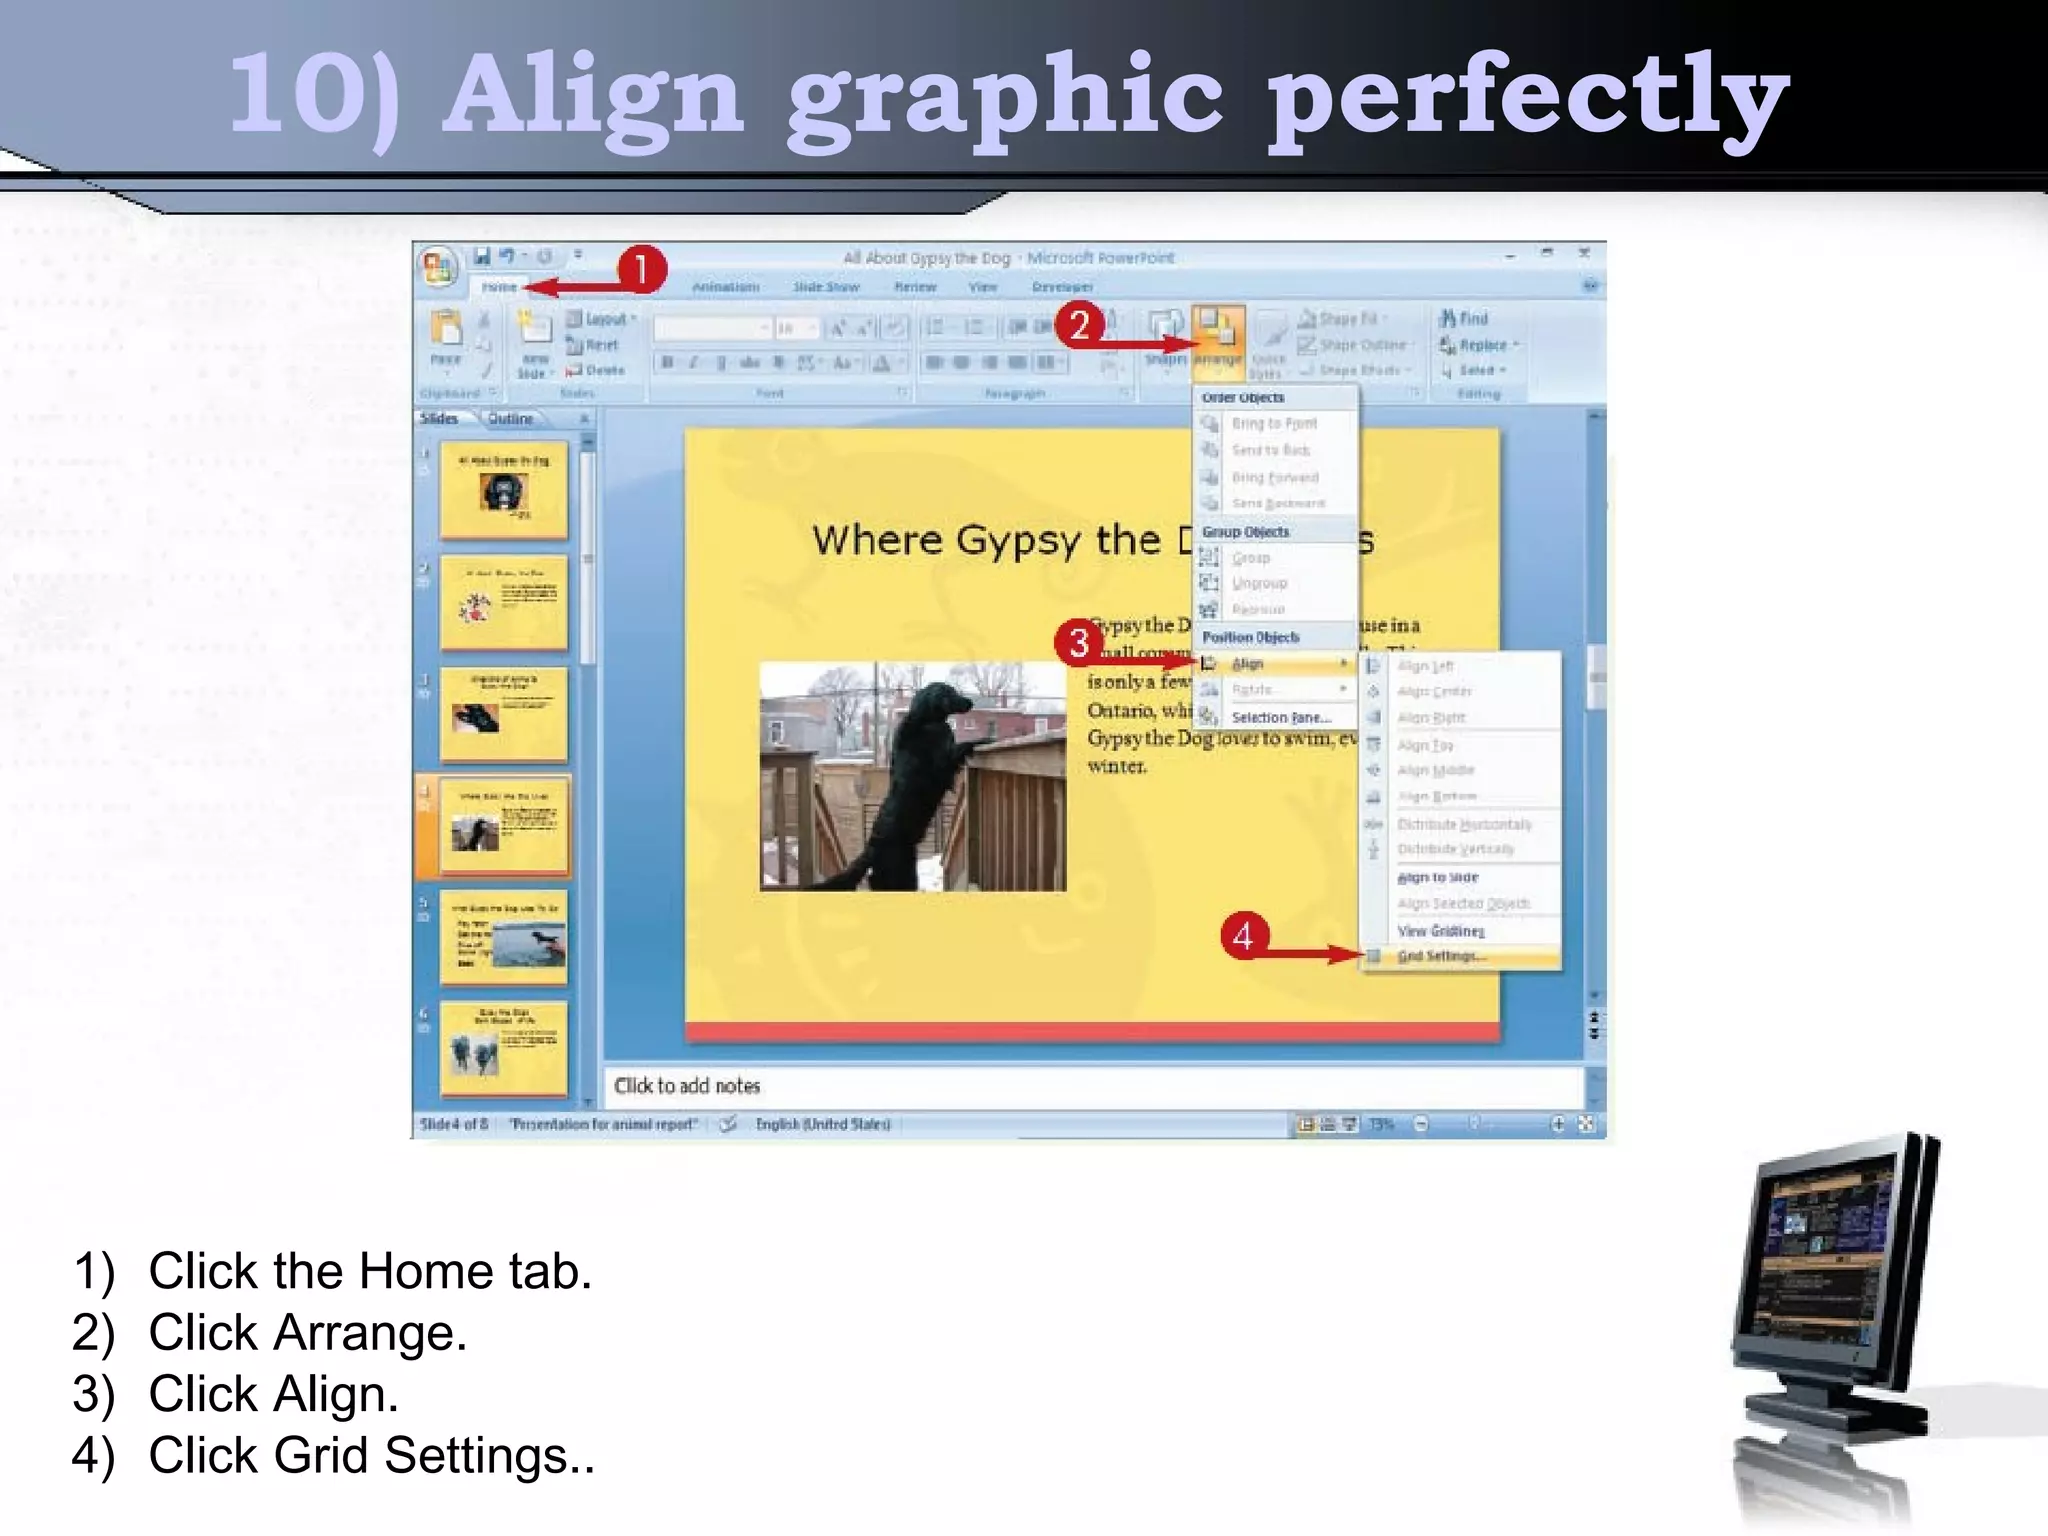
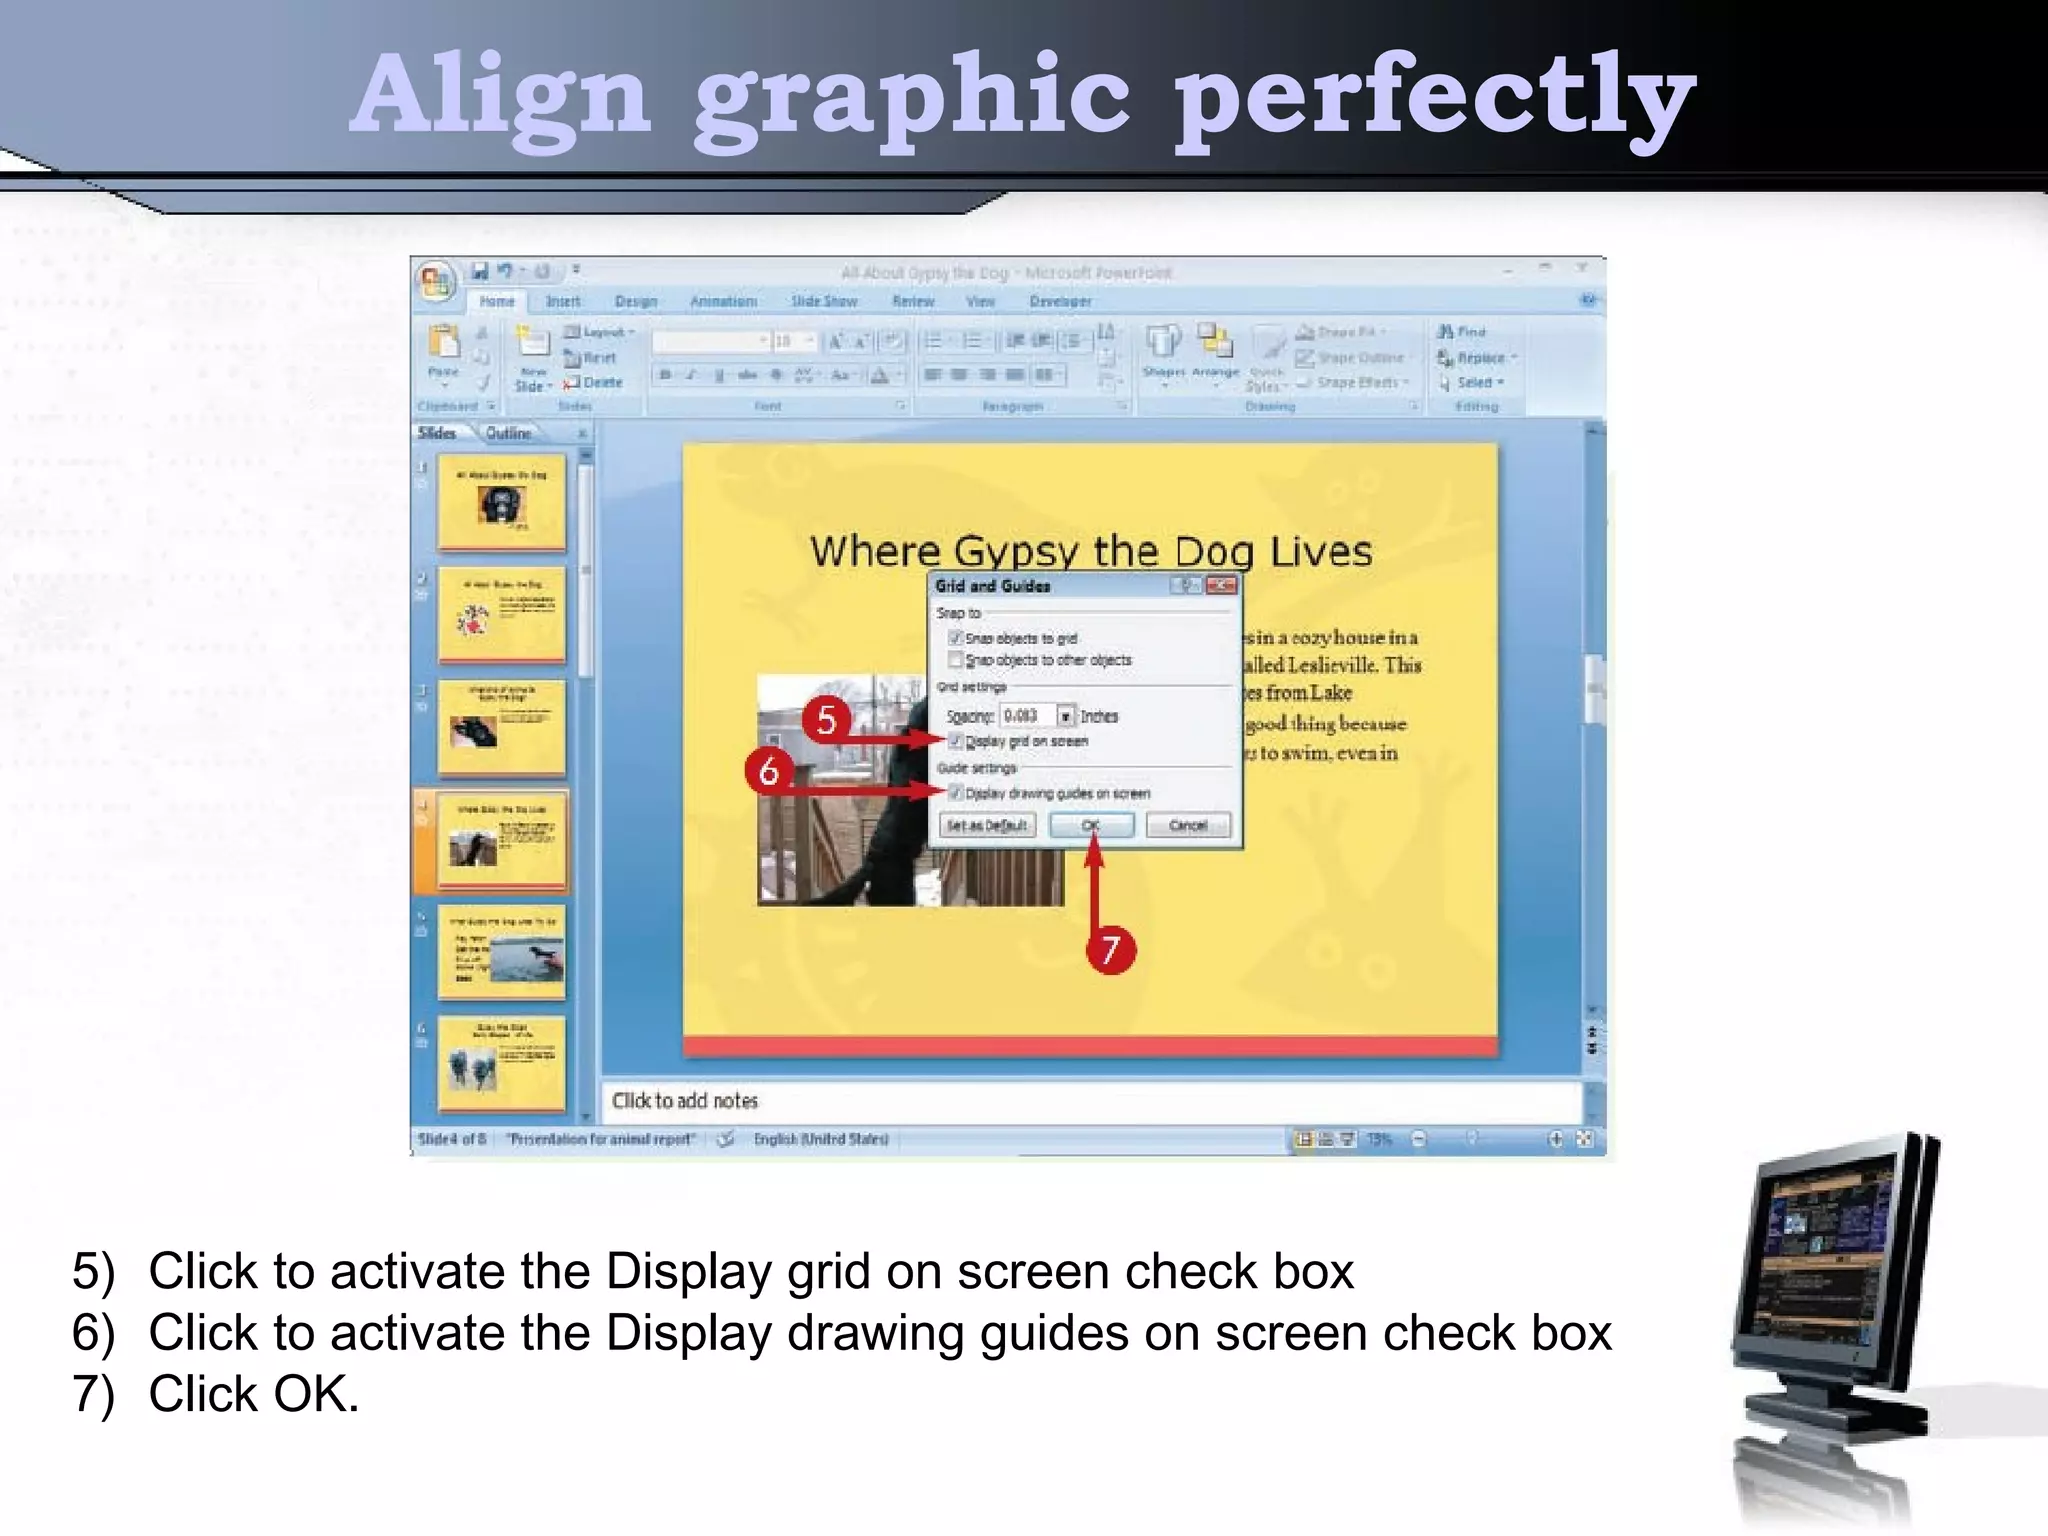
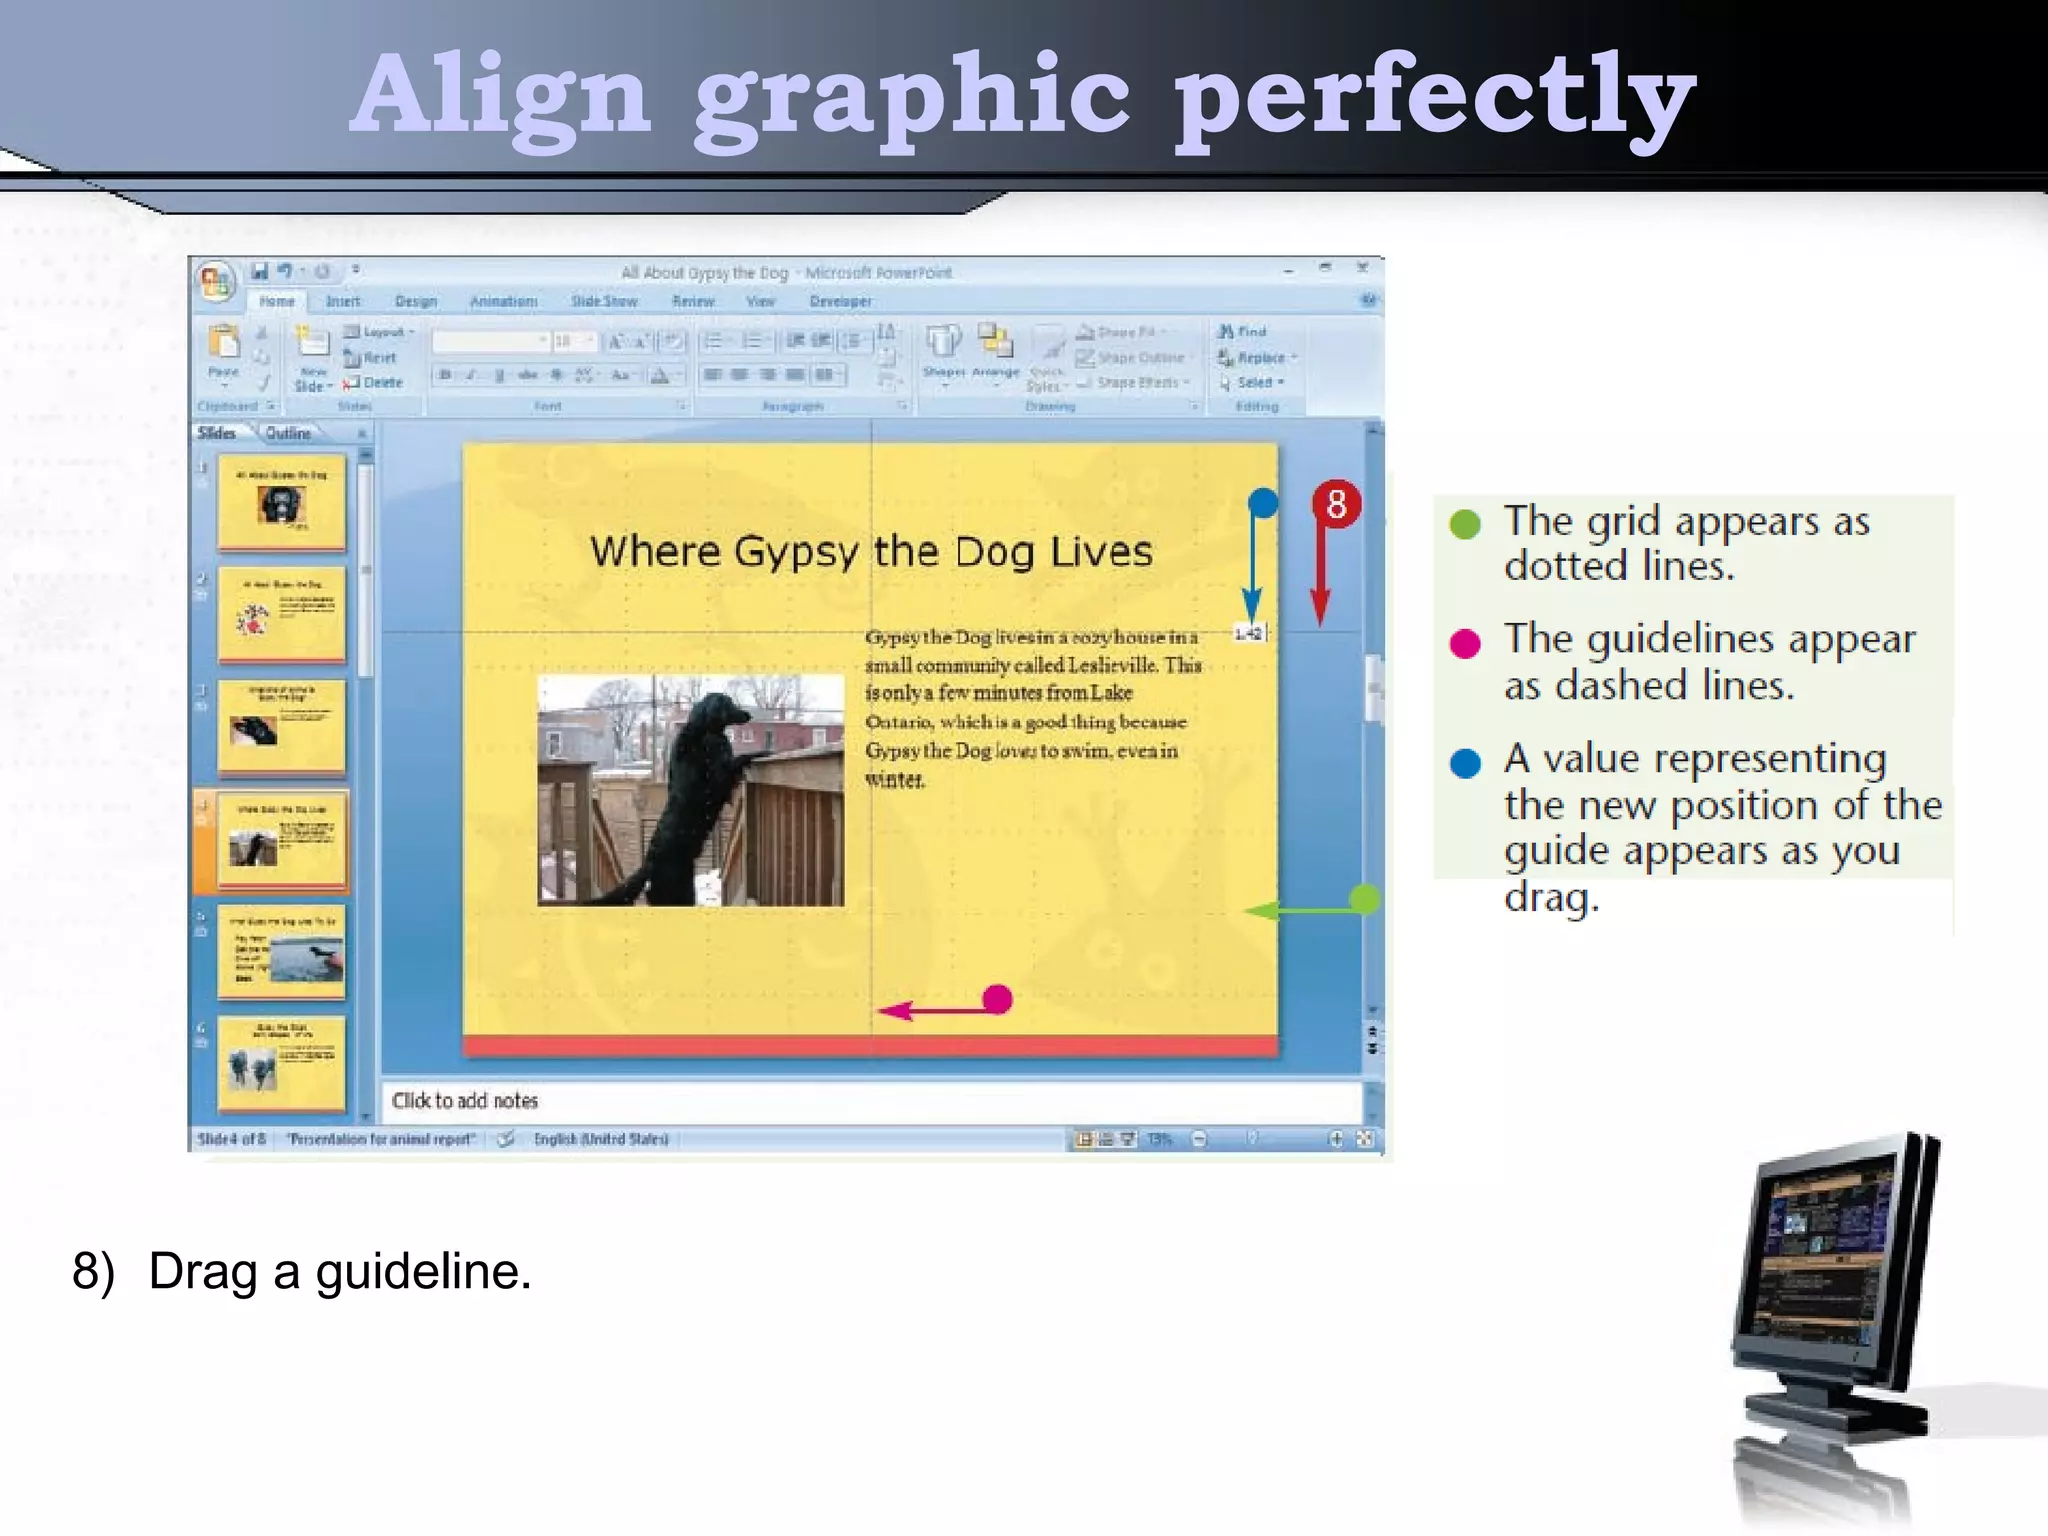
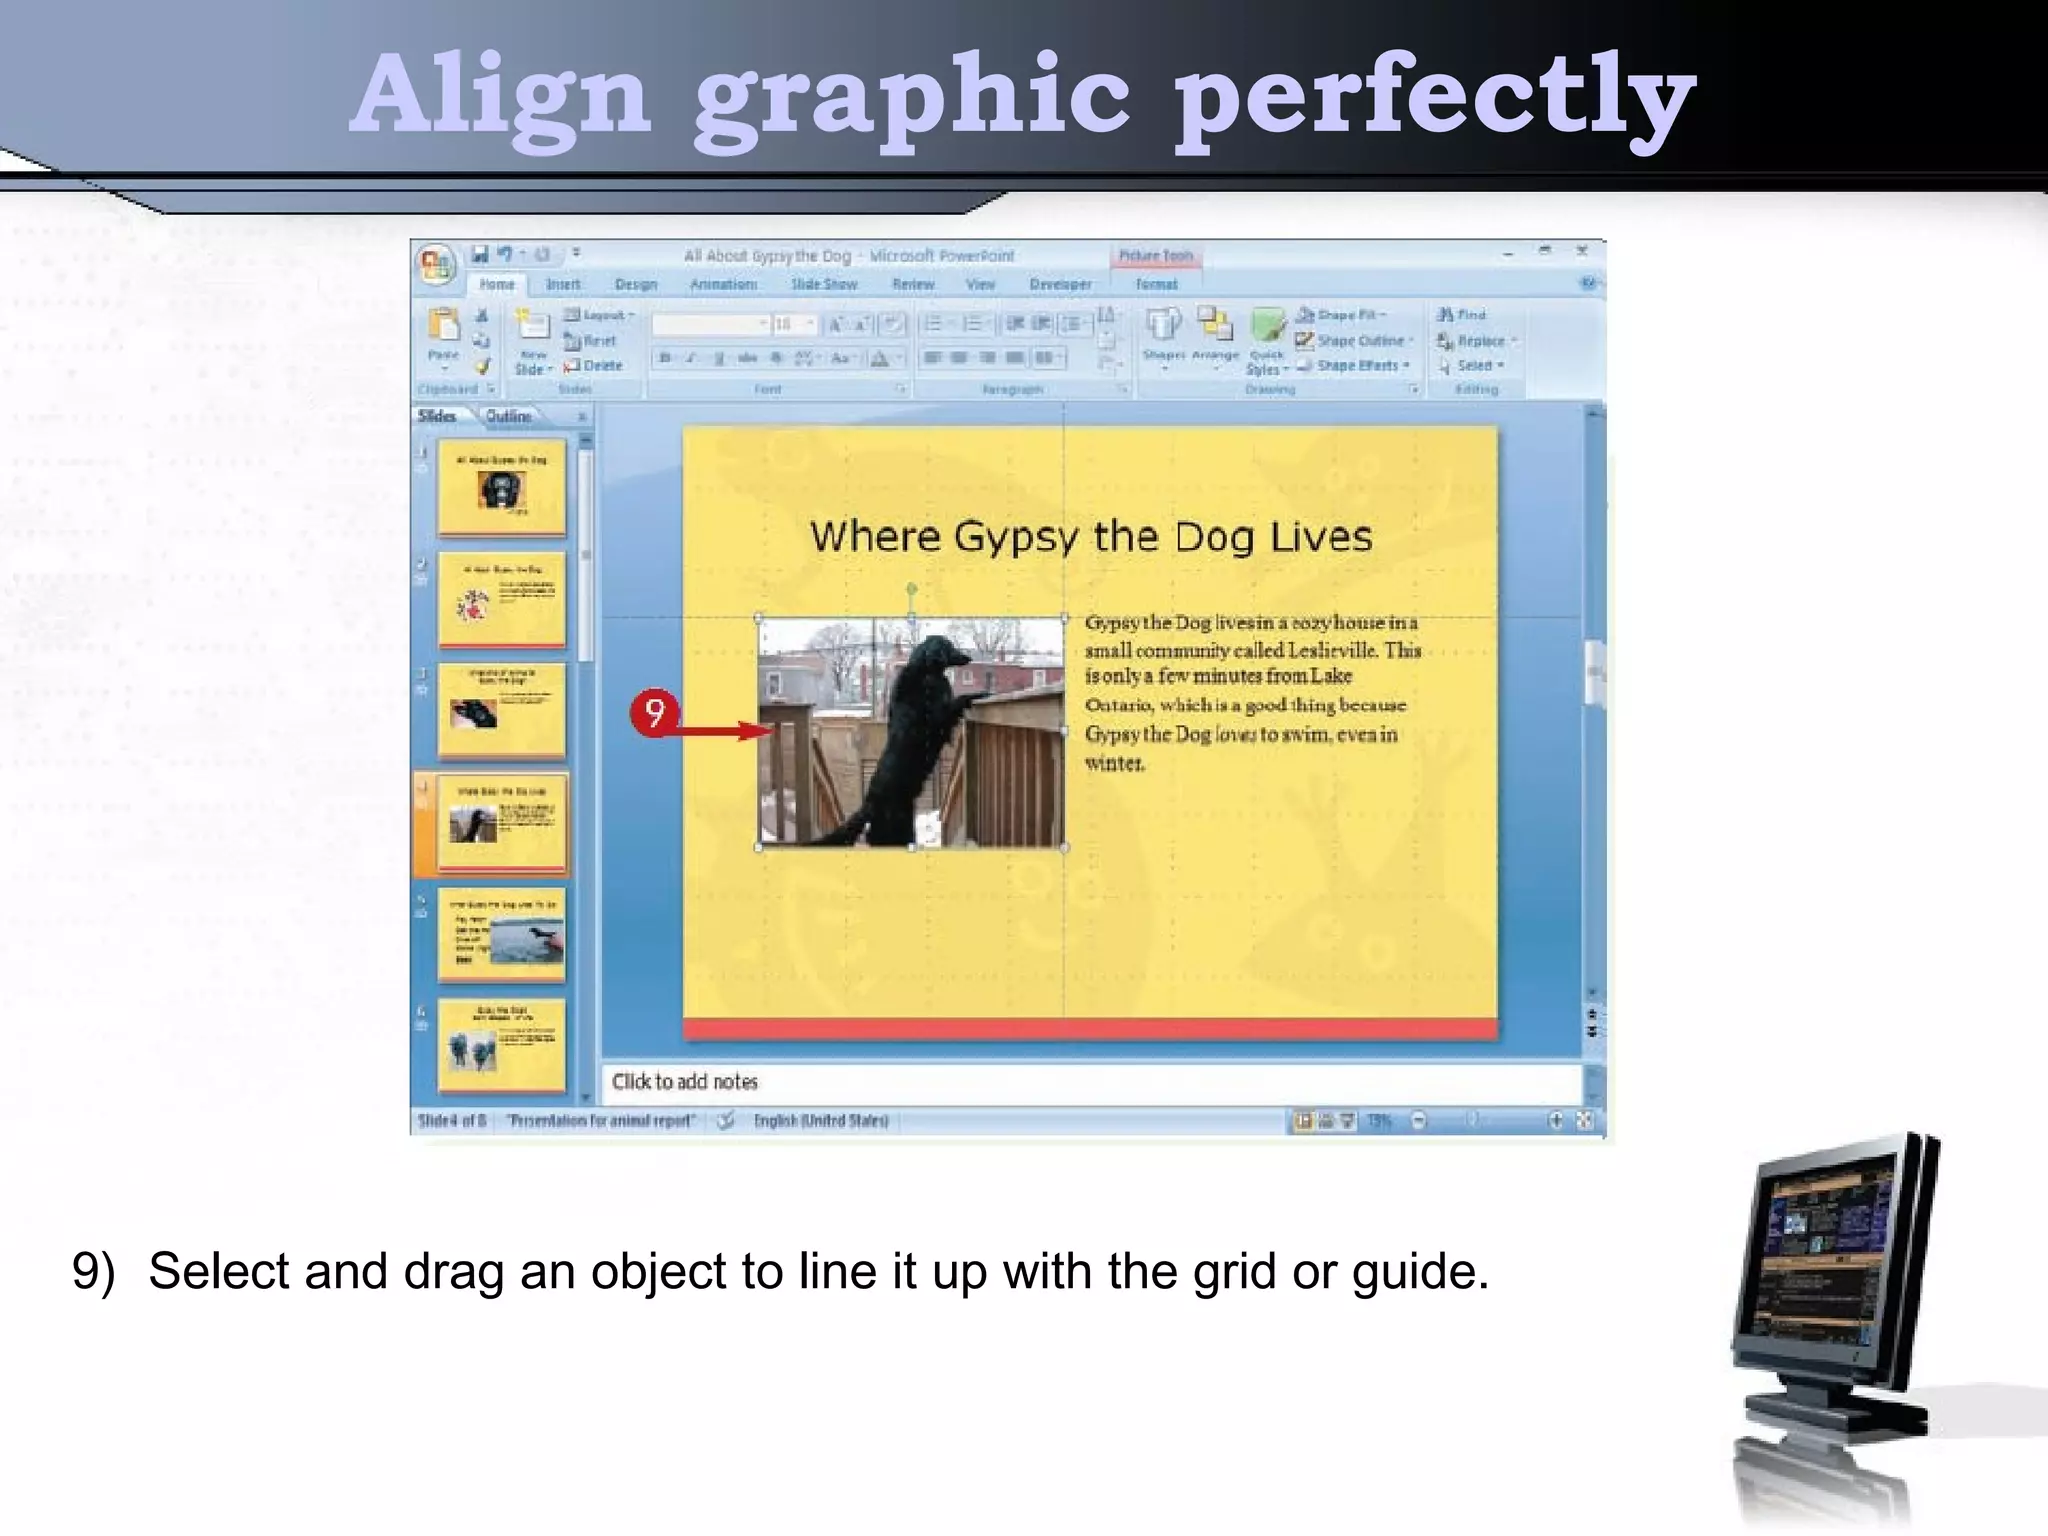
Computer
Application
Software
Chapter 4.0 :
Powerpoint
FP103 : C.A.S
Learning Outcome
  By the end of this topic, students shall be able
to :
1.Apply appropriate features of powerpoint package to
prepare standard presentation using window based or
open source application
Table of content
This slide content of :
1) Document default theme
2) Create Unique Bullets
3) Change the layout
4) Custom the background image
5) Smartart Graphic
6) Add connector lines
7) Border
8) Photo Album
9) 3D-Effect
10) Align graphic perfectly
1) Document default theme
SAVE THE CUSTOM DOCUMENT THEME
1) Click the Design tab.
2) Use the Themes group to apply custom colors, fonts, and effects.
3) In the Themes group, click the Themes gallery’s down arrow. The Themes gallery
appears.
4) Click Save Current Theme.
Make a document default theme
4) Type a filename. There’s no need to change the save folder. Using the default
location ensures that the custom theme will show up in the gallery of themes.
5) Click Save, PowerPoint adds the theme to the gallery in a special
Make a document default theme
SET THE CUSTOM THEME AS THE DEFAULT
1)Click the Design tab.
2)In the Themes group, click the Themes gallery’s down arrow.
Make a document default theme
3) Right-click the theme you want to set as the default.
4) Click Set as Default Theme. The theme immediately becomes the
default theme. Any blank presentation you create will use that theme.
2) Create Unique Bullets
1) Click and drag to select the text next to the bullets you want to change.
2) Click the Home tab.
3) Click the Bullets menu.
4) Click Bullets and Numbering.
Create Unique Bullets
5) Click Picture. The Picture Bullet dialog box appears.
6) Click Import.
Create Unique Bullets
7) Click here to locate the folder where your graphic files are stored.
8) Click the name of the graphic file you want to use in place of the
current bullet.
9) Click Add.
Create Unique Bullets
10)Click your custom bullet.
11)Click OK. The Picture Bullet and Bullets and Numbering dialog boxes close.
The presentation is updated with the new custom bullet.
3) Change the layout
4) Click one of the icons to insert a table, a chart, a picture, a diagram,
or a video clip.
Change the layout
5) Click the item you want to insert into the slide.
6) Click OK.
Change the layout
7) Fill or format the item as desired.
4) Custom the background image
1) Click the Design tab.
2) Click Background Styles.
3) Click Format Background.
Custom the background image
4) Click the Picture or texture fill option.
Custom the background image
5) Click File
Custom the background image
6) Click here and locate the folder containing the file you want to use as the
background image.
7) Click the file you want to use.
8) Click Insert. PowerPoint adds the background image to the slide.
Custom the background image
9) Click Apply to All.
10)Click Close.
Custom the background image
PowerPoint applies the background image to all the slides.
5) Smartart Graphic
1) Click the Insert tab.
2) Click SmartArt.
Smartart Graphic
3) Click a category.
4) Click the SmartArt graphic you want to insert.
5) Click OK.
Smartart Graphic
6) Use the Text Pane to type the text for each item you want to include in
the SmartArt graphic.
7) Click the Close button.
Smartart Graphic
8) Click the border of the SmartArt graphic.
9) Click and drag any corner of the image diagonally toward the opposite corner of
the image to resize the graphic.
10)Click the Design tab.
Smartart Graphic
8) Click the border of the SmartArt graphic.
9) Click and drag any corner of the image diagonally toward the opposite corner of
the image to resize the graphic.
10)Click the Design tab.
6) Add connector lines
1) Display the slide containing the two objects you want to connect.
2) Click the Insert tab.
3) Click Shapes.
4) Click the connector style you want to apply.
Add connector lines
5) Position the mouse pointer over the first item.
6) Click the handle you want to use as the anchor point.
Add connector lines
7) Drag the other end of the connector over the object to which you want to connect.
8) Click the handle you want to use as the second anchor point.
Add connector lines
7) Drag the other end of the connector over the object to which you want to connect.
8) Click the handle you want to use as the second anchor point.
7) Border
1) Right-click the image
2) Click Format Picture
Border
3) Click Line Color.
4) Click the Solid line option
5) Click the Color menu button.
6) Click the color you want to use for the border.
Border
7) Click Line Style.
8) Use the Width spin box to set the width of the border.
9) Click Close.
Border
PowerPoint updates the image with the new border.
8) Photo Album
1) Click the Insert tab.
2) Click the top portion of the Photo Album button.
Photo Album
3) Click File/Disk.
Photo Album
4) Navigate to the folder that holds the image files that you want to
insert into the album.
5) Select the picture files to insert.
6) Click Insert.
Photo Album
7) Adjust the photo album by choosing the desired settings.
8) Click Create.
Photo Album
7) Adjust the photo album by choosing the desired settings.
8) Click Create.
9) 3D - Effect
1) Click the shape to which you want to add a 3-D effect.
2) Click the Format tab.
3D - Effect
3) Click Shape Effects
4) Click 3-D Rotation.
5) Click the 3-D rotation effect you want to use.
10) Align graphic perfectly
1) Click the Home tab.
2) Click Arrange.
3) Click Align.
4) Click Grid Settings..
Align graphic perfectly
5) Click to activate the Display grid on screen check box
6) Click to activate the Display drawing guides on screen check box
7) Click OK.
Align graphic perfectly
8) Drag a guideline.
Align graphic perfectly
9) Select and drag an object to line it up with the grid or guide.
Align graphic perfectly
9) Select and drag an object to line it up with the grid or guide.

Powerponint

  • 1.
  • 2.
    Learning Outcome   Bythe end of this topic, students shall be able to : 1.Apply appropriate features of powerpoint package to prepare standard presentation using window based or open source application
  • 3.
    Table of content Thisslide content of : 1) Document default theme 2) Create Unique Bullets 3) Change the layout 4) Custom the background image 5) Smartart Graphic 6) Add connector lines 7) Border 8) Photo Album 9) 3D-Effect 10) Align graphic perfectly
  • 4.
    1) Document defaulttheme SAVE THE CUSTOM DOCUMENT THEME 1) Click the Design tab. 2) Use the Themes group to apply custom colors, fonts, and effects. 3) In the Themes group, click the Themes gallery’s down arrow. The Themes gallery appears. 4) Click Save Current Theme.
  • 5.
    Make a documentdefault theme 4) Type a filename. There’s no need to change the save folder. Using the default location ensures that the custom theme will show up in the gallery of themes. 5) Click Save, PowerPoint adds the theme to the gallery in a special
  • 6.
    Make a documentdefault theme SET THE CUSTOM THEME AS THE DEFAULT 1)Click the Design tab. 2)In the Themes group, click the Themes gallery’s down arrow.
  • 7.
    Make a documentdefault theme 3) Right-click the theme you want to set as the default. 4) Click Set as Default Theme. The theme immediately becomes the default theme. Any blank presentation you create will use that theme.
  • 8.
    2) Create UniqueBullets 1) Click and drag to select the text next to the bullets you want to change. 2) Click the Home tab. 3) Click the Bullets menu. 4) Click Bullets and Numbering.
  • 9.
    Create Unique Bullets 5)Click Picture. The Picture Bullet dialog box appears. 6) Click Import.
  • 10.
    Create Unique Bullets 7)Click here to locate the folder where your graphic files are stored. 8) Click the name of the graphic file you want to use in place of the current bullet. 9) Click Add.
  • 11.
    Create Unique Bullets 10)Clickyour custom bullet. 11)Click OK. The Picture Bullet and Bullets and Numbering dialog boxes close. The presentation is updated with the new custom bullet.
  • 12.
    3) Change thelayout 4) Click one of the icons to insert a table, a chart, a picture, a diagram, or a video clip.
  • 13.
    Change the layout 5)Click the item you want to insert into the slide. 6) Click OK.
  • 14.
    Change the layout 7)Fill or format the item as desired.
  • 15.
    4) Custom thebackground image 1) Click the Design tab. 2) Click Background Styles. 3) Click Format Background.
  • 16.
    Custom the backgroundimage 4) Click the Picture or texture fill option.
  • 17.
    Custom the backgroundimage 5) Click File
  • 18.
    Custom the backgroundimage 6) Click here and locate the folder containing the file you want to use as the background image. 7) Click the file you want to use. 8) Click Insert. PowerPoint adds the background image to the slide.
  • 19.
  • 20.
    Custom the backgroundimage 9) Click Apply to All. 10)Click Close.
  • 21.
    Custom the backgroundimage PowerPoint applies the background image to all the slides.
  • 22.
    5) Smartart Graphic 1)Click the Insert tab. 2) Click SmartArt.
  • 23.
    Smartart Graphic 3) Clicka category. 4) Click the SmartArt graphic you want to insert. 5) Click OK.
  • 24.
    Smartart Graphic 6) Usethe Text Pane to type the text for each item you want to include in the SmartArt graphic. 7) Click the Close button.
  • 25.
    Smartart Graphic 8) Clickthe border of the SmartArt graphic. 9) Click and drag any corner of the image diagonally toward the opposite corner of the image to resize the graphic. 10)Click the Design tab.
  • 26.
    Smartart Graphic 8) Clickthe border of the SmartArt graphic. 9) Click and drag any corner of the image diagonally toward the opposite corner of the image to resize the graphic. 10)Click the Design tab.
  • 27.
    6) Add connectorlines 1) Display the slide containing the two objects you want to connect. 2) Click the Insert tab. 3) Click Shapes. 4) Click the connector style you want to apply.
  • 28.
    Add connector lines 5)Position the mouse pointer over the first item. 6) Click the handle you want to use as the anchor point.
  • 29.
    Add connector lines 7)Drag the other end of the connector over the object to which you want to connect. 8) Click the handle you want to use as the second anchor point.
  • 30.
    Add connector lines 7)Drag the other end of the connector over the object to which you want to connect. 8) Click the handle you want to use as the second anchor point.
  • 31.
    7) Border 1) Right-clickthe image 2) Click Format Picture
  • 32.
    Border 3) Click LineColor. 4) Click the Solid line option 5) Click the Color menu button. 6) Click the color you want to use for the border.
  • 33.
    Border 7) Click LineStyle. 8) Use the Width spin box to set the width of the border. 9) Click Close.
  • 34.
    Border PowerPoint updates theimage with the new border.
  • 35.
    8) Photo Album 1)Click the Insert tab. 2) Click the top portion of the Photo Album button.
  • 36.
  • 37.
    Photo Album 4) Navigateto the folder that holds the image files that you want to insert into the album. 5) Select the picture files to insert. 6) Click Insert.
  • 38.
    Photo Album 7) Adjustthe photo album by choosing the desired settings. 8) Click Create.
  • 39.
    Photo Album 7) Adjustthe photo album by choosing the desired settings. 8) Click Create.
  • 40.
    9) 3D -Effect 1) Click the shape to which you want to add a 3-D effect. 2) Click the Format tab.
  • 41.
    3D - Effect 3)Click Shape Effects 4) Click 3-D Rotation. 5) Click the 3-D rotation effect you want to use.
  • 42.
    10) Align graphicperfectly 1) Click the Home tab. 2) Click Arrange. 3) Click Align. 4) Click Grid Settings..
  • 43.
    Align graphic perfectly 5)Click to activate the Display grid on screen check box 6) Click to activate the Display drawing guides on screen check box 7) Click OK.
  • 44.
    Align graphic perfectly 8)Drag a guideline.
  • 45.
    Align graphic perfectly 9)Select and drag an object to line it up with the grid or guide.
  • 46.
    Align graphic perfectly 9)Select and drag an object to line it up with the grid or guide.