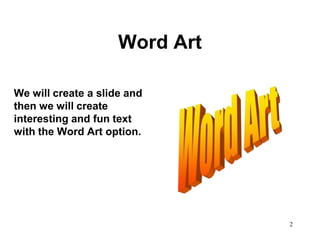
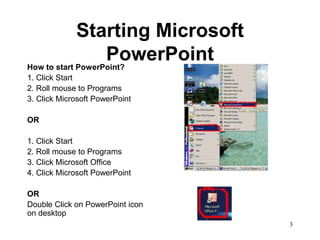
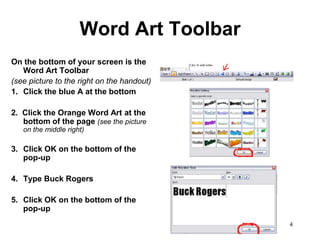
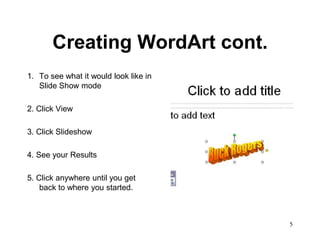
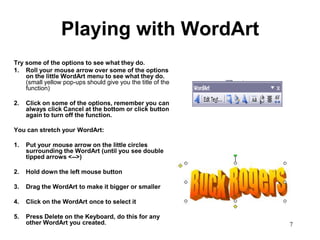
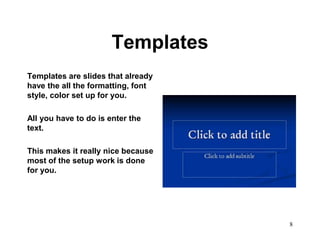
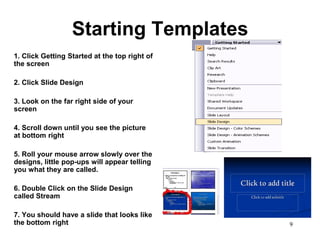
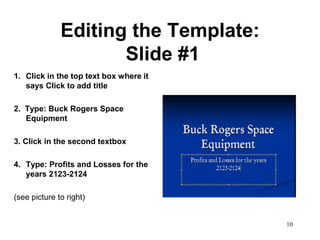
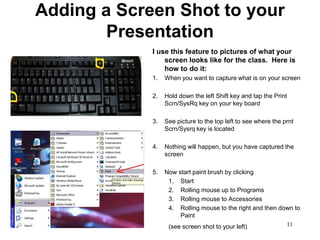
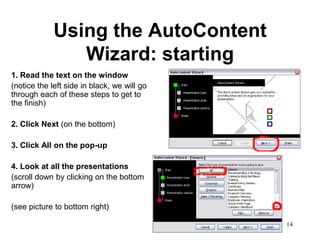
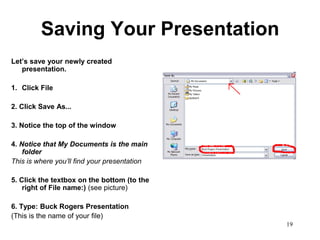
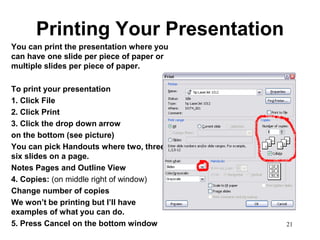
Microsoft PowerPoint
           Class 4
     Word Art, Templates,
     Saving and Printing


                            1
Word Art

We will create a slide and
then we will create
interesting and fun text
with the Word Art option.


                                2
Starting Microsoft
                   PowerPoint
How to start PowerPoint?
1. Click Start
2. Roll mouse to Programs
3. Click Microsoft PowerPoint

OR

1. Click Start
2. Roll mouse to Programs
3. Click Microsoft Office
4. Click Microsoft PowerPoint

OR
Double Click on PowerPoint icon
on desktop
                                  3
Word Art Toolbar
On the bottom of your screen is the
   Word Art Toolbar
(see picture to the right on the handout)
1. Click the blue A at the bottom

2. Click the Orange Word Art at the
   bottom of the page (see the picture
   on the middle right)

3. Click OK on the bottom of the
   pop-up

4. Type Buck Rogers

5. Click OK on the bottom of the
   pop-up
                                            4
Creating WordArt cont.
1. To see what it would look like in
   Slide Show mode

2. Click View

3. Click Slideshow

4. See your Results

5. Click anywhere until you get
    back to where you started.


                                       5
Customizing WordArt
On the WordArt Menu you can change
the characteristics of the
WordArt
1. Click Buck Rogers (notice the little
circles around it, this shows it has been
selected)

2. Click the little blue A off the MIDDLE
of the little WordArt toolbar (not the first
blue A)
(see picture on the top right)

3. Click the shape on the middle left
(see picture to the top right)

4. Click the little blue A off the middle of
the little WordArt toolbar and select
another shape.
                                               6
Playing with WordArt
Try some of the options to see what they do.
1. Roll your mouse arrow over some of the options
    on the little WordArt menu to see what they do.
    (small yellow pop-ups should give you the title of the
    function)

2.   Click on some of the options, remember you can
     always click Cancel at the bottom or click button
     again to turn off the function.

You can stretch your WordArt:

1.   Put your mouse arrow on the little circles
     surrounding the WordArt (until you see double
     tipped arrows <-->)

2.   Hold down the left mouse button

3.   Drag the WordArt to make it bigger or smaller

4.   Click on the WordArt once to select it

5.   Press Delete on the Keyboard, do this for any
     other WordArt you created.                              7
Templates
Templates are slides that already
have the all the formatting, font
style, color set up for you.

All you have to do is enter the
text.

This makes it really nice because
most of the setup work is done
for you.


                                    8
Starting Templates
1. Click Getting Started at the top right of
the screen

2. Click Slide Design

3. Look on the far right side of your
screen

4. Scroll down until you see the picture
at bottom right

5. Roll your mouse arrow slowly over the
designs, little pop-ups will appear telling
you what they are called.

6. Double Click on the Slide Design
called Stream

7. You should have a slide that looks like
the bottom right                               9
Editing the Template:
                     Slide #1
1. Click in the top text box where it
   says Click to add title

2. Type: Buck Rogers Space
   Equipment

3. Click in the second textbox

4. Type: Profits and Losses for the
   years 2123-2124

(see picture to right)


                                        10
Adding a Screen Shot to your
        Presentation
             I use this feature to pictures of what your
                 screen looks like for the class. Here is
                 how to do it:
             1.   When you want to capture what is on your screen

             2.   Hold down the left Shift key and tap the Print
                  Scrn/SysRq key on your key board

             3.   See picture to the top left to see where the prnt
                  Scrn/Sysrq key is located

             4.   Nothing will happen, but you have captured the
                  screen

             5.   Now start paint brush by clicking
                   1. Start
                   2. Rolling mouse up to Programs
                   3. Rolling mouse to Accessories
                   4. Rolling mouse to the right and then down to
                       Paint
                   (see screen shot to your left)           11
Adding a screen shot to your
     Presentation cont.
          1.   Click on Edit (at the top of screen)

          2.   Click on Paste

          3.   Your screen shot will be pasted in your paint brush window.

          4.   Click the maximize button on the top right hand corner (it is
               located next to the red X.

          5.   You can use the other features on the paintbrush toolbar to
               draw lines and circles.

          6.   Now you can click the crop button (see picture middle left) to
               draw a square around the part of the picture you want.

          7.   Click Edit

          8.   Click Copy

          9.   Go back to your presentation – by clicking on Microsoft
               Powerpoint on the bottom of your screen

          10. Click Edit and then Paste

          11. Here you can drag the screen shot to where you want it and
              resize it. (see first handout for directions)

                                                                         12
Using AutoContent Wizard
AutoContent Wizard - takes you step by
   step by first choosing the type of
   presentation, then
you choose the template you want and
   then edit your template.

We will go through the process of using
   the AutoContent Wizard

1. Click Slide Design on the top right
   corner

2. Click New Presentation (on the far
    right on your screen)

3. (see picture to the right)

4. Click From the AutoContent Wizard on
    the top right (see the screen on the
    far right)
                                           13
Using the AutoContent
                Wizard: starting
1. Read the text on the window
(notice the left side in black, we will go
through each of these steps to get to
the finish)

2. Click Next (on the bottom)

3. Click All on the pop-up

4. Look at all the presentations
(scroll down by clicking on the bottom
arrow)

(see picture to bottom right)

                                             14
Using the AutoContent
             Wizard: Choosing type
We’ll use Recommending a Strategy

1. Click Recommending a Strategy (on the
right side in the white area)

2. Notice the steps on the left side shows
where we are: (there is a green square by
Presentation type)

3. Click Next> (on the bottom)
(see picture to right)

4. Click the On-screen presentation
(should be a green dot in the circle to the
left)
(notice what you can do, see the other
styles…web presentation, black and white
overheads..etc.)
                                              15
5. Click Next at the bottom of pop-up
Using the AutoContent
     Wizard: Presentation Options
Now we are going to give our
  presentation a title.

1. Click in the textbox to place the
   cursor there.

2. Type in Buck Rogers Space
    Equipment in the textbox
(see picture top right)

3. Click Next > on the bottom on the
    pop-up
(see picture to the bottom right)

4. Click Finish at the bottom of the pop-
    up

You have finished the wizard
                                            16
Using AutoContent Wizard:
              Finish
Here is your result!
You can edit this presentation
1. Click slide two on the left side (on
   the little square in front of vision)

2. Click in the lower text box

3. Highlight State the vision and long
    term direction

4. Press the delete

5. Type: To explore strange new worlds
    and seek out civilizations and sell
    space equipment to every person
    and alien we meet.
                                           17
Changing Your Presentation
             Design
1. Click Format

2. Click Slide Design

3. Look on the far right side of
your screen

4. Scroll down the design menu
Double click on the design of
your choice.

5. See your results! If you don’t
like that design, find another one
and double click on it!

                                     18
Saving Your Presentation
Let’s save your newly created
   presentation.

1. Click File

2. Click Save As...

3. Notice the top of the window

4. Notice that My Documents is the main
    folder
This is where you’ll find your presentation

5. Click the textbox on the bottom (to the
    right of File name:) (see picture)

6. Type: Buck Rogers Presentation
(This is the name of your file)
                                              19
Finding Your Presentation
Closing your presentation
1. Click File

2. Click Close

Click File and Click Close on the paint brush
    screen, Click NO on the do you want to
    save your changes.

Opening your presentation

1. Click File

2. Look at the bottom of the File menu

3. See picture to right

4. Click on Buck Rogers Presentation

This is the quick way
                                                20
Printing Your Presentation
You can print the presentation where you
can have one slide per piece of paper or
multiple slides per piece of paper.

To print your presentation
1. Click File
2. Click Print
3. Click the drop down arrow
on the bottom (see picture)
You can pick Handouts where two, three,
six slides on a page.
Notes Pages and Outline View
4. Copies: (on middle right of window)
Change number of copies
We won’t be printing but I’ll have
examples of what you can do.
5. Press Cancel on the bottom window       21
Questions?
We have learned a lot in these
past 4 weeks.

I have enjoyed teaching you.

Look forward to seeing you
again.


                                 22

Powerpoint class 4

  • 1.
    Microsoft PowerPoint Class 4 Word Art, Templates, Saving and Printing 1
  • 2.
    Word Art We willcreate a slide and then we will create interesting and fun text with the Word Art option. 2
  • 3.
    Starting Microsoft PowerPoint How to start PowerPoint? 1. Click Start 2. Roll mouse to Programs 3. Click Microsoft PowerPoint OR 1. Click Start 2. Roll mouse to Programs 3. Click Microsoft Office 4. Click Microsoft PowerPoint OR Double Click on PowerPoint icon on desktop 3
  • 4.
    Word Art Toolbar Onthe bottom of your screen is the Word Art Toolbar (see picture to the right on the handout) 1. Click the blue A at the bottom 2. Click the Orange Word Art at the bottom of the page (see the picture on the middle right) 3. Click OK on the bottom of the pop-up 4. Type Buck Rogers 5. Click OK on the bottom of the pop-up 4
  • 5.
    Creating WordArt cont. 1.To see what it would look like in Slide Show mode 2. Click View 3. Click Slideshow 4. See your Results 5. Click anywhere until you get back to where you started. 5
  • 6.
    Customizing WordArt On theWordArt Menu you can change the characteristics of the WordArt 1. Click Buck Rogers (notice the little circles around it, this shows it has been selected) 2. Click the little blue A off the MIDDLE of the little WordArt toolbar (not the first blue A) (see picture on the top right) 3. Click the shape on the middle left (see picture to the top right) 4. Click the little blue A off the middle of the little WordArt toolbar and select another shape. 6
  • 7.
    Playing with WordArt Trysome of the options to see what they do. 1. Roll your mouse arrow over some of the options on the little WordArt menu to see what they do. (small yellow pop-ups should give you the title of the function) 2. Click on some of the options, remember you can always click Cancel at the bottom or click button again to turn off the function. You can stretch your WordArt: 1. Put your mouse arrow on the little circles surrounding the WordArt (until you see double tipped arrows <-->) 2. Hold down the left mouse button 3. Drag the WordArt to make it bigger or smaller 4. Click on the WordArt once to select it 5. Press Delete on the Keyboard, do this for any other WordArt you created. 7
  • 8.
    Templates Templates are slidesthat already have the all the formatting, font style, color set up for you. All you have to do is enter the text. This makes it really nice because most of the setup work is done for you. 8
  • 9.
    Starting Templates 1. ClickGetting Started at the top right of the screen 2. Click Slide Design 3. Look on the far right side of your screen 4. Scroll down until you see the picture at bottom right 5. Roll your mouse arrow slowly over the designs, little pop-ups will appear telling you what they are called. 6. Double Click on the Slide Design called Stream 7. You should have a slide that looks like the bottom right 9
  • 10.
    Editing the Template: Slide #1 1. Click in the top text box where it says Click to add title 2. Type: Buck Rogers Space Equipment 3. Click in the second textbox 4. Type: Profits and Losses for the years 2123-2124 (see picture to right) 10
  • 11.
    Adding a ScreenShot to your Presentation I use this feature to pictures of what your screen looks like for the class. Here is how to do it: 1. When you want to capture what is on your screen 2. Hold down the left Shift key and tap the Print Scrn/SysRq key on your key board 3. See picture to the top left to see where the prnt Scrn/Sysrq key is located 4. Nothing will happen, but you have captured the screen 5. Now start paint brush by clicking 1. Start 2. Rolling mouse up to Programs 3. Rolling mouse to Accessories 4. Rolling mouse to the right and then down to Paint (see screen shot to your left) 11
  • 12.
    Adding a screenshot to your Presentation cont. 1. Click on Edit (at the top of screen) 2. Click on Paste 3. Your screen shot will be pasted in your paint brush window. 4. Click the maximize button on the top right hand corner (it is located next to the red X. 5. You can use the other features on the paintbrush toolbar to draw lines and circles. 6. Now you can click the crop button (see picture middle left) to draw a square around the part of the picture you want. 7. Click Edit 8. Click Copy 9. Go back to your presentation – by clicking on Microsoft Powerpoint on the bottom of your screen 10. Click Edit and then Paste 11. Here you can drag the screen shot to where you want it and resize it. (see first handout for directions) 12
  • 13.
    Using AutoContent Wizard AutoContentWizard - takes you step by step by first choosing the type of presentation, then you choose the template you want and then edit your template. We will go through the process of using the AutoContent Wizard 1. Click Slide Design on the top right corner 2. Click New Presentation (on the far right on your screen) 3. (see picture to the right) 4. Click From the AutoContent Wizard on the top right (see the screen on the far right) 13
  • 14.
    Using the AutoContent Wizard: starting 1. Read the text on the window (notice the left side in black, we will go through each of these steps to get to the finish) 2. Click Next (on the bottom) 3. Click All on the pop-up 4. Look at all the presentations (scroll down by clicking on the bottom arrow) (see picture to bottom right) 14
  • 15.
    Using the AutoContent Wizard: Choosing type We’ll use Recommending a Strategy 1. Click Recommending a Strategy (on the right side in the white area) 2. Notice the steps on the left side shows where we are: (there is a green square by Presentation type) 3. Click Next> (on the bottom) (see picture to right) 4. Click the On-screen presentation (should be a green dot in the circle to the left) (notice what you can do, see the other styles…web presentation, black and white overheads..etc.) 15 5. Click Next at the bottom of pop-up
  • 16.
    Using the AutoContent Wizard: Presentation Options Now we are going to give our presentation a title. 1. Click in the textbox to place the cursor there. 2. Type in Buck Rogers Space Equipment in the textbox (see picture top right) 3. Click Next > on the bottom on the pop-up (see picture to the bottom right) 4. Click Finish at the bottom of the pop- up You have finished the wizard 16
  • 17.
    Using AutoContent Wizard: Finish Here is your result! You can edit this presentation 1. Click slide two on the left side (on the little square in front of vision) 2. Click in the lower text box 3. Highlight State the vision and long term direction 4. Press the delete 5. Type: To explore strange new worlds and seek out civilizations and sell space equipment to every person and alien we meet. 17
  • 18.
    Changing Your Presentation Design 1. Click Format 2. Click Slide Design 3. Look on the far right side of your screen 4. Scroll down the design menu Double click on the design of your choice. 5. See your results! If you don’t like that design, find another one and double click on it! 18
  • 19.
    Saving Your Presentation Let’ssave your newly created presentation. 1. Click File 2. Click Save As... 3. Notice the top of the window 4. Notice that My Documents is the main folder This is where you’ll find your presentation 5. Click the textbox on the bottom (to the right of File name:) (see picture) 6. Type: Buck Rogers Presentation (This is the name of your file) 19
  • 20.
    Finding Your Presentation Closingyour presentation 1. Click File 2. Click Close Click File and Click Close on the paint brush screen, Click NO on the do you want to save your changes. Opening your presentation 1. Click File 2. Look at the bottom of the File menu 3. See picture to right 4. Click on Buck Rogers Presentation This is the quick way 20
  • 21.
    Printing Your Presentation Youcan print the presentation where you can have one slide per piece of paper or multiple slides per piece of paper. To print your presentation 1. Click File 2. Click Print 3. Click the drop down arrow on the bottom (see picture) You can pick Handouts where two, three, six slides on a page. Notes Pages and Outline View 4. Copies: (on middle right of window) Change number of copies We won’t be printing but I’ll have examples of what you can do. 5. Press Cancel on the bottom window 21
  • 22.
    Questions? We have learneda lot in these past 4 weeks. I have enjoyed teaching you. Look forward to seeing you again. 22