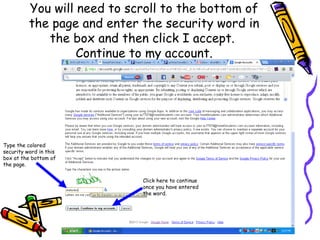
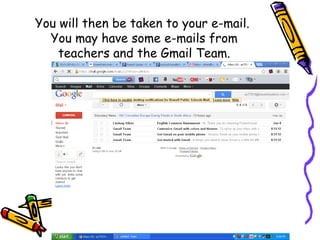
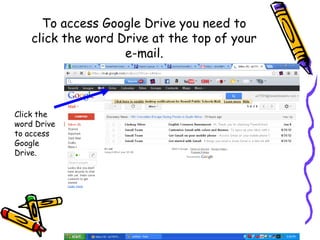
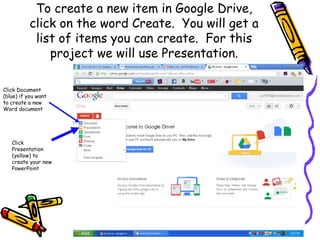
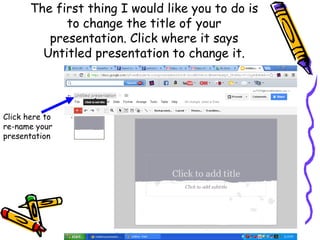
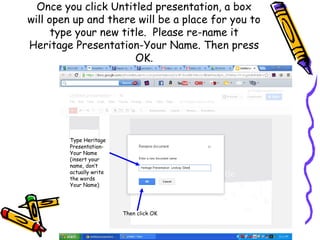
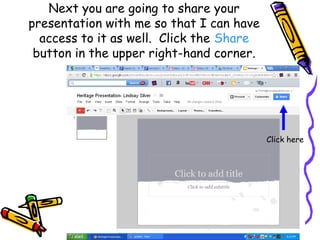
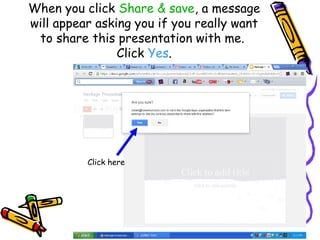
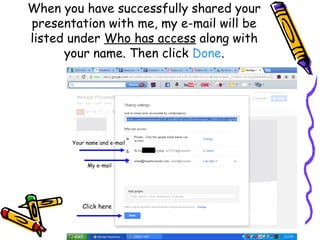
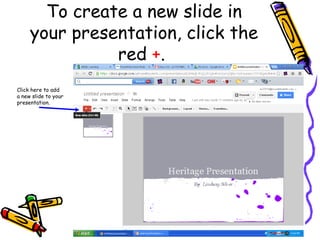
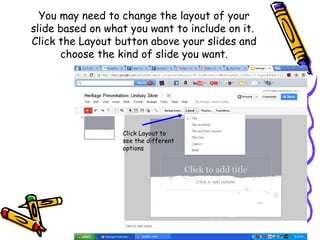
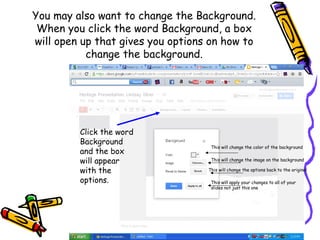
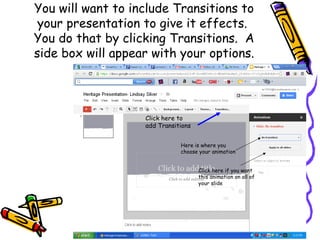
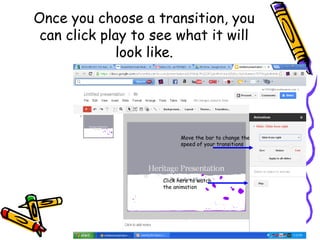
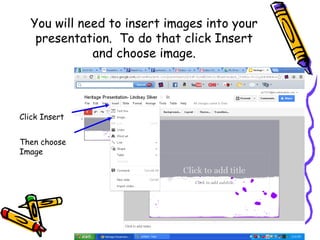
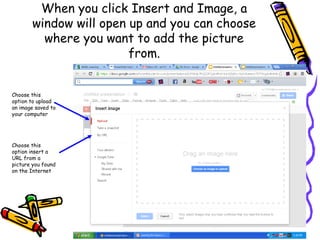
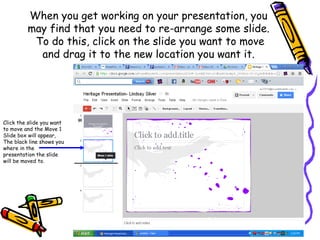
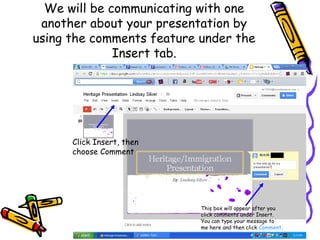
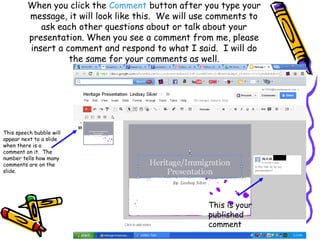
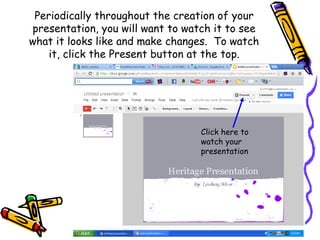
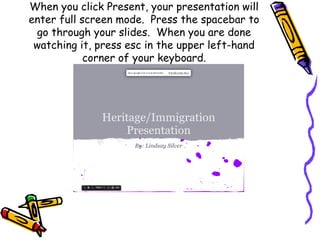
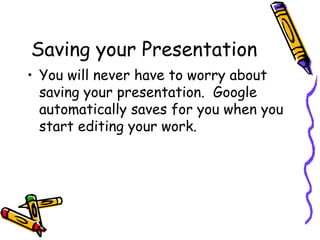
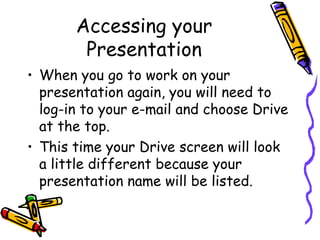
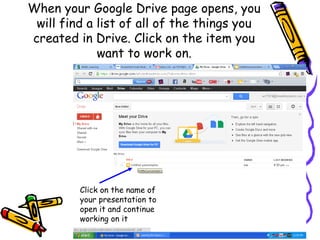
This document provides instructions for students on how to access and use their school-provided Gmail and Google Drive accounts. It explains how to log in, access Google Drive, create and share a Google Slides presentation, add slides, images, transitions and comments. It also covers how to save the presentation and access it again later to continue working. The overall purpose is to teach students the basics of using these Google tools to collaborate on class projects.
Stencil is an Online tool that allows you to create beautiful images for posts, ads, banners, and stunning front-end images for your websites and videos. This tutorial will help you create a Social Media post and learn about the features that Stencil could offer.
The presentation from our "Intermediate Gmail" course.
Learn more about Gmail, a free email service, set-up an account, and learn new skills such as vacation responders, labels, and themes.
Gmail is a web-based e-mail service provided by Google. Gmail offers unique features that make it easy to find, sort, and manage your e-mail and contacts. This webinar will introduce other services that Google offers with your Gmail account including cloud-based document sharing and calendaring – and more.
Step-by-step instructions from our "Introduction to Gmail" course.
Learn all about Gmail, a free email service, set-up an account, and learn the basics of creating, sending, and forwarding a message.
The presentation from our "Introduction to Gmail" course.
Learn all about Gmail, a free email service, set-up an account, and learn the basics of creating, sending, and forwarding a message.
Prezi is the presentation platform that helps you connect more powerfully with your audience and customers. Unlike slides, Prezi's single, interactive canvas
2. Howell Student Email
• Did you know that you have an e-mail
account through the school?
• You can easily access your e-mail
from any computer that is connected
to the Internet.
3. Accessing your E-mail
• The first thing you need to do is go to the
Howell Schools Homepage Click here
• or go to www.howellschools.com.
4. Once you get to the homepage, click on the
green link that says Student Google Apps.
This will take you to a log-in screen.
Click here
5. When you click the Student Google
Apps link, it will take you to a page that
looks like this.
6. To log-in, your username is your
PowerSchool login and your password is
your Student ID number.
First initial of
your first name,
first initial of
your last name
and 5 numbers
Student ID
number ex:
9901…. Or
8000….
7. The first time you log in to your e-mail you will
have to set up your account. Once you enter
your username and password it will take you to
a screen that looks like this.
8. You will need to scroll to the bottom of
the page and enter the security word in
the box and then click I accept.
Continue to my account.
Type the colored
security word in this
box at the bottom of
the page.
Click here to continue
once you have entered
the word.
9. You will then be taken to your e-mail.
You may have some e-mails from
teachers and the Gmail Team.
10. To access Google Drive you need to
click the word Drive at the top of your
e-mail.
Click the
word Drive
to access
Google
Drive.
11. When you click Drive, it will open
up a new window that looks like
this.
12. To create a new item in Google Drive,
click on the word Create. You will get a
list of items you can create. For this
project we will use Presentation.
Click Document
(blue) if you want
to create a new
Word document
Click
Presentation
(yellow) to
create your new
PowerPoint
13. When you select Presentation, a new window will open
that will look like this. You will need to choose the
theme of your presentation (what you want the slides to
look like). You can change it later if you decide you
don’t like it or want something else.
14. The first thing I would like you to do is
to change the title of your
presentation. Click where it says
Untitled presentation to change it.
Click here to
re-name your
presentation
15. Once you click Untitled presentation, a box
will open up and there will be a place for you to
type your new title. Please re-name it
Heritage Presentation-Your Name. Then press
OK.
Type Heritage
Presentation-
Your Name
(insert your
name, don’t
actually write
the words
Your Name)
Then click OK
16. Next you are going to share your
presentation with me so that I can have
access to it as well. Click the Share
button in the upper right-hand corner.
Click here
17. When you click Share, a window will
open like this one. Down at the bottom
you are going to type in my e-mail. Then
click Share & save.
In this box type my e-mail:
silverl@howellschools.com
Then click
here
18. When you click Share & save, a message
will appear asking you if you really want
to share this presentation with me.
Click Yes.
Click here
19. When you have successfully shared your
presentation with me, my e-mail will be
listed under Who has access along with
your name. Then click Done.
Your name and e-mail
My e-mail
Click here
20. To create a new slide in
your presentation, click the
red +.
Click here to add
a new slide to your
presentation.
21. You may need to change the layout of your
slide based on what you want to include on it.
Click the Layout button above your slides and
choose the kind of slide you want.
Click Layout to
see the different
options
22. You may also want to change the Background.
When you click the word Background, a box
will open up that gives you options on how to
change the background.
Click the word
Background
This will change the color of the background
and the box
will appear This will change the image on the background
with the This will change the options back to the original
options. This will apply your changes to all of your
slides not just this one
23. You will want to include Transitions to
your presentation to give it effects.
You do that by clicking Transitions. A
side box will appear with your options.
Click here to
add Transitions
Here is where you
choose your animation
Click here if you want
this animation on all of
your slide
24. Once you choose a transition, you
can click play to see what it will
look like.
Move the bar to change the
speed of your transitions
Click here to watch
the animation
25. You will need to insert images into your
presentation. To do that click Insert
and choose image.
Click Insert
Then choose
Image
26. When you click Insert and Image, a
window will open up and you can choose
where you want to add the picture
from.
Choose this
option to upload
an image saved to
your computer
Choose this
option insert a
URL from a
picture you found
on the Internet
27. When you get working on your presentation, you
may find that you need to re-arrange some slide.
To do this, click on the slide you want to move
and drag it to the new location you want it.
Click the slide you want
to move and the Move 1
Slide box will appear,
The black line shows you
where in the
presentation the slide
will be moved to.
28. We will be communicating with one
another about your presentation by
using the comments feature under the
Insert tab.
Click Insert, then
choose Comment
This box will appear after you
click comments under Insert.
You can type your message to
me here and then click Comment.
29. When you click the Comment button after you type your
message, it will look like this. We will use comments to
ask each other questions about or talk about your
presentation. When you see a comment from me, please
insert a comment and respond to what I said. I will do
the same for your comments as well.
This speech bubble will
appear next to a slide
when there is a
comment on it. The
number tells how many
comments are on the
slide.
This is your
published
comment
30. Periodically throughout the creation of your
presentation, you will want to watch it to see
what it looks like and make changes. To watch
it, click the Present button at the top.
Click here to
watch your
presentation
31. When you click Present, your presentation will
enter full screen mode. Press the spacebar to
go through your slides. When you are done
watching it, press esc in the upper left-hand
corner of your keyboard.
32. Saving your Presentation
• You will never have to worry about
saving your presentation. Google
automatically saves for you when you
start editing your work.
33. Accessing your
Presentation
• When you go to work on your
presentation again, you will need to
log-in to your e-mail and choose Drive
at the top.
• This time your Drive screen will look
a little different because your
presentation name will be listed.
34. When your Google Drive page opens, you
will find a list of all of the things you
created in Drive. Click on the item you
want to work on.
Click on the name of
your presentation to
open it and continue
working on it
35. Get Started!
• Now you are ready to get working on
your presentation!
• If you have any questions raise your
hand and I will come help you.
• You can also ask your neighbor for
help too.