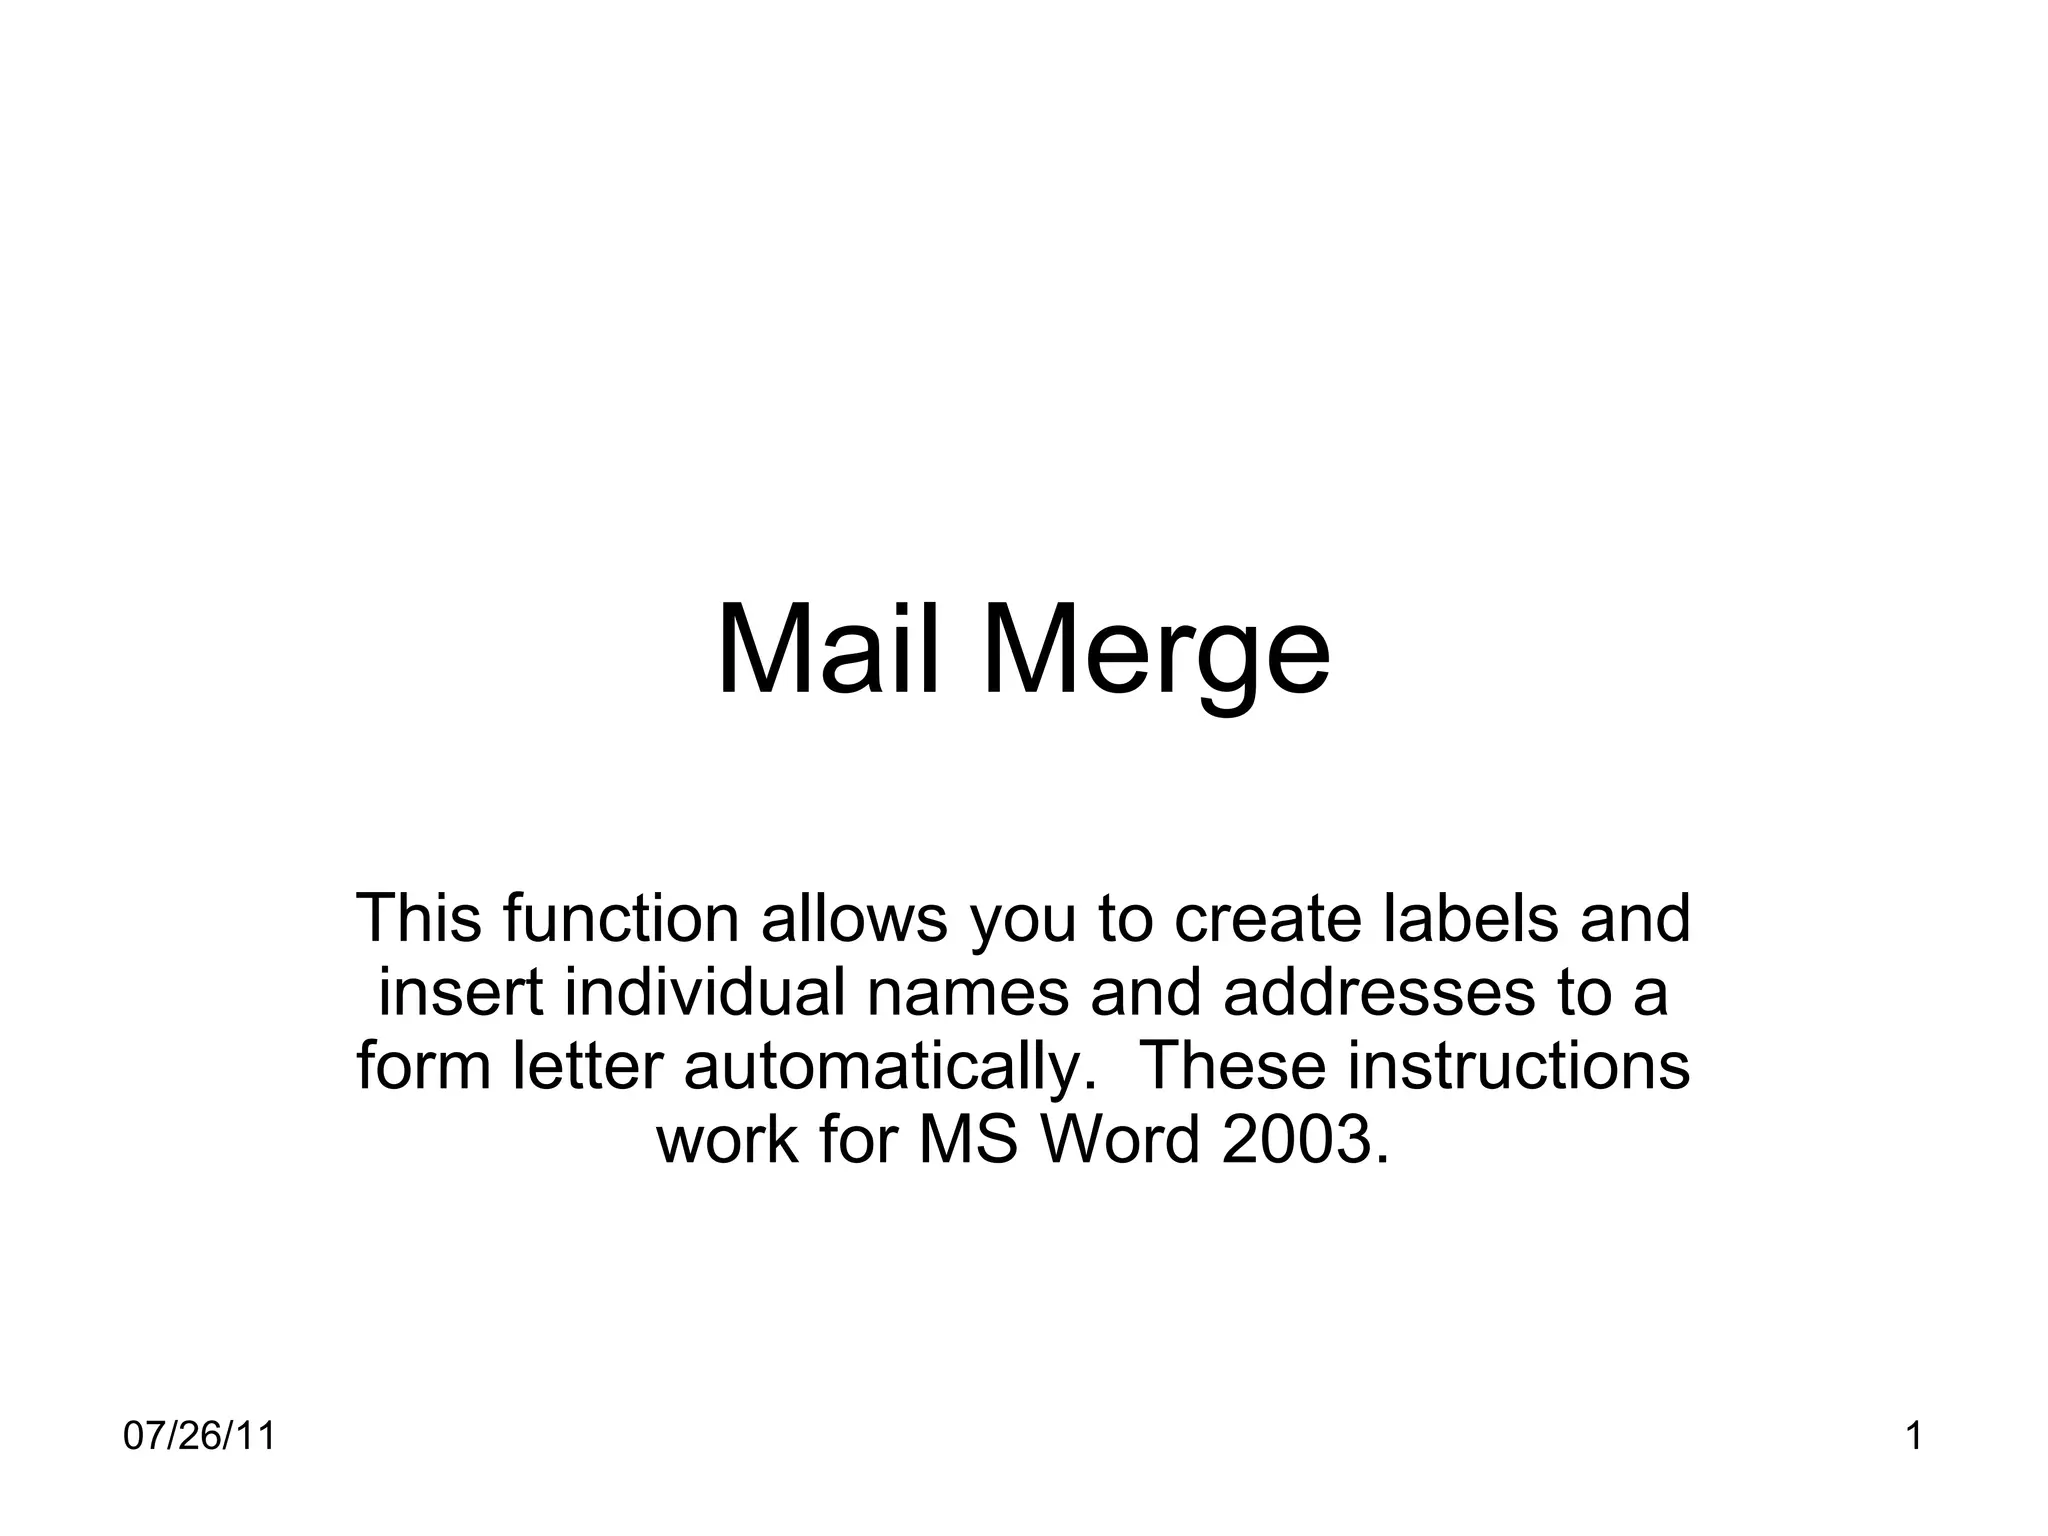
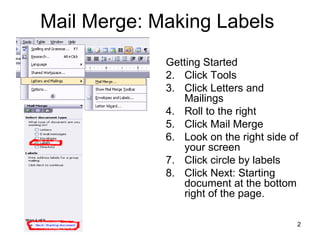
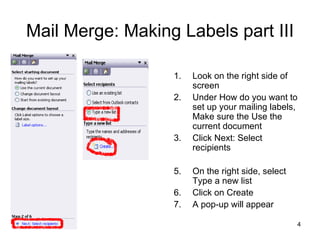
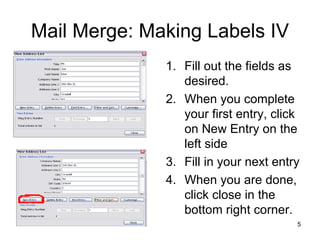
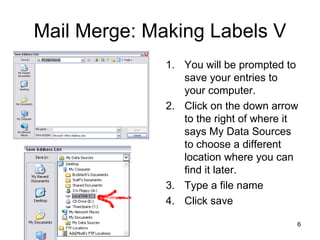
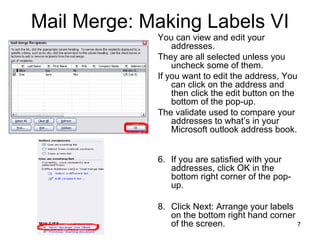
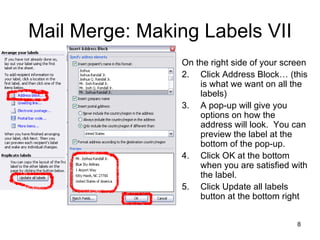
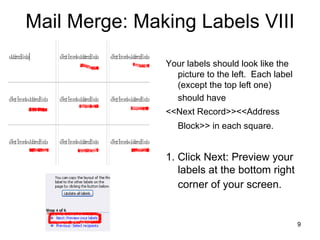
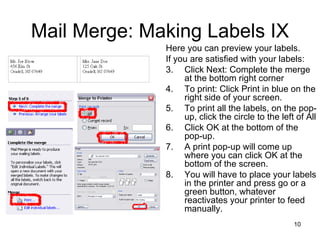
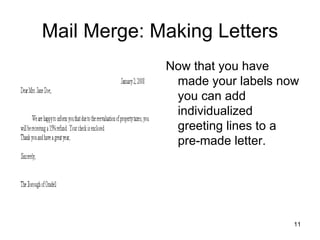
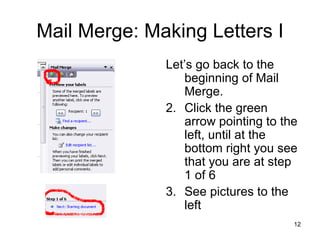
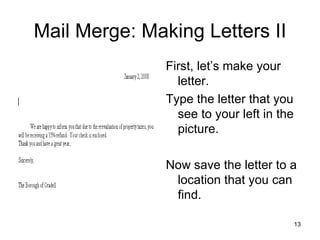
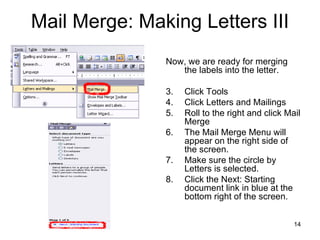
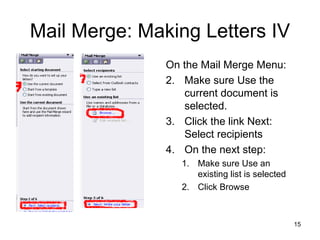
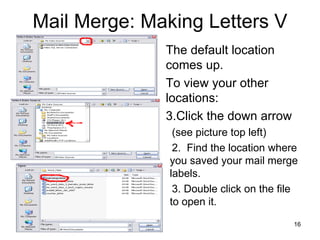
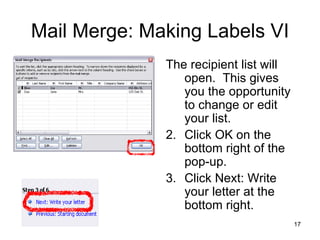
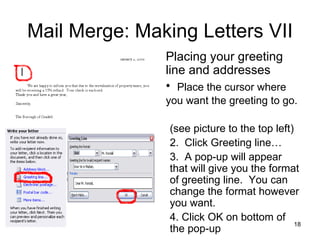
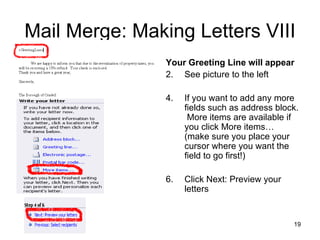
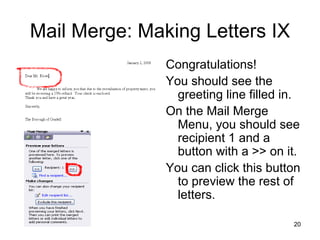
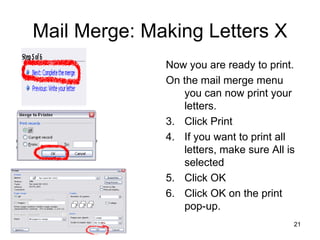
Mail Merge This function allows you to create labels and insert individual names and addresses to a form letter automatically.  These instructions work for MS Word 2003.
Mail Merge: Making Labels  Getting Started Click Tools Click Letters and Mailings Roll to the right Click Mail Merge Look on the right side of your screen Click circle by labels Click Next: Starting document at the bottom right of the page.
Mail Merge: Making Labels part II Click Change document layout Click Label options A pop-up window will appear on the middle of the screen. Choose the size of labels according to what’s on your box of labels. Click OK on the bottom of pop-up
Mail Merge: Making Labels part III Look on the right side of screen Under How do you want to set up your mailing labels, Make sure the Use the current document Click Next: Select recipients On the right side, select Type a new list Click on Create A pop-up will appear
Mail Merge: Making Labels IV Fill out the fields as desired. When you complete your first entry, click on New Entry on the left side Fill in your next entry When you are done, click close in the bottom right corner.
Mail Merge: Making Labels V You will be prompted to save your entries to your computer. Click on the down arrow to the right of where it says My Data Sources to choose a different location where you can find it later. Type a file name Click save
Mail Merge: Making Labels VI You can view and edit your addresses. They are all selected unless you uncheck some of them.  If you want to edit the address, You can click on the address and then click the edit button on the bottom of the pop-up.  The validate used to compare your addresses to what’s in your Microsoft outlook address book.  If you are satisfied with your addresses, click OK in the bottom right corner of the pop-up.  Click Next: Arrange your labels on the bottom right hand corner of the screen.
Mail Merge: Making Labels VII On the right side of your screen  Click Address Block… (this is what we want on all the labels) A pop-up will give you options on how the address will look.  You can preview the label at the bottom of the pop-up. Click OK at the bottom when you are satisfied with the label.  Click Update all labels button at the bottom right
Mail Merge: Making Labels VIII Your labels should look like the picture to the left.  Each label (except the top left one)  should have  <<Next Record>><<Address Block>> in each square.   1. Click Next: Preview your labels at the bottom right corner of your screen.
Mail Merge: Making Labels IX Here you can preview your labels.  If you are satisfied with your labels: Click Next: Complete the merge at the bottom right corner To print: Click Print in blue on the right side of your screen.  To print all the labels, on the pop-up, click the circle to the left of All Click OK at the bottom of the pop-up. A print pop-up will come up where you can click OK at the bottom of the screen.  You will have to place your labels in the printer and press go or a green button, whatever reactivates your printer to feed manually.
Mail Merge: Making Letters Now that you have made your labels now you can add individualized greeting lines to a pre-made letter.
Mail Merge: Making Letters I Let’s go back to the beginning of Mail Merge.  Click the green arrow pointing to the left, until at the bottom right you see that you are at step 1 of 6 See pictures to the left
Mail Merge: Making Letters II First, let’s make your letter.  Type the letter that you see to your left in the picture. Now save the letter to a location that you can find.
Mail Merge: Making Letters III Now, we are ready for merging the labels into the letter. Click Tools Click Letters and Mailings Roll to the right and click Mail Merge The Mail Merge Menu will appear on the right side of the screen. Make sure the circle by Letters is selected. Click the Next: Starting document link in blue at the bottom right of the screen.
Mail Merge: Making Letters IV On the Mail Merge Menu: Make sure Use the current document is selected. Click the link Next: Select recipients On the next step: Make sure Use an existing list is selected Click Browse
Mail Merge: Making Letters V The default location comes up. To view your other locations: Click the down arrow (see picture top left) 2.  Find the location where you saved your mail merge labels. 3. Double click on the file to open it.
Mail Merge: Making Labels VI The recipient list will open.  This gives you the opportunity to change or edit your list.  Click OK on the bottom right of the pop-up. Click Next: Write your letter at the bottom right.
Mail Merge: Making Letters VII Placing your greeting line and addresses Place the cursor where you want the greeting to go.   (see picture to the top left) Click Greeting line… A pop-up will appear that will give you the format of greeting line.  You can change the format however you want.  Click OK on bottom of the pop-up
Mail Merge: Making Letters VIII Your Greeting Line will appear See picture to the left If you want to add any more fields such as address block.  More items are available if you click More items… (make sure you place your cursor where you want the field to go first!) Click Next: Preview your letters
Mail Merge: Making Letters IX Congratulations! You should see the greeting line filled in.  On the Mail Merge Menu, you should see recipient 1 and a button with a >> on it.  You can click this button to preview the rest of letters.
Mail Merge: Making Letters X Now you are ready to print.  On the mail merge menu you can now print your letters. Click Print  If you want to print all letters, make sure All is selected Click OK Click OK on the print pop-up.
Mail Merge: Making Letters XI Congratulations! Some tips: You can’t save the individualized letters, you have to merge the labels and letter together again. You can use the saved labels over and over again and you can add  to and delete recipients.

Mail merge

  • 1.
    Mail Merge Thisfunction allows you to create labels and insert individual names and addresses to a form letter automatically. These instructions work for MS Word 2003.
  • 2.
    Mail Merge: MakingLabels Getting Started Click Tools Click Letters and Mailings Roll to the right Click Mail Merge Look on the right side of your screen Click circle by labels Click Next: Starting document at the bottom right of the page.
  • 3.
    Mail Merge: MakingLabels part II Click Change document layout Click Label options A pop-up window will appear on the middle of the screen. Choose the size of labels according to what’s on your box of labels. Click OK on the bottom of pop-up
  • 4.
    Mail Merge: MakingLabels part III Look on the right side of screen Under How do you want to set up your mailing labels, Make sure the Use the current document Click Next: Select recipients On the right side, select Type a new list Click on Create A pop-up will appear
  • 5.
    Mail Merge: MakingLabels IV Fill out the fields as desired. When you complete your first entry, click on New Entry on the left side Fill in your next entry When you are done, click close in the bottom right corner.
  • 6.
    Mail Merge: MakingLabels V You will be prompted to save your entries to your computer. Click on the down arrow to the right of where it says My Data Sources to choose a different location where you can find it later. Type a file name Click save
  • 7.
    Mail Merge: MakingLabels VI You can view and edit your addresses. They are all selected unless you uncheck some of them. If you want to edit the address, You can click on the address and then click the edit button on the bottom of the pop-up. The validate used to compare your addresses to what’s in your Microsoft outlook address book. If you are satisfied with your addresses, click OK in the bottom right corner of the pop-up. Click Next: Arrange your labels on the bottom right hand corner of the screen.
  • 8.
    Mail Merge: MakingLabels VII On the right side of your screen Click Address Block… (this is what we want on all the labels) A pop-up will give you options on how the address will look. You can preview the label at the bottom of the pop-up. Click OK at the bottom when you are satisfied with the label. Click Update all labels button at the bottom right
  • 9.
    Mail Merge: MakingLabels VIII Your labels should look like the picture to the left. Each label (except the top left one) should have <<Next Record>><<Address Block>> in each square. 1. Click Next: Preview your labels at the bottom right corner of your screen.
  • 10.
    Mail Merge: MakingLabels IX Here you can preview your labels. If you are satisfied with your labels: Click Next: Complete the merge at the bottom right corner To print: Click Print in blue on the right side of your screen. To print all the labels, on the pop-up, click the circle to the left of All Click OK at the bottom of the pop-up. A print pop-up will come up where you can click OK at the bottom of the screen. You will have to place your labels in the printer and press go or a green button, whatever reactivates your printer to feed manually.
  • 11.
    Mail Merge: MakingLetters Now that you have made your labels now you can add individualized greeting lines to a pre-made letter.
  • 12.
    Mail Merge: MakingLetters I Let’s go back to the beginning of Mail Merge. Click the green arrow pointing to the left, until at the bottom right you see that you are at step 1 of 6 See pictures to the left
  • 13.
    Mail Merge: MakingLetters II First, let’s make your letter. Type the letter that you see to your left in the picture. Now save the letter to a location that you can find.
  • 14.
    Mail Merge: MakingLetters III Now, we are ready for merging the labels into the letter. Click Tools Click Letters and Mailings Roll to the right and click Mail Merge The Mail Merge Menu will appear on the right side of the screen. Make sure the circle by Letters is selected. Click the Next: Starting document link in blue at the bottom right of the screen.
  • 15.
    Mail Merge: MakingLetters IV On the Mail Merge Menu: Make sure Use the current document is selected. Click the link Next: Select recipients On the next step: Make sure Use an existing list is selected Click Browse
  • 16.
    Mail Merge: MakingLetters V The default location comes up. To view your other locations: Click the down arrow (see picture top left) 2. Find the location where you saved your mail merge labels. 3. Double click on the file to open it.
  • 17.
    Mail Merge: MakingLabels VI The recipient list will open. This gives you the opportunity to change or edit your list. Click OK on the bottom right of the pop-up. Click Next: Write your letter at the bottom right.
  • 18.
    Mail Merge: MakingLetters VII Placing your greeting line and addresses Place the cursor where you want the greeting to go. (see picture to the top left) Click Greeting line… A pop-up will appear that will give you the format of greeting line. You can change the format however you want. Click OK on bottom of the pop-up
  • 19.
    Mail Merge: MakingLetters VIII Your Greeting Line will appear See picture to the left If you want to add any more fields such as address block. More items are available if you click More items… (make sure you place your cursor where you want the field to go first!) Click Next: Preview your letters
  • 20.
    Mail Merge: MakingLetters IX Congratulations! You should see the greeting line filled in. On the Mail Merge Menu, you should see recipient 1 and a button with a >> on it. You can click this button to preview the rest of letters.
  • 21.
    Mail Merge: MakingLetters X Now you are ready to print. On the mail merge menu you can now print your letters. Click Print If you want to print all letters, make sure All is selected Click OK Click OK on the print pop-up.
  • 22.
    Mail Merge: MakingLetters XI Congratulations! Some tips: You can’t save the individualized letters, you have to merge the labels and letter together again. You can use the saved labels over and over again and you can add to and delete recipients.