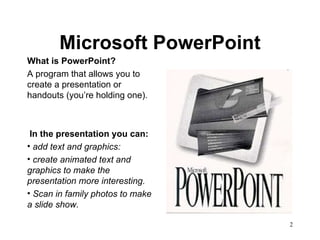
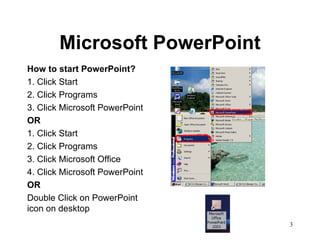
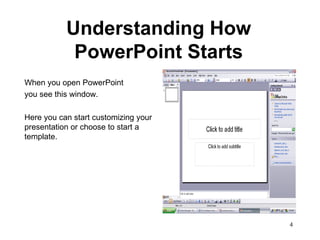
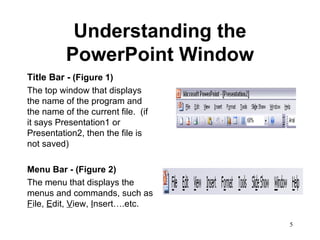
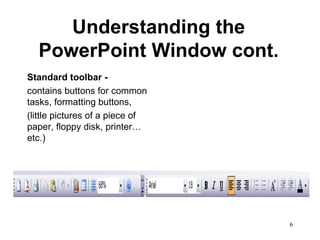
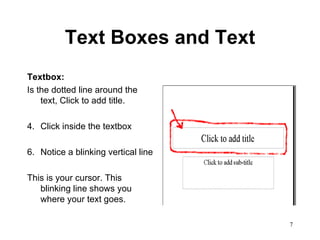
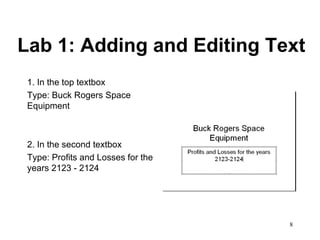
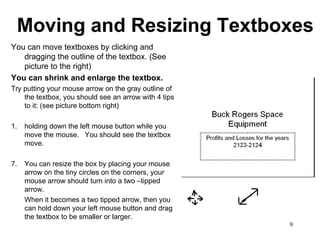
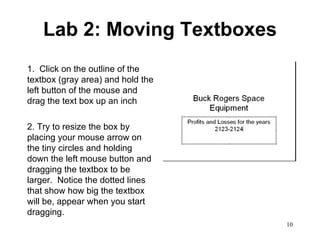
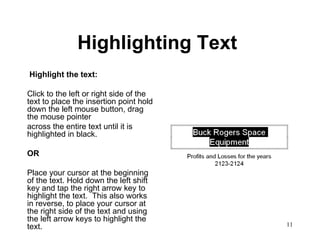
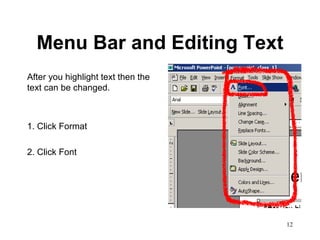
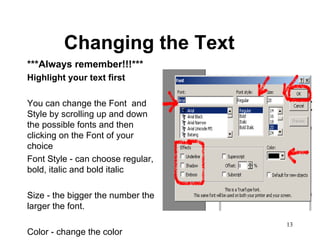
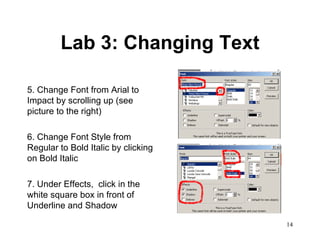
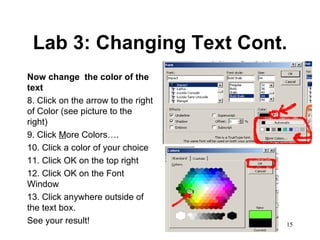
Microsoft PowerPoint Welcome: Introductions: What you want out of the class, specifics? Today’s Class: Starting up PowerPoint Editing Text Exiting PowerPoint
Microsoft PowerPoint What is PowerPoint? A program that allows you to create a presentation or handouts (you’re holding one). In the presentation you can: add text and graphics: create animated text and graphics to make the presentation more interesting.  Scan in family photos to make a slide show.
Microsoft PowerPoint How to start PowerPoint? 1. Click Start 2. Click Programs 3. Click Microsoft PowerPoint OR 1. Click Start 2. Click Programs 3. Click Microsoft Office 4. Click Microsoft PowerPoint OR Double Click on PowerPoint icon on desktop
Understanding How PowerPoint Starts When you open PowerPoint you see this window.  Here you can start customizing your presentation or choose to start a template.
Understanding the PowerPoint Window Title Bar -  (Figure 1) The top window that displays the name of the program and the name of the current file.  (if it says Presentation1 or Presentation2, then the file is not saved)  Menu Bar - (Figure 2) The menu that displays the menus and commands, such as  F ile,  E dit,  V iew,  I nsert….etc.
Understanding the PowerPoint Window cont. Standard toolbar - contains buttons for common tasks, formatting buttons,  (little pictures of a piece of paper, floppy disk, printer…etc.)
Text Boxes and Text Textbox:   Is the dotted line around the text, Click to add title.  Click inside the textbox Notice a blinking vertical line This is your cursor. This blinking line shows you where your text goes.
Lab 1: Adding and Editing Text 1. In the top textbox  Type: Buck Rogers Space Equipment 2. In the second textbox Type: Profits and Losses for the years 2123 - 2124
Moving and Resizing Textboxes You can move textboxes by clicking and dragging the outline of the textbox. (See picture to the right) You can shrink and enlarge the textbox.   Try putting your mouse arrow on the gray outline of the textbox, you should see an arrow with 4 tips to it: (see picture bottom right) 1. holding down the left mouse button while you move the mouse.  You should see the textbox move. You can resize the box by placing your mouse arrow on the tiny circles on the corners, your mouse arrow should turn into a two –tipped arrow.  When it becomes a two tipped arrow, then you can hold down your left mouse button and drag the textbox to be smaller or larger.
Lab 2: Moving Textboxes 1.  Click on the outline of the textbox (gray area) and hold the left button of the mouse and drag the text box up an inch 2. Try to resize the box by placing your mouse arrow on the tiny circles and holding down the left mouse button and dragging the textbox to be larger.  Notice the dotted lines that show how big the textbox will be, appear when you start dragging.
Highlighting Text   Highlight the text: Click to the left or right side of the text to place the insertion point hold down the left mouse button, drag the mouse pointer  across the entire text until it is highlighted in black. OR Place your cursor at the beginning of the text. Hold down the left shift key and tap the right arrow key to highlight the text.  This also works in reverse, to place your cursor at the right side of the text and using the left arrow keys to highlight the text.
Menu Bar and Editing Text After you highlight text then the text can be changed.  1. Click Format 2. Click Font
Changing the Text ***Always remember!!!*** Highlight your text first You can change the Font  and Style by scrolling up and down the possible fonts and then clicking on the Font of your choice Font Style - can choose regular, bold, italic and bold italic Size - the bigger the number the larger the font.  Color - change the color
Lab 3: Changing Text 5. Change Font from Arial to Impact by scrolling up (see picture to the right) 6. Change Font Style from Regular to Bold Italic by clicking on Bold Italic 7. Under Effects,  click in the white square box in front of Underline and Shadow
Lab 3: Changing Text Cont. Now change  the color of the text 8. Click on the arrow to the right of Color (see picture to the right) 9. Click  M ore Colors…. 10. Click a color of your choice 11. Click OK on the top right 12. Click OK on the Font Window 13. Click anywhere outside of the text box.  See your result!
Results! There are endless possibilities that you can do with editing and changing text.
Lab 4: Editing  the Second Textbox   Now lets change the second textbox Click the textbox that has “Profits and Losses for the years 2123 - 2124” (you should see a gray outline around it) 2. Highlight the text (see pg. 11) 3. Click Format 4. Click Font
Lab 4: Editing  the Second Textbox 7. Play with the many combinations and pick your own style and color.
Closing PowerPoint 1. Click File 2. Click Exit 3. Click ‘No’ to the pop-up asking if you want to save your changes.  (in the future when you make your presentations, you will click “yes” to save your changes)
Questions? Next Week: We will learn how to add graphics We will learn how to animate text and graphics Animation is fun to play with, so I’m looking forward to teaching this part of the course.

Powerpoint class 1

  • 1.
    Microsoft PowerPoint Welcome:Introductions: What you want out of the class, specifics? Today’s Class: Starting up PowerPoint Editing Text Exiting PowerPoint
  • 2.
    Microsoft PowerPoint Whatis PowerPoint? A program that allows you to create a presentation or handouts (you’re holding one). In the presentation you can: add text and graphics: create animated text and graphics to make the presentation more interesting. Scan in family photos to make a slide show.
  • 3.
    Microsoft PowerPoint Howto start PowerPoint? 1. Click Start 2. Click Programs 3. Click Microsoft PowerPoint OR 1. Click Start 2. Click Programs 3. Click Microsoft Office 4. Click Microsoft PowerPoint OR Double Click on PowerPoint icon on desktop
  • 4.
    Understanding How PowerPointStarts When you open PowerPoint you see this window. Here you can start customizing your presentation or choose to start a template.
  • 5.
    Understanding the PowerPointWindow Title Bar - (Figure 1) The top window that displays the name of the program and the name of the current file. (if it says Presentation1 or Presentation2, then the file is not saved) Menu Bar - (Figure 2) The menu that displays the menus and commands, such as F ile, E dit, V iew, I nsert….etc.
  • 6.
    Understanding the PowerPointWindow cont. Standard toolbar - contains buttons for common tasks, formatting buttons, (little pictures of a piece of paper, floppy disk, printer…etc.)
  • 7.
    Text Boxes andText Textbox: Is the dotted line around the text, Click to add title. Click inside the textbox Notice a blinking vertical line This is your cursor. This blinking line shows you where your text goes.
  • 8.
    Lab 1: Addingand Editing Text 1. In the top textbox Type: Buck Rogers Space Equipment 2. In the second textbox Type: Profits and Losses for the years 2123 - 2124
  • 9.
    Moving and ResizingTextboxes You can move textboxes by clicking and dragging the outline of the textbox. (See picture to the right) You can shrink and enlarge the textbox. Try putting your mouse arrow on the gray outline of the textbox, you should see an arrow with 4 tips to it: (see picture bottom right) 1. holding down the left mouse button while you move the mouse. You should see the textbox move. You can resize the box by placing your mouse arrow on the tiny circles on the corners, your mouse arrow should turn into a two –tipped arrow. When it becomes a two tipped arrow, then you can hold down your left mouse button and drag the textbox to be smaller or larger.
  • 10.
    Lab 2: MovingTextboxes 1. Click on the outline of the textbox (gray area) and hold the left button of the mouse and drag the text box up an inch 2. Try to resize the box by placing your mouse arrow on the tiny circles and holding down the left mouse button and dragging the textbox to be larger. Notice the dotted lines that show how big the textbox will be, appear when you start dragging.
  • 11.
    Highlighting Text Highlight the text: Click to the left or right side of the text to place the insertion point hold down the left mouse button, drag the mouse pointer across the entire text until it is highlighted in black. OR Place your cursor at the beginning of the text. Hold down the left shift key and tap the right arrow key to highlight the text. This also works in reverse, to place your cursor at the right side of the text and using the left arrow keys to highlight the text.
  • 12.
    Menu Bar andEditing Text After you highlight text then the text can be changed. 1. Click Format 2. Click Font
  • 13.
    Changing the Text***Always remember!!!*** Highlight your text first You can change the Font and Style by scrolling up and down the possible fonts and then clicking on the Font of your choice Font Style - can choose regular, bold, italic and bold italic Size - the bigger the number the larger the font. Color - change the color
  • 14.
    Lab 3: ChangingText 5. Change Font from Arial to Impact by scrolling up (see picture to the right) 6. Change Font Style from Regular to Bold Italic by clicking on Bold Italic 7. Under Effects, click in the white square box in front of Underline and Shadow
  • 15.
    Lab 3: ChangingText Cont. Now change the color of the text 8. Click on the arrow to the right of Color (see picture to the right) 9. Click M ore Colors…. 10. Click a color of your choice 11. Click OK on the top right 12. Click OK on the Font Window 13. Click anywhere outside of the text box. See your result!
  • 16.
    Results! There areendless possibilities that you can do with editing and changing text.
  • 17.
    Lab 4: Editing the Second Textbox Now lets change the second textbox Click the textbox that has “Profits and Losses for the years 2123 - 2124” (you should see a gray outline around it) 2. Highlight the text (see pg. 11) 3. Click Format 4. Click Font
  • 18.
    Lab 4: Editing the Second Textbox 7. Play with the many combinations and pick your own style and color.
  • 19.
    Closing PowerPoint 1.Click File 2. Click Exit 3. Click ‘No’ to the pop-up asking if you want to save your changes. (in the future when you make your presentations, you will click “yes” to save your changes)
  • 20.
    Questions? Next Week:We will learn how to add graphics We will learn how to animate text and graphics Animation is fun to play with, so I’m looking forward to teaching this part of the course.