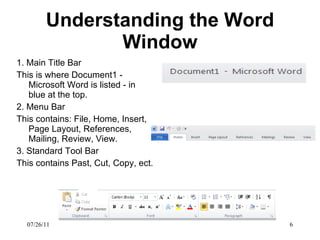
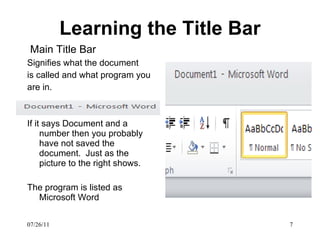
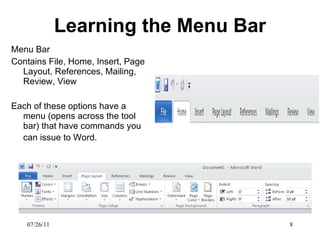
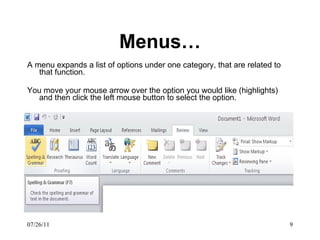
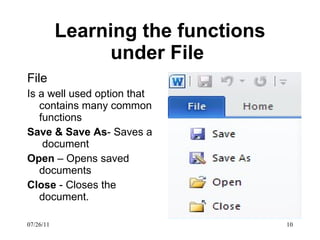
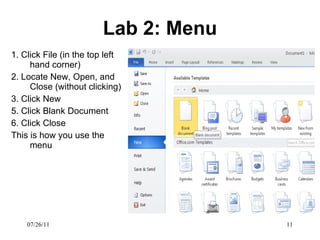
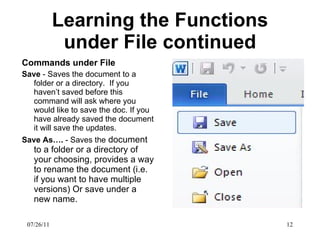
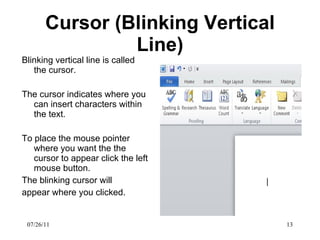
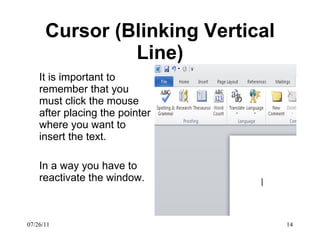
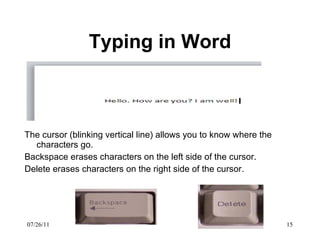
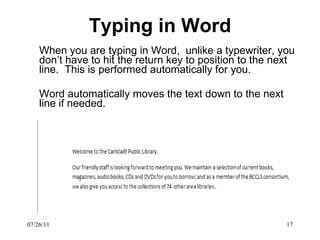
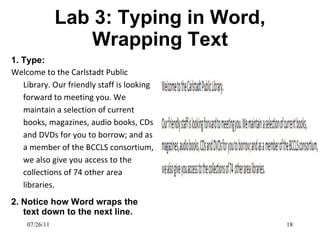
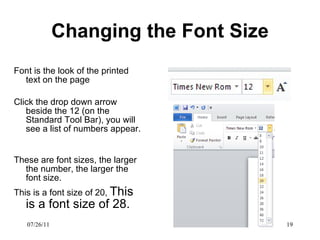
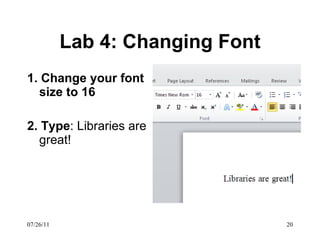
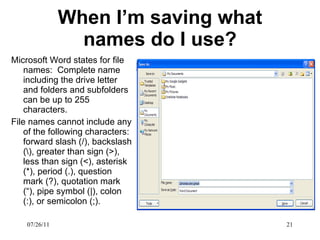
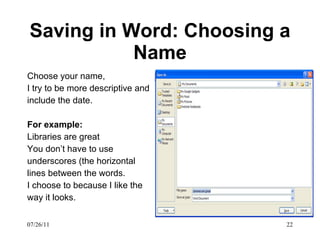
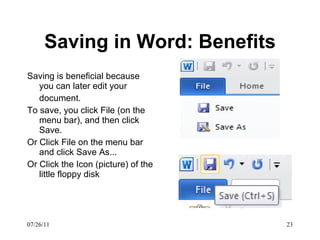
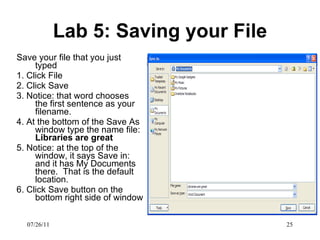
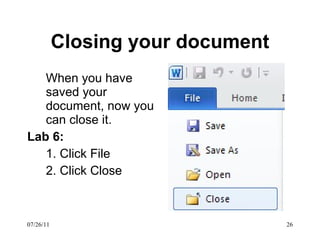
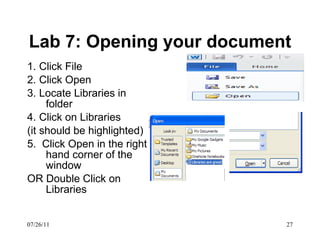
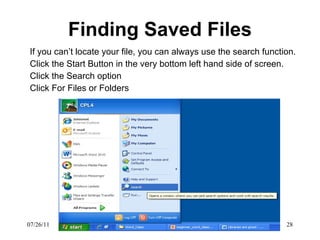
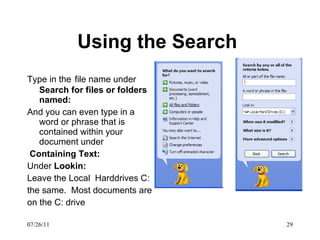
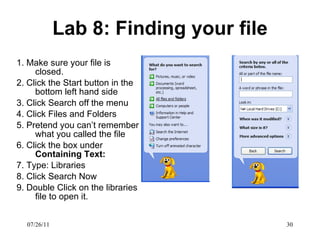
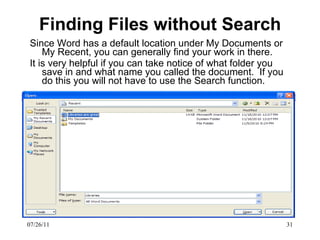
Beginning Microsoft Word Class What is Microsoft Word? It is a word processor.  You can create letters,  reports, faxes,  resumes, memos, agendas, awards/certificates, calendars,  labels, purchase orders, web pages and many many more items. 07/26/11
Starting Microsoft Word 1. Click Start button on the bottom left side of the screen with left mouse button.  2. Place mouse arrow on Programs 3. Click Microsoft Word 07/26/11
Starting Microsoft Word… OR 1. Place mouse arrow on Start  2. Click Microsoft Office 3. Click Microsoft Word 07/26/11
Starting Microsoft Word… OR 1. Double Click on the MS Word icon on the screen 07/26/11
Lab 1: Starting Word 1. Double Click the Microsoft Word Icon on your screen 07/26/11
Understanding the Word Window 1. Main Title Bar This is where Document1 - Microsoft Word is listed - in blue at the top.  2. Menu Bar This contains: File, Home, Insert, Page Layout, References, Mailing, Review, View.  3. Standard Tool Bar This contains Past, Cut, Copy, ect.  07/26/11
Learning the Title Bar Main Title Bar   Signifies what the document is called and what program you are in. If it says Document and a number then you probably have not saved the document.  Just as the picture to the right shows. The program is listed as Microsoft Word 07/26/11
Learning the Menu Bar Menu Bar Contains File, Home, Insert, Page Layout, References, Mailing, Review, View Each of these options have a menu (opens across the tool bar) that have commands you can issue to Word.   07/26/11
Menus… A menu expands a list of options under one category, that are related to that function. You move your mouse arrow over the option you would like (highlights) and then click the left mouse button to select the option. 07/26/11
Learning the functions under File  File Is a well used option that contains many common functions Save & Save As - Saves a  document Open  – Opens saved documents Close  - Closes the document. 07/26/11
Lab 2: Menu 1. Click File (in the top left hand corner) 2. Locate New, Open, and Close (without clicking) 3. Click New 5. Click Blank Document  6. Click Close This is how you use the menu 07/26/11
Learning the Functions under File continued Commands under File Save  - Saves the document to a folder or a directory.  If you haven’t saved before this command will ask where you would like to save the doc. If you have already saved the document it will save the updates.  Save As….  - Saves the  document to a folder or a directory of your choosing, provides a way to rename the document (i.e. if you want to have multiple versions) Or save under a new name. 07/26/11
Cursor (Blinking Vertical Line) Blinking vertical line is called the cursor. The cursor indicates where you can insert characters within the text. To place the mouse pointer where you want the the cursor to appear click the left mouse button.  The blinking cursor will appear where you clicked.  07/26/11
Cursor (Blinking Vertical Line) It is important to remember that you must click the mouse after placing the pointer where you want to insert the text.  In a way you have to reactivate the window.  07/26/11
Typing in Word The cursor (blinking vertical line) allows you to know where the characters go.  Backspace erases characters on the left side of the cursor.  Delete erases characters on the right side of the cursor.  07/26/11
Lab 2: Difference between Backspace and Delete Type:  Libraries are a great place to read. 2. Slowly press Backspace key to erase ‘read’ 3. Place cursor before the word ‘place’ (use left arrow key) 4. Slowly press Delete key to erase ‘place to’ 07/26/11
Typing in Word When you are typing in Word,  unlike a typewriter, you don’t have to hit the return key to position to the next line.  This is performed automatically for you. Word automatically moves the text down to the next line if needed. 07/26/11
Lab 3: Typing in Word, Wrapping Text 1. Type: Welcome to the Carlstadt Public Library. Our friendly staff is looking forward to meeting you. We maintain a selection of current books, magazines, audio books, CDs and DVDs for you to borrow; and as a member of the BCCLS consortium, we also give you access to the collections of 74 other area libraries. 2. Notice how Word wraps the text down to the next line. 07/26/11
Changing the Font Size Font is the look of the printed text on the page Click the drop down arrow beside the 12 (on the Standard Tool Bar), you will see a list of numbers appear.  These are font sizes, the larger the number, the larger the font size.  This is a font size of 20,  This is a font size of 28.  07/26/11
Lab 4: Changing Font 1. Change your font size to 16 2.   Type : Libraries are great! 07/26/11
When I’m saving what names do I use? Microsoft Word states for file names:  Complete name including the drive letter and folders and subfolders can be up to 255 characters. File names cannot include any of the following characters: forward slash (/), backslash (\), greater than sign (>), less than sign (<), asterisk (*), period (.), question mark (?), quotation mark (“), pipe symbol (|), colon (:), or semicolon (;). 07/26/11
Saving in Word: Choosing a Name Choose your name,  I try to be more descriptive and include the date.  For example: Libraries are great You don’t have to use underscores (the horizontal lines between the words.  I choose to because I like the way it looks.  07/26/11
Saving in Word: Benefits Saving is beneficial because you can later edit your document.  To save, you click File (on the menu bar), and then click Save.  Or Click File on the menu bar and click Save As... Or Click the Icon (picture) of the little floppy disk 07/26/11
Default location  for saved files The default folder for saving documents in word is: C:\Documents and Settings\My Documents Some computers save under a different folder structure, but generally this is how Word saves documents.  07/26/11
Lab 5: Saving your File Save your file that you just typed 1. Click File  2. Click Save 3. Notice: that word chooses the first sentence as your filename. 4. At the bottom of the Save As window type the name file:  Libraries are great 5. Notice: at the top of the window, it says Save in: and it has My Documents there.  That is the default location.  6. Click Save button on the bottom right side of window 07/26/11
Closing your document When you have saved your document, now you can close it.  Lab 6:  1. Click File 2. Click Close 07/26/11
Lab 7: Opening your document 1. Click File 2. Click Open 3. Locate Libraries in folder 4. Click on Libraries (it should be highlighted) 5.  Click Open in the right hand corner of the window OR Double Click on Libraries 07/26/11
Finding Saved Files If you can’t locate your file, you can always use the search function. Click the Start Button in the very bottom left hand side of screen. Click the Search option Click For Files or Folders 07/26/11
Using the Search  Type in the   file name under  Search for files or folders named: And you can even type in a word or phrase that is contained within your document under Containing Text: Under  Lookin: Leave the Local  Harddrives C: the same.  Most documents are  on the C: drive 07/26/11
Lab 8: Finding your file 1. Make sure your file is closed.  2. Click the Start button in the bottom left hand side 3. Click Search off the menu 4. Click Files and Folders 5. Pretend you can’t remember what you called the file 6. Click the box under  Containing Text: 7. Type: Libraries 8. Click Search Now 9. Double Click on the libraries file to open it.  07/26/11
Finding Files without Search Since Word has a default location under My Documents or My Recent, you can generally find your work in there.  It is very helpful if you can take notice of what folder you save in and what name you called the document.  If you do this you will not have to use the Search function.  07/26/11
Questions ? This was a lot to cover, but I wanted to give you an understanding of saving, file structure and being able to find your file.  These are the most important aspects of using word.  Next week we will do more with editing the text.  07/26/11

Beginner word class_1

  • 1.
    Beginning Microsoft WordClass What is Microsoft Word? It is a word processor. You can create letters, reports, faxes, resumes, memos, agendas, awards/certificates, calendars, labels, purchase orders, web pages and many many more items. 07/26/11
  • 2.
    Starting Microsoft Word1. Click Start button on the bottom left side of the screen with left mouse button. 2. Place mouse arrow on Programs 3. Click Microsoft Word 07/26/11
  • 3.
    Starting Microsoft Word…OR 1. Place mouse arrow on Start 2. Click Microsoft Office 3. Click Microsoft Word 07/26/11
  • 4.
    Starting Microsoft Word…OR 1. Double Click on the MS Word icon on the screen 07/26/11
  • 5.
    Lab 1: StartingWord 1. Double Click the Microsoft Word Icon on your screen 07/26/11
  • 6.
    Understanding the WordWindow 1. Main Title Bar This is where Document1 - Microsoft Word is listed - in blue at the top. 2. Menu Bar This contains: File, Home, Insert, Page Layout, References, Mailing, Review, View. 3. Standard Tool Bar This contains Past, Cut, Copy, ect. 07/26/11
  • 7.
    Learning the TitleBar Main Title Bar Signifies what the document is called and what program you are in. If it says Document and a number then you probably have not saved the document. Just as the picture to the right shows. The program is listed as Microsoft Word 07/26/11
  • 8.
    Learning the MenuBar Menu Bar Contains File, Home, Insert, Page Layout, References, Mailing, Review, View Each of these options have a menu (opens across the tool bar) that have commands you can issue to Word. 07/26/11
  • 9.
    Menus… A menuexpands a list of options under one category, that are related to that function. You move your mouse arrow over the option you would like (highlights) and then click the left mouse button to select the option. 07/26/11
  • 10.
    Learning the functionsunder File File Is a well used option that contains many common functions Save & Save As - Saves a document Open – Opens saved documents Close - Closes the document. 07/26/11
  • 11.
    Lab 2: Menu1. Click File (in the top left hand corner) 2. Locate New, Open, and Close (without clicking) 3. Click New 5. Click Blank Document 6. Click Close This is how you use the menu 07/26/11
  • 12.
    Learning the Functionsunder File continued Commands under File Save - Saves the document to a folder or a directory. If you haven’t saved before this command will ask where you would like to save the doc. If you have already saved the document it will save the updates. Save As…. - Saves the document to a folder or a directory of your choosing, provides a way to rename the document (i.e. if you want to have multiple versions) Or save under a new name. 07/26/11
  • 13.
    Cursor (Blinking VerticalLine) Blinking vertical line is called the cursor. The cursor indicates where you can insert characters within the text. To place the mouse pointer where you want the the cursor to appear click the left mouse button. The blinking cursor will appear where you clicked. 07/26/11
  • 14.
    Cursor (Blinking VerticalLine) It is important to remember that you must click the mouse after placing the pointer where you want to insert the text. In a way you have to reactivate the window. 07/26/11
  • 15.
    Typing in WordThe cursor (blinking vertical line) allows you to know where the characters go. Backspace erases characters on the left side of the cursor. Delete erases characters on the right side of the cursor. 07/26/11
  • 16.
    Lab 2: Differencebetween Backspace and Delete Type: Libraries are a great place to read. 2. Slowly press Backspace key to erase ‘read’ 3. Place cursor before the word ‘place’ (use left arrow key) 4. Slowly press Delete key to erase ‘place to’ 07/26/11
  • 17.
    Typing in WordWhen you are typing in Word, unlike a typewriter, you don’t have to hit the return key to position to the next line. This is performed automatically for you. Word automatically moves the text down to the next line if needed. 07/26/11
  • 18.
    Lab 3: Typingin Word, Wrapping Text 1. Type: Welcome to the Carlstadt Public Library. Our friendly staff is looking forward to meeting you. We maintain a selection of current books, magazines, audio books, CDs and DVDs for you to borrow; and as a member of the BCCLS consortium, we also give you access to the collections of 74 other area libraries. 2. Notice how Word wraps the text down to the next line. 07/26/11
  • 19.
    Changing the FontSize Font is the look of the printed text on the page Click the drop down arrow beside the 12 (on the Standard Tool Bar), you will see a list of numbers appear. These are font sizes, the larger the number, the larger the font size. This is a font size of 20, This is a font size of 28. 07/26/11
  • 20.
    Lab 4: ChangingFont 1. Change your font size to 16 2. Type : Libraries are great! 07/26/11
  • 21.
    When I’m savingwhat names do I use? Microsoft Word states for file names: Complete name including the drive letter and folders and subfolders can be up to 255 characters. File names cannot include any of the following characters: forward slash (/), backslash (\), greater than sign (>), less than sign (<), asterisk (*), period (.), question mark (?), quotation mark (“), pipe symbol (|), colon (:), or semicolon (;). 07/26/11
  • 22.
    Saving in Word:Choosing a Name Choose your name, I try to be more descriptive and include the date. For example: Libraries are great You don’t have to use underscores (the horizontal lines between the words. I choose to because I like the way it looks. 07/26/11
  • 23.
    Saving in Word:Benefits Saving is beneficial because you can later edit your document. To save, you click File (on the menu bar), and then click Save. Or Click File on the menu bar and click Save As... Or Click the Icon (picture) of the little floppy disk 07/26/11
  • 24.
    Default location for saved files The default folder for saving documents in word is: C:\Documents and Settings\My Documents Some computers save under a different folder structure, but generally this is how Word saves documents. 07/26/11
  • 25.
    Lab 5: Savingyour File Save your file that you just typed 1. Click File 2. Click Save 3. Notice: that word chooses the first sentence as your filename. 4. At the bottom of the Save As window type the name file: Libraries are great 5. Notice: at the top of the window, it says Save in: and it has My Documents there. That is the default location. 6. Click Save button on the bottom right side of window 07/26/11
  • 26.
    Closing your documentWhen you have saved your document, now you can close it. Lab 6: 1. Click File 2. Click Close 07/26/11
  • 27.
    Lab 7: Openingyour document 1. Click File 2. Click Open 3. Locate Libraries in folder 4. Click on Libraries (it should be highlighted) 5. Click Open in the right hand corner of the window OR Double Click on Libraries 07/26/11
  • 28.
    Finding Saved FilesIf you can’t locate your file, you can always use the search function. Click the Start Button in the very bottom left hand side of screen. Click the Search option Click For Files or Folders 07/26/11
  • 29.
    Using the Search Type in the file name under Search for files or folders named: And you can even type in a word or phrase that is contained within your document under Containing Text: Under Lookin: Leave the Local Harddrives C: the same. Most documents are on the C: drive 07/26/11
  • 30.
    Lab 8: Findingyour file 1. Make sure your file is closed. 2. Click the Start button in the bottom left hand side 3. Click Search off the menu 4. Click Files and Folders 5. Pretend you can’t remember what you called the file 6. Click the box under Containing Text: 7. Type: Libraries 8. Click Search Now 9. Double Click on the libraries file to open it. 07/26/11
  • 31.
    Finding Files withoutSearch Since Word has a default location under My Documents or My Recent, you can generally find your work in there. It is very helpful if you can take notice of what folder you save in and what name you called the document. If you do this you will not have to use the Search function. 07/26/11
  • 32.
    Questions ? Thiswas a lot to cover, but I wanted to give you an understanding of saving, file structure and being able to find your file. These are the most important aspects of using word. Next week we will do more with editing the text. 07/26/11