FPGA Verilog Processor Design
•
20 likes•10,270 views

Verilog code for design a specific processor to down sample a given image via a math-lab by using SPARTAN-6 FPGA. Math-lab code, results also included.

Recommended
More Related Content
What's hot
What's hot (20)
Viewers also liked
Viewers also liked (20)
Similar to FPGA Verilog Processor Design
Similar to FPGA Verilog Processor Design (20)
Recently uploaded
Recently uploaded (20)
FPGA Verilog Processor Design
- 1. EN 3030 - CIRCUITS AND SYSTEMS DESIGN Group Members A.U.W. Arachchi 130036T H.A.S. Kalhara 130260A W.A.K.N.C.Karunarathne 130282R W.G.A.Prabashwara 130450G Supervisor: Dr.Jayathu Samarawickrama Department of Electronics and Telecommunication, University Of Moratuwa August 27, 2016
- 3. FPGA BASED PROCESSOR IMPLEMENTATION A central processing unit (CPU) is the electronic circuitry within a computer that carries out the instructions of a computer program by performing the basic arithmetic, logical, control and input/output (I/O) operations specified by the instructions. Traditionally, the term "CPU" refers to a processor, more specifically to its processing unit and control unit (CU), distinguishing these core elements of a computer from external components such as main memory and I/O circuitry. A microprocessor is a computer processor which incorporates the functions of a computer's central processing unit (CPU) on a single integrated circuit (IC), or at most a few integrated circuits. The microprocessor is a multipurpose, clock driven, register based programmable electronic device which accepts digital or binary data as input, processes it according to instructions stored in its memory, and provides results as output. A microprocessor is a computer processor which incorporates the functions of a computer's central processing unit (CPU) on a single integrated circuit (IC), or at most a few integrated circuits. The microprocessor is a multipurpose, clock driven, register based programmable electronic device which accepts digital or binary data as input, processes it according to instructions stored in its memory, and provides results as output. EN 3030 - CIRCUITS AND SYSTEMS DESIGN ELECTRONIC AND TELECOMMUNICATION DEPARTMENT – UNIVERSITY OF MORATUWA
- 4. FPGA BASED PROCESSOR IMPLEMENTATION Microprocessors contain both combinational logic and sequential digital logic. Microprocessors operate on numbers and symbols represented in the binary numeral system. Thousands of items that were traditionally not computer-related include microprocessors. These include large and small household appliances, cars (and their accessory equipment units), car keys, tools and test instruments, toys, light switches/dimmers and electrical circuit breakers, smoke alarms, battery packs, and hi-fi audio/visual components (from DVD players to phonograph turntables). Such products as cellular telephones, DVD video system and HDTV broadcast systems fundamentally require consumer devices with powerful, low-cost, microprocessors. Increasingly stringent pollution control standards effectively require automobile manufacturers to use microprocessor engine management systems, to allow optimal control of emissions over widely varying operating conditions of an automobile. Non-programmable controls would require complex, bulky, or costly implementation to achieve the results possible with a microprocessor. Therefore we can say that microprocessors are very important electronic devices for implement modern world applications. Because all the modern world applications depend on microprocessors, to achieve special tasks various types of microprocessors have been built by different companies. Therefore designing and implementing a special microprocessor to fulfill a given task is very important. In this project we look to design and implement such a microprocessor to achieve given tasks with maximum optimization. EN 3030 - CIRCUITS AND SYSTEMS DESIGN ELECTRONIC AND TELECOMMUNICATION DEPARTMENT – UNIVERSITY OF MORATUWA
- 5. RISC: TOP LEVEL DESCRIPTION AND GUIDELINES Design Plan
- 6. FPGA BASED PROCESSOR IMPLEMENTATION We implemented a 12-bit RISC microprocessor based on a simplified version of the MIPS architecture. The processor has 4-bit instruction words and 4 general purpose registers. Every instruction is completed in 2 cycles. An external clock is used as the timing mechanism for the control and data path units. This section includes a summary of the main features of the processor, a description of the pins, a high level diagram of the external interface of the chip, and the instruction word formats. Specification • Processor can access 12 x 1024 bits Memory • Address line size width is 12 bit • 16 instructions in the instruction set architecture. • 4 general purpose registers. • Instruction completion in 2 clock cycles • External Clock is used. • 12 external address lines. • 12 bit Address Register • 12 bit Temp_Address Register • 8 bit instruction register • 12 bit program counter • 1 bit z flag • 5 channel mux • 12 bit Register( Reg_Y) EN 3030 - CIRCUITS AND SYSTEMS DESIGN ELECTRONIC AND TELECOMMUNICATION DEPARTMENT – UNIVERSITY OF MORATUWA
- 10. FPGA BASED PROCESSOR IMPLEMENTATION The processor consists of 4 bit instructions. The instruction set of the processor is shown in the table. Instruction Instruction Code Operation(Example) NOP 0000 No Operation ADD 0001 ADD R2 R3; R3 = R2 + R3 SUB 0010 SUB R0 R2; R2 = R0 - R2 DIV 0011 - NOT 0100 NOT R0, R0 = !R0 RD 0101 RD FECH_ADDR R2 xxx R2 = M[xxx] WR 0110 WR R3 xxx, - M[xxx] = R3 BR 0111 BR loop1 BRZ 1000 BRZ Exit1 1001 Not Used 1010 Not Used IOSTS 1011 IOSTS R1; R1 = IO_STU SHFL 1100 SHFL R0, R0 = R0<<1 SHFR 1101 SHFL R0, R0 = R0>>1 ADRI 1110 ADRI BYMEM; Addr = *p(raw_addr) 1111 rawnum(*); -> value may change by main() Table: Instruction Set EN 3030 - CIRCUITS AND SYSTEMS DESIGN ELECTRONIC AND TELECOMMUNICATION DEPARTMENT – UNIVERSITY OF MORATUWA
- 12. FPGA BASED PROCESSOR IMPLEMENTATION EN 3030 - CIRCUITS AND SYSTEMS DESIGN ELECTRONIC AND TELECOMMUNICATION DEPARTMENT – UNIVERSITY OF MORATUWA
- 13. VERILOG MODULES The module is the basic unit of hierarchy in Verilog
- 14. REGISTER MODULE And Verilog Code For Processor
- 16. Register_Unit.v Sat Aug 27 12:06:47 2016 Page 1 1 `timescale 1ns / 1ps 2 ////////////////////////////////////////////////////////////////////////////////// 3 // Company: 4 // Engineer: 5 // 6 // Create Date: 21:45:03 06/04/2016 7 // Design Name: 8 // Module Name: Register_Unit 9 // Project Name: 10 // Target Devices: 11 // Tool versions: 12 // Description: 13 // 14 // Dependencies: 15 // 16 // Revision: 17 // Revision 0.01 - File Created 18 // Additional Comments: 19 // 20 ////////////////////////////////////////////////////////////////////////////////// 21 module Register_Unit(data_out, 22 data_in, 23 load, 24 clk, 25 rst); 26 parameter word_size=12; 27 output [word_size-1:0] data_out; 28 input [word_size-1:0] data_in; 29 input load; 30 input clk,rst; 31 reg [word_size-1:0] data_out; 32 33 always @(posedge clk or negedge rst)begin 34 if(rst==0) 35 data_out <= 0; 36 else if(load) 37 data_out <= data_in; 38 end 39 endmodule 40
- 17. Z FLAG MODULE And Verilog Code For Processor
- 19. D_flop.v Sat Aug 27 12:07:21 2016 Page 1 1 `timescale 1ns / 1ps 2 ////////////////////////////////////////////////////////////////////////////////// 3 // Company: 4 // Engineer: 5 // 6 // Create Date: 21:59:39 06/04/2016 7 // Design Name: 8 // Module Name: D_flop 9 // Project Name: 10 // Target Devices: 11 // Tool versions: 12 // Description: 13 // 14 // Dependencies: 15 // 16 // Revision: 17 // Revision 0.01 - File Created 18 // Additional Comments: 19 // 20 ////////////////////////////////////////////////////////////////////////////////// 21 module D_flop(data_out, 22 data_in, 23 load, 24 clk, 25 rst); 26 output data_out; 27 input data_in; 28 input load; 29 input clk,rst; 30 reg data_out; 31 32 always @(posedge clk or negedge rst)begin 33 if(rst==0) 34 data_out <= 0; 35 else if(load) 36 data_out <= data_in; 37 end 38 endmodule 39
- 20. ADDRESS REGISTER MODULE And Verilog Code For Processor
- 22. Address_Register.v Sat Aug 27 12:07:41 2016 Page 1 1 `timescale 1ns / 1ps 2 ////////////////////////////////////////////////////////////////////////////////// 3 // Company: 4 // Engineer: 5 // 6 // Create Date: 22:07:50 06/04/2016 7 // Design Name: 8 // Module Name: Address_Register 9 // Project Name: 10 // Target Devices: 11 // Tool versions: 12 // Description: 13 // 14 // Dependencies: 15 // 16 // Revision: 17 // Revision 0.01 - File Created 18 // Additional Comments: 19 // 20 ////////////////////////////////////////////////////////////////////////////////// 21 module Address_Register(data_out, 22 data_in, 23 data_frm_TmpAddr, 24 Load_Add_R, 25 Load_frm_TmpAddr, 26 Inc_Addr, 27 clk, 28 rst); 29 parameter addr_size=12, 30 word_size=12; 31 output [addr_size-1:0] data_out; 32 input [word_size-1:0] data_in; 33 34 35 input [addr_size-1:0] data_frm_TmpAddr; 36 37 input Load_Add_R, 38 Load_frm_TmpAddr, 39 Inc_Addr; 40 41 input clk,rst; 42 43 reg [addr_size-1:0] data_out; 44 45 always @(posedge clk or negedge rst)begin 46 if(rst==0) 47 data_out <= 0; 48 else if(Load_Add_R) 49 data_out <= data_in; 50 else if(Load_frm_TmpAddr) 51 data_out <= data_frm_TmpAddr; 52 else if(Inc_Addr) 53 data_out <= data_out + 1'b1; 54 55 end 56 endmodule 57
- 23. TEMP ADDRESS REGISTER MODULE And Verilog Code For Processor
- 25. TMP_ADDR_REG.v Sat Aug 27 12:11:00 2016 Page 1 1 `timescale 1ns / 1ps 2 ////////////////////////////////////////////////////////////////////////////////// 3 // Company: 4 // Engineer: 5 // 6 // Create Date: 01:34:33 06/22/2016 7 // Design Name: 8 // Module Name: TMP_ADDR_REG 9 // Project Name: 10 // Target Devices: 11 // Tool versions: 12 // Description: 13 // 14 // Dependencies: 15 // 16 // Revision: 17 // Revision 0.01 - File Created 18 // Additional Comments: 19 // 20 ////////////////////////////////////////////////////////////////////////////////// 21 module TMP_ADDR_REG( data_out, 22 data_in, 23 Load_TmpAddr, 24 Inc_TmpAddr, 25 Inc_TmpAddr_by_reg, 26 clk, 27 rst); 28 29 parameter address_size=12, 30 word_size = 12; 31 32 output [address_size-1:0] data_out; 33 34 input [word_size-1:0] data_in; 35 36 37 input Load_TmpAddr, 38 Inc_TmpAddr, 39 Inc_TmpAddr_by_reg; 40 41 input clk,rst; 42 reg [address_size-1:0] data_out; 43 44 always @(posedge clk or negedge rst)begin 45 if(rst==0) 46 data_out <= 0; 47 else if(Load_TmpAddr) 48 data_out <= data_in; 49 else if(Inc_TmpAddr) 50 data_out <= data_out + 1'b1; 51 else if(Inc_TmpAddr_by_reg) 52 data_out <= data_out + data_in; 53 54 end 55 56 endmodule 57
- 26. INSTRUCTION REGISTER MODULE And Verilog Code For Processor
- 28. Instruction_Register.v Sat Aug 27 16:25:37 2016 Page 1 1 `timescale 1ns / 1ps 2 ////////////////////////////////////////////////////////////////////////////////// 3 // Company: 4 // Engineer: 5 // 6 // Create Date: 22:18:18 06/04/2016 7 // Design Name: 8 // Module Name: Instruction_Register 9 // Project Name: 10 // Target Devices: 11 // Tool versions: 12 // Description: 13 // 14 // Dependencies: 15 // 16 // Revision: 17 // Revision 0.01 - File Created 18 // Additional Comments: 19 // 20 ////////////////////////////////////////////////////////////////////////////////// 21 module Instruction_Register(data_out, 22 data_in, 23 load, 24 clk, 25 rst); 26 parameter word_size=8; 27 output [word_size-1:0] data_out; 28 input [word_size-1:0] data_in; 29 input load; 30 input clk,rst; 31 reg [word_size-1:0] data_out; 32 33 always @(posedge clk or negedge rst)begin 34 if(rst==0) 35 data_out <= 0; 36 else if(load) 37 data_out <= data_in; 38 end 39 endmodule 40
- 29. PROGRAM COUNTER MODULE And Verilog Code For Processor
- 31. Program_Counter.v Sat Aug 27 16:26:34 2016 Page 1 1 `timescale 1ns / 1ps 2 ////////////////////////////////////////////////////////////////////////////////// 3 // Company: 4 // Engineer: 5 // 6 // Create Date: 22:22:12 06/04/2016 7 // Design Name: 8 // Module Name: Program_Counter 9 // Project Name: 10 // Target Devices: 11 // Tool versions: 12 // Description: 13 // 14 // Dependencies: 15 // 16 // Revision: 17 // Revision 0.01 - File Created 18 // Additional Comments: 19 // 20 ////////////////////////////////////////////////////////////////////////////////// 21 module Program_Counter(count, 22 data_in, 23 Load_PC, 24 Inc_PC, 25 clk, 26 rst); 27 parameter word_size=12; 28 output [word_size-1:0] count; 29 input [word_size-1:0] data_in; 30 input Load_PC,Inc_PC; 31 input clk,rst; 32 reg [word_size-1:0] count; 33 34 always @(posedge clk or negedge rst)begin 35 if(rst==0) 36 count <= 0; 37 else if(Load_PC) 38 count <= data_in; 39 else if(Inc_PC) 40 count <= count + 1'b1; 41 end 42 endmodule 43
- 32. MULTIPLEXER MODULE And Verilog Code For Processor
- 34. Multiplexer_5ch.v Sat Aug 27 16:27:21 2016 Page 1 1 `timescale 1ns / 1ps 2 ////////////////////////////////////////////////////////////////////////////////// 3 // Company: 4 // Engineer: 5 // 6 // Create Date: 22:38:41 06/04/2016 7 // Design Name: 8 // Module Name: Multiplexer_5ch 9 // Project Name: 10 // Target Devices: 11 // Tool versions: 12 // Description: 13 // 14 // Dependencies: 15 // 16 // Revision: 17 // Revision 0.01 - File Created 18 // Additional Comments: 19 // 20 ////////////////////////////////////////////////////////////////////////////////// 21 module Multiplexer_5ch(mux_out, 22 data_a, data_b, data_c, data_d, data_e, 23 sel); 24 25 parameter word_size=12; 26 27 output [word_size-1:0] mux_out; 28 input [word_size-1:0] data_a, data_b, data_c, data_d, data_e; 29 input [2:0] sel; 30 31 assign mux_out = (sel===3'b000)?data_a:(sel===3'b001) 32 ?data_b:(sel===3'b010) 33 ?data_c:(sel===3'b011) 34 ?data_d:(sel===3'b100) 35 ?data_e:8'bx; 36 endmodule 37
- 35. ALU MODULE And Verilog Code For Processor
- 37. Alu_RISC.v Sat Aug 27 16:28:06 2016 Page 1 1 `timescale 1ns / 1ps 2 ////////////////////////////////////////////////////////////////////////////////// 3 // Company: 4 // Engineer: 5 // 6 // Create Date: 10:10:26 06/05/2016 7 // Design Name: 8 // Module Name: Alu_RISC 9 // Project Name: 10 // Target Devices: 11 // Tool versions: 12 // Description: 13 // 14 // Dependencies: 15 // 16 // Revision: 17 // Revision 0.01 - File Created 18 // Additional Comments: 19 // 20 ////////////////////////////////////////////////////////////////////////////////// 21 module Alu_RISC(alu_zero_flag, 22 alu_out, 23 Div_done, 24 25 data_1, 26 data_2, 27 sel, 28 Start_Div, 29 clk, 30 rst); 31 32 parameter word_size=12; 33 parameter op_size=4; 34 35 parameter NOP = 4'b0000, 36 ADD = 4'b0001, 37 SUB = 4'b0010, 38 DIV = 4'b0011, 39 NOT = 4'b0100, 40 RD = 4'b0101, 41 WR = 4'b0110, 42 BR = 4'b0111, 43 BRZ = 4'b1000, 44 SHFL = 4'b1100, 45 SHFR = 4'b1101; 46 47 output alu_zero_flag, Div_done; 48 output [word_size-1:0] alu_out; 49 input [word_size-1:0] data_1, data_2; 50 input [op_size-1:0] sel; 51 52 input Start_Div, 53 clk, 54 rst; 55 56 wire [word_size-1:0] div; 57 58 reg [word_size-1:0] dividend; 59 60 wire div_done; 61 62 //reg [word_size-1:0] alu_out;
- 38. Alu_RISC.v Sat Aug 27 16:28:06 2016 Page 2 63 reg [word_size-1:0] accumelator; 64 assign alu_zero_flag = ~|alu_out; 65 66 assign alu_out = (div_done==1'b1) ? div : accumelator; 67 assign Div_done = div_done; 68 69 always @(sel or data_1 or data_2)begin:ALU_OPERATIONS 70 case(sel) 71 NOP : accumelator = 0; 72 ADD : accumelator = data_1 + data_2; //Reg_Y + Bus_1 73 SUB : accumelator = data_1 - data_2; 74 DIV : //dividend = data_1; 75 NOT : accumelator = ~data_2; //~Bus_1 76 SHFL : accumelator = {data_2[word_size-2:0],1'b0}; 77 SHFR : accumelator = {1'b0,data_2[word_size-1:1]}; 78 default accumelator = 0; 79 endcase 80 end 81 82 // Instantiate the division_unit 83 Division_Unit division_unit ( 84 .Div_out(div), 85 .Div_done(div_done), 86 .divisor(data_2), 87 .dividend(data_1), 88 .Start_Div(Start_Div), 89 .clk(clk), 90 .rst(rst) 91 ); 92 93 endmodule 94
- 39. MEMORY MODULE And Verilog Code For Processor
- 41. Memory_Unit.v Sat Aug 27 16:28:45 2016 Page 1 1 `timescale 1ns / 1ps 2 ////////////////////////////////////////////////////////////////////////////////// 3 // Company: 4 // Engineer: 5 // 6 // Create Date: 11:19:10 06/07/2016 7 // Design Name: 8 // Module Name: Memory_Unit 9 // Project Name: 10 // Target Devices: 11 // Tool versions: 12 // Description: 13 // 14 // Dependencies: 15 // 16 // Revision: 17 // Revision 0.01 - File Created 18 // Additional Comments: 19 // 20 ////////////////////////////////////////////////////////////////////////////////// 21 module Memory_Unit(data_out, 22 data_in, 23 address, 24 write, 25 clk); 26 parameter word_size = 12, 27 address_size = 12, 28 memory_size = 1024; 29 30 output [word_size-1:0] data_out; 31 32 input [word_size-1:0] data_in; 33 input [address_size-1:0] address; 34 input write; 35 input clk; 36 37 // declaring the RAM cells. 38 reg [word_size-1:0] memory [memory_size-1:0]; 39 // data flow modeling for memory out. 40 assign data_out = memory[address]; 41 42 // behavior of the data writing to the momory. 43 always @(posedge clk)begin:MEMORY_WRITING 44 if(write==1'b1) 45 memory[address] = data_in; 46 end 47 48 49 initial begin 50 51 //$readmemb("final_asm.dat", memory); 52 53 // @000 54 memory[0] = 12'b0000_00_00; // 0. NOP 55 memory[1] = 12'b0101_00_00; // 1. loop1: RD FECH_ADDR R0 ; R0 = NOT_EMPTY_STU 56 memory[2] = 12'b100110000; // 2. 304 57 memory[3] = 12'b1011_00_01; // 3. IOSTS R1 ; R1 = IO_STU 58 memory[4] = 12'b0010_01_00; // 4. SUB R1 R0 ; R0 = R1- R0 59 memory[5] = 12'b1000_00_00; // 5. BRZ Exit1 60 memory[6] = 12'b01001010 ; // 6. 74 61 memory[7] = 12'b0000_00_00 ; // 7. NOP 62 memory[8] = 12'b0111_00_00 ; // 8. BR loop1
- 42. Memory_Unit.v Sat Aug 27 16:28:45 2016 Page 2 63 memory[9] = 12'b00000001 ; // 9. 1 64 65 66 67 ///////////////////////////////////////////////////////////////////////// 68 /////////////void get_raw_data()///////////////////////////////////////// 69 ///////////////////////////////////////////////////////////////////////// 70 memory[10] = 12'b1110_00_10 ; // 10. ADRI BYMEM ; Addr = *p(raw_addr) 71 memory[11] = 12'b11110111 ; // 11. rawnum(*) ; -> value may change by main() 72 memory[12] = 12'b0101_10_00 ; // 12. RD FECH_VAL R0 ; R0 = i = 0; :Exit1 73 memory[13] = 12'b00000000 ; // 13. 0 74 memory[14] = 12'b0101_10_01 ; // 14. RD FECH_VAL R1 ; R1 = j1 = 1; 75 memory[15] = 12'b00000001 ; // 15. 1 76 memory[16] = 12'b0101_10_10 ; // 16. loop1: RD FECH_VAL R2 ; R2 = SIZE 77 memory[17] = 12'b100000000 ; // 17. 16 78 memory[18] = 12'b0010_00_10 ; // 18. SUB R0 R2 ; R2 = R0 - R2 // we should keep i(R0) alive 79 memory[19] = 12'b1000_00_00 ; // 19. BRZ 80 memory[20] = 12'b00100100 ; // 20. Exit2(36) 81 //// 82 memory[21] = 12'b0101_00_10 ; // 21. RD FECH_ADDR R2 ; R2 = NOT_EMPTY_STU 83 memory[22] = 12'b100110000 ; // 22. 304 84 memory[23] = 12'b1011_00_11 ; // 23. IOSTS R3 ; R3 = IO_STU 85 memory[24] = 12'b0010_11_10 ; // 24. SUB R3 R2 ; R2 = R3- R2 86 memory[25] = 12'b1000_00_00 ; // 25. BRZ 87 memory[26] = 12'b00011101 ; // 26. DOIF1(29) 88 memory[27] = 12'b0111_00_00 ; // 27. BR 89 memory[28] = 12'b000010101 ; // 28. loop1(21) ;go nack and wait for data 90 memory[29] = 12'b1001_00_00 ; // 29. DOIF1: IOCMD P0 91 memory[30] = 12'b1010_11_00 ; // 30. IORW R3 IO_R 92 memory[31] = 12'b0110_11_01 ; // 31. WR R3 NFECH_ADDR 93 memory[32] = 12'b1110_00_00 ; // 32. ADRI BYONE 94 //// 95 memory[33] = 12'b0001_01_00 ; // 33. ADD R1 R0 ; R0 = R1(j2=1) + R0 96 memory[34] = 12'b0111_00_00 ; // 34. BR 97 memory[35] = 12'b00010000 ; // 35. loop1(16) 98 memory[36] = 12'b0111_00_00 ; // 36. BR 99 memory[37] = 12'b00011101 ; // 37. EXIT_ALL (*) ; -> value may change by main() 100 101 102 103 ///////////////////////////////////////////////////////////////////////// 104 /////////////void sample()/////////////////////////////////////////////// 105 ///////////////////////////////////////////////////////////////////////// 106 107 memory[38] = 12'b0101_10_00 ; // 38. RD FECH_VAL R0 ; R0 = k = 0; 108 memory[39] = 12'b00000000 ; // 39. 0 109 //// 110 111 //(0,0) 112 memory[40] = 12'b1110_00_10 ; // 40. loop: ADRI BYMEM ; 306 : FIMG_BASE0_ADDR_L
- 43. Memory_Unit.v Sat Aug 27 16:28:45 2016 Page 3 113 memory[41] = 12'b100110010 ; // 41. 306 114 115 memory[42] = 12'b0101_10_11 ; // 42. RD FECH_VAL R3 ; R3 = 0; -> total 116 memory[43] = 12'b00000000 ; // 43. 0 117 118 memory[44] = 12'b1110_00_01 ; // 44. ADRI R0 BYREG 119 memory[45] = 12'b0101_01_10 ; // 45. RD NFECH_ADDR R2 ; R2 = filterd_pixel_val 120 memory[46] = 12'b0001_10_11 ; // 46. ADD R2 R3 ; R3 = R2 + R3 121 122 memory[47] = 12'b1110_00_00 ; // 47. ADRI BYONE 123 124 //(0,1) 125 memory[48] = 12'b0101_01_10 ; // 48. RD NFECH_ADDR R2 ; R2 = filterd_pixel_val 126 memory[49] = 12'b0001_10_11 ; // 49. ADD R2 R3 ; R3 = R2 + R3 127 128 //(1,0) 129 memory[50] = 12'b1110_00_10 ; // 50. ADRI BYMEM ;254 : FIMG_BASE1_ADDR_L 130 memory[51] = 12'b100110011 ; // 51. 307 ; fixed to be FROW1 131 memory[52] = 12'b1110_00_01 ; // 52. ADRI R0 BYREG 132 memory[53] = 12'b0101_01_10 ; // 53. RD NFECH_ADDR R2 ; R2 = filterd_pixel_val 133 memory[54] = 12'b0001_10_11 ; // 54. ADD R2 R3 ; R3 = R2 + R3 134 135 memory[55] = 12'b1110_00_00 ; // 55. ADRI BYONE 136 137 //(1,1) 138 memory[56] = 12'b0101_01_10 ; // 56. RD NFECH_ADDR R2 ; R2 = filterd_pixel_val 139 memory[57] = 12'b0001_10_11 ; // 57. ADD R2 R3 ; R3 = R2 + R3 140 141 memory[58] = 12'b1101_00_11 ; // 58. SHFR R3 142 memory[59] = 12'b1101_00_11 ; // 59. SHFR R3 143 144 memory[60] = 12'b1010_11_01 ; // 60. IORW R3 IO_W 145 memory[61] = 12'b1001_00_01 ; // 61. IOCMD P1 146 //// 147 memory[62] = 12'b0101_10_10 ; // 62. RD FECH_VAL R2 ; R2 = SIZE = 254 148 memory[63] = 12'b11111110 ; // 63. 14 149 memory[64] = 12'b0010_00_10 ; // 64. SUB R0 R2 ; R2 = R0 - R2 // we should keep i(R0) alive 150 memory[65] = 12'b1000_00_00 ; // 65. BRZ 151 memory[66] = 12'b01001000 ; // 66. Exit1(72) 152 memory[67] = 12'b0101_10_01 ; // 67. RD FECH_VAL R1 ; R1 = 2; 153 memory[68] = 12'b00000010 ; // 68. 2 154 memory[69] = 12'b0001_01_00 ; // 69. ADD R1 R0 ; R0 = R1(j2=2) + R0 155 memory[70] = 12'b0111_00_00 ; // 70. BR 156 memory[71] = 12'b000101000 ; // 71. loop(40) 157 memory[72] = 12'b0111_00_00 ; // 72. Exit1: BR 158 memory[73] = 12'b00011101 ; // 73. EXIT_ALL (**) ; -> value may change by main() 159 160 161 162 163 ///////////////////////////////////////////////////////////////////////// 164 /////////////void main()/////////////////////////////////////////////////
- 44. Memory_Unit.v Sat Aug 27 16:28:45 2016 Page 4 165 ///////////////////////////////////////////////////////////////////////// 166 167 168 memory[74] = 12'b0101_10_00 ; // 74. RD FECH_VAL R0 ; R0 = k = 0; 169 memory[75] = 12'b00000000 ; // 75. 0 170 //// 171 memory[76] = 12'b0110_00_00 ; // 76. loop: WR R0 FECH_ADDR ;save R0 172 memory[77] = 12'b100101100 ; // 77. 300 173 174 //-----------------call1 get_rawdata()-------------------// 175 memory[78] = 12'b0101_10_00 ; // 78. RD FECH_VAL R0 176 memory[79] = 12'b100110010 ; // 79. 306 177 memory[80] = 12'b0110_00_00 ; // 80. WR R0 FECH_ADDR 178 memory[81] = 12'b000001011 ; // 81. 11 179 180 memory[82] = 12'b0101_10_00 ; // 82. RD FECH_VAL R0 181 memory[83] = 12'b001011000 ; // 83. 88 182 memory[84] = 12'b0110_00_00 ; // 84. WR R0 FECH_ADDR 183 memory[85] = 12'b000100101 ; // 85. 37` 184 185 memory[86] = 12'b0111_00_00 ; // 86. BR 186 memory[87] = 12'b000001010 ; // 87. 10 // get_rawdata() 187 //--------------------------------------------------------// 188 189 190 //-----------------call2 get_rawdata()-------------------// 191 memory[88] = 12'b0101_10_00 ; // 88. RD FECH_VAL R0 192 memory[89] = 12'b100110011 ; // 89. 307 193 memory[90] = 12'b0110_00_00 ; // 90. WR R0 FECH_ADDR 194 memory[91] = 12'b000001011 ; // 91. 11 195 196 memory[92] = 12'b0101_10_00 ; // 92. RD FECH_VAL R0 197 memory[93] = 12'b001100010 ; // 93. 98 198 memory[94] = 12'b0110_00_00 ; // 94. WR R0 FECH_ADDR 199 memory[95] = 12'b000100101 ; // 95. 37` 200 201 memory[96] = 12'b0111_00_00 ; // 96. BR 202 memory[97] = 12'b000001010 ; // 97. 10 // get_rawdata() 203 //--------------------------------------------------------// 204 205 memory[98] = 12'b0101_10_00 ; // 98. RD FECH_VAL R0 206 memory[99] = 12'b001101000 ; // 99. 104 207 memory[100] = 12'b0110_00_00; // 100. WR R0 FECH_ADDR 208 memory[101] = 12'b001001001 ; // 101. 73 209 210 memory[102] = 12'b0111_00_00; // 102. BR 211 memory[103] = 12'b000100110 ; // 103. 38 // sample() 212 213 memory[104] = 12'b1001_00_10; // 104. IOCMD P2 214 215 //// 216 memory[105] = 12'b0101_00_00; // 105. RD FECH_ADDR R0 ; restore R0 for outer loop 217 memory[106] = 12'b100101100 ; // 106. 300 218 219 memory[107] = 12'b0101_10_10; // 107. RD FECH_VAL R2 ; R2 = SIZE = 254 220 memory[108] = 12'b11111110 ; // 108. 14 221 memory[109] = 12'b0010_00_10; // 109. SUB R0 R2 ; R2 = R0 - R2 // we should keep i(R0) alive 222 memory[110] = 12'b1000_00_00; // 110. BRZ 223 memory[111] = 12'b01110101 ; // 111. Exit(117)
- 45. Memory_Unit.v Sat Aug 27 16:28:45 2016 Page 5 224 memory[112] = 12'b0101_10_01; // 112. RD FECH_VAL R1 ; R1 = 2; 225 memory[113] = 12'b00000010 ; // 113. 2 226 memory[114] = 12'b0001_01_00; // 114. ADD R1 R0 ; R0 = R1(j2=2) + R0 227 memory[115] = 12'b0111_00_00; // 115. BR 228 memory[116] = 12'b001001100 ; // 116. loop(76) 229 memory[117] = 12'b11110000 ; // OFF : Exit1 230 231 232 //@130 233 memory[304] = 12'b0000_0001_1000; 234 memory[305] = 12'b0000_0000_1000; 235 memory[306] = 12'b0001_0100_0000; 236 memory[307] = 12'b0010_0100_0000; 237 238 end 239 240 endmodule 241
- 46. PROCESSING UNIT MODULE And Verilog Code For Processor
- 47. Processing_unit.v Sat Aug 27 12:04:40 2016 Page 1 1 `timescale 1ns / 1ps 2 ////////////////////////////////////////////////////////////////////////////////// 3 // Company: 4 // Engineer: 5 // 6 // Create Date: 17:07:44 06/05/2016 7 // Design Name: 8 // Module Name: Processing_unit 9 // Project Name: 10 // Target Devices: 11 // Tool versions: 12 // Description: 13 // 14 // Dependencies: 15 // 16 // Revision: 17 // Revision 0.01 - File Created 18 // Additional Comments: 19 // 20 ////////////////////////////////////////////////////////////////////////////////// 21 module Processing_unit(instruction, 22 Zflag, 23 address, 24 Bus_1, 25 Div_done, 26 27 io_status, 28 io_word, 29 mem_word, 30 Load_R0, 31 Load_R1, 32 Load_R2, 33 Load_R3, 34 Load_PC, 35 Load_IR, 36 Load_TmpAddr, 37 Load_Add_R, 38 Load_Reg_Y, 39 Load_Reg_Z, 40 Load_Reg_Div, 41 Clear_Reg_Div, 42 Inc_PC, 43 Load_frm_TmpAddr, 44 Inc_Addr, 45 Inc_TmpAddr, 46 Inc_TmpAddr_by_reg, 47 Sel_Bus_1_Mux, 48 Sel_Bus_2_Mux, 49 Start_Div, 50 clk, 51 rst); 52 53 parameter instruction_size = 8; 54 parameter word_size = 12; 55 parameter addr_size = 12; 56 parameter op_size = 4; 57 parameter Sel1_size = 3; 58 parameter Sel2_size = 3; 59 60 output [instruction_size-1:0] instruction; 61 output [word_size-1:0] Bus_1; 62 output [addr_size-1:0] address;
- 48. Processing_unit.v Sat Aug 27 12:04:40 2016 Page 2 63 output Zflag, Div_done; 64 65 input [word_size-1:0] mem_word; 66 input [word_size-1:0] io_word; 67 input [word_size-1:0] io_status; 68 69 input Load_R0, 70 Load_R1, 71 Load_R2, 72 Load_R3, 73 Load_PC, 74 Load_IR, 75 Load_TmpAddr, 76 Load_Add_R, 77 Load_Reg_Y, 78 Load_Reg_Z, 79 Load_Reg_Div, 80 Clear_Reg_Div, 81 Inc_PC, 82 Load_frm_TmpAddr, 83 Inc_Addr, 84 Inc_TmpAddr, 85 Inc_TmpAddr_by_reg, 86 Start_Div; 87 88 input [Sel1_size-1:0] Sel_Bus_1_Mux; 89 input [Sel2_size-1:0] Sel_Bus_2_Mux; 90 input clk, rst; 91 92 wire [word_size-1:0] Bus_2; 93 wire [word_size-1:0] R0_out; 94 wire [word_size-1:0] R1_out; 95 wire [word_size-1:0] R2_out; 96 wire [word_size-1:0] R3_out; 97 wire [word_size-1:0] PC_count; 98 wire [word_size-1:0] Y_value; 99 wire [word_size-1:0] alu_out; 100 101 wire alu_zero_flag, Div_done_frm_alu; 102 103 wire [addr_size-1:0] TmpAddr_to_Addr; 104 105 wire [op_size-1:0] op_code = instruction[instruction_size-1:instruction_size- op_size]; //implicitly assign opcode from 106 107 108 109 //the instruction to be decoded to the op_code. 110 // Instantiate the data registers 111 Register_Unit R0 ( 112 .data_out(R0_out), 113 .data_in(Bus_2), 114 .load(Load_R0), 115 .clk(clk), 116 .rst(rst) 117 ); 118 119 Register_Unit R1 ( 120 .data_out(R1_out), 121 .data_in(Bus_2), 122 .load(Load_R1), 123 .clk(clk),
- 49. Processing_unit.v Sat Aug 27 12:04:40 2016 Page 3 124 .rst(rst) 125 ); 126 127 Register_Unit R2 ( 128 .data_out(R2_out), 129 .data_in(Bus_2), 130 .load(Load_R2), 131 .clk(clk), 132 .rst(rst) 133 ); 134 135 Register_Unit R3 ( 136 .data_out(R3_out), 137 .data_in(Bus_2), 138 .load(Load_R3), 139 .clk(clk), 140 .rst(rst) 141 ); 142 143 Register_Unit Reg_Y ( 144 .data_out(Y_value), 145 .data_in(Bus_2), 146 .load(Load_Reg_Y), 147 .clk(clk), 148 .rst(rst) 149 ); 150 151 // Instantiate the especial registers 152 /* 153 DFF_flag Reg_Div ( 154 .data_out(Div_done), 155 .data_in(Div_done_frm_alu), 156 .load(Load_Reg_Div), 157 .clr(Clear_Reg_Div), 158 .clk(clk), 159 .rst(rst) 160 ); 161 */ 162 D_flop Reg_Z ( 163 .data_out(Zflag), 164 .data_in(alu_zero_flag), 165 .load(Load_Reg_Z), 166 .clk(clk), 167 .rst(rst) 168 ); 169 170 Address_Register Add_R ( 171 .data_out(address), 172 .data_in(Bus_2), 173 .data_frm_TmpAddr(TmpAddr_to_Addr), 174 .Load_Add_R(Load_Add_R), 175 .Load_frm_TmpAddr(Load_frm_TmpAddr), 176 .Inc_Addr(Inc_Addr), 177 .clk(clk), 178 .rst(rst) 179 ); 180 181 // Instantiate the TmpAddr 182 TMP_ADDR_REG TmpAddr ( 183 .data_out(TmpAddr_to_Addr), 184 .data_in(Bus_2), 185 .Load_TmpAddr(Load_TmpAddr),
- 50. Processing_unit.v Sat Aug 27 12:04:40 2016 Page 4 186 .Inc_TmpAddr(Inc_TmpAddr), 187 .Inc_TmpAddr_by_reg(Inc_TmpAddr_by_reg), 188 .clk(clk), 189 .rst(rst) 190 ); 191 192 Instruction_Register IR ( 193 .data_out(instruction), 194 .data_in(Bus_2[7:0]), 195 .load(Load_IR), 196 .clk(clk), 197 .rst(rst) 198 ); 199 200 Program_Counter PC ( 201 .count(PC_count), 202 .data_in(Bus_2), 203 .Load_PC(Load_PC), 204 .Inc_PC(Inc_PC), 205 .clk(clk), 206 .rst(rst) 207 ); 208 209 // Instantiate the mux modules 210 Multiplexer_5ch Mux_1 ( 211 .mux_out(Bus_1), 212 .data_a(R0_out), 213 .data_b(R1_out), 214 .data_c(R2_out), 215 .data_d(R3_out), 216 .data_e(PC_count), 217 .sel(Sel_Bus_1_Mux) 218 ); 219 220 Multiplexer_5ch Mux_2 ( 221 .mux_out(Bus_2), 222 .data_a(alu_out), 223 .data_b(Bus_1), 224 .data_c(mem_word), 225 .data_d(io_word), 226 .data_e(io_status), 227 .sel(Sel_Bus_2_Mux) 228 ); 229 230 // Instantiate the ALU 231 Alu_RISC ALU ( 232 .alu_zero_flag(alu_zero_flag), 233 .alu_out(alu_out), 234 .Div_done(Div_done), 235 .data_1(Y_value), 236 .data_2(Bus_1), 237 .sel(op_code), 238 .Start_Div(Start_Div), 239 .clk(clk), 240 .rst(rst) 241 ); 242 endmodule 243
- 51. CONTROL UNIT MODULE And Verilog Code For Processor
- 53. Control_Unit.v Sat Aug 27 08:31:20 2016 Page 1 1 `timescale 1ns / 1ps 2 ////////////////////////////////////////////////////////////////////////////////// 3 // Company: 4 // Engineer: 5 // 6 // Create Date: 21:59:55 06/05/2016 7 // Design Name: 8 // Module Name: Control_Unit 9 // Project Name: 10 // Target Devices: 11 // Tool versions: 12 // Description: 13 // 14 // Dependencies: 15 // 16 // Revision: 17 // Revision 0.01 - File Created 18 // Additional Comments: 19 // 20 ////////////////////////////////////////////////////////////////////////////////// 21 module Control_Unit(Load_R0, 22 Load_R1, 23 Load_R2, 24 Load_R3, 25 Load_PC, 26 Load_IR, 27 Load_Add_R, 28 Load_TmpAddr, 29 Inc_Addr, 30 Inc_TmpAddr_by_reg, 31 Inc_TmpAddr, 32 Load_Reg_Y, 33 Load_Reg_Z, 34 Load_Reg_Div, 35 Clear_Reg_Div, 36 Inc_PC, 37 Load_frm_TmpAddr, 38 Sel_Bus_1_Mux, 39 Sel_Bus_2_Mux, 40 write, 41 IO_Addr_cmds, 42 IO_operation_enable, 43 Start_Div, 44 45 46 instruction, 47 zero, 48 Div_done, 49 clk, 50 rst); 51 52 parameter word_size = 8, 53 op_size = 4, 54 state_size = 5, 55 src_size = 2, 56 dest_size = 2, 57 Sel1_size = 3, 58 Sel2_size = 3, 59 IO_cmd_size =2; 60 61 //state codes 62 parameter S_idle = 5'b00000,
- 54. Control_Unit.v Sat Aug 27 08:31:20 2016 Page 2 63 S_fet1 = 5'b00001, 64 S_fet2 = 5'b00010, 65 S_dec = 5'b00011, 66 S_ex1 = 5'b00100, 67 S_rd1 = 5'b00101, 68 S_rd2 = 5'b00110, 69 S_wr1 = 5'b00111, 70 S_wr2 = 5'b01000, 71 S_br1 = 5'b01001, 72 S_br2 = 5'b01010, 73 S_adrfc1 = 5'b01011, 74 S_adrfc2 = 5'b01100, 75 S_adrfc3 = 5'b01101, 76 S_div1 = 5'b01110, 77 S_div2 = 5'b01111, 78 S_div1_wast= 5'b10000, 79 S_halt = 5'b11111; 80 //opcodes 81 parameter NOP = 4'b0000, 82 ADD = 4'b0001, 83 SUB = 4'b0010, 84 DIV = 4'b0011, 85 NOT = 4'b0100, 86 RD = 4'b0101, 87 WR = 4'b0110, 88 BR = 4'b0111, 89 BRZ = 4'b1000, 90 IOCMD = 4'b1001, 91 IORW = 4'b1010, 92 IOSTS = 4'b1011, 93 SHFL = 4'b1100, 94 SHFR = 4'b1101, 95 ADRI = 4'b1110; 96 //source and destination codes 97 parameter R0 = 2'b00, 98 R1 = 2'b01, 99 R2 = 2'b10, 100 R3 = 2'b11; 101 102 //IO address 103 parameter P0 = 2'b00, 104 P1 = 2'b01, 105 P2 = 2'b10; 106 107 parameter IO_R = 2'b00, 108 IO_W = 2'b01; 109 110 localparam BYONE = 2'b00, 111 BYREG = 2'b01, 112 BYMEM = 2'b10, 113 ADRSV = 2'b11; 114 115 localparam SAVEADDR = 2'b00, 116 RESTADDR = 2'b01; 117 118 localparam FECH_ADDR = 2'b00, 119 NFECH_ADDR = 2'b01, 120 FECH_VAL = 2'b10; 121 122 output Load_R0, 123 Load_R1, 124 Load_R2,
- 55. Control_Unit.v Sat Aug 27 08:31:20 2016 Page 3 125 Load_R3, 126 Load_PC, 127 Load_IR, 128 Load_TmpAddr, 129 Load_Add_R, 130 Inc_Addr, 131 Inc_TmpAddr, 132 Inc_TmpAddr_by_reg, 133 Load_Reg_Y, 134 Load_Reg_Z, 135 Load_Reg_Div, 136 Clear_Reg_Div, 137 Inc_PC, 138 Load_frm_TmpAddr, 139 Start_Div; 140 141 142 143 144 145 output [Sel1_size-1:0] Sel_Bus_1_Mux; 146 output [Sel2_size-1:0] Sel_Bus_2_Mux; 147 output [IO_cmd_size-1:0] IO_Addr_cmds; 148 output write; 149 output IO_operation_enable; 150 151 input [word_size-1:0] instruction; 152 input zero, 153 Div_done, 154 clk, 155 rst; 156 157 reg [state_size-1:0] state, next_state; 158 reg Load_R0, 159 Load_R1, 160 Load_R2, 161 Load_R3, 162 Load_PC, 163 Load_IR, 164 Load_Add_R, 165 Load_Reg_Y, 166 Load_Reg_Z, 167 Load_Reg_Div, 168 Clear_Reg_Div, 169 Inc_PC, 170 write, 171 IO_operation_enable, 172 Start_Div; 173 174 175 reg Load_TmpAddr, 176 Inc_Addr, 177 Inc_TmpAddr, 178 Inc_TmpAddr_by_reg, 179 Load_frm_TmpAddr; 180 181 reg Sel_R0, 182 Sel_R1, 183 Sel_R2, 184 Sel_R3, 185 Sel_PC; 186
- 56. Control_Unit.v Sat Aug 27 08:31:20 2016 Page 4 187 188 reg Sel_ALU, 189 Sel_Bus_1, 190 Sel_Mem, 191 Sel_IO, 192 Sel_IO_Stus; 193 194 reg Addr_p0, 195 Addr_p1, 196 Addr_p2, 197 write_data_io; 198 199 200 reg err_flag; 201 202 //implicitly assign values from the instruction 203 wire [op_size-1:0] opcode = instruction[word_size-1:word_size-op_size]; 204 wire [src_size-1:0] src = instruction[src_size+dest_size-1:dest_size]; 205 wire [dest_size-1:0] dest = instruction[dest_size-1:0]; 206 207 //Mux selectors 208 assign Sel_Bus_1_Mux[Sel1_size-1:0] = Sel_R0 ? 3'b000 : 209 Sel_R1 ? 3'b001 : 210 Sel_R2 ? 3'b010 : 211 Sel_R3 ? 3'b011 : 212 Sel_PC ? 3'b100 : 3'bx; 213 214 assign Sel_Bus_2_Mux[Sel2_size-1:0] = Sel_ALU ? 3'b000 : 215 Sel_Bus_1 ? 3'b001 : 216 Sel_Mem ? 3'b010 : 217 Sel_IO ? 3'b011 : 218 Sel_IO_Stus ? 3'b100 : 3'bx; 219 220 //IO address select 221 assign IO_Addr_cmds[IO_cmd_size-1:0] = Addr_p0 ? 2'b00: 222 Addr_p1 ? 2'b01: 223 Addr_p2 ? 2'b10: 224 write_data_io ? 2'b11: 2'bx; 225 226 always @(posedge clk or negedge rst)begin:STATE_TRANSITION 227 if(rst==0)begin 228 state = S_idle; 229 //next_state = S_idle; 230 end 231 else 232 state = next_state; 233 end 234 235 always @(state or opcode or src or dest or zero)begin:OUTPUT_AND_NEXT_STATE //state or opcode or src or dest or zero 236 Sel_R0 = 1'b0; 237 Sel_R1 = 1'b0; 238 Sel_R2 = 1'b0; 239 Sel_R3 = 1'b0; 240 Sel_PC = 1'b0; 241 242 243 Load_R0 = 1'b0; 244 Load_R1 = 1'b0; 245 Load_R2 = 1'b0; 246 Load_R3 = 1'b0; 247 Load_PC = 1'b0;
- 57. Control_Unit.v Sat Aug 27 08:31:21 2016 Page 5 248 Load_IR = 1'b0; 249 Load_Add_R = 1'b0; 250 Load_Reg_Y = 1'b0; 251 Load_Reg_Z = 1'b0; 252 Load_Reg_Div = 1'b0; 253 Clear_Reg_Div = 1'b0; 254 Inc_PC = 1'b0; 255 write = 1'b0; 256 IO_operation_enable = 1'b0; 257 258 Sel_ALU = 1'b0; 259 Sel_Bus_1 = 1'b0; 260 Sel_Mem = 1'b0; 261 Sel_IO = 1'b0; 262 Sel_IO_Stus=1'b0; 263 264 Load_TmpAddr = 1'b0; 265 Inc_Addr = 1'b0; 266 Inc_TmpAddr = 1'b0; 267 Inc_TmpAddr_by_reg = 1'b0; 268 269 Load_frm_TmpAddr = 1'b0; 270 271 Addr_p0 = 1'b0; 272 Addr_p1 = 1'b0; 273 Addr_p2 = 1'b0; 274 write_data_io = 1'b0; 275 err_flag = 1'b0; 276 277 Start_Div = 1'b0; 278 279 next_state = state; 280 281 case(state) 282 S_idle: next_state = S_fet1; //state 0 283 284 S_fet1: begin //state 1 285 next_state = S_fet2; 286 Sel_PC = 1'b1; 287 Sel_Bus_1 = 1'b1; 288 Load_Add_R = 1'b1; 289 end 290 291 S_fet2: begin 292 next_state = S_dec; //state 2 293 Sel_Mem = 1'b1; 294 Load_IR = 1'b1; 295 Inc_PC = 1'b1; 296 end 297 298 S_dec: begin //state 3 299 case(opcode) 300 NOP: next_state = S_fet1; 301 302 ADD, SUB: begin //reg_Y <= value_of_src 303 next_state = S_ex1; 304 case(src) 305 R0: Sel_R0 = 1'b1; 306 R1: Sel_R1 = 1'b1; 307 R2: Sel_R2 = 1'b1; 308 R3: Sel_R3 = 1'b1; 309 default err_flag = 1'b1;
- 58. Control_Unit.v Sat Aug 27 08:31:21 2016 Page 6 310 endcase 311 Sel_Bus_1 = 1'b1; 312 Load_Reg_Y = 1'b1; 313 end 314 315 DIV: begin //reg_Y <= dest = dividend 316 next_state = S_div1; 317 case(dest) 318 R0: Sel_R0 = 1'b1; 319 R1: Sel_R1 = 1'b1; 320 R2: Sel_R2 = 1'b1; 321 R3: Sel_R3 = 1'b1; 322 default err_flag = 1'b1; 323 endcase 324 Sel_Bus_1 = 1'b1; 325 Load_Reg_Y = 1'b1; 326 end 327 328 NOT: begin // dest = ~src 329 next_state = S_fet1; 330 Load_Reg_Z = 1'b1; 331 Sel_ALU = 1'b1; 332 case(src) 333 R0: Sel_R0 = 1'b1; 334 R1: Sel_R1 = 1'b1; 335 R2: Sel_R2 = 1'b1; 336 R3: Sel_R3 = 1'b1; 337 default err_flag = 1'b1; 338 endcase 339 case(dest) 340 R0: Load_R0 = 1'b1; 341 R1: Load_R1 = 1'b1; 342 R2: Load_R2 = 1'b1; 343 R3: Load_R3 = 1'b1; 344 default err_flag = 1'b1; 345 endcase 346 end 347 SHFL,SHFR: begin 348 next_state = S_fet1; 349 Load_Reg_Z = 1'b1; 350 Sel_ALU = 1'b1; 351 case(dest) 352 R0: begin Sel_R0 = 1'b1; Load_R0 = 1'b1; end 353 R1: begin Sel_R1 = 1'b1; Load_R1 = 1'b1; end 354 R2: begin Sel_R2 = 1'b1; Load_R2 = 1'b1; end 355 R3: begin Sel_R3 = 1'b1; Load_R3 = 1'b1; end 356 default: err_flag = 1'b1; 357 endcase 358 end 359 360 RD: begin 361 case(src) 362 FECH_ADDR: begin 363 next_state = S_rd1; 364 Sel_PC = 1'b1; 365 Sel_Bus_1 = 1'b1; 366 Load_Add_R = 1'b1; 367 end 368 369 NFECH_ADDR: begin 370 Load_frm_TmpAddr = 1'b1; 371 next_state = S_rd2;
- 59. Control_Unit.v Sat Aug 27 08:31:21 2016 Page 7 372 end 373 374 FECH_VAL: begin 375 next_state = S_rd2; 376 Sel_PC = 1'b1; 377 Sel_Bus_1 = 1'b1; 378 Load_Add_R = 1'b1; 379 Inc_PC = 1'b1; 380 end 381 382 endcase 383 end 384 385 WR: begin //0110 386 case(dest) 387 FECH_ADDR: begin //0110_src_00 388 next_state = S_wr1; 389 Sel_PC = 1'b1; 390 Sel_Bus_1 = 1'b1; 391 Load_Add_R = 1'b1; 392 end 393 394 NFECH_ADDR: begin //0110_src_01 395 Load_frm_TmpAddr = 1'b1; 396 next_state = S_wr2; 397 end 398 endcase 399 end 400 401 BR: begin 402 next_state = S_br2; 403 Sel_PC = 1'b1; 404 Sel_Bus_1 = 1'b1; 405 Load_Add_R = 1'b1; 406 end 407 408 BRZ: begin 409 if(zero==1)begin 410 next_state = S_br2; 411 Sel_PC = 1'b1; 412 Sel_Bus_1 = 1'b1; 413 Load_Add_R = 1'b1; 414 end 415 else begin 416 next_state = S_fet1; 417 Inc_PC = 1'b1; 418 end 419 end 420 421 IOCMD: begin 422 next_state = S_fet1; 423 IO_operation_enable = 1'b1; 424 case(dest) //here dest = io_addr 425 P0: Addr_p0 = 1'b1; 426 P1: Addr_p1 = 1'b1; 427 P2: Addr_p2 = 1'b1; 428 default: err_flag = 1'b1; 429 endcase 430 end 431 432 IORW: begin //1010 433 next_state = S_fet1;
- 60. Control_Unit.v Sat Aug 27 08:31:21 2016 Page 8 434 IO_operation_enable = 1'b1; 435 case(dest) // dest = R or W 436 IO_R: begin //1010_dest_00 437 Sel_IO = 1'b1; 438 case(src) // here act src as the dest 439 R0: Load_R0 = 1'b1; 440 R1: Load_R1 = 1'b1; 441 R2: Load_R2 = 1'b1; 442 R3: Load_R3 = 1'b1; 443 default: err_flag = 1'b1; 444 endcase 445 end 446 IO_W: begin //1010_src_01 447 write_data_io = 1'b1; 448 case(src) 449 R0: Sel_R0 = 1'b1; 450 R1: Sel_R1 = 1'b1; 451 R2: Sel_R2 = 1'b1; 452 R3: Sel_R3 = 1'b1; 453 default err_flag = 1'b1; 454 endcase 455 end 456 457 endcase 458 end 459 460 IOSTS: begin 461 next_state = S_fet1; 462 Sel_IO_Stus = 1'b1; 463 case(dest) 464 R0: Load_R0 = 1'b1; 465 R1: Load_R1 = 1'b1; 466 R2: Load_R2 = 1'b1; 467 R3: Load_R3 = 1'b1; 468 default: err_flag = 1'b1; 469 endcase 470 end 471 472 ADRI: begin //1110 473 474 case(dest) 475 BYONE: begin //1110_??_00 476 next_state = S_fet1; 477 Inc_TmpAddr = 1'b1; 478 end 479 BYREG: begin //1110_src_01 480 next_state = S_fet1; 481 Sel_Bus_1 = 1'b1; 482 Inc_TmpAddr_by_reg = 1'b1; 483 case(src) 484 R0: Sel_R0 = 1'b1; 485 R1: Sel_R1 = 1'b1; 486 R2: Sel_R2 = 1'b1; 487 R3: Sel_R3 = 1'b1; 488 default: err_flag = 1'b1; 489 endcase 490 end 491 492 BYMEM: begin //1110_??_10 493 next_state = S_adrfc1; 494 Sel_PC = 1'b1; 495 Sel_Bus_1 = 1'b1;
- 61. Control_Unit.v Sat Aug 27 08:31:21 2016 Page 9 496 Load_Add_R = 1'b1; 497 end 498 endcase 499 end 500 default: next_state = S_halt; 501 endcase //(opcode) 502 end 503 504 S_ex1: begin // dest <= Reg_Y (operate) dest 505 next_state = S_fet1; 506 Load_Reg_Z = 1'b1; 507 Sel_ALU = 1'b1; 508 case(dest) 509 R0: begin Sel_R0 = 1'b1; Load_R0 = 1'b1; end 510 R1: begin Sel_R1 = 1'b1; Load_R1 = 1'b1; end 511 R2: begin Sel_R2 = 1'b1; Load_R2 = 1'b1; end 512 R3: begin Sel_R3 = 1'b1; Load_R3 = 1'b1; end 513 default: err_flag = 1'b1; 514 endcase 515 end 516 517 S_div1: begin //bus_1 <= src = divisor 518 // next_state = S_div1_wast; 519 Start_Div = 1'b1; next_state = S_div2; 520 case(src) 521 R0: begin Sel_R0 = 1'b1; end 522 R1: begin Sel_R1 = 1'b1; end 523 R2: begin Sel_R2 = 1'b1; end 524 R3: begin Sel_R3 = 1'b1; end 525 default: err_flag = 1'b1; 526 endcase 527 end 528 529 S_div2: begin 530 531 if(~Div_done) begin 532 next_state = S_fet1; 533 end 534 else begin 535 next_state = S_div2; 536 Load_Reg_Z = 1'b1; 537 Sel_ALU = 1'b1; 538 case(dest) 539 R0: Load_R0 = 1'b1; 540 R1: Load_R1 = 1'b1; 541 R2: Load_R2 = 1'b1; 542 R3: Load_R3 = 1'b1; 543 default: err_flag = 1'b1; 544 endcase 545 end 546 547 end 548 549 S_rd1: begin // load the Addr 550 next_state = S_rd2; 551 Sel_Mem = 1'b1; 552 Load_Add_R = 1'b1; 553 Inc_PC = 1'b1; 554 end 555 556 S_wr1: begin // load the Addr 557 next_state = S_wr2;
- 62. Control_Unit.v Sat Aug 27 08:31:21 2016 Page 10 558 Sel_Mem = 1'b1; 559 Load_Add_R = 1'b1; 560 Inc_PC = 1'b1; 561 end 562 563 S_rd2: begin // load memory word to the dest 564 next_state = S_fet1; 565 Sel_Mem = 1'b1; 566 case(dest) 567 R0: Load_R0 = 1'b1; 568 R1: Load_R1 = 1'b1; 569 R2: Load_R2 = 1'b1; 570 R3: Load_R3 = 1'b1; 571 default: err_flag = 1'b1; 572 endcase 573 end 574 575 S_wr2: begin 576 next_state = S_fet1; 577 write = 1'b1; 578 case(src) 579 R0: Sel_R0 = 1'b1; 580 R1: Sel_R1 = 1'b1; 581 R2: Sel_R2 = 1'b1; 582 R3: Sel_R3 = 1'b1; 583 default: err_flag = 1'b1; 584 endcase 585 end 586 587 S_br1: begin 588 next_state = S_br2; 589 //Sel_Mem = 1'b1; 590 //Load_Add_R = 1'b1; 591 end 592 593 S_br2: begin 594 next_state = S_fet1; 595 Sel_Mem = 1'b1; 596 Load_PC = 1'b1; 597 end 598 599 S_adrfc1: begin // load the Addr where the base addr lower 8bit stored 600 next_state = S_adrfc2; 601 Sel_Mem = 1'b1; 602 Load_Add_R = 1'b1; 603 Inc_PC = 1'b1; 604 end 605 606 S_adrfc2: begin 607 next_state = S_fet1; 608 Sel_Mem = 1'b1; 609 Load_TmpAddr = 1'b1; 610 end 611 612 S_halt: next_state = S_halt; 613 614 default: next_state = S_idle; 615 endcase 616 end 617 618 endmodule 619
- 63. PROCCESSOR RISC_SPM MODULE And Verilog Code For Processor
- 65. RISC_SPM.v Sat Aug 27 16:30:12 2016 Page 1 1 `timescale 1ns / 1ps 2 ////////////////////////////////////////////////////////////////////////////////// 3 // Company: 4 // Engineer: 5 // 6 // Create Date: 11:36:36 06/07/2016 7 // Design Name: 8 // Module Name: RISC_SPM 9 // Project Name: 10 // Target Devices: 11 // Tool versions: 12 // Description: 13 // 14 // Dependencies: 15 // 16 // Revision: 17 // Revision 0.01 - File Created 18 // Additional Comments: 19 // 20 ////////////////////////////////////////////////////////////////////////////////// 21 module RISC_SPM(IO_Addr_cmds, 22 IO_operation_enable, 23 data_to_io, 24 25 io_status, 26 io_word, 27 clk, 28 rst); 29 30 localparam word_size = 12; 31 localparam address_size = 12; 32 localparam Sel1_size = 3; 33 localparam Sel2_size = 3; 34 localparam IO_cmd_size = 2; 35 36 output [word_size-1:0] data_to_io; 37 output [IO_cmd_size-1:0] IO_Addr_cmds; 38 output IO_operation_enable; 39 40 input [word_size-1:0] io_status; 41 input [word_size-1:0] io_word; 42 input clk; 43 input rst; 44 45 // Data Nets. 46 wire [word_size-1:0] instruction; 47 wire [word_size-1:0] Bus_1; 48 wire [word_size-1:0] mem_word; 49 wire [address_size-1:0] address; 50 wire zero; 51 52 // Control Nets. 53 wire [Sel1_size-1:0] Sel_Bus_1_Mux; 54 wire [Sel2_size-1:0] Sel_Bus_2_Mux; 55 wire Load_R0, 56 Load_R1, 57 Load_R2, 58 Load_R3, 59 Load_PC, 60 Load_IR, 61 Load_Add_R, 62 Load_TmpAddr,
- 66. RISC_SPM.v Sat Aug 27 16:30:12 2016 Page 2 63 Inc_Addr, 64 Inc_TmpAddr, 65 Inc_TmpAddr_by_reg, 66 Load_Reg_Y, 67 Load_Reg_Z, 68 Load_Reg_Div, 69 Clear_Reg_Div, 70 Inc_PC, 71 Load_frm_TmpAddr, 72 write, 73 Div_done, 74 Start_Div; 75 76 assign data_to_io = Bus_1; 77 78 // Instantiate the control unit 79 Control_Unit control_unit ( 80 .Load_R0(Load_R0), 81 .Load_R1(Load_R1), 82 .Load_R2(Load_R2), 83 .Load_R3(Load_R3), 84 .Load_PC(Load_PC), 85 .Load_IR(Load_IR), 86 .Load_Add_R(Load_Add_R), 87 .Load_TmpAddr(Load_TmpAddr), 88 .Inc_Addr(Inc_Addr), 89 .Inc_TmpAddr(Inc_TmpAddr), 90 .Inc_TmpAddr_by_reg(Inc_TmpAddr_by_reg), 91 .Load_Reg_Y(Load_Reg_Y), 92 .Load_Reg_Z(Load_Reg_Z), 93 .Load_Reg_Div(Load_Reg_Div), 94 .Clear_Reg_Div(Clear_Reg_Div), 95 .Inc_PC(Inc_PC), 96 .Load_frm_TmpAddr(Load_frm_TmpAddr), 97 .Sel_Bus_1_Mux(Sel_Bus_1_Mux), 98 .Sel_Bus_2_Mux(Sel_Bus_2_Mux), 99 .write(write), 100 .IO_Addr_cmds(IO_Addr_cmds), 101 .IO_operation_enable(IO_operation_enable), 102 .Start_Div(Start_Div), 103 .instruction(instruction), 104 .zero(zero), 105 .Div_done(Div_done), 106 .clk(clk), 107 .rst(rst) 108 ); 109 110 // Instantiate the processing unit 111 Processing_unit processing_unit ( 112 .instruction(instruction), 113 .Zflag(zero), 114 .address(address), 115 .Bus_1(Bus_1), 116 .Div_done(Div_done), 117 .io_status(io_status), 118 .io_word(io_word), 119 .mem_word(mem_word), 120 .Load_R0(Load_R0), 121 .Load_R1(Load_R1), 122 .Load_R2(Load_R2), 123 .Load_R3(Load_R3), 124 .Load_PC(Load_PC),
- 67. RISC_SPM.v Sat Aug 27 16:30:12 2016 Page 3 125 .Load_IR(Load_IR), 126 .Load_Add_R(Load_Add_R), 127 .Load_Reg_Y(Load_Reg_Y), 128 .Load_Reg_Z(Load_Reg_Z), 129 .Load_Reg_Div(Load_Reg_Div), 130 .Clear_Reg_Div(Clear_Reg_Div), 131 .Inc_PC(Inc_PC), 132 .Load_TmpAddr(Load_TmpAddr), 133 .Load_frm_TmpAddr(Load_frm_TmpAddr), 134 .Inc_Addr(Inc_Addr), 135 .Inc_TmpAddr(Inc_TmpAddr), 136 .Inc_TmpAddr_by_reg(Inc_TmpAddr_by_reg), 137 .Sel_Bus_1_Mux(Sel_Bus_1_Mux), 138 .Sel_Bus_2_Mux(Sel_Bus_2_Mux), 139 .Start_Div(Start_Div), 140 .clk(clk), 141 .rst(rst) 142 ); 143 144 // Instantiate the memory module 145 Memory_Unit RAM ( 146 .data_out(mem_word), 147 .data_in(Bus_1), 148 .address(address), 149 .write(write), 150 .clk(clk) 151 ); 152 153 endmodule 154
- 68. IO MODULE And Verilog Code For Processor
- 70. IO_Module.v Sat Aug 27 16:31:01 2016 Page 1 1 `timescale 1ns / 1ps 2 ////////////////////////////////////////////////////////////////////////////////// 3 // Company: 4 // Engineer: 5 // 6 // Create Date: 11:44:59 06/18/2016 7 // Design Name: 8 // Module Name: IO_Module 9 // Project Name: 10 // Target Devices: 11 // Tool versions: 12 // Description: 13 // 14 // Dependencies: 15 // 16 // Revision: 17 // Revision 0.01 - File Created 18 // Additional Comments: 19 // 20 ////////////////////////////////////////////////////////////////////////////////// 21 module IO_Module(io_word, 22 data_to_tx, 23 tx_wr, 24 rx_rd, 25 send_tx, 26 io_status, 27 28 rx_empty, 29 data_from_RISC, 30 data_from_rx, 31 io_Addr_cmds, 32 io_operation_enable, 33 clk, 34 rst); 35 36 localparam word_size = 8, 37 IO_cmd_size = 2; 38 39 localparam RDRX = 2'b00, 40 WRTX = 2'b01, 41 SNTX = 2'b10, 42 RDPU = 2'b11; 43 44 //io status 45 localparam RXEM = 8'b00001000, 46 RXNEM = 8'b00011000; 47 48 //STATES 49 localparam idle = 2'b00, 50 rx_read = 2'b01; 51 52 output [word_size-1:0] io_word; 53 output [word_size-1:0] data_to_tx; 54 output [word_size-1:0] io_status; 55 output tx_wr, 56 rx_rd, 57 send_tx; 58 59 input [word_size-1:0] data_from_RISC; 60 input [word_size-1:0] data_from_rx; 61 input [IO_cmd_size-1:0] io_Addr_cmds; 62 input io_operation_enable;
- 71. IO_Module.v Sat Aug 27 16:31:01 2016 Page 2 63 input rx_empty; 64 input clk, rst; 65 66 67 reg tx_wr, 68 rx_rd, 69 send_tx; 70 71 reg rx_rd_next, 72 tx_wr_next , 73 send_tx_next; 74 75 reg Sel_rx, Sel_rx_next, Sel_RISC; 76 reg load_buf, load_buf_next; 77 wire [word_size-1:0] data_to_buf, buffer_out; 78 wire load_buf_final; 79 //dataflow modeling for output data 80 assign io_word = buffer_out; 81 assign data_to_tx = buffer_out; 82 assign io_status[word_size-1:0] = rx_empty==1'b1 ? RXEM : 83 rx_empty==1'b0 ? RXNEM : 8'bx; 84 85 always @(posedge clk or negedge rst)begin 86 if(rst==0)begin 87 rx_rd <= 1'b0; 88 tx_wr <= 1'b0; 89 send_tx <= 1'b0; 90 //load_buf <= 1'b0; 91 //Sel_rx <= 1'b0; 92 end 93 else begin 94 rx_rd <= rx_rd_next; 95 tx_wr <= tx_wr_next; 96 send_tx <= send_tx_next; 97 //load_buf <= load_buf_next; 98 //Sel_rx <= Sel_rx_next; 99 end 100 end 101 102 103 104 assign data_to_buf[word_size-1:0] = Sel_rx ? data_from_rx : 105 ((io_operation_enable) & (io_Addr_cmds==RDPU)) ? data_from_RISC : 8'b1; 106 107 assign load_buf_final = load_buf ? 1'b1 : 108 ((io_operation_enable) & (io_Addr_cmds==RDPU)) ? 1'b1 : 1'b0; 109 110 111 // Instantiate the buffer 112 Register_Unit buffer ( 113 .data_out(buffer_out), 114 .data_in(data_to_buf), 115 .load(load_buf_final), 116 .clk(clk), 117 .rst(rst) 118 ); 119 120 always @* begin //(io_Addr_cmds, io_operation_enable) 121 load_buf <= 1'b0; 122 Sel_rx <= 1'b0;
- 72. IO_Module.v Sat Aug 27 16:31:01 2016 Page 3 123 // Sel_RISC <= 1'b0; 124 rx_rd_next <= 1'b0; 125 tx_wr_next <= 1'b0; 126 send_tx_next <= 1'b0; 127 128 if(io_operation_enable) //IO_OPERATIONS_DECODING 129 case(io_Addr_cmds) 130 RDRX: begin Sel_rx <= 1'b1; load_buf <= 1'b1; rx_rd_next <= 1'b1; end 131 132 WRTX: begin tx_wr_next <= 1'b1; end 133 134 SNTX: begin send_tx_next <= 1'b1; end 135 136 // RDPU: begin Sel_RISC <= 1'b1; load_buf <= 1'b1; end 137 endcase 138 139 end 140 endmodule 141
- 73. UART RX MODULE And Verilog Code For Processor
- 75. UART_Rx.v Sat Aug 27 16:33:46 2016 Page 1 1 `timescale 1ns / 1ps 2 ////////////////////////////////////////////////////////////////////////////////// 3 // Company: 4 // Engineer: 5 // 6 // Create Date: 10:11:18 06/12/2016 7 // Design Name: 8 // Module Name: UART_Rx 9 // Project Name: 10 // Target Devices: 11 // Tool versions: 12 // Description: 13 // 14 // Dependencies: 15 // 16 // Revision: 17 // Revision 0.01 - File Created 18 // Additional Comments: 19 // 20 ////////////////////////////////////////////////////////////////////////////////// 21 module UART_Rx (rx_done_tick, 22 dout, 23 rx, 24 s_tick, 25 clk, 26 rst); 27 28 29 localparam D_BIT = 8; 30 localparam SB_TICK = 16; 31 localparam word_size = 8; 32 33 output rx_done_tick; 34 output [word_size-1:0] dout; 35 input rx; 36 input s_tick; 37 input clk; 38 input rst; 39 40 41 42 reg rx_reg; 43 reg rx_done, rx_done_next; 44 wire [word_size-1:0] dout; 45 46 //symbolic state declaration. 47 localparam [1:0] idle = 2'b00, 48 start = 2'b01, 49 data = 2'b10, 50 stop = 2'b11; 51 //signal declaration. 52 reg [1:0] state_reg, state_next; 53 reg [7:0] s_reg, s_next; //to count up to 15. 54 reg [7:0] n_reg, n_next; //to count num of bits. 55 reg [7:0] b_reg, b_next; //to store online data. 56 reg err_flg;//for debugging 57 58 59 60 //dataflow modeling for output 61 assign dout = b_reg; 62 assign rx_done_tick = rx_done;
- 76. UART_Rx.v Sat Aug 27 16:33:46 2016 Page 2 63 64 always @(posedge clk or negedge rst)begin:STATE_TRANSITION 65 if(rst==0)begin 66 67 rx_done <= 0; 68 state_reg <= idle; 69 s_reg <= 0; 70 n_reg <= 0; 71 b_reg <= 0; 72 end 73 else begin 74 75 rx_done <= rx_done_next; 76 state_reg <= state_next; 77 s_reg <= s_next; 78 n_reg <= n_next; 79 b_reg <= b_next; 80 81 end 82 end 83 84 85 always @* begin:NEXT_STATE_LOGIC 86 begin 87 rx_done_next <= 1'b0; 88 state_next <= state_reg; 89 s_next <= s_reg; 90 n_next <= n_reg; 91 b_next <= b_reg; 92 err_flg <= 1'b0; 93 end 94 case(state_reg) 95 96 idle: 97 begin 98 rx_done_next <= 1'b0; 99 if(~rx)begin 100 101 state_next <= start; 102 s_next <= 0; 103 end 104 end 105 start: if(s_tick) 106 if(s_reg==7)begin 107 108 state_next <= data; 109 s_next <= 0; 110 n_next <= 0; 111 end 112 else 113 s_next <= s_reg + 1'b1; 114 115 data: if(s_tick) 116 if(s_reg==15)begin 117 118 s_next <= 0; 119 b_next <= {rx, b_reg[7:1]}; 120 121 if(n_reg==(D_BIT-1)) 122 state_next <= stop; 123 else 124 n_next <= n_reg + 1'b1;
- 77. UART_Rx.v Sat Aug 27 16:33:46 2016 Page 3 125 end 126 else 127 s_next <= s_reg + 1'b1; 128 stop: if(s_tick) 129 if(s_reg==(SB_TICK-1))begin 130 131 state_next <= idle; 132 rx_done_next <= 1'b1; 133 134 end 135 else 136 s_next <= s_reg + 1'b1; 137 default: state_next <= idle; 138 endcase 139 140 end 141 endmodule 142
- 78. UART TX MODULE And Verilog Code For Processor
- 80. UART_Tx.v Sat Aug 27 16:35:06 2016 Page 1 1 `timescale 1ns / 1ps 2 ////////////////////////////////////////////////////////////////////////////////// 3 // Company: 4 // Engineer: 5 // 6 // Create Date: 07:44:56 06/15/2016 7 // Design Name: 8 // Module Name: UART_Tx 9 // Project Name: 10 // Target Devices: 11 // Tool versions: 12 // Description: 13 // 14 // Dependencies: 15 // 16 // Revision: 17 // Revision 0.01 - File Created 18 // Additional Comments: 19 // 20 ////////////////////////////////////////////////////////////////////////////////// 21 module UART_Tx (tx, 22 tx_done_tick, 23 24 din, 25 tx_start, 26 s_tick, 27 clk, 28 rst); 29 30 localparam D_BIT = 8; 31 localparam SB_TICK = 16; 32 33 localparam WORD_SIZE = 8; 34 localparam ADDRESS_SIZE = 8; 35 36 output tx, tx_done_tick; 37 38 input [WORD_SIZE-1:0] din; 39 input tx_start, 40 s_tick, 41 clk, 42 rst; 43 reg tx_done_tick, tx_done_tick_next; 44 45 //state declaration 46 localparam [1:0] idle = 2'b00, 47 start = 2'b01, 48 data = 2'b10, 49 stop = 2'b11; 50 51 reg [1:0] state_reg, state_next; 52 reg [7:0] s_reg, s_next; //to count up to 15. 53 reg [7:0] n_reg, n_next; //to count num of bits. 54 reg [7:0] b_reg, b_next; //to store shifting data. 55 reg tx_reg, tx_next; //to avoid glitches in output. 56 reg err_flg;//for debugging 57 58 //dataflow modeling to Tx output. 59 assign tx = tx_reg; 60 61 always @(posedge clk or negedge rst)begin:STATE_TRANSITION 62 if(rst==0)begin
- 81. UART_Tx.v Sat Aug 27 16:35:06 2016 Page 2 63 state_reg <= idle; 64 s_reg <= 0; 65 n_reg <= 0; 66 b_reg <= 8'b00001010; 67 tx_reg <= 1'b1; 68 //tx_done_tick <= 1'b0; 69 end 70 else begin 71 state_reg <= state_next; 72 s_reg <= s_next; 73 n_reg <= n_next; 74 b_reg <= b_next; 75 tx_reg <= tx_next; 76 //tx_done_tick <= tx_done_tick_next; 77 end 78 end 79 80 always @* begin:NEXT_STATE_LOGIC 81 state_next = state_reg; 82 tx_done_tick = 1'b0; 83 s_next = s_reg; 84 n_next = n_reg; 85 b_next = b_reg; 86 tx_next = tx_reg; 87 err_flg = 1'b0; 88 case(state_reg) 89 idle: begin 90 tx_next = 1'b1; 91 if(tx_start)begin 92 state_next = start; 93 s_next = 0; 94 95 b_next = din; 96 end 97 end 98 99 start: begin 100 tx_next = 1'b0; 101 if(s_tick)begin 102 if(s_reg==15)begin 103 state_next = data; 104 s_next = 0; 105 n_next = 0; 106 end 107 else 108 s_next = s_reg + 1'b1; 109 end 110 end 111 112 data: 113 begin 114 tx_next = b_reg[0]; 115 if(s_tick) 116 if(s_reg==15)begin 117 s_next = 0; 118 b_next = b_reg >> 1; 119 if(n_reg==(D_BIT-1)) 120 state_next = stop; 121 else 122 n_next = n_reg + 1'b1; 123 end 124 else
- 82. UART_Tx.v Sat Aug 27 16:35:06 2016 Page 3 125 s_next = s_reg + 1'b1; 126 end 127 stop: begin 128 tx_next = 1'b1; 129 if(s_tick) 130 if(s_reg==(SB_TICK-1))begin 131 state_next = idle; 132 133 tx_done_tick = 1'b1; 134 end 135 else 136 s_next = s_reg + 1'b1; 137 end 138 default: err_flg = 1'b1; 139 endcase 140 141 end 142 endmodule 143
- 83. FIFO MODULE And Verilog Code For Processor
- 85. FIFO.v Sat Aug 27 16:34:20 2016 Page 1 1 `timescale 1ns / 1ps 2 ////////////////////////////////////////////////////////////////////////////////// 3 // Company: 4 // Engineer: 5 // 6 // Create Date: 21:48:53 06/13/2016 7 // Design Name: 8 // Module Name: FIFO 9 // Project Name: 10 // Target Devices: 11 // Tool versions: 12 // Description: 13 // 14 // Dependencies: 15 // 16 // Revision: 17 // Revision 0.01 - File Created 18 // Additional Comments: 19 // 20 ////////////////////////////////////////////////////////////////////////////////// 21 module FIFO 22 ( r_data, 23 empty, 24 full, 25 26 w_data, 27 rd, 28 wr, 29 clk, 30 rst); 31 32 localparam WORD_SIZE = 8, 33 ADDRESS_SIZE = 9, 34 SIZE_OF_A_BUF = (2**ADDRESS_SIZE)-1; 35 36 output [WORD_SIZE-1:0] r_data; 37 output empty, full; 38 39 input [WORD_SIZE-1:0] w_data; 40 input rd, 41 wr, 42 clk, 43 rst; 44 45 //signal declaration. 46 reg [WORD_SIZE-1:0] array_reg [(2**ADDRESS_SIZE)-1:0]; //8-bit register array 47 reg [ADDRESS_SIZE-1:0] w_ptr_reg, w_ptr_next; 48 reg [ADDRESS_SIZE-1:0] w_ptr_succ, r_ptr_succ; 49 reg [ADDRESS_SIZE-1:0] r_ptr_reg, r_ptr_next; 50 reg full_reg, full_next; 51 reg empty_reg, empty_next; 52 53 always @(posedge clk)begin:WRITING_DATA 54 if(wr_en) 55 array_reg[w_ptr_reg] <= w_data; 56 end 57 58 assign r_data = array_reg[r_ptr_reg]; //data flow modeling to output bus. 59 60 assign full = full_reg; 61 assign empty = empty_reg; 62
- 86. FIFO.v Sat Aug 27 16:34:20 2016 Page 2 63 assign wr_en = wr & ~full_reg;//write only when write signal assert and FIFO is not full. 64 65 always @(posedge clk or negedge rst)begin:STATE_TRANSITION 66 if(rst==0)begin 67 w_ptr_reg <= 1'b0; 68 r_ptr_reg <= 1'b0; 69 full_reg <= 1'b0; 70 empty_reg <= 1'b1; 71 end 72 else begin 73 w_ptr_reg <= w_ptr_next; 74 r_ptr_reg <= r_ptr_next; 75 full_reg <= full_next; 76 empty_reg <= empty_next; 77 end 78 end 79 80 always @* begin:STATE_CONTROLLER 81 82 /* 83 if(w_ptr_reg == SIZE_OF_A_BUF)begin w_ptr_succ = 9'b1; end 84 else begin w_ptr_succ = w_ptr_reg + 1'b1; end 85 86 if(r_ptr_reg == SIZE_OF_A_BUF)begin r_ptr_succ = 9'b1; end 87 else begin r_ptr_succ = r_ptr_reg + 1'b1; end //FIFO is circuler one direction is considered. 88 */ 89 w_ptr_succ = w_ptr_reg + 1'b1; 90 r_ptr_succ = r_ptr_reg + 1'b1; 91 92 //default: keep old values. 93 w_ptr_next = w_ptr_reg; 94 r_ptr_next = r_ptr_reg; 95 full_next = full_reg; 96 empty_next = empty_reg; 97 98 case({wr, rd}) 99 2'b01: // read 100 if (~empty_reg)begin // not empty 101 r_ptr_next = r_ptr_succ; 102 full_next = 1'b0; 103 if (r_ptr_succ==w_ptr_reg)//only one item left to read. 104 empty_next = 1'b1; 105 end 106 2'b10: // write 107 if (~full_reg)begin // not full 108 w_ptr_next = w_ptr_succ; 109 empty_next = 1'b0; 110 if (w_ptr_succ==r_ptr_reg) // now all regs are circularly connected 111 full_next = 1'b1; 112 end 113 2'b11: // write and read begin 114 begin 115 w_ptr_next = w_ptr_succ; 116 r_ptr_next = r_ptr_succ ; 117 end 118 endcase 119 120 end 121
- 87. FIFO.v Sat Aug 27 16:34:20 2016 Page 3 122 123 endmodule 124
- 89. BAUD_RATE_GEN.v Sat Aug 27 17:09:24 2016 Page 1 1 `timescale 1ns / 1ps 2 ////////////////////////////////////////////////////////////////////////////////// 3 // Company: 4 // Engineer: 5 // 6 // Create Date: 19:21:58 06/15/2016 7 // Design Name: 8 // Module Name: BAUD_RATE_GEN 9 // Project Name: 10 // Target Devices: 11 // Tool versions: 12 // Description: 13 // 14 // Dependencies: 15 // 16 // Revision: 17 // Revision 0.01 - File Created 18 // Additional Comments: 19 // 20 ////////////////////////////////////////////////////////////////////////////////// 21 module BAUD_RATE_GEN ( max_tick, 22 q, 23 24 clk, 25 rst); 26 localparam M=651; 27 localparam N=10; 28 output max_tick; 29 output [N-1:0] q; 30 input clk, rst; 31 32 //signal declaration 33 reg [N-1:0] r_reg; 34 wire [N-1:0]r_next; 35 36 always @(posedge clk or negedge rst)begin:STATE_TRANSITION 37 if(rst==0) 38 r_reg <= 0; 39 else 40 r_reg <= r_next; 41 end 42 43 //next state logic in dataflow modeling 44 assign r_next = (r_reg==(M-1)) ? 0 : r_reg + 1'b1; 45 46 //output modeling 47 assign q = r_reg; 48 assign max_tick = (r_reg==(M-1)) ? 1'b1 : 1'b0; 49 50 endmodule 51 52 53
- 90. TX SENDING CONTROLLER MODULE And Verilog Code For Processor
- 92. Tx_sending_controller.v Sat Aug 27 17:10:10 2016 Page 1 1 `timescale 1ns / 1ps 2 ////////////////////////////////////////////////////////////////////////////////// 3 // Company: 4 // Engineer: 5 // 6 // Create Date: 20:45:56 06/18/2016 7 // Design Name: 8 // Module Name: Tx_sending_controller 9 // Project Name: 10 // Target Devices: 11 // Tool versions: 12 // Description: 13 // 14 // Dependencies: 15 // 16 // Revision: 17 // Revision 0.01 - File Created 18 // Additional Comments: 19 // 20 ////////////////////////////////////////////////////////////////////////////////// 21 module Tx_sending_controller(send_tx, 22 23 io_module_triger, 24 tx_fifo_empty, 25 clk, 26 rst); 27 28 output send_tx; 29 30 input io_module_triger; 31 input tx_fifo_empty; 32 input clk, rst; 33 34 reg send_tx, send_tx_next; 35 36 localparam idle = 2'b00, 37 trigering = 2'b01, 38 sending = 2'b10; 39 40 reg [1:0] state, state_next; 41 42 always @(posedge clk or negedge rst)begin:STATE_TRANSITION 43 if(rst==0)begin 44 state <= idle; 45 send_tx <= 1'b0; 46 end 47 else begin 48 state <= state_next; 49 send_tx <= send_tx_next; 50 end 51 end 52 53 always @(state, io_module_triger, tx_fifo_empty) begin:STATE_LOGIC //(state, io_module_triger, tx_fifo_empty) 54 state_next <= state; 55 56 case(state) 57 idle: begin //wait until triger 58 send_tx_next <= 1'b0; 59 if(io_module_triger)begin 60 state_next <= trigering; 61 end
- 93. Tx_sending_controller.v Sat Aug 27 17:10:10 2016 Page 2 62 else 63 state_next <= idle; 64 end 65 66 trigering: if(~tx_fifo_empty)//start sending 67 state_next <= sending; 68 else 69 state_next <= idle; 70 71 sending: if(~tx_fifo_empty)begin //carry on sending untill EOBUF 72 state_next <= sending; 73 send_tx_next <= 1'b1; 74 end 75 else begin 76 state_next <= idle; 77 send_tx_next <= 1'b0; 78 end 79 80 endcase 81 end 82 endmodule 83
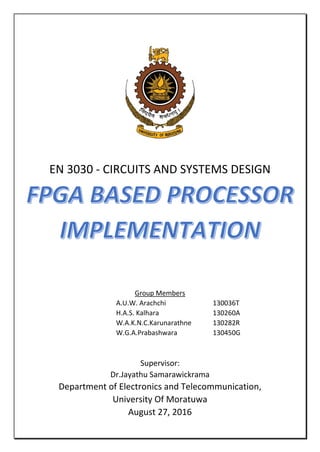
- 94. UART CORE MODULE And Verilog Code For Processor
- 95. UART_CORE UART_CORE w_data(7:0) clk rd_uart rst rx send_tx wr_uart r_data(7:0) rx_empty tx tx_full
- 96. UART_CORE.v Sat Aug 27 16:32:39 2016 Page 1 1 `timescale 1ns / 1ps 2 ////////////////////////////////////////////////////////////////////////////////// 3 // Company: 4 // Engineer: 5 // 6 // Create Date: 19:38:06 06/15/2016 7 // Design Name: 8 // Module Name: UART_CORE 9 // Project Name: 10 // Target Devices: 11 // Tool versions: 12 // Description: 13 // 14 // Dependencies: 15 // 16 // Revision: 17 // Revision 0.01 - File Created 18 // Additional Comments: 19 // 20 ////////////////////////////////////////////////////////////////////////////////// 21 module UART_CORE#(parameter WORD_SIZE =8, 22 ADDRESS_SIZE = 8, 23 SB_TICK = 16, 24 DVSR = 651, //DVSR = 100MHz/(16*baud rate) 25 DVSR_SIZE = 10 26 ) 27 (tx, 28 tx_full, 29 rx_empty, 30 r_data, 31 32 rx, 33 w_data, 34 rd_uart, 35 wr_uart, 36 send_tx, 37 clk, 38 rst); 39 40 output [WORD_SIZE-1:0] r_data; 41 output tx, 42 tx_full, 43 rx_empty; 44 45 input [WORD_SIZE-1:0] w_data; 46 input rx, 47 rd_uart, 48 wr_uart, 49 send_tx, 50 clk, 51 rst; 52 53 wire tick, rx_done_tick, tx_done_tick; 54 wire tx_fifo_empty, tx_fifo_not_empty; 55 wire [WORD_SIZE-1:0] tx_fifo_bus, rx_fifo_bus; 56 57 //assign tx_fifo_not_empty = (~tx_fifo_empty) & send_tx; 58 59 // Instantiate the uart_rx module 60 UART_Rx uart_rx ( 61 .rx_done_tick(rx_done_tick), 62 .dout(rx_fifo_bus),
- 97. UART_CORE.v Sat Aug 27 16:32:39 2016 Page 2 63 64 .rx(rx), 65 .s_tick(tick), 66 .clk(clk), 67 .rst(rst) 68 ); 69 70 // Instantiate the rx_buffer module 71 FIFO rx_buffer ( 72 .r_data(r_data), 73 .empty(rx_empty), 74 .full(), 75 76 .w_data(rx_fifo_bus), 77 .rd(rd_uart), 78 .wr(rx_done_tick), 79 .clk(clk), 80 .rst(rst) 81 ); 82 83 // Instantiate the uart_tx module 84 UART_Tx uart_tx ( 85 .tx(tx), 86 .tx_done_tick(tx_done_tick), 87 88 .din(tx_fifo_bus), 89 .tx_start(tx_fifo_not_empty), 90 .s_tick(tick), 91 .clk(clk), 92 .rst(rst) 93 ); 94 95 // Instantiate the tx_buffer module 96 FIFO tx_buffer ( 97 .r_data(tx_fifo_bus), 98 .empty(tx_fifo_empty), 99 .full(tx_full), 100 101 .w_data(w_data), 102 .rd(tx_done_tick), 103 .wr(wr_uart), 104 .clk(clk), 105 .rst(rst) 106 ); 107 108 // Instantiate the baud_rate_gen module 109 BAUD_RATE_GEN baud_rate_gen ( 110 .max_tick(tick), 111 .q(), 112 .clk(clk), 113 .rst(rst) 114 ); 115 116 // Instantiate the tx_send_controller module 117 Tx_sending_controller tx_send_controller( 118 .send_tx(tx_fifo_not_empty), 119 .io_module_triger(send_tx), 120 .tx_fifo_empty(tx_fifo_empty), 121 .clk(clk), 122 .rst(rst) 123 ); 124 endmodule
- 98. ROOT SYSTEM MODULE And Verilog Code For Processor
- 100. ROOT_SYSTEM.v Sat Aug 27 17:11:56 2016 Page 1 1 `timescale 1ns / 1ps 2 ////////////////////////////////////////////////////////////////////////////////// 3 // Company: 4 // Engineer: 5 // 6 // Create Date: 14:06:31 06/18/2016 7 // Design Name: 8 // Module Name: ROOT_SYSTEM 9 // Project Name: 10 // Target Devices: 11 // Tool versions: 12 // Description: 13 // 14 // Dependencies: 15 // 16 // Revision: 17 // Revision 0.01 - File Created 18 // Additional Comments: 19 // 20 ////////////////////////////////////////////////////////////////////////////////// 21 module ROOT_SYSTEM(tx, 22 23 rx, 24 clk, 25 rst); 26 27 localparam word_size = 8, 28 IO_cmd_size = 2; 29 output tx; 30 31 input rx, 32 clk, 33 rst; 34 35 wire [11:0] RISC_to_IO_data; 36 wire [11:0] IO_to_RISC_data; 37 wire [word_size-1:0] Rx_to_IO_data; 38 wire [word_size-1:0] IO_to_Tx_data; 39 wire [11:0] IO_status; 40 41 wire rd_uart, wr_uart, rx_empty, send_tx, IO_operation_enable; 42 43 wire [IO_cmd_size-1:0] RISC_to_IO_cmds; 44 45 assign IO_to_RISC_data[11:8] = 4'b0000; 46 assign IO_status[11:8] = 4'b0000; 47 48 // Instantiate the uart module 49 UART_CORE uart ( 50 .tx(tx), 51 .tx_full(), 52 .rx_empty(rx_empty), 53 .r_data(Rx_to_IO_data), 54 .rx(rx), 55 .w_data(IO_to_Tx_data), 56 .rd_uart(rd_uart), 57 .wr_uart(wr_uart), 58 .send_tx(send_tx), 59 .clk(clk), 60 .rst(rst) 61 ); 62
- 101. ROOT_SYSTEM.v Sat Aug 27 17:11:56 2016 Page 2 63 // Instantiate the io_module 64 IO_Module io_module ( 65 .io_word(IO_to_RISC_data[7:0]), 66 .data_to_tx(IO_to_Tx_data), 67 .tx_wr(wr_uart), 68 .rx_rd(rd_uart), 69 .send_tx(send_tx), 70 .io_status(IO_status[7:0]), 71 .rx_empty(rx_empty), 72 .data_from_RISC(RISC_to_IO_data[7:0]), 73 .data_from_rx(Rx_to_IO_data), 74 .io_Addr_cmds(RISC_to_IO_cmds), 75 .io_operation_enable(IO_operation_enable), 76 .clk(clk), 77 .rst(rst) 78 ); 79 80 // Instantiate the processor 81 RISC_SPM processor ( 82 .IO_Addr_cmds(RISC_to_IO_cmds), 83 .IO_operation_enable(IO_operation_enable), 84 .data_to_io(RISC_to_IO_data), 85 .io_status(IO_status), 86 .io_word(IO_to_RISC_data), 87 .clk(clk), 88 .rst(rst) 89 ); 90 91 endmodule 92
- 102. USER CONSTRAINTS FILE (UCF) How to assign physical pins of FPGA to Xilinx ISE Verilog modules
- 103. ROOT_SYSTEM.ucf Sat Aug 27 21:17:15 2016 Page 1 1 2 3 INST "clk_BUFGP" LOC = L15; 4 NET "clk" LOC = L15; 5 NET "rst" LOC = T15; 6 7 8 NET "tx" LOC = N5; 9 NET "rx" LOC = P6; 10
- 104. SPARTAN-6 XC6SLX45- CSG324C FPAG OVERVIEW Atlys™ FPGA Board Reference Manual
- 105. 1300HenleyCourt Pullman,WA99163 509.334.6306 www.digilentinc.com Atlys™ FPGA Board Reference Manual RevisedApril11,2016 ThismanualappliestotheAtlysrev.C DOC#: 502-178 Copyright Digilent, Inc. All rights reserved. Other product and company names mentioned may be trademarks of their respective owners. Page 1 of 19 Overview The Atlys circuit board is a complete, ready-to- use digital circuit development platform based on a Xilinx Spartan-6 LX45 FPGA, speed grade - 3. The large FPGA and on-board collection of high-end peripherals including Gbit Ethernet, HDMI Video, 128MByte 16-bit DDR2 memory, and USB and audio ports make the Atlys board an ideal host for a wide range of digital systems, including embedded processor designs based on Xilinx's MicroBlaze. Atlys is compatible with all Xilinx CAD tools, including ChipScope, EDK, and the free ISE WebPack™, so designs can be completed at no extra cost. The Spartan-6 LX45 is optimized for high- performance logic and offers: 6,822 slices, each containing four 6- input LUTs and eight flip-flops 2.1Mbits of fast block RAM four clock tiles (eight DCMs & four PLLs) six phase-locked loops 58 DSP slices 500MHz+ clock speeds The Atlys board includes Digilent's newest Adept USB2 system, which offers device programming, real-time power supply monitoring, automated board tests, virtual I/O, and simplified user-data transfer facilities. A comprehensive collection of board support IP and reference designs, and a large collection of add-on boards are available on the Digilent website. See the Atlys page at www.digilentinc.com for more information. 23 DDR2 128MByte SPI Flash (x4) 16Mbyte High-Speed Expansion USB HID Host Mouse/Keyboard Spartan-6 XC6SLX45 CSG324C Basic I/O LEDs, Btns, Swts Pmod Port Expansion 45 10 29 22 40 8 4 5 6 USB-UART 2 HDMI IN 10 HDMI IN 10 HDMI OUT 10 HDMI OUT Clock 100MHz Adept USB2 Config & data 10/100/1000 Ethernet PHY AC-97 Audio Codec
- 106. Atlys™ FPGA Board Reference Manual Copyright Digilent, Inc. All rights reserved. Other product and company names mentioned may be trademarks of their respective owners. Page 2 of 19 Features include: Xilinx Spartan-6 LX45 FPGA, 324-pin BGA package 128Mbyte DDR2 with 16-bit wide data 10/100/1000 Ethernet PHY on-board USB2 ports for programming and data transfer USB-UART and USB-HID port (for mouse/keyboard) two HDMI video input ports and two HDMI output ports AC-97 Codec with line-in, line-out, mic, and headphone real-time power monitors on all power rails 16Mbyte x4 SPI Flash for configuration and data storage 100MHz CMOS oscillator 48 I/O's routed to expansion connectors GPIO includes eight LEDs, six buttons, and eight slide switches ships with a 20W power supply and USB cable 1 Configuration After power-on, the FPGA on the Atlys board must be configured (or programmed) before it can perform any functions. The FPGA can be configured in three ways: a USB-connected PC can configure the board using the JTAG port any time power is on, a configuration file stored in the SPI Flash ROM can be automatically transferred to the FPGA at power-on, or a programming file can be transferred from a USB memory stick attached to the USB HID port. M0 M1 HSWEN JTAG Port USB Controller Numonyx SPI Flash (x4) 16Mbytes 2x7 2mm Prog. Header SPI Port J17 Adept USB Port Spartan-6 JP11 JP10 Done J10 Load to disable boot from ROM Load to disable I/O pull-ups during config PIC24 J13 Host Port Serial Port 2 An on-board mode jumper (JP11) selects between JTAG/USB and ROM programming modes. If JP11 is not loaded, the FPGA will automatically configure itself from the ROM. If JP11 is loaded, the FPGA will remain idle after power- on until configured from the JTAG or Serial programming port. Always keep JP12 loaded (either on 3.3V or 2.5V). If JP12 is not loaded, bank 2 of the FPGA is not supplied, and neither are the pull-ups for CCLK, DONE, PROGRAM_B and INIT_B. The FPGA is held in the Reset state, so it is not seen in the JTAG chain, neither can be programmed from the serial FLASH.
- 107. Atlys™ FPGA Board Reference Manual Copyright Digilent, Inc. All rights reserved. Other product and company names mentioned may be trademarks of their respective owners. Page 3 of 19 Both Digilent and Xilinx freely distribute software that can be used to program the FPGA and the SPI ROM. Programming files are stored within the FPGA in SRAM-based memory cells. This data defines the FPGA's logic functions and circuit connections, and it remains valid until it is erased by removing power or asserting the PROG_B input, or until it is overwritten by a new configuration file. FPGA configuration files transferred via the JTAG port use the .bin or .svf file types, files transferred from a USB stick use the .bit file type, and SPI programming files use the .bit, .bin, or .mcs file types. Xilinx's ISE WebPack and EDK software can create .bit, .svf, .bin, or .mcs files from VHDL, Verilog, or schematic-based source files (EDK is used for MicroBlaze™ embedded processor-based designs). Digilent's Adept software and Xilinx's iMPACT software can be used to program the FPGA or ROM using the Adept USB port. During FPGA programming, a .bit or .svf file is transferred from the PC directly to the FPGA using the USB-JTAG port. When programming the ROM, a .bit, .bin, or .mcs file is transferred to the ROM in a two-step process. First, the FPGA is programmed with a circuit that can program the SPI ROM, and then data is transferred to the ROM via the FPGA circuit (this complexity is hidden and a simple "program ROM" interface is shown). After the ROM has been programmed, it can automatically configure the FPGA at a subsequent power-on or reset event if the JP11 jumper is unloaded. A programming file stored in the SPI ROM will remain until it is overwritten, regardless of power-cycle events. The FPGA can be programmed from a memory stick attached to the USB-HID port if the stick contains a single .bit configuration file in the root directory, JP11 is loaded, and board power is cycled. The FPGA will automatically reject any .bit files that are not built for the proper FPGA. 2 Adept System Adept has a simplified programming interface and many additional features as described in the following sections. 2.1 Adept and iMPACT USB Port The Adept port is compatible with Xilinx's iMPACT programming software if the Digilent Plug-In for Xilinx Tools is installed on the host PC (download it free from the Digilent website's software section). The plug-in automatically translates iMPACT-generated JTAG commands into formats compatible with the Digilent USB port, providing a seamless programming experience without leaving the Xilinx tool environment. Once the plug-in is installed, the "third party" programming option can be selected from the iMPACT tools menu, and iMPACT will work as if a Xilinx programming cable were being used. All Xilinx tools (iMPACT, ChipScope, EDK, etc.) can work with the plug-in, and they can be used in conjunction with Adept tools (like the power supply monitor). Adept's high-speed USB2 system can be used to program the FPGA and ROM, run automated board tests, monitor the four main board power supplies, add PC-based virtual I/O devices (like buttons, switches, and LEDs) to FPGA designs, and exchange register-based and file-based data with the FPGA. Adept automatically recognizes the Atlys board and presents a graphical interface with tabs for each of these applications. Adept also includes public Power Good LED Adept USB Port Mode Jumper (JP11) Power Jack Power Switch HID Host Port
- 108. Atlys™ FPGA Board Reference Manual Copyright Digilent, Inc. All rights reserved. Other product and company names mentioned may be trademarks of their respective owners. Page 4 of 19 APIs/DLLs so that users can write applications to exchange data with the Atlys board at up to 38Mbytes/sec. The Adept application, an SDK, and reference materials are freely downloadable from the Digilent website. 2.2 Programming Interface To program the Atlys board using Adept, first set up the board and initialize the software: plug in and attach the power supply plug in the USB cable to the PC and to the USB port on the board start the Adept software turn ON Atlys' power switch wait for the FPGA to be recognized. Use the browse function to associate the desired .bit file with the FPGA, and click on the Program button. The configuration file will be sent to the FPGA, and a dialog box will indicate whether programming was successful. The configuration "done" LED will light after the FPGA has been successfully configured. Before starting the programming sequence, Adept ensures that any selected configuration file contains the correct FPGA ID code – this prevents incorrect .bit files from being sent to the FPGA. In addition to the navigation bar and browse and program buttons, the Config interface provides an Initialize Chain button, console window, and status bar. The Initialize Chain button is useful if USB communications with the board have been interrupted. The console window displays current status, and the status bar shows real-time progress when downloading a configuration file. 2.3 Flash Interface The Flash programming application allows .bin, .bit, and .mcs configuration files to be transferred to the on-board SPI Flash ROM for FPGA programming, and allows user data files to be transferred to/from the Flash at user-specified addresses. The configuration tool supports programming from any valid ROM file produced by the Xilinx tools. After programming, board power must be cycled to program the FPGA from the SPI Flash. If programming with a .bit file, the startup clock must be set to CCLK. The Read/Write tools allow data to be exchanged between files on the host PC and specified address ranges in Flash.
- 109. Atlys™ FPGA Board Reference Manual Copyright Digilent, Inc. All rights reserved. Other product and company names mentioned may be trademarks of their respective owners. Page 5 of 19 2.4 Test Interface The test interface provides an easy way to verify many of the board's hardware circuits and interfaces. These are divided into two major categories: on-board memory (DDR2 and Flash) and peripherals. In both cases, the FPGA is configured with test and PC-communication circuits, overwriting any FPGA configuration that may have been present. Clicking the Run RAM/Flash Test button will perform a walking '1' test on the DDR2 memory and verify the IDCODE in the SPI Flash. Clicking the Start Peripherals Test button will initialize GPIO and user I/O testing. Once the indicator near the Start Peripherals Test button turns green, all peripheral tests can be run. The Test Shorts feature checks all discrete I/O's for shorts to Vdd, GND, and neighboring I/O pins. The switches and buttons graphics show the current states of those devices on the Atlys board. Each button press will drive a tone out of the LINE-OUT or HP-OUT audio connectors. 2.5 Power The power application provides highly-accurate (better than 1%) real-time current and power readings from four on-board power-supply monitors. The monitors are based on Linear Technology's LTC2481C sigma-delta analog-to- digital converters that return 16-bit samples for each channel. Real-time current and power data is displayed in tabular form and updated continuously when the power meter is active (or started). Historical data is available using the Show Graph feature, which shows a graph with current data for all four power supplies for up to ten minutes. Recorded values are also stored in a buffer that can be saved to a file for later analysis. Save Buffer and Clear Buffer are used to save and clear the historical data in the buffer.
- 110. Atlys™ FPGA Board Reference Manual Copyright Digilent, Inc. All rights reserved. Other product and company names mentioned may be trademarks of their respective owners. Page 6 of 19 2.6 Register I/O The register I/O tab requires that a corresponding IP block, available in the Parallel Interface reference design (DpimRef.vhd) on the Adept page of the Digilent website, is included and active in the FPGA. This IP block provides an EPP-style interface, where an 8-bit address selects a register, and data read and write buttons transfer data to and from the selected address. Addresses entered into the address field must match the physical address included in the FPGA IP block. Register I/O provides an easy way to move small amounts of data into and out of specific registers in a given design. This feature greatly simplifies passing control parameters into a design, or reading low-frequency status information out of a design. 2.7 File I/O The File I/O tab can transfer files between the PC and the Atlys FPGA. A number of bytes (specified by the Length value) can be streamed into a specified register address from a file or out of a specified register address into a file. During upload and download, the file start location can be specified in terms of bytes. As with the Register I/O tab, File I/O also requires specific IP to be available in the FPGA. This IP can include a memory controller for writing files into the on-board DDR2 and Flash memories. 2.8 I/O Expand The I/O Expand tab works with an IP block in the FPGA to provide additional simple I/O beyond the physical devices found on the Atlys board. Virtual I/O devices include a 24-LED light bar, 16 slide switches, 16 push buttons, 8 discrete LEDs, a 32-bit register that can be sent to the FPGA, and a 32-bit register that can be read from the FPGA. The IP block, available in the Adept I/O Expansion reference design (AdeptIOExpansion.zip) on the Adept page of the Digilent website, provides a simple interface with well-defined signals. This IP block can easily be included in, and accessed from, user-defined circuits. For more information, see the Adept documentation available at the Digilent website.
- 111. Atlys™ FPGA Board Reference Manual Copyright Digilent, Inc. All rights reserved. Other product and company names mentioned may be trademarks of their respective owners. Page 7 of 19 3 Power Supplies The Atlys board requires an external 5V, 4A or greater power source with a coax center-positive 2.1mm internal- diameter plug (a suitable supply is provided as a part of the Atlys kit). Voltage regulator circuits from Linear Technology create the required 3.3V, 2.5V, 1.8V, 1.0V, and 0.9V supplies from the main 5V supply. The table below provides additional information (typical currents depend strongly on FGPA configuration, and the values provided are typical of medium-size/speed designs). Table 1. Atlys power supplies. The four main voltage rails on the Atlys board use Linear Technology LTC2481 Delta-Sigma 16-bit ADC's to continuously measure supply current. Accurate to within 1%, these measured values can be viewed on a PC using the power meter that is a part of the Adept software. Supply Circuits Device Amps (max/typ) 3.3V FPGA I/O, video, USB ports, clocks, ROM, audio IC16: LT3501 3A / 900mA 2.5V FPGA aux, VHDC, Ethernet PHY I/O, GPIO IC15: LTC3546 1A / 400mA 1.2V FPGA core, Ethernet PHY core IC15: LTC3546 3A / 0.8 – 1.8A 1.8V DDR & FPGA DDR I/O IC16: LT3501 3A / 0.5 -- 1.2A 0.9V DDR termination voltage (VTT) IC14: LTC3413 3A / 900mA
- 112. Atlys™ FPGA Board Reference Manual Copyright Digilent, Inc. All rights reserved. Other product and company names mentioned may be trademarks of their respective owners. Page 8 of 19 Power Jack Battery Connector Power Select Jumper JP13 VU 1.8V 1.2V 2.5V 3.3V IC16 IC15 IC16 IC15 ENPower Switch Vswt IC17 EN 0.9V .01Ω LTC2481 To Digilent Adept USB I2C Bus IC14 To Expansion Connectors, HDMI, USB PG PG PG PG EN EN EN Power On LED (LD15) LT3501 3A Regulator LTC3546 1A Regulator LT3501 3A Regulator LTC3546 3A Regulator ON OFF LTC3413 DDR Term. Reg. Load Switch J12 .01Ω LTC2481 .01Ω LTC2481 .01Ω LTC2481 Atlys power supplies are enabled by a logic-level switch (SW8). A power-good LED (LD15), driven by the wired-OR of all the power-good outputs on the supplies, indicates that all supplies are operating within 10% of nominal. A load switch (the FDC6330 at IC17) passes the input voltage VU to the Vswt node whenever the power switch (SW8) is enabled. Vswt is assumed to be 5V, and is used by many systems on the board including the HDMI ports, I2C bus, and USB host. Vswt is also available at expansion connectors, so that any connected boards can be turned off along with the Atlys board. 4 DDR2 Memory A single 1Gbit DDR2 memory chip is driven from the memory controller block in the Spartan-6 FGPA. Previous versions of the Atlys were loaded with a Micron MT47H64M16-25E DDR2 component, however, newly manufactured Atlys boards now carry an MIRA P3R1GE3EGF G8E DDR2 component. The datasheet for the MIRA device can be found be performing an internet search for P3R1GE3JGF, which is an equivalent part. Both of these chips provide a 16-bit data bus and 64M locations and have been tested for DDR2 operation at up to an 800MHz data rate. The DDR2 interface follows the pinout and routing guidelines specified in the Xilinx Memory Interface Generator (MIG) User Guide. The interface supports SSTL18 signaling, and all address, data, clocks, and control signals are delay-matched and impedance-controlled. Address and control signals are terminated through 47-ohm resistors to a 0.9V VTT, and data signals use the On-Die-Termination (ODT) feature of the DDR2 chip. Two well-matched DDR2 clock signal pairs are provided so the DDR can be driven with low-skew clocks from the FPGA.
- 113. Atlys™ FPGA Board Reference Manual Copyright Digilent, Inc. All rights reserved. Other product and company names mentioned may be trademarks of their respective owners. Page 9 of 19 When generating a MIG core for the MIRA part, selecting the "EDE1116AXXX-8E" device will result in the correct timing parameters being set. When generating a component for the Micron part, it can be selected by name within the wizard. The part loaded on your Atlys can be determined by examining the print on the DDR2 component (IC13). DQ[15:0] 13 16 AD[12:0] RAS# CAS# WE# BA0 BA1 BA2 See Table CS# L4 P1 P2 E1 F1 F2 E3 K5 L5 Spartan-6 DDR2 x14 VREF CKE CK CK# UDQS_P UDQS_N LDQS_P LDQS_N UDM LDM ODT 1V8 L3 K4 K3 K6 H7 G1 G3 5 Flash Memory The Atlys board uses a128Mbit Numonyx N25Q12 Serial Flash memory device (organized as 16-bit by 16Mbytes) for non-volatile storage of FPGA configuration files. The SPI Flash can be programmed with a .bit, .bin., or .mcs file using the Adept software. An FPGA configuration file requires less than 12Mbits, leaving 116Mbits available for user data. Data can be transferred from a PC to/from the Flash by user applications, or by facilities built into the Adept software. User designs programmed into the FPGA can also transfer data to and from the ROM. A reference design on the Digilent website provides an example of driving the Flash memory from an FPGA-based design. A board test/demonstration program is loaded into the SPI Flash during manufacturing. That configuration, also available on the Digilent webpage, can be used to demonstrate and check all of the devices and circuits on the Atlys board. Address A12: G6 A4: F3 A11: D3 A3: L7 A10: F4 A2: H5 A9: D1 A1: J6 A8: D2 A0: J7 A7: H6 A6: H3 A5: H4 Data D15: U1 D7: J1 D14: U2 D6: J3 D13: T1 D5: H1 D12: T2 D4: H2 D11: N1 D3: K1 D10: N2 D2: K2 D9: M1 D1: L1 D8: M3 D0: L2 CS# SDI/DQ0 SDO/DQ1 AH18 AF20 AF14 AE14 Spartan-6 SPI Flash WP#/DQ2 HLD#/DQ3 AG21 AG17 SCK
- 114. Atlys™ FPGA Board Reference Manual Copyright Digilent, Inc. All rights reserved. Other product and company names mentioned may be trademarks of their respective owners. Page 10 of 19 6 Ethernet PHY The Atlys board includes a Marvell Alaska Tri-mode PHY (the 88E1111) paired with a Halo HFJ11-1G01E RJ-45 connector. Both MII and GMII interface modes are supported at 10/100/1000 Mb/s. Default settings used at power-on or reset are: MII/GMII mode to copper interface Auto Negotiation Enabled, advertising all speeds, preferring Slave MDIO interface selected, PHY MDIO address = 00111 No asymmetric pause, no MAC pause, automatic crossover enabled Energy detect on cable disabled (Sleep Mode disabled), interrupt polarity LOW The data sheet for the Marvell PHY is available from Marvell only with a valid NDA. Please contact Marvell for more PHY-specific information. EDK-based designs can access the PHY using either the xps_ethernetlite IP core for 10/100 Mbps designs, or the xps_ll_temac IP core for 10/100/1000 Mbps designs. See Table K15 F17 L16 F16 N17 Spartan-6 G13 C17 INT# RESET# COL CRS RXDV RXCLK RXER GTXCLK TXCLK TXER TXEN MDIO 8 25MHz Crystal MDC CONFIG 7 0001101 CLK See Table C18 L12 K16 G18 H15 RXD TXD 8 8 Marvell M88E1111 x14 Halo HFJ11 Integrated magnetics F18 Link/Status LEDs (x6) The Atlys Base System Builder (BSB) support package automatically generates a test application for the Ethernet MAC; this can be used as a reference for creating custom designs. ISE designs can use the IP Core Generator wizard to create a tri-mode Ethernet MAC controller IP core. RXD Signals RXD0: G16 RXD1: H14 RXD2: E16 RXD3: F15 RXD4: F14 RXD5: E18 RXD6: D18 RXD7: D17 TXD Signals TXD0: H16 TXD1: H13 TXD2: K14 TXD3: K13 TXD4: J13 TXD5: G14 TXD6: H12 TXD7: K12
- 115. Atlys™ FPGA Board Reference Manual Copyright Digilent, Inc. All rights reserved. Other product and company names mentioned may be trademarks of their respective owners. Page 11 of 19 7 Video Input and Output (HDMI Ports) The Atlys board contains four HDMI ports, including two buffered HDMI input/output ports, one buffered HDMI output port, and one unbuffered port that can be input or output (generally used as an output port.) The three buffered ports use HDMI type A connectors, and the unbuffered port uses a type D connector loaded on the bottom side of the PCB immediately under the Pmod port(the type D connector is much smaller than the type A). The data signals on the unbuffered port are shared with a Pmod port. This limits signal bandwidth somewhat – the shared connector may not be able to produce or receive the highest frequency video signals, particularly with longer HDMI cables. Since the HDMI and DVI systems use the same TMDS signaling standard, a simple adaptor (available at most electronics stores) can be used to drive a DVI connector from either of the HDMI output ports. The HDMI connector does not include VGA signals, so analog displays cannot be driven. The 19-pin HDMI connectors include four differential data channels, five GND connections, a one-wire Consumer Electronics Control (CEC) bus, a two-wire Display Data Channel (DDC) bus that is essentially an I2C bus, a Hot Plug Detect (HPD) signal, a 5V signal capable of delivering up to 50mA, and one reserved (RES) pin. Of these, only the differential data channels and I2C bus are connected to the FPGA. All signal connections are shown in the table below. See Table Spartan-6 8 8 HDMI Buffer TI TMDS141 J1: Type A HDMI IN 8 J3: Type A HDMI IN 8 HDMI Buffer TI TMDS141 J2: Type A HDMI OUT JA: Type D HDMI Unbuffered, shared with Pmod HDMI Buffer TI TMDS141 See Table See Table See Table SCL: C13 SDA: A13 TX-SDA: C9 TX-SCL: D9 RX-SDA: M18 RX-SCL: M16 JP6, JP7 JP2 RXB: JA: TX: RX:
- 116. Atlys™ FPGA Board Reference Manual Copyright Digilent, Inc. All rights reserved. Other product and company names mentioned may be trademarks of their respective owners. Page 12 of 19 HDMI Type A Connectors HDMI Type D Pin/Signal J1: IN J2: Out J3: IN Pin/Signal JA: BiDi 1: D2+ B12 B8 J16 1: HPD JP3* 2: D2_S GND GND GND 2: RES VCCB2 3: D2- A12 A8 J18 3: D2+ N5 4: D1+ B11 C7 L17 4: D2_S GND 5: D1_S GND GND GND 5: D2- P6 6: D1- A11 A7 L18 6: D1+ T4 7: D0+ G9 D8 K17 7: D1_S GND 8: D0_S GND GND GND 8: D1- V4 9: D0- F9 C8 K18 9: D0+ R3 10: Clk+ D11 B6 H17 10: D0_S GND 11: Clk_S GND GND GND 11: D0- T3 12: Clk- C11 A6 H18 12: Clk+ T9 13: CEC NC 0K to Gnd NC 13: Clk_S GND 14: RES NC NC NC 14: Clk- V9 15: SCL C13 D9 M16 15: CEC VCCB2 16: SDA A13 C9 M18 16: Gnd GND 17: Gnd GND GND GND 17: SCL C13** 18: 5V JP4* 5V JP8* 18: SCA A13** 19: HPD 1K to 5V NC 1K to 5V 19: 5V JP3 *jumper can disconnect Vdd **shared with J1 I2C signals via jumper JP2 EDK designs can use the xps_tft IP core (and its associated driver) to access the HDMI ports. The xps_tft core reads video data from the DDR2 memory, and sends it to the HDMI port for display on an external monitor. An EDK reference design available on the Digilent website (and included as a part of the User Demo) displays a gradient color bar on an HDMI-connected monitor. Another second EDK reference design inputs data from port J3 into onboard DDR2. Data is read from the DDR2 frame buffer and displayed on port J2. An xps_iic core is included to control the DDC on port J2 (this allows consumer devices to detect the Atlys). 8 Audio (AC-97) The Atlys board includes a National Semiconductor LM4550 AC '97 audio codec (IC3) with four 1/8" audio jacks for line-out (J5), headphone- out (J7), line-in (J4), and microphone-in (J6). Audio data at up to 18 bits and 48KHz sampling is supported, and the audio in (record) and audio out (playback) sampling rates can be different. The microphone jack is mono, all other jacks are stereo.
- 117. Atlys™ FPGA Board Reference Manual Copyright Digilent, Inc. All rights reserved. Other product and company names mentioned may be trademarks of their respective owners. Page 13 of 19 The headphone jack is driven by the audio codec's internal 50mW amplifier. The table below summarizes the audio signals. The LM4550 audio codec is compliant to the AC '97 v2.1 (Intel) standard and is connected as a Primary Codec (ID1 = 0, ID0 = 0). The table below shows the AC '97 codec control and data signals. All signals are LVCMOS33. Signal Name FPGA Pin Pin Function AUD-BIT-CLK L13 12.288MHZ serial clock output, driven at one-half the frequency of the 24.576MHz crystal input (XTL_IN). AUD-SDI T18 Serial Data In (to the FPGA) from the codec. SDI data consists of AC '97 Link Input frames that contain both configuration and PCM audio data. SDI data is driven on the rising edge of AUD-BIT-CLK. AUD-SDO N16 Serial Data Out (to the codec) from the FPGA. SDO data consists of AC '97 Link Output frames that contain both configuration and DAC audio data. SDO is sampled by the LM4550 on the falling edge of AUD-BIT-CLK. AUD-SYNC U17 AC Link frame marker and Warm Reset. SYNC (input to the codec) defines AC Link frame boundaries. Each frame lasts 256 periods of AUD-BIT-CLK. SYNC is normally a 48kHz positive pulse with a duty cycle of 6.25% (16/256). SYNC is sampled on the rising edge of AUD-BIT-CLK, and the codec takes the first positive sample of SYNC as defining the start of a new AC Link frame. If a subsequent SYNC pulse occurs within 255 AUD-BIT-CLK periods of the frame start it will be ignored. SYNC is also used as an active high input to perform an (asynchronous) Warm Reset. Warm Reset is used to clear a power- down state on the codec AC Link interface. AUD-RESET T17 Cold Reset. This active low signal causes a hardware reset which returns the control registers and all internal circuits to their default conditions. RESET must be used to initialize the LM4550 after Power On when the supplies have stabilized. RESET also clears the codec from both ATE and Vendor test modes. In addition, while active, it switches the PC_BEEP mono input directly to both channels of the LINE_OUT stereo output. The EDK reference design (available on the Digilent website) leverages our custom AC-97 pcore to accomplish several standard audio processing tasks such as recording and playing back audio data. 9 Oscillators/Clocks The Atlys board includes a single 100MHz CMOS oscillator connected to pin L15 (L15 is a GCLK input in bank 1). The input clock can drive any or all of the four clock management tiles in the Spartan-6. Each tile includes two Digital Clock Managers (DCMs) and four Phase-Locked Loops (PLLs). DCMs provide the four phases of the input frequency (0º, 90º, 180º, and 270º), a divided clock that can be the input clock divided by any integer from 2 to 16 or 1.5, 2.5, 3.5... 7.5, and two antiphase clock outputs that can be multiplied by any integer from 2 to 32 and simultaneously divided by any integer from 1 to 32. PLLs use VCOs that can be programmed to generate frequencies in the 400MHz to 1080MHz range by setting three sets of programmable dividers during FPAG configuration. VCO outputs have eight equally-spaced outputs (0º, 45º, 90º, 135º, 180º, 225º, 270º, and 315º) that can be divided by any integer between 1 and 128.