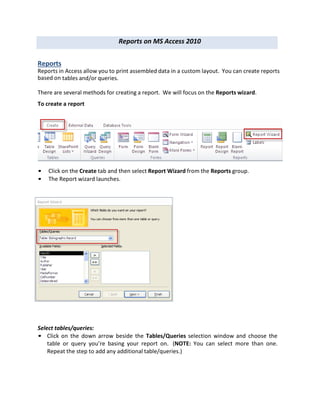
Reports on MS Access 2010
Reports
Reports in Access allow you to print assembled data in a custom layout. You can create reports
based on tables and/or queries.
There are several methods for creating a report. We will focus on the Reports wizard.
To create a report
• Click on the Create tab and then select Report Wizard from the Reports group.
• The Report wizard launches.
Select tables/queries:
• Click on the down arrow beside the Tables/Queries selection window and choose the
table or query you’re basing your report on. (NOTE: You can select more than one.
Repeat the step to add any additional table/queries.)
Add fields:
• All the fields from your selected tables/queries appear in the Available Fields: window.
• Use the button to add fields to the Selected Fields window, one-at-a-time.
• Use the button to move all available fields into the Selected Fields window at once.
• To remove individual fields from Selected Fields, click on each field and press .
• To remove all fields, press .
NOTE: The order in which you add fields to the Selected Fields window determines their default
order in the report.
• When done, click Next.
Create grouping levels
• If desired, use the right arrow button to create grouping levels (group your report
listing by a category or categories), and use the up and down arrow buttons to
promote or demote a field’s position. The left arrow button removes selected fields
from grouping levels.
• When done, click Next.
Sort by category (field)
• You can select a sort order for up to four
fields. Click on the down arrow to select
a field and then choose ascending or descending
order.
• When done, click Next.
Choose a layout
• Choose from the various layout options and click
Next.
• Choose a page orientation—
portrait or landscape.
Assign a title
• Enter a title for your report, or stick
with the default title assigned by
Access.
• Make sure that Preview the report is
selected and click Finish.
The report appears in Print Preview.
NOTE: Any changes to data in
the source tables/queries are
automatically updated in
your report.
Reformat your report
Notice in the example below that the text in the Title field appears truncated (part of the title
in several row is cut off).

MS Access 2010 tutorial 6

  • 1.
    Reports on MSAccess 2010 Reports Reports in Access allow you to print assembled data in a custom layout. You can create reports based on tables and/or queries. There are several methods for creating a report. We will focus on the Reports wizard. To create a report • Click on the Create tab and then select Report Wizard from the Reports group. • The Report wizard launches. Select tables/queries: • Click on the down arrow beside the Tables/Queries selection window and choose the table or query you’re basing your report on. (NOTE: You can select more than one. Repeat the step to add any additional table/queries.)
  • 2.
    Add fields: • Allthe fields from your selected tables/queries appear in the Available Fields: window. • Use the button to add fields to the Selected Fields window, one-at-a-time. • Use the button to move all available fields into the Selected Fields window at once. • To remove individual fields from Selected Fields, click on each field and press . • To remove all fields, press . NOTE: The order in which you add fields to the Selected Fields window determines their default order in the report. • When done, click Next. Create grouping levels • If desired, use the right arrow button to create grouping levels (group your report listing by a category or categories), and use the up and down arrow buttons to promote or demote a field’s position. The left arrow button removes selected fields from grouping levels. • When done, click Next. Sort by category (field) • You can select a sort order for up to four fields. Click on the down arrow to select a field and then choose ascending or descending order. • When done, click Next.
  • 3.
    Choose a layout •Choose from the various layout options and click Next. • Choose a page orientation— portrait or landscape. Assign a title • Enter a title for your report, or stick with the default title assigned by Access. • Make sure that Preview the report is selected and click Finish. The report appears in Print Preview. NOTE: Any changes to data in the source tables/queries are automatically updated in your report.
  • 4.
    Reformat your report Noticein the example below that the text in the Title field appears truncated (part of the title in several row is cut off).