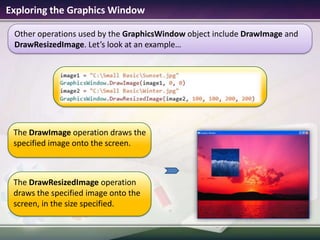
Microsoft® Small BasicGraphics WindowEstimated time to complete this lesson: 1 hour
Graphics WindowIn this lesson, you will learn about:Statements using the GraphicsWindow object.Properties of the GraphicsWindow object.Operations of the GraphicsWindow object.
Introducing the Graphics Window So far, you have used the text window to understand the fundamentals of programming using Small Basic.This lesson exposes you to some exciting graphic capabilities offered by Small Basic. You start with a graphics window that you can display by using the GraphicsWindow object.
Properties of the Graphics WindowYou use the GraphicsWindow object to display a graphics window and draw colorful shapes in it. To display the graphics window on your screen, you use the Show operation.Let’s see how to use different properties of the GraphicsWindow object in a program…You can also define the properties of the graphics window, such as its title, height, width, and background color.output
Properties of the Graphics WindowMouseX—You can use this property to find the x-position of the mouse relative to the graphics window.
MouseY—You can use this property to find the y-position of the mouse relative to the graphics window.
PenColor—You can use this property to change the color with which shapes are drawn on the graphics window.
PenWidth—You can use thisproperty to change the width of the pen used to draw shapes on the graphics window.
BrushColor—You can use thisproperty to change the color used to fill shapes drawn on the graphics window.Certain properties of the GraphicsWindow object help you enhance the shapes your create. Some of these properties are:
Operations on the Graphics WindowSome of the operations available for the GraphicsWindow object are:DrawRectangle
DrawEllipse
DrawLine

2.1 graphics window

  • 1.
    Microsoft® Small BasicGraphicsWindowEstimated time to complete this lesson: 1 hour
  • 2.
    Graphics WindowIn thislesson, you will learn about:Statements using the GraphicsWindow object.Properties of the GraphicsWindow object.Operations of the GraphicsWindow object.
  • 3.
    Introducing the GraphicsWindow So far, you have used the text window to understand the fundamentals of programming using Small Basic.This lesson exposes you to some exciting graphic capabilities offered by Small Basic. You start with a graphics window that you can display by using the GraphicsWindow object.
  • 4.
    Properties of theGraphics WindowYou use the GraphicsWindow object to display a graphics window and draw colorful shapes in it. To display the graphics window on your screen, you use the Show operation.Let’s see how to use different properties of the GraphicsWindow object in a program…You can also define the properties of the graphics window, such as its title, height, width, and background color.output
  • 5.
    Properties of theGraphics WindowMouseX—You can use this property to find the x-position of the mouse relative to the graphics window.
  • 6.
    MouseY—You can usethis property to find the y-position of the mouse relative to the graphics window.
  • 7.
    PenColor—You can usethis property to change the color with which shapes are drawn on the graphics window.
  • 8.
    PenWidth—You can usethisproperty to change the width of the pen used to draw shapes on the graphics window.
  • 9.
    BrushColor—You can usethisproperty to change the color used to fill shapes drawn on the graphics window.Certain properties of the GraphicsWindow object help you enhance the shapes your create. Some of these properties are:
  • 10.
    Operations on theGraphics WindowSome of the operations available for the GraphicsWindow object are:DrawRectangle
  • 11.
  • 12.

Editor's Notes

  • #9 You can choose from a variety of colors supported by Small Basic, categorized by their base hue. In your code, you can either specify the name of the color, or the hex color code.
  • #10 In addition drawing shapes, you can also create colorful designs in your program by using conditions and loops for your shapes. For example, take a look at the displayed example. You use a For loop to create a barcode-like design with lines. You also use the GetRandomColoroperation to randomize the color of the lines. Another useful operation for the GraphicsWindow object is ShowMessage.WithShowMessage,you can display a message box in your program. You just needto provide two parameters—the message to be displayed and the title for the message box.On clicking the Run button on the toolbar or pressing F5 on the keyboard, the program is executed. Notice that along with your graphics window, a message box is displayed. The graphics window displays the random-colored barcode-like design that we defined in the code.Code:GraphicsWindow.Title = "Graphics Window"GraphicsWindow.BackgroundColor = "White"GraphicsWindow.Width = 325GraphicsWindow.Height = 200For i = 1 To 15GraphicsWindow.PenColor = GraphicsWindow.GetRandomColor()GraphicsWindow.PenWidth = iGraphicsWindow.DrawLine(i * 20, 20, i * 20, 180)EndForGraphicsWindow.ShowMessage("Create wonderful designs and shapes in Small Basic", "Message")
  • #11 You can insert images in your program by using the DrawImage operation of the GraphicsWindow object. The parameters for DrawImagerequire the image name, and the x- and y-coordinates of the points where the image is to be drawn. You can also insert resized images in your program by using the DrawResizedImage operation of the GraphicsWindow object. The parameters for DrawResizedImagerequire the image name, and the x- and y-coordinates of the points where the image is to be drawn, and the width and height of the image. You also have to define the image path. If the image is stored on a Web site or server, you can specify the URL. If the image is stored on your computer, simply specify the path to the image.When you click the Run button on the toolbar or press F5 on the keyboard, the program is executed. Notice that your graphics window is displayed, along with the resized image, at the set pixel location.You can also use the SetPixeloperation to draw a pixel on the graphics window at the location specified by the x- and y-coordinates.Code:GraphicsWindow.Title = "Graphics Window"GraphicsWindow.Width = 800GraphicsWindow.Height = 600image1 = "C:Small BasicSunset.jpg"GraphicsWindow.DrawImage(image1, 0, 0)image2 = "C:Small BasicWinter.jpg"GraphicsWindow.DrawResizedImage(image2, 100, 100, 200, 200)
  • #13 Please Note: Ensure that the image exists at the location specified in the code.Solution:  GraphicsWindow.Show()GraphicsWindow.Title = "A Graphics Window"GraphicsWindow.Height = 640GraphicsWindow.Width = 800GraphicsWindow.BackgroundColor = "Black"GraphicsWindow.PenWidth = 10GraphicsWindow.PenColor =GraphicsWindow.PenColor = “Gold"GraphicsWindow.DrawLine(65, 100, 65, 370)GraphicsWindow.PenColor =GraphicsWindow.PenColor = “Black"GraphicsWindow.BrushColor =GraphicsWindow.BrushColor = “Cyan"GraphicsWindow.DrawEllipse(70, 250, 100, 100)GraphicsWindow.FillEllipse(70, 250, 100, 100)For i = 1 To 10GraphicsWindow.PenColor = GraphicsWindow.GetRandomColor()GraphicsWindow.PenWidth = 2GraphicsWindow.Drawrectangle(100, i * 20, 50, 10)EndForimage1 = "C:Small BasicWinter.jpg"GraphicsWindow.DrawResizedImage(image1, 200, 100, 500, 500)GraphicsWindow.ShowMessage("Have a nice day!", "Message")