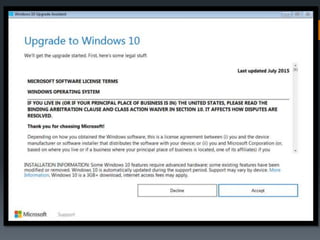
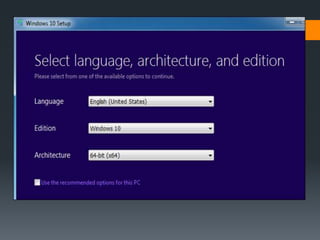
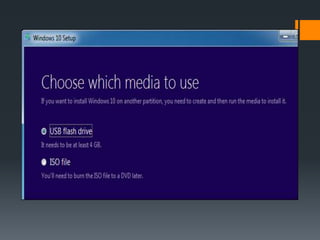
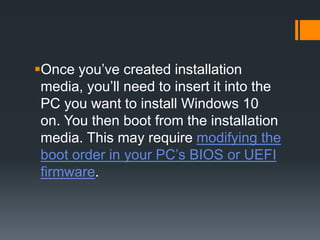
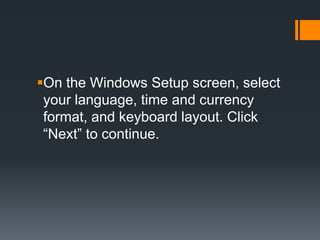
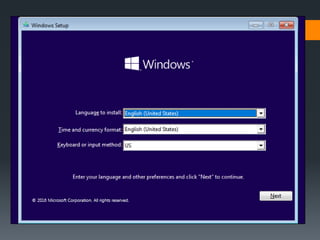
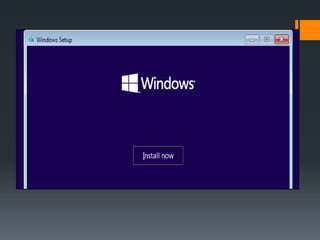
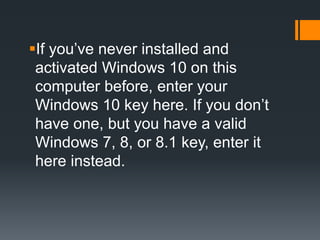
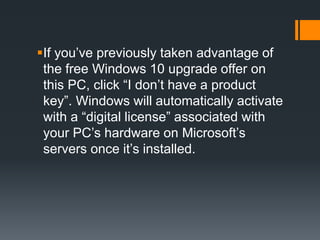
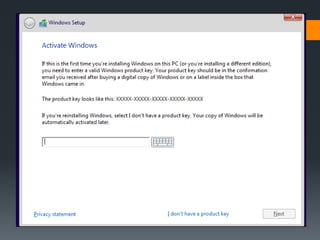
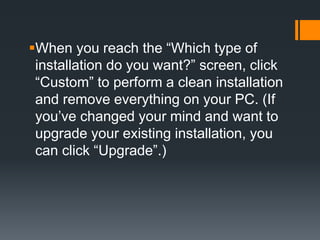
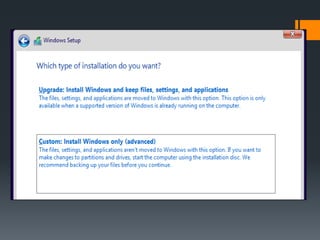
2. You can use Microsoft’s upgrade tool
to install Windows 10 on your PC if
you already have Windows 7 or 8.1
installed. This will also make it
possible to downgrade and go back to
Windows 7 or 8.1 after you perform
the upgrade, if you don’t like it.
3.
4. If you don’t want to upgrade from an
existing Windows installation, you can
download the official Windows 10
installation media for free from
Microsoft and perform a clean install.
5. To do this, visit Microsoft’s Download
Windows 10 page, click “Download
Tool Now”, and run the downloaded
file. Select “Create installation media
for another PC”.
6.
7. Be sure to select the language,
edition, and architecture you want to
install of Windows 10. If you’re
installing it on a PC with a 64-bit CPU,
you probably want the 64-bit version.
If you’re installing it on a PC with a 32-
bit CPU, you’ll need the 32-bit version.
8. You can check what type of CPU your
PC has if you don’t know off the top of
your head.
9. If you’re installing Windows 10 on the
current PC, just keep the “Use the
recommended options for this PC” box
checked and the tool will automatically
download the correct version for your
current PC.
10.
11. The tool will allow you to copy the Windows
10 installation files to a USB drive or burn
them to a DVD. If you’re using a USB drive,
it must be 4 GB or larger in size. All files on
the USB drive will be erased as part of this
process.
12. If you want to install Windows 10 in
a virtual machine, select the “ISO file”
option here. The tool will download an
ISO file, and you can then boot the
downloaded ISO in a virtual machine
to install Windows 10 inside it
13.
14. Once you’ve created installation
media, you’ll need to insert it into the
PC you want to install Windows 10
on. You then boot from the installation
media. This may require modifying the
boot order in your PC’s BIOS or UEFI
firmware.
15.
16. On the Windows Setup screen, select
your language, time and currency
format, and keyboard layout. Click
“Next” to continue.
17.
18. When you reach the installer screen,
select “Install Now” and follow the
instructions to install Windows 10 on
your PC.
19.
20. When you see the Activate Windows
screen, you’ll need to either enter a
key or skip it. You may not see this
screen if Windows 10 automatically
detects a key associated with your
PC’s hardware.
21. If you’ve never installed and
activated Windows 10 on this
computer before, enter your
Windows 10 key here. If you don’t
have one, but you have a valid
Windows 7, 8, or 8.1 key, enter it
here instead.
22. If you’ve previously taken advantage of
the free Windows 10 upgrade offer on
this PC, click “I don’t have a product
key”. Windows will automatically activate
with a “digital license” associated with
your PC’s hardware on Microsoft’s
servers once it’s installed.
23.
24. When you reach the “Which type of
installation do you want?” screen, click
“Custom” to perform a clean installation
and remove everything on your PC. (If
you’ve changed your mind and want to
upgrade your existing installation, you
can click “Upgrade”.)
25.
26. On the next screen, select the hard drive
you want to install Windows on and
erase it. If you have multiple partitions on
that drive, you may want to erase those
as well.
27. Warning: When you delete a partition,
you’re also deleting all the files on that
partition. Be sure you have backups of
any important files before doing this!
28. When you’re done erasing partitions,
you should have a big block of
“Unallocated Space”. Select that, click
“New”, and once it’s formatted your
drive, click Next.
29.
30. Windows 10 will install itself, and may
restart a few times during this process.
When it’s done, you’ll see the normal
setup interface you see when setting up
Windows 10 on any new PC, where you
can add user accounts and adjust
various settings.
31.
32. Prepared by:
Hushley Kate Lapena
Dominic Minor
Yvann Adolfo
Armie Joy Bayaborda
Jeric Oliviaga