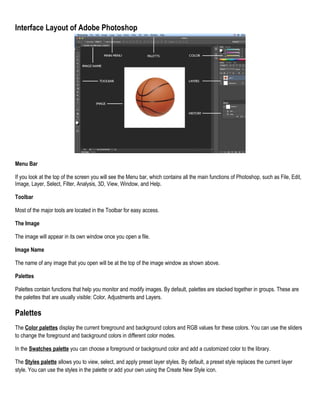
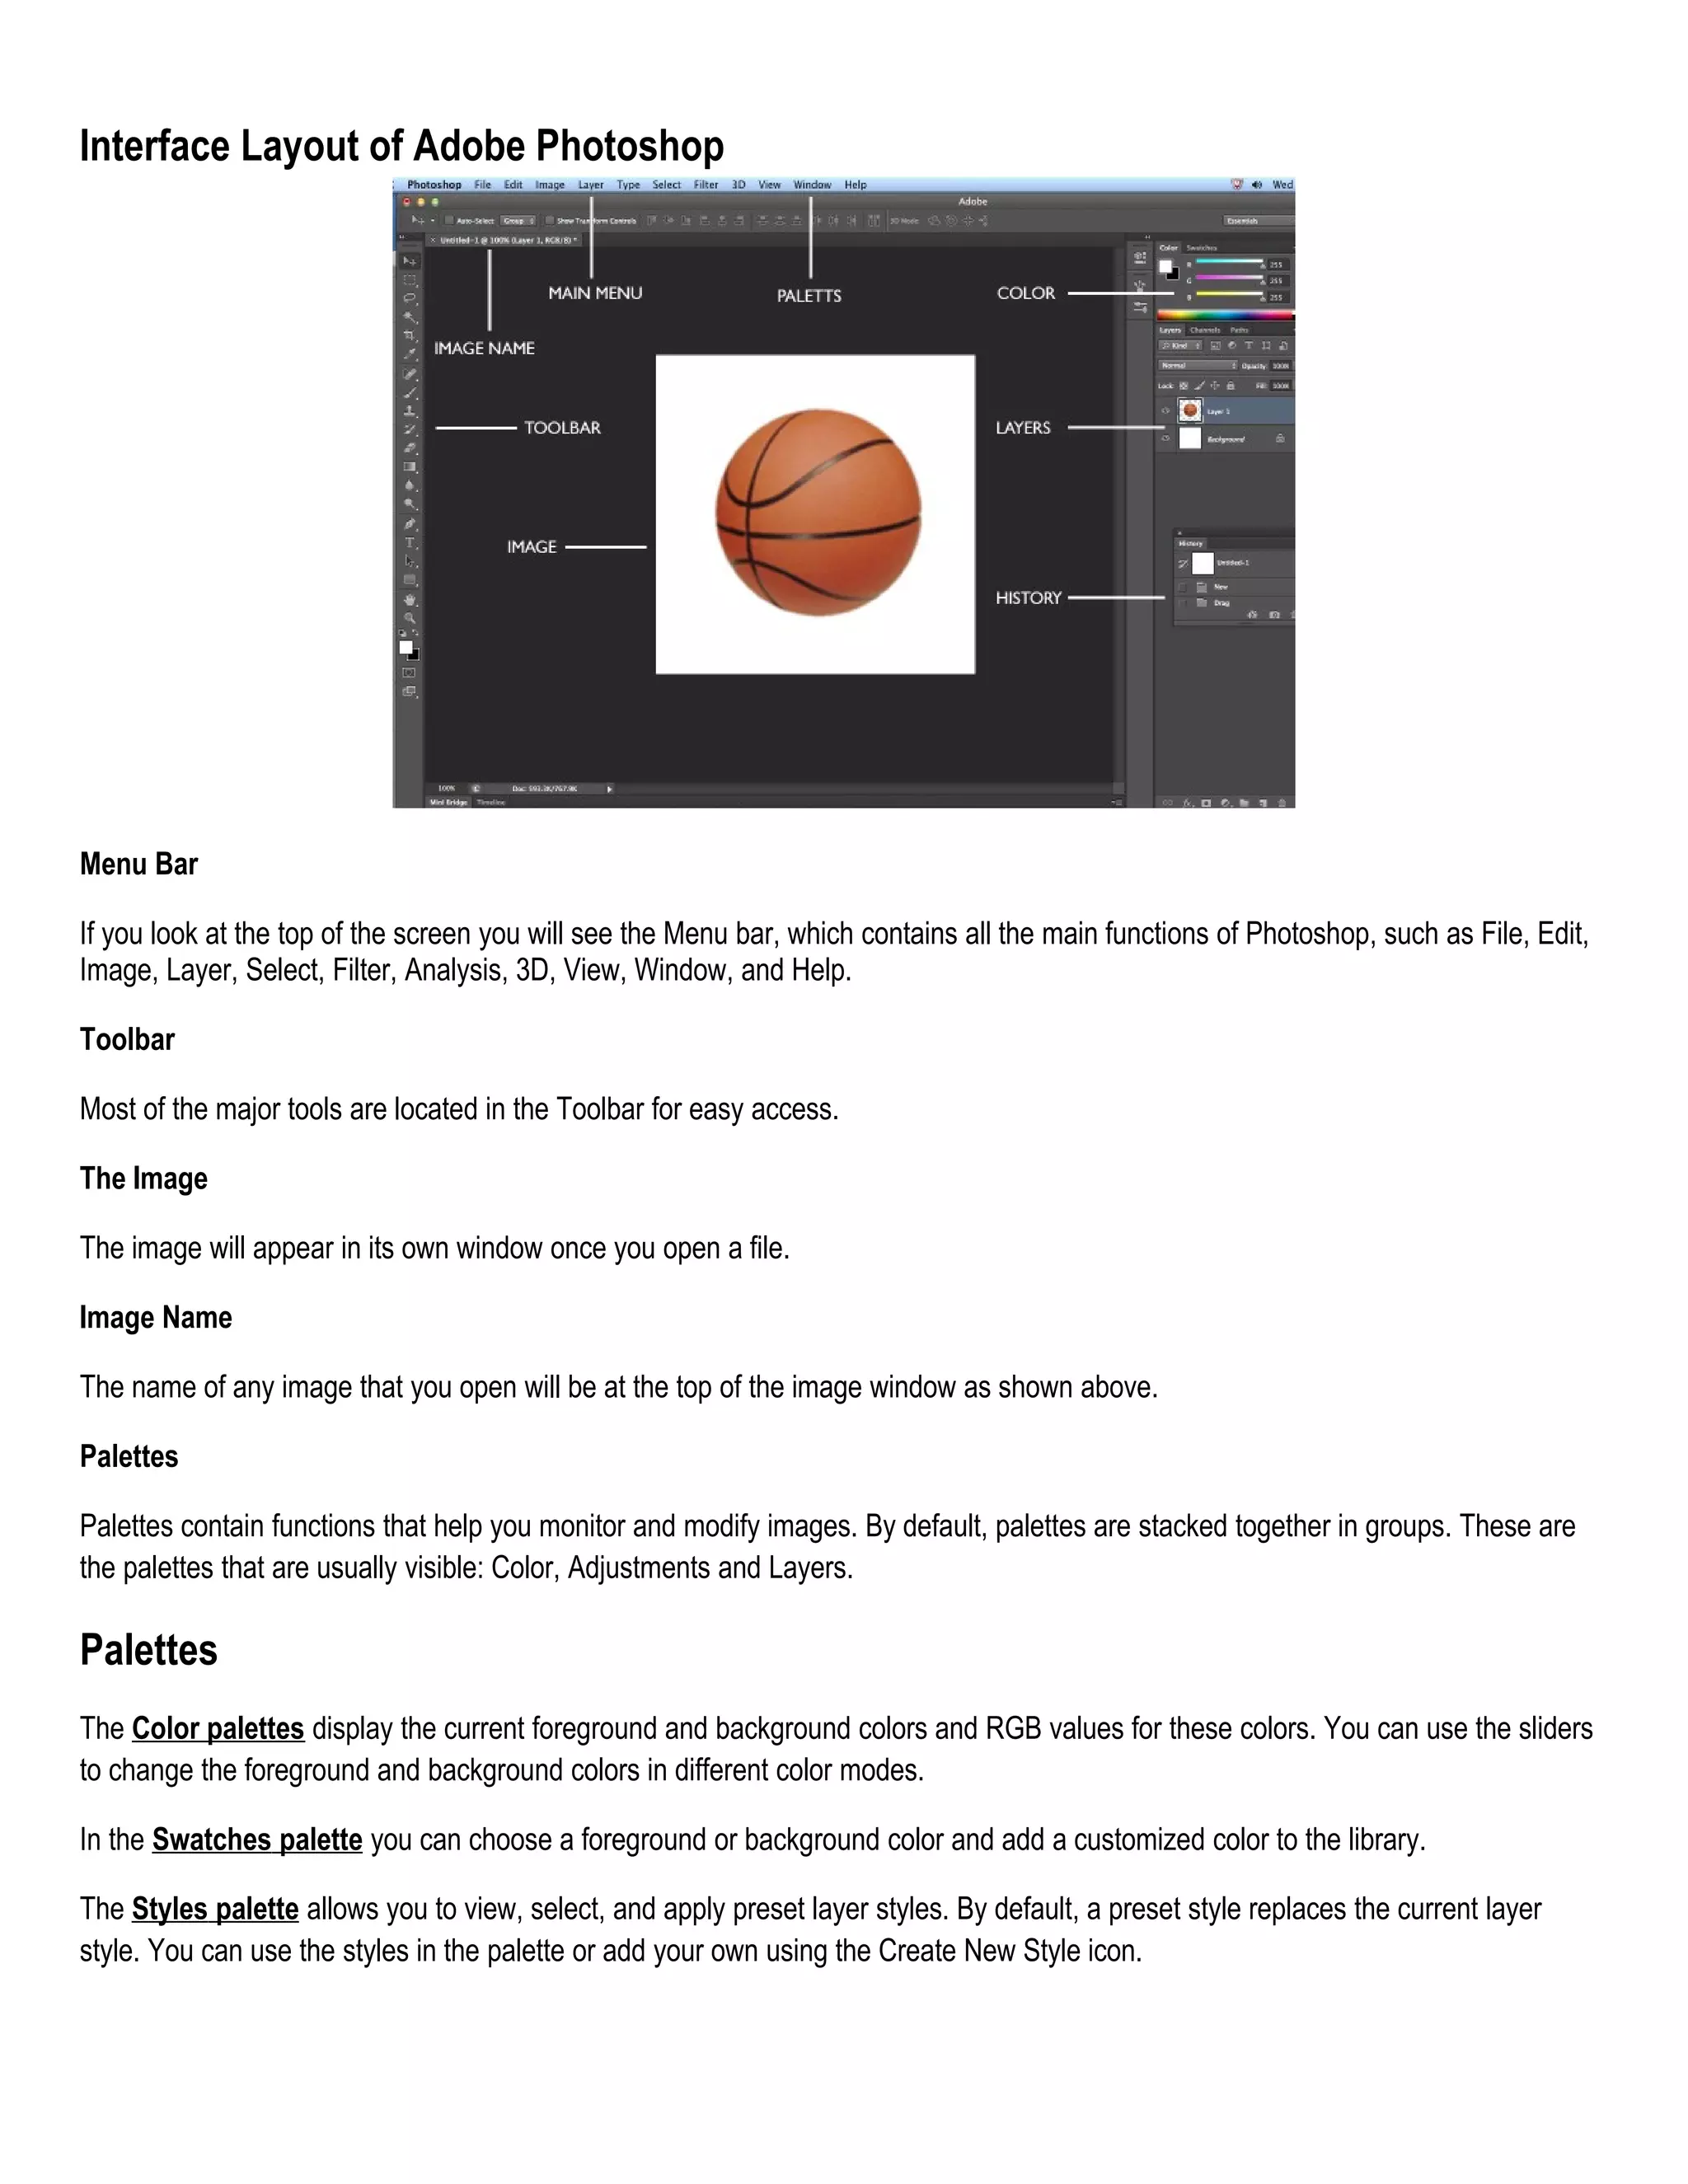
Interface Layout of Adobe Photoshop

Menu Bar
If you look at the top of the screen you will see the Menu bar, which contains all the main functions of Photoshop, such as File, Edit,
Image, Layer, Select, Filter, Analysis, 3D, View, Window, and Help.
Toolbar
Most of the major tools are located in the Toolbar for easy access.
The Image
The image will appear in its own window once you open a file.
Image Name
The name of any image that you open will be at the top of the image window as shown above.
Palettes
Palettes contain functions that help you monitor and modify images. By default, palettes are stacked together in groups. These are
the palettes that are usually visible: Color, Adjustments and Layers.

Palettes
The Color palettes display the current foreground and background colors and RGB values for these colors. You can use the sliders
to change the foreground and background colors in different color modes.
In the Swatches palette you can choose a foreground or background color and add a customized color to the library.
The Styles palette allows you to view, select, and apply preset layer styles. By default, a preset style replaces the current layer
style. You can use the styles in the palette or add your own using the Create New Style icon.
The History palette stores and displays each action performed allowing you jump to any recent stage of the image alteration. The
alterations should be created during the current working session.
The Adjustment layers palette give you the ability to apply an effect to a group of layers in Photoshop, and then you can edit that
effect later, while preserving the original layers.
Layers let you organize your work into distinct levels that can be edited and viewed as individual units.
A) Layer Visibility -The eye shows that the selected layer is visible. Click on or off to see or to hide a layer.
B) Layer Locking Options -Click the checkered square icon to lock Transparency, click the brush icon to lock the Image, click the
arrow icon to lock the Position, and click the lock icon to lock all options.
C) Layer Blending Mode -Defines how the layer’s pixels blend with underlying pixels in the image. By choosing a particular blending
mode from the drop-down menu you can create a variety of special effects.
D) Fill -By typing in a value or dragging the slider you can specify the transparency.
E) Opacity -By typing in a value or dragging the slider, you can specify the transparency of the entire layer.
F) Layer Lock -The icon shows when the layer is locked and disappears when it is unlocked. Double-click the icon to unlock the
layer.
G) Layer Options Menu -Click the black triangle to display the following options: New Layer, Duplicate Layer, Delete Layer, Layer
Properties, etc. Some of the options are presented as icons at the bottom of the Layers palette.
H) Link Layers – Can be used to link layers together.
I) Layer Styles -If a layer has a style, an “F” icon shows at the bottom of the Layers palette. Click the little black triangle to see style
options.
J) Layer Mask -Allows you to hide certain parts of the layer, which can then be revealed by using the paintbrush and the white paint
color to expose portions of the layer.
K) Layer Set -This option helps to organize images with multiple layers. Click the icon to create a folder for several layers.
L) Create New Fill or Adjustment Layer -Have the same opacity and blending mode options as image layers and can be
rearranged, deleted, hidden and duplicated in the same manner as image layers. Click the icon and select an option to create a new
fill or adjustment layer.
M) Create New Layer -Click this icon to create a new layer.
N) Delete Layer -To delete a layer, select a layer in the Layers palette and drag it to the trash can icon, or select a layer and click
the icon.

Toolbox tools
Move Used to select and move objects on the page.
Marquee Selects an object by drawing a rectangle or an ellipse around it.
Lasso Selects an object by drawing a freehand border around it.
Magic Wand Selects all objects in a document with the same or similar fill color, stroke weight, stroke color, opacity or
blending mode. By specifying the color range or tolerance, you can control what the Magic Wand tool selects.
Crop Click the tool button, then click and drag the tool over the part of the image that you want to keep. Resize the selected
area dragging the squares at the sides and corners.
Eye Dropper Takes color samples from colors on the page and displays them in the Color Boxes.
Healing Brush Corrects small blemishes in scanned photos.
Brush Draws brush strokes of different thicknesses and colors.
Clone Stamp Takes a sample of an image and applies over another image, or a part of the same image.
Art History Brush Paints over an image using the source data from a specified history state or snapshot.
Eraser Removes part of an existing path or stroke. You can use the Erase tool on paths. Text can only be erased when
rasterized.
Paint Bucket Applies a color fill to a selected part of the image or to an entire layer.
Blur Blurs the sharp edges of an image.
Path Selection Selects paths and path segments.
Type Types text on a page. Every time you click the Type Tool on a new portion of the page, a new layer will be created.
Pen Draws smooth-edged paths.
Line Shape Draws a straight line. Other shapes that are hidden in this tool are: Rounded Rectangle Tool, Ellipse Tool,
Polygon Tool, Line Tool, and Custom Shape Tool.
Hand Allows you to move around within the image.
Magnify Magnifies or reduces the display of any area in your image window.

Color Boxes The foreground color appears in the upper color selection box and represents a color that is currently active.

Adobe Photoshop Toolbox definition term

  • 1.
    Interface Layout ofAdobe Photoshop Menu Bar If you look at the top of the screen you will see the Menu bar, which contains all the main functions of Photoshop, such as File, Edit, Image, Layer, Select, Filter, Analysis, 3D, View, Window, and Help. Toolbar Most of the major tools are located in the Toolbar for easy access. The Image The image will appear in its own window once you open a file. Image Name The name of any image that you open will be at the top of the image window as shown above. Palettes Palettes contain functions that help you monitor and modify images. By default, palettes are stacked together in groups. These are the palettes that are usually visible: Color, Adjustments and Layers. Palettes The Color palettes display the current foreground and background colors and RGB values for these colors. You can use the sliders to change the foreground and background colors in different color modes. In the Swatches palette you can choose a foreground or background color and add a customized color to the library. The Styles palette allows you to view, select, and apply preset layer styles. By default, a preset style replaces the current layer style. You can use the styles in the palette or add your own using the Create New Style icon.
  • 2.
    The History palettestores and displays each action performed allowing you jump to any recent stage of the image alteration. The alterations should be created during the current working session. The Adjustment layers palette give you the ability to apply an effect to a group of layers in Photoshop, and then you can edit that effect later, while preserving the original layers. Layers let you organize your work into distinct levels that can be edited and viewed as individual units. A) Layer Visibility -The eye shows that the selected layer is visible. Click on or off to see or to hide a layer. B) Layer Locking Options -Click the checkered square icon to lock Transparency, click the brush icon to lock the Image, click the arrow icon to lock the Position, and click the lock icon to lock all options. C) Layer Blending Mode -Defines how the layer’s pixels blend with underlying pixels in the image. By choosing a particular blending mode from the drop-down menu you can create a variety of special effects. D) Fill -By typing in a value or dragging the slider you can specify the transparency. E) Opacity -By typing in a value or dragging the slider, you can specify the transparency of the entire layer. F) Layer Lock -The icon shows when the layer is locked and disappears when it is unlocked. Double-click the icon to unlock the layer. G) Layer Options Menu -Click the black triangle to display the following options: New Layer, Duplicate Layer, Delete Layer, Layer Properties, etc. Some of the options are presented as icons at the bottom of the Layers palette. H) Link Layers – Can be used to link layers together. I) Layer Styles -If a layer has a style, an “F” icon shows at the bottom of the Layers palette. Click the little black triangle to see style options. J) Layer Mask -Allows you to hide certain parts of the layer, which can then be revealed by using the paintbrush and the white paint color to expose portions of the layer. K) Layer Set -This option helps to organize images with multiple layers. Click the icon to create a folder for several layers. L) Create New Fill or Adjustment Layer -Have the same opacity and blending mode options as image layers and can be rearranged, deleted, hidden and duplicated in the same manner as image layers. Click the icon and select an option to create a new fill or adjustment layer. M) Create New Layer -Click this icon to create a new layer. N) Delete Layer -To delete a layer, select a layer in the Layers palette and drag it to the trash can icon, or select a layer and click the icon. Toolbox tools Move Used to select and move objects on the page. Marquee Selects an object by drawing a rectangle or an ellipse around it. Lasso Selects an object by drawing a freehand border around it.
  • 3.
    Magic Wand Selectsall objects in a document with the same or similar fill color, stroke weight, stroke color, opacity or blending mode. By specifying the color range or tolerance, you can control what the Magic Wand tool selects. Crop Click the tool button, then click and drag the tool over the part of the image that you want to keep. Resize the selected area dragging the squares at the sides and corners. Eye Dropper Takes color samples from colors on the page and displays them in the Color Boxes. Healing Brush Corrects small blemishes in scanned photos. Brush Draws brush strokes of different thicknesses and colors. Clone Stamp Takes a sample of an image and applies over another image, or a part of the same image. Art History Brush Paints over an image using the source data from a specified history state or snapshot. Eraser Removes part of an existing path or stroke. You can use the Erase tool on paths. Text can only be erased when rasterized. Paint Bucket Applies a color fill to a selected part of the image or to an entire layer. Blur Blurs the sharp edges of an image. Path Selection Selects paths and path segments. Type Types text on a page. Every time you click the Type Tool on a new portion of the page, a new layer will be created. Pen Draws smooth-edged paths. Line Shape Draws a straight line. Other shapes that are hidden in this tool are: Rounded Rectangle Tool, Ellipse Tool, Polygon Tool, Line Tool, and Custom Shape Tool. Hand Allows you to move around within the image. Magnify Magnifies or reduces the display of any area in your image window. Color Boxes The foreground color appears in the upper color selection box and represents a color that is currently active.