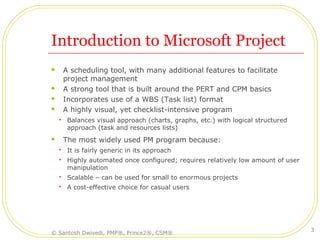
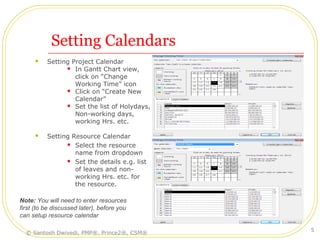
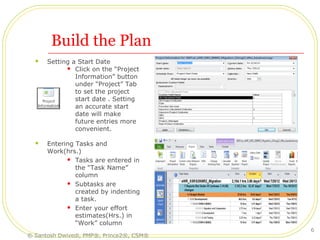
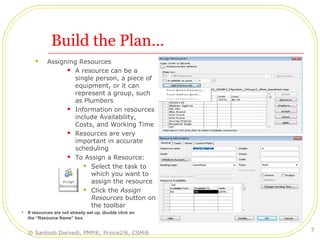
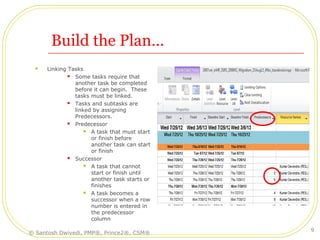
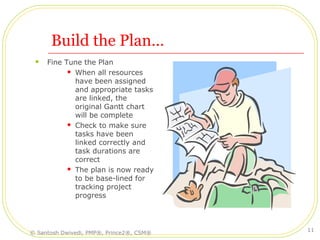
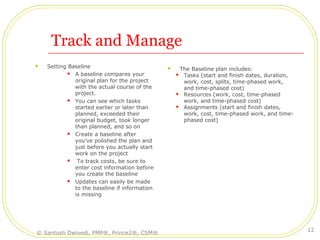
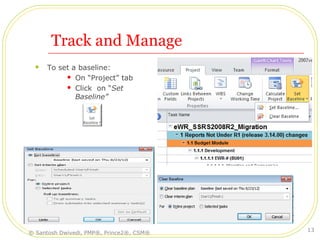
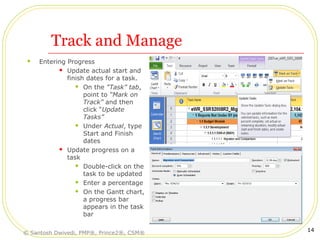
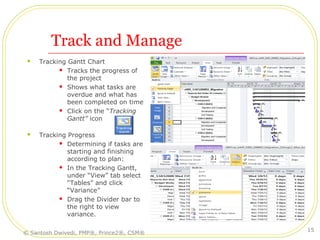
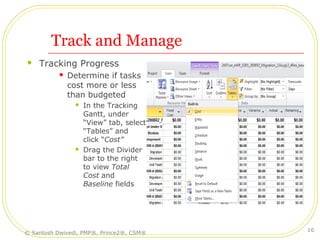
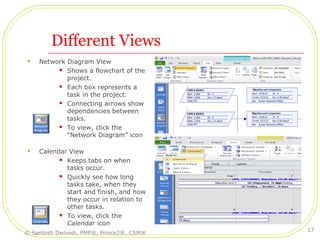
Microsoft Project 2010
A Quick Overview
Santosh Dwivedi, PMP®,Prince2®,CSM®
Contents
 Introduction to Microsoft Project
 Using MS Project
 Setting up Calendars
 Build the plan
 Track and Manage
 Different views
 Know the Terms
© Santosh Dwivedi, PMP®, Prince2®, CSM®
2
Introduction to Microsoft Project
 A scheduling tool, with many additional features to facilitate
project management
 A strong tool that is built around the PERT and CPM basics
 Incorporates use of a WBS (Task list) format
 A highly visual, yet checklist-intensive program
 Balances visual approach (charts, graphs, etc.) with logical structured
approach (task and resources lists)
 The most widely used PM program because:
 It is fairly generic in its approach
 Highly automated once configured; requires relatively low amount of user
manipulation
 Scalable – can be used for small to enormous projects
 A cost-effective choice for casual users
© Santosh Dwivedi, PMP®, Prince2®, CSM®
3
Using MS Project
 Pre-requisites
 Define the Project
 The objective of the project should be defined by the person/group that is
going to manage the project.
 Tasks, start times, and deadlines should be clearly established.
 Setting up Calendars
 Build the Plan
 Set a start date
 Enter tasks/durations
 Assign resources
 Link tasks
 Fine tune the plan
 Track and Manage
 Set a baseline
 Enter actuals
 Adjust plan
 Close Project
© Santosh Dwivedi, PMP®, Prince2®, CSM®
4
Setting Calendars
 Setting Project Calendar
 In Gantt Chart view,
click on “Change
Working Time” icon
 Click on “Create New
Calendar”
 Set the list of Holydays,
Non-working days,
working Hrs. etc.
 Setting Resource Calendar
 Select the resource
name from dropdown
 Set the details e.g. list
of leaves and non-
working Hrs. etc. for
the resource.
Note: You will need to enter resources
first (to be discussed later), before you
can setup resource calendar
© Santosh Dwivedi, PMP®, Prince2®, CSM®
5
Build the Plan
 Setting a Start Date
 Click on the “Project
Information” button
under “Project” Tab
to set the project
start date . Setting
an accurate start
date will make
future entries more
convenient.
 Entering Tasks and
Work(hrs.)
 Tasks are entered in
the “Task Name”
column
 Subtasks are
created by indenting
a task.
 Enter your effort
estimates(Hrs.) in
“Work” column
© Santosh Dwivedi, PMP®, Prince2®, CSM®
6
Build the Plan…
 Assigning Resources
 A resource can be a
single person, a piece of
equipment, or it can
represent a group, such
as Plumbers
 Information on resources
include Availability,
Costs, and Working Time
 Resources are very
important in accurate
scheduling
 To Assign a Resource:
 Select the task to
which you want to
assign the resource
 Click the Assign
Resources button on
the toolbar
• If resources are not already set up, double click on
the “Resource Name” box
© Santosh Dwivedi, PMP®, Prince2®, CSM®
7
Build the Plan…
 Entering Start Date
 Enter the start date in
“Start” column for each task
 By default each task has
project start date
 End Date
 The End date for a given
task is generally calculated
by the system and Shown
under “Finish” column
 You can also enter End date
manually, but it is not
considered a good practice,
in general.
 Duration
 Duration is calculated by the
system based on the hrs.
entered and resource
assigned.
 Can be overwritten to extend
the task duration longer or
shorter * System calculated duration is shown with “?”
© Santosh Dwivedi, PMP®, Prince2®, CSM®
8
Build the Plan…
 Linking Tasks
 Some tasks require that
another task be completed
before it can begin. These
tasks must be linked.
 Tasks and subtasks are
linked by assigning
Predecessors.
 Predecessor
 A task that must start
or finish before
another task can start
or finish
 Successor
 A task that cannot
start or finish until
another task starts or
finishes
 A task becomes a
successor when a row
number is entered in
the predecessor
column
© Santosh Dwivedi, PMP®, Prince2®, CSM®
9
Build the Plan…
 Task Dependencies
 There are 4 type of
dependencies:
 Finish to Start (FS)
 This is the default
dependency
 The successor can
start only after
predecessor is finished
 Start to Finish (SF)
 The successor can
finish only after
predecessor is started
 Many times this type of
dependency lead to
slack
 Start to Start (SS)
 The successor can
start in parallel with
predecessor
 Finish to Finish (FF)
 The successor should
finish along with
predecessor finish
FS
SF
SS
FF
© Santosh Dwivedi, PMP®, Prince2®, CSM®
10
Build the Plan…
 Fine Tune the Plan
 When all resources
have been assigned
and appropriate tasks
are linked, the
original Gantt chart
will be complete
 Check to make sure
tasks have been
linked correctly and
task durations are
correct
 The plan is now ready
to be base-lined for
tracking project
progress
© Santosh Dwivedi, PMP®, Prince2®, CSM®
11
Track and Manage
 Setting Baseline
 A baseline compares your
original plan for the project
with the actual course of the
project.
 You can see which tasks
started earlier or later than
planned, exceeded their
original budget, took longer
than planned, and so on
 Create a baseline after
you've polished the plan and
just before you actually start
work on the project
 To track costs, be sure to
enter cost information before
you create the baseline
 Updates can easily be made
to the baseline if information
is missing
 The Baseline plan includes:
 Tasks (start and finish dates, duration,
work, cost, splits, time-phased work,
and time-phased cost)
 Resources (work, cost, time-phased
work, and time-phased cost)
 Assignments (start and finish dates,
work, cost, time-phased work, and time-
phased cost)
© Santosh Dwivedi, PMP®, Prince2®, CSM®
12
Track and Manage
 To set a baseline:
 On “Project” tab
 Click on “Set
Baseline”
© Santosh Dwivedi, PMP®, Prince2®, CSM®
13
Track and Manage
 Entering Progress
 Update actual start and
finish dates for a task.
 On the “Task” tab,
point to “Mark on
Track” and then
click “Update
Tasks”
 Under Actual, type
Start and Finish
dates
 Update progress on a
task
 Double-click on the
task to be updated
 Enter a percentage
 On the Gantt chart,
a progress bar
appears in the task
bar
© Santosh Dwivedi, PMP®, Prince2®, CSM®
14
Track and Manage
 Tracking Gantt Chart
 Tracks the progress of
the project
 Shows what tasks are
overdue and what has
been completed on time
 Click on the “Tracking
Gantt” icon
 Tracking Progress
 Determining if tasks are
starting and finishing
according to plan:
 In the Tracking Gantt,
under “View” tab select
“Tables” and click
“Variance”
 Drag the Divider bar to
the right to view
variance.
© Santosh Dwivedi, PMP®, Prince2®, CSM®
15
Track and Manage
 Tracking Progress
 Determine if tasks
cost more or less
than budgeted
 In the Tracking
Gantt, under
“View” tab, select
“Tables” and
click “Cost”
 Drag the Divider
bar to the right
to view Total
Cost and
Baseline fields
© Santosh Dwivedi, PMP®, Prince2®, CSM®
16
Different Views
 Network Diagram View
 Shows a flowchart of the
project.
 Each box represents a
task in the project.
 Connecting arrows show
dependencies between
tasks.
 To view, click the
“Network Diagram” icon
 Calendar View
 Keeps tabs on when
tasks occur.
 Quickly see how long
tasks take, when they
start and finish, and how
they occur in relation to
other tasks.
 To view, click the
Calendar icon
© Santosh Dwivedi, PMP®, Prince2®, CSM®
17
Different Views
 Task Usage View
 Work with task and
resource information
side by side.
 Easily create useful
reports about when a
resource is scheduled to
work on a task.
 To view, click the Task
Usage icon
 Resource Graph View
 See whether resources
are over-allocated, what
capacity they're working
at, and how much they
cost in a timescale graph
 To view, click the
Resource Graph icon
© Santosh Dwivedi, PMP®, Prince2®, CSM®
18
Different Views
 Resource Sheet View
 Easy way to
review, add, edit
data about
resources.
 Resource Usage View
 Work with resource
and task
information side by
side
© Santosh Dwivedi, PMP®, Prince2®, CSM®
19
Know the Terms
 Duration
 The total span of working time or elapsed time required to
complete a task.
 Duration = Work ÷ Resource Units
 Work
 The total effort required to complete a task
 Resource
 Resources are the people, equipment and supplies used to
complete tasks in a project
 Resource Units
 Indicate how much of a resource's available time, according
to the resource calendar, is being used to work on a particular
task. In a project schedule, resource effort is expressed as
assignment units or sometimes just as units.
© Santosh Dwivedi, PMP®, Prince2®, CSM®
20
Know the Terms . .
 Fixed Duration
 For a constant task duration, as assigned work is increased so
will assigned units.
 Decrease the units and the work will correspondingly reduce.
 If assigned units are greater than max units, a resource over-
allocation will arise
 Fixed Units
 As the task's assigned units remain constant, an increase /
decrease in assigned work will result in a corresponding
increase / decrease in task duration.
 Fixed Units is the default task type for new tasks.
 Fixed Work
 If assigned work should remain constant, then as a task's
duration goes up assigned units will go down (and vice
versa).
 If assigned units are greater than max units, a resource over-
allocation will arise.
© Santosh Dwivedi, PMP®, Prince2®, CSM®
21
Know the Terms . .
 Effort-Driven
 Only comes into play after the initial resource assignments
have been made
 Work stays constant
 When resources (manpower) are assigned or removed from a
task, Microsoft Project will extend or shorten the duration of
the task to accommodate change in resources
 This is the default option for new tasks
 Over-allocation
 Situation when more hours of a resource are allocated than
are available
 Identifying Over-allocated Resources
 Special leveling indicator
 Resource Usage View – over-allocated resources are red
 Over-allocation can be resolved by leveling project
© Santosh Dwivedi, PMP®, Prince2®, CSM® 22
Know the Terms . .
 Leveling
 Resolving resource conflicts or over-allocations by delaying or
splitting certain tasks.
 During leveling, assignments are rescheduled according to the
resource availability profiles, assigned units, and resource
calendars, as well as the task's duration and constraints.
 It is instigated either automatically or (more commonly) by
the command level now.
 Tools | Level Resources . . . (hour by hour)
 Gant Chart
 A Gantt Chart is a visual tool to help Plan, Manage, and Track
a project or projects.
 Milestones
 A reference point marking a major event in a project and
used to monitor the project's progress
 To create a milestone, Enter “0” in the duration field
© Santosh Dwivedi, PMP®, Prince2®, CSM® 23
Questions?
© Santosh Dwivedi, PMP®, Prince2®, CSM® 24

Microsoft project 2010

  • 1.
    Microsoft Project 2010 AQuick Overview Santosh Dwivedi, PMP®,Prince2®,CSM®
  • 2.
    Contents  Introduction toMicrosoft Project  Using MS Project  Setting up Calendars  Build the plan  Track and Manage  Different views  Know the Terms © Santosh Dwivedi, PMP®, Prince2®, CSM® 2
  • 3.
    Introduction to MicrosoftProject  A scheduling tool, with many additional features to facilitate project management  A strong tool that is built around the PERT and CPM basics  Incorporates use of a WBS (Task list) format  A highly visual, yet checklist-intensive program  Balances visual approach (charts, graphs, etc.) with logical structured approach (task and resources lists)  The most widely used PM program because:  It is fairly generic in its approach  Highly automated once configured; requires relatively low amount of user manipulation  Scalable – can be used for small to enormous projects  A cost-effective choice for casual users © Santosh Dwivedi, PMP®, Prince2®, CSM® 3
  • 4.
    Using MS Project Pre-requisites  Define the Project  The objective of the project should be defined by the person/group that is going to manage the project.  Tasks, start times, and deadlines should be clearly established.  Setting up Calendars  Build the Plan  Set a start date  Enter tasks/durations  Assign resources  Link tasks  Fine tune the plan  Track and Manage  Set a baseline  Enter actuals  Adjust plan  Close Project © Santosh Dwivedi, PMP®, Prince2®, CSM® 4
  • 5.
    Setting Calendars  SettingProject Calendar  In Gantt Chart view, click on “Change Working Time” icon  Click on “Create New Calendar”  Set the list of Holydays, Non-working days, working Hrs. etc.  Setting Resource Calendar  Select the resource name from dropdown  Set the details e.g. list of leaves and non- working Hrs. etc. for the resource. Note: You will need to enter resources first (to be discussed later), before you can setup resource calendar © Santosh Dwivedi, PMP®, Prince2®, CSM® 5
  • 6.
    Build the Plan Setting a Start Date  Click on the “Project Information” button under “Project” Tab to set the project start date . Setting an accurate start date will make future entries more convenient.  Entering Tasks and Work(hrs.)  Tasks are entered in the “Task Name” column  Subtasks are created by indenting a task.  Enter your effort estimates(Hrs.) in “Work” column © Santosh Dwivedi, PMP®, Prince2®, CSM® 6
  • 7.
    Build the Plan… Assigning Resources  A resource can be a single person, a piece of equipment, or it can represent a group, such as Plumbers  Information on resources include Availability, Costs, and Working Time  Resources are very important in accurate scheduling  To Assign a Resource:  Select the task to which you want to assign the resource  Click the Assign Resources button on the toolbar • If resources are not already set up, double click on the “Resource Name” box © Santosh Dwivedi, PMP®, Prince2®, CSM® 7
  • 8.
    Build the Plan… Entering Start Date  Enter the start date in “Start” column for each task  By default each task has project start date  End Date  The End date for a given task is generally calculated by the system and Shown under “Finish” column  You can also enter End date manually, but it is not considered a good practice, in general.  Duration  Duration is calculated by the system based on the hrs. entered and resource assigned.  Can be overwritten to extend the task duration longer or shorter * System calculated duration is shown with “?” © Santosh Dwivedi, PMP®, Prince2®, CSM® 8
  • 9.
    Build the Plan… Linking Tasks  Some tasks require that another task be completed before it can begin. These tasks must be linked.  Tasks and subtasks are linked by assigning Predecessors.  Predecessor  A task that must start or finish before another task can start or finish  Successor  A task that cannot start or finish until another task starts or finishes  A task becomes a successor when a row number is entered in the predecessor column © Santosh Dwivedi, PMP®, Prince2®, CSM® 9
  • 10.
    Build the Plan… Task Dependencies  There are 4 type of dependencies:  Finish to Start (FS)  This is the default dependency  The successor can start only after predecessor is finished  Start to Finish (SF)  The successor can finish only after predecessor is started  Many times this type of dependency lead to slack  Start to Start (SS)  The successor can start in parallel with predecessor  Finish to Finish (FF)  The successor should finish along with predecessor finish FS SF SS FF © Santosh Dwivedi, PMP®, Prince2®, CSM® 10
  • 11.
    Build the Plan… Fine Tune the Plan  When all resources have been assigned and appropriate tasks are linked, the original Gantt chart will be complete  Check to make sure tasks have been linked correctly and task durations are correct  The plan is now ready to be base-lined for tracking project progress © Santosh Dwivedi, PMP®, Prince2®, CSM® 11
  • 12.
    Track and Manage Setting Baseline  A baseline compares your original plan for the project with the actual course of the project.  You can see which tasks started earlier or later than planned, exceeded their original budget, took longer than planned, and so on  Create a baseline after you've polished the plan and just before you actually start work on the project  To track costs, be sure to enter cost information before you create the baseline  Updates can easily be made to the baseline if information is missing  The Baseline plan includes:  Tasks (start and finish dates, duration, work, cost, splits, time-phased work, and time-phased cost)  Resources (work, cost, time-phased work, and time-phased cost)  Assignments (start and finish dates, work, cost, time-phased work, and time- phased cost) © Santosh Dwivedi, PMP®, Prince2®, CSM® 12
  • 13.
    Track and Manage To set a baseline:  On “Project” tab  Click on “Set Baseline” © Santosh Dwivedi, PMP®, Prince2®, CSM® 13
  • 14.
    Track and Manage Entering Progress  Update actual start and finish dates for a task.  On the “Task” tab, point to “Mark on Track” and then click “Update Tasks”  Under Actual, type Start and Finish dates  Update progress on a task  Double-click on the task to be updated  Enter a percentage  On the Gantt chart, a progress bar appears in the task bar © Santosh Dwivedi, PMP®, Prince2®, CSM® 14
  • 15.
    Track and Manage Tracking Gantt Chart  Tracks the progress of the project  Shows what tasks are overdue and what has been completed on time  Click on the “Tracking Gantt” icon  Tracking Progress  Determining if tasks are starting and finishing according to plan:  In the Tracking Gantt, under “View” tab select “Tables” and click “Variance”  Drag the Divider bar to the right to view variance. © Santosh Dwivedi, PMP®, Prince2®, CSM® 15
  • 16.
    Track and Manage Tracking Progress  Determine if tasks cost more or less than budgeted  In the Tracking Gantt, under “View” tab, select “Tables” and click “Cost”  Drag the Divider bar to the right to view Total Cost and Baseline fields © Santosh Dwivedi, PMP®, Prince2®, CSM® 16
  • 17.
    Different Views  NetworkDiagram View  Shows a flowchart of the project.  Each box represents a task in the project.  Connecting arrows show dependencies between tasks.  To view, click the “Network Diagram” icon  Calendar View  Keeps tabs on when tasks occur.  Quickly see how long tasks take, when they start and finish, and how they occur in relation to other tasks.  To view, click the Calendar icon © Santosh Dwivedi, PMP®, Prince2®, CSM® 17
  • 18.
    Different Views  TaskUsage View  Work with task and resource information side by side.  Easily create useful reports about when a resource is scheduled to work on a task.  To view, click the Task Usage icon  Resource Graph View  See whether resources are over-allocated, what capacity they're working at, and how much they cost in a timescale graph  To view, click the Resource Graph icon © Santosh Dwivedi, PMP®, Prince2®, CSM® 18
  • 19.
    Different Views  ResourceSheet View  Easy way to review, add, edit data about resources.  Resource Usage View  Work with resource and task information side by side © Santosh Dwivedi, PMP®, Prince2®, CSM® 19
  • 20.
    Know the Terms Duration  The total span of working time or elapsed time required to complete a task.  Duration = Work ÷ Resource Units  Work  The total effort required to complete a task  Resource  Resources are the people, equipment and supplies used to complete tasks in a project  Resource Units  Indicate how much of a resource's available time, according to the resource calendar, is being used to work on a particular task. In a project schedule, resource effort is expressed as assignment units or sometimes just as units. © Santosh Dwivedi, PMP®, Prince2®, CSM® 20
  • 21.
    Know the Terms. .  Fixed Duration  For a constant task duration, as assigned work is increased so will assigned units.  Decrease the units and the work will correspondingly reduce.  If assigned units are greater than max units, a resource over- allocation will arise  Fixed Units  As the task's assigned units remain constant, an increase / decrease in assigned work will result in a corresponding increase / decrease in task duration.  Fixed Units is the default task type for new tasks.  Fixed Work  If assigned work should remain constant, then as a task's duration goes up assigned units will go down (and vice versa).  If assigned units are greater than max units, a resource over- allocation will arise. © Santosh Dwivedi, PMP®, Prince2®, CSM® 21
  • 22.
    Know the Terms. .  Effort-Driven  Only comes into play after the initial resource assignments have been made  Work stays constant  When resources (manpower) are assigned or removed from a task, Microsoft Project will extend or shorten the duration of the task to accommodate change in resources  This is the default option for new tasks  Over-allocation  Situation when more hours of a resource are allocated than are available  Identifying Over-allocated Resources  Special leveling indicator  Resource Usage View – over-allocated resources are red  Over-allocation can be resolved by leveling project © Santosh Dwivedi, PMP®, Prince2®, CSM® 22
  • 23.
    Know the Terms. .  Leveling  Resolving resource conflicts or over-allocations by delaying or splitting certain tasks.  During leveling, assignments are rescheduled according to the resource availability profiles, assigned units, and resource calendars, as well as the task's duration and constraints.  It is instigated either automatically or (more commonly) by the command level now.  Tools | Level Resources . . . (hour by hour)  Gant Chart  A Gantt Chart is a visual tool to help Plan, Manage, and Track a project or projects.  Milestones  A reference point marking a major event in a project and used to monitor the project's progress  To create a milestone, Enter “0” in the duration field © Santosh Dwivedi, PMP®, Prince2®, CSM® 23
  • 24.
    Questions? © Santosh Dwivedi,PMP®, Prince2®, CSM® 24