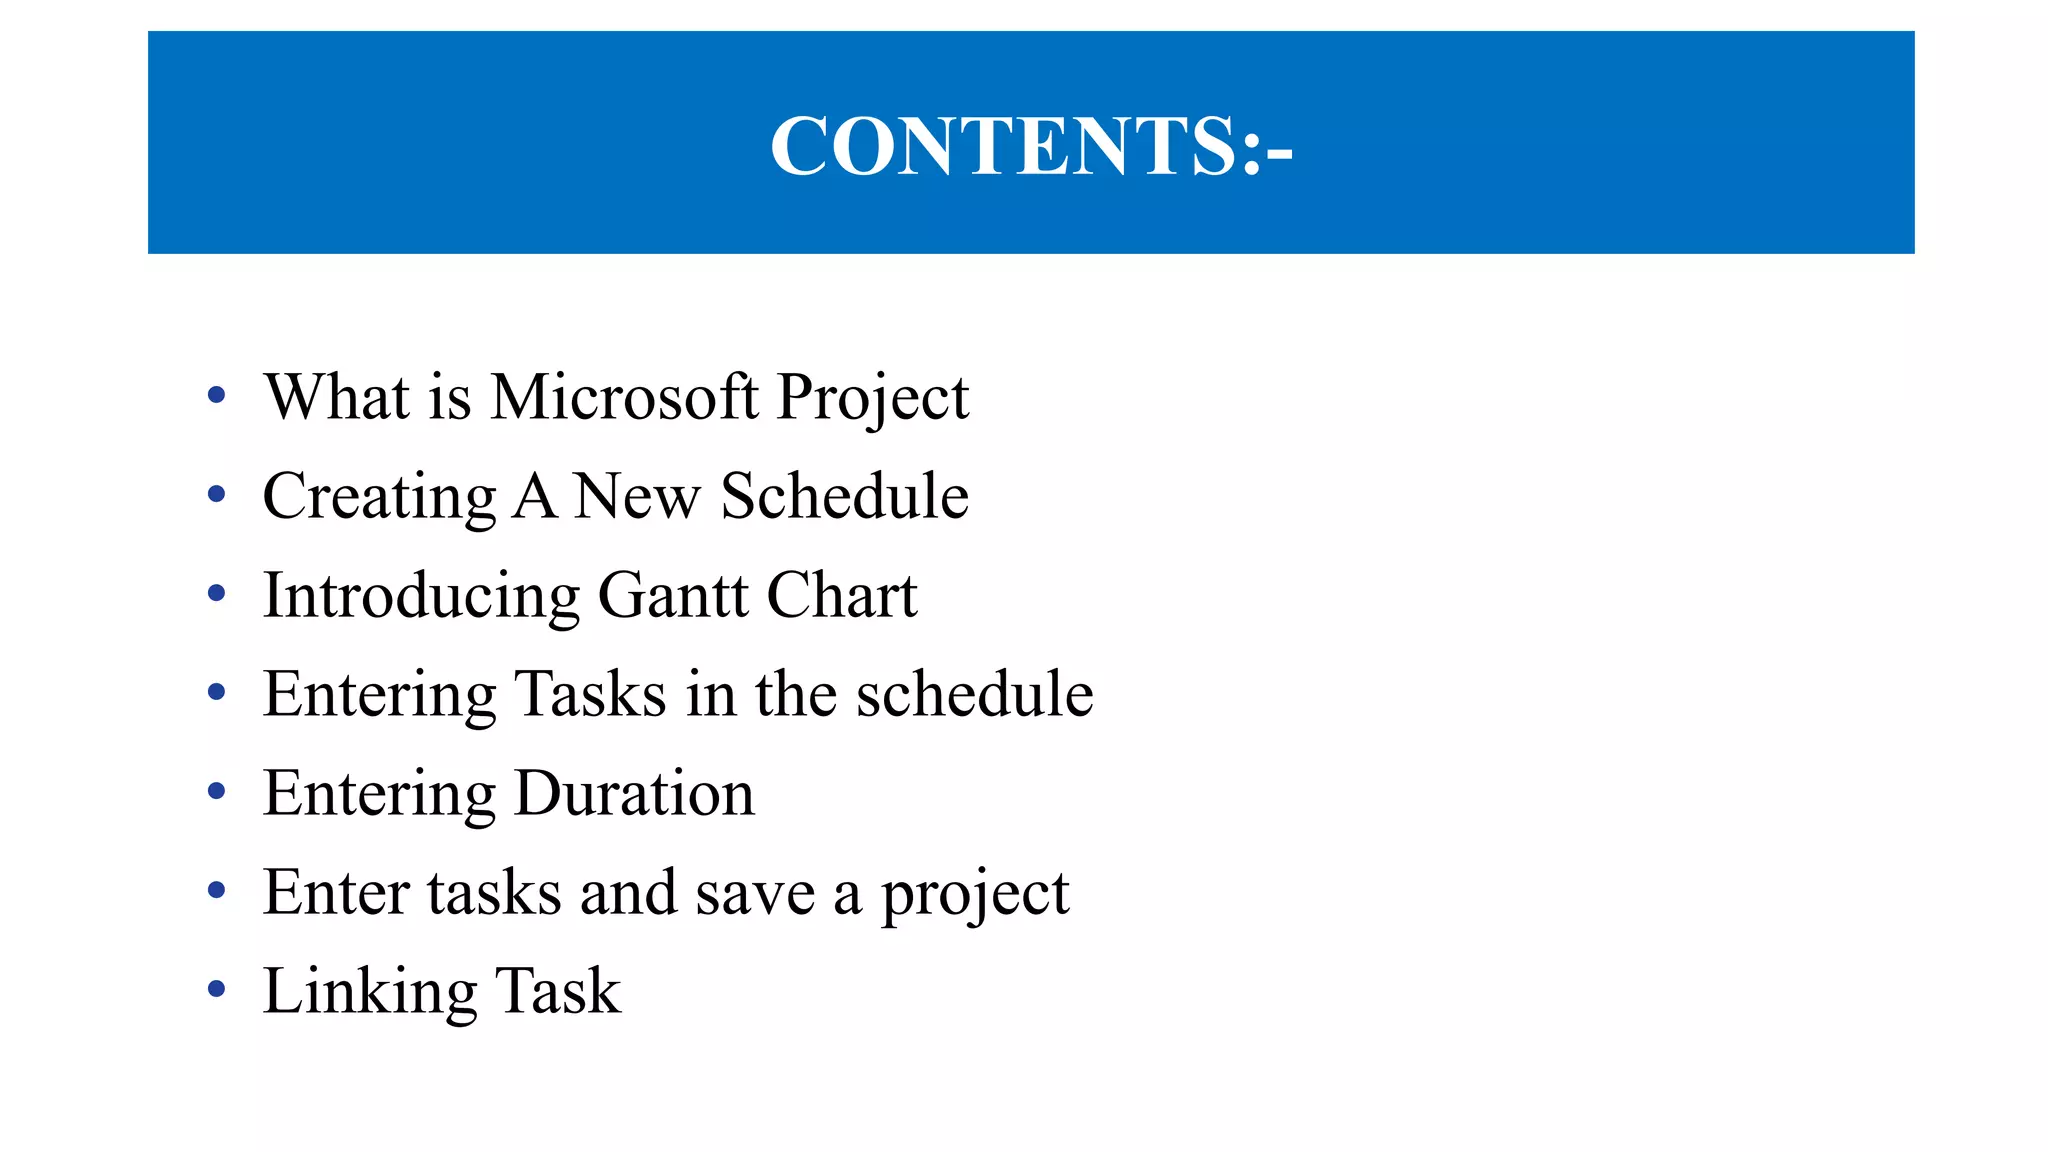
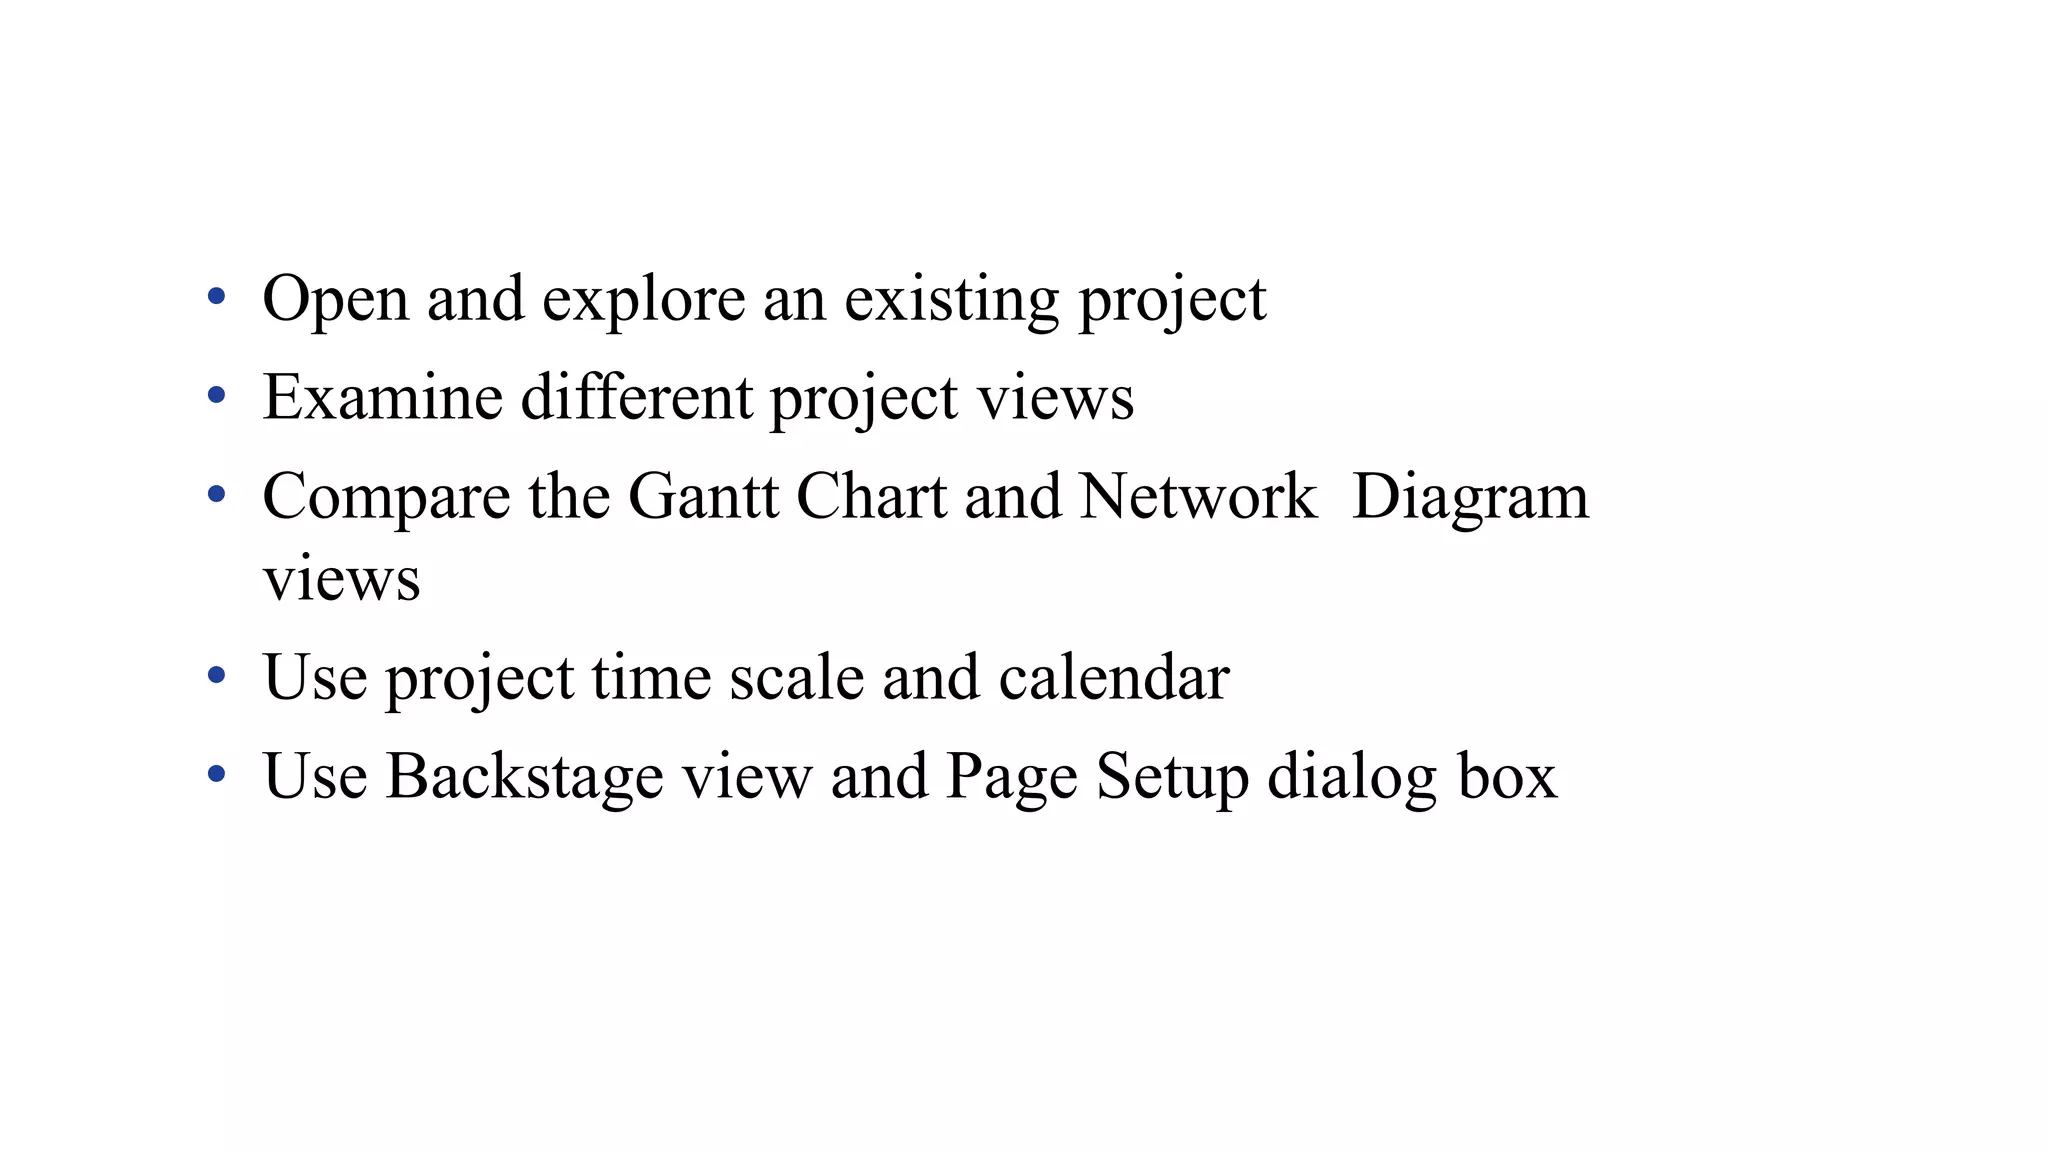
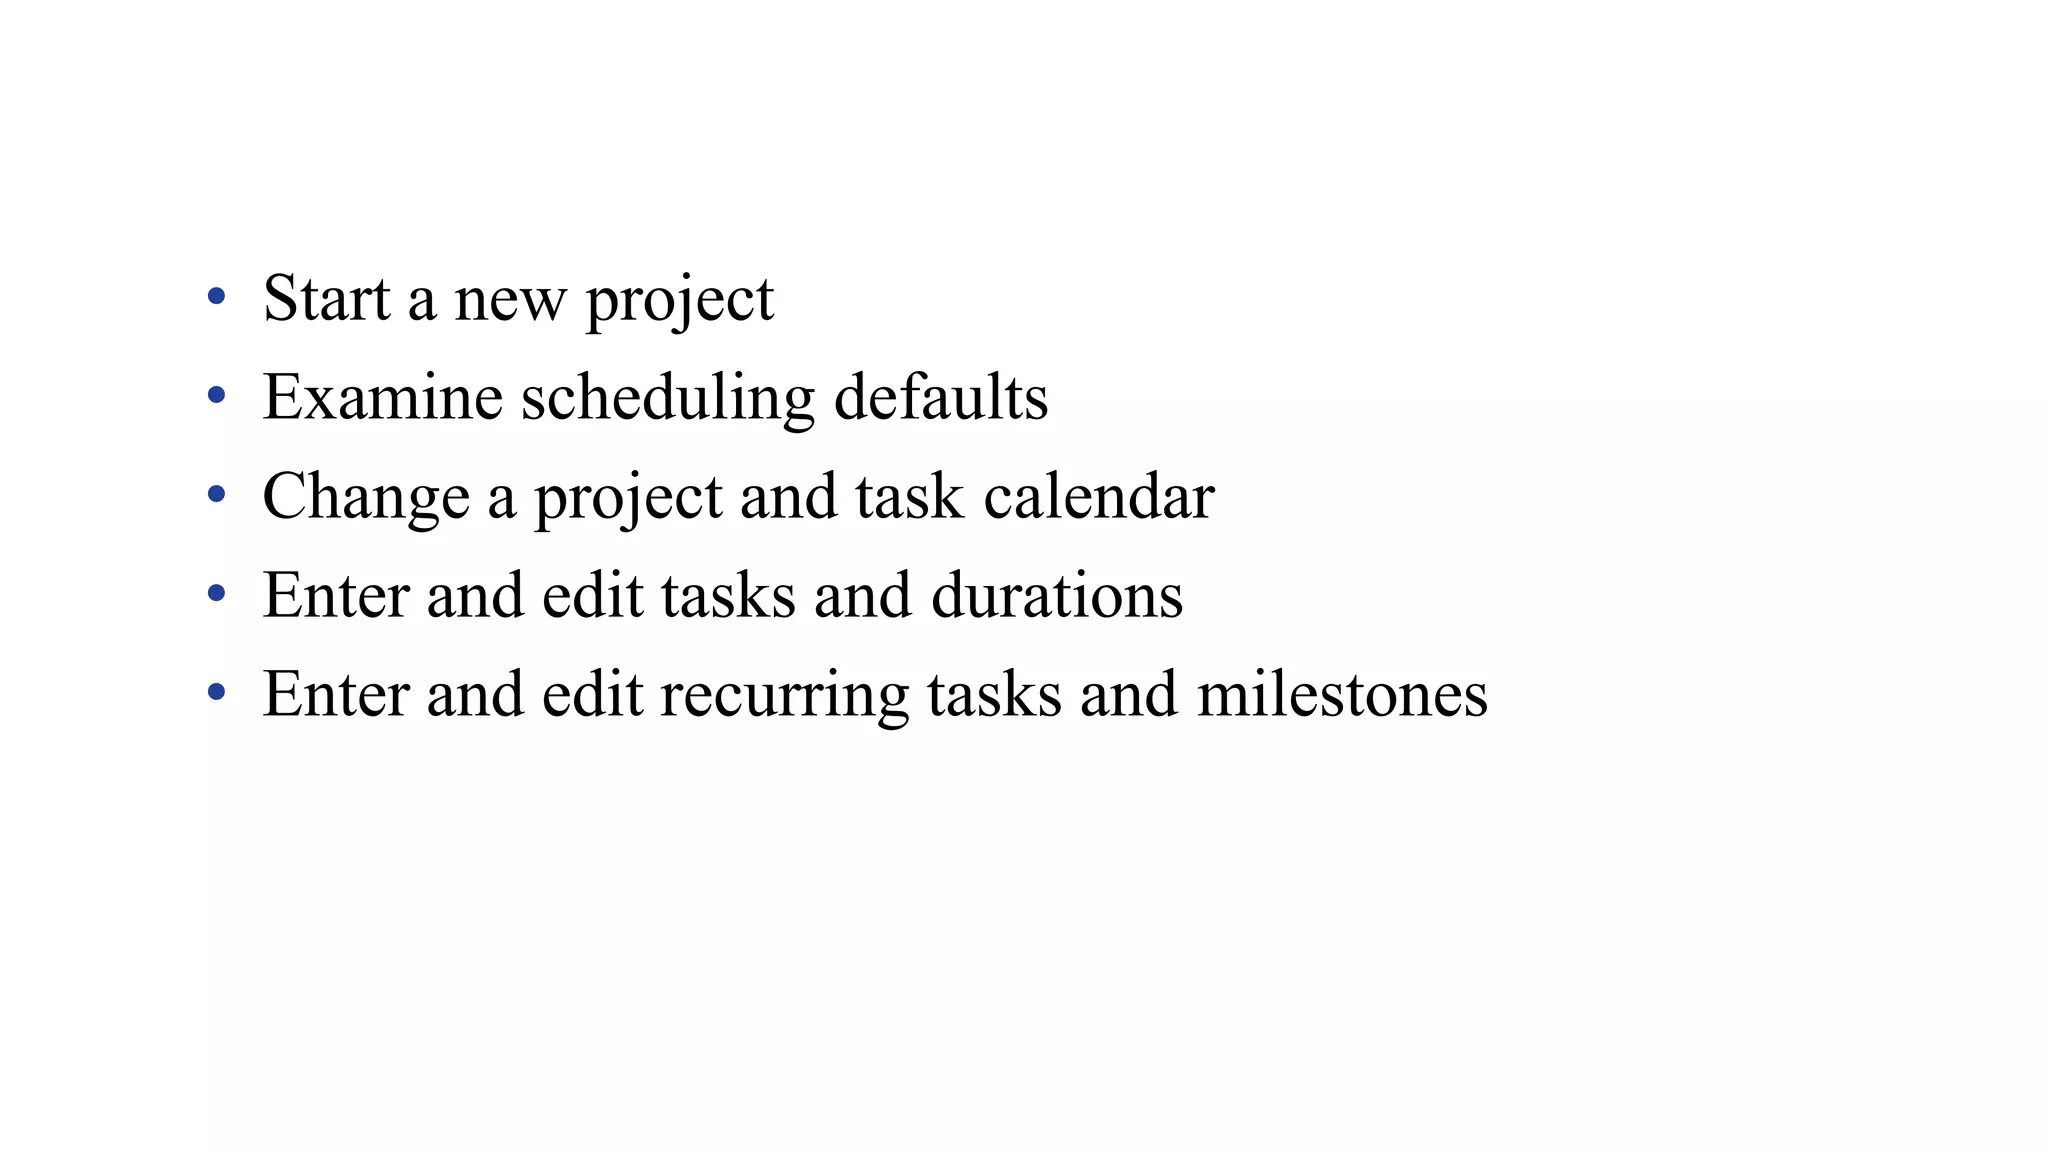
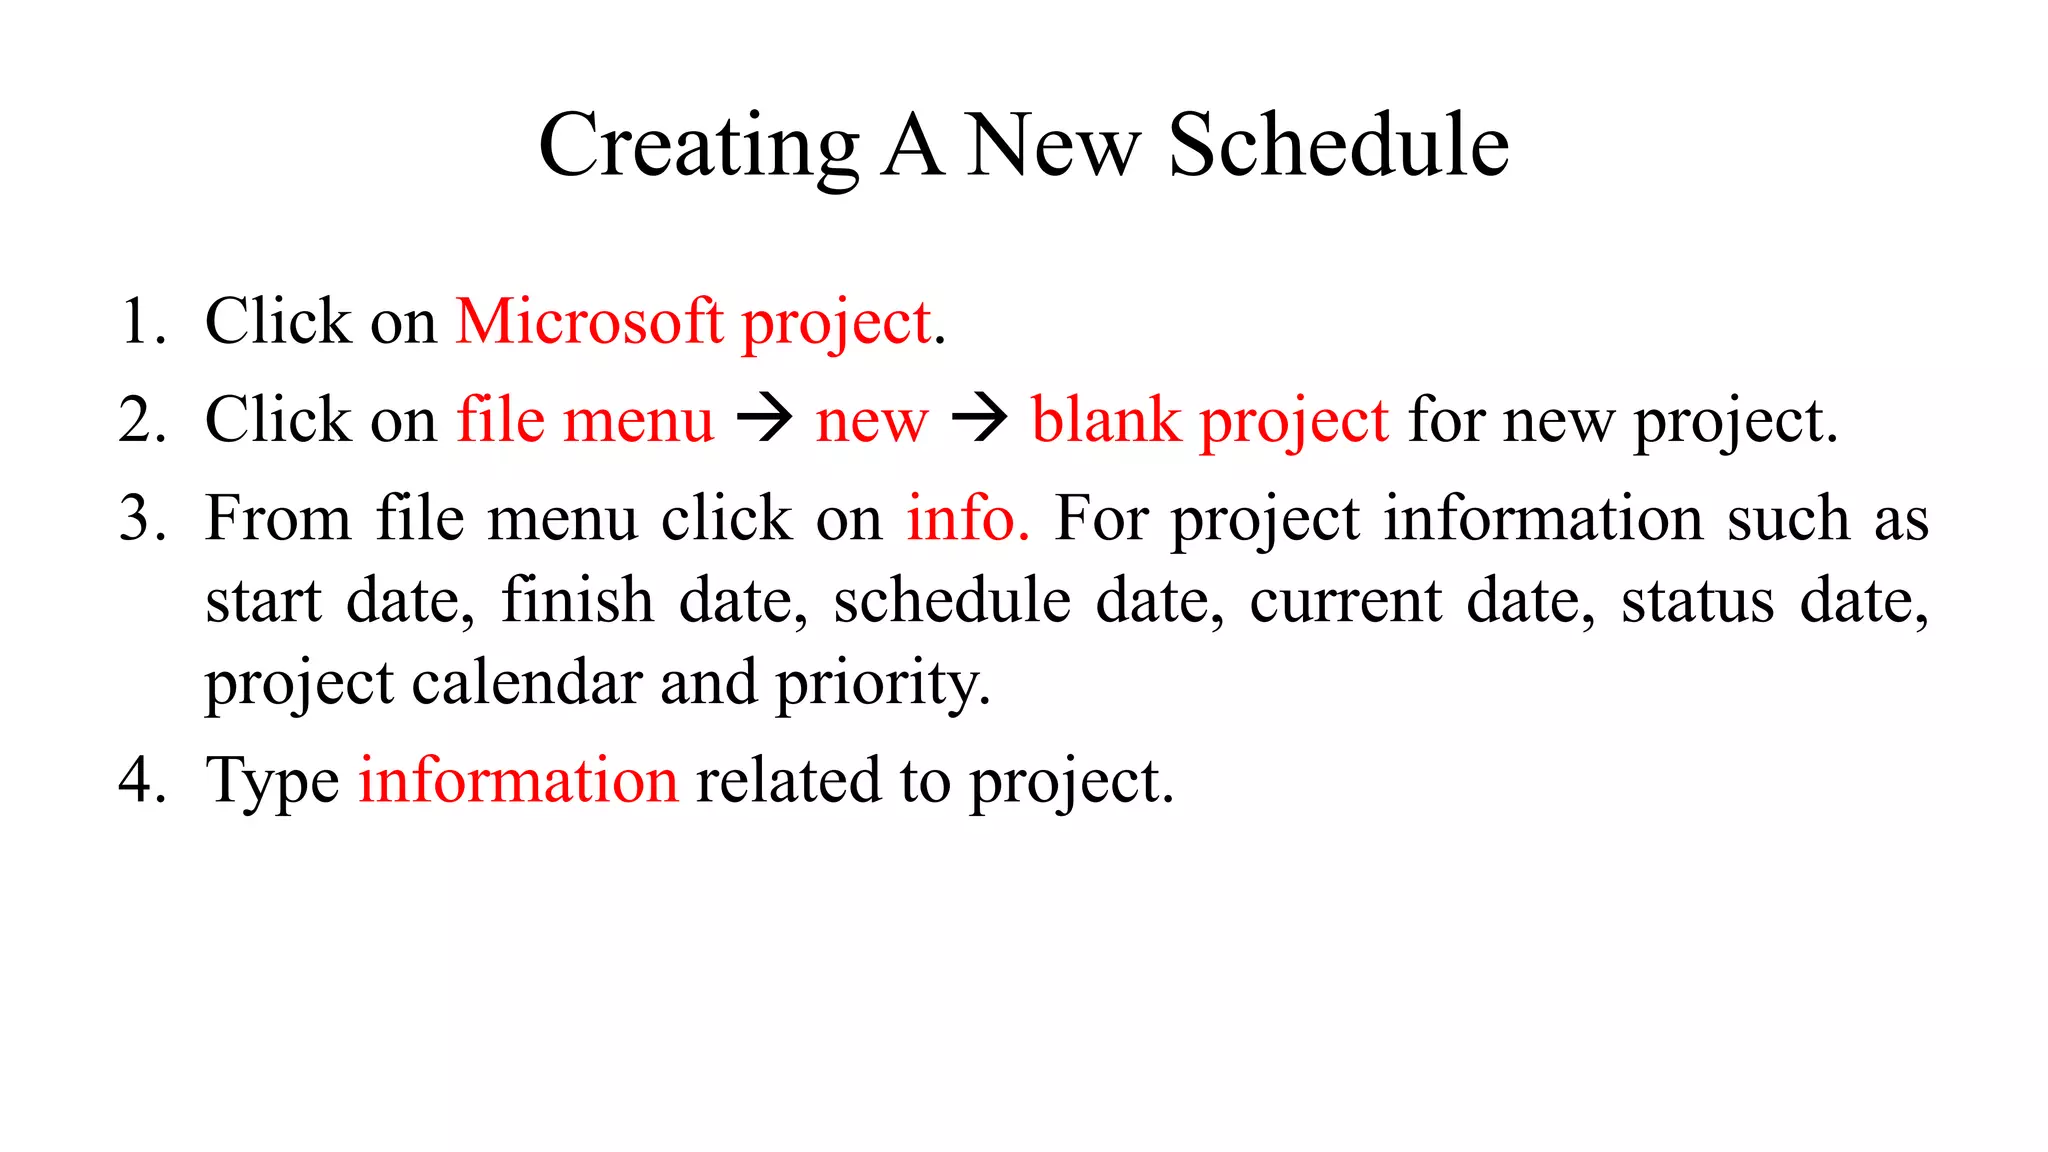
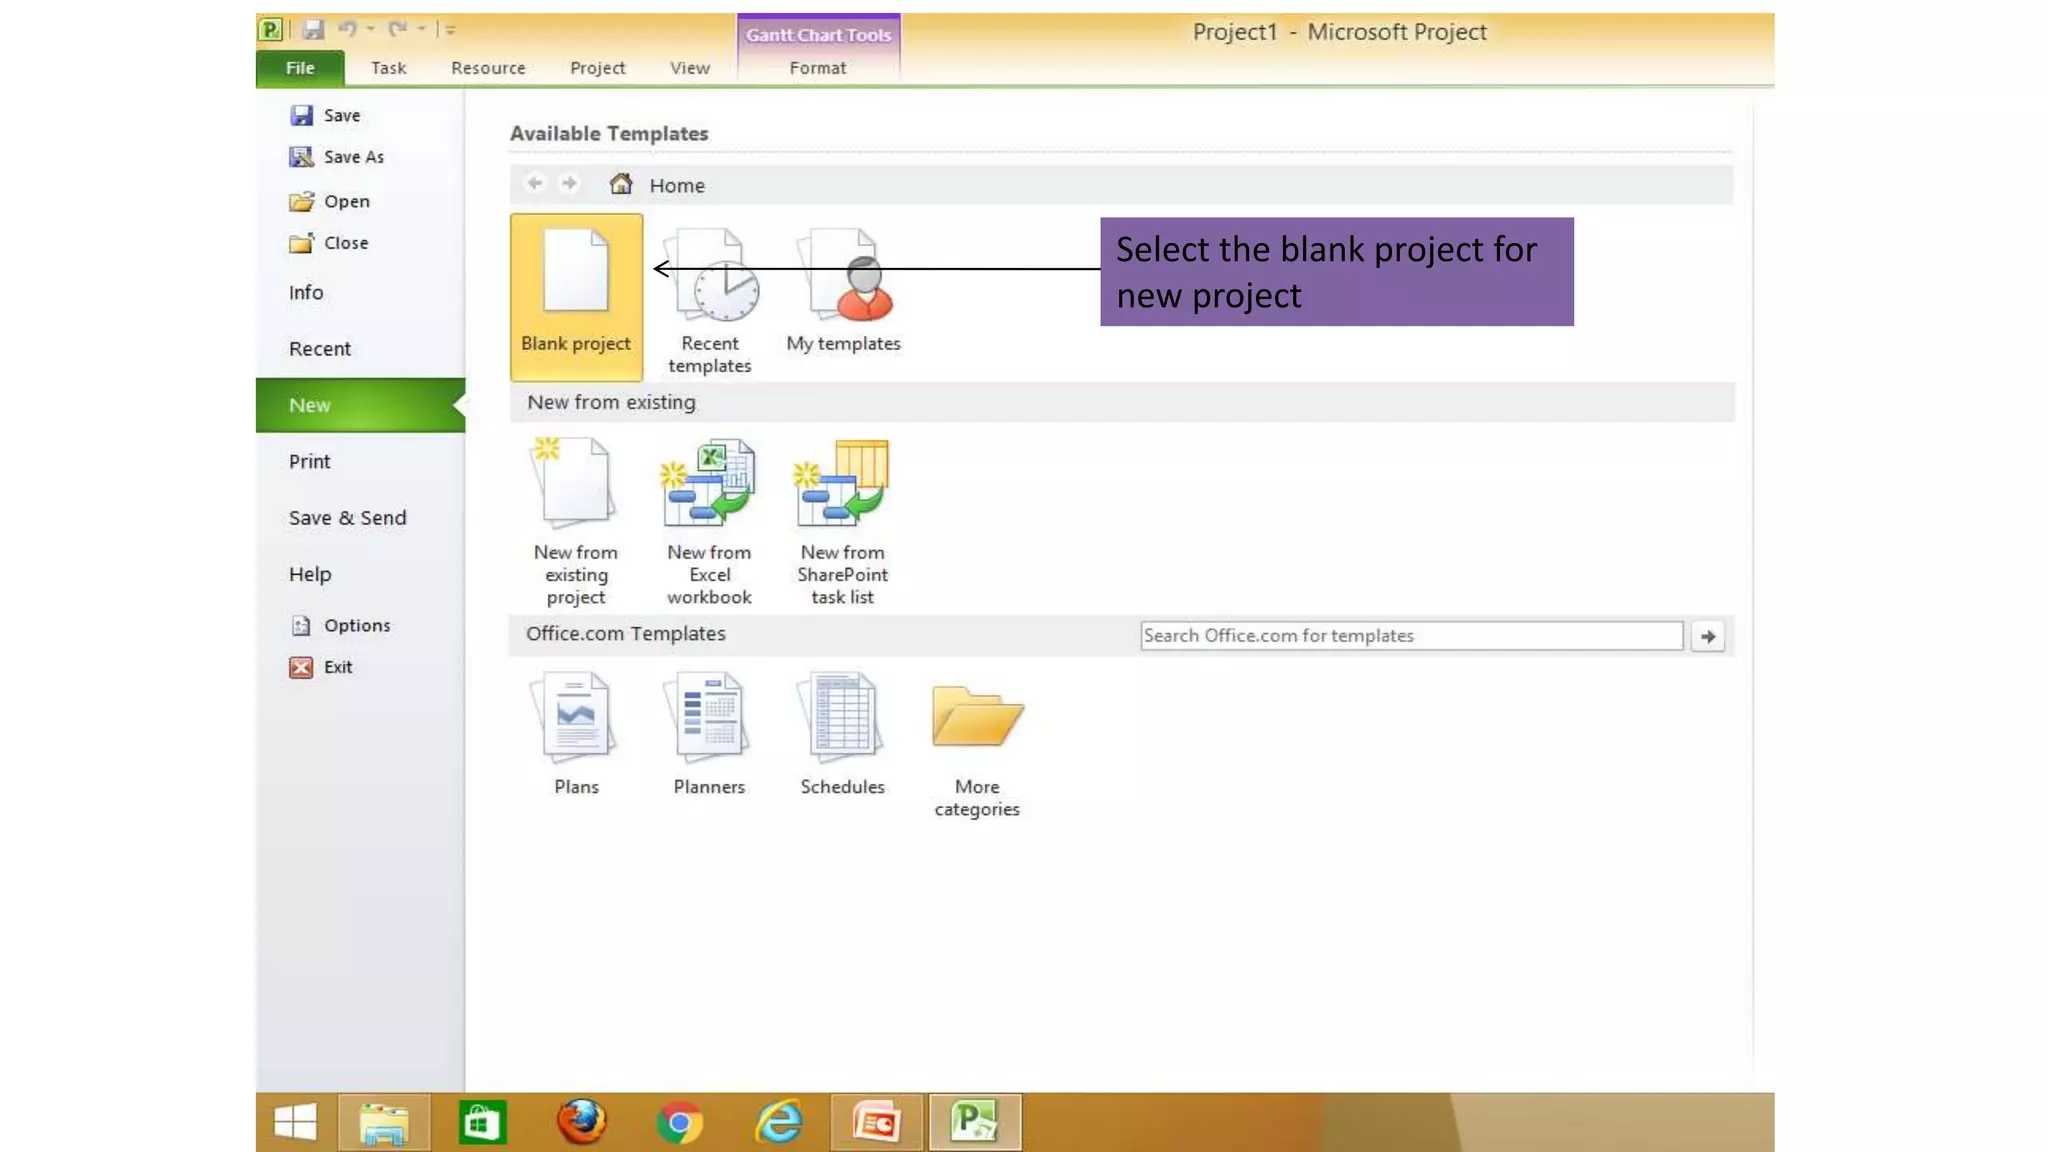
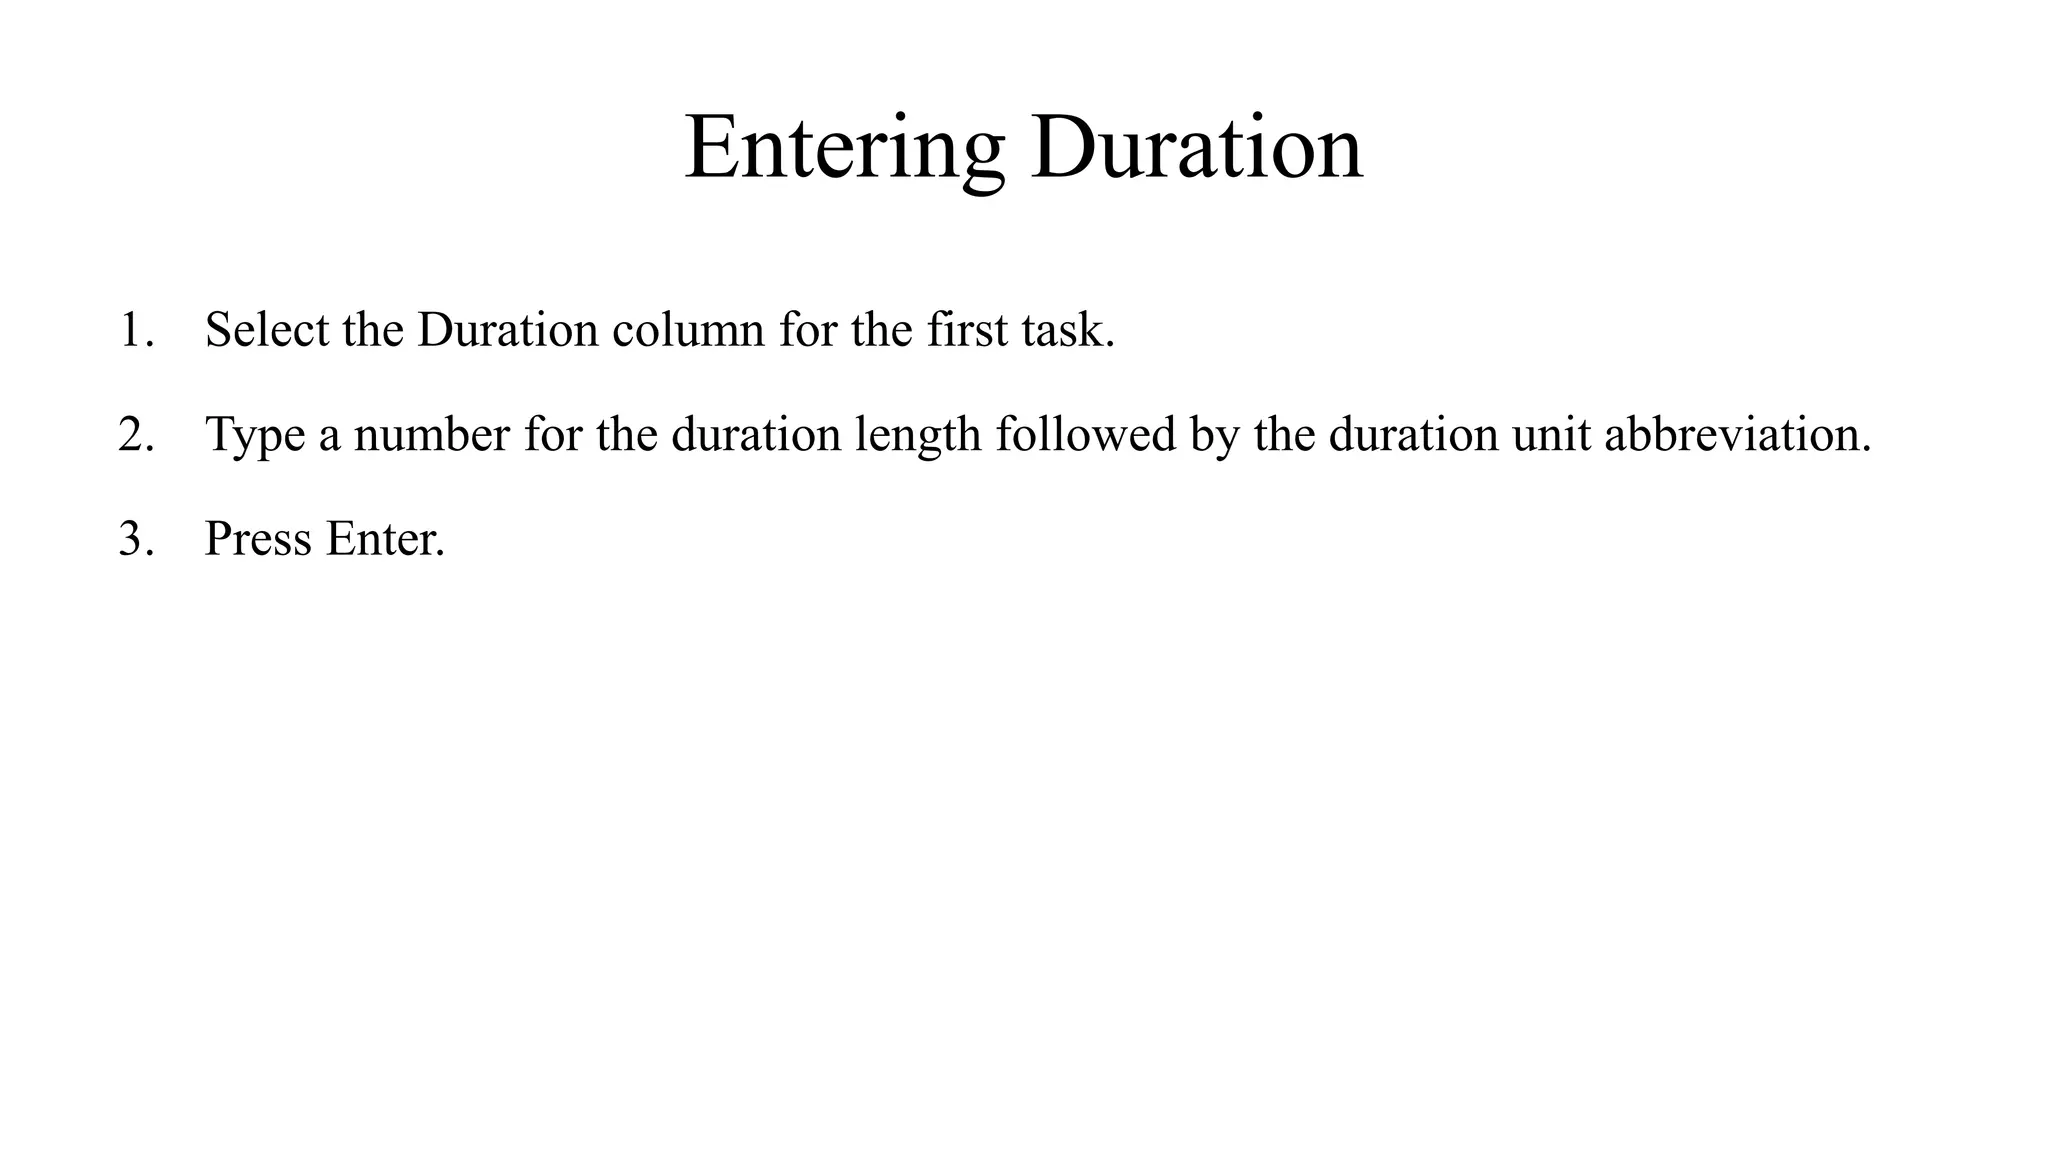
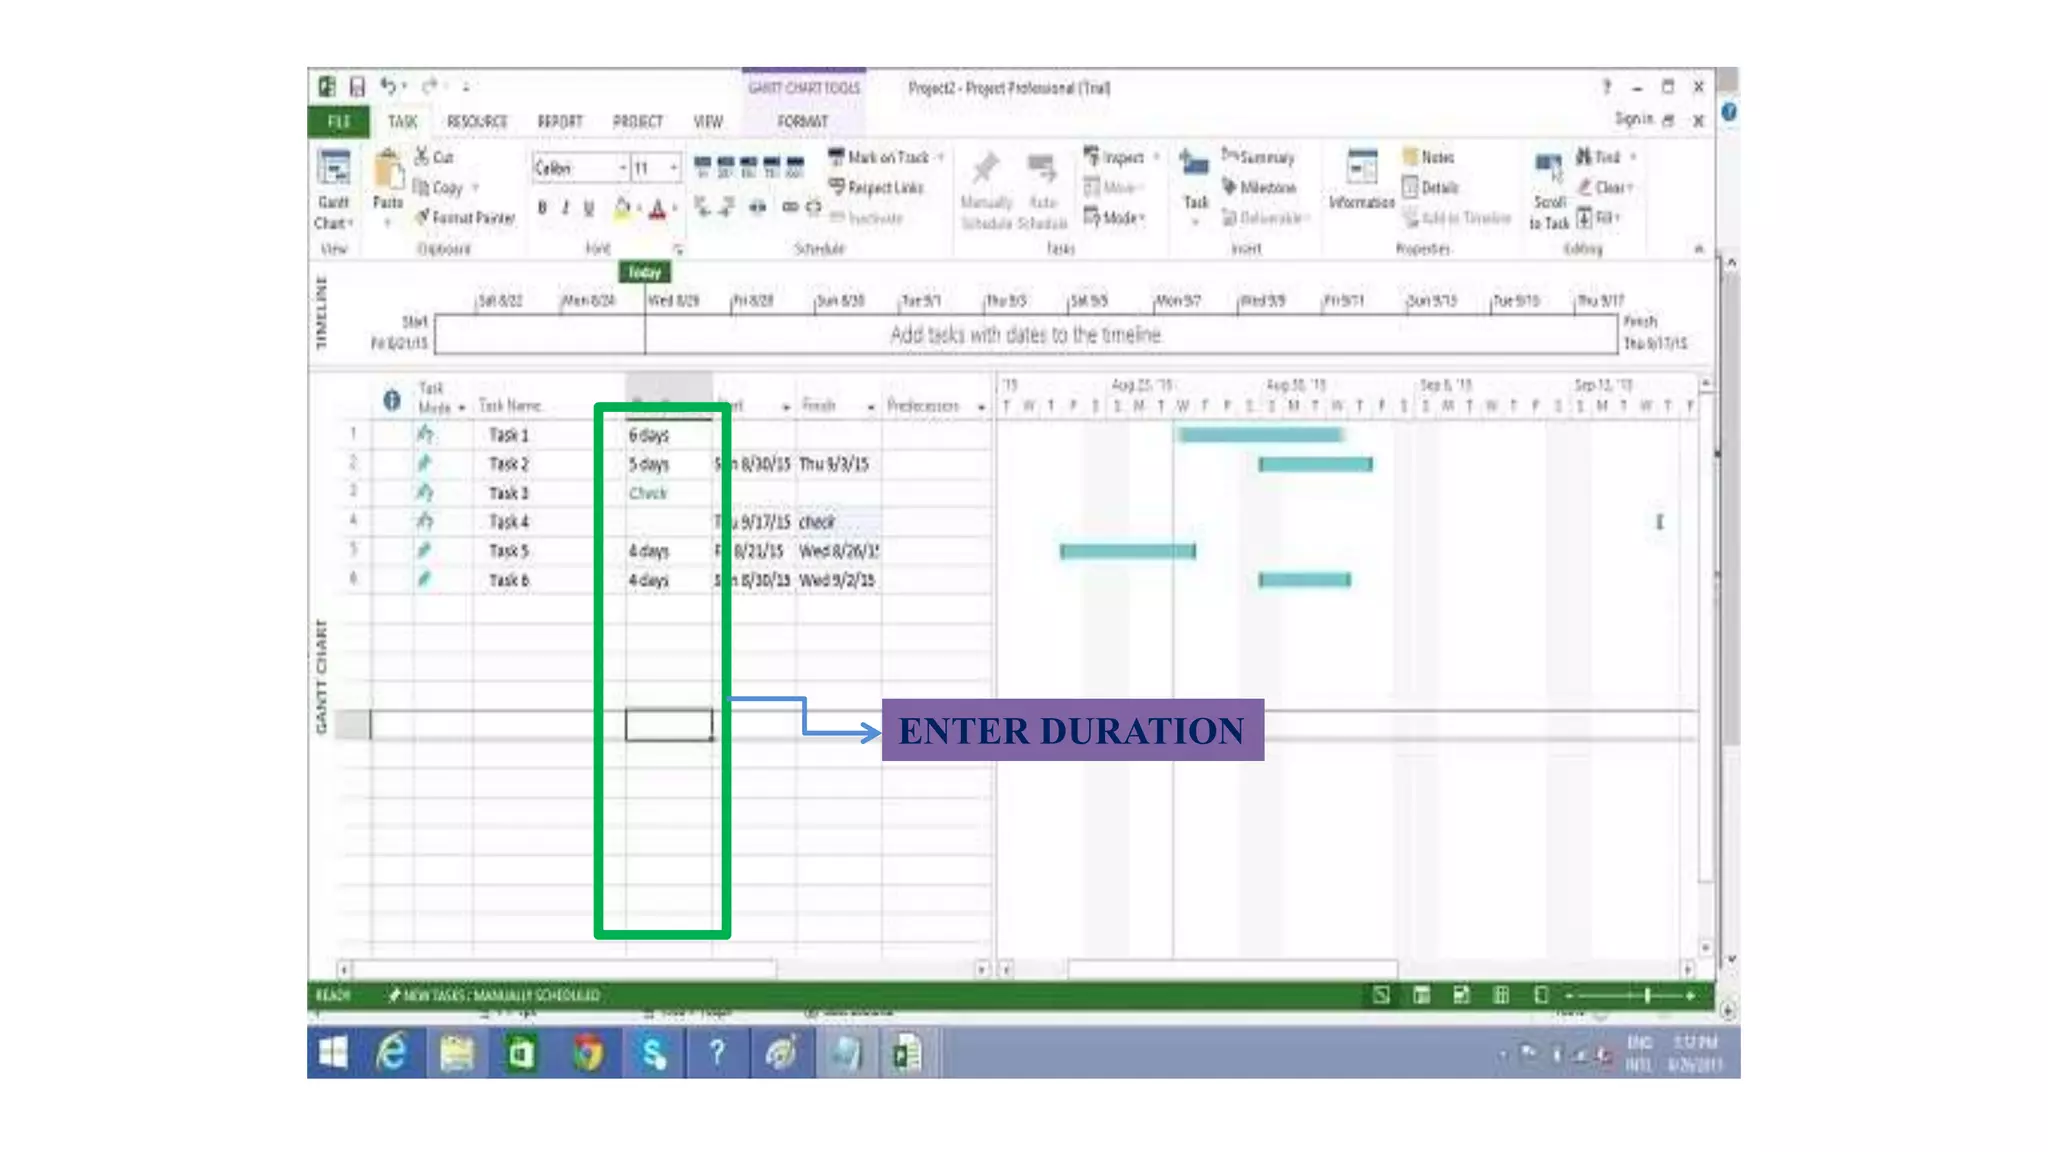
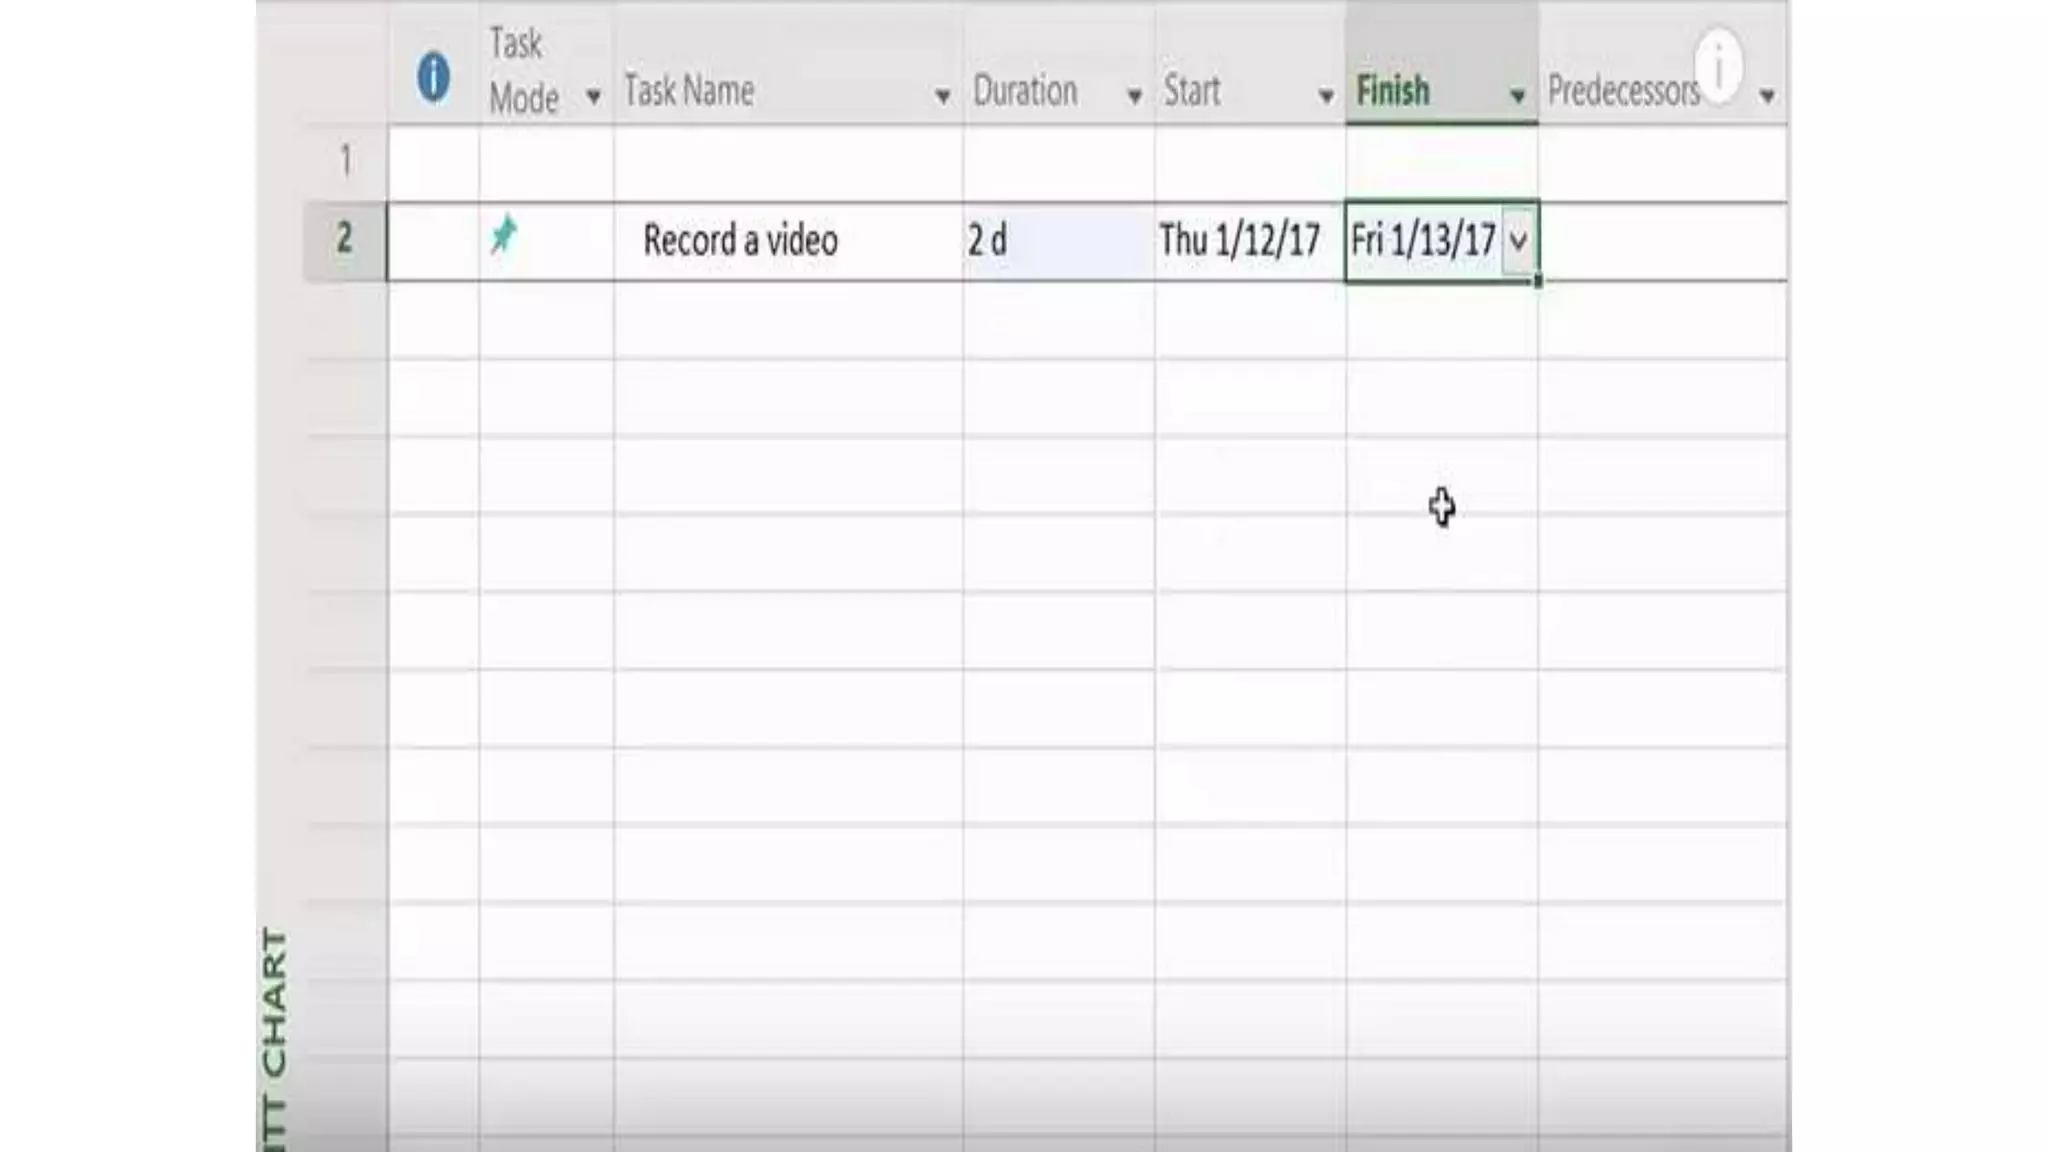
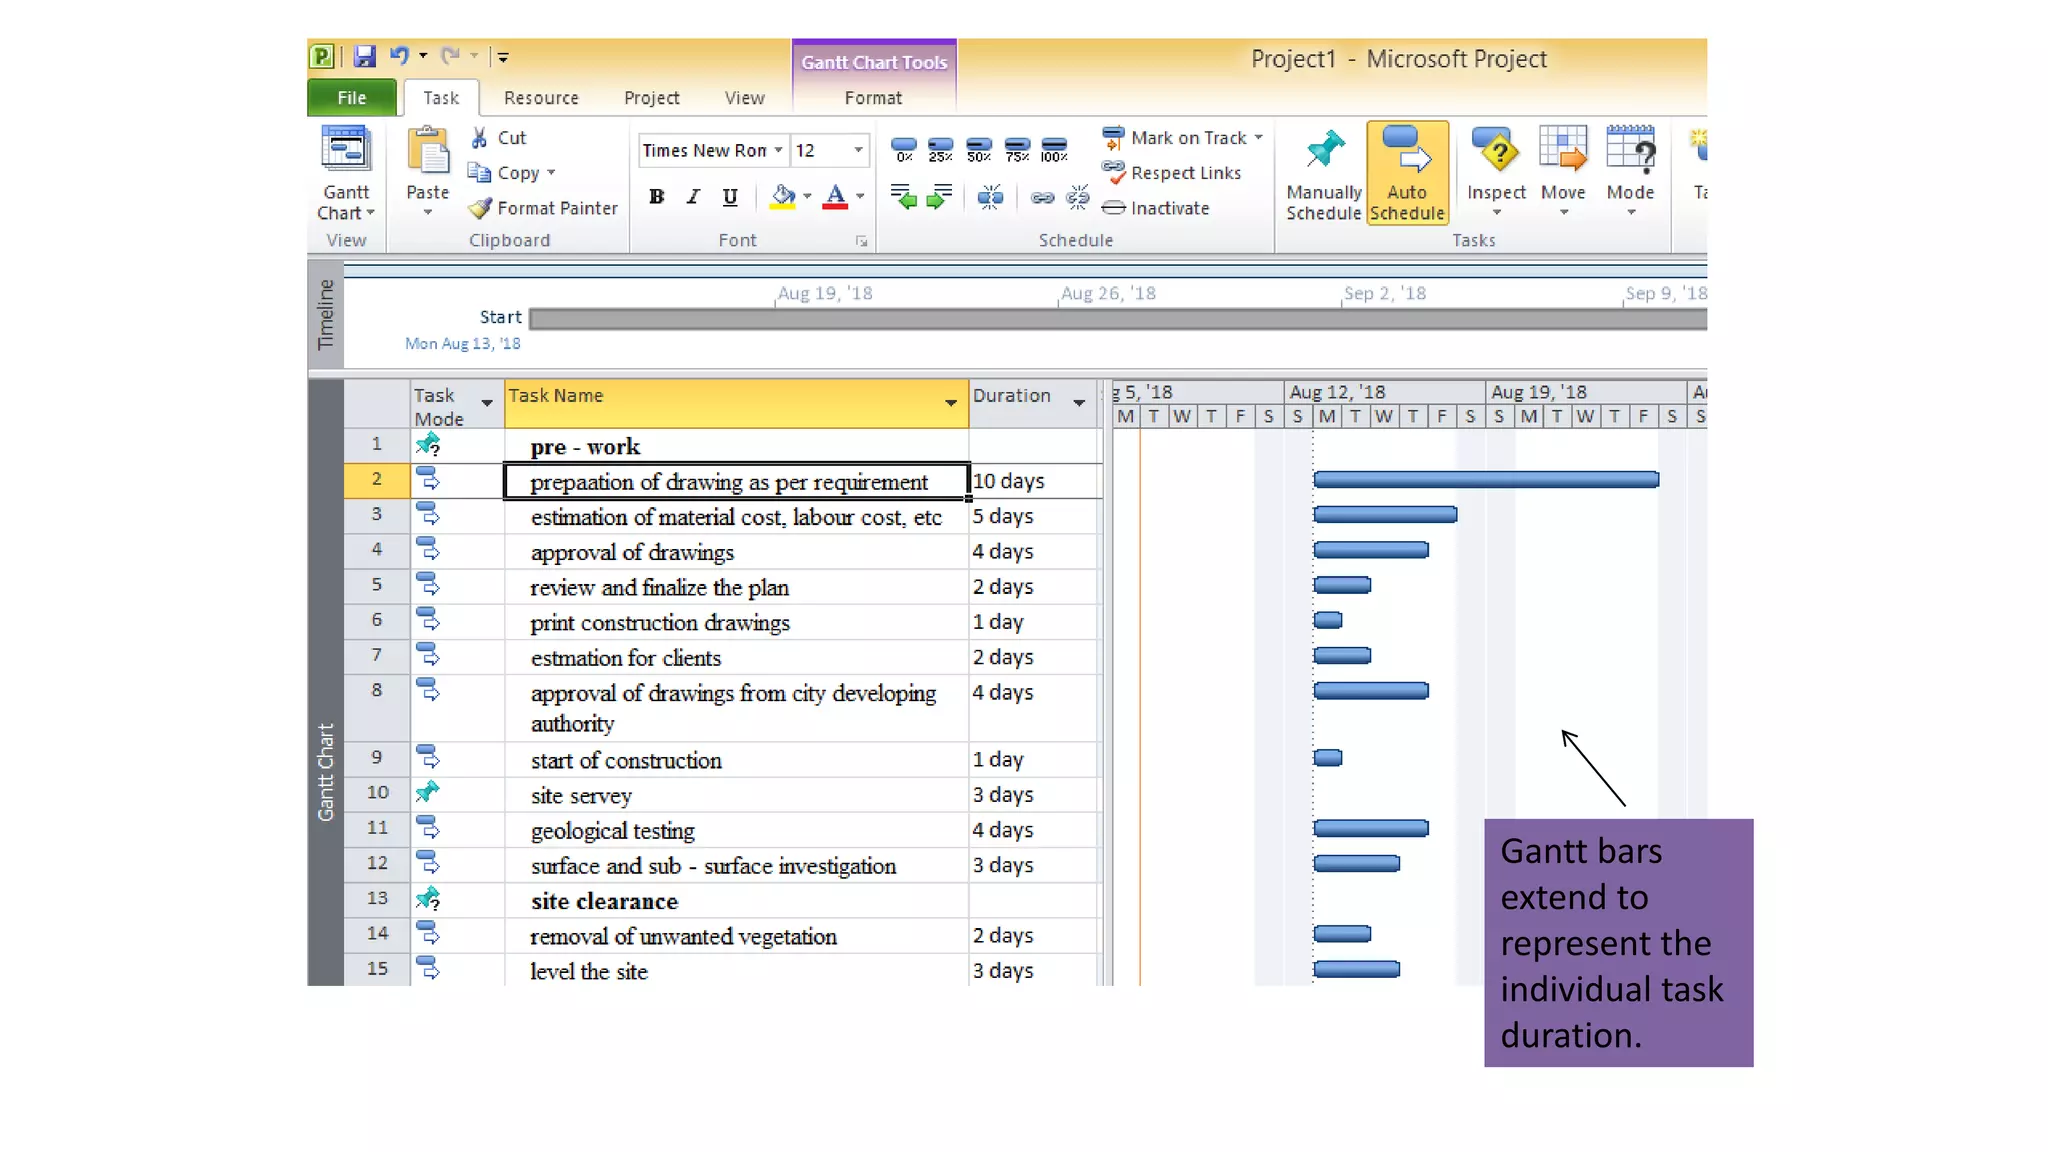
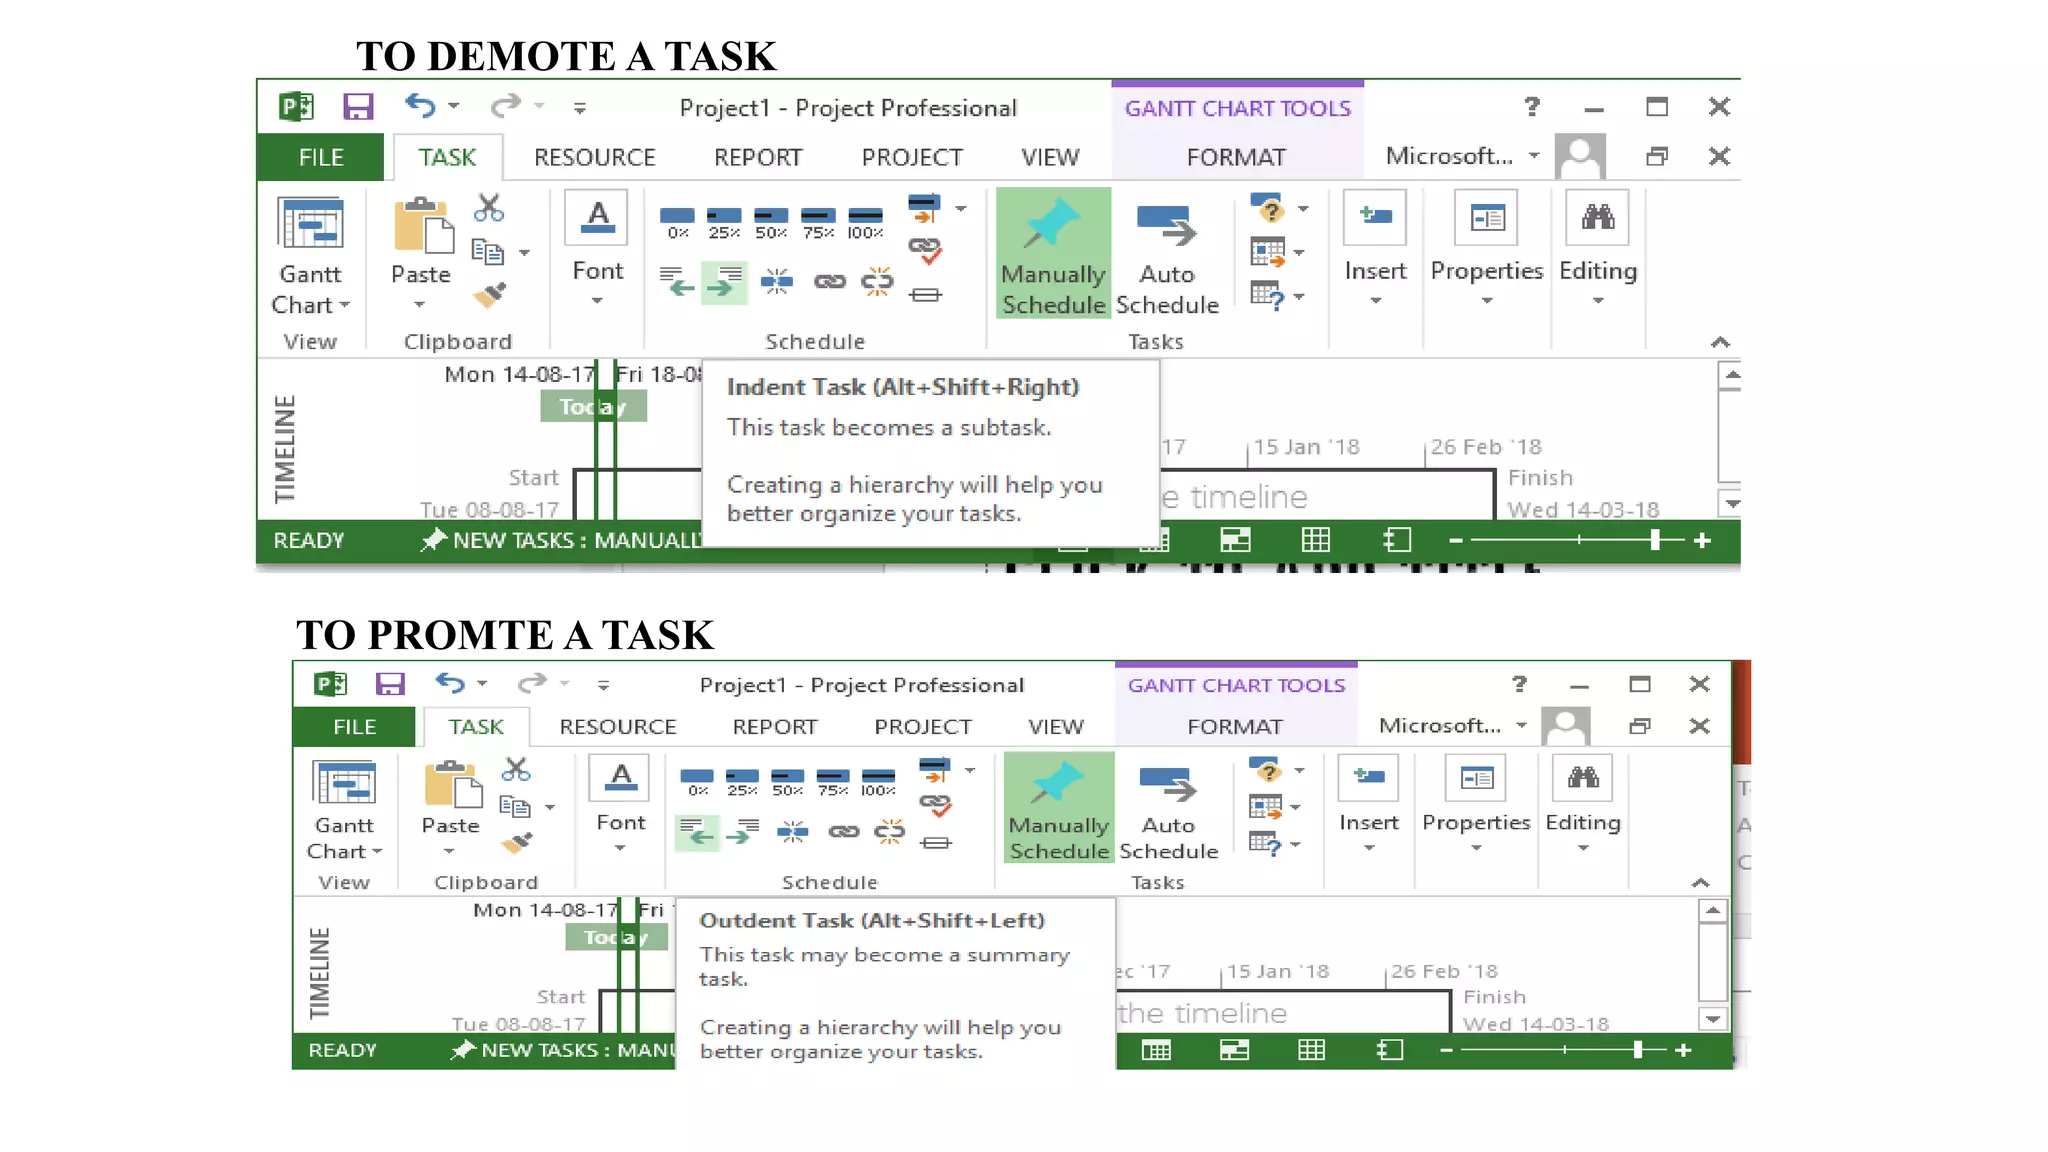
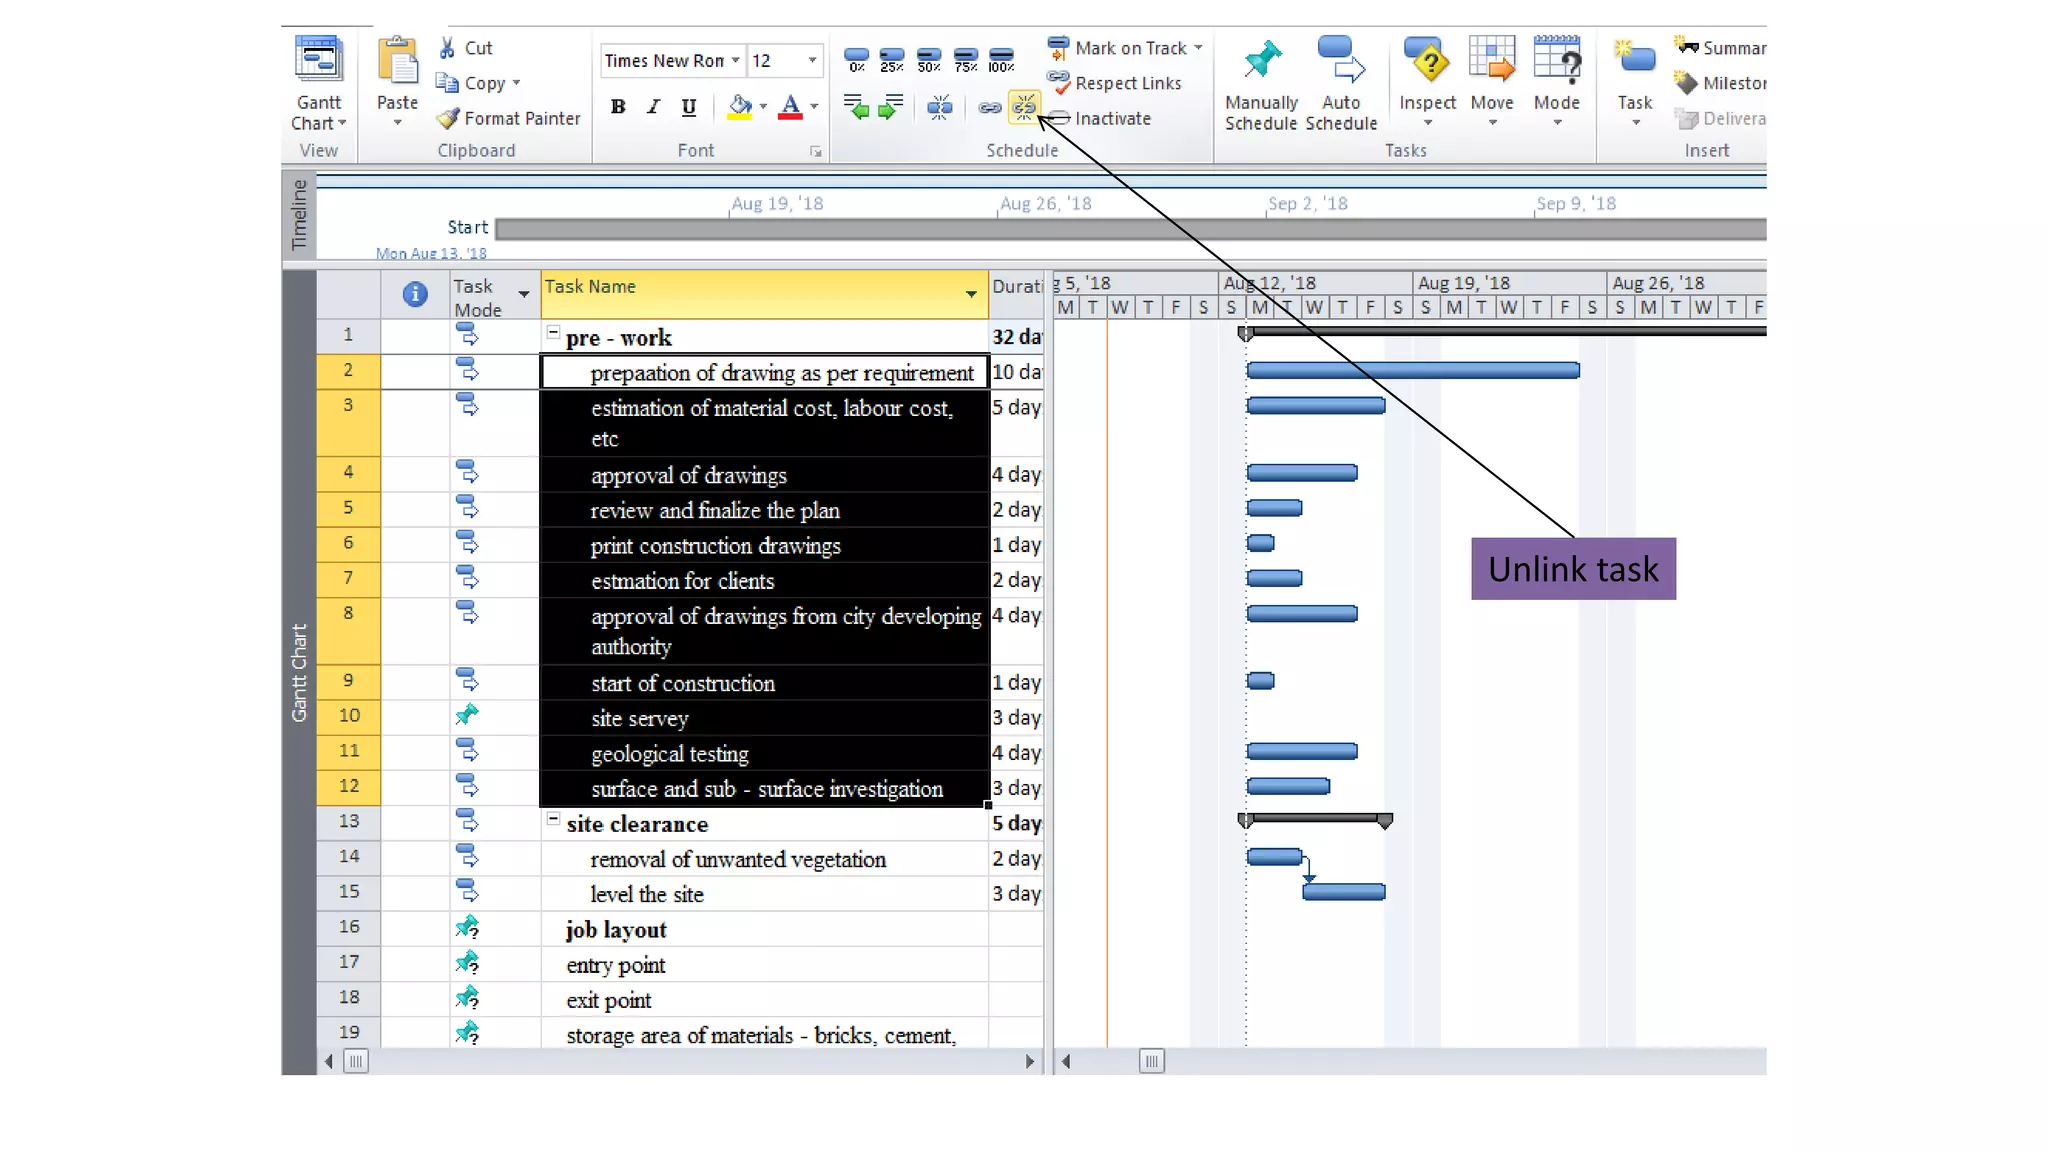
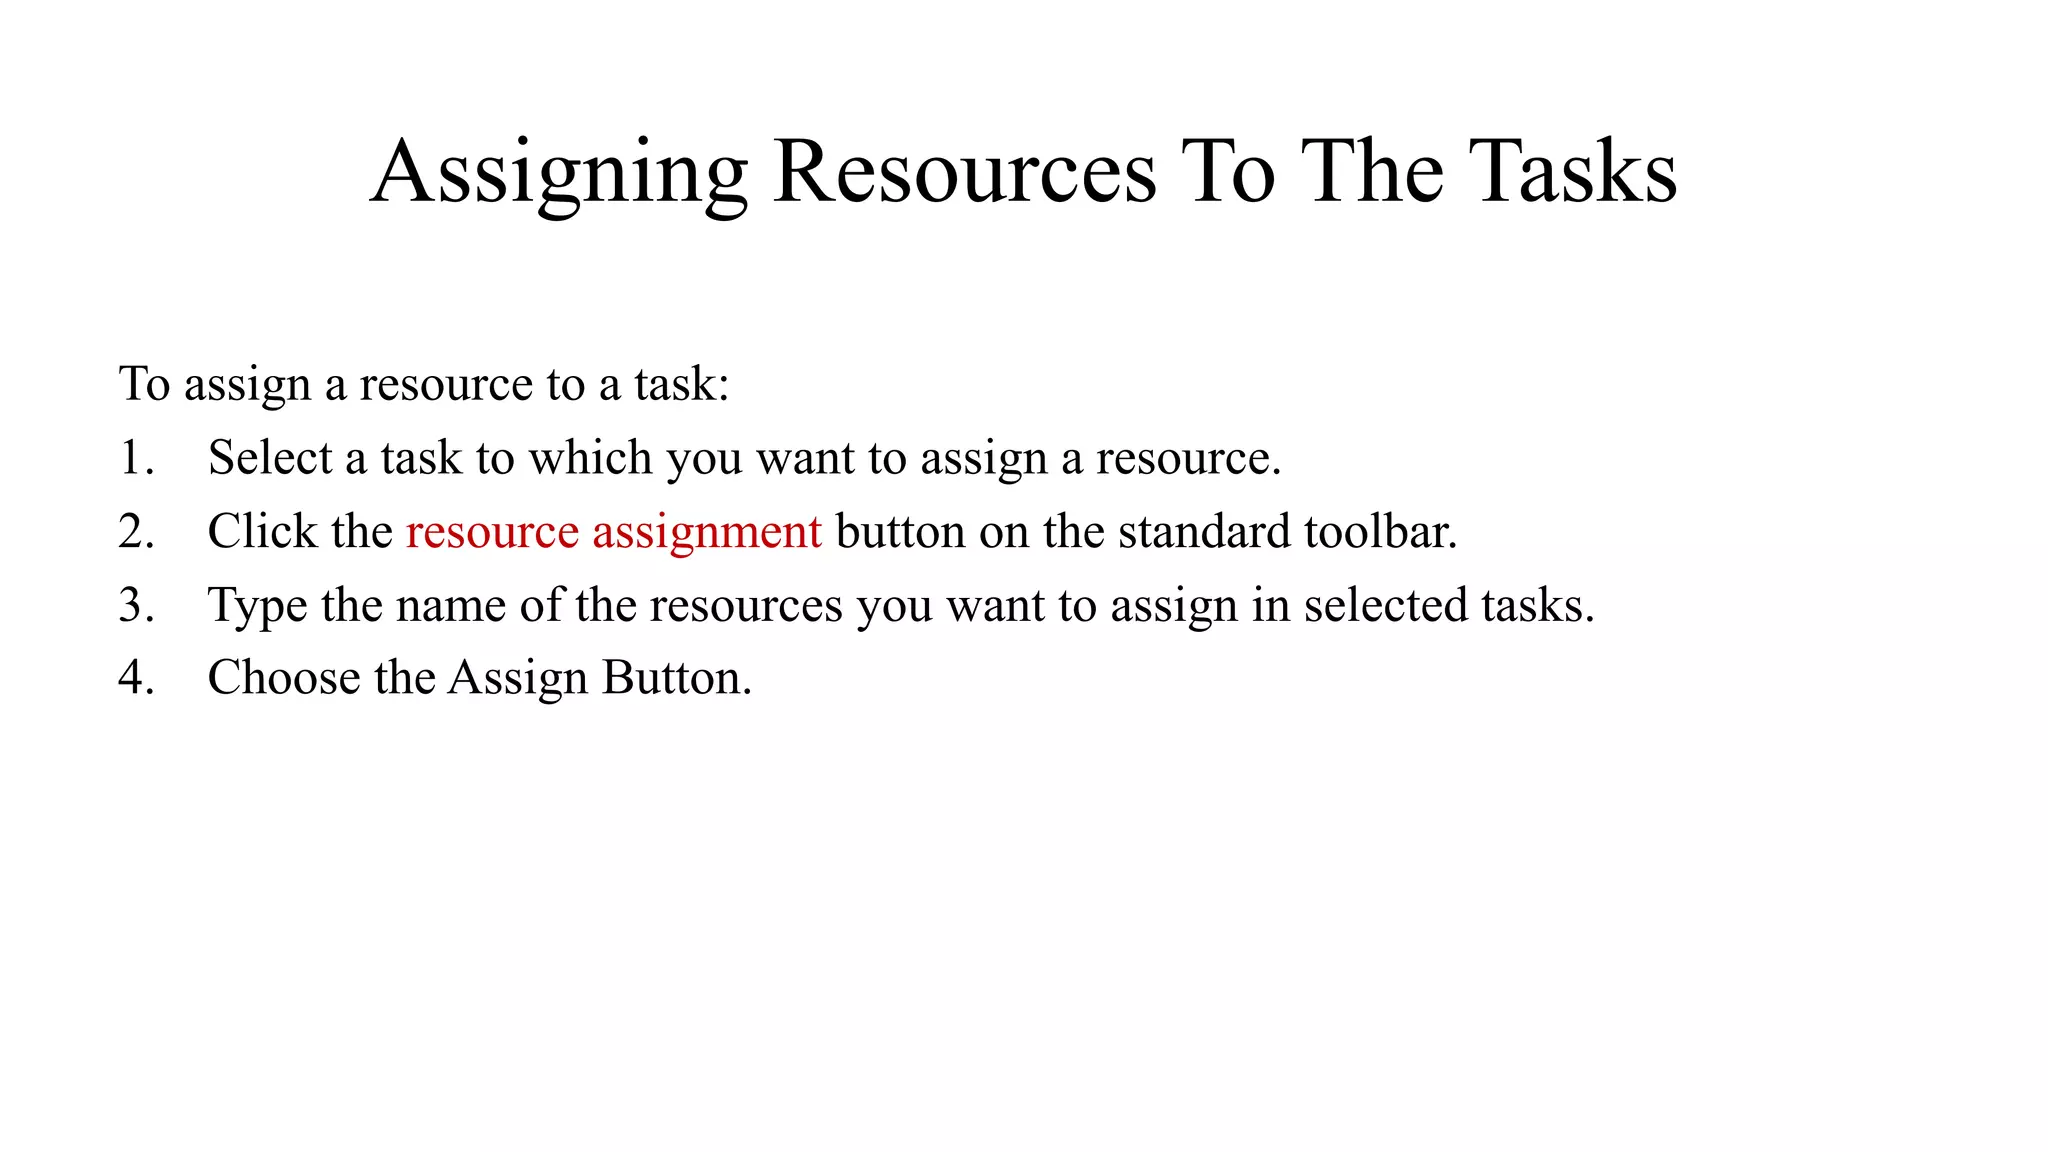
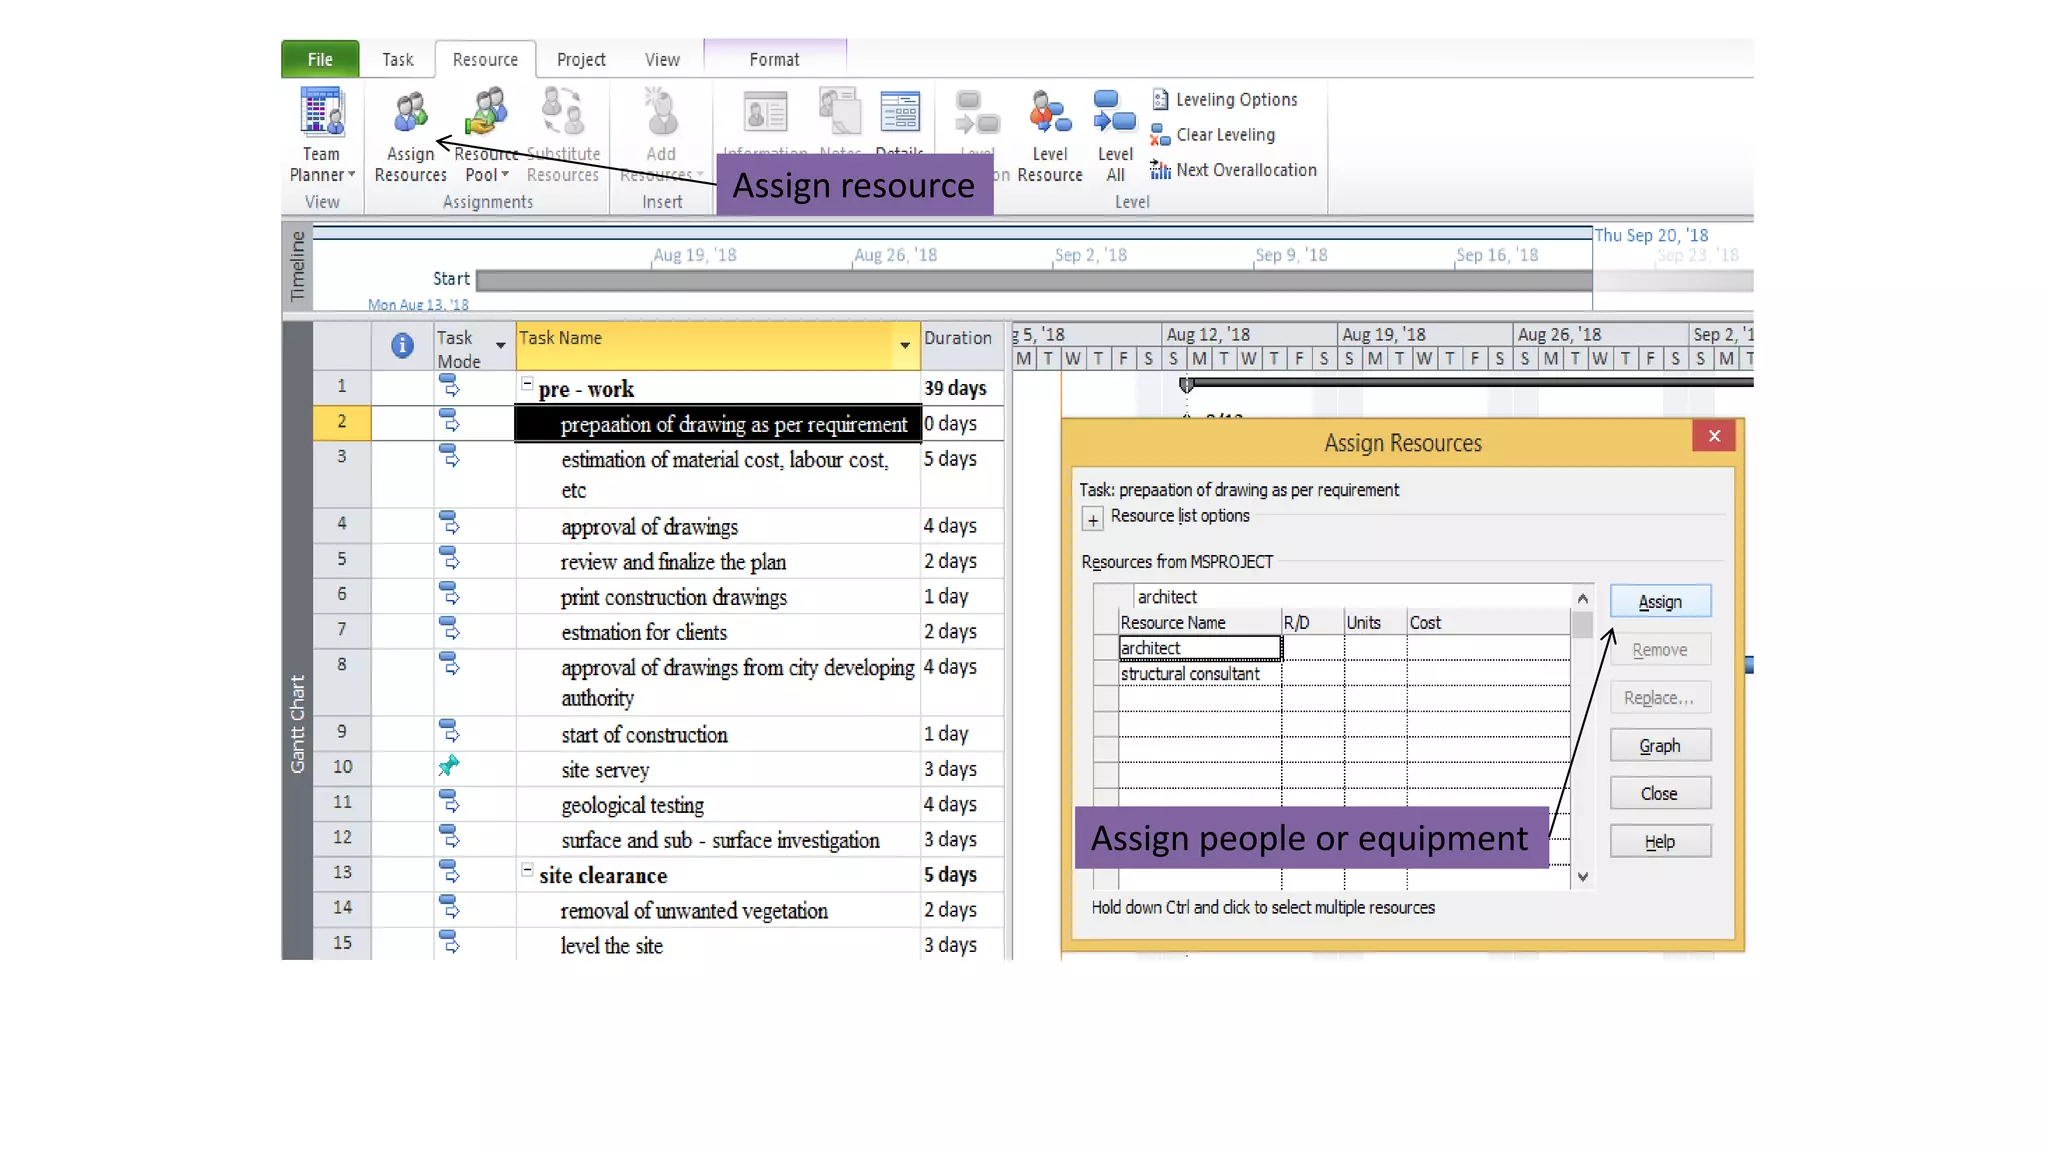
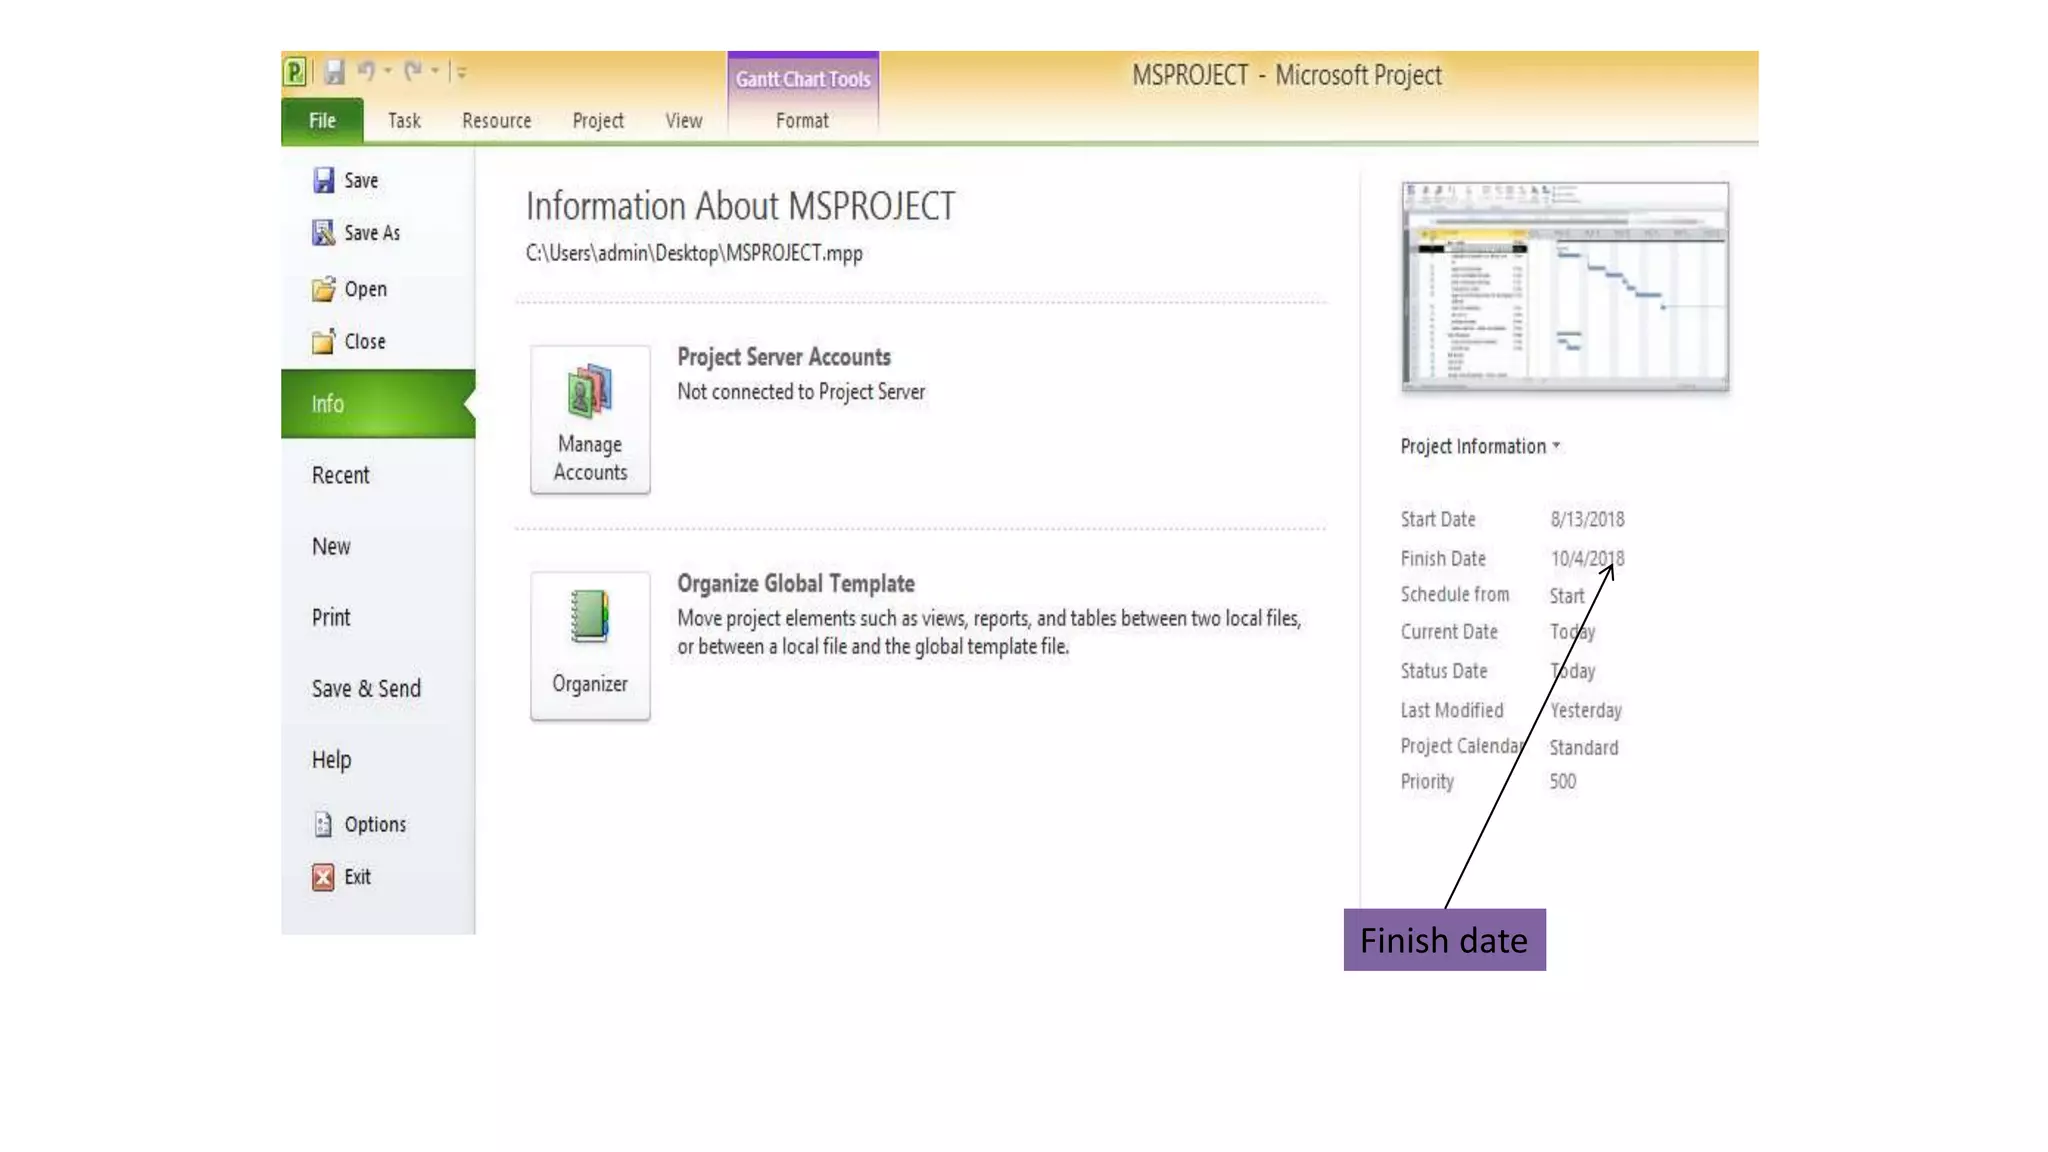
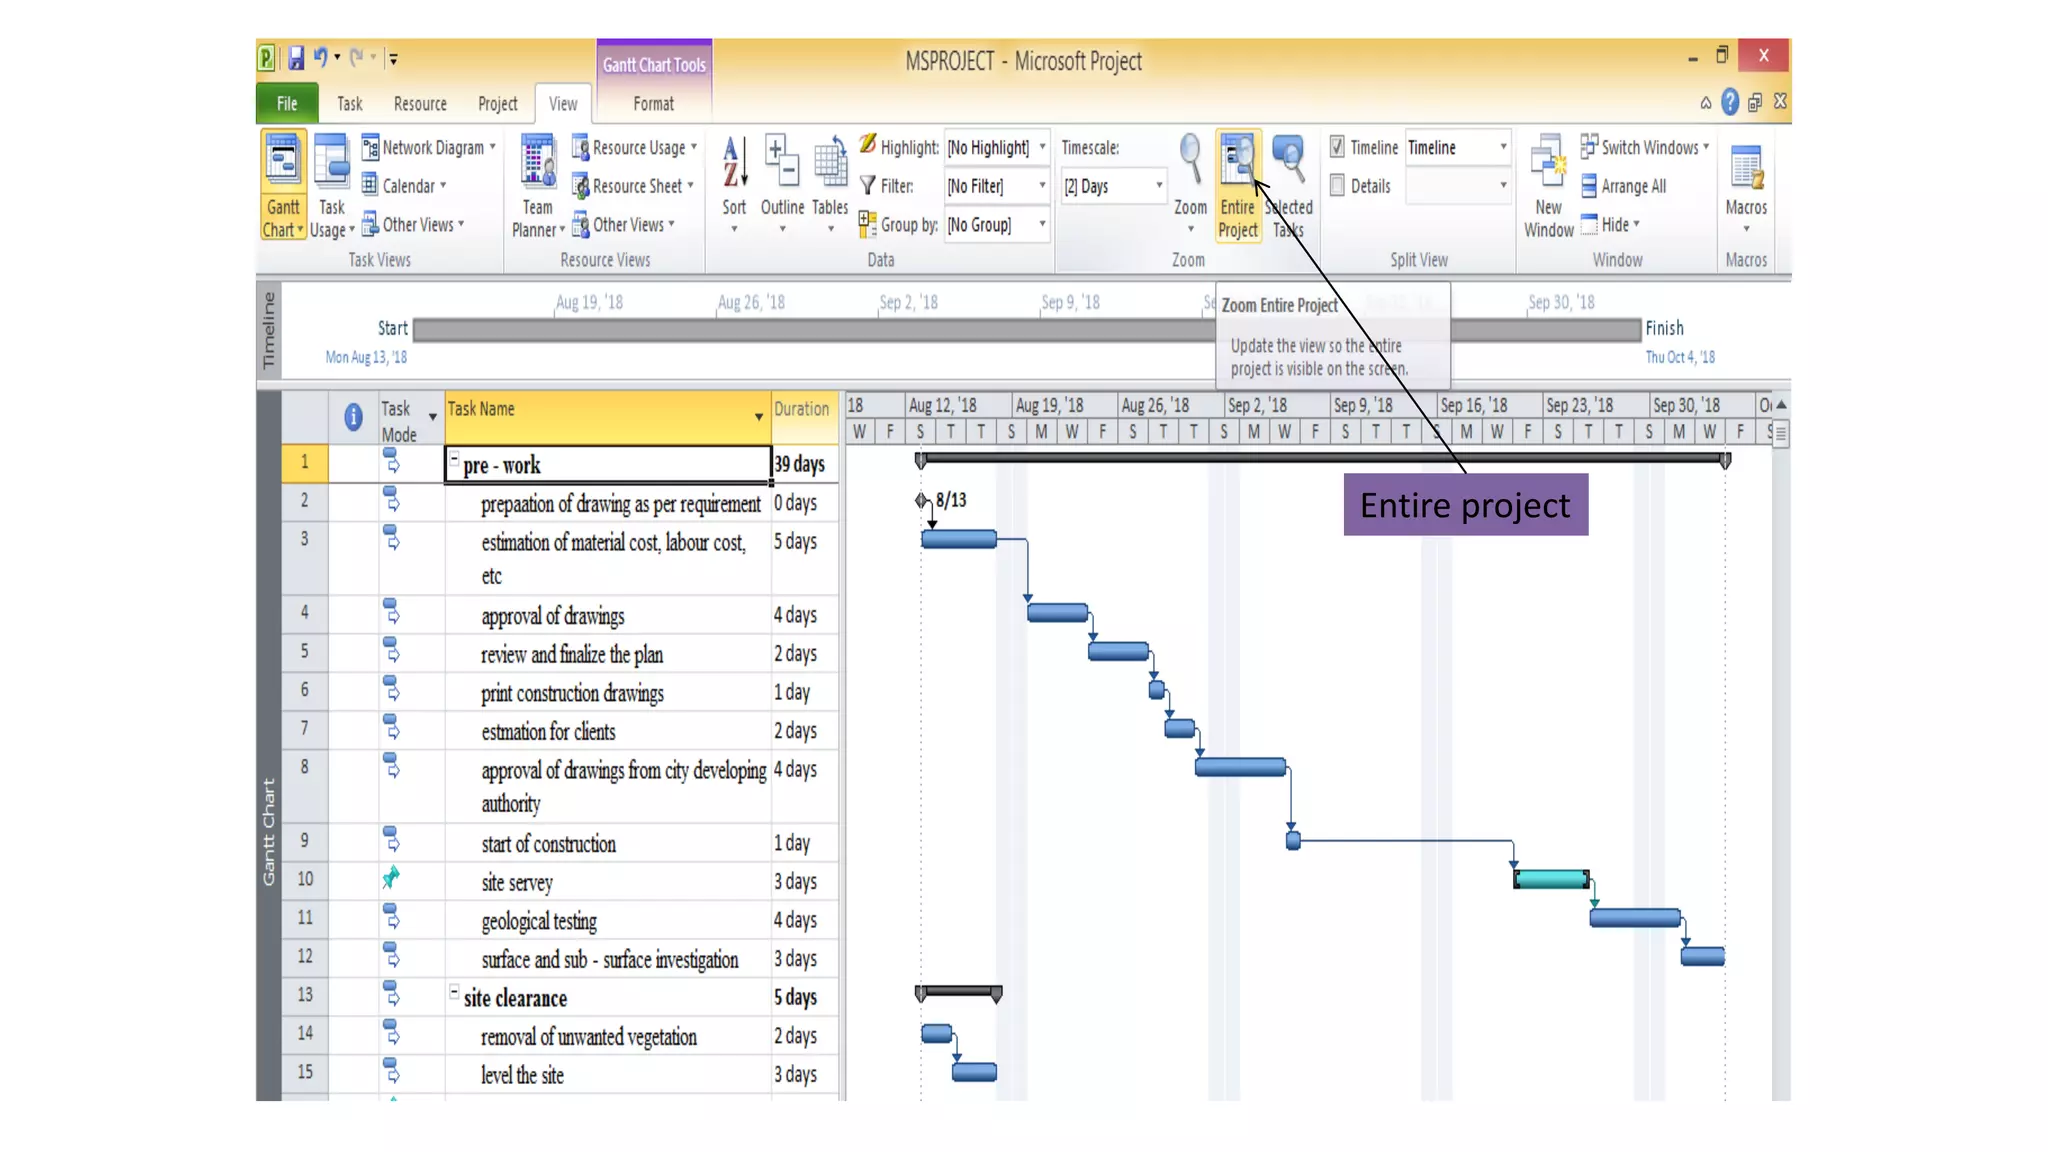
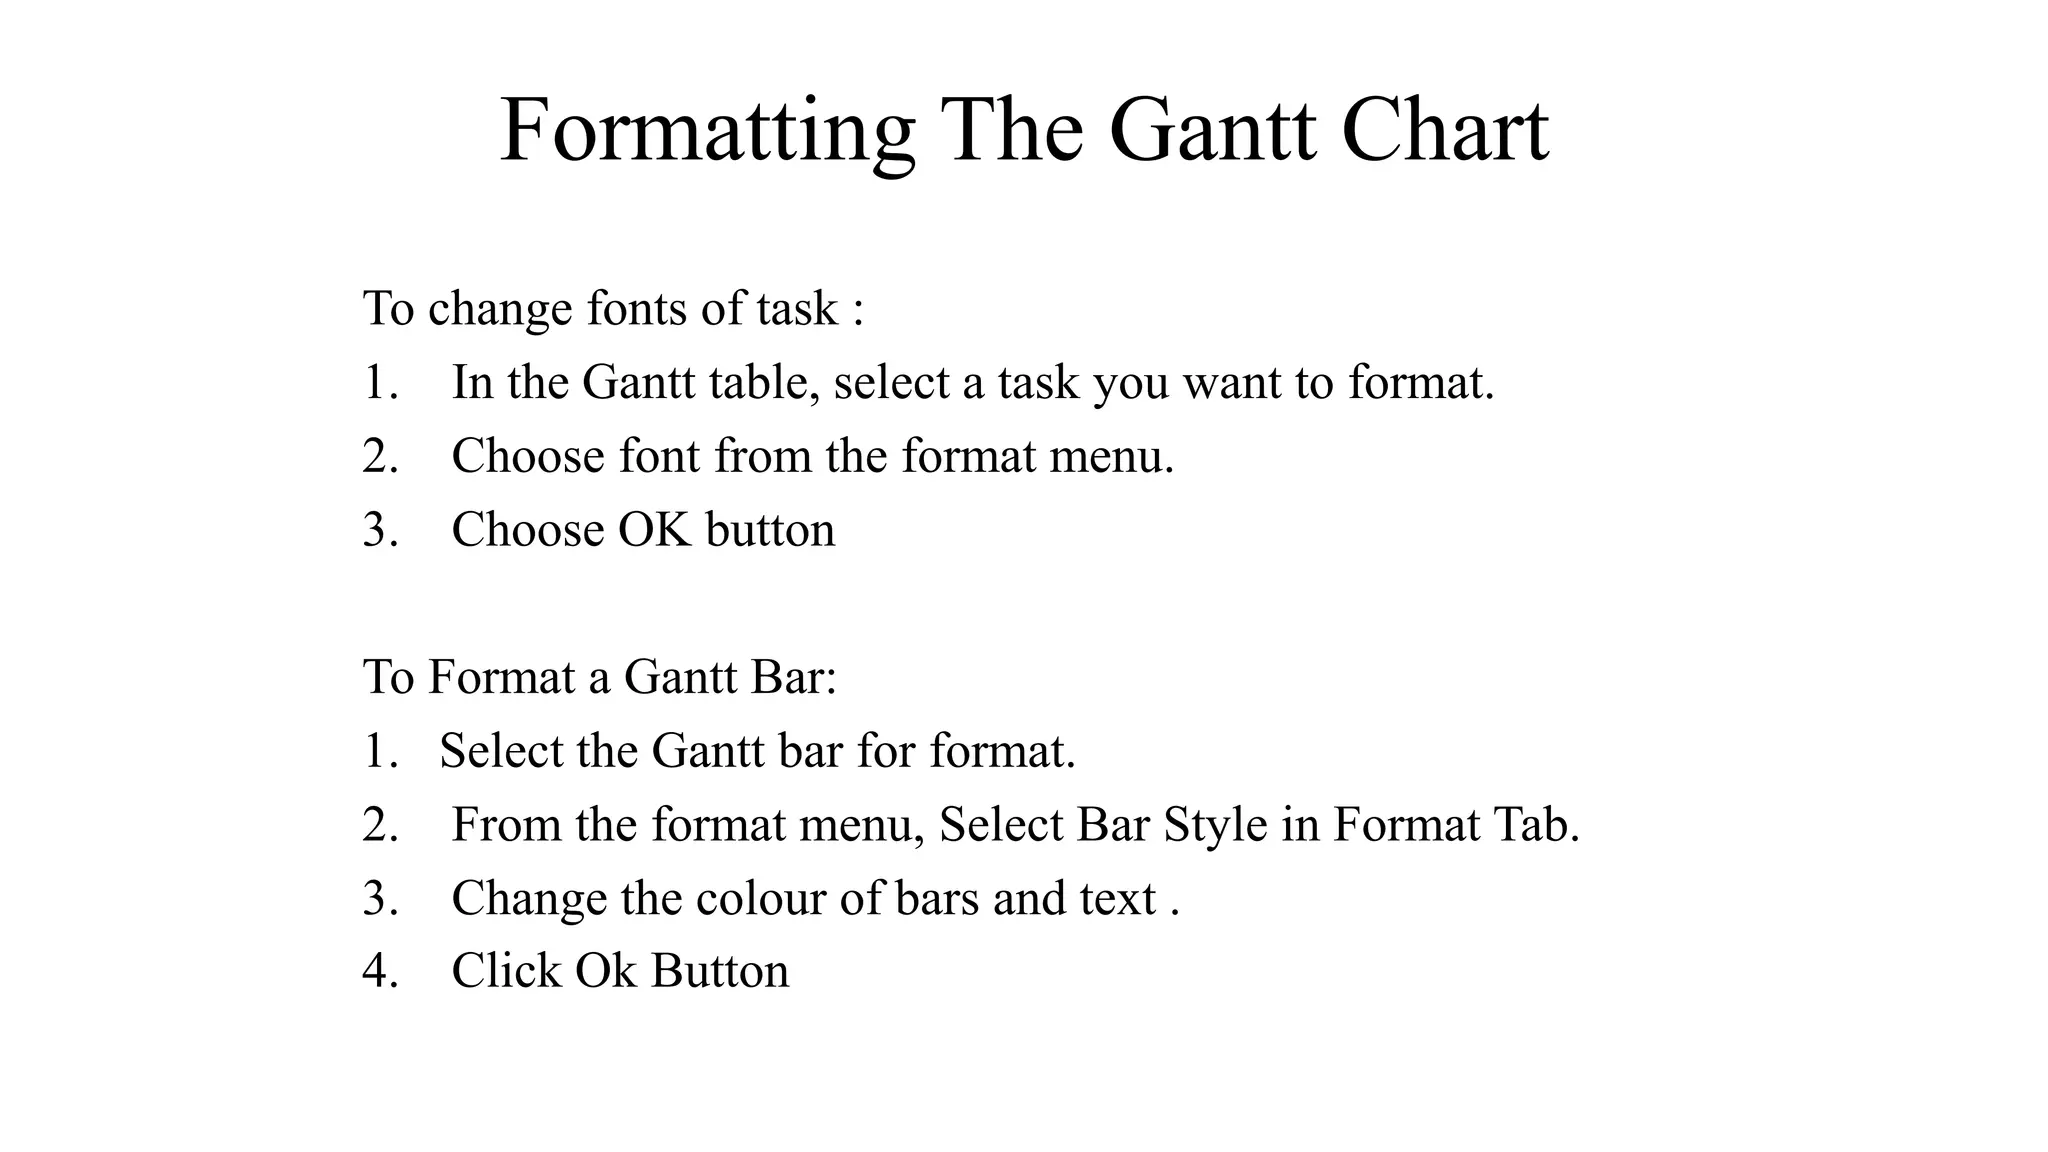
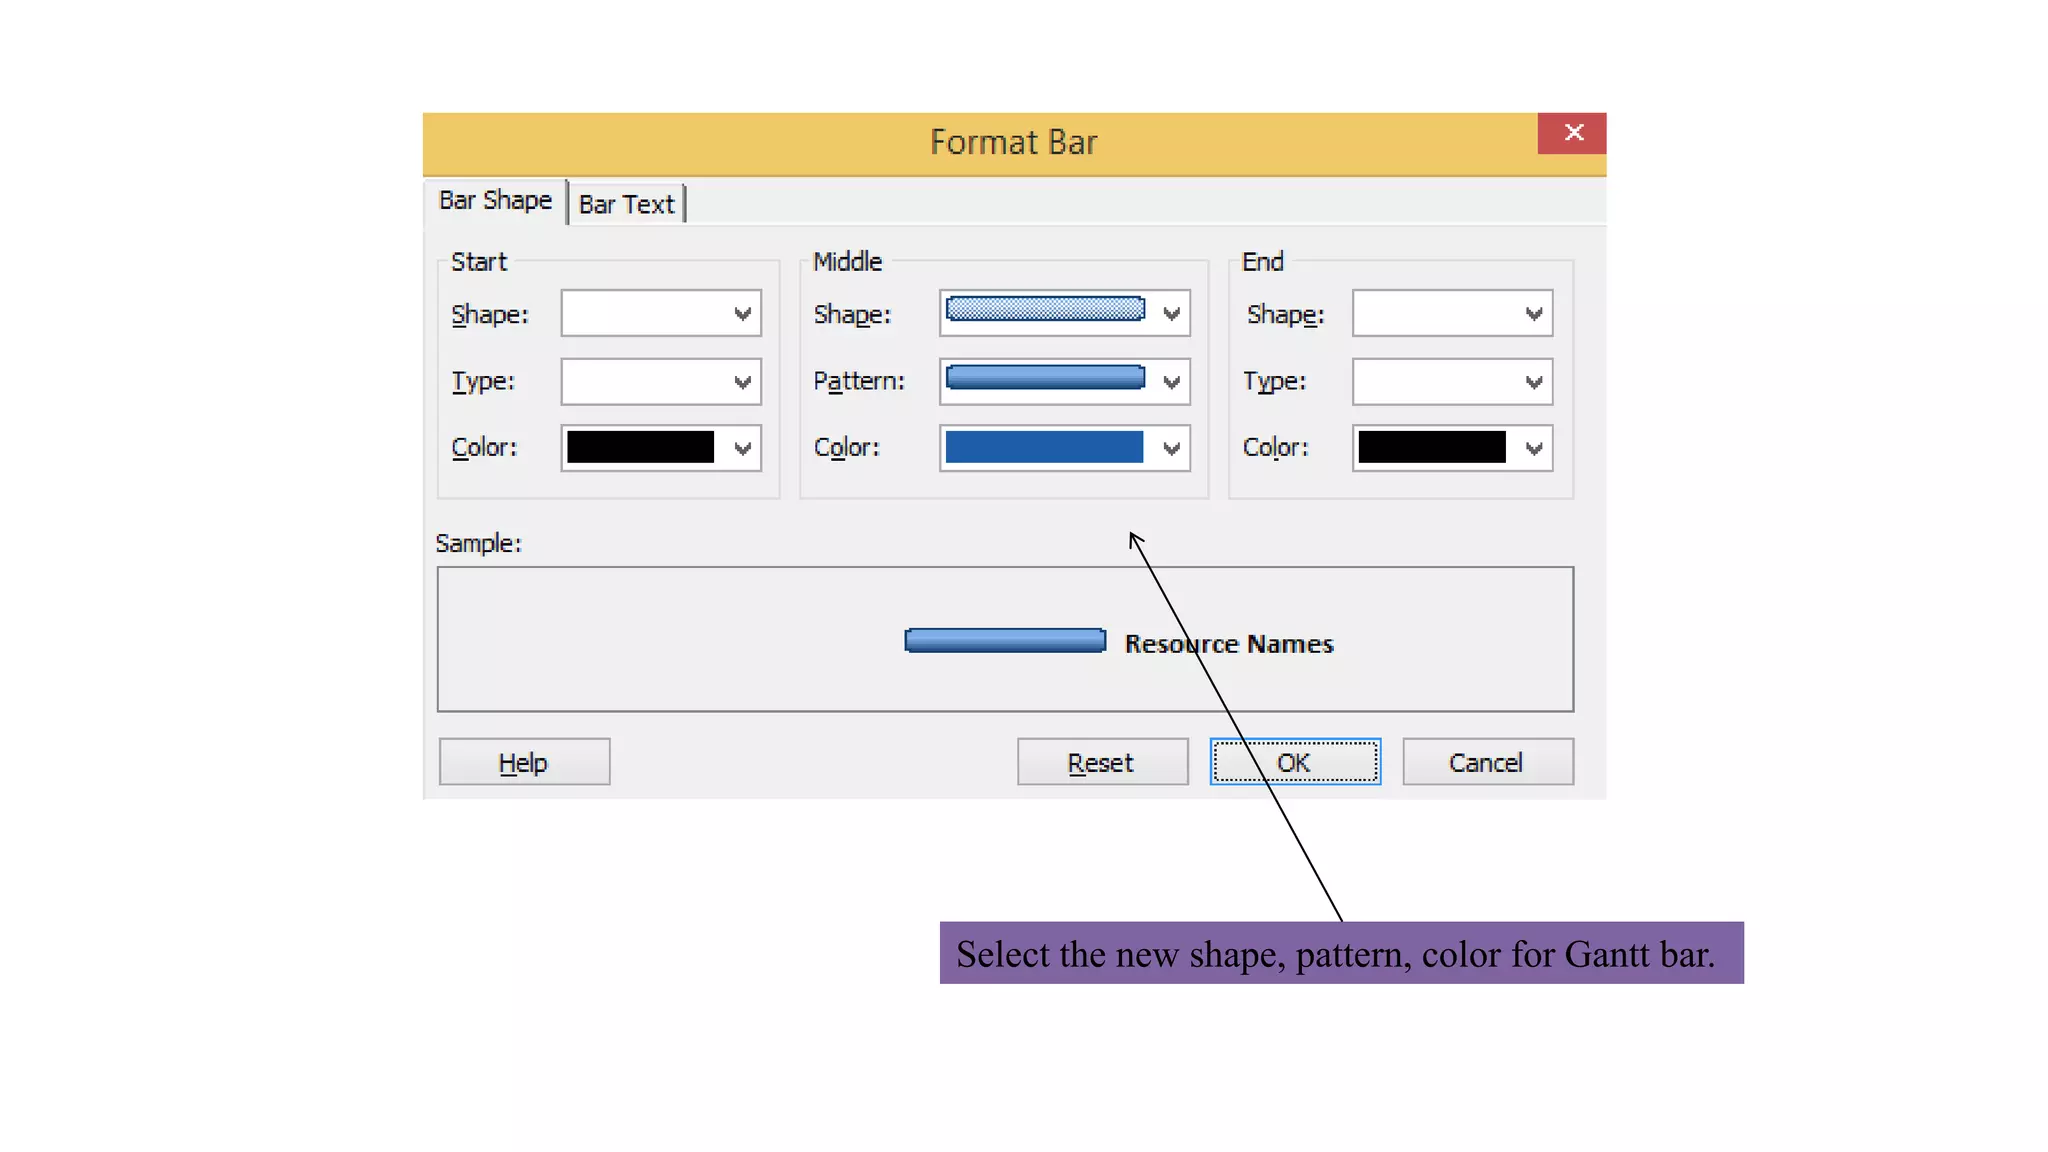
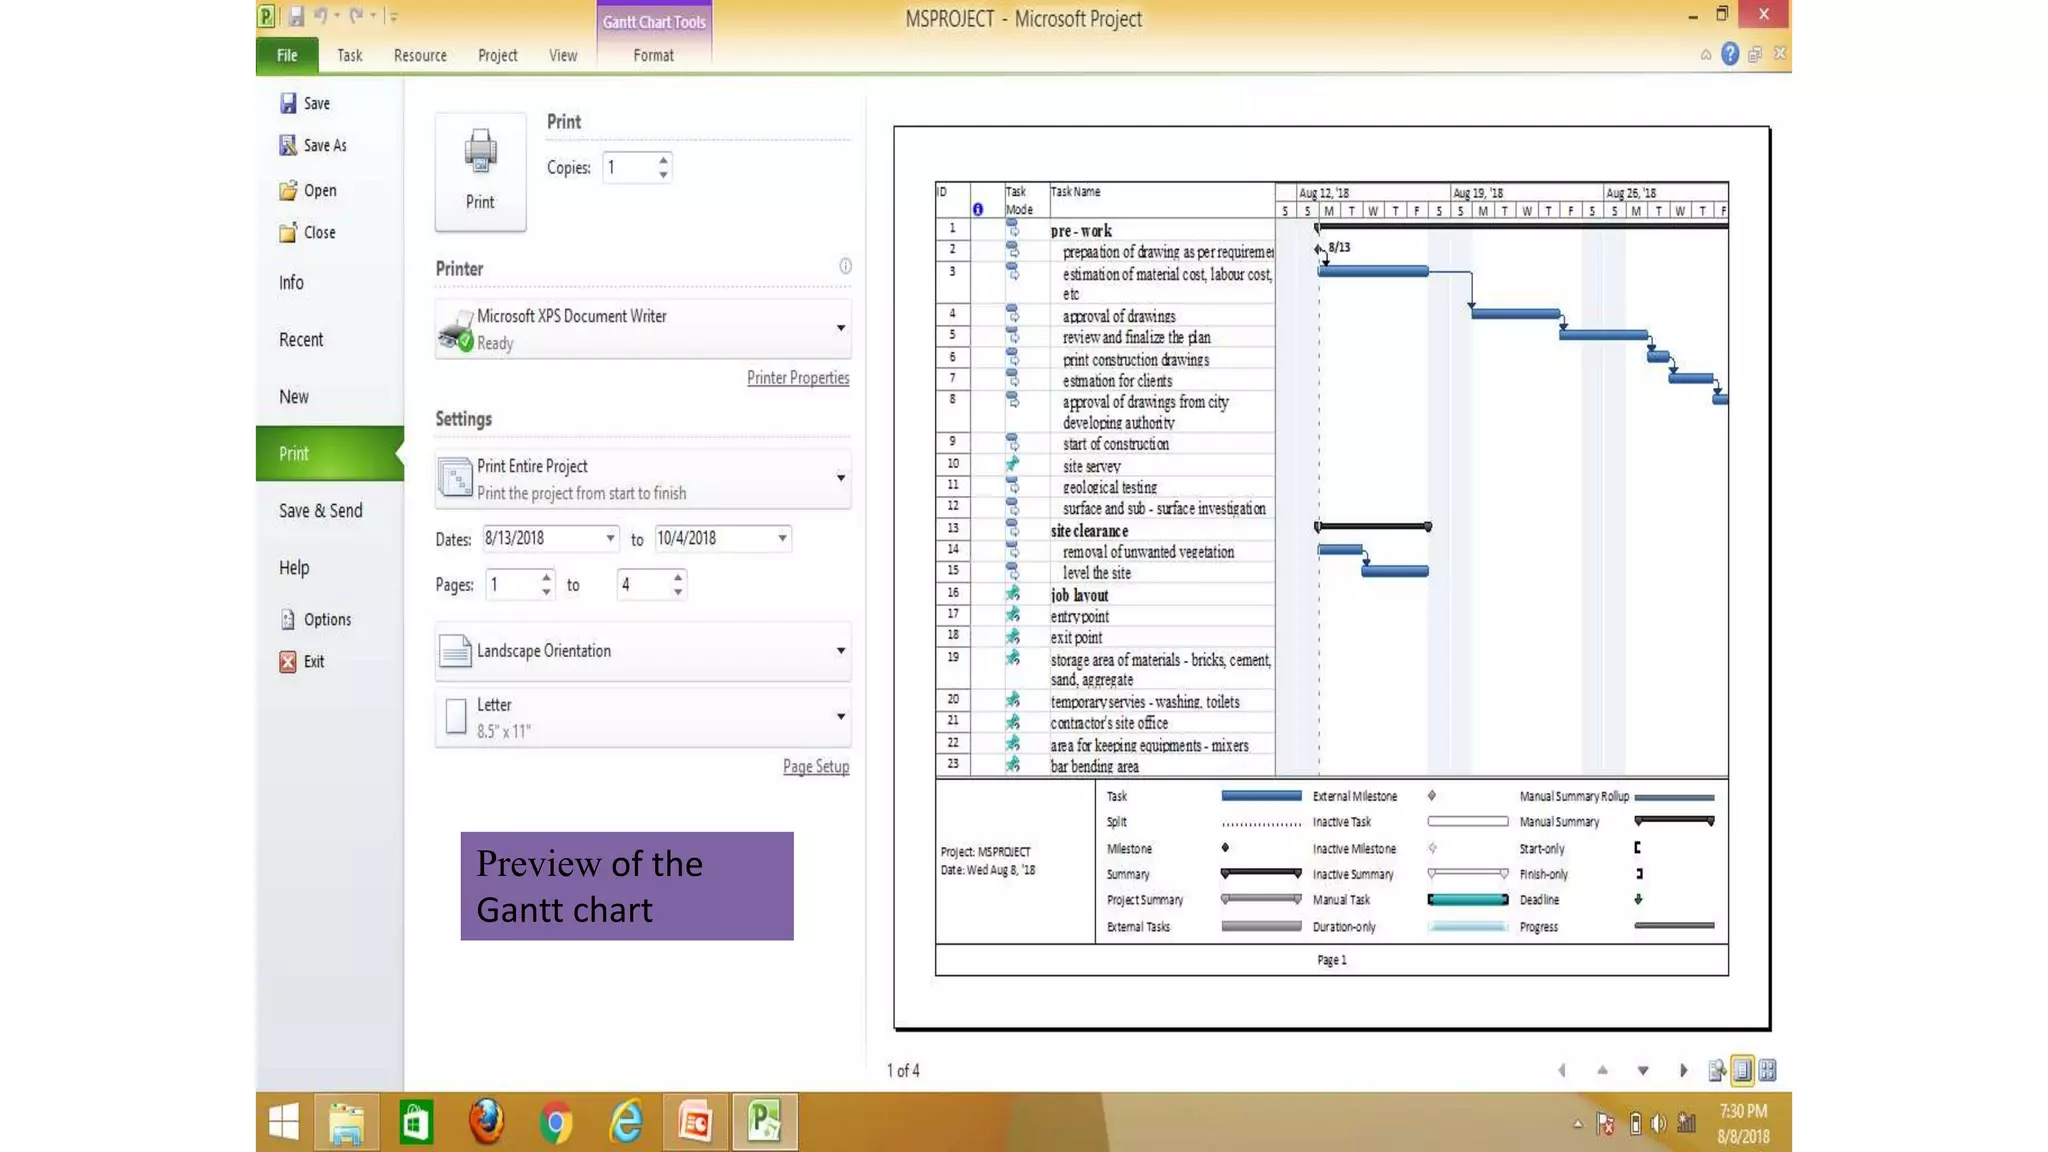
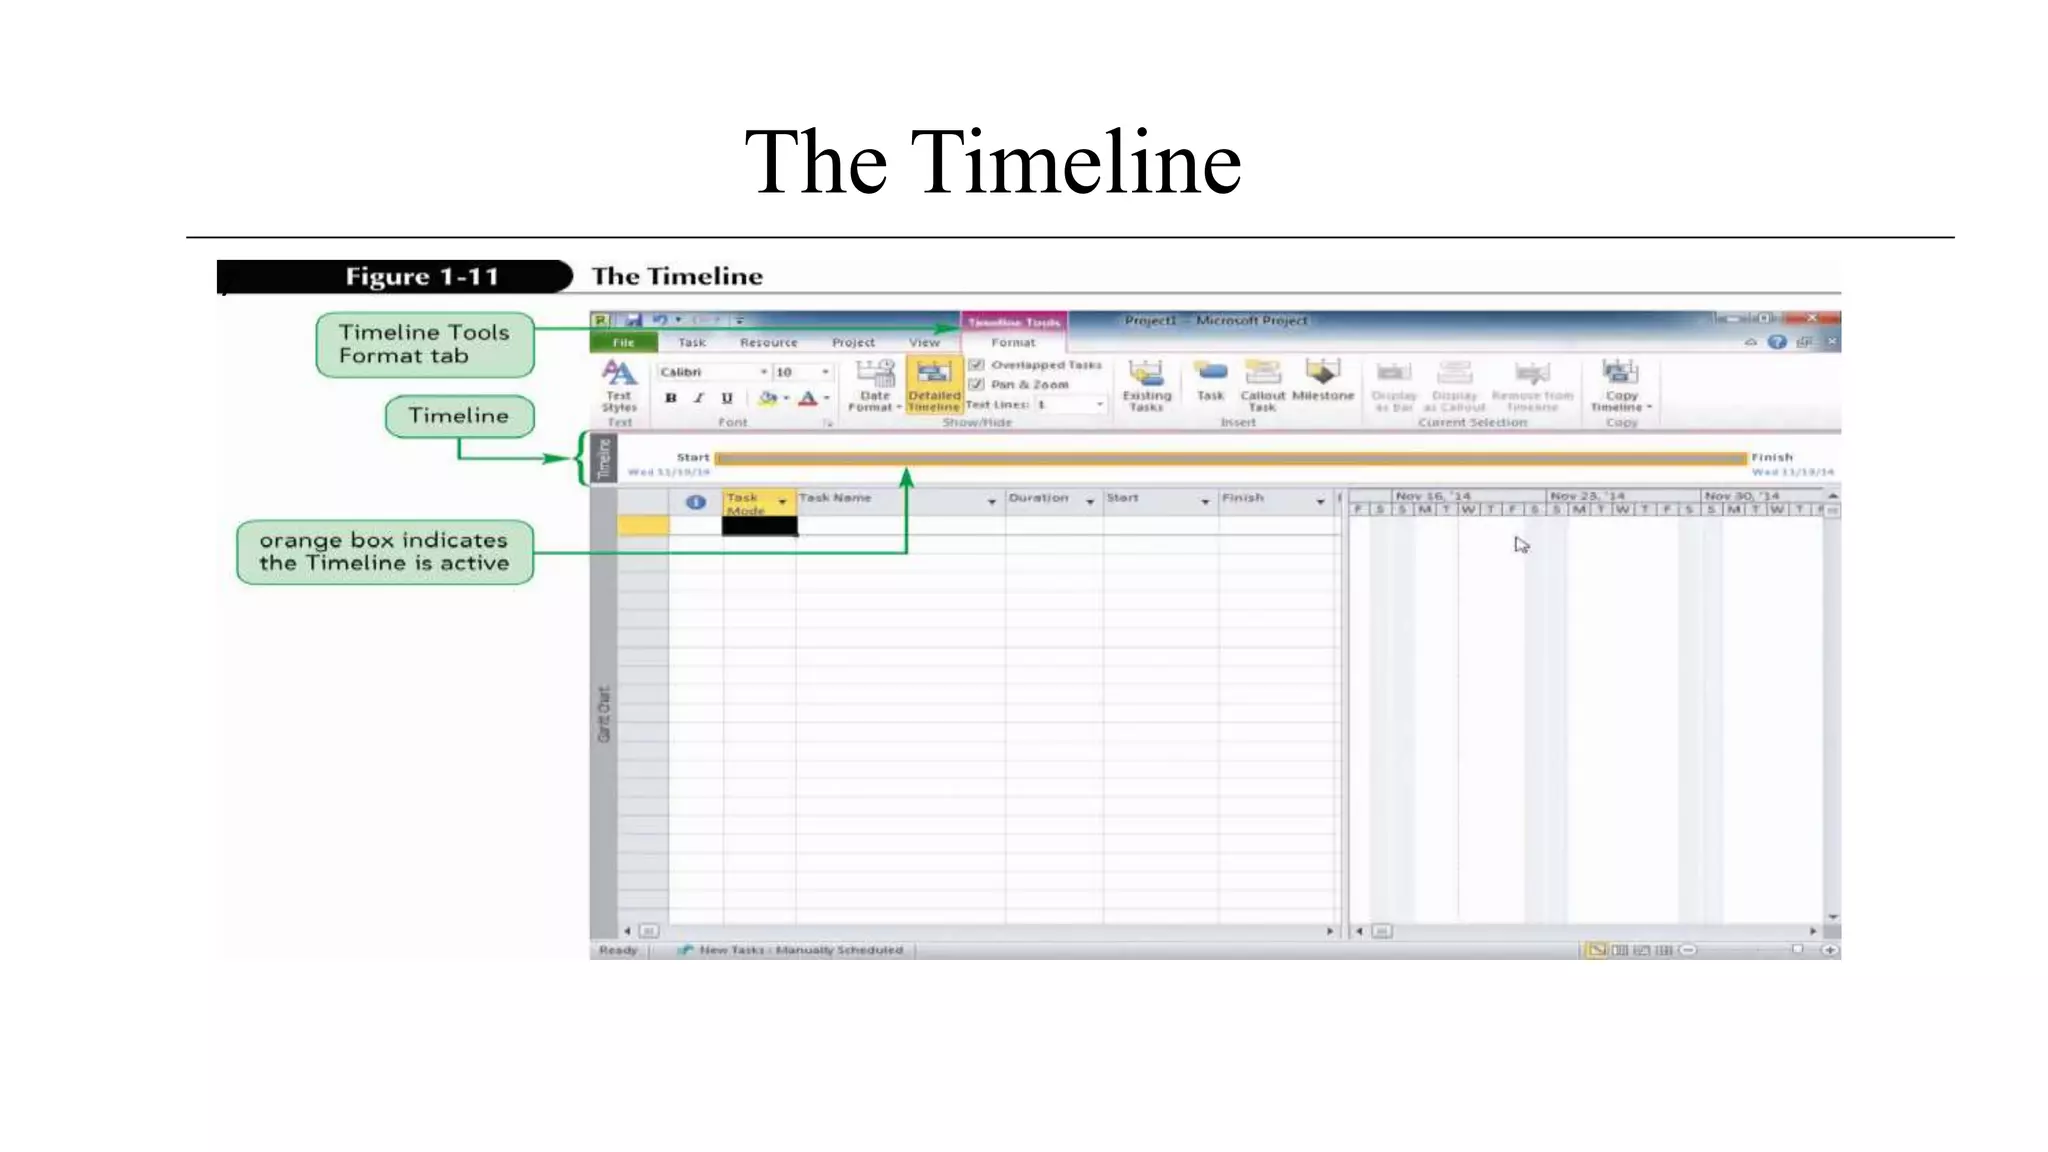
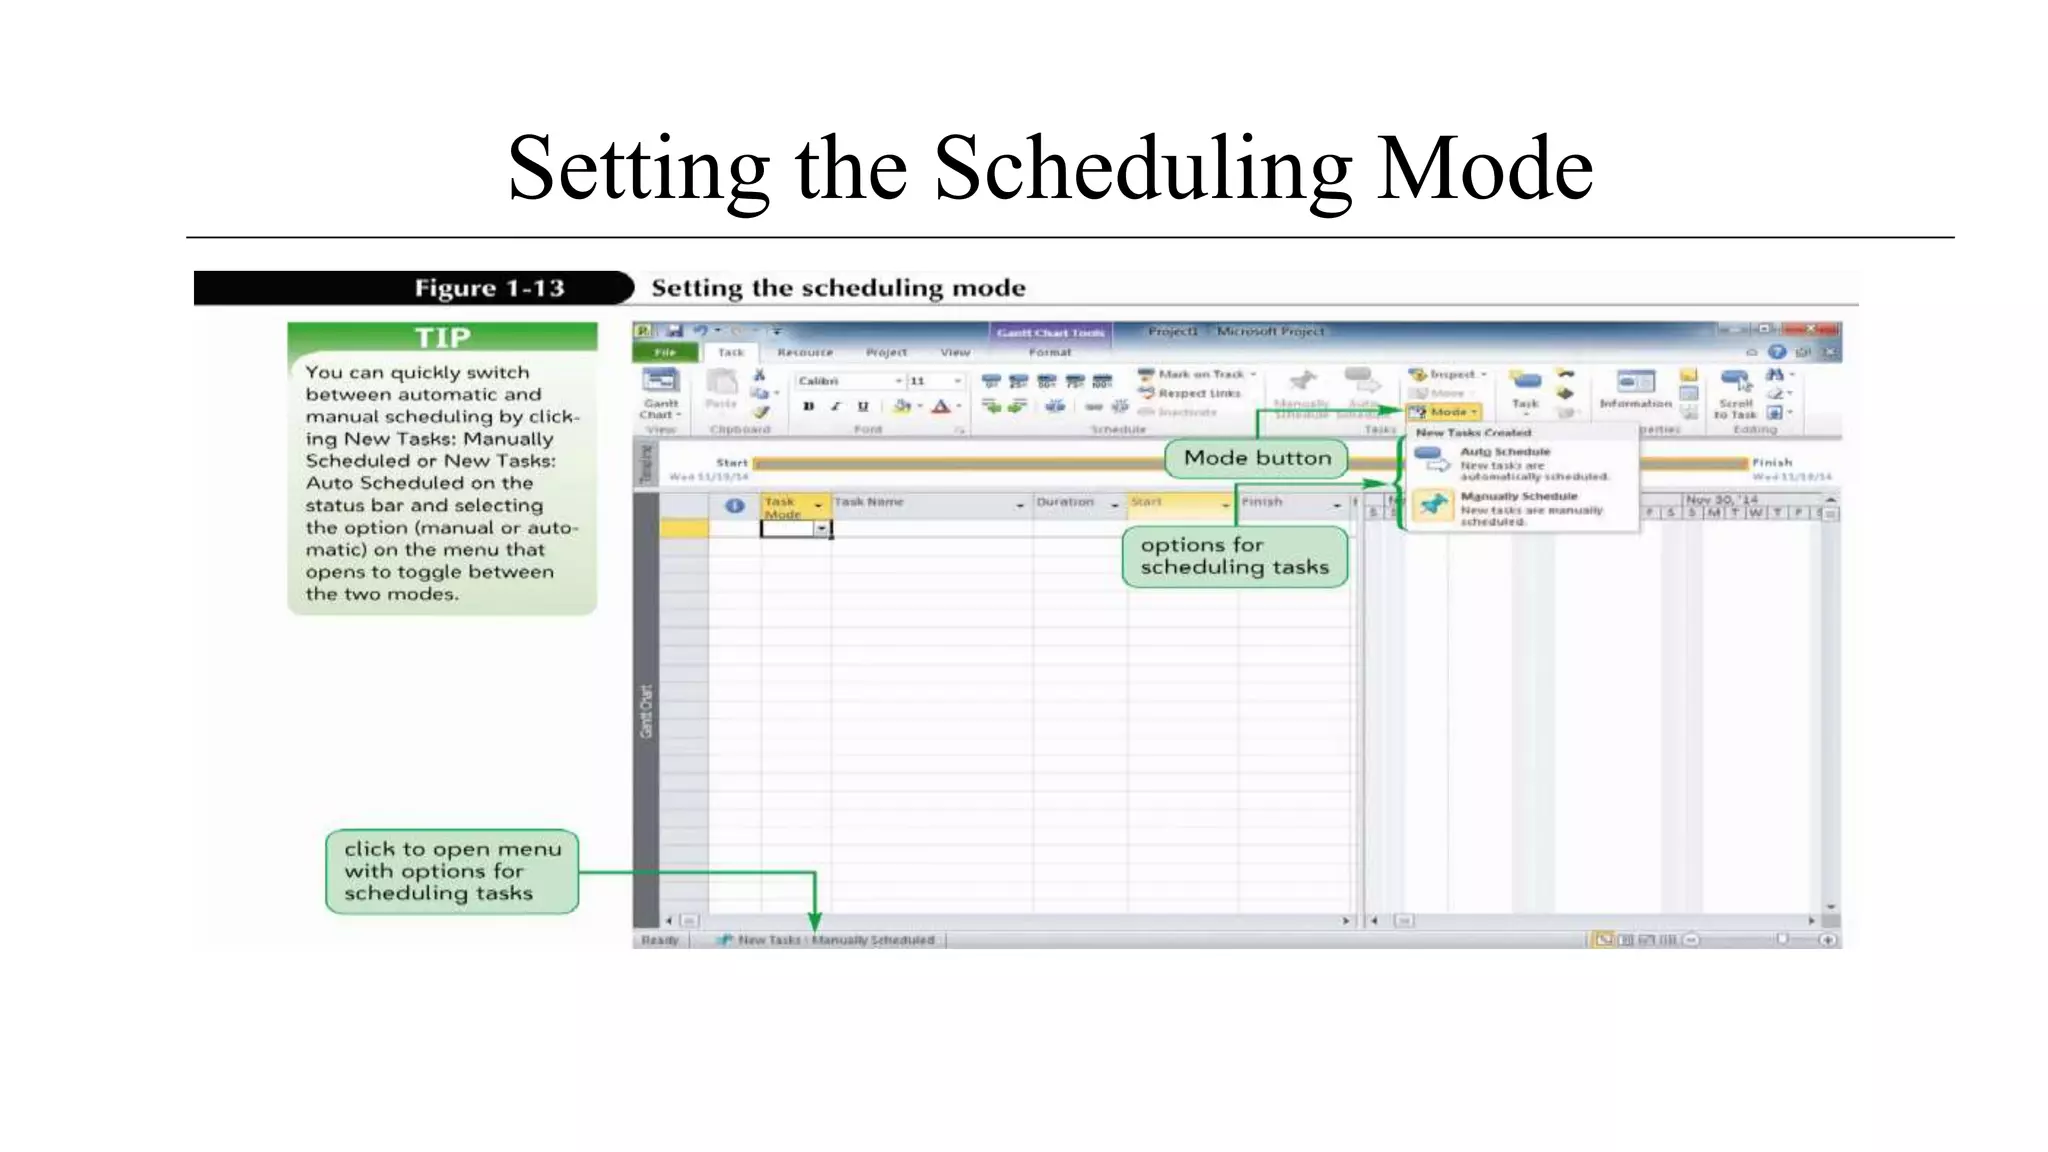
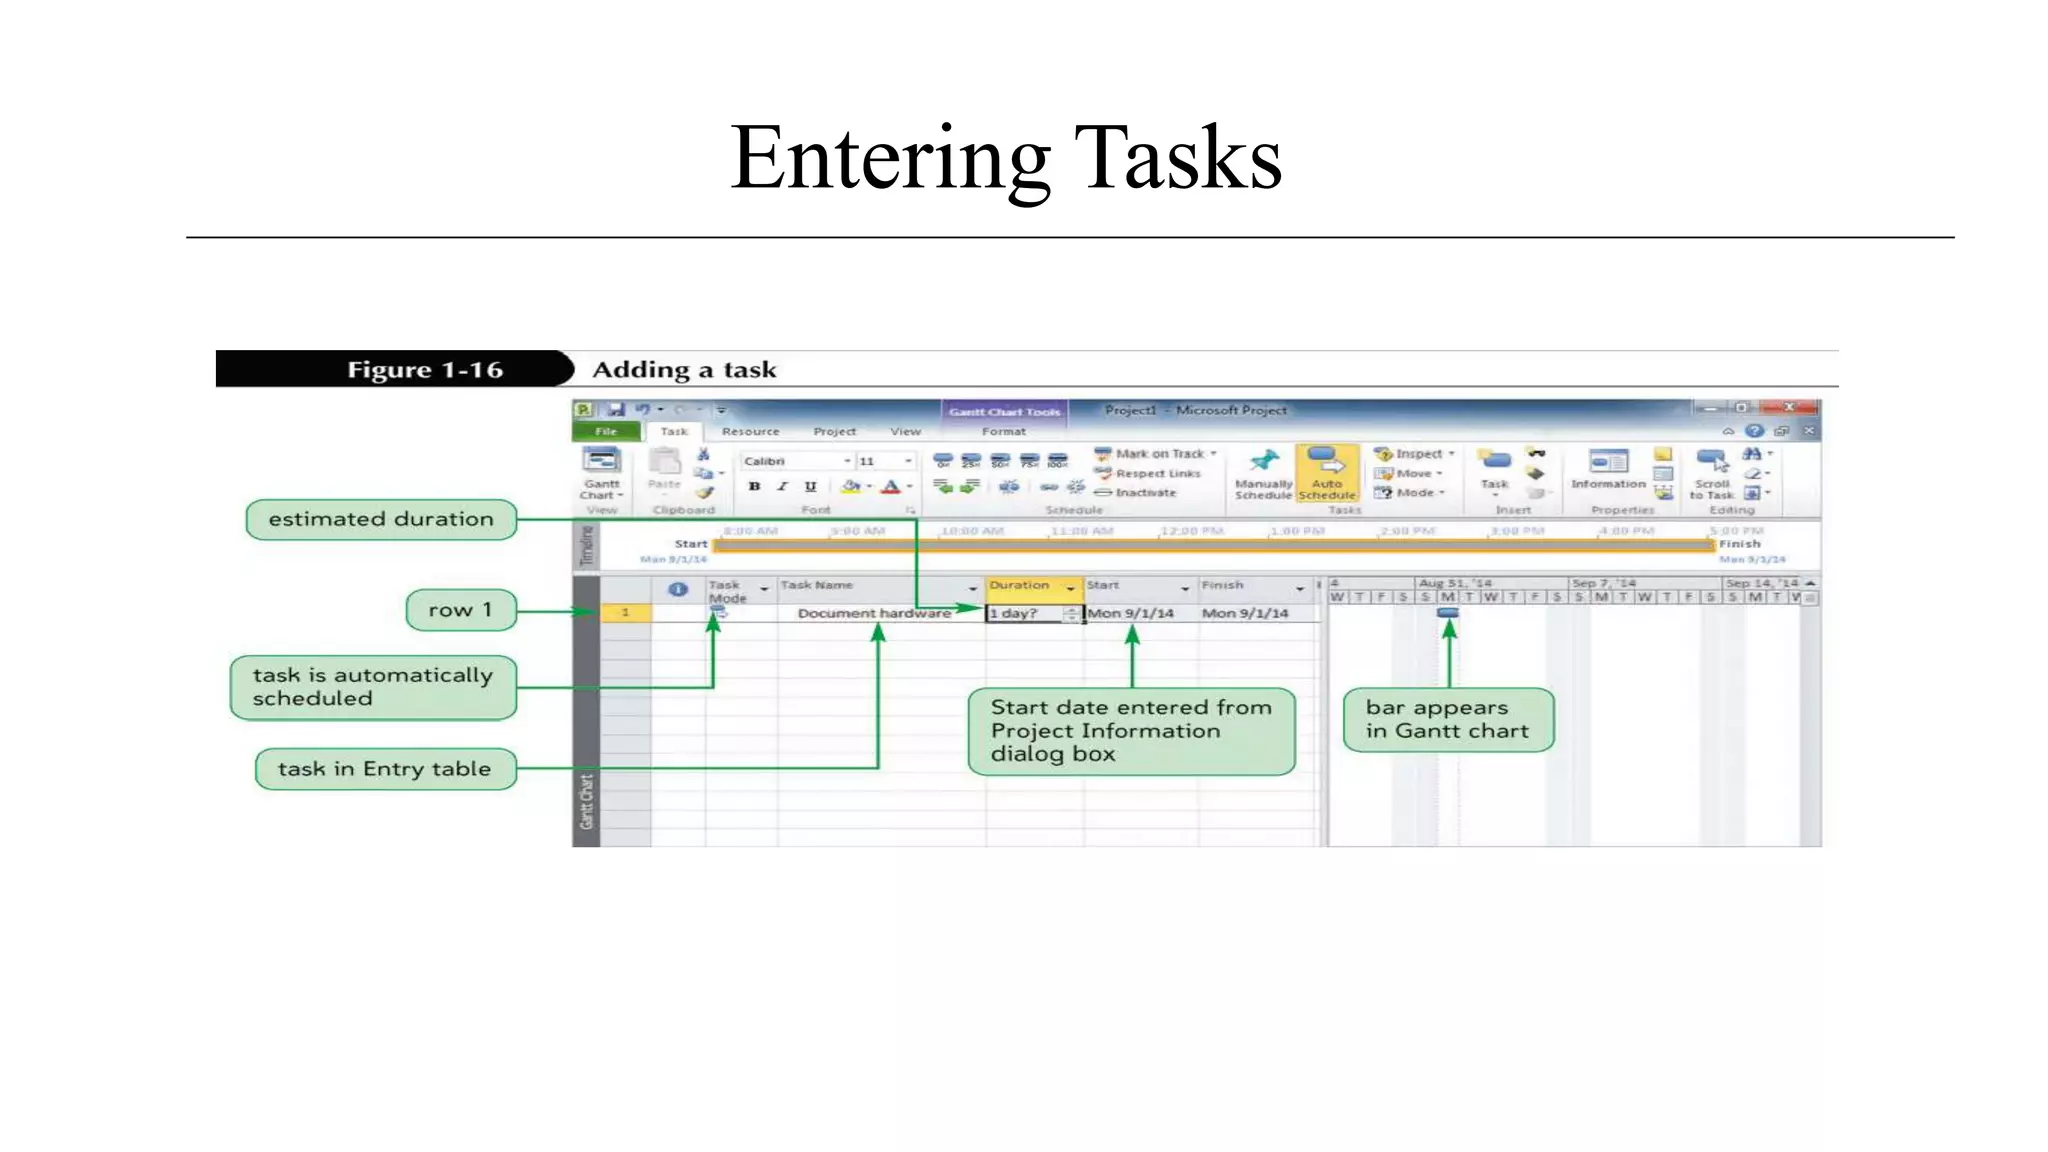
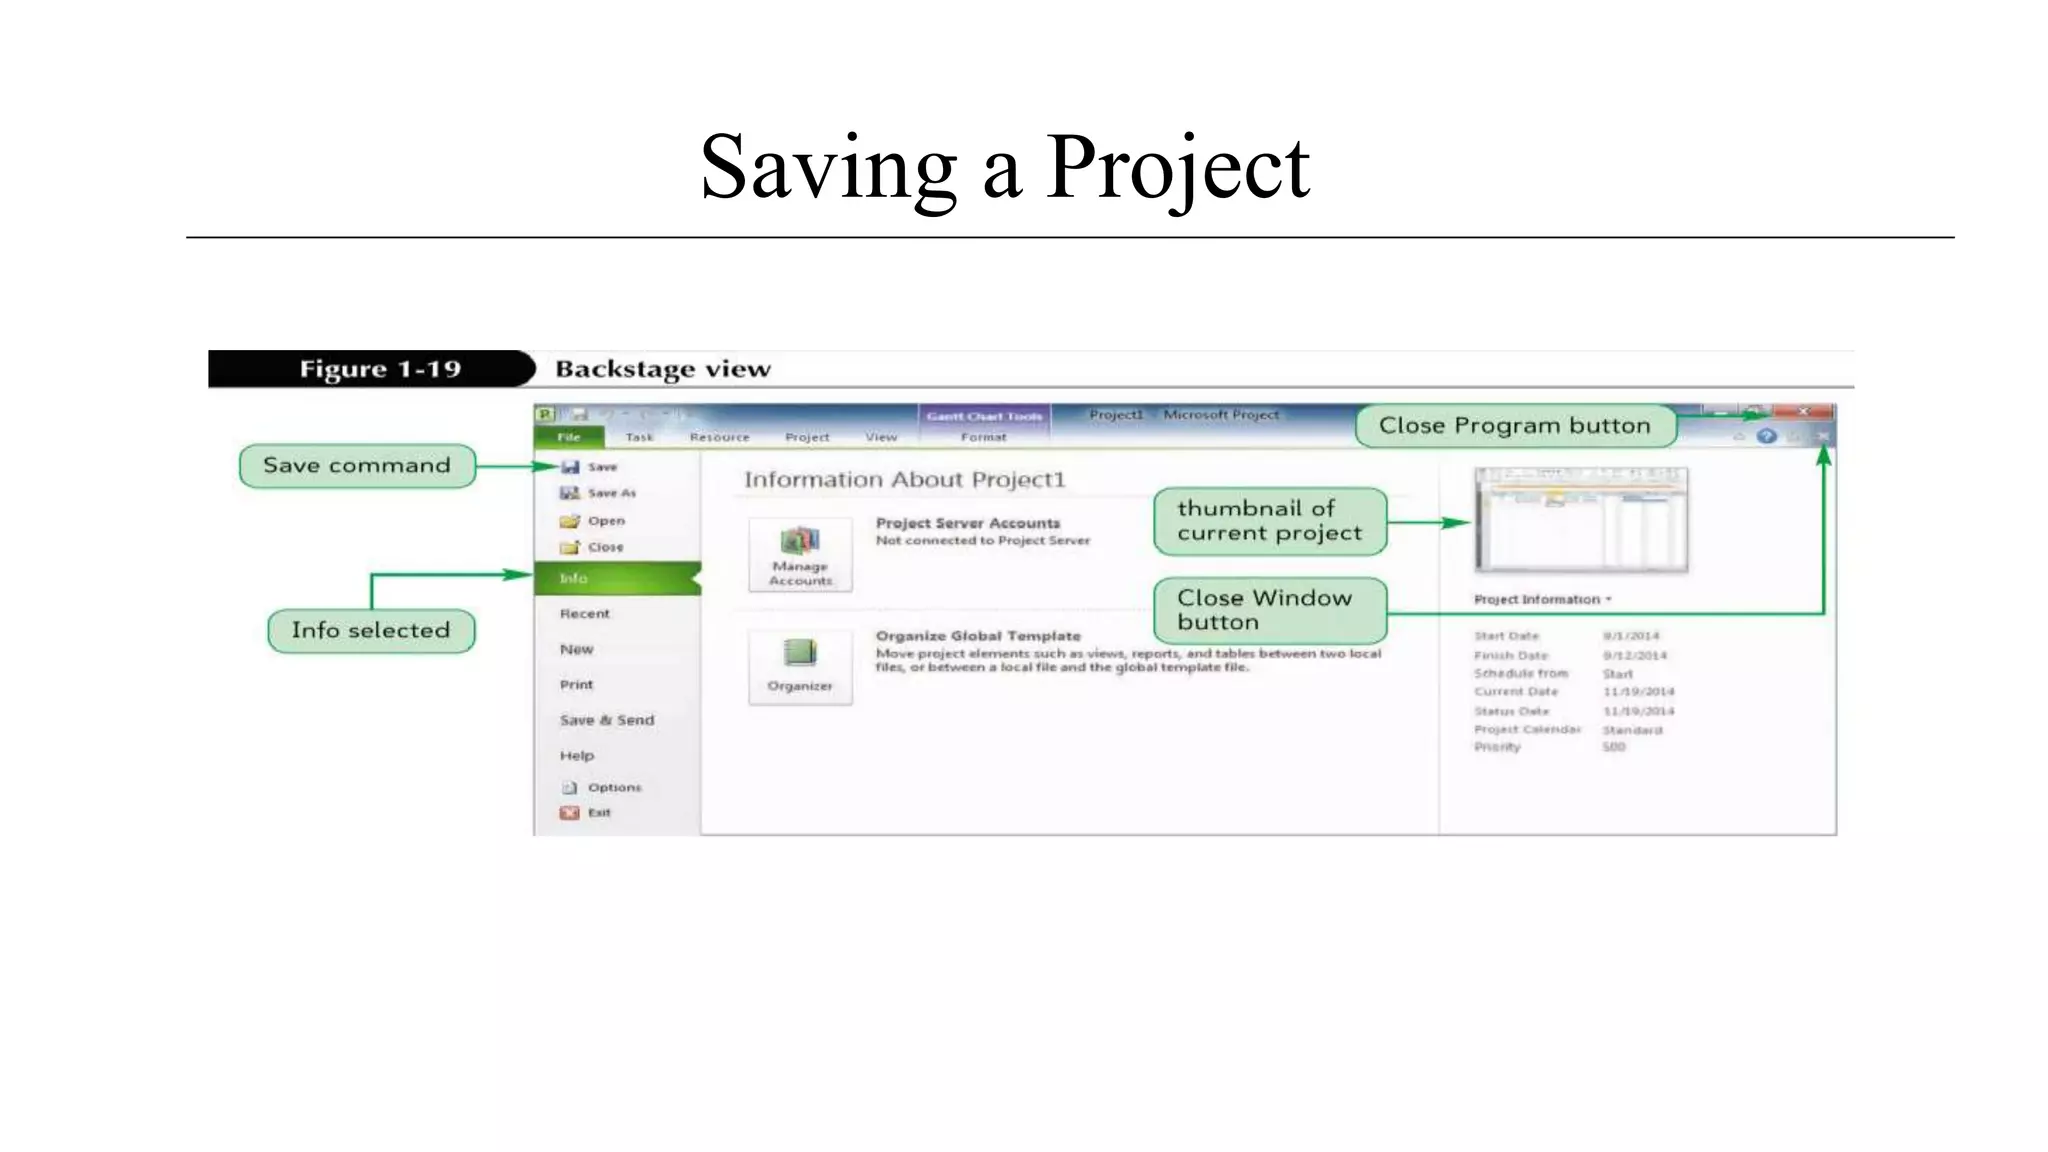
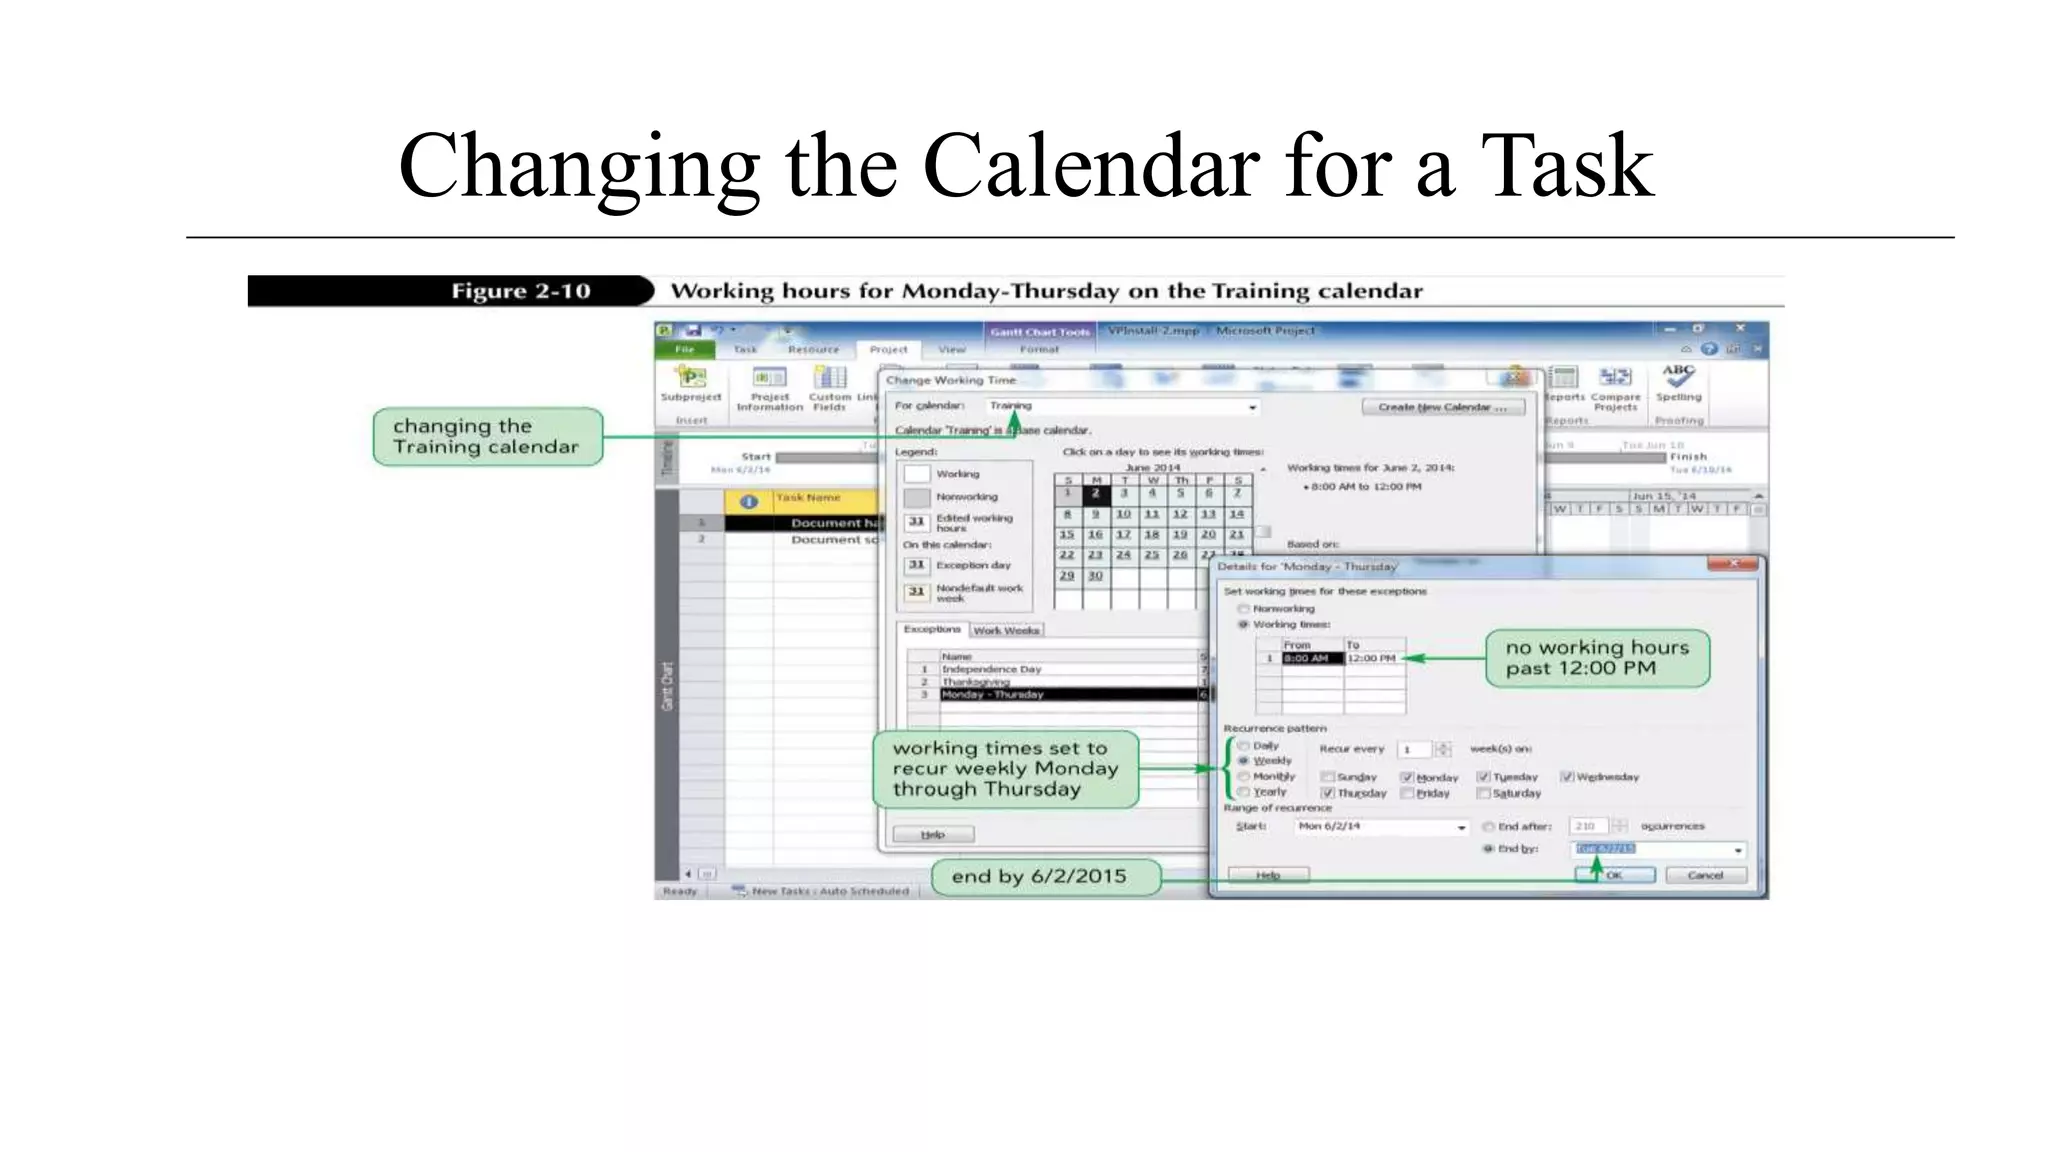
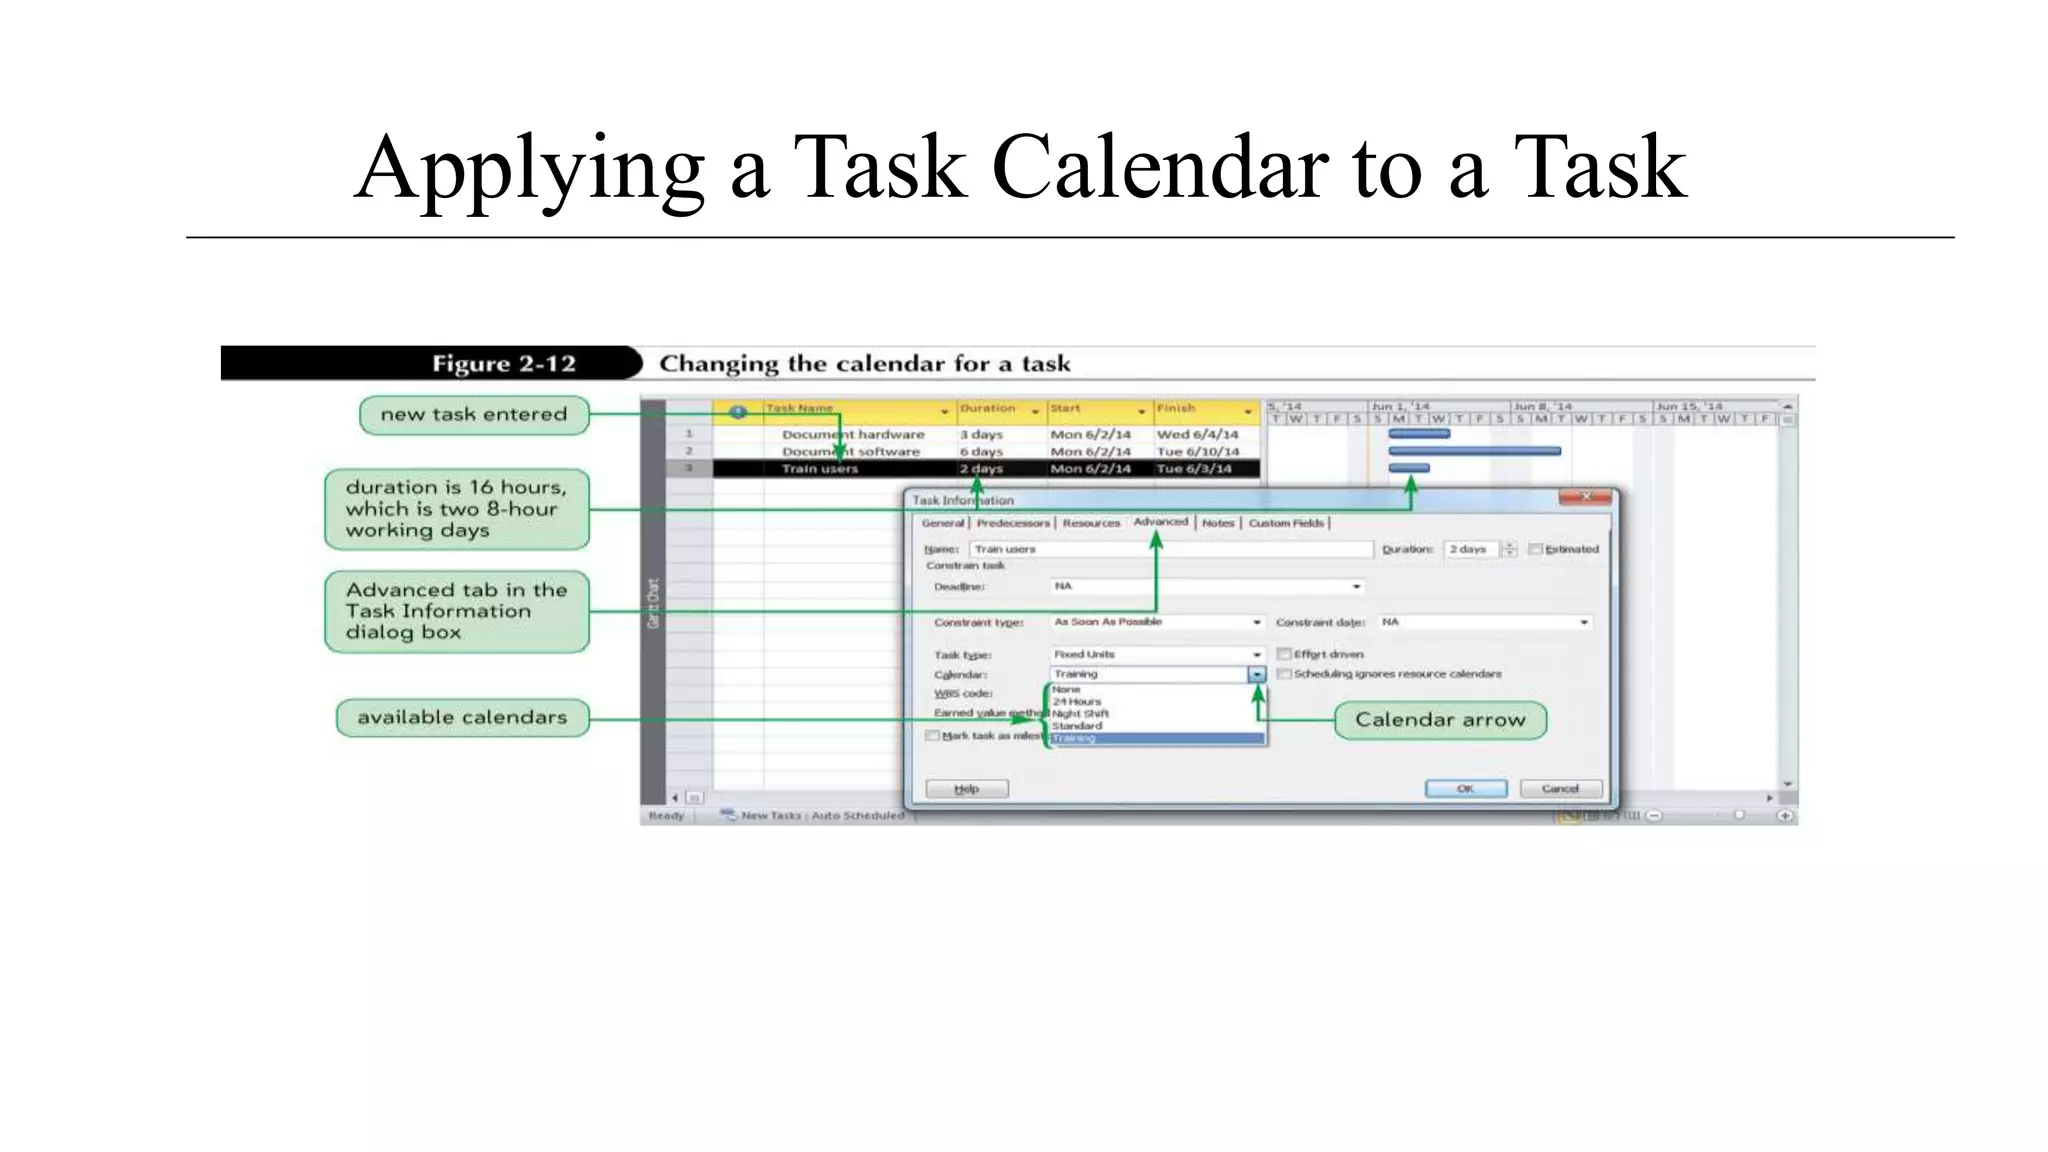
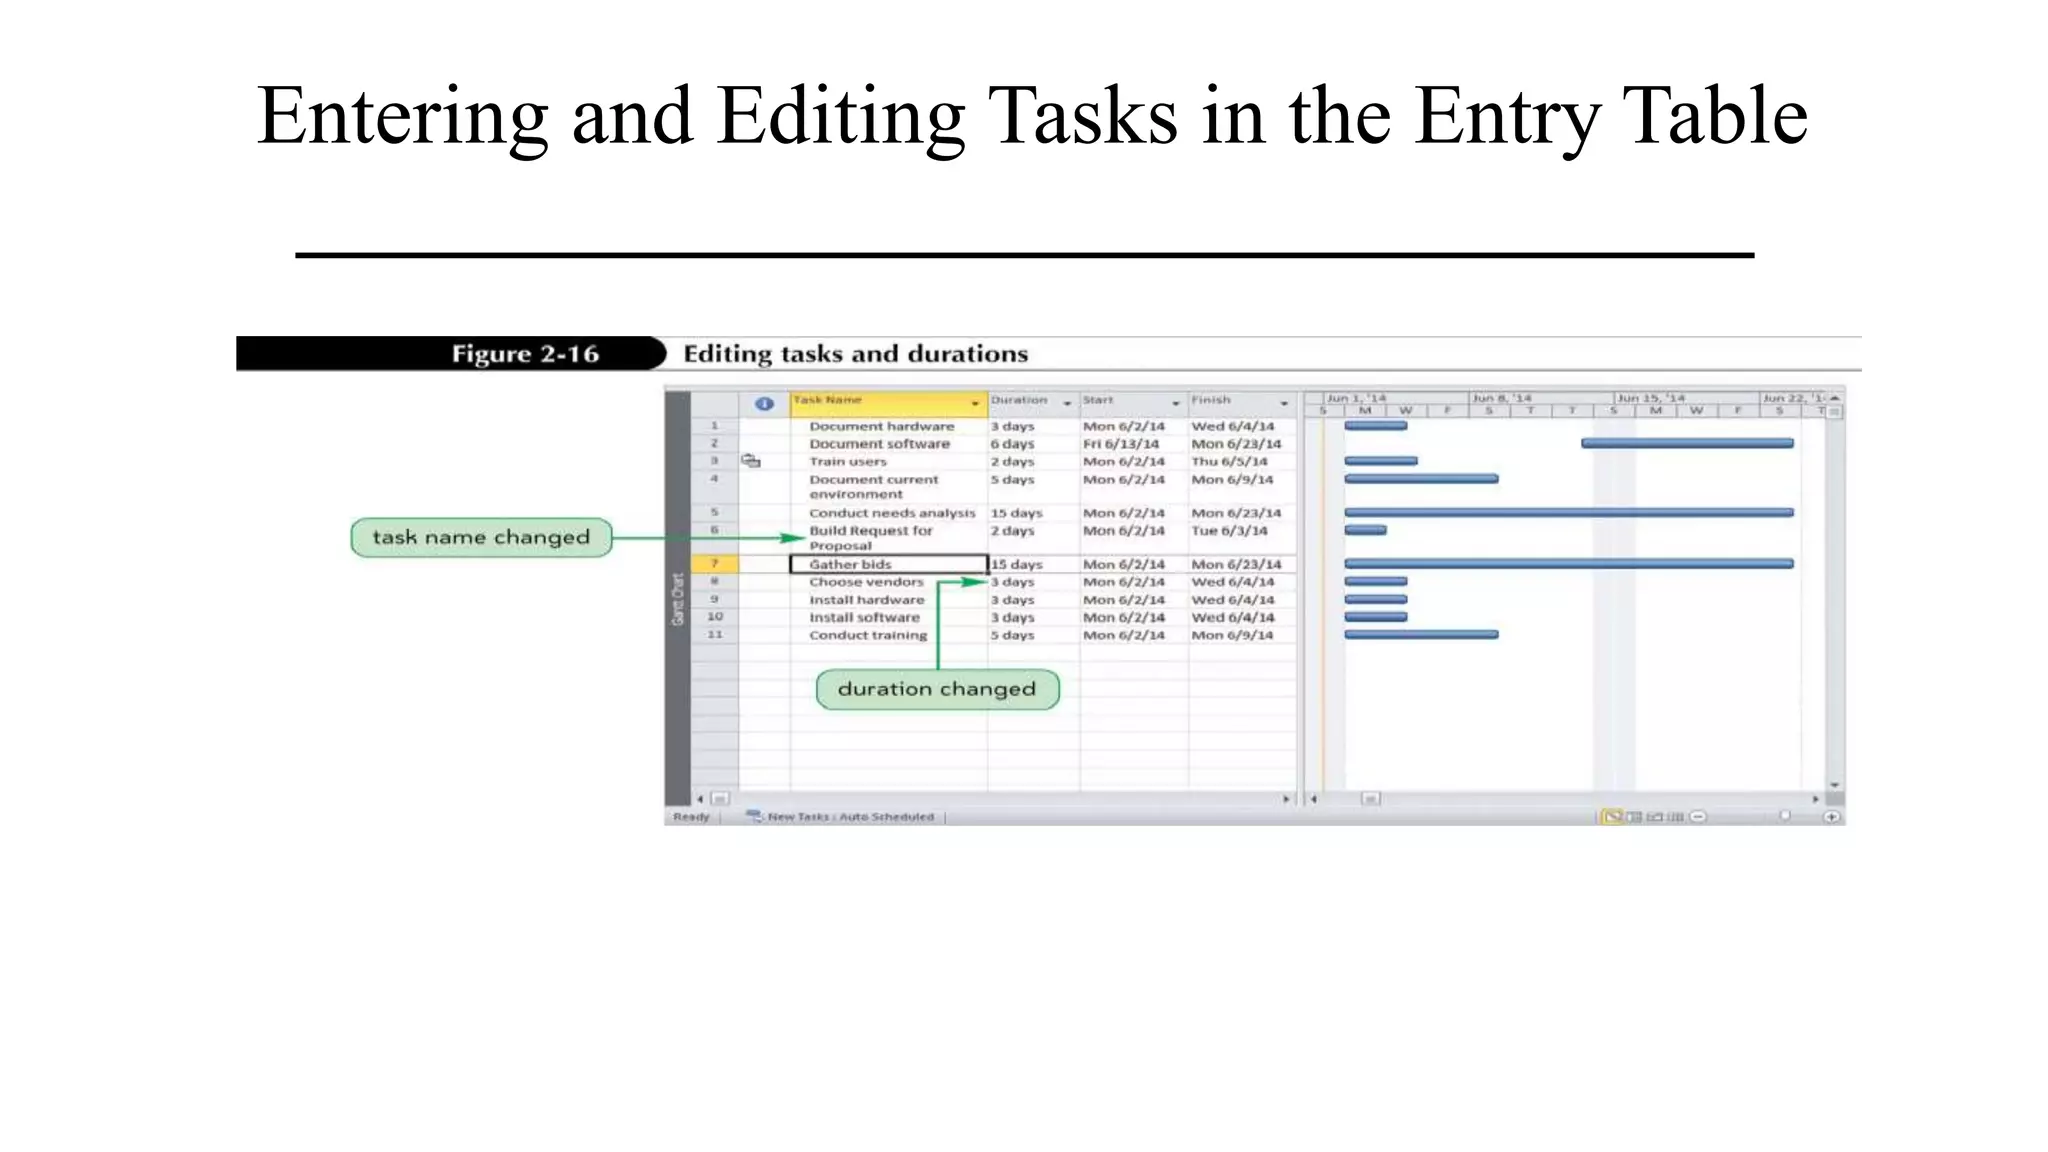
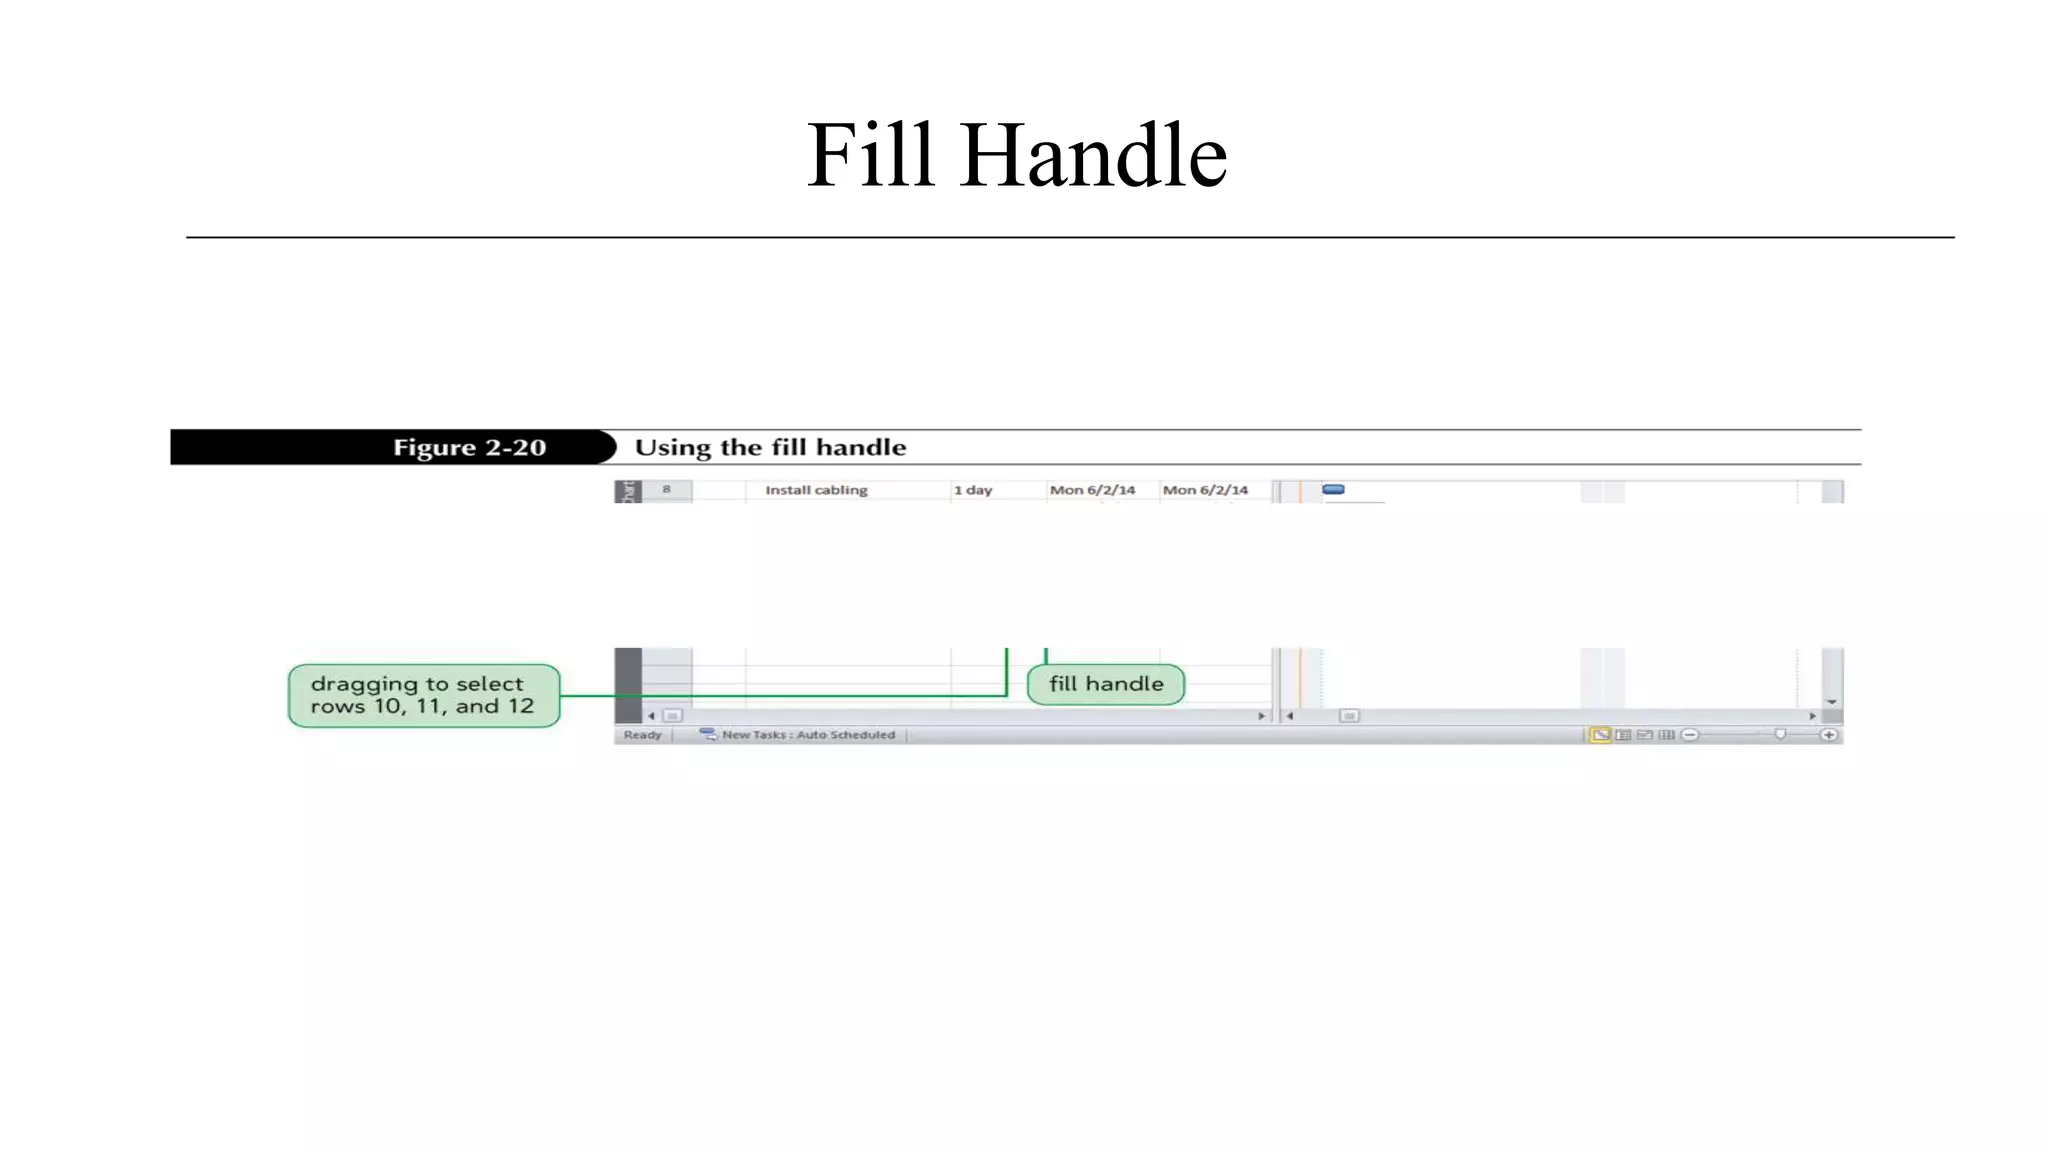
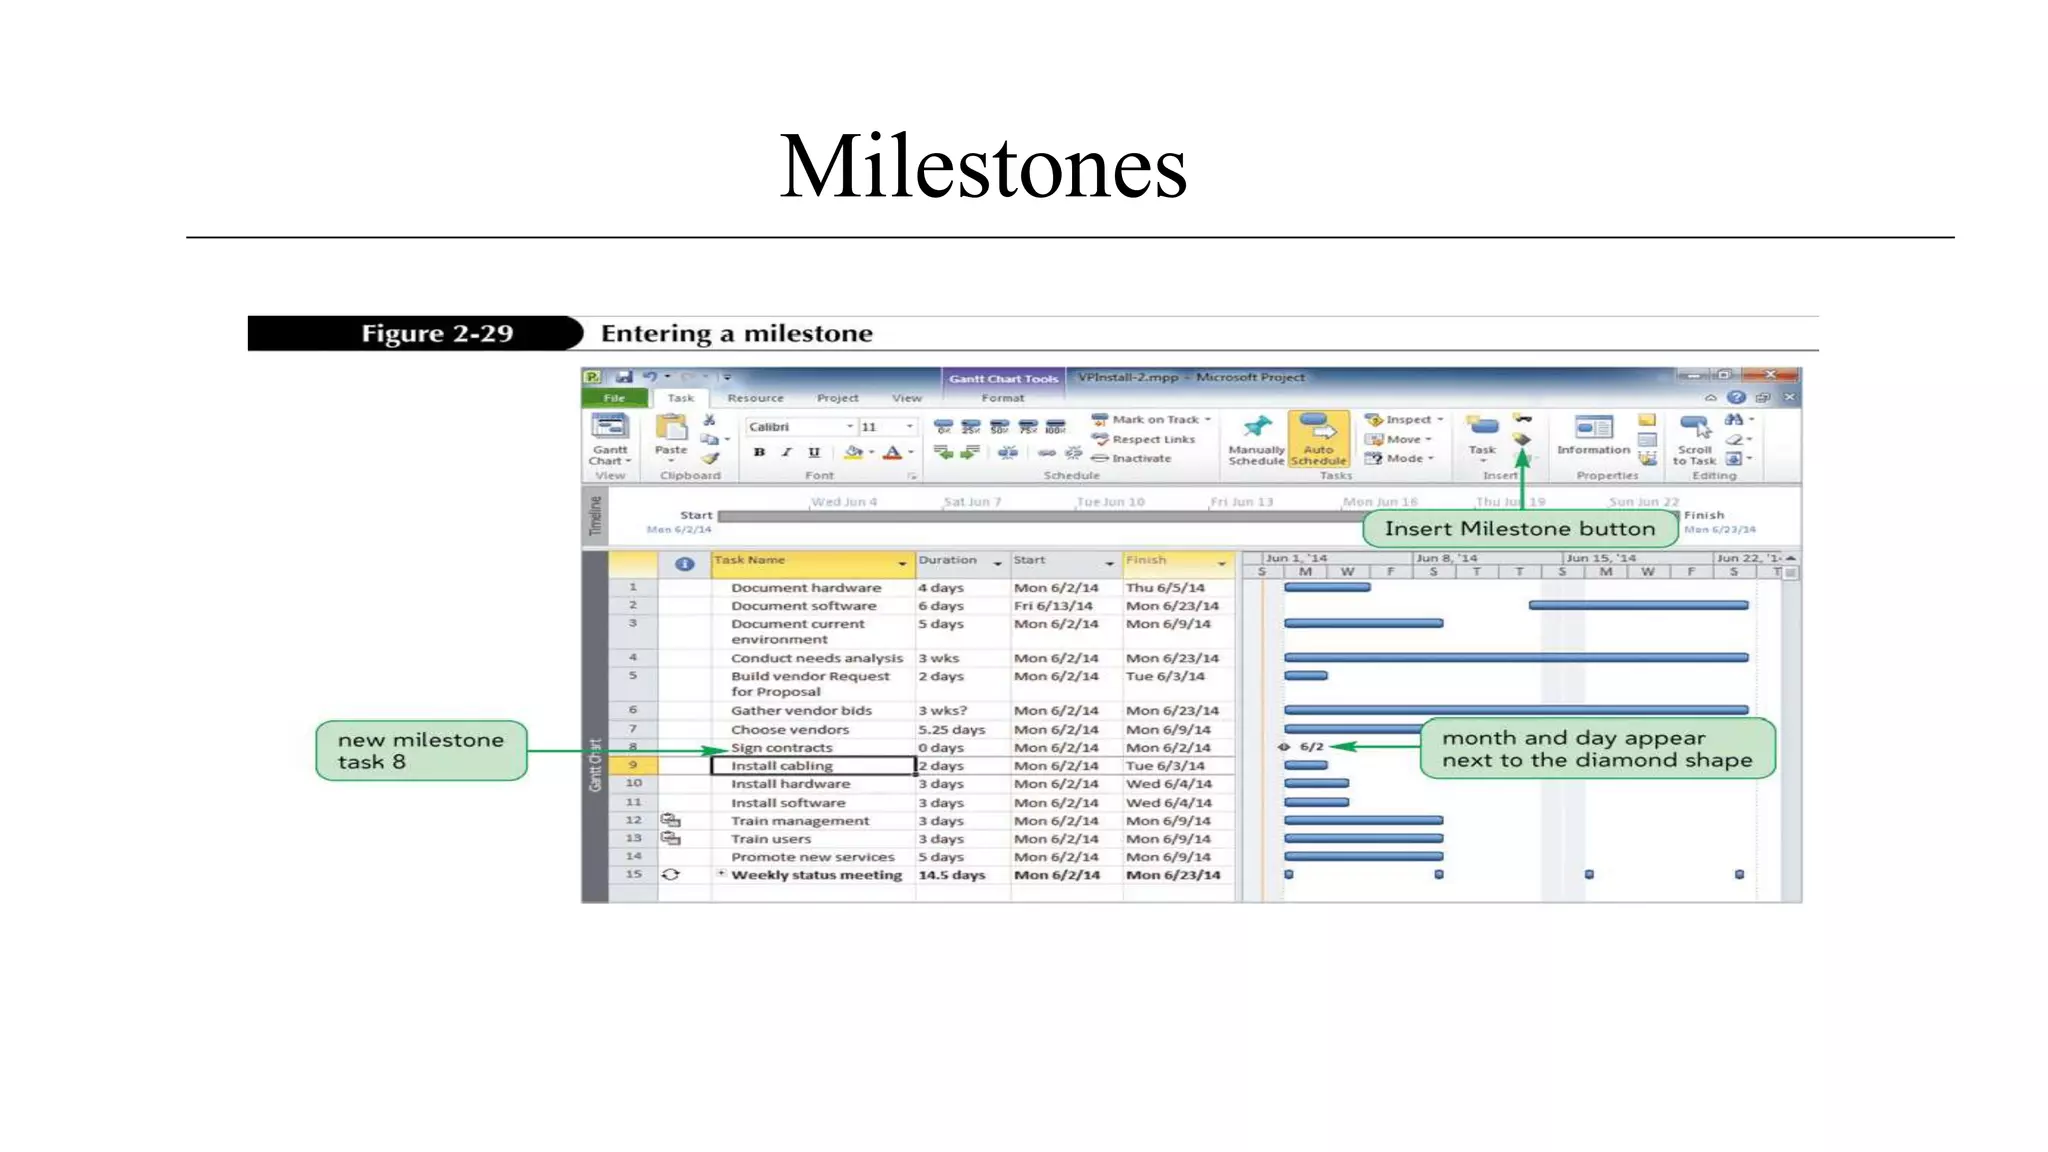
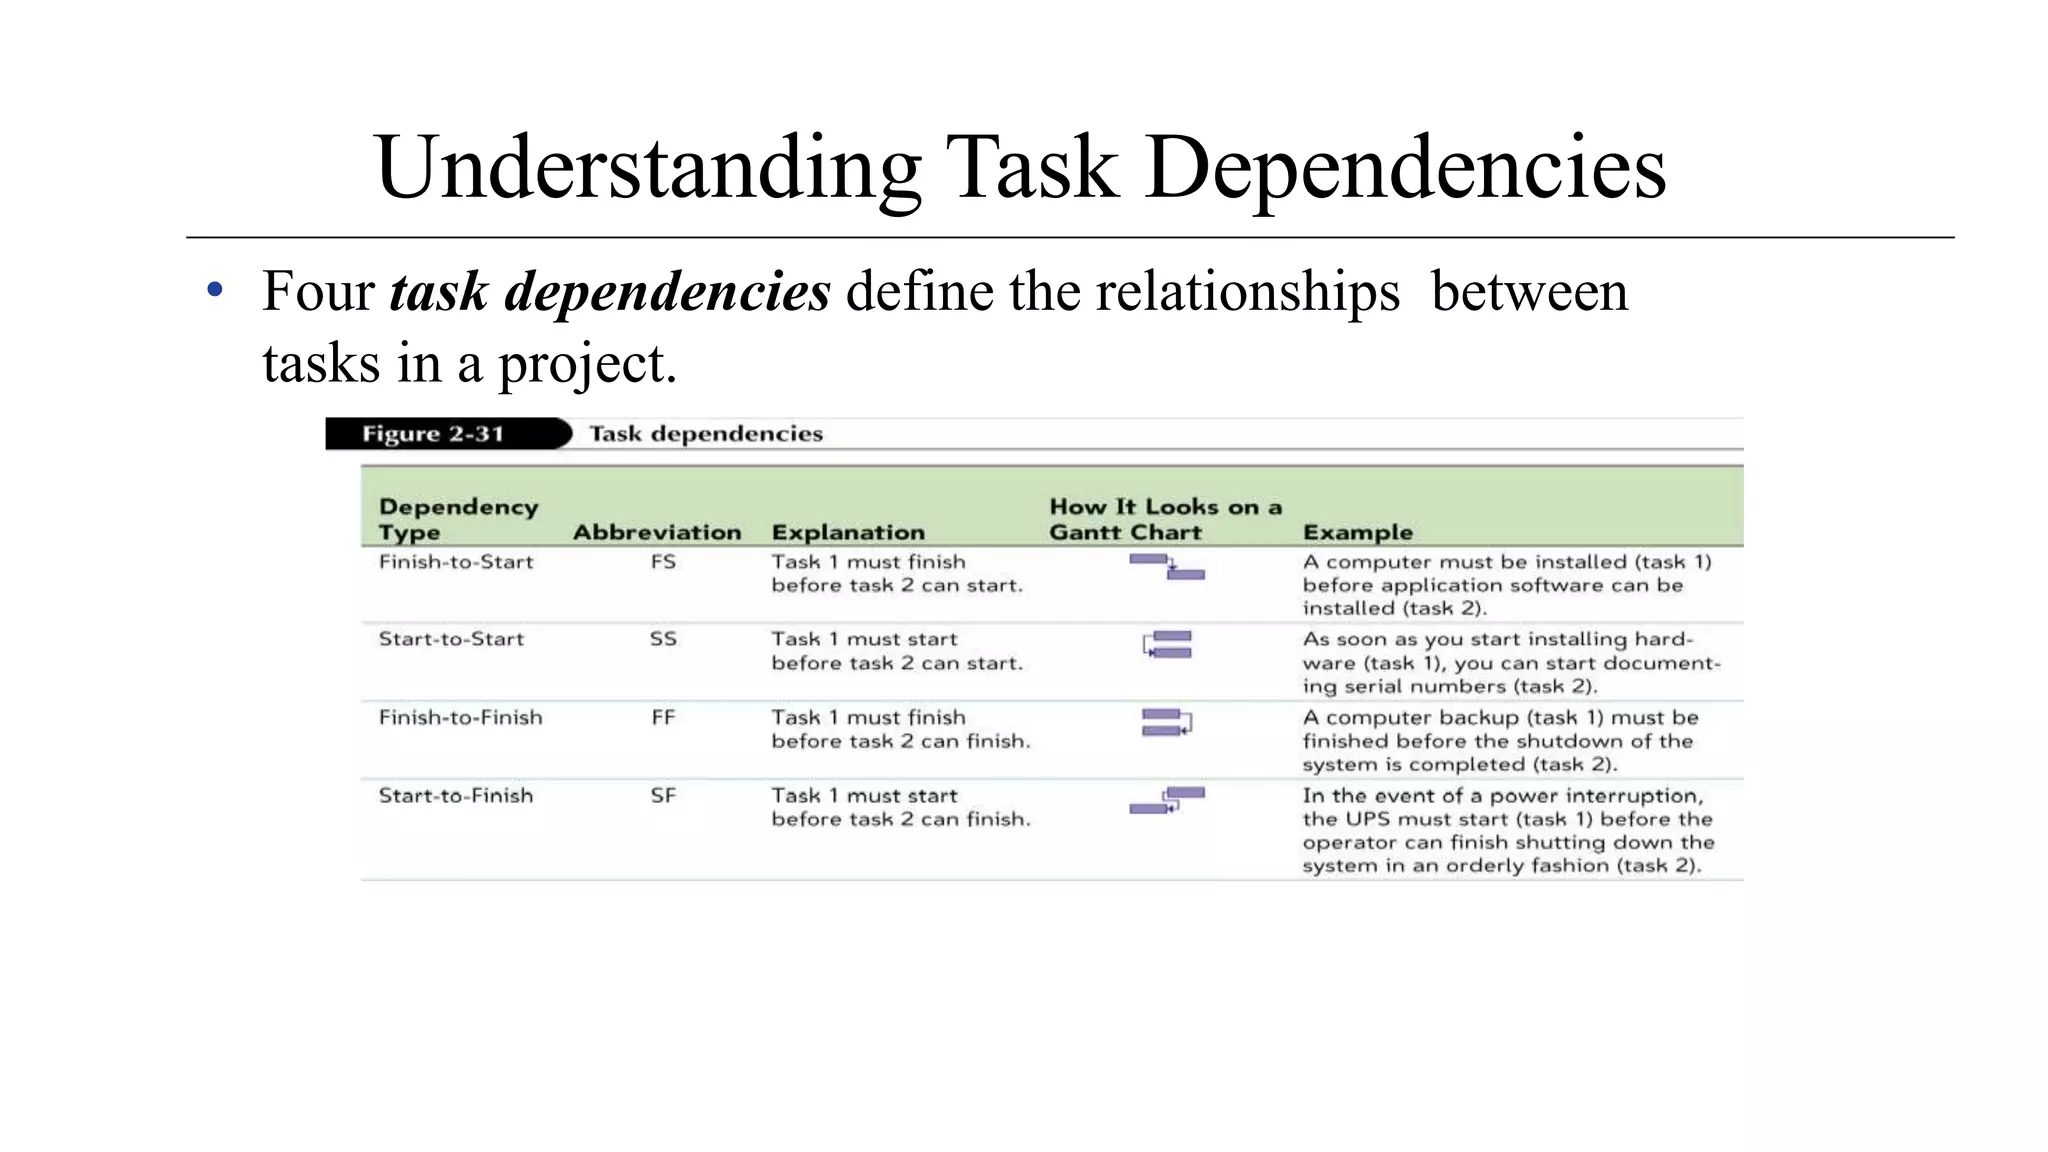
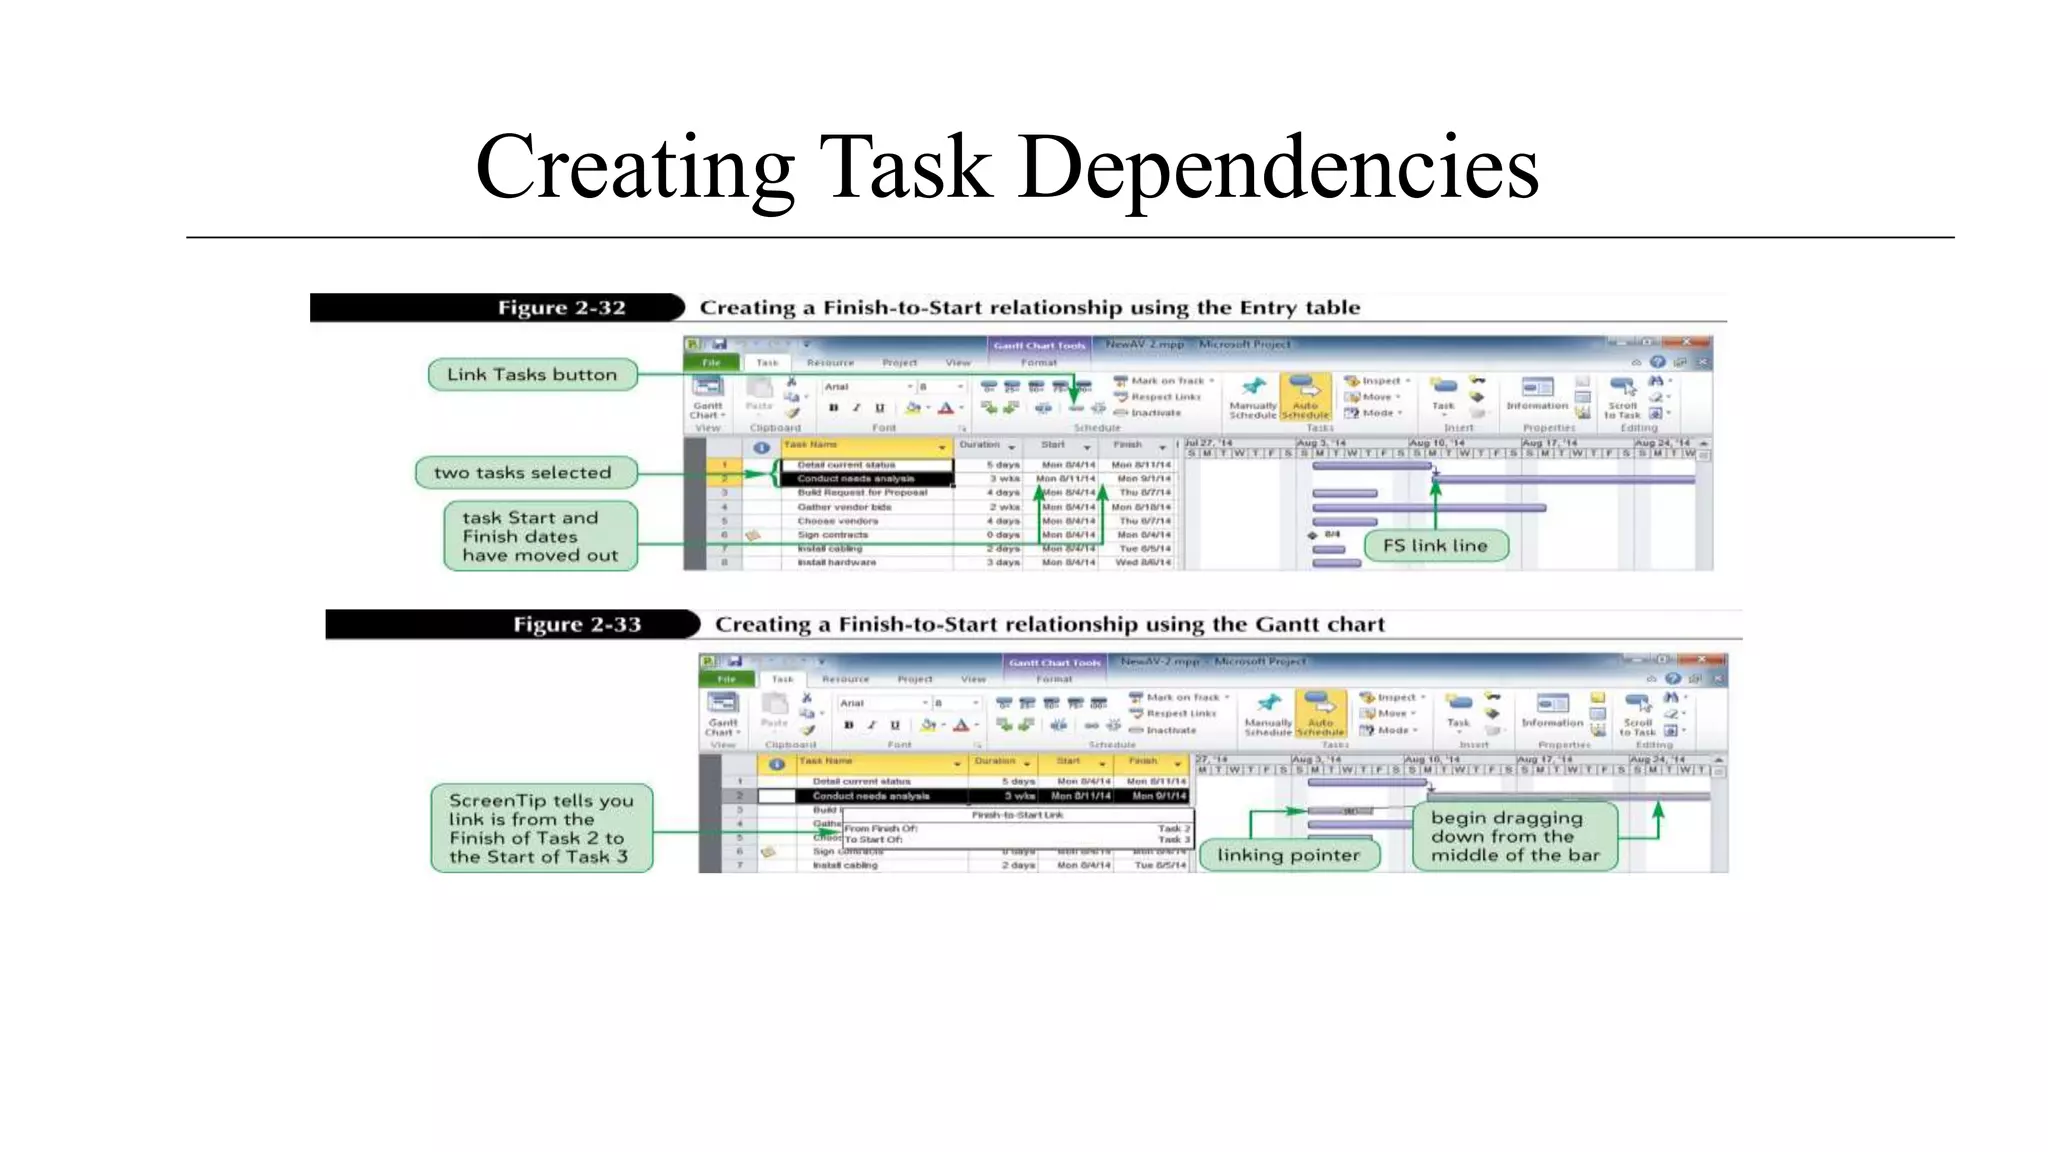
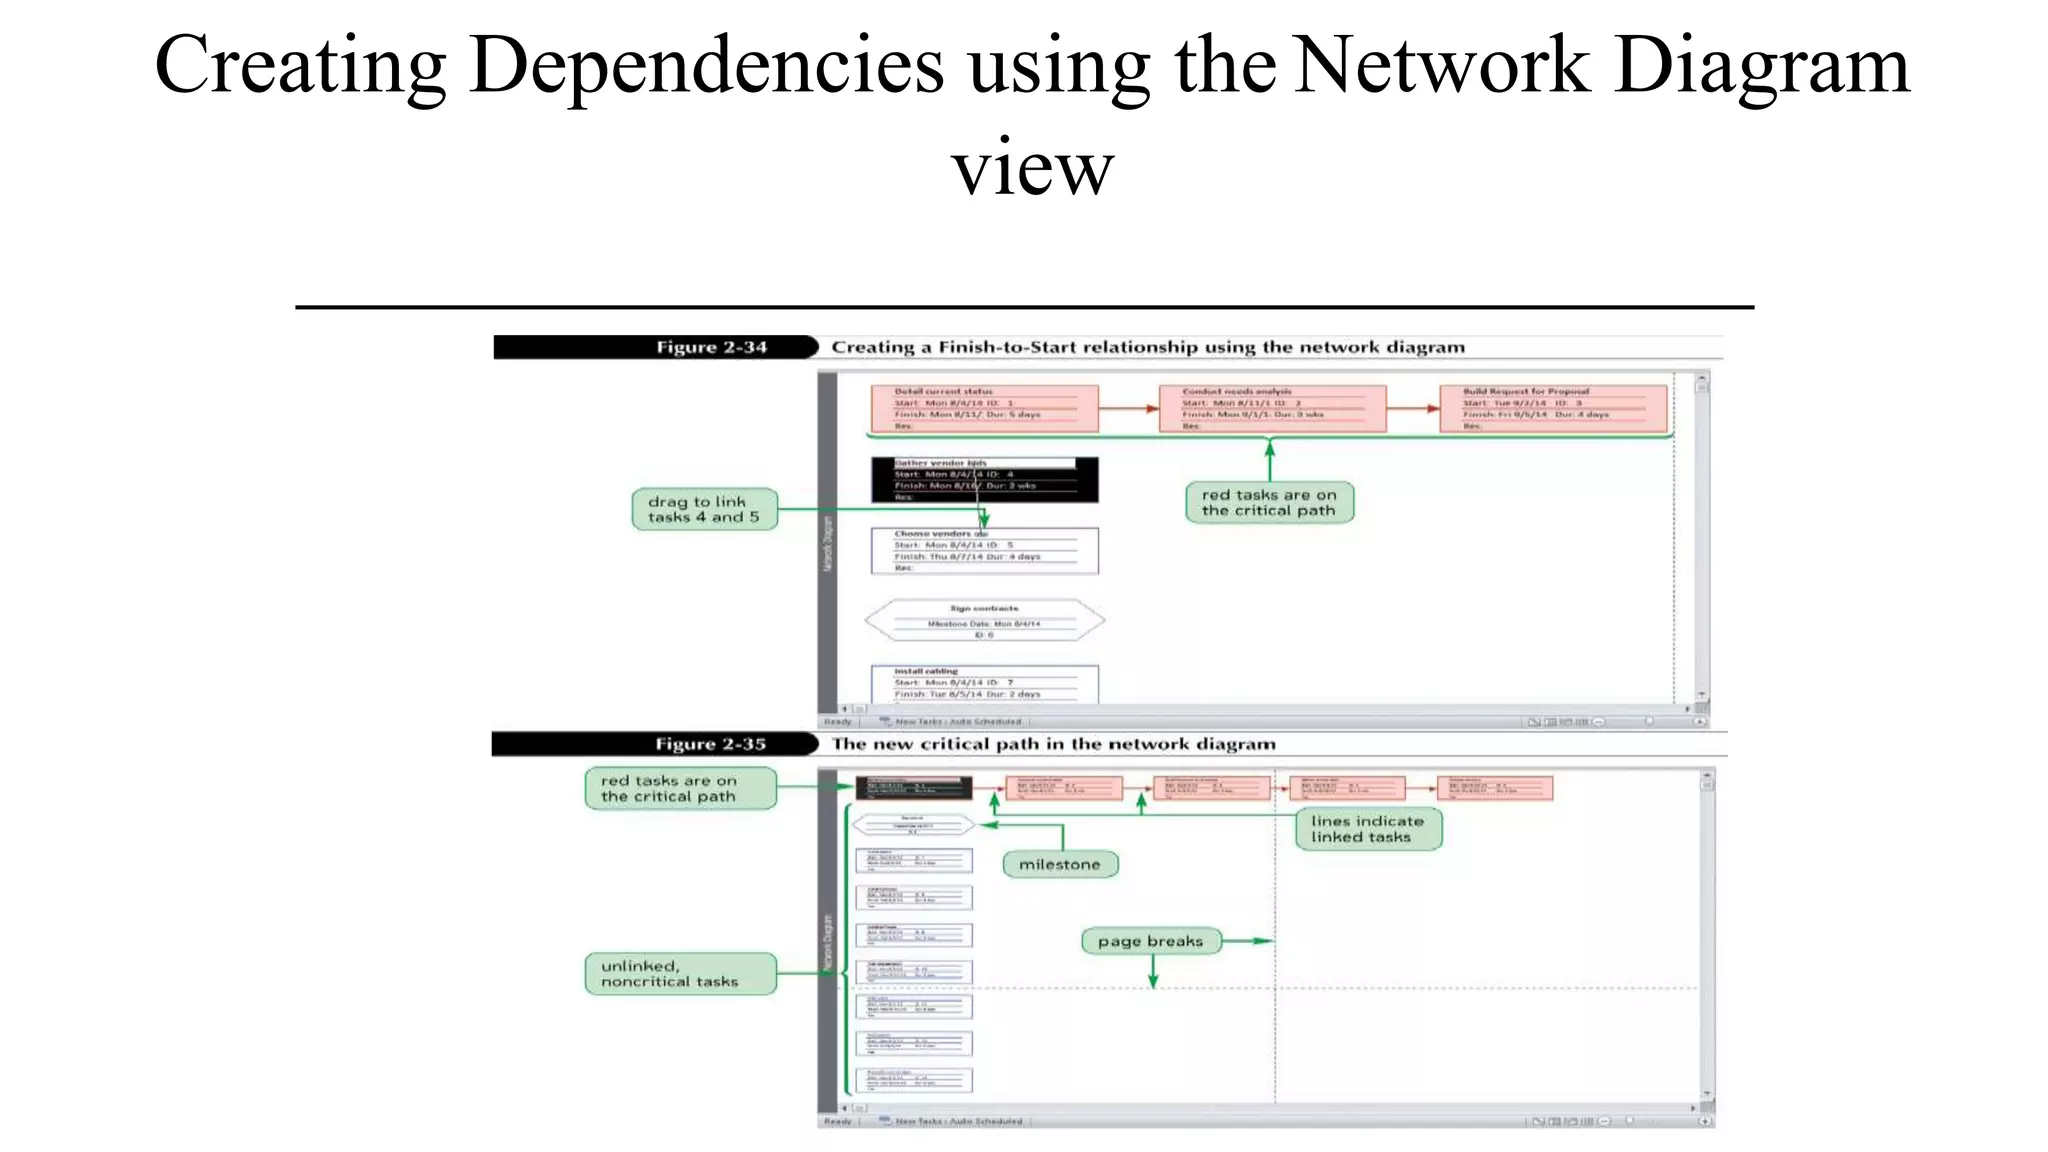
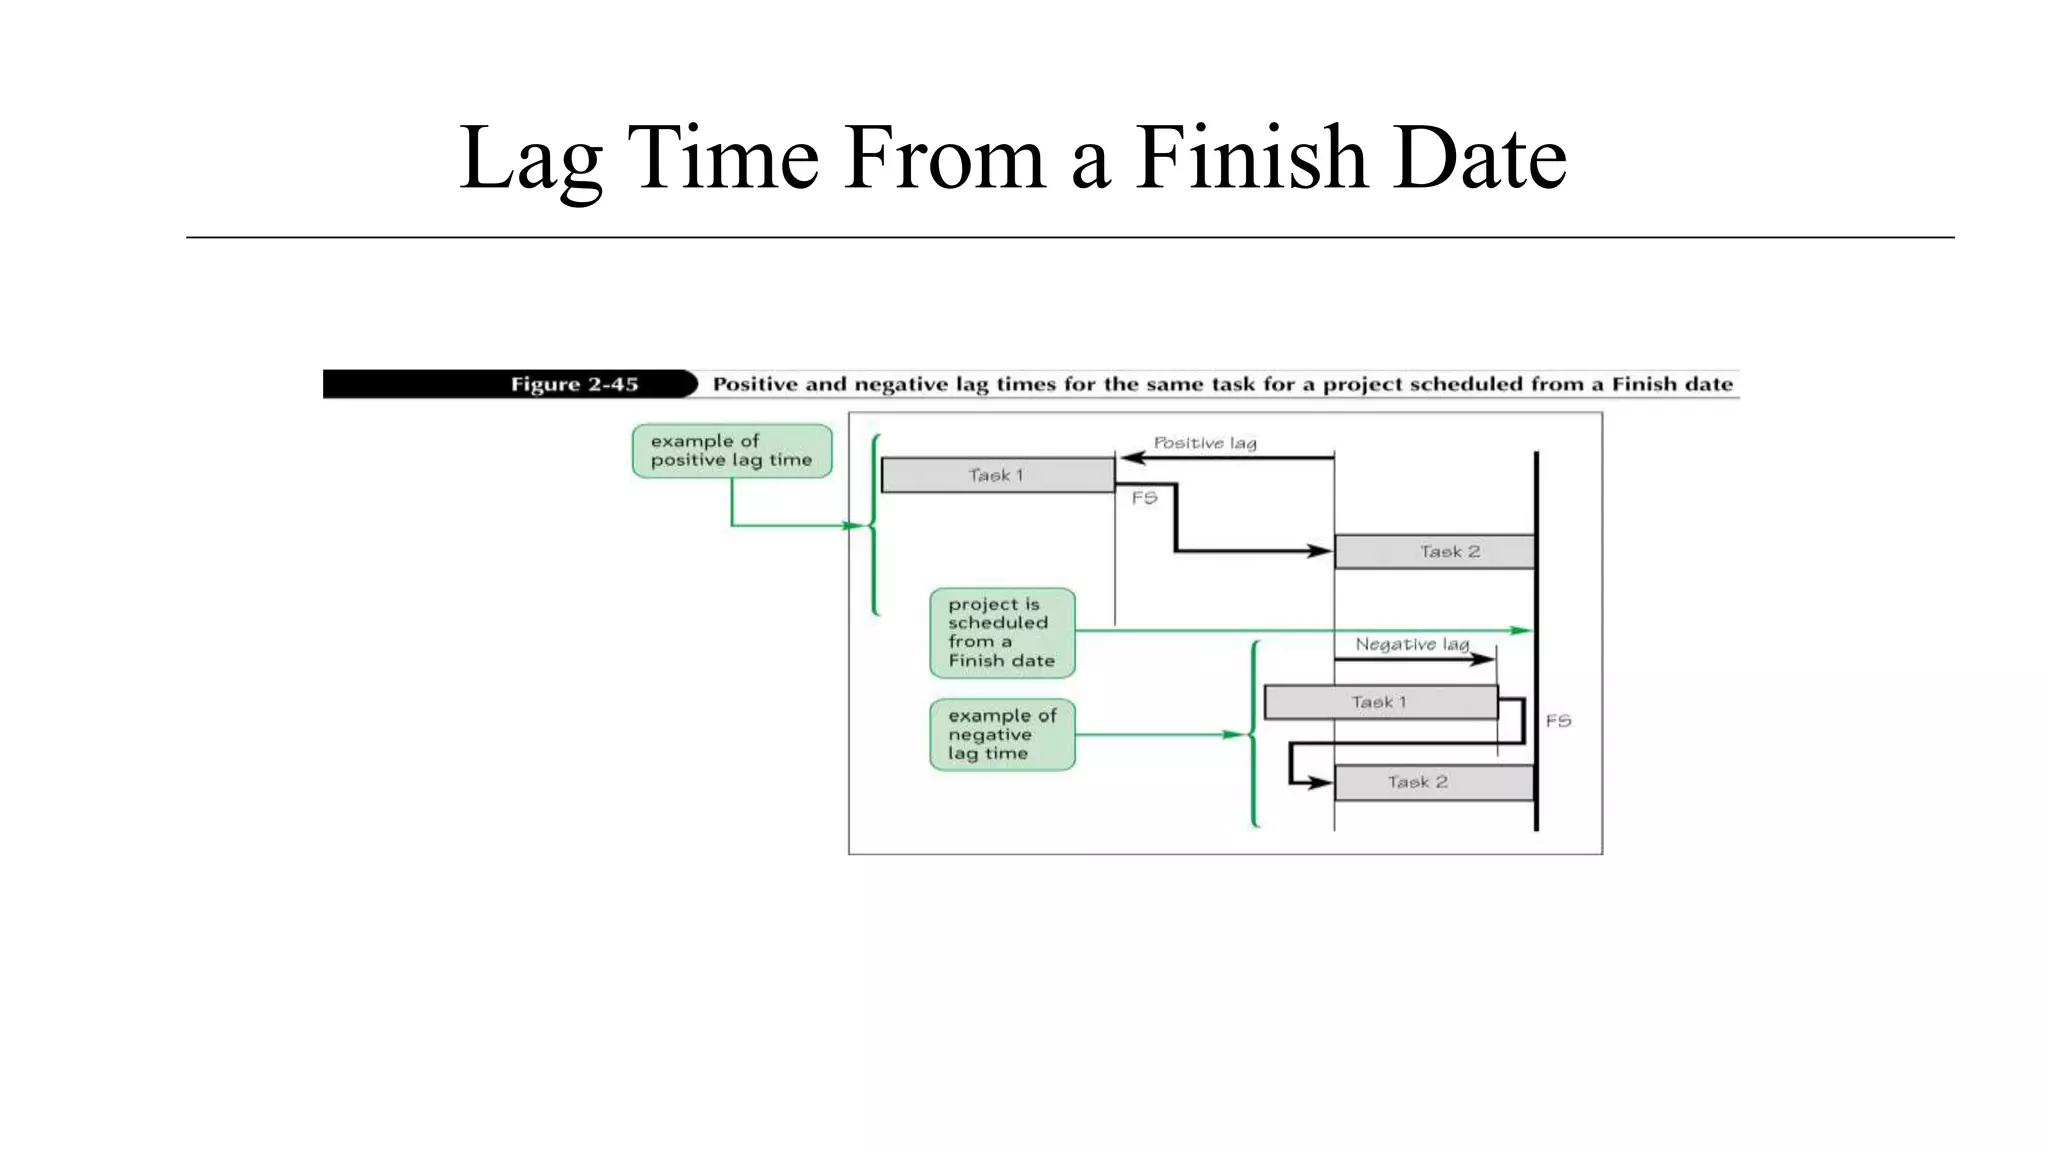
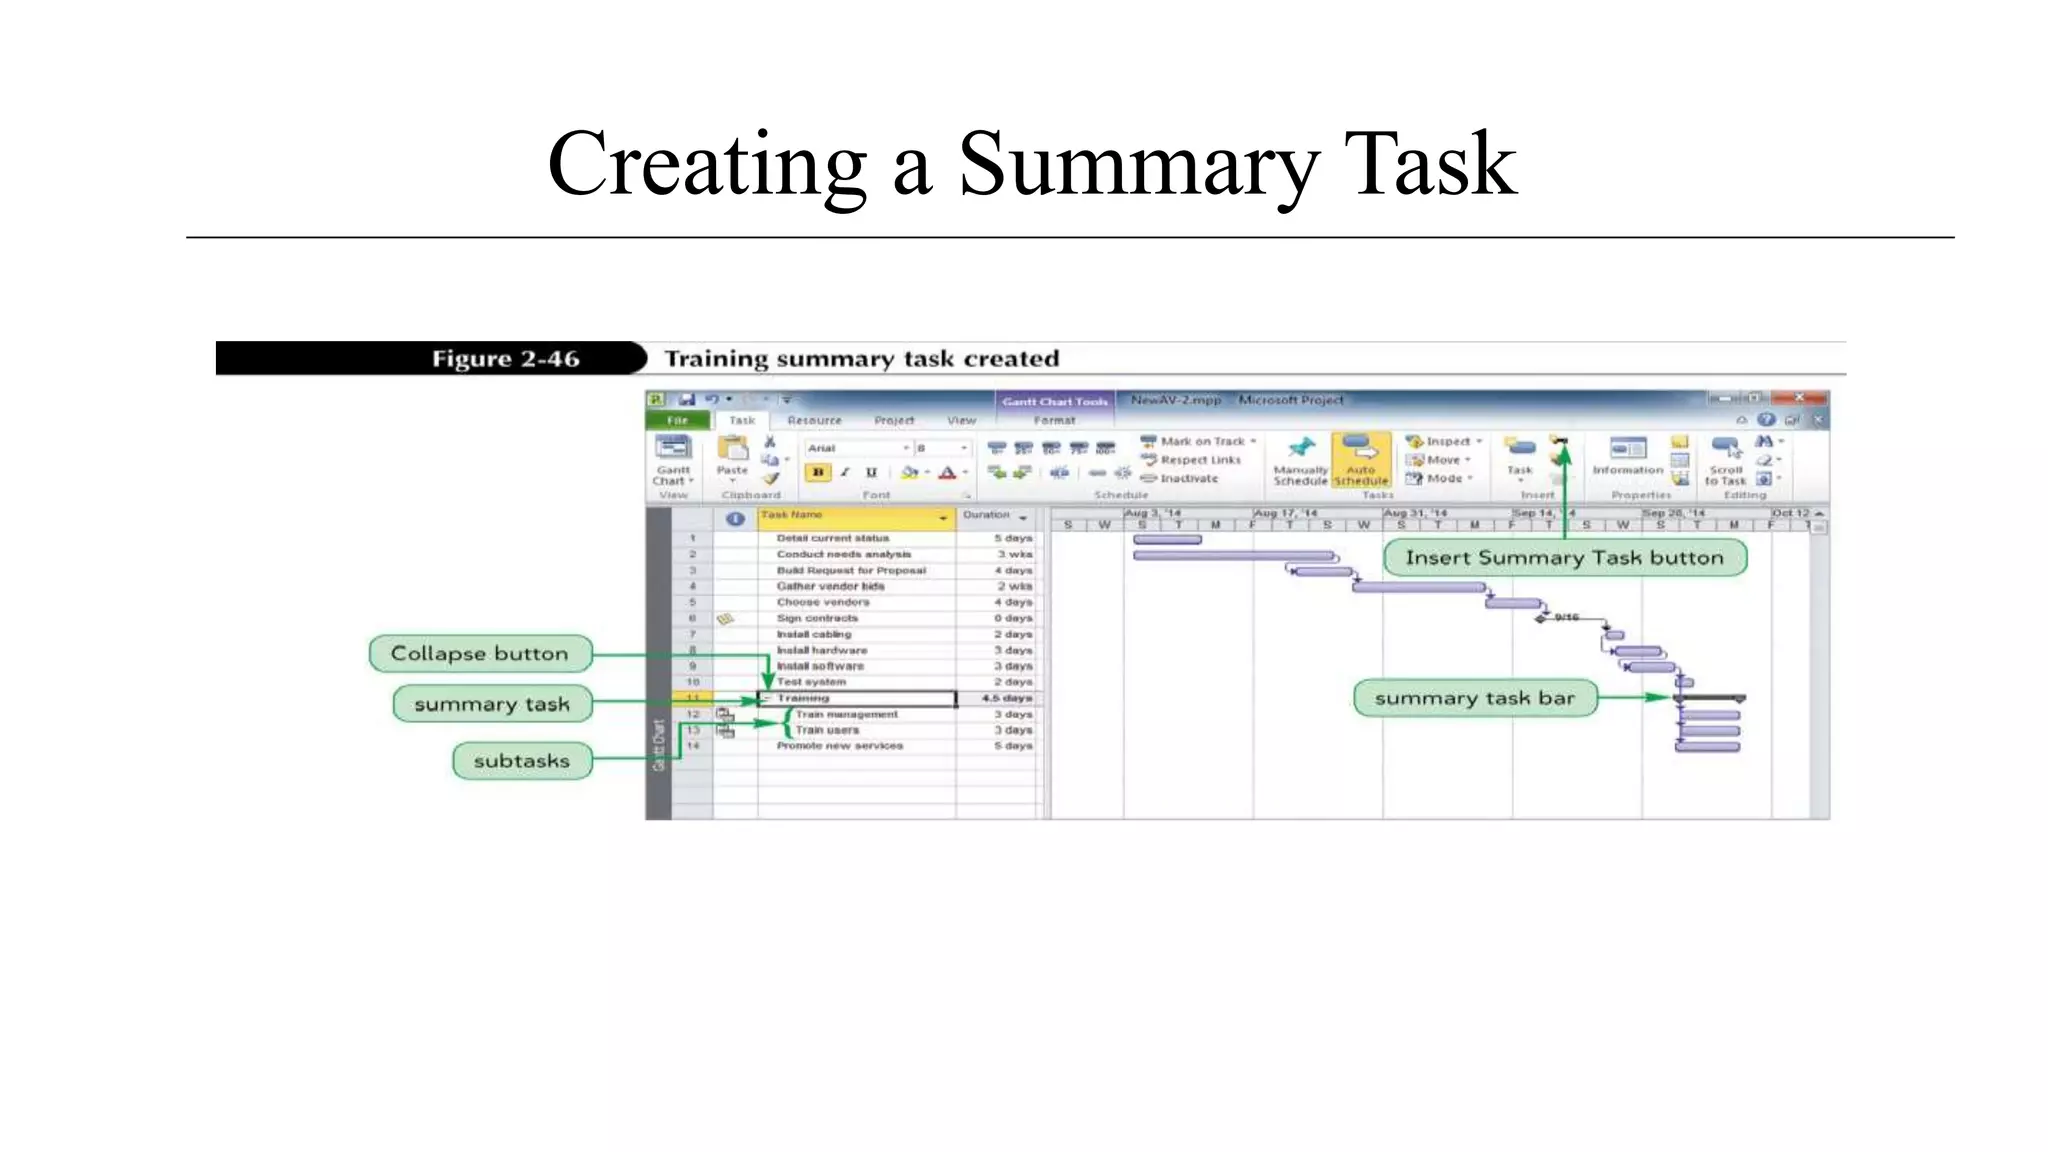
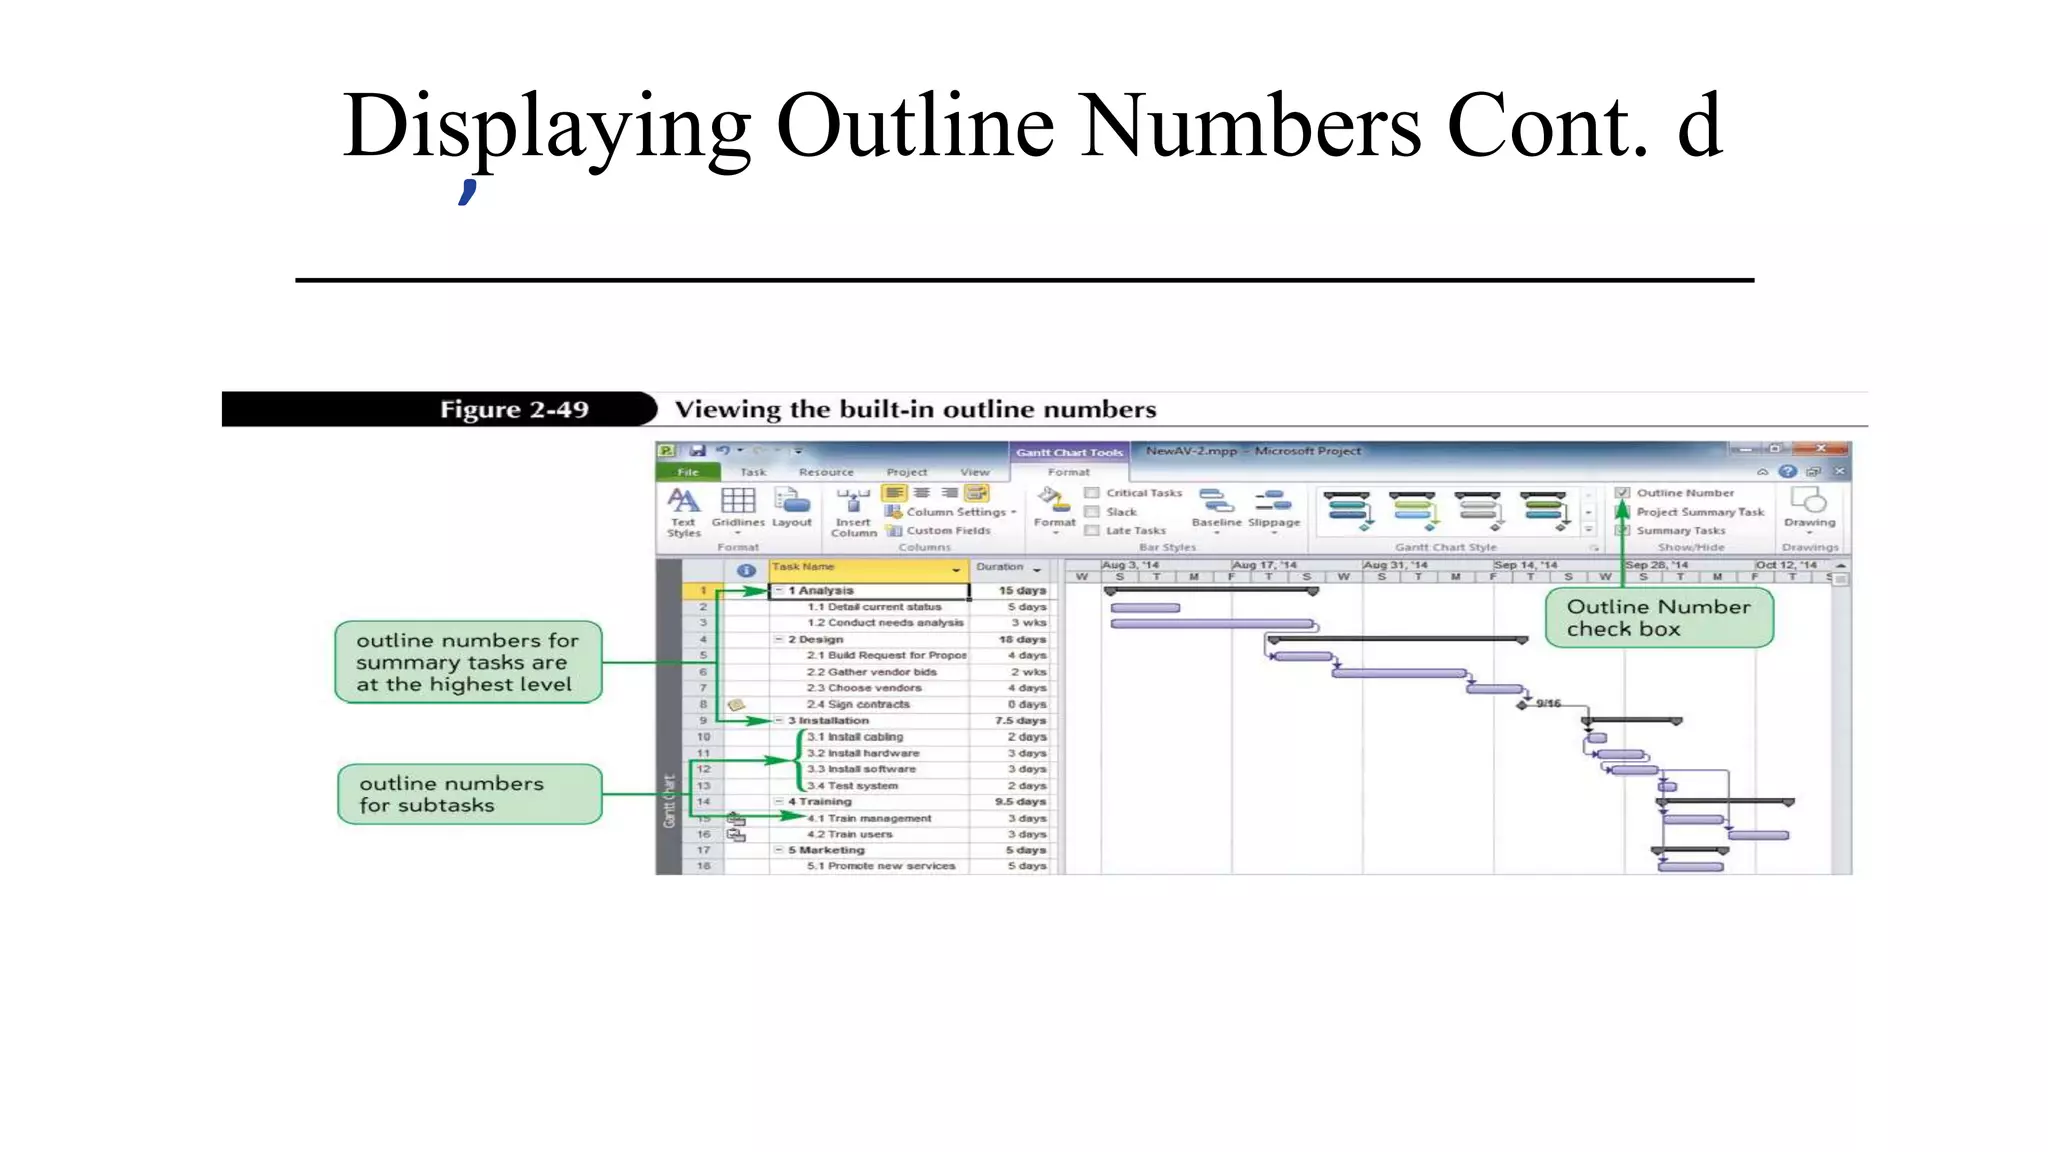
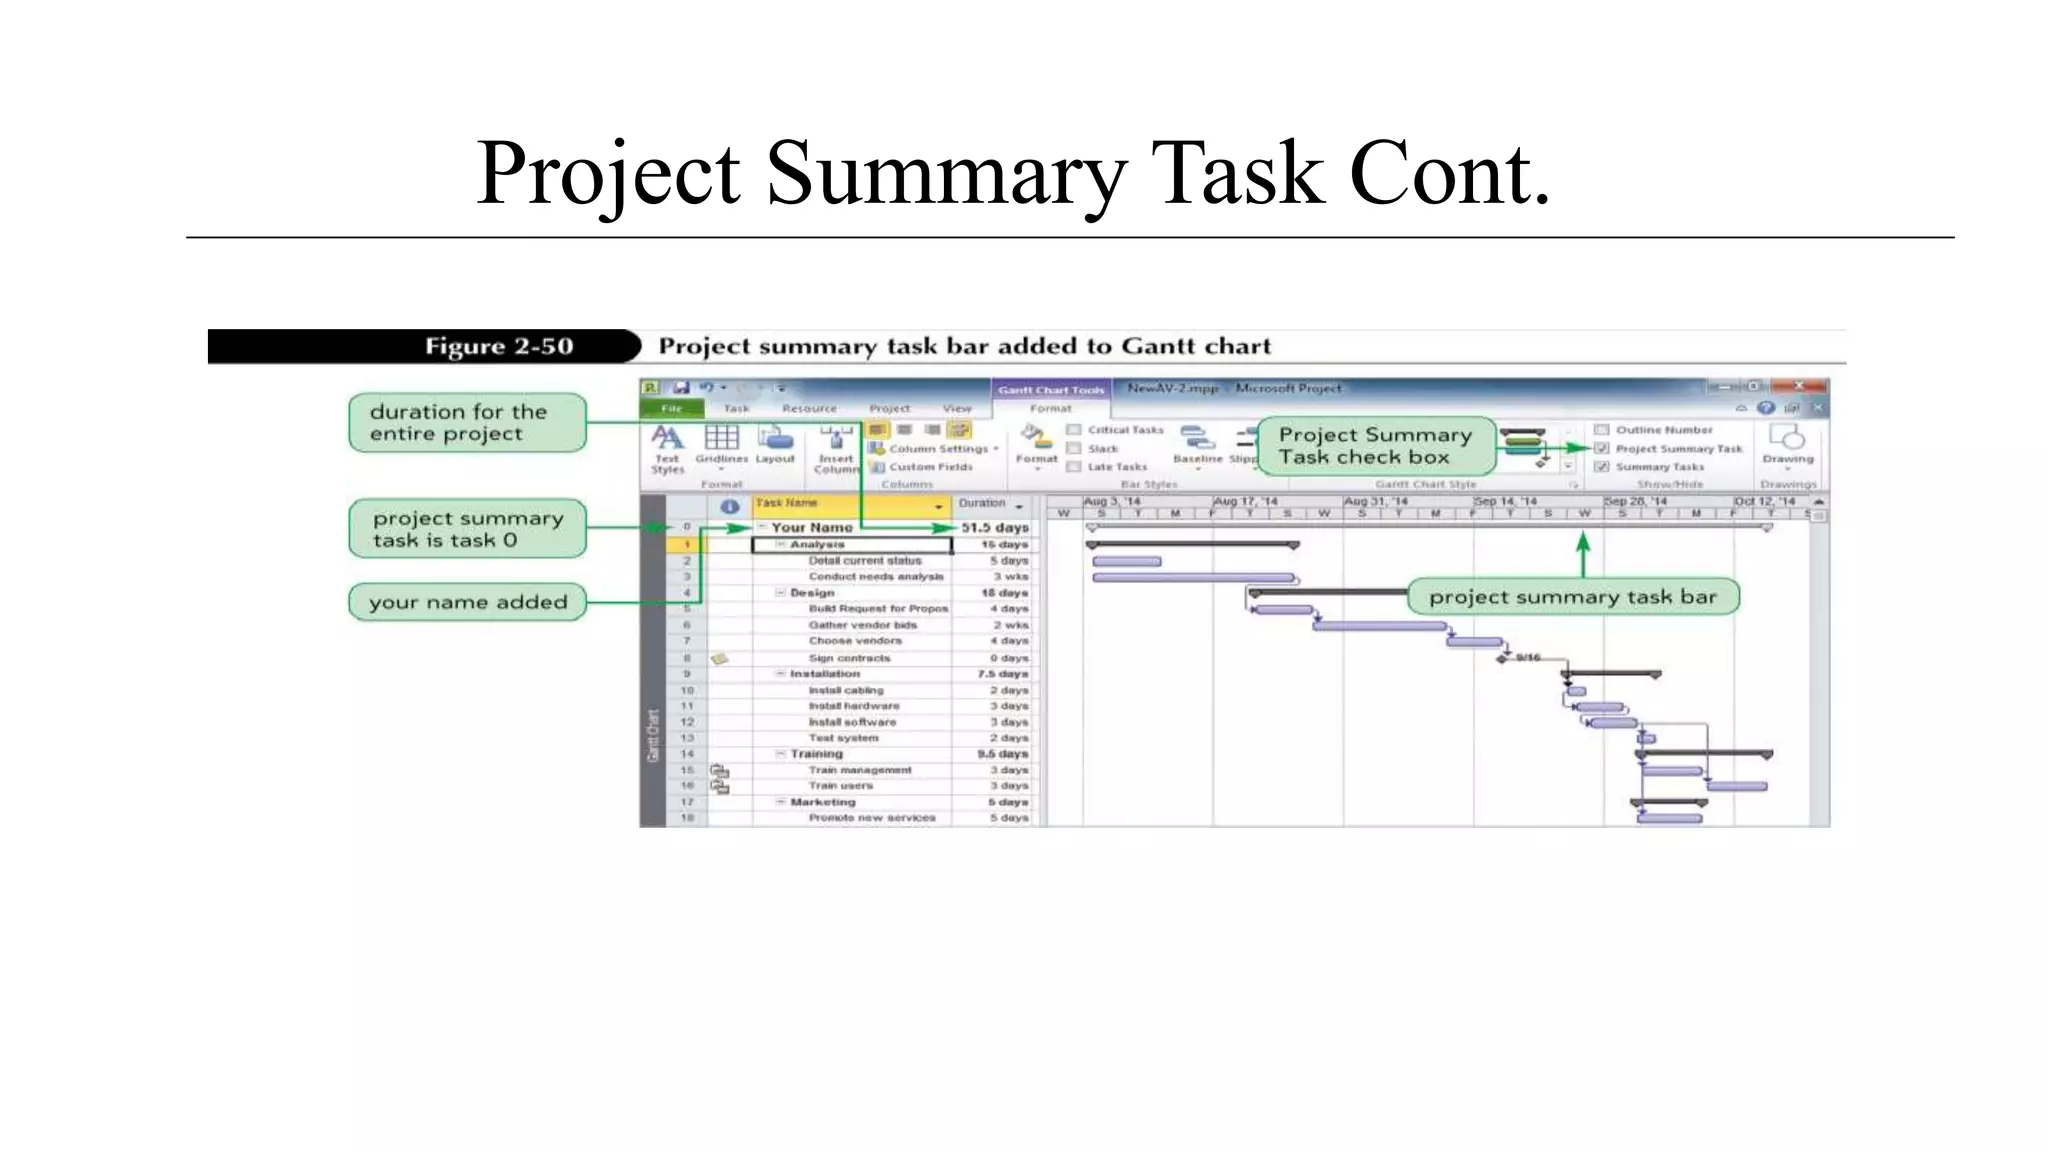
Subject : MICROSOFT OFFICE PROJECT
M.Tech (Civil)
1
PROJECT MANAGEMENT
PANDIT DEENDAYAL PETROLEUM
UNIVERSITY
GUIDED BY:
DR.DEBASIS SARKAR
ASSOCIATE PROFESSOR
(CIVIL, SCHOOL OF TECHNOLOGY)
PANDIT DEENDAYAL PETROLEUM
UNIVERSITY.
Group No:- 05
PREPARED BY :-
18MCL014 SMIT PATEL
18MCL015 KUNJAN SHUKLA
18MCL016 JAY SONI
• What is Microsoft Project
• Creating A New Schedule
• Introducing Gantt Chart
• Entering Tasks in the schedule
• Entering Duration
• Enter tasks and save a project
• Linking Task
CONTENTS:-
• Open and explore an existing project
• Examine different project views
• Compare the Gantt Chart and Network Diagram
views
• Use project time scale and calendar
• Use Backstage view and Page Setup dialog box
• Start a new project
• Examine scheduling defaults
• Change a project and task calendar
• Enter and edit tasks and durations
• Enter and edit recurring tasks and milestones
• Show the project summary
• Enter lag and lead times
• Review project statistics
• Develop a work breakdown structure
What is Microsoft Project?
Microsoft Project (or MSP) is a project management software
program.
It is designed to assist project managers in:-
Developing plans.
Assigning resources to tasks.
Tracking progress.
Managing budgets.
Analyzing workloads.
Creating A New Schedule
1. Click on Microsoft project.
2. Click on file menu  new  blank project for new project.
3. From file menu click on info. For project information such as
start date, finish date, schedule date, current date, status date,
project calendar and priority.
4. Type information related to project.
Select the blank project for
new project
Introducing Gantt Chart:-
• Choose New command from file menu, MSP displays Gantt
Chart
It consists ,
Table of task information
Bar chart
Divider bar
Gantt table Gantt bar chart
Divider bar
Standard toolbar
Formatting toolbar
Entering Tasks In The Schedule
 To enter a task:-
1. Enter task in task name.
2. Click enter.
 To delete a task:-
1. Select the task you want to delete.
2. From edit menu, choose delete task.
Enter Tasks
Select the task  delete task Task deleted
Entering Duration
1. Select the Duration column for the first task.
2. Type a number for the duration length followed by the duration unit abbreviation.
3. Press Enter.
ENTER DURATION
Gantt bars
extend to
represent the
individual task
duration.
Getting Organized With Outlining
 To demote a task:
1. Select the task you want to demote.
2. Click the indent button on formatting toolbar.
 To promote a task:
1. Select the task you want to promote.
2. Click the outdent button on the formatting toolbar.
TO PROMTE A TASK
TO DEMOTE A TASK
Linking Tasks
To create a task relationship :-
1. In the Gantt table, select the tasks you want to link.
2. Click the Link Tasks button on standard toolbar.
To remove a task relationship :-
1. In the Gantt table, select the tasks you want to unlink.
2. Click the Unlink Tasks button on standard toolbar.
Link task
Unlink task
Assigning Resources To The Tasks
To assign a resource to a task:
1. Select a task to which you want to assign a resource.
2. Click the resource assignment button on the standard toolbar.
3. Type the name of the resources you want to assign in selected tasks.
4. Choose the Assign Button.
Assign resource
Assign people or equipment
Checking Your Schedule
• To check the Finish Date:
1. From Project Menu, choose summary info.
2. Select Project Information Tab.
3. After verify ,close by cancel button
• To view the entire project:
1. From the view menu, choose zoom.
2. Select the entire project option button.
Finish date
Entire project
Formatting The Gantt Chart
To change fonts of task :
1. In the Gantt table, select a task you want to format.
2. Choose font from the format menu.
3. Choose OK button
To Format a Gantt Bar:
1. Select the Gantt bar for format.
2. From the format menu, Select Bar Style in Format Tab.
3. Change the colour of bars and text .
4. Click Ok Button
Select the new shape, pattern, color for Gantt bar.
Printing Your Schedule
• To preview or print the Gantt chart:
1. File  print button.
Preview of the
Gantt chart
The Timeline
7
The Timescale
• Current Date
• Working Days and Nonworking Days
• Setting Automatic Scheduling
• Setting Project Start and Finish Dates
• Entering Tasks
• Saving a Project
• Closing a Project
• Opening an Existing Project
• Saving a Project with a new name
Setting the Scheduling Mode
Setting Project Start and Finish Dates
Changing the Current Date
Entering Tasks
Two Tasks Entered
Saving a Project
Working in Different Views
• Chart or Graphic: representation of data using bars,
boxes, lines, and images
• Sheet: A spreadsheet‐like representation of data in
rows and columns
• Form: view of many pieces of information to focus on
the details of one task
• Combination: view of many tasks at the top of the
screen, view of task details below.
Common Views
• Gantt Chart View
• Network Diagram View
• Calendar View
• Task Information Dialog Box
• Notes Tab, Notes Indicator
• Relationship View
Network Diagram View
Calendar view
Task Information Dialog Box
Notes Tab
Notes Indicators
Relationship Diagram View
Common Views, Cont.
• Entry Table
• Schedule Table
• Split View
• Zooming in and Out
• Timescale Dialog Box
• Changing the timescale
Entry Table
Schedule Table
Split View
Zooming In and Out
Timescale Dialog Box
Changing the Timescale
’
• By default, the new project file is scheduled from a project
Start date
• All tasks are scheduled to begin as soon as possible
• Project 2010 calculates the project s Finish date based on
the:
– Tasks
– Durations
– Dependencies
Project Information Dialog Box
Scheduling a Project from a Finish Date
• When a project is scheduled from a Finish date, such as a
conference, all tasks are scheduled to begin as late as possible.
• Project 2010 calculates the project’s Start date based on the tasks,
durations and dependencies.
• The default is for all tasks and the project to start as late as
possible.
• To schedule from a Finish Date, you apply this setting as soon as
the project is created.
Project Scheduled From Finish Date
The Task Information Dialog Box
• The Task Information dialog box is a comprehensive collection
of all of the information about each task organized into six
categories:
– General
– Predecessors
– Resources
– Advanced
– Notes
– Custom Fields
• The Task Information dialog box is another view by which you
can examine and enter data about a task.
The Task Information Dialog Box
Constraints using Task Information
• How the project is originally scheduled (from a Start date or
from a Finish date) determines the initial Constraint types (as
soon as possible or as late as possible).
• The initial Constraint type has a tremendous impact on the
calculated start and finish dates for each task entered into the
project.
• Always take the time to examine the Project Information dialog
box before starting a new project.
Examining Project Calendars
• By default, the entire project, each task, and each resource is
scheduled according to the Standard calendar.
• The Standard calendar specifies that Monday through Friday are
working days with 8 hours of work completed each day.
• Saturday and Sunday are designated as nonworking days.
• The Calendar can be modified to identify holidays or other nonworking
days or times in which work should not be scheduled.
• You can also create unique calendars for tasks and resources that do
not follow the working and nonworking times specified by the
Standard calendar.
Change Time for a Work Week
Creating a Task Calendar
• An individual task calendar can be created for any task that
does not follow the working and nonworking times specified by
the project calendar.
• An individual resource calendar can be created for a resource
that does not follow the working and nonworking times
specified by the project calendar.
• By default, all tasks and resource assignments inherit the project
calendar unless you specify something else.
Changing the Calendar for a Task
Applying a Task Calendar to a Task
Entering Tasks and Durations in the Entry Table
• Entering tasks and durations is probably the single most
important effort in developing a useful project file.
• If tasks are omitted or durations underestimated, the value of the
project’s scheduling and cost information is compromised and the
success of the project might be jeopardized.
• Often you will need to change an existing task or insert,
delete, or move a task.
Editing Tasks and Durations in the Entry Table
• Project 2010 makes it very easy to edit an existing project.
• Many of the editing skills that you gained when editing a
spreadsheet will apply to a project table.
• To change an existing entry, you first navigate to the cell.
Once there, you have several options:
– Retype the entry
– Edit the entry directly in the cell
– Edit an entry in the Entry bar
Entering and Editing Tasks in the Entry Table
Copy, Paste and Move
• Copying, pasting, and moving tasks are important task
editing skills.
• Project 2010 offers a variety of tools that you can use to
accomplish these common tasks, including:
– Menu bar options
– Toolbar buttons
– Quick keystrokes
– Right‐click shortcut menus
Fill Handle
• If several task durations are the same, you can use either the
copy and paste features to quickly enter the durations or the
fill handle to populate cells.
• If you have used the fill handle in Excel or another
spreadsheet program, you will find it a very similar process in
Project 2010.
• The fill handle is a small square that appears in the lower
corner of the selected cell.
• When you drag a fill handle, the contents of the active cell
are copied.
• You can also use the fill handle to fill task names.
Fill Handle
Working with Duration Units of Measure
• Entering and editing durations involves understanding the
units of measure available for them.
• The default unit of measure is day, and therefore “day” does
not need to be entered.
• To use any other unit, you must type the
abbreviation.
Units of Measure Abbreviations
• Elapsed refers to clock time rather than working time.
• An example is the task “Allow paint to dry.” The paint will dry in
exactly the same amount of time regardless of whether it dries on
a workday, a weekend or holiday. If it takes one day to dry, the
duration should be entered as “1 ed” (for 1 elapsed day).
Editing Tasks and Durations in Other Views
• Anything changed in one view is automatically changed in all
the other views.
• You can use the View Bar to quickly switch between views.
• The way data is displayed differs by view and often satisfies
different communication and reporting needs as the project
develops.
Entering Milestones
• A milestone is a task that marks a significant point in time or a
progress checkpoint.
• It has a zero duration and is therefore a symbolic task that is used
mainly to communicate progress or to mark the end of a
significant phase of the project.
• Examples include the signing of a contract or the
announcement of a new product.
• Milestones can also be used to motivate project participants
by recognizing accomplishments.
Milestones
Understanding Task Dependencies
• Four task dependencies define the relationships between
tasks in a project.
’
Under standing Task Dependencies
• By linking tasks in finish‐to‐start relationships, you establish
the required sequence of tasks.
• Project 2010 uses these relationships to set start and finish dates
for each task.
• Most dependencies are Finish‐to‐Start (FS), meaning a certain
task (the predecessor) must finish before another task (the
successor) can start.
• In order to use important project management techniques such
as critical path analysis, you must determine task
dependencies.
Creating Task Dependencies
• Project 2010 makes it easy to create, and remove, FS
relationships between tasks by providing the Link Tasks and
Unlink Tasks buttons on the Standard toolbar.
• Task dependencies also can be established in the graphical
views.
Creating Task Dependencies
Slack Times
• Total slack is the amount of time by which an activity may be
delayed from its scheduled Start date without the delay setting
back the entire project.
• Free slack is the amount of time by which an activity may be
delayed without delaying the early start of any immediately
following tasks.
Critical and Non‐Critical Tasks
• In the Network Diagram view, the critical tasks— tasks that
are on the critical path—are displayed within a red border.
• A task that is not on the critical path is a non‐critical task, that is,
it doesn’t necessarily have to start on its currently scheduled Start
date in order for the overall project to be completed on time.
• The Network Diagram is used mainly to view and analyze
the critical path.
Creating Dependencies using the Network Diagram
view
Entering Lag and Lead Times
• When a project is scheduled from a Start date, lag and lead
times refer to an amount of time that the second task of a
relationship is moved backward (lead) or forward (lag) in
time.
• Lead time moves the second task backward in time so that the
two tasks overlap.
• Lag time is the opposite of lead time. It moves the second
task forward in time so that the tasks are further separated.
Lag and Lead Time from Start Date
Entering Lag and Lead Times Cont.
• Project 2010 combines the concepts of lag and lead times into
one term, lag time.
• When a project is scheduled from a Start date, positive lag time
moves the second task forward in time.
– Positive lag time is the traditional definition of lag time in general
project management discussions.
• Negative lag time moves the second task backward in time so
that the tasks overlap.
– Negative lag time is called lead time in general project management
discussions.
Negative and Positive Lag Time
Check for Lag Time Effects Cont.
• Confusing negative and positive lag times is easy, especially
when examining them for both a project that is scheduled
from a Start date and one scheduled from a Finish date.
• Remember:
– Positive lag time always increases the amount of time between
tasks.
– Negative lag time always causes the tasks to overlap.
– This rule holds true regardless of whether the project is scheduled
from the Start date or the Finish date.
Check for Lag Time Effects
• Once the tasks, durations, and relationships are entered, you
should check the Project Information dialog box to verify the
project’s calculated Finish date if the project is scheduled from a
Start date, or calculated Start date if the project is scheduled
from a Finish date.
• When a project is scheduled from a Start date, applying negative
lag time to task dependencies that are on the critical path is a
common way to shorten the critical path because it allows tasks
to overlap.
Check for Lag Time Effects Cont.
• When you apply negative lag time, the second task is
allowed to start before the first task is completely finished.
• When a project is scheduled from a Finish date, all tasks
have as late as possible schedules and lag time affects the
first task rather than the second.
Lag Time From a Finish Date
Creating a Work Breakdown Structure with
Summary Tasks
• A very important strategy for managing projects well is to
organize the work that needs to be done in a logical manner.
• A work breakdown structure (WBS) is an outcome‐ oriented
analysis of the work involved in a project that defines the total
scope of the project.
– A WBS is a foundation document in project management because it
provides the basis for planning and managing project schedules, costs,
and changes.
– The WBS provides a hierarchy, similar to an organizational chart, to
group project work logically.
Creating a Work Breakdown Structure with
Summary Tasks Cont.’d
• In order to use a WBS in Project 2010, you must organize
tasks into summary tasks (groups of tasks that logically belong
together).
• When developing a new, large project, some project managers
prefer to start with broad groupings of summary tasks and then
break them down into smaller tasks.
Creating a Work Breakdown Structure with
Summary Tasks Cont.
• Planning a project by starting with broad categories of tasks is
called the top‐down method of creating a WBS.
• Other project managers prefer to list all of the individual
tasks, and then collect them into logical groupings using the
bottom‐up method.
• Once you have indentified your summary tasks, you use
Outdenting and Indenting in Project 2010 to create the
summary tasks.
Creating a Summary Task
Displaying Outline Numbers
• Tasks and subtasks are organized in an outline, with tasks in a
hierarchy, when you have created summary tasks.
• In Project 2010, you can view built‐in outline numbers, which
will display in the Task name cells for all tasks.
’
Displaying Outline Numbers Cont. d
Project Summary Task
• Many Project Managers like to create a Project Summary Task
which allows them to see how the start and finish dates change
as they enter and edit tasks, durations, and dependencies.
Project Summary Task Cont.
Expanding and Collapsing Tasks
• Once your project has been organized into summary tasks, you
can easily expand (show) and collapse (hide) the individual
tasks within each phase.
Using WBS Codes
• Many people like to number tasks in their WBS to show the
logical groupings of work.
• Using outline numbers or special work breakdown structure
(WBS) code is a way to use an alphanumeric code to represent
each task’s position within the hierarchical structure of the
project.
• A WBS code helps identify and group project tasks for project
communication, documentation, or accounting purposes.
Creating WBS Codes
MICROSOFT PROJECT

MICROSOFT PROJECT

  • 1.
    Subject : MICROSOFTOFFICE PROJECT M.Tech (Civil) 1 PROJECT MANAGEMENT PANDIT DEENDAYAL PETROLEUM UNIVERSITY GUIDED BY: DR.DEBASIS SARKAR ASSOCIATE PROFESSOR (CIVIL, SCHOOL OF TECHNOLOGY) PANDIT DEENDAYAL PETROLEUM UNIVERSITY. Group No:- 05 PREPARED BY :- 18MCL014 SMIT PATEL 18MCL015 KUNJAN SHUKLA 18MCL016 JAY SONI
  • 2.
    • What isMicrosoft Project • Creating A New Schedule • Introducing Gantt Chart • Entering Tasks in the schedule • Entering Duration • Enter tasks and save a project • Linking Task CONTENTS:-
  • 3.
    • Open andexplore an existing project • Examine different project views • Compare the Gantt Chart and Network Diagram views • Use project time scale and calendar • Use Backstage view and Page Setup dialog box
  • 4.
    • Start anew project • Examine scheduling defaults • Change a project and task calendar • Enter and edit tasks and durations • Enter and edit recurring tasks and milestones
  • 5.
    • Show theproject summary • Enter lag and lead times • Review project statistics • Develop a work breakdown structure
  • 6.
    What is MicrosoftProject? Microsoft Project (or MSP) is a project management software program. It is designed to assist project managers in:- Developing plans. Assigning resources to tasks. Tracking progress. Managing budgets. Analyzing workloads.
  • 7.
    Creating A NewSchedule 1. Click on Microsoft project. 2. Click on file menu  new  blank project for new project. 3. From file menu click on info. For project information such as start date, finish date, schedule date, current date, status date, project calendar and priority. 4. Type information related to project.
  • 8.
    Select the blankproject for new project
  • 9.
    Introducing Gantt Chart:- •Choose New command from file menu, MSP displays Gantt Chart It consists , Table of task information Bar chart Divider bar
  • 10.
    Gantt table Ganttbar chart Divider bar Standard toolbar Formatting toolbar
  • 11.
    Entering Tasks InThe Schedule  To enter a task:- 1. Enter task in task name. 2. Click enter.  To delete a task:- 1. Select the task you want to delete. 2. From edit menu, choose delete task.
  • 12.
  • 13.
    Select the task delete task Task deleted
  • 14.
    Entering Duration 1. Selectthe Duration column for the first task. 2. Type a number for the duration length followed by the duration unit abbreviation. 3. Press Enter.
  • 15.
  • 17.
    Gantt bars extend to representthe individual task duration.
  • 18.
    Getting Organized WithOutlining  To demote a task: 1. Select the task you want to demote. 2. Click the indent button on formatting toolbar.  To promote a task: 1. Select the task you want to promote. 2. Click the outdent button on the formatting toolbar.
  • 19.
    TO PROMTE ATASK TO DEMOTE A TASK
  • 20.
    Linking Tasks To createa task relationship :- 1. In the Gantt table, select the tasks you want to link. 2. Click the Link Tasks button on standard toolbar. To remove a task relationship :- 1. In the Gantt table, select the tasks you want to unlink. 2. Click the Unlink Tasks button on standard toolbar.
  • 21.
  • 22.
  • 23.
    Assigning Resources ToThe Tasks To assign a resource to a task: 1. Select a task to which you want to assign a resource. 2. Click the resource assignment button on the standard toolbar. 3. Type the name of the resources you want to assign in selected tasks. 4. Choose the Assign Button.
  • 24.
  • 25.
    Checking Your Schedule •To check the Finish Date: 1. From Project Menu, choose summary info. 2. Select Project Information Tab. 3. After verify ,close by cancel button • To view the entire project: 1. From the view menu, choose zoom. 2. Select the entire project option button.
  • 26.
  • 27.
  • 28.
    Formatting The GanttChart To change fonts of task : 1. In the Gantt table, select a task you want to format. 2. Choose font from the format menu. 3. Choose OK button To Format a Gantt Bar: 1. Select the Gantt bar for format. 2. From the format menu, Select Bar Style in Format Tab. 3. Change the colour of bars and text . 4. Click Ok Button
  • 29.
    Select the newshape, pattern, color for Gantt bar.
  • 30.
    Printing Your Schedule •To preview or print the Gantt chart: 1. File  print button.
  • 31.
  • 32.
  • 33.
  • 34.
    • Current Date •Working Days and Nonworking Days • Setting Automatic Scheduling • Setting Project Start and Finish Dates • Entering Tasks • Saving a Project • Closing a Project • Opening an Existing Project • Saving a Project with a new name
  • 35.
  • 36.
    Setting Project Startand Finish Dates
  • 37.
  • 38.
  • 39.
  • 40.
  • 41.
    Working in DifferentViews • Chart or Graphic: representation of data using bars, boxes, lines, and images • Sheet: A spreadsheet‐like representation of data in rows and columns • Form: view of many pieces of information to focus on the details of one task • Combination: view of many tasks at the top of the screen, view of task details below.
  • 42.
    Common Views • GanttChart View • Network Diagram View • Calendar View • Task Information Dialog Box • Notes Tab, Notes Indicator • Relationship View
  • 43.
  • 44.
  • 45.
  • 46.
  • 47.
  • 48.
  • 49.
    Common Views, Cont. •Entry Table • Schedule Table • Split View • Zooming in and Out • Timescale Dialog Box • Changing the timescale
  • 50.
  • 51.
  • 52.
  • 53.
  • 54.
  • 55.
  • 56.
    ’ • By default,the new project file is scheduled from a project Start date • All tasks are scheduled to begin as soon as possible • Project 2010 calculates the project s Finish date based on the: – Tasks – Durations – Dependencies
  • 57.
  • 58.
    Scheduling a Projectfrom a Finish Date • When a project is scheduled from a Finish date, such as a conference, all tasks are scheduled to begin as late as possible. • Project 2010 calculates the project’s Start date based on the tasks, durations and dependencies. • The default is for all tasks and the project to start as late as possible. • To schedule from a Finish Date, you apply this setting as soon as the project is created.
  • 59.
  • 60.
    The Task InformationDialog Box • The Task Information dialog box is a comprehensive collection of all of the information about each task organized into six categories: – General – Predecessors – Resources – Advanced – Notes – Custom Fields • The Task Information dialog box is another view by which you can examine and enter data about a task.
  • 61.
  • 62.
    Constraints using TaskInformation • How the project is originally scheduled (from a Start date or from a Finish date) determines the initial Constraint types (as soon as possible or as late as possible). • The initial Constraint type has a tremendous impact on the calculated start and finish dates for each task entered into the project. • Always take the time to examine the Project Information dialog box before starting a new project.
  • 63.
    Examining Project Calendars •By default, the entire project, each task, and each resource is scheduled according to the Standard calendar. • The Standard calendar specifies that Monday through Friday are working days with 8 hours of work completed each day. • Saturday and Sunday are designated as nonworking days. • The Calendar can be modified to identify holidays or other nonworking days or times in which work should not be scheduled. • You can also create unique calendars for tasks and resources that do not follow the working and nonworking times specified by the Standard calendar.
  • 64.
    Change Time fora Work Week
  • 65.
    Creating a TaskCalendar • An individual task calendar can be created for any task that does not follow the working and nonworking times specified by the project calendar. • An individual resource calendar can be created for a resource that does not follow the working and nonworking times specified by the project calendar. • By default, all tasks and resource assignments inherit the project calendar unless you specify something else.
  • 66.
  • 67.
    Applying a TaskCalendar to a Task
  • 68.
    Entering Tasks andDurations in the Entry Table • Entering tasks and durations is probably the single most important effort in developing a useful project file. • If tasks are omitted or durations underestimated, the value of the project’s scheduling and cost information is compromised and the success of the project might be jeopardized. • Often you will need to change an existing task or insert, delete, or move a task.
  • 69.
    Editing Tasks andDurations in the Entry Table • Project 2010 makes it very easy to edit an existing project. • Many of the editing skills that you gained when editing a spreadsheet will apply to a project table. • To change an existing entry, you first navigate to the cell. Once there, you have several options: – Retype the entry – Edit the entry directly in the cell – Edit an entry in the Entry bar
  • 70.
    Entering and EditingTasks in the Entry Table
  • 71.
    Copy, Paste andMove • Copying, pasting, and moving tasks are important task editing skills. • Project 2010 offers a variety of tools that you can use to accomplish these common tasks, including: – Menu bar options – Toolbar buttons – Quick keystrokes – Right‐click shortcut menus
  • 72.
    Fill Handle • Ifseveral task durations are the same, you can use either the copy and paste features to quickly enter the durations or the fill handle to populate cells. • If you have used the fill handle in Excel or another spreadsheet program, you will find it a very similar process in Project 2010. • The fill handle is a small square that appears in the lower corner of the selected cell. • When you drag a fill handle, the contents of the active cell are copied. • You can also use the fill handle to fill task names.
  • 73.
  • 74.
    Working with DurationUnits of Measure • Entering and editing durations involves understanding the units of measure available for them. • The default unit of measure is day, and therefore “day” does not need to be entered. • To use any other unit, you must type the abbreviation.
  • 75.
    Units of MeasureAbbreviations • Elapsed refers to clock time rather than working time. • An example is the task “Allow paint to dry.” The paint will dry in exactly the same amount of time regardless of whether it dries on a workday, a weekend or holiday. If it takes one day to dry, the duration should be entered as “1 ed” (for 1 elapsed day).
  • 76.
    Editing Tasks andDurations in Other Views • Anything changed in one view is automatically changed in all the other views. • You can use the View Bar to quickly switch between views. • The way data is displayed differs by view and often satisfies different communication and reporting needs as the project develops.
  • 77.
    Entering Milestones • Amilestone is a task that marks a significant point in time or a progress checkpoint. • It has a zero duration and is therefore a symbolic task that is used mainly to communicate progress or to mark the end of a significant phase of the project. • Examples include the signing of a contract or the announcement of a new product. • Milestones can also be used to motivate project participants by recognizing accomplishments.
  • 78.
  • 79.
    Understanding Task Dependencies •Four task dependencies define the relationships between tasks in a project.
  • 80.
    ’ Under standing TaskDependencies • By linking tasks in finish‐to‐start relationships, you establish the required sequence of tasks. • Project 2010 uses these relationships to set start and finish dates for each task. • Most dependencies are Finish‐to‐Start (FS), meaning a certain task (the predecessor) must finish before another task (the successor) can start. • In order to use important project management techniques such as critical path analysis, you must determine task dependencies.
  • 81.
    Creating Task Dependencies •Project 2010 makes it easy to create, and remove, FS relationships between tasks by providing the Link Tasks and Unlink Tasks buttons on the Standard toolbar. • Task dependencies also can be established in the graphical views.
  • 82.
  • 83.
    Slack Times • Totalslack is the amount of time by which an activity may be delayed from its scheduled Start date without the delay setting back the entire project. • Free slack is the amount of time by which an activity may be delayed without delaying the early start of any immediately following tasks.
  • 84.
    Critical and Non‐CriticalTasks • In the Network Diagram view, the critical tasks— tasks that are on the critical path—are displayed within a red border. • A task that is not on the critical path is a non‐critical task, that is, it doesn’t necessarily have to start on its currently scheduled Start date in order for the overall project to be completed on time. • The Network Diagram is used mainly to view and analyze the critical path.
  • 85.
    Creating Dependencies usingthe Network Diagram view
  • 86.
    Entering Lag andLead Times • When a project is scheduled from a Start date, lag and lead times refer to an amount of time that the second task of a relationship is moved backward (lead) or forward (lag) in time. • Lead time moves the second task backward in time so that the two tasks overlap. • Lag time is the opposite of lead time. It moves the second task forward in time so that the tasks are further separated.
  • 87.
    Lag and LeadTime from Start Date
  • 88.
    Entering Lag andLead Times Cont. • Project 2010 combines the concepts of lag and lead times into one term, lag time. • When a project is scheduled from a Start date, positive lag time moves the second task forward in time. – Positive lag time is the traditional definition of lag time in general project management discussions. • Negative lag time moves the second task backward in time so that the tasks overlap. – Negative lag time is called lead time in general project management discussions.
  • 89.
  • 90.
    Check for LagTime Effects Cont. • Confusing negative and positive lag times is easy, especially when examining them for both a project that is scheduled from a Start date and one scheduled from a Finish date. • Remember: – Positive lag time always increases the amount of time between tasks. – Negative lag time always causes the tasks to overlap. – This rule holds true regardless of whether the project is scheduled from the Start date or the Finish date.
  • 91.
    Check for LagTime Effects • Once the tasks, durations, and relationships are entered, you should check the Project Information dialog box to verify the project’s calculated Finish date if the project is scheduled from a Start date, or calculated Start date if the project is scheduled from a Finish date. • When a project is scheduled from a Start date, applying negative lag time to task dependencies that are on the critical path is a common way to shorten the critical path because it allows tasks to overlap.
  • 92.
    Check for LagTime Effects Cont. • When you apply negative lag time, the second task is allowed to start before the first task is completely finished. • When a project is scheduled from a Finish date, all tasks have as late as possible schedules and lag time affects the first task rather than the second.
  • 93.
    Lag Time Froma Finish Date
  • 94.
    Creating a WorkBreakdown Structure with Summary Tasks • A very important strategy for managing projects well is to organize the work that needs to be done in a logical manner. • A work breakdown structure (WBS) is an outcome‐ oriented analysis of the work involved in a project that defines the total scope of the project. – A WBS is a foundation document in project management because it provides the basis for planning and managing project schedules, costs, and changes. – The WBS provides a hierarchy, similar to an organizational chart, to group project work logically.
  • 95.
    Creating a WorkBreakdown Structure with Summary Tasks Cont.’d • In order to use a WBS in Project 2010, you must organize tasks into summary tasks (groups of tasks that logically belong together). • When developing a new, large project, some project managers prefer to start with broad groupings of summary tasks and then break them down into smaller tasks.
  • 96.
    Creating a WorkBreakdown Structure with Summary Tasks Cont. • Planning a project by starting with broad categories of tasks is called the top‐down method of creating a WBS. • Other project managers prefer to list all of the individual tasks, and then collect them into logical groupings using the bottom‐up method. • Once you have indentified your summary tasks, you use Outdenting and Indenting in Project 2010 to create the summary tasks.
  • 97.
  • 98.
    Displaying Outline Numbers •Tasks and subtasks are organized in an outline, with tasks in a hierarchy, when you have created summary tasks. • In Project 2010, you can view built‐in outline numbers, which will display in the Task name cells for all tasks.
  • 99.
  • 100.
    Project Summary Task •Many Project Managers like to create a Project Summary Task which allows them to see how the start and finish dates change as they enter and edit tasks, durations, and dependencies.
  • 101.
  • 102.
    Expanding and CollapsingTasks • Once your project has been organized into summary tasks, you can easily expand (show) and collapse (hide) the individual tasks within each phase.
  • 103.
    Using WBS Codes •Many people like to number tasks in their WBS to show the logical groupings of work. • Using outline numbers or special work breakdown structure (WBS) code is a way to use an alphanumeric code to represent each task’s position within the hierarchical structure of the project. • A WBS code helps identify and group project tasks for project communication, documentation, or accounting purposes.
  • 104.