Objectives
Understand projectmanagement using Microsoft Project 2016.
Work breakdown structure.
Define Tasks(modes, types and relationships) and Resources in Project.
Make Work Package Estimates.
Create an Initial Schedule, projects from templates, Excel files, Global templates.
Create formulas and graphical indicators.
Steps to record macro.
Format Output and Print Reports.
Integrate multiple projects.
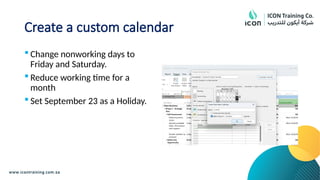
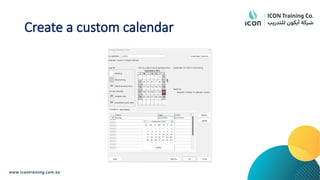
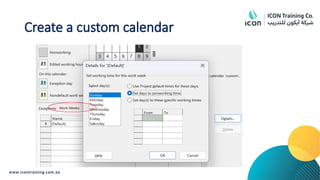
Using custom calendar.
Manage multiple projects.
Create a master project list with shared resources.
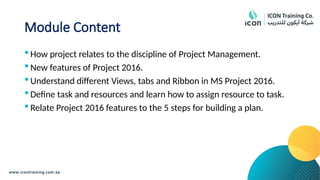
Module Content
Howproject relates to the discipline of Project Management.
New features of Project 2016.
Understand different Views, tabs and Ribbon in MS Project 2016.
Define task and resources and learn how to assign resource to task.
Relate Project 2016 features to the 5 steps for building a plan.
7.
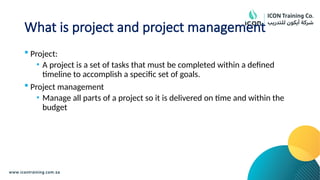
What is projectand project management
Project:
• A project is a set of tasks that must be completed within a defined
timeline to accomplish a specific set of goals.
Project management
• Manage all parts of a project so it is delivered on time and within the
budget
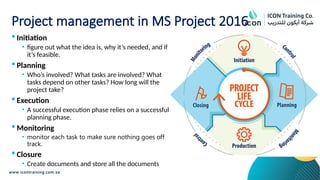
Project management inMS Project 2016
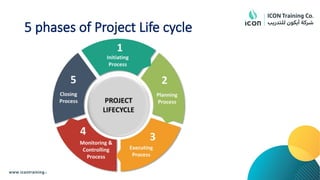
Initiation
• figure out what the idea is, why it’s needed, and if
it’s feasible.
Planning
• Who’s involved? What tasks are involved? What
tasks depend on other tasks? How long will the
project take?
Execution
• A successful execution phase relies on a successful
planning phase.
Monitoring
• monitor each task to make sure nothing goes off
track.
Closure
• Create documents and store all the documents
10.
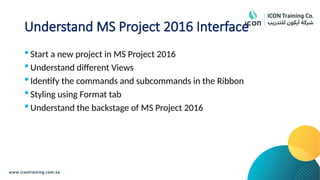
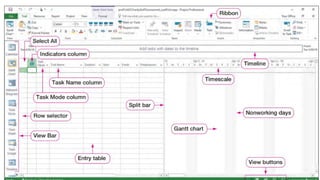
Understand MS Project2016 Interface
Start a new project in MS Project 2016
Understand different Views
Identify the commands and subcommands in the Ribbon
Styling using Format tab
Understand the backstage of MS Project 2016
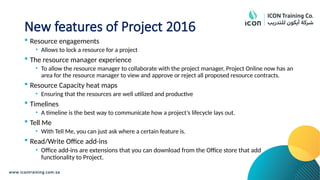
New features ofProject 2016
Resource engagements
• Allows to lock a resource for a project
The resource manager experience
• To allow the resource manager to collaborate with the project manager, Project Online now has an
area for the resource manager to view and approve or reject all proposed resource contracts.
Resource Capacity heat maps
• Ensuring that the resources are well utilized and productive
Timelines
• A timeline is the best way to communicate how a project’s lifecycle lays out.
Tell Me
• With Tell Me, you can just ask where a certain feature is.
Read/Write Office add-ins
• Office add-ins are extensions that you can download from the Office store that add
functionality to Project.
14.
Knowledge check
What arethe five phases of project
management?
Name any five views of MS Project 2016?
Module Content
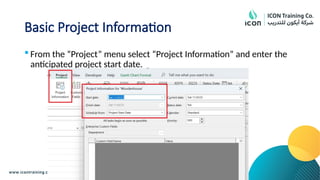
Createa new project
Enter project tasks
Sequence the tasks
Define resources
Estimate task duration and assign resources
Baseline the project
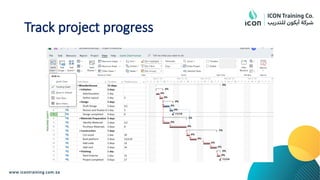
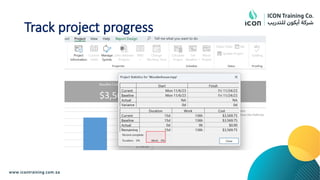
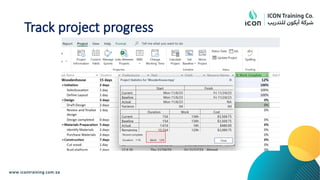
Track project progress
17.
Steps to createa project in MS Project 2016
1.Project start: Create and set up a schedule
2.Task creation: Create tasks, establish relationships, & build logic (dependencies &
predecessors)
3.Resource management: Request resources and assign work
4.Co-authoring: Work with other project managers, schedulers, and stakeholders to
update tasks, resources, schedules, and more simultaneously
5.Schedule oversight: View the project in multiple views
1. Grid view (all tasks in a list)
2. Gantt chart view (bar chart) all tasks displayed in a timeline
3. Board view ( All tasks as a storyboard)
6.Project calendar: See project status and key deliverables due each day
7.Budgeting: Track project costs, including work, material, and resources
8.Collaboration: Access schedule and work with project teams virtually online anywhere
9.Risk Analysis: Analyse the effects of identified risk and overall impact on the schedule
10.
Reporting: Track and report project progress with automated pre-built reports
18.
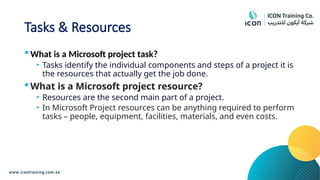
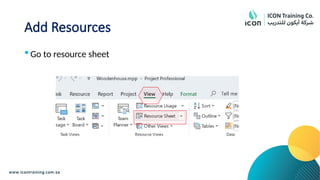
Tasks & Resources
What is a Microsoft project task?
• Tasks identify the individual components and steps of a project it is
the resources that actually get the job done.
What is a Microsoft project resource?
• Resources are the second main part of a project.
• In Microsoft Project resources can be anything required to perform
tasks – people, equipment, facilities, materials, and even costs.
19.
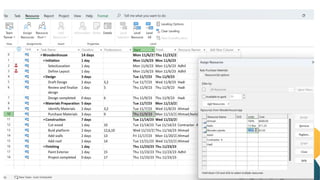
Module 2 LAB1
Create a small project to construct a wooden outhouse. Tasks and
resources are given in the practice file.
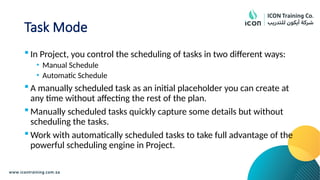
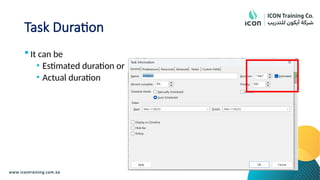
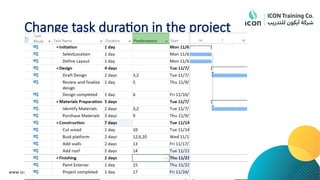
Task Mode
InProject, you control the scheduling of tasks in two different ways:
• Manual Schedule
• Automatic Schedule
A manually scheduled task as an initial placeholder you can create at
any time without affecting the rest of the plan.
Manually scheduled tasks quickly capture some details but without
scheduling the tasks.
Work with automatically scheduled tasks to take full advantage of the
powerful scheduling engine in Project.
24.
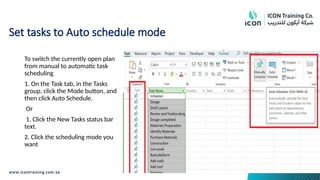
Set tasks toAuto schedule mode
To switch the currently open plan
from manual to automatic task
scheduling
1. On the Task tab, in the Tasks
group, click the Mode button, and
then click Auto Schedule.
Or
1. Click the New Tasks status bar
text.
2. Click the scheduling mode you
want
25.
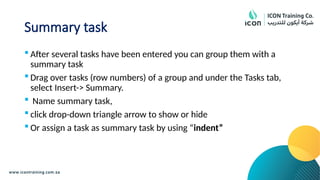
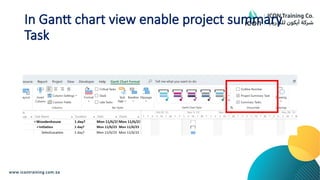
Summary task
Afterseveral tasks have been entered you can group them with a
summary task
Drag over tasks (row numbers) of a group and under the Tasks tab,
select Insert-> Summary.
Name summary task,
click drop-down triangle arrow to show or hide
Or assign a task as summary task by using “indent”
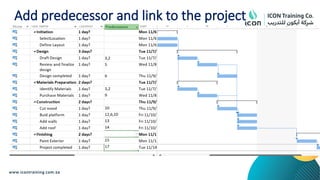
Create Task Dependencies/Relationships/
Links
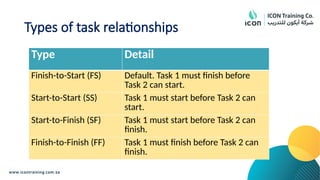
Type Detail
Finish-to-Start (FS) Default. Task 1 must finish before
Task 2 can start.
Start-to-Start (SS) Task 1 must start before Task 2 can
start.
Start-to-Finish (SF) Task 1 must start before Task 2 can
finish.
Finish-to-Finish (FF) Task 1 must finish before Task 2 can
finish.
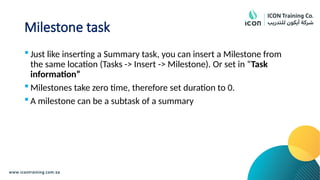
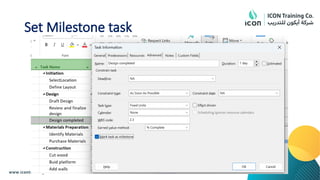
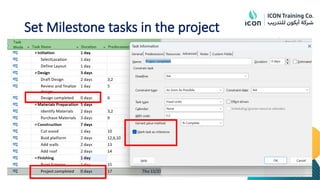
Milestone task
Justlike inserting a Summary task, you can insert a Milestone from
the same location (Tasks -> Insert -> Milestone). Or set in “Task
information”
Milestones take zero time, therefore set duration to 0.
A milestone can be a subtask of a summary
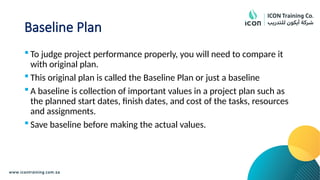
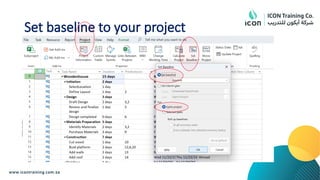
Baseline Plan
Tojudge project performance properly, you will need to compare it
with original plan.
This original plan is called the Baseline Plan or just a baseline
A baseline is collection of important values in a project plan such as
the planned start dates, finish dates, and cost of the tasks, resources
and assignments.
Save baseline before making the actual values.
Module Content
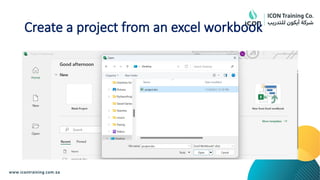
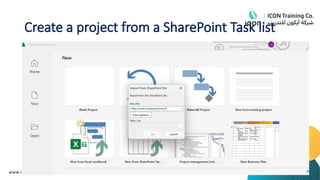
Createa new project from an Excel file
Create a new project from SharePoint task list
Establish one or more calendars to constrain resource availability
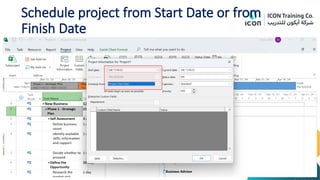
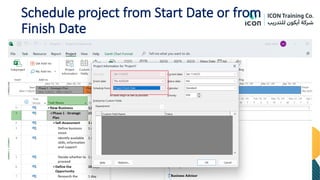
Calculate schedule from the start date or finish date
Module 3 LAB1
Follow the instructions given in the practice file
59.
Knowledge check
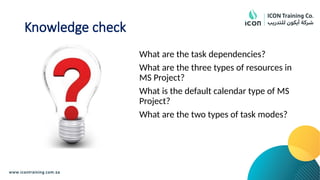
What arethe task dependencies?
What are the three types of resources in
MS Project?
What is the default calendar type of MS
Project?
What are the two types of task modes?
Module Content
Understandmore about Manual schedule and Auto schedule
Switch between manual schedule and auto schedule
Project functions to schedule tasks
62.
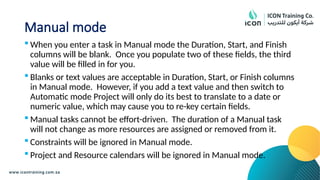
Manual mode
Whenyou enter a task in Manual mode the Duration, Start, and Finish
columns will be blank. Once you populate two of these fields, the third
value will be filled in for you.
Blanks or text values are acceptable in Duration, Start, or Finish columns
in Manual mode. However, if you add a text value and then switch to
Automatic mode Project will only do its best to translate to a date or
numeric value, which may cause you to re-key certain fields.
Manual tasks cannot be effort-driven. The duration of a Manual task
will not change as more resources are assigned or removed from it.
Constraints will be ignored in Manual mode.
Project and Resource calendars will be ignored in Manual mode.
63.
Auto mode
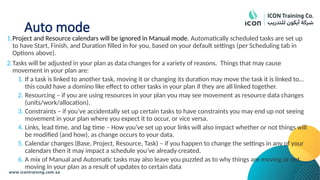
1.Project andResource calendars will be ignored in Manual mode. Automatically scheduled tasks are set up
to have Start, Finish, and Duration filled in for you, based on your default settings (per Scheduling tab in
Options above).
2.Tasks will be adjusted in your plan as data changes for a variety of reasons. Things that may cause
movement in your plan are:
1. If a task is linked to another task, moving it or changing its duration may move the task it is linked to…
this could have a domino like effect to other tasks in your plan if they are all linked together.
2. Resourcing – if you are using resources in your plan you may see movement as resource data changes
(units/work/allocation).
3. Constraints – if you’ve accidentally set up certain tasks to have constraints you may end up not seeing
movement in your plan where you expect it to occur, or vice versa.
4. Links, lead time, and lag time – How you’ve set up your links will also impact whether or not things will
be modified (and how), as change occurs to your data.
5. Calendar changes (Base, Project, Resource, Task) – if you happen to change the settings in any of your
calendars then it may impact a schedule you’ve already created.
6. A mix of Manual and Automatic tasks may also leave you puzzled as to why things are moving or not
moving in your plan as a result of updates to certain data
64.
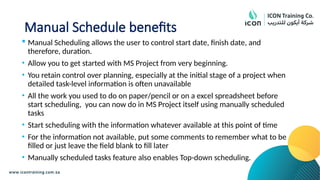
Manual Schedule benefits
Manual Scheduling allows the user to control start date, finish date, and
therefore, duration.
• Allow you to get started with MS Project from very beginning.
• You retain control over planning, especially at the initial stage of a project when
detailed task-level information is often unavailable
• All the work you used to do on paper/pencil or on a excel spreadsheet before
start scheduling, you can now do in MS Project itself using manually scheduled
tasks
• Start scheduling with the information whatever available at this point of time
• For the information not available, put some comments to remember what to be
filled or just leave the field blank to fill later
• Manually scheduled tasks feature also enables Top-down scheduling.
65.
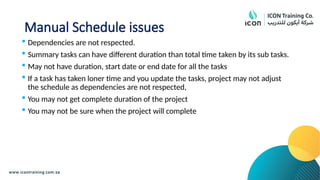
Manual Schedule issues
Dependencies are not respected.
Summary tasks can have different duration than total time taken by its sub tasks.
May not have duration, start date or end date for all the tasks
If a task has taken loner time and you update the tasks, project may not adjust
the schedule as dependencies are not respected,
You may not get complete duration of the project
You may not be sure when the project will complete
66.
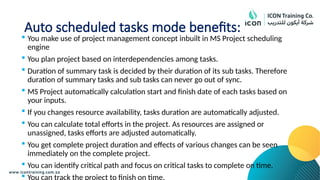
Auto scheduled tasksmode benefits:
You make use of project management concept inbuilt in MS Project scheduling
engine
You plan project based on interdependencies among tasks.
Duration of summary task is decided by their duration of its sub tasks. Therefore
duration of summary tasks and sub tasks can never go out of sync.
MS Project automatically calculation start and finish date of each tasks based on
your inputs.
If you changes resource availability, tasks duration are automatically adjusted.
You can calculate total efforts in the project. As resources are assigned or
unassigned, tasks efforts are adjusted automatically.
You get complete project duration and effects of various changes can be seen
immediately on the complete project.
You can identify critical path and focus on critical tasks to complete on time.
You can track the project to finish on time.
Module Content
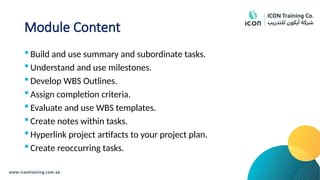
Buildand use summary and subordinate tasks.
Understand and use milestones.
Develop WBS Outlines.
Assign completion criteria.
Evaluate and use WBS templates.
Create notes within tasks.
Hyperlink project artifacts to your project plan.
Create reoccurring tasks.
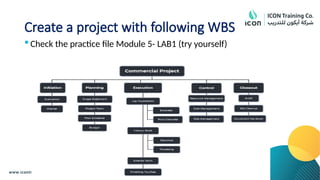
Create a projectwith following WBS
Check the practice file Module 5- LAB1 (try yourself)
74.
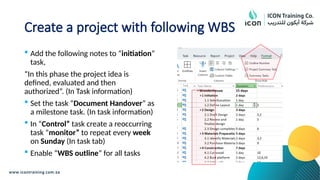
Create a projectwith following WBS
Add the following notes to “initiation”
task,
“In this phase the project idea is
defined, evaluated and then
authorized”. (In Task information)
Set the task “Document Handover” as
a milestone task. (In task information)
In “Control” task create a reoccurring
task “monitor” to repeat every week
on Sunday (In task tab)
Enable “WBS outline” for all tasks
75.
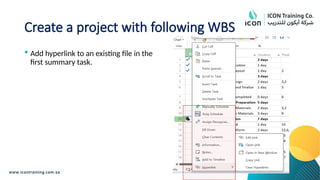
Create a projectwith following WBS
Add hyperlink to an existing file in the
first summary task.
76.
Project completion criteria
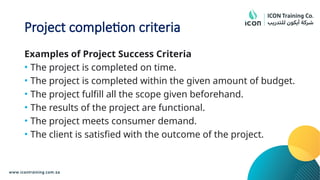
Examplesof Project Success Criteria
• The project is completed on time.
• The project is completed within the given amount of budget.
• The project fulfill all the scope given beforehand.
• The results of the project are functional.
• The project meets consumer demand.
• The client is satisfied with the outcome of the project.
Module Content
Recollectthe different types of task relationships
Understand Different methods to create relationships
Determine and display task sequences
Understand and use lag, lead and delay.
Understand the new feature of Task paths.
81.
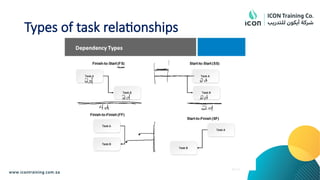
Types of taskrelationships
Type Detail
Finish-to-Start (FS) Default. Task 1 must finish before
Task 2 can start.
Start-to-Start (SS) Task 1 must start before Task 2 can
start.
Start-to-Finish (SF) Task 1 must start before Task 2 can
finish.
Finish-to-Finish (FF) Task 1 must finish before Task 2 can
finish.
Various methods tocreate task relationships
1. Add predecessor or successor column in tasks
2. Add link between two tasks by using link command
[Select the two tasksTask tabschedule group link]
Identify the links between tasks by using network diagram
84.
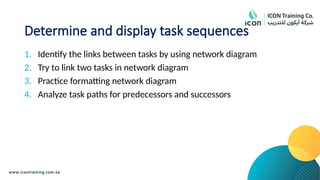
Determine and displaytask sequences
1. Identify the links between tasks by using network diagram
2. Try to link two tasks in network diagram
3. Practice formatting network diagram
4. Analyze task paths for predecessors and successors
85.
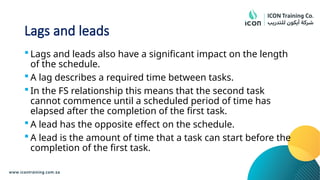
Lags and leads
Lags and leads also have a significant impact on the length
of the schedule.
A lag describes a required time between tasks.
In the FS relationship this means that the second task
cannot commence until a scheduled period of time has
elapsed after the completion of the first task.
A lead has the opposite effect on the schedule.
A lead is the amount of time that a task can start before the
completion of the first task.
86.
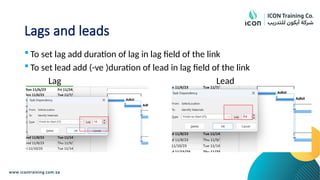
Lags and leads
To set lag add duration of lag in lag field of the link
To set lead add (-ve )duration of lead in lag field of the link
Lag Lead
87.
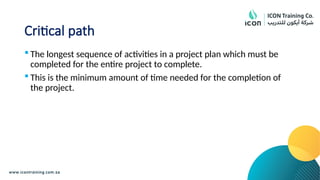
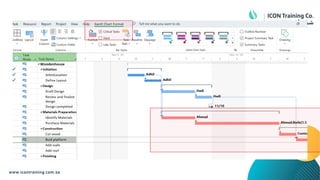
Critical path
Thelongest sequence of activities in a project plan which must be
completed for the entire project to complete.
This is the minimum amount of time needed for the completion of
the project.
89.
Module 6 LAB1
Follow the instructions given in the practice file
90.
Knowledge check
What isWBS code?
What is the difference between a lag
time and lead time?
Describe is critical path?
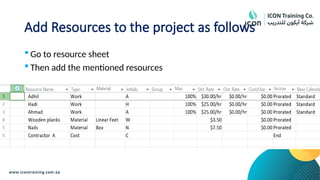
Module Content
Understandtypes of resources
Record cost of using each resource
Record limit of availability for each type of resource by establishing a
resource calendar.
93.
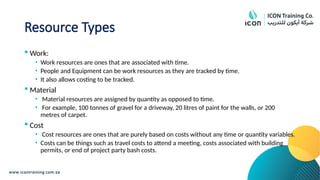
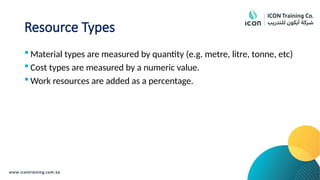
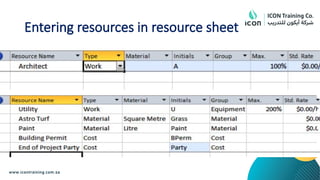
Resource Types
Work:
•Work resources are ones that are associated with time.
• People and Equipment can be work resources as they are tracked by time.
• It also allows costing to be tracked.
Material
• Material resources are assigned by quantity as opposed to time.
• For example, 100 tonnes of gravel for a driveway, 20 litres of paint for the walls, or 200
metres of carpet.
Cost
• Cost resources are ones that are purely based on costs without any time or quantity variables.
• Costs can be things such as travel costs to attend a meeting, costs associated with building
permits, or end of project party bash costs.
94.
Resource Types
Materialtypes are measured by quantity (e.g. metre, litre, tonne, etc)
Cost types are measured by a numeric value.
Work resources are added as a percentage.
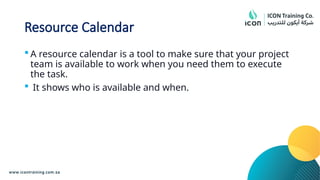
Resource Calendar
Aresource calendar is a tool to make sure that your project
team is available to work when you need them to execute
the task.
It shows who is available and when.
97.
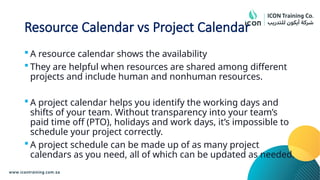
Resource Calendar vsProject Calendar
A resource calendar shows the availability
They are helpful when resources are shared among different
projects and include human and nonhuman resources.
A project calendar helps you identify the working days and
shifts of your team. Without transparency into your team’s
paid time off (PTO), holidays and work days, it’s impossible to
schedule your project correctly.
A project schedule can be made up of as many project
calendars as you need, all of which can be updated as needed.
98.
Module 7 LAB1
Follow the instructions given in the practice file
Module Content
Distinguishbetween task types and describe when each task is
appropriate
Enter estimates for duration and costs for each task
Describe the relationship between work, unit and duration
Describe the way Effort Driven scheduling is affected by work, units,
and duration
Assign tasks to resources using the Team Planner view
101.
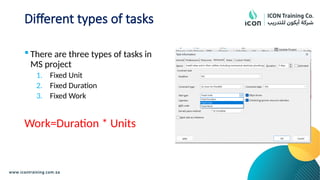
Different types oftasks
There are three types of tasks in
MS project
1. Fixed Unit
2. Fixed Duration
3. Fixed Work
Work=Duration * Units
102.
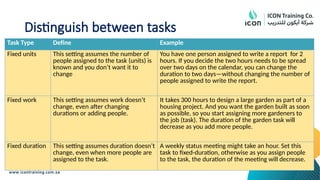
Distinguish between tasks
TaskType Define Example
Fixed units This setting assumes the number of
people assigned to the task (units) is
known and you don’t want it to
change
You have one person assigned to write a report for 2
hours. If you decide the two hours needs to be spread
over two days on the calendar, you can change the
duration to two days—without changing the number of
people assigned to write the report.
Fixed work This setting assumes work doesn’t
change, even after changing
durations or adding people.
It takes 300 hours to design a large garden as part of a
housing project. And you want the garden built as soon
as possible, so you start assigning more gardeners to
the job (task). The duration of the garden task will
decrease as you add more people.
Fixed duration This setting assumes duration doesn’t
change, even when more people are
assigned to the task.
A weekly status meeting might take an hour. Set this
task to fixed-duration, otherwise as you assign people
to the task, the duration of the meeting will decrease.
103.
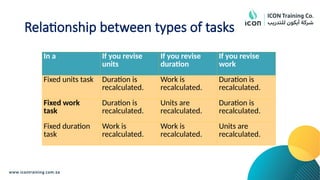
Relationship between typesof tasks
In a If you revise
units
If you revise
duration
If you revise
work
Fixed units task Duration is
recalculated.
Work is
recalculated.
Duration is
recalculated.
Fixed work
task
Duration is
recalculated.
Units are
recalculated.
Duration is
recalculated.
Fixed duration
task
Work is
recalculated.
Work is
recalculated.
Units are
recalculated.
104.
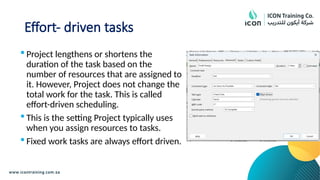
Effort- driven tasks
Project lengthens or shortens the
duration of the task based on the
number of resources that are assigned to
it. However, Project does not change the
total work for the task. This is called
effort-driven scheduling.
This is the setting Project typically uses
when you assign resources to tasks.
Fixed work tasks are always effort driven.
105.
Exceptions in Effort-driven tasks
Exception Explanation
First
assignment
Effort-driven calculations apply only after resources are initially assigned to
the task. After the first resources are assigned, the work value doesn't
change as new resources are assigned or removed from the same task.
Fixed work
tasks
You can’t remove effort-driven scheduling from fixed-work tasks. Fixed work
tasks do not have flexible work values, and are therefore always effort-
driven.
Fixed unit tasks If the assigned task type is fixed units, assigning additional resources
shortens the duration of the task.
Fixed duration
tasks
If the assigned task type is fixed duration, assigning additional resources
decreases the individual unit values for resources.
Summary tasks Summary tasks and inserted projects can’t be set to effort-driven.
Inserted
projects
Inserted projects can’t be set to effort-driven.
106.
Module 8 LAB1
Follow the instructions given in the practice file
107.
Knowledge check
What arethe different types of tasks in
MS project?
What are the different types of
Resources in MS project?
What is meant by effort-driven task?
Can you assign effort-driven to a fixed
work task?
Module Content
Calculatefloat and identify a project’s critical path.
Understand and identify task constraints.
Create milestones.
Use the Task Inspector to troubleshoot the initial schedule.
110.
Understand slack andslippage
Slack, also called float, is the amount of time a task can
delay without affecting another task.
It's automatically calculated into your project when you
schedule tasks.
Project slippage is the act of missing deadlines when
managing a task or series of tasks.
This can happen during the project planning stages or while
a team is executing tasks, resulting in a delay between the
scheduled times and the actual completion dates.
111.
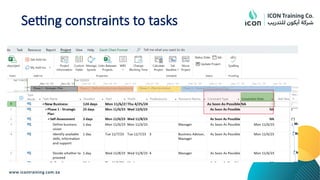
Understand task constraints
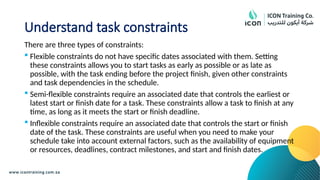
Thereare three types of constraints:
Flexible constraints do not have specific dates associated with them. Setting
these constraints allows you to start tasks as early as possible or as late as
possible, with the task ending before the project finish, given other constraints
and task dependencies in the schedule.
Semi-flexible constraints require an associated date that controls the earliest or
latest start or finish date for a task. These constraints allow a task to finish at any
time, as long as it meets the start or finish deadline.
Inflexible constraints require an associated date that controls the start or finish
date of the task. These constraints are useful when you need to make your
schedule take into account external factors, such as the availability of equipment
or resources, deadlines, contract milestones, and start and finish dates.
112.
Module 9 LAB1
Follow the instructions given in the practice file
Module Content
Adjusta project schedule to account for limited people and other
resources.
View the overall cost and schedule of a project.
Identify resources that have been overallocated for a project
schedule.
Use multiple ways to adjust tasks and assignments to remove over
allocation for any resource.
115.
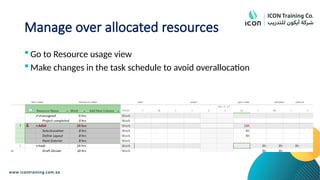
Resource Leveling
Resourceleveling is a tool that involves resolving overallocation or
scheduling conflicts to ensure a project can be completed with the
available resources.
116.
Module 10 LAB1
Follow the instructions given in the practice file
Module Content
Learnhow to set a baseline.
Lean how to enter and track project performance data.
Learn how to apply different tracking methods.
Learn how to perform a variance analysis on a project.
119.
Cost variance
Ifthe cost variance is negative, the cost for the resource is
currently under the budgeted, or baseline, amount.
If the cost variance is positive, the cost for the resource is
currently over budget.
Microsoft Office Project calculates the cost variance as follows:
Cost Variance = Cost - Baseline Cost
120.
Module 11 LAB1
Follow the instructions given in the practice file
Reports
Identify thecommands available
under report tab
Try to generate the following
reports and customize it
Cash flow
Resource Overview
Critical task
Milestone Report
Task cost overview
Module Content
Learnhow to use common resources among multiple projects.
Learn how to link tasks between multiple projects.
Learn how to create a consolidated view of multiple projects.
129.
Master project
Masterproject is a collection of consolidated projects that show
a hierarchy among multiple related projects.
Projects inserted into a master project are called subprojects.
130.
Resource Pool
Aresource pool makes it easier for you to administer people
or equipment assigned to tasks in more than one project
file.
The resource pool centralizes resource information, such as
the resource name, calendar used, resource units, and cost
rate tables.
131.
Module 13 LAB1
Follow the instructions given in the practice file
Module Content
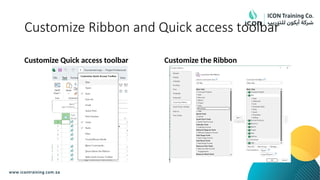
Learnhow to customize the Ribbon and the Quick Access Toolbar.
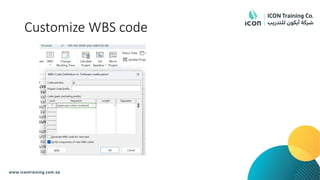
Learn how to customize WBS numbering.
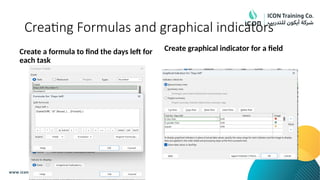
Learn the concepts of Formulas and Graphical indicators.
Learn the purpose of the Global template and Organizer.
Learn how to use Task Deadlines.
Learn how to record a Macro.
Creating Formulas andgraphical indicators
Create a formula to find the days left for
each task
Create graphical indicator for a field
137.
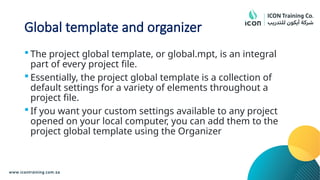
Global template andorganizer
The project global template, or global.mpt, is an integral
part of every project file.
Essentially, the project global template is a collection of
default settings for a variety of elements throughout a
project file.
If you want your custom settings available to any project
opened on your local computer, you can add them to the
project global template using the Organizer
140.
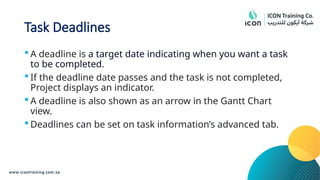
Task Deadlines
Adeadline is a target date indicating when you want a task
to be completed.
If the deadline date passes and the task is not completed,
Project displays an indicator.
A deadline is also shown as an arrow in the Gantt Chart
view.
Deadlines can be set on task information’s advanced tab.
141.
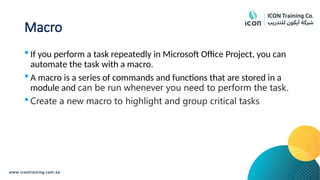
Macro
If youperform a task repeatedly in Microsoft Office Project, you can
automate the task with a macro.
A macro is a series of commands and functions that are stored in a
module and can be run whenever you need to perform the task.
Create a new macro to highlight and group critical tasks
142.
Module 14 LAB1
Follow the instructions given in the practice file
#7 Initiation
Before you get started on any project, the first step is to figure out what the idea is, why it’s needed, and if it’s feasible. This stage is critical. If it’s a great idea, but impossible to accomplish with the resources you have, it must be scrapped (or at least modified).
Planning
The next step is to start figuring out how, exactly, you’ll get the project done. Who’s involved? What tasks are involved? What tasks depend on other tasks? How long will the project take?
A great visual tool for this aspect of the process is a Gantt chart.
Execution
A successful execution phase relies on a successful planning phase. To that end, one of the best visual tools for executing complex projects is also great for planning them: a flow chart.
Monitoring
At this point, you’re getting things done, but it’s still crucial to monitor each task to make sure nothing goes off track.
Closure
You made it! Once your team has completed all the deliverables, the project is done. But the key to this last phase is to take a moment to assess what just happened.
Create documents and store all the documentation in a central location so that it can stay there as a resource for the next time.
#8 Initiation
Before you get started on any project, the first step is to figure out what the idea is, why it’s needed, and if it’s feasible. This stage is critical. If it’s a great idea, but impossible to accomplish with the resources you have, it must be scrapped (or at least modified).
Planning
The next step is to start figuring out how, exactly, you’ll get the project done. Who’s involved? What tasks are involved? What tasks depend on other tasks? How long will the project take?
A great visual tool for this aspect of the process is a Gantt chart.
Execution
A successful execution phase relies on a successful planning phase. To that end, one of the best visual tools for executing complex projects is also great for planning them: a flow chart.
Monitoring
At this point, you’re getting things done, but it’s still crucial to monitor each task to make sure nothing goes off track.
Closure
You made it! Once your team has completed all the deliverables, the project is done. But the key to this last phase is to take a moment to assess what just happened.
Create documents and store all the documentation in a central location so that it can stay there as a resource for the next time.


![Various methods to create task relationships
1. Add predecessor or successor column in tasks
2. Add link between two tasks by using link command
[Select the two tasksTask tabschedule group link]
Identify the links between tasks by using network diagram](https://image.slidesharecdn.com/700542811-microsoft-project-2016-250618213939-30e68930/85/2eee22222w811-Microsoft-Project-2016-pptx-83-320.jpg)