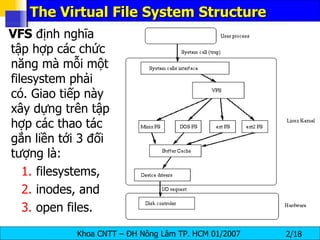
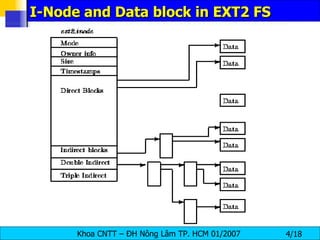
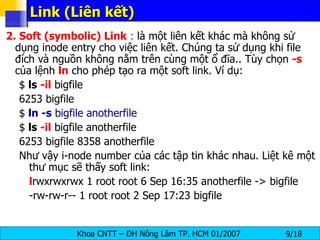
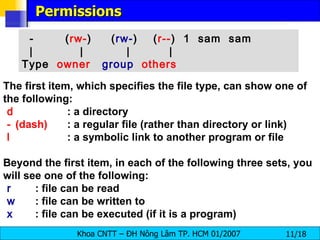
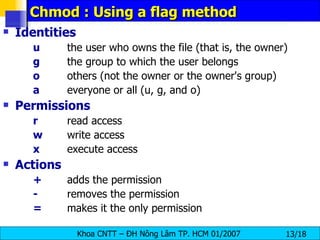
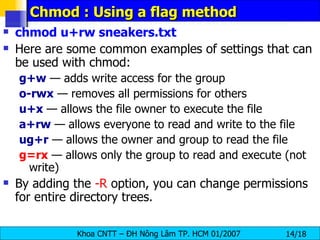
The document discusses Linux file systems and permissions. It describes the Virtual File System (VFS) interface and how it interacts with filesystems, inodes, and open files. It then discusses the EXT2 filesystem in more detail, describing how inodes store file metadata and how hard and soft links work. It also covers common Linux permissions and how to manage users, groups, and permissions using commands like chmod, chown, useradd, and others.


![Adding a User To add a user to the system: Issue the useradd command to create a locked user account: useradd [ options ] < username > Unlock the account by issuing the passwd command to assign a password and set password aging guidelines: passwd < username >](https://image.slidesharecdn.com/lession1-linuxpreview-091013105123-phpapp02/85/Lession1-Linux-Preview-27-320.jpg)
![Delete a user account - userdel userdel [-r ] user_name The userdel command modifies the system account files, deleting all entries that refer to login. The named user must exist. The options which apply to the userdel command are: -r Files in the user’s home directory will be removed along with the home directory itself and the user’s mail spool. Files located in other file systems will have to be searched for and deleted manually.](https://image.slidesharecdn.com/lession1-linuxpreview-091013105123-phpapp02/85/Lession1-Linux-Preview-30-320.jpg)
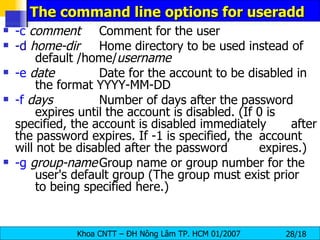
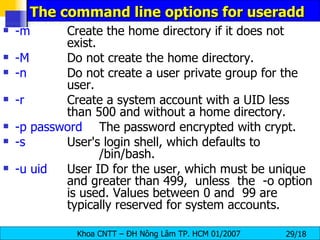
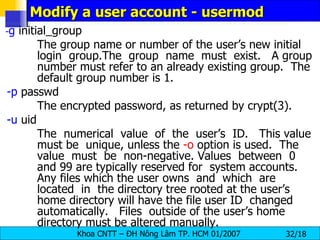
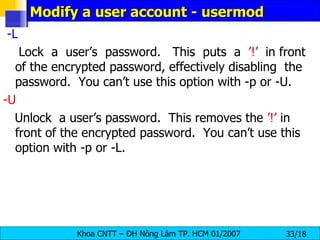
![Modify a user account - usermod usermod [ option ] user_name -c comment The new value of the user’s password file comment field. It is normally modified using the chfn(1) utility. -d home_dir The user’s new login directory. If the -m option is given the contents of the current home directory will be moved to the new home directory, which is created if it does not already exist. -e expire_date The date on which the user account will be disabled. The date is specified in the format YYYY-MM-DD.](https://image.slidesharecdn.com/lession1-linuxpreview-091013105123-phpapp02/85/Lession1-Linux-Preview-31-320.jpg)
![Adding a Group groupadd [ options ] < group-nam e> -g gid Group ID for the group, which must be unique and greater than 499, unless the -o option is used. -r Create a system group with a GID less than 500. -f Exit with an error if the group already exists. If -g and -f are specified, but the group already exists, the -g option is ignored.](https://image.slidesharecdn.com/lession1-linuxpreview-091013105123-phpapp02/85/Lession1-Linux-Preview-35-320.jpg)


![Determining Your IP Address You can determine the IP address of this device with the " ifconfig " command. [root@bigboy tmp]# ifconfig eth0 Link encap:Ethernet HWaddr 00:A0:CC:60:B7:G4 inet addr: 192.168.100.5 Bcast: 192.168.100.255 Mask: 255.255.255.0 UP BROADCAST RUNNING MULTICAST MTU:1500 Metric:1 RX packets:161930 errors:1 dropped:0 overruns:0 frame:0 TX packets:244570 errors:0 dropped:0 overruns:0 carrier:0 collisions:475 txqueuelen:100 RX bytes:55075551 (52.5 Mb) TX bytes:178108895 (169.8 Mb) Interrupt:10 Base address:0x9000](https://image.slidesharecdn.com/lession1-linuxpreview-091013105123-phpapp02/85/Lession1-Linux-Preview-43-320.jpg)
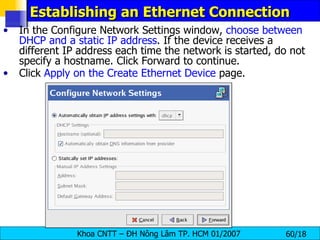
![Changing Your IP Address If you wanted, you could give this eth0 interface an IP address using the ifconfig command. [root@bigboy tmp]# ifconfig eth0 10.0.0.1 netmask 255.255.255.0 up The " up " at the end of the command activates the interface . To make this permanent each time you boot up you'll have to add this command in your /etc/rc.d/rc.local file. Linux also makes life a little easier with interface configuration files located in the /etc/sysconfig/network-scripts directory. Interface eth0 has a file called ifcfg-eth0 , eth1 uses ifcfg-eth1 ... etc. You can place your IP address information in these files which are then used to auto-configure your NICs when Linux boots .](https://image.slidesharecdn.com/lession1-linuxpreview-091013105123-phpapp02/85/Lession1-Linux-Preview-44-320.jpg)
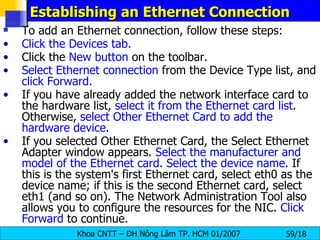
![Interface Control Scripts The interface control scripts activate and deactivated system interfaces . There are two primary interface control scripts, /sbin/ifdown and /sbin/ifup , that call on control scripts located in the /etc/sysconfig/network-scripts/ directory. The ifdown and ifup interface scripts are symbolic links to scripts in the /sbin/ directory . When either of these scripts are called, they require the value of the interface to be specified, such as: [root@bigboy network-scripts]# ifup eth0 Determining IP information for eth0... done. The easiest way to manipulate all network scripts simultaneously is to use the /sbin/service command on the network service (/etc/rc.d/init.d/network), as illustrated the following command: # /etc/rc.d/init.d/network < action > <action> can be either start, stop, restart , or status .](https://image.slidesharecdn.com/lession1-linuxpreview-091013105123-phpapp02/85/Lession1-Linux-Preview-49-320.jpg)
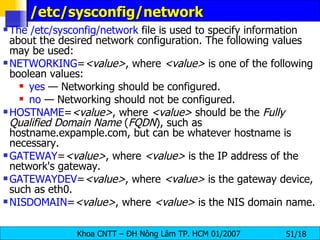
![How To Change Your Default Gateway This can be done with a simple command. This example uses the standard ethernet interface eth0. [root@bigboy tmp]# route add default gw 192.168.1.1 eth0 In this case, make sure that the router / firewall with IP address 192.168.1.1 is connected to the same network as interface eth0 ! Once done, you'll need to update your /etc/sysconfig/network file to reflect the change. This file is used to configure your default gateway each time Linux boots . NETWORKING= yes HOSTNAME=bigboy GATEWAY= 192.168.1.1 Some people don't bother with this step and just place the " route add " command in the file /etc/rc.d/rc.local](https://image.slidesharecdn.com/lession1-linuxpreview-091013105123-phpapp02/85/Lession1-Linux-Preview-50-320.jpg)
![To Change The Duplex Setting Of Your NIC A Ethernet NICs built into motherboards ( onboard NICs ) frequently don't negotiate port speed and duplex correctly . You can manage the duplex and speed settings of your NIC with the mii-tool command . It is best to use this command with compatible hardware. In the example below, we can see the output of the command verbose "-v" mode. In this case, negotiation was OK, with the NIC selecting 100Mbps, full duplex mode (FD). [root@bigboy tmp]# mii-tool –v eth1: negotiated 100baseTx-FD, link ok product info: vendor 00:10:18, model 33 rev 2 basic mode: autonegotiation enabled basic status: autonegotiation complete, link ok capabilities: 100baseTx-FD 100baseTx-HD 10baseT-FD 10baseT-HD advertising: 100baseTx-FD 100baseTx-HD 10baseT-FD 10baseT-HD link partner: 100baseTx-FD 100baseTx-HD 10baseT-FD 10baseT-HD flow-control](https://image.slidesharecdn.com/lession1-linuxpreview-091013105123-phpapp02/85/Lession1-Linux-Preview-52-320.jpg)
![To Change The Duplex Setting Of Your NIC You can set your NIC to force itself to a particular speed and duplex by using the "-F" switch with any of the following options: 100baseTx-FD , 100baseTx-HD, 10baseT-FD, or 10baseT-HD . Remember that you could lose all network connectivity to your server if you force your NIC to a particular speed/duplex that doesn't match that of your switch!!! . [root@bigboy tmp]# mii-tool -F 100baseTx-FD eth0 I have seen where NICs appear to work with failed negotiation , but this is usually accompanied by many " collision " type errors being seen on the NIC when using the ifconfig -a command and only marginal performance. The causes for this could include an incompatible NIC , incorrect settings on your switch port or a bad cable .](https://image.slidesharecdn.com/lession1-linuxpreview-091013105123-phpapp02/85/Lession1-Linux-Preview-53-320.jpg)
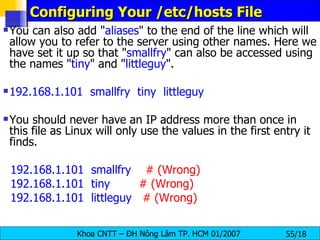
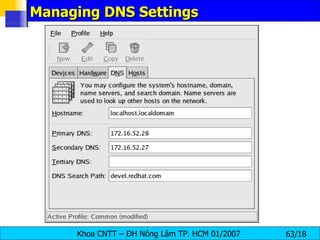
![Configuring Your /etc/hosts File The /etc/hosts file is just a list of IP addresses and their corresponding server names . Your server will typically check this file before referencing DNS , if the name is found with a corresponding IP address then DNS won't be queried at all. 192.168.1.101 smallfry In the example above server "smallfry" has an IP address of 192.168.1.101. You can access 192.168.1.101 using the "ping", "telnet" or any other network aware program by referring to it as "smallfry" Here is an example using the "ping" to see if "smallfry" is alive and well on the network. [root@bigboy tmp]# ping smallfry PING zero ( 192.168.1.101 ) 56(84) bytes of data. 64 bytes from smallfry (192.168.1.101): icmp_seq=0 ttl=64 time=0.197 ms 64 bytes from smallfry (192.168.1.101): icmp_seq=1 ttl=64 time=0.047 ms](https://image.slidesharecdn.com/lession1-linuxpreview-091013105123-phpapp02/85/Lession1-Linux-Preview-54-320.jpg)

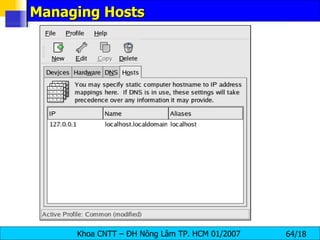
![Managing Hosts To add an entry to the /etc/hosts file, go to the Hosts tab, click the New button on the toolbar, provide the requested information, and click OK . Select File => Save or press [Ctrl]-[S] to save the changes to the /etc/hosts file . The network or network services do not need to be restarted since the current version of the file is referred to each time an address is resolved. To change lookup order, edit the /etc/host.conf file . The line order hosts, bind specifies that the /etc/hosts takes precedence over the name servers. Changing the line to order bind, hosts configures the system to resolve hostnames and IP addresses using the name servers first. If the IP address cannot be resolved through the name servers, the system then looks for the IP address in the /etc/hosts file.](https://image.slidesharecdn.com/lession1-linuxpreview-091013105123-phpapp02/85/Lession1-Linux-Preview-65-320.jpg)