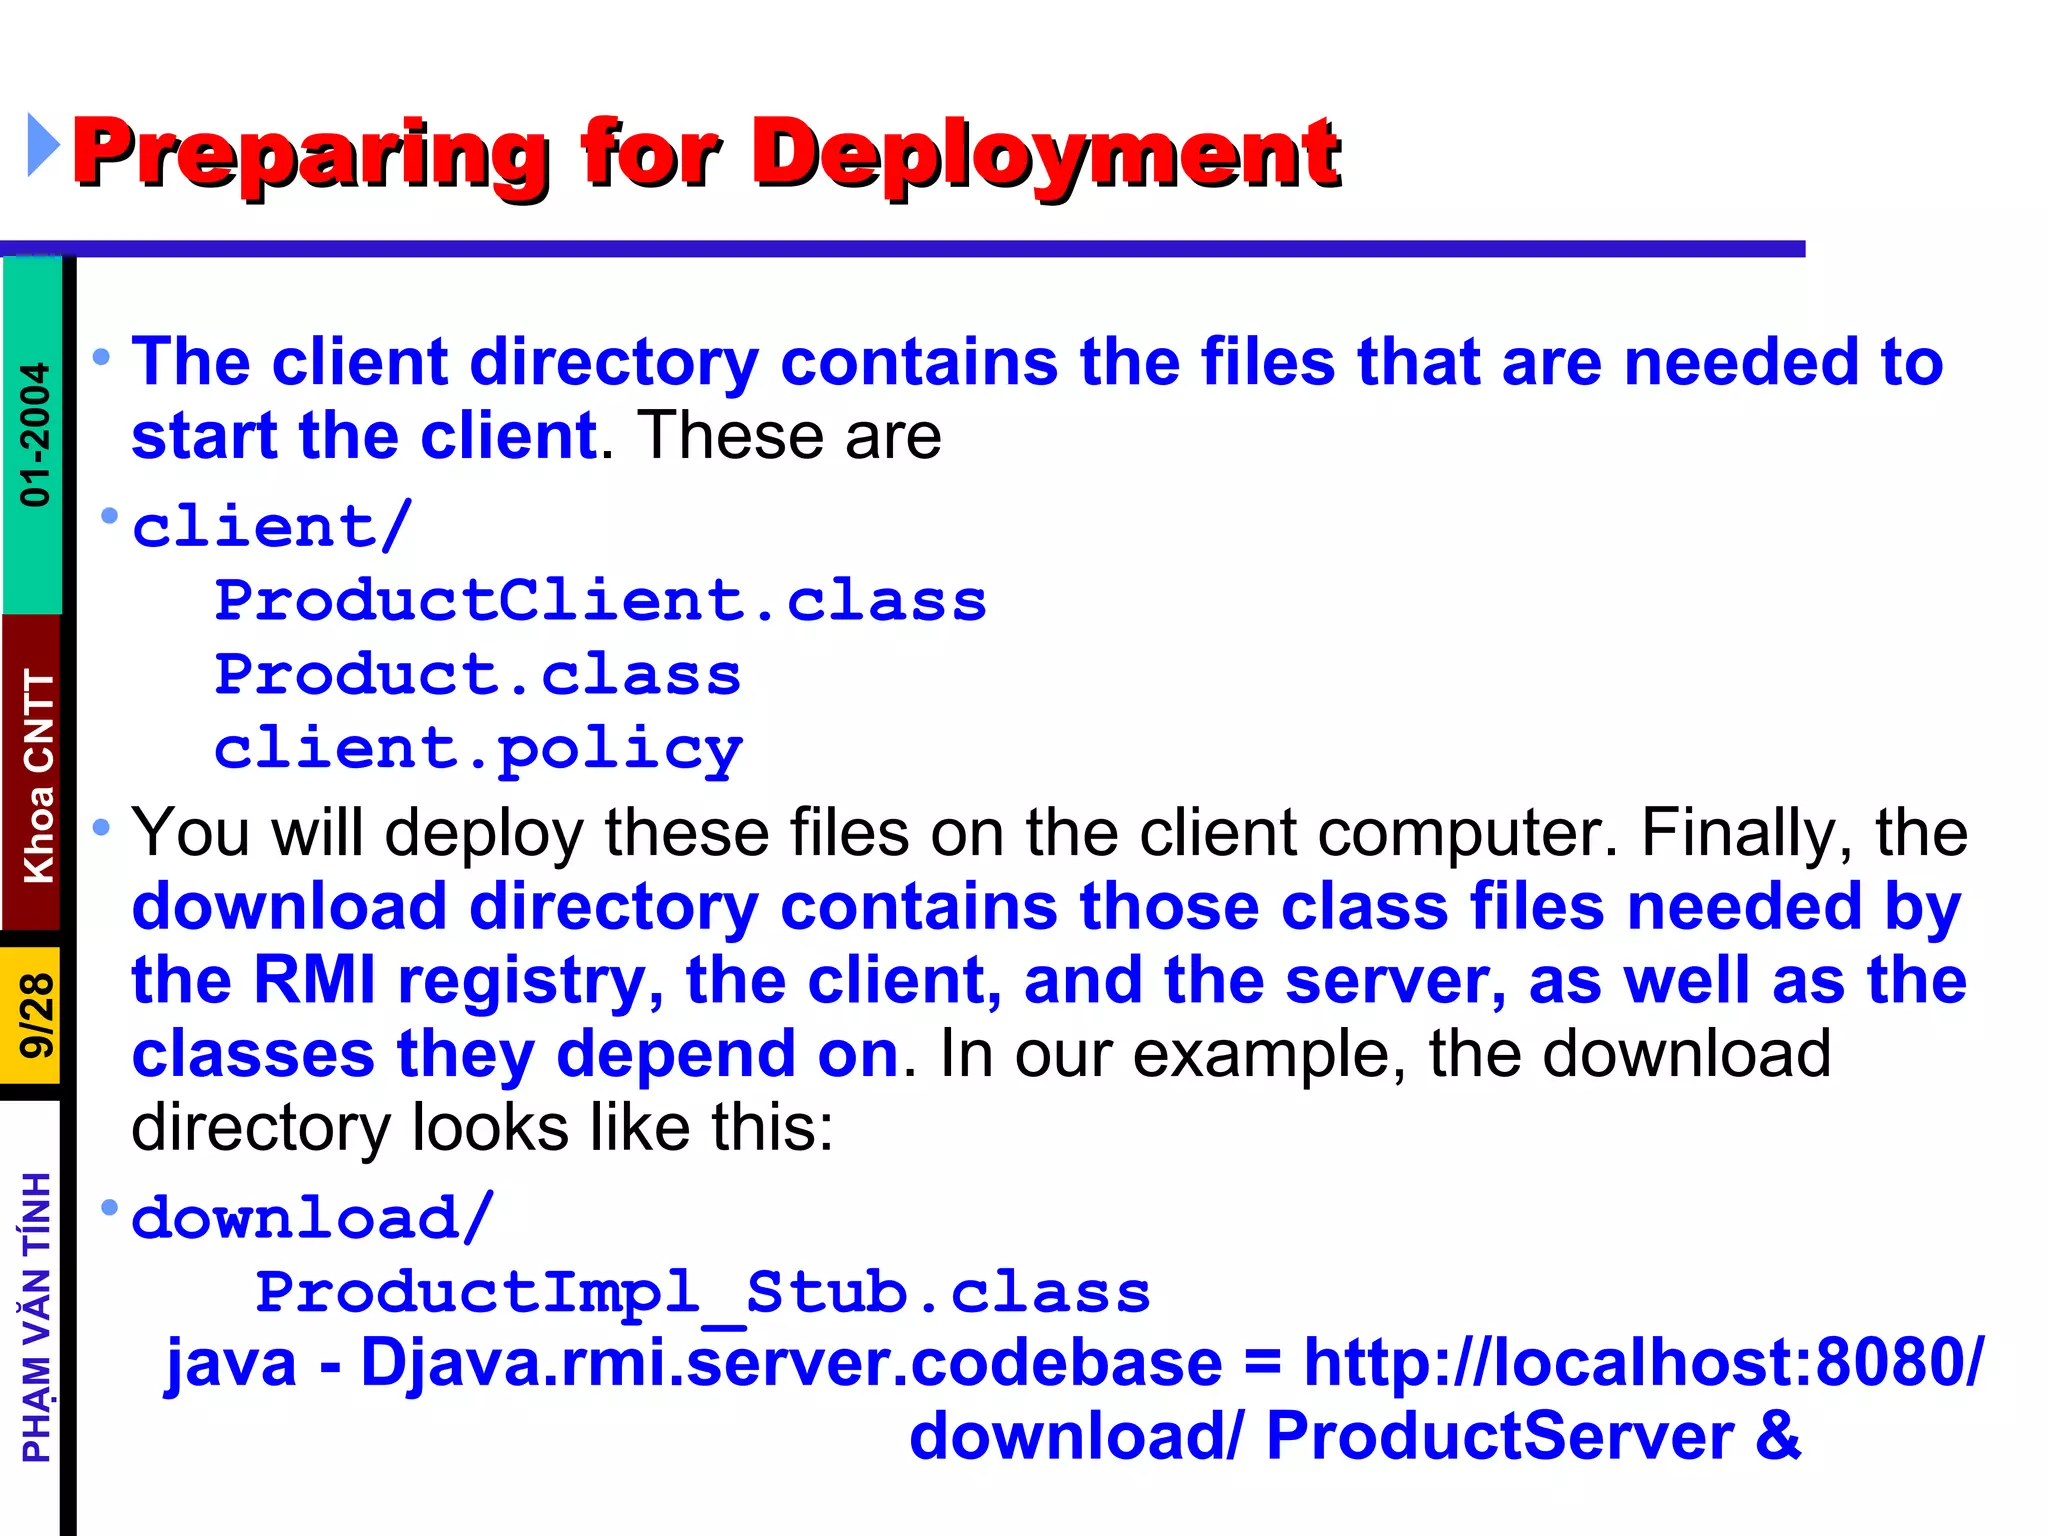
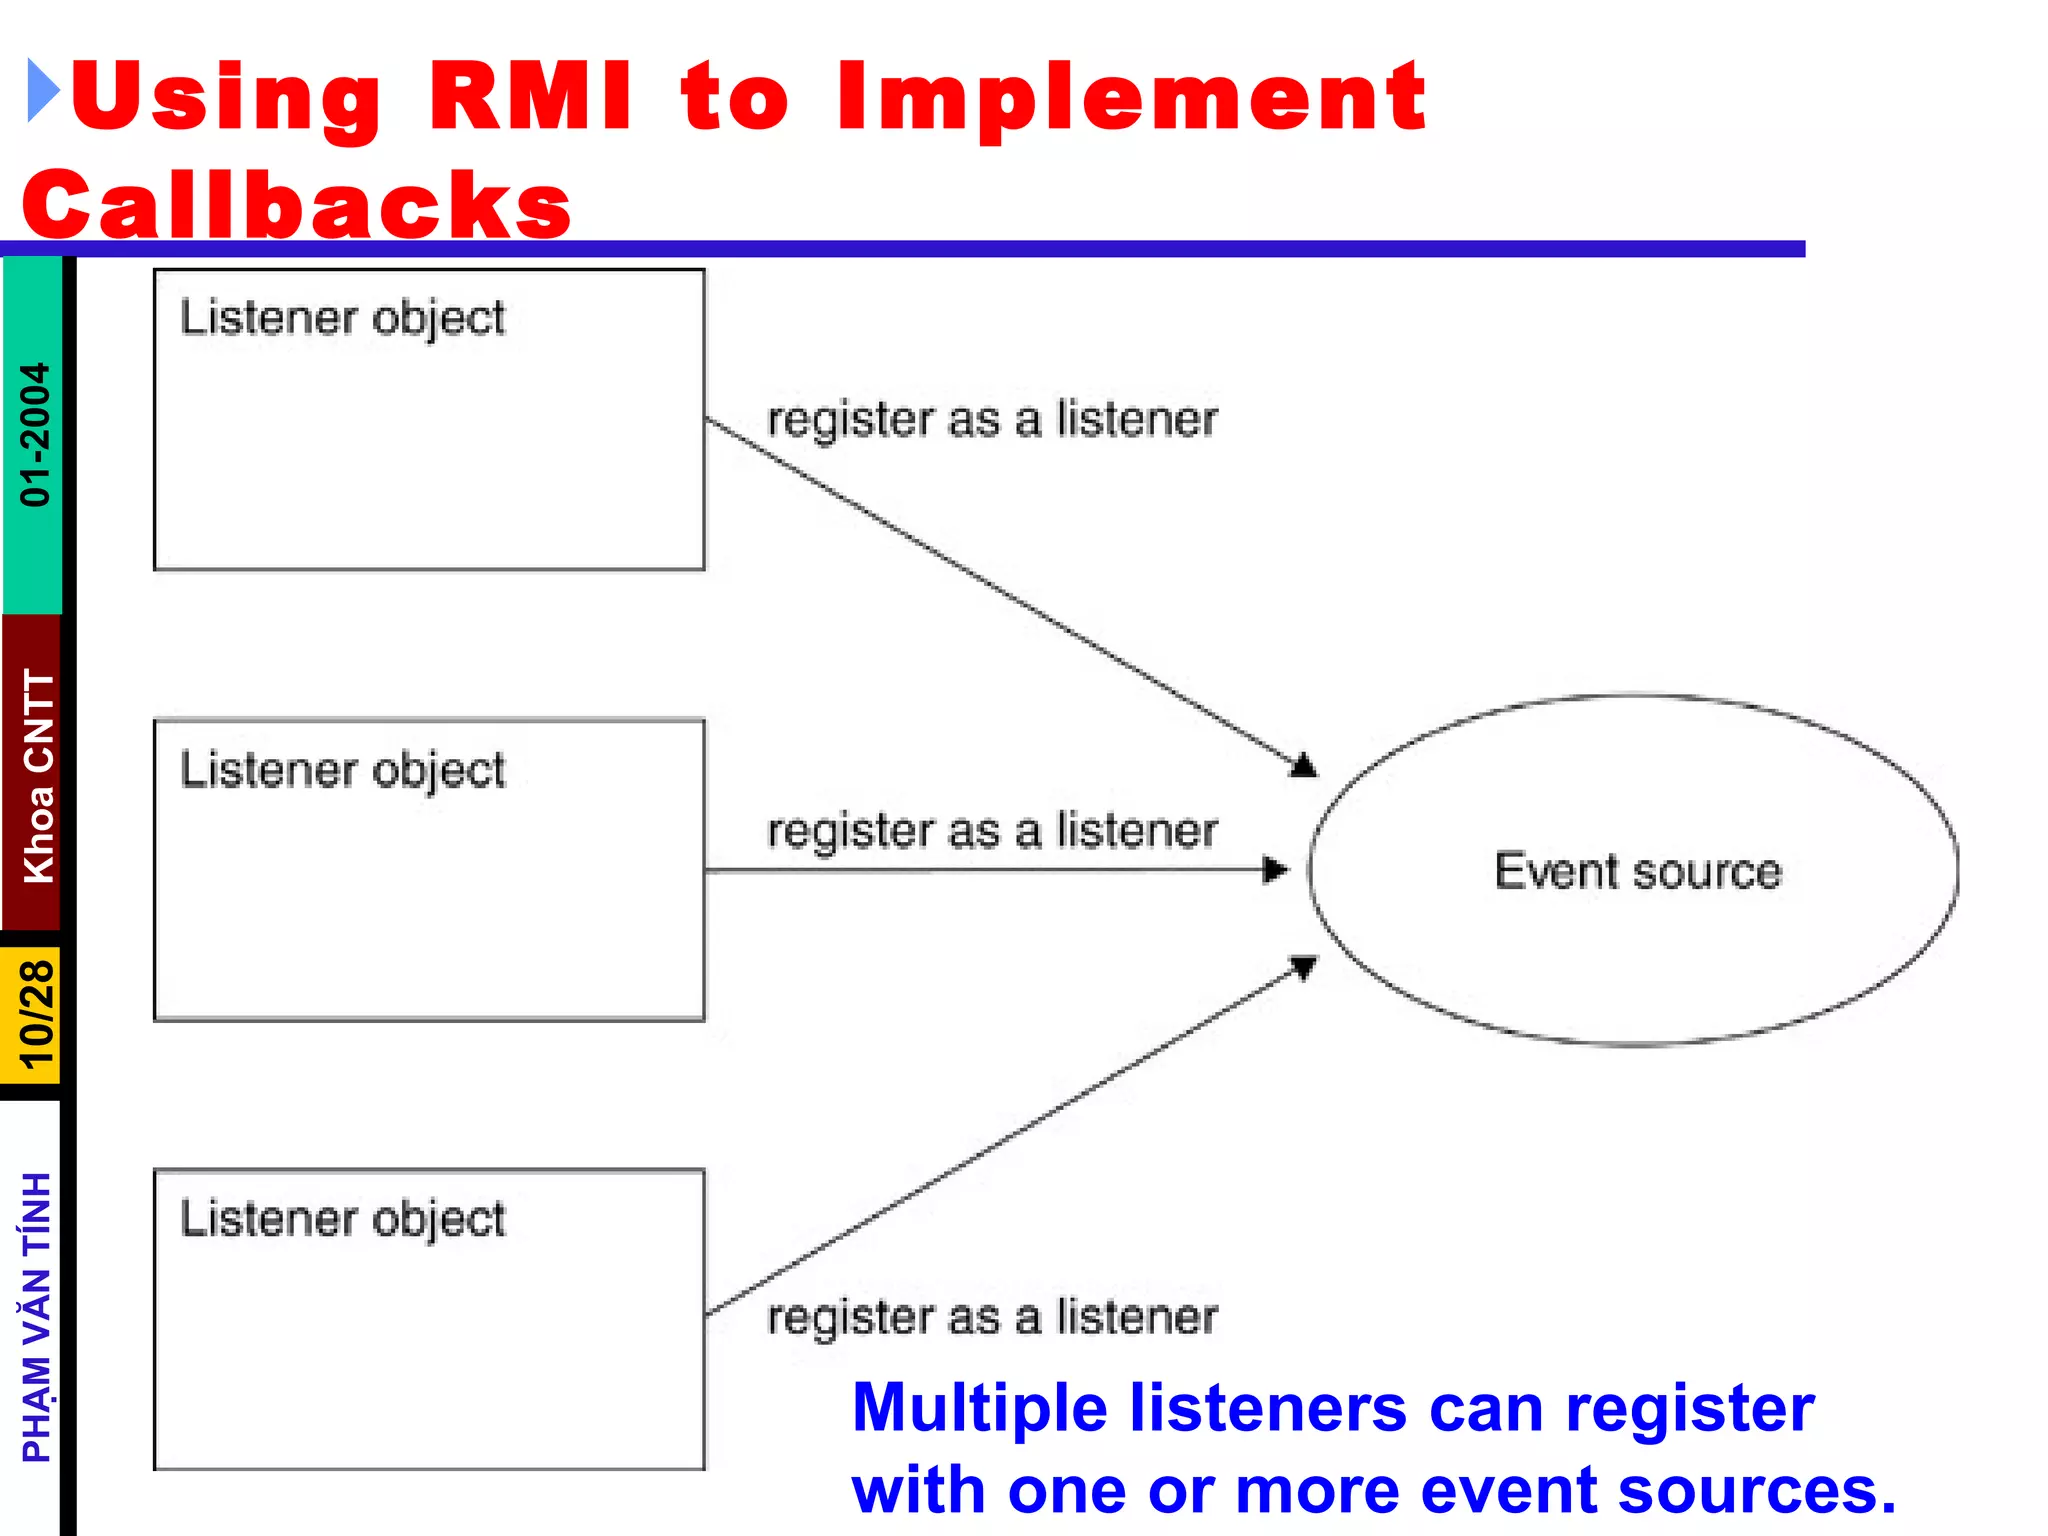
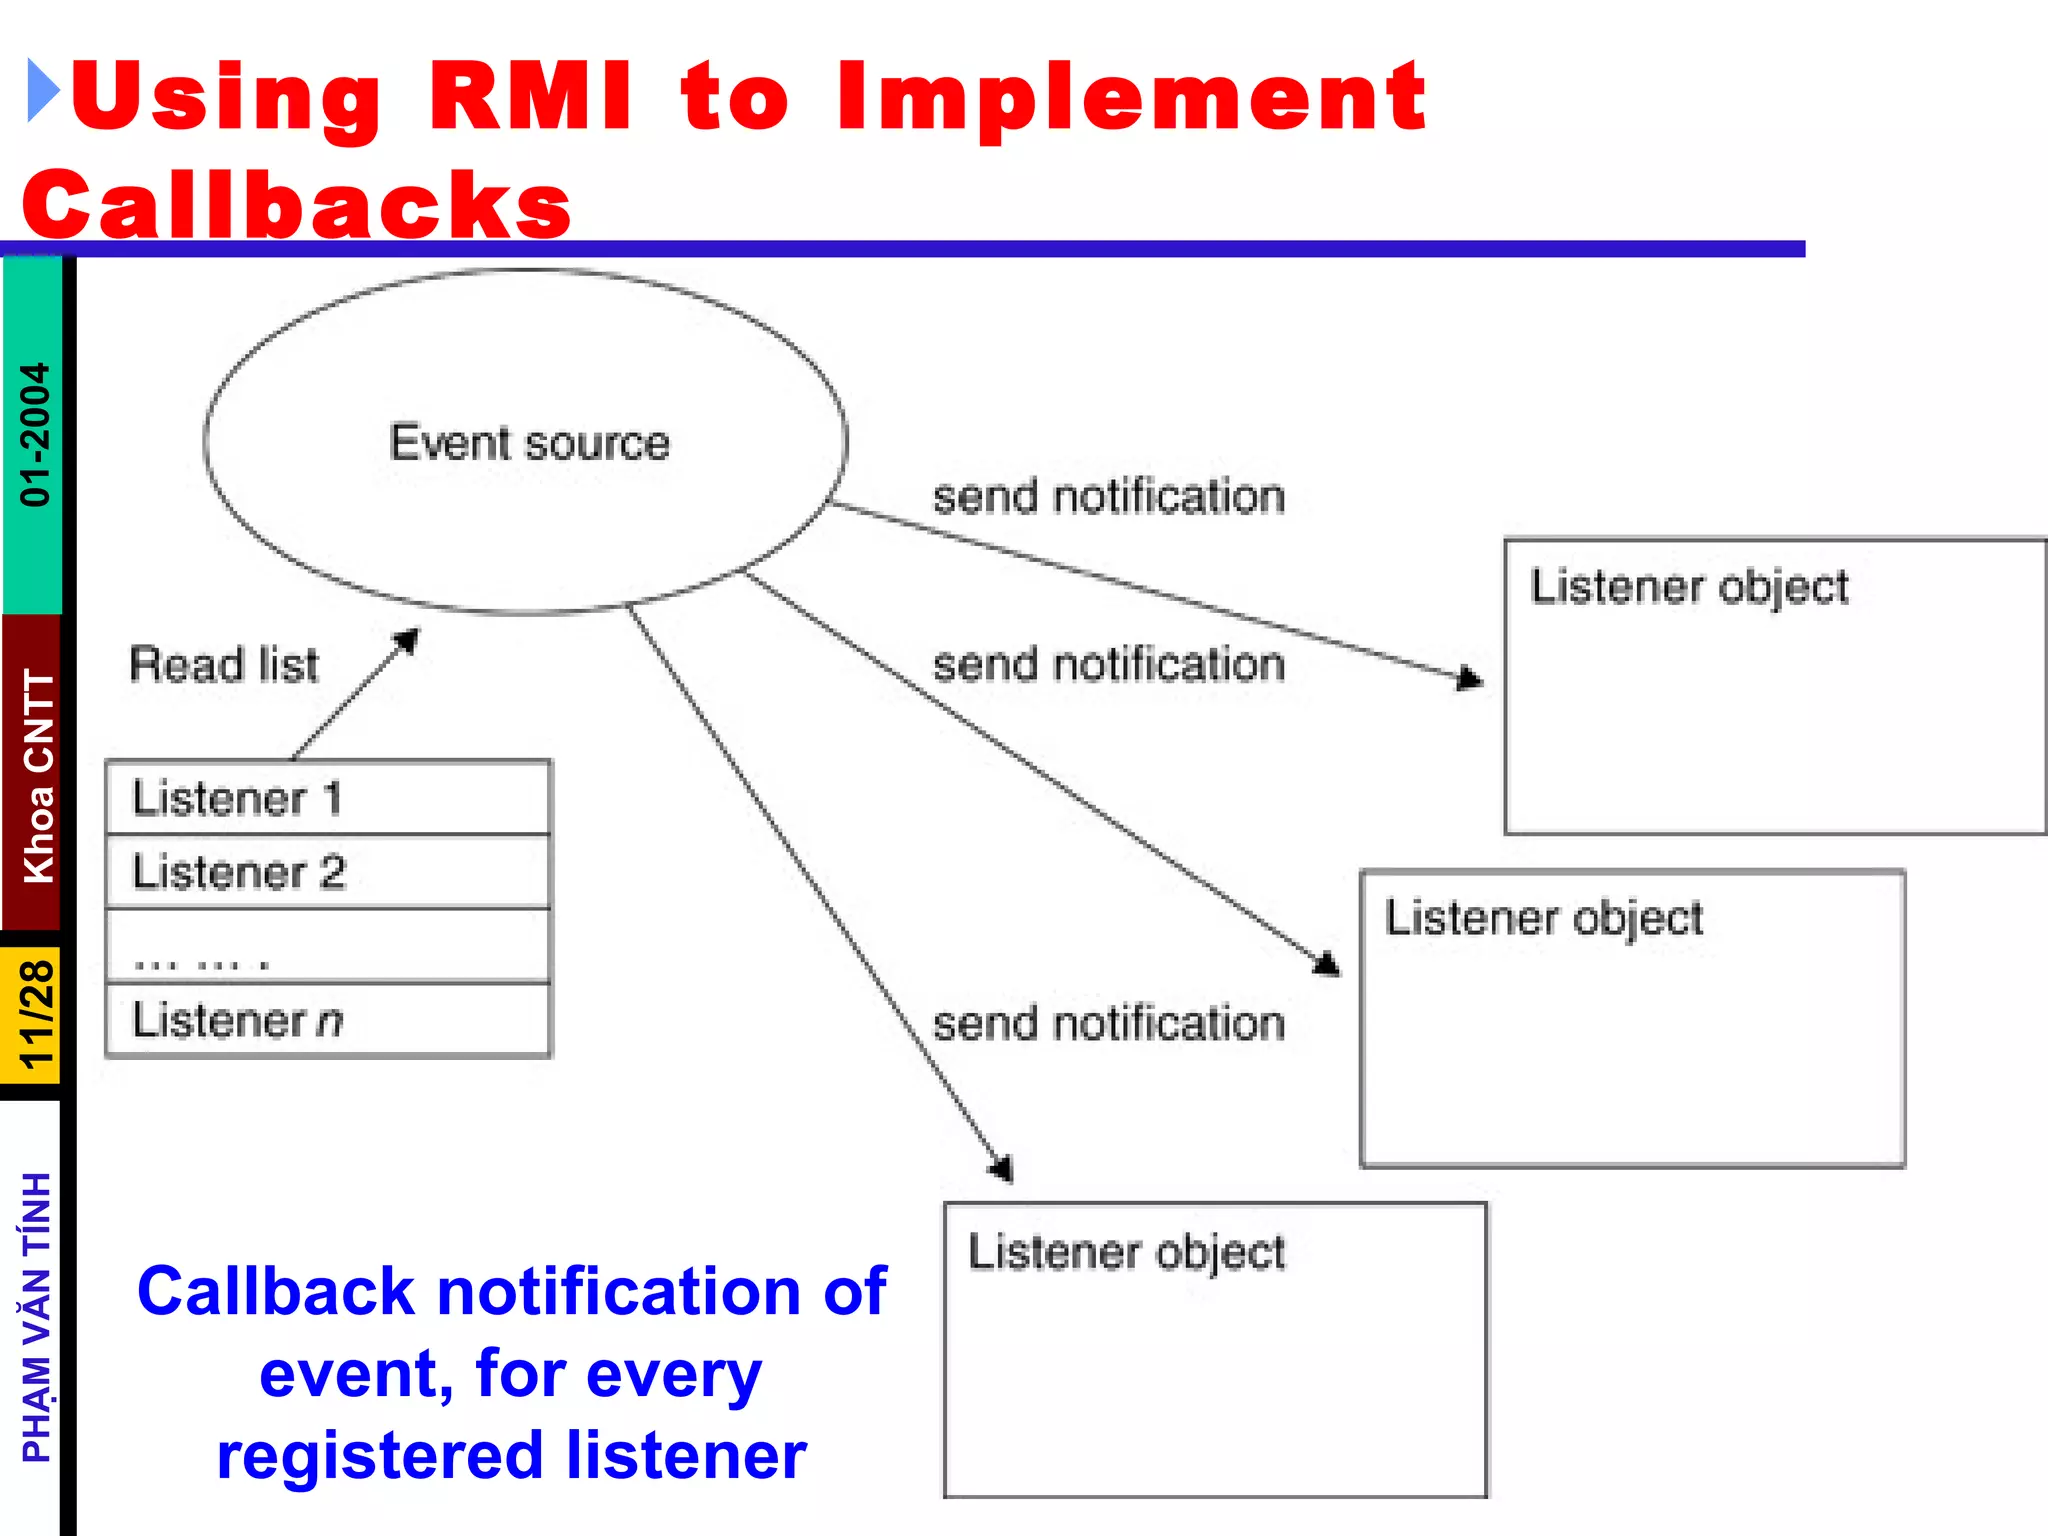
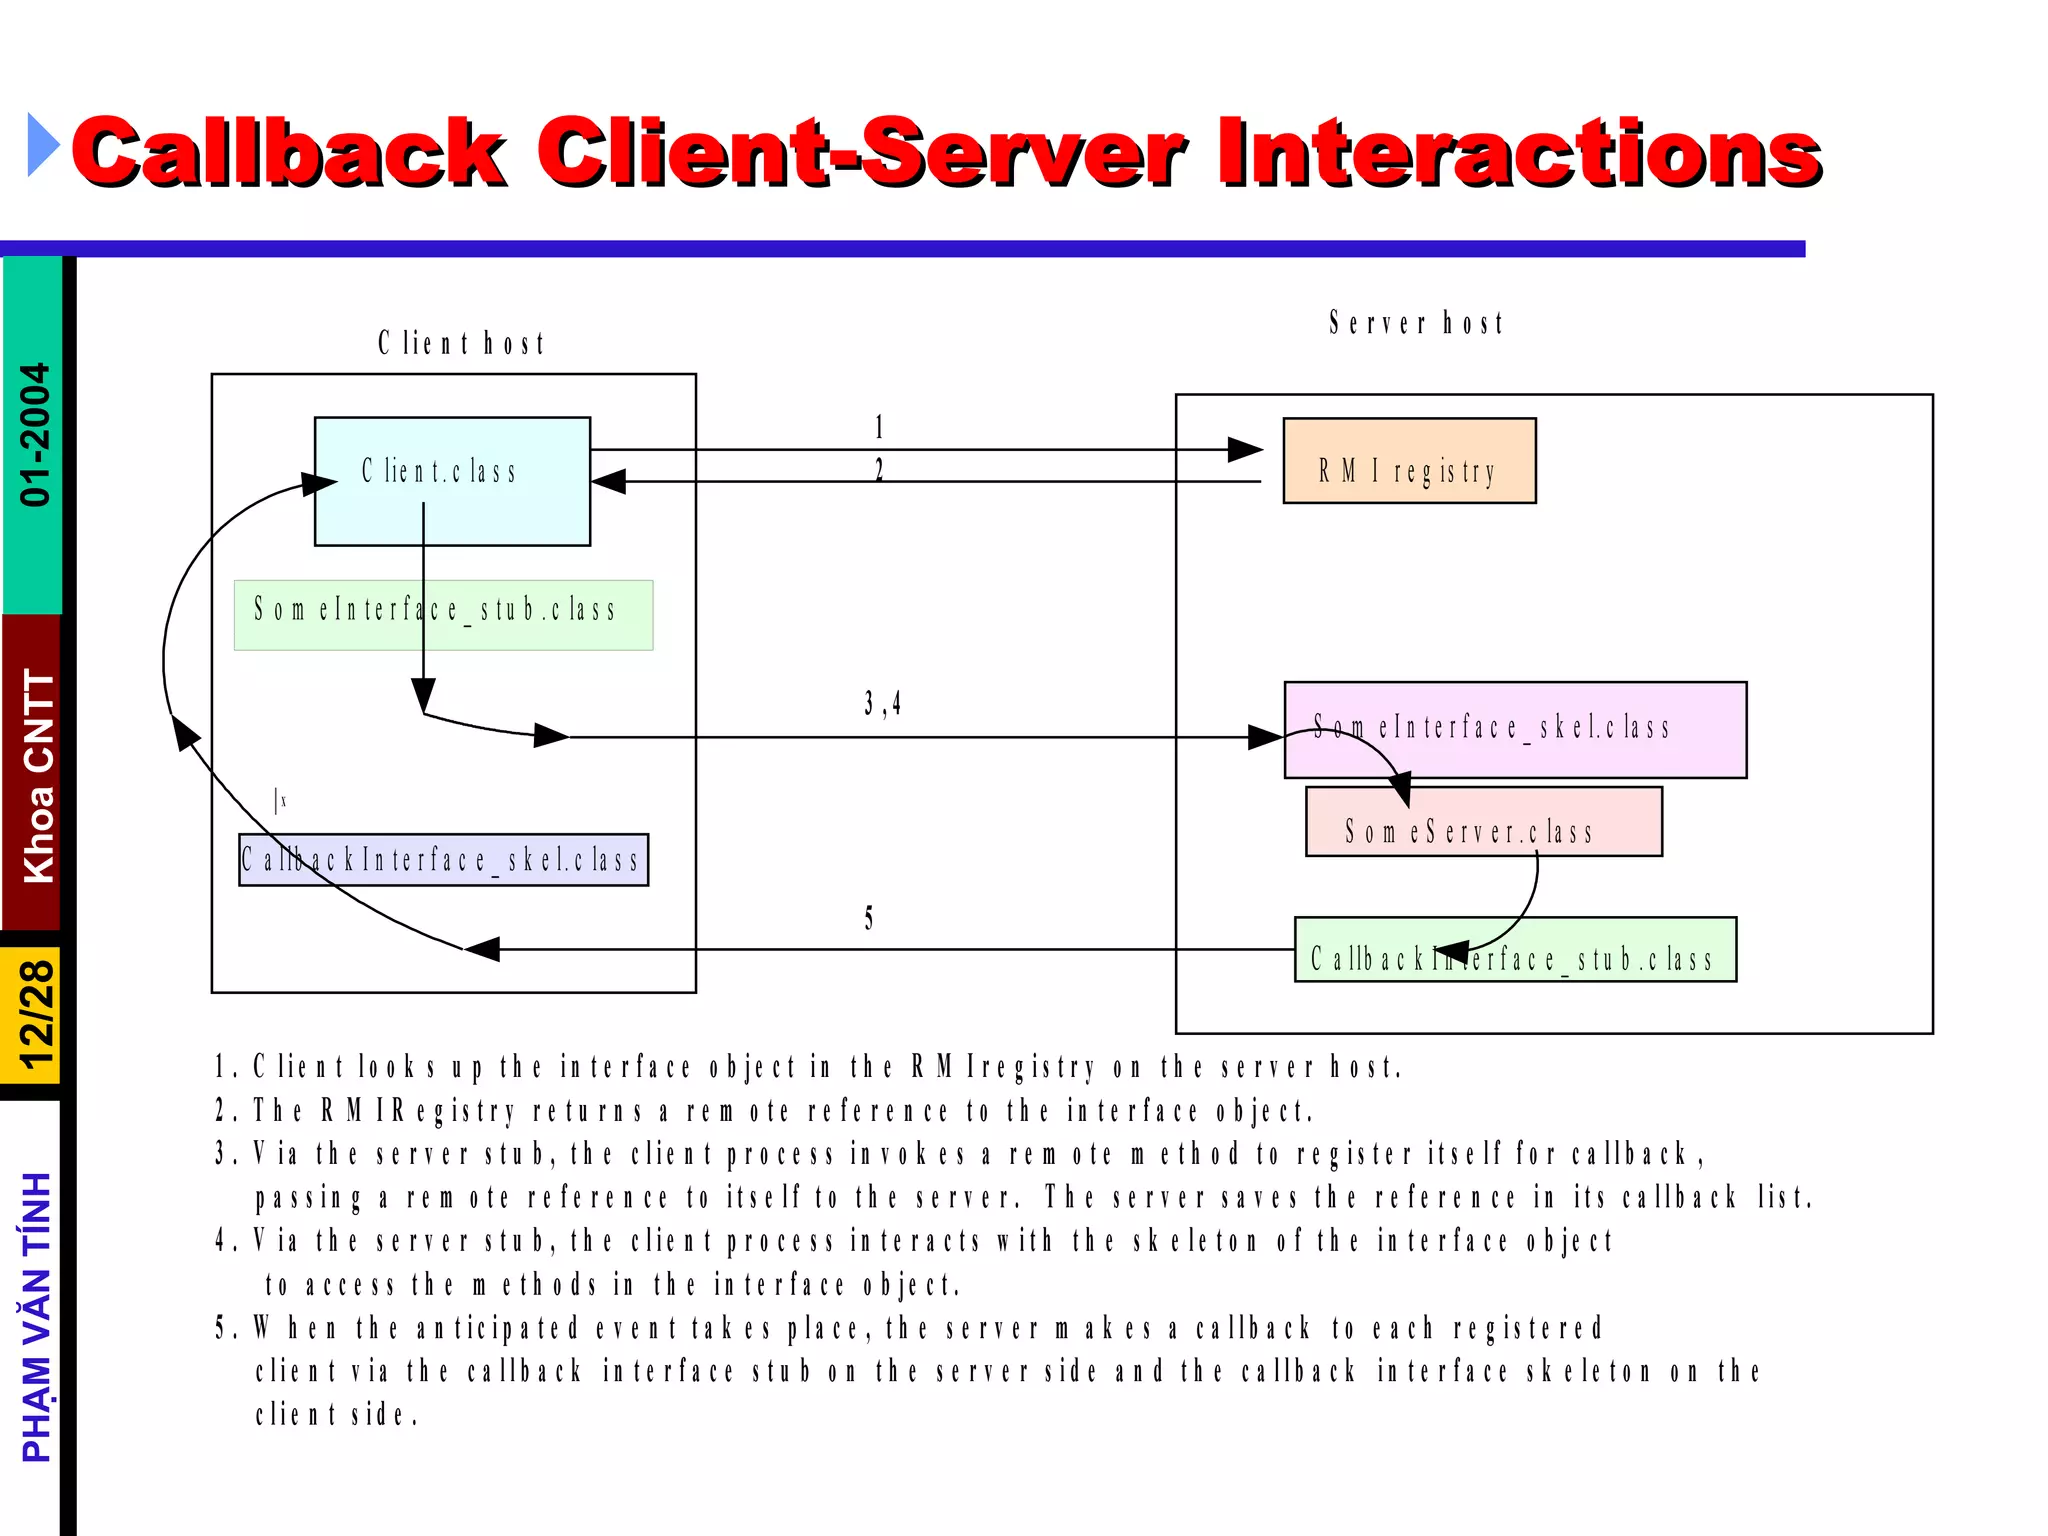
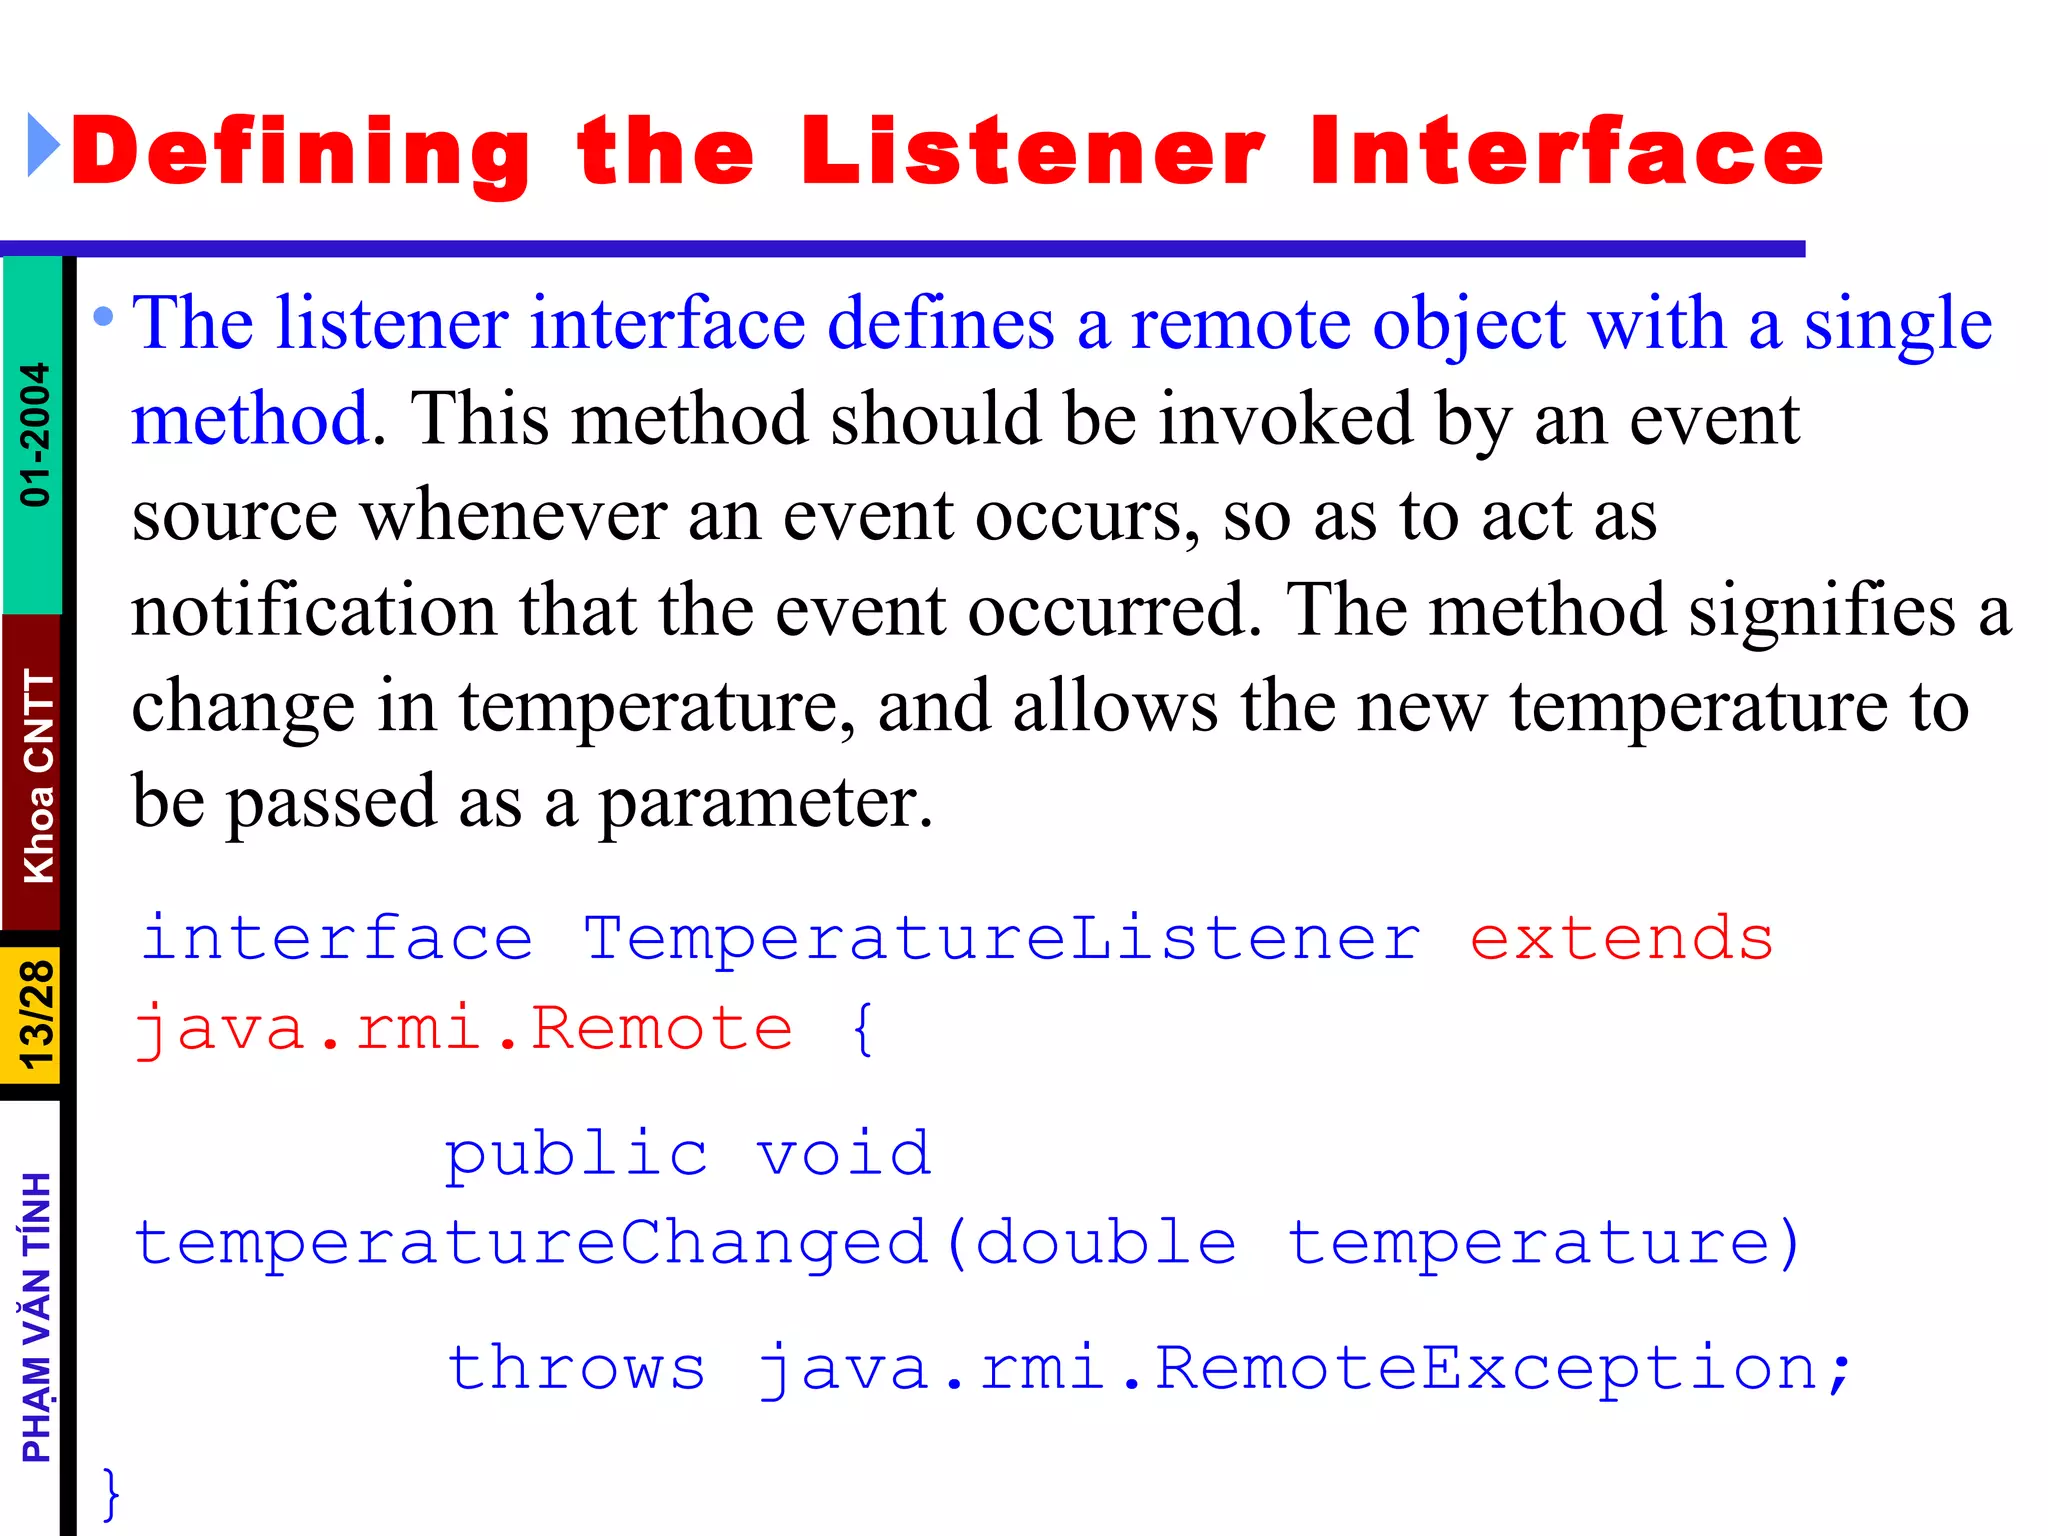
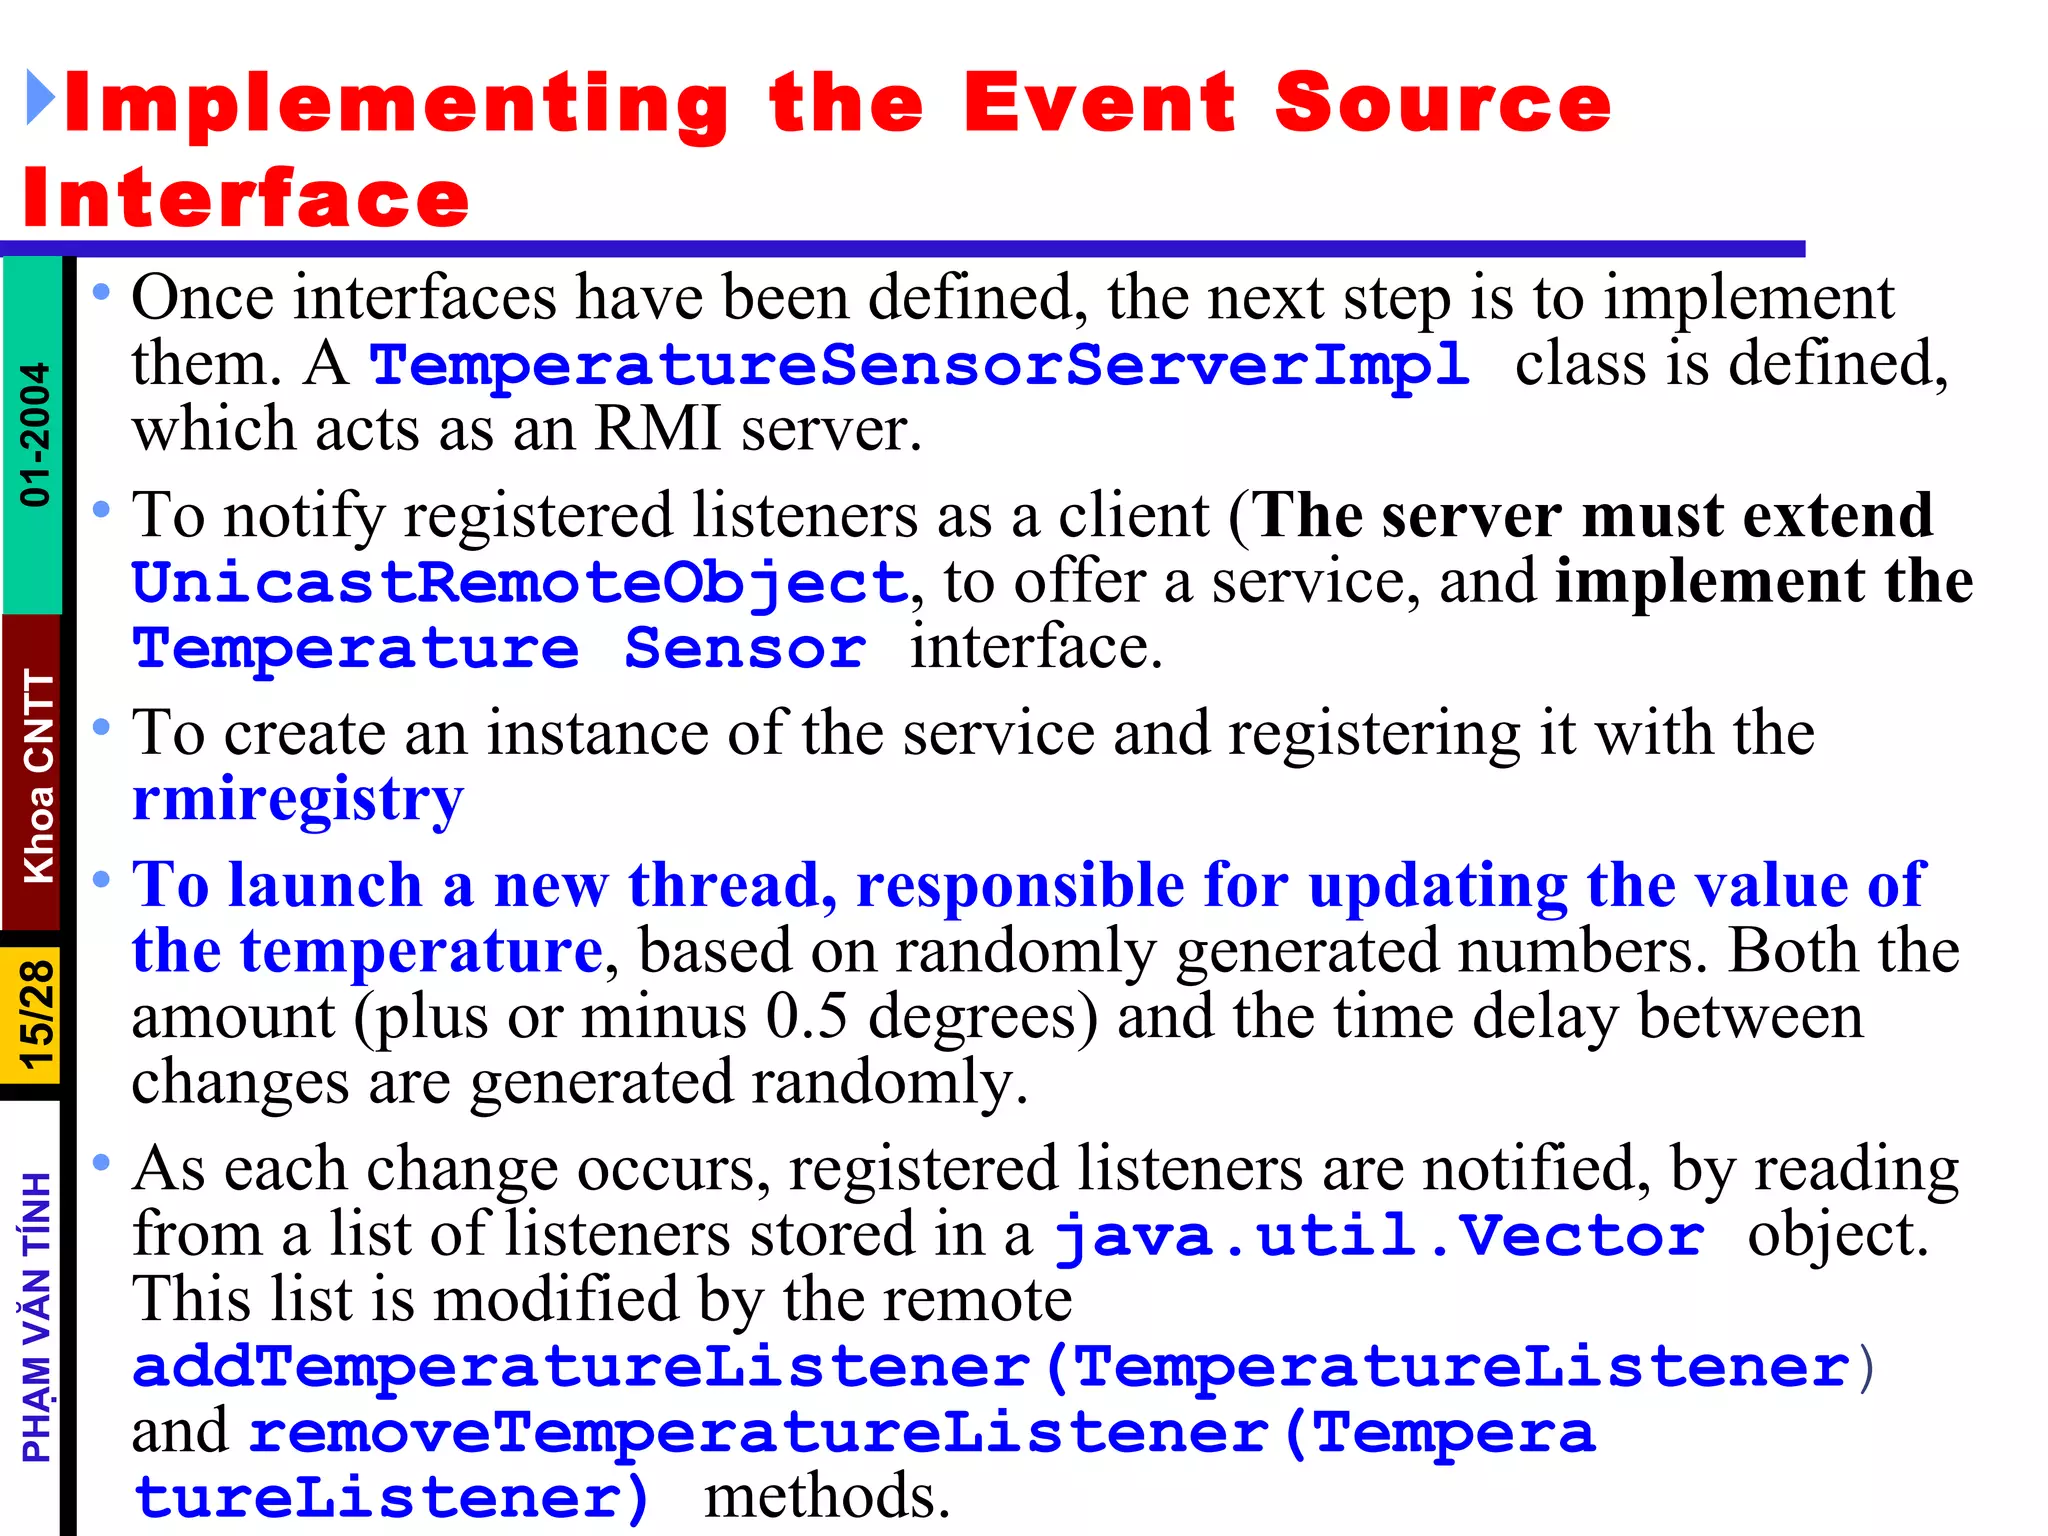
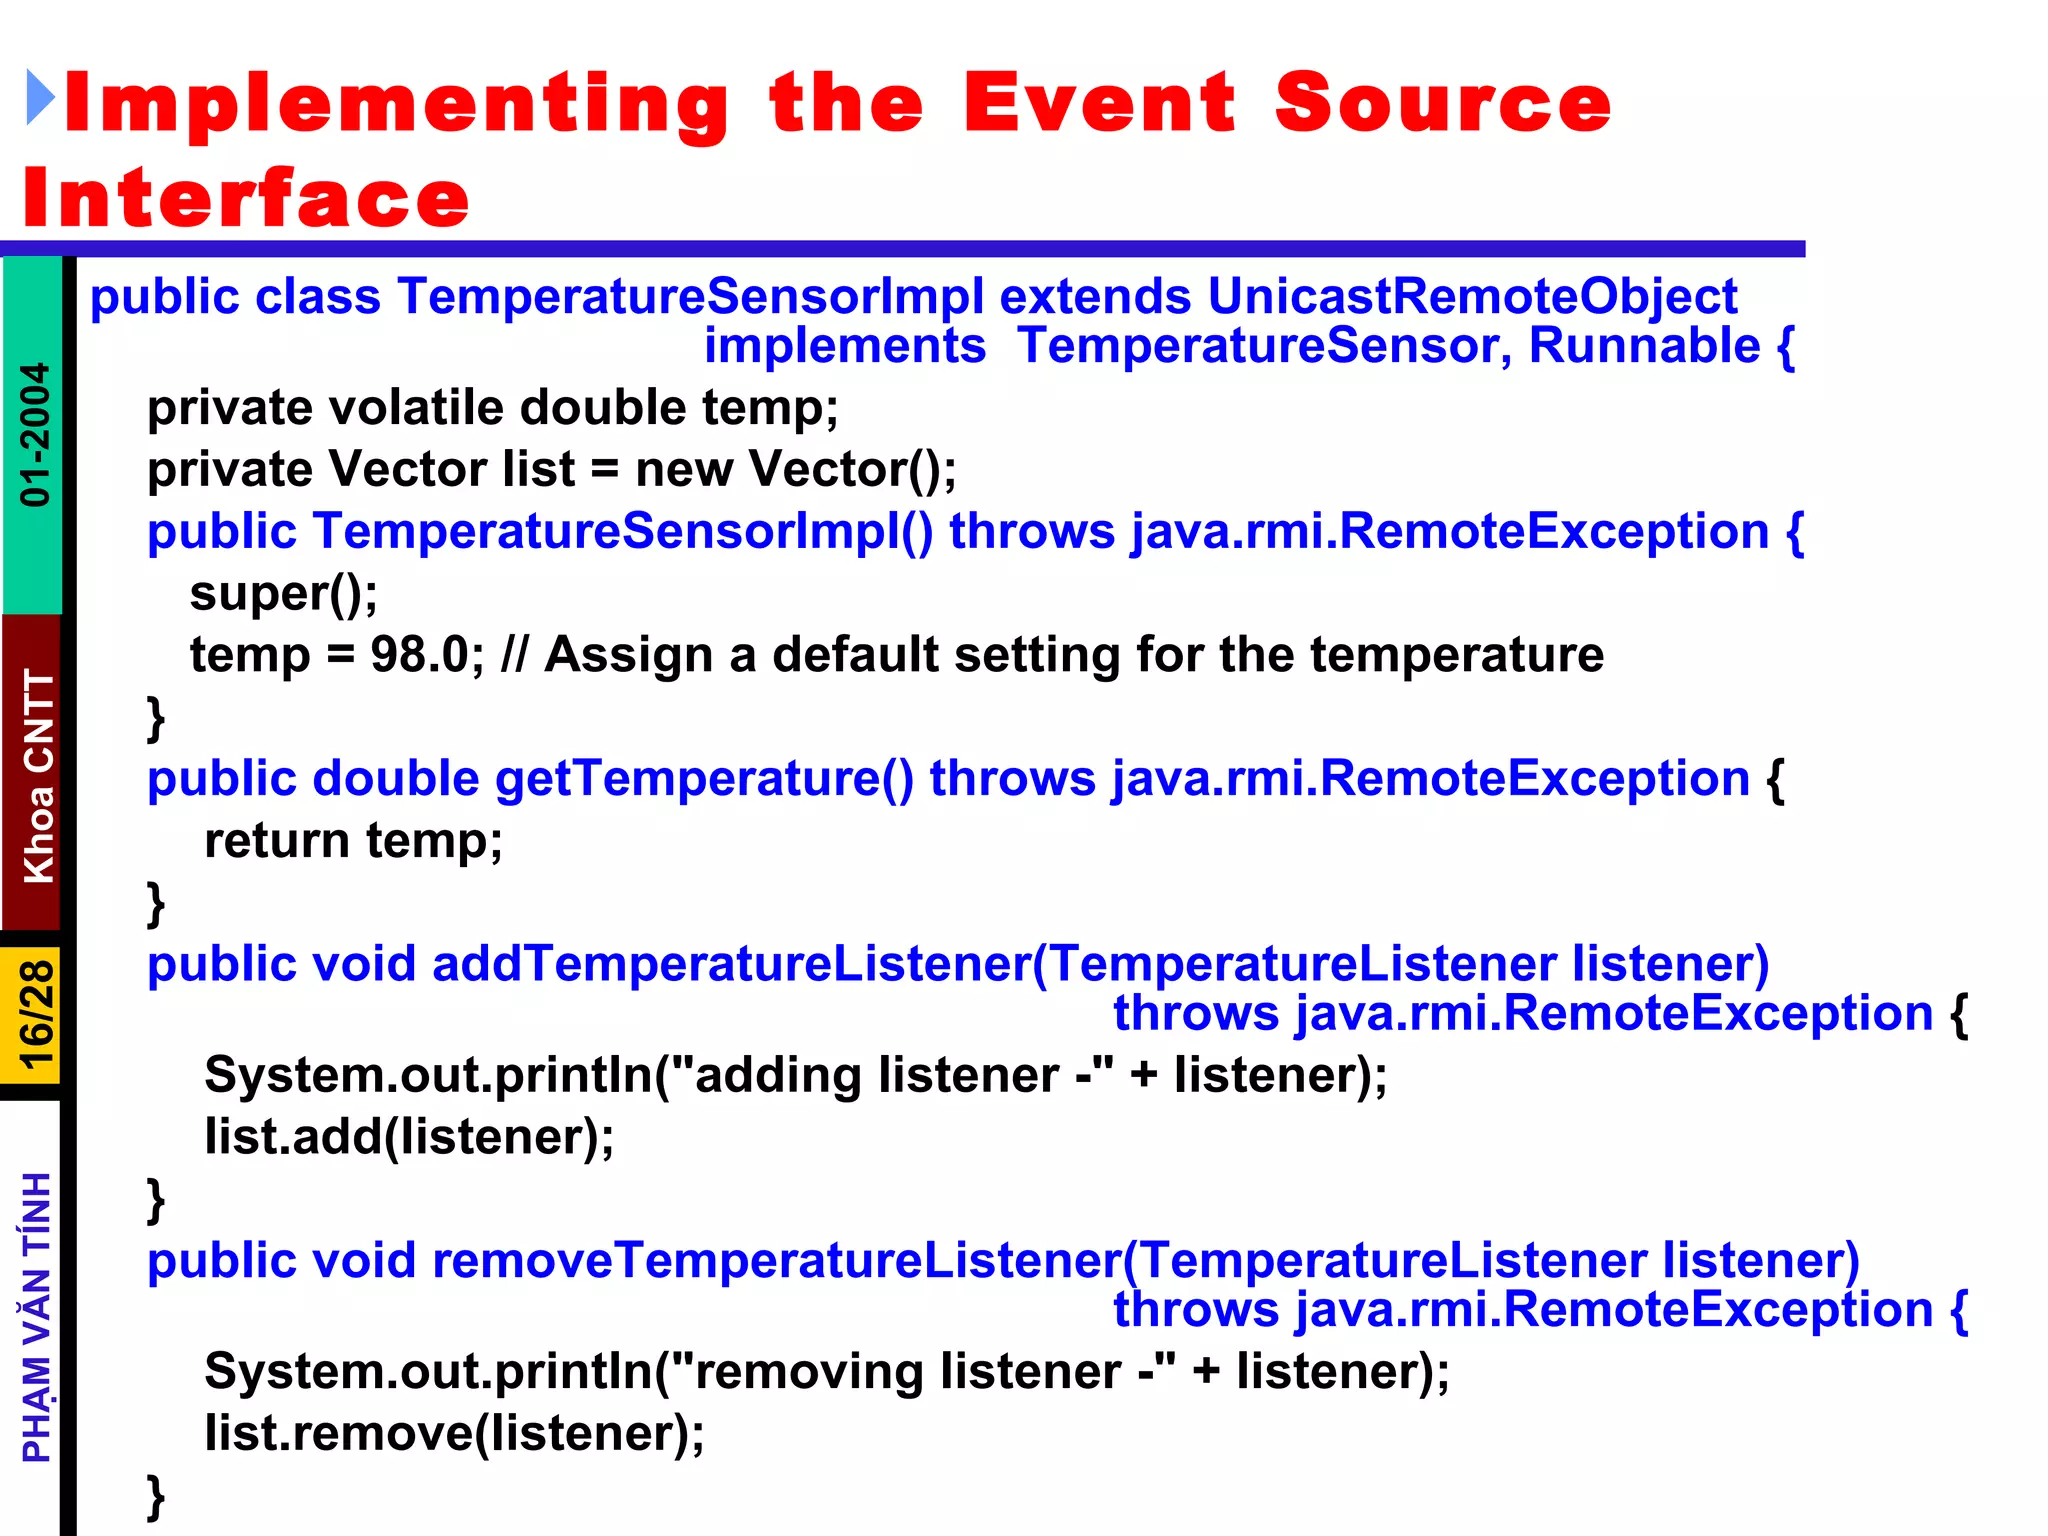
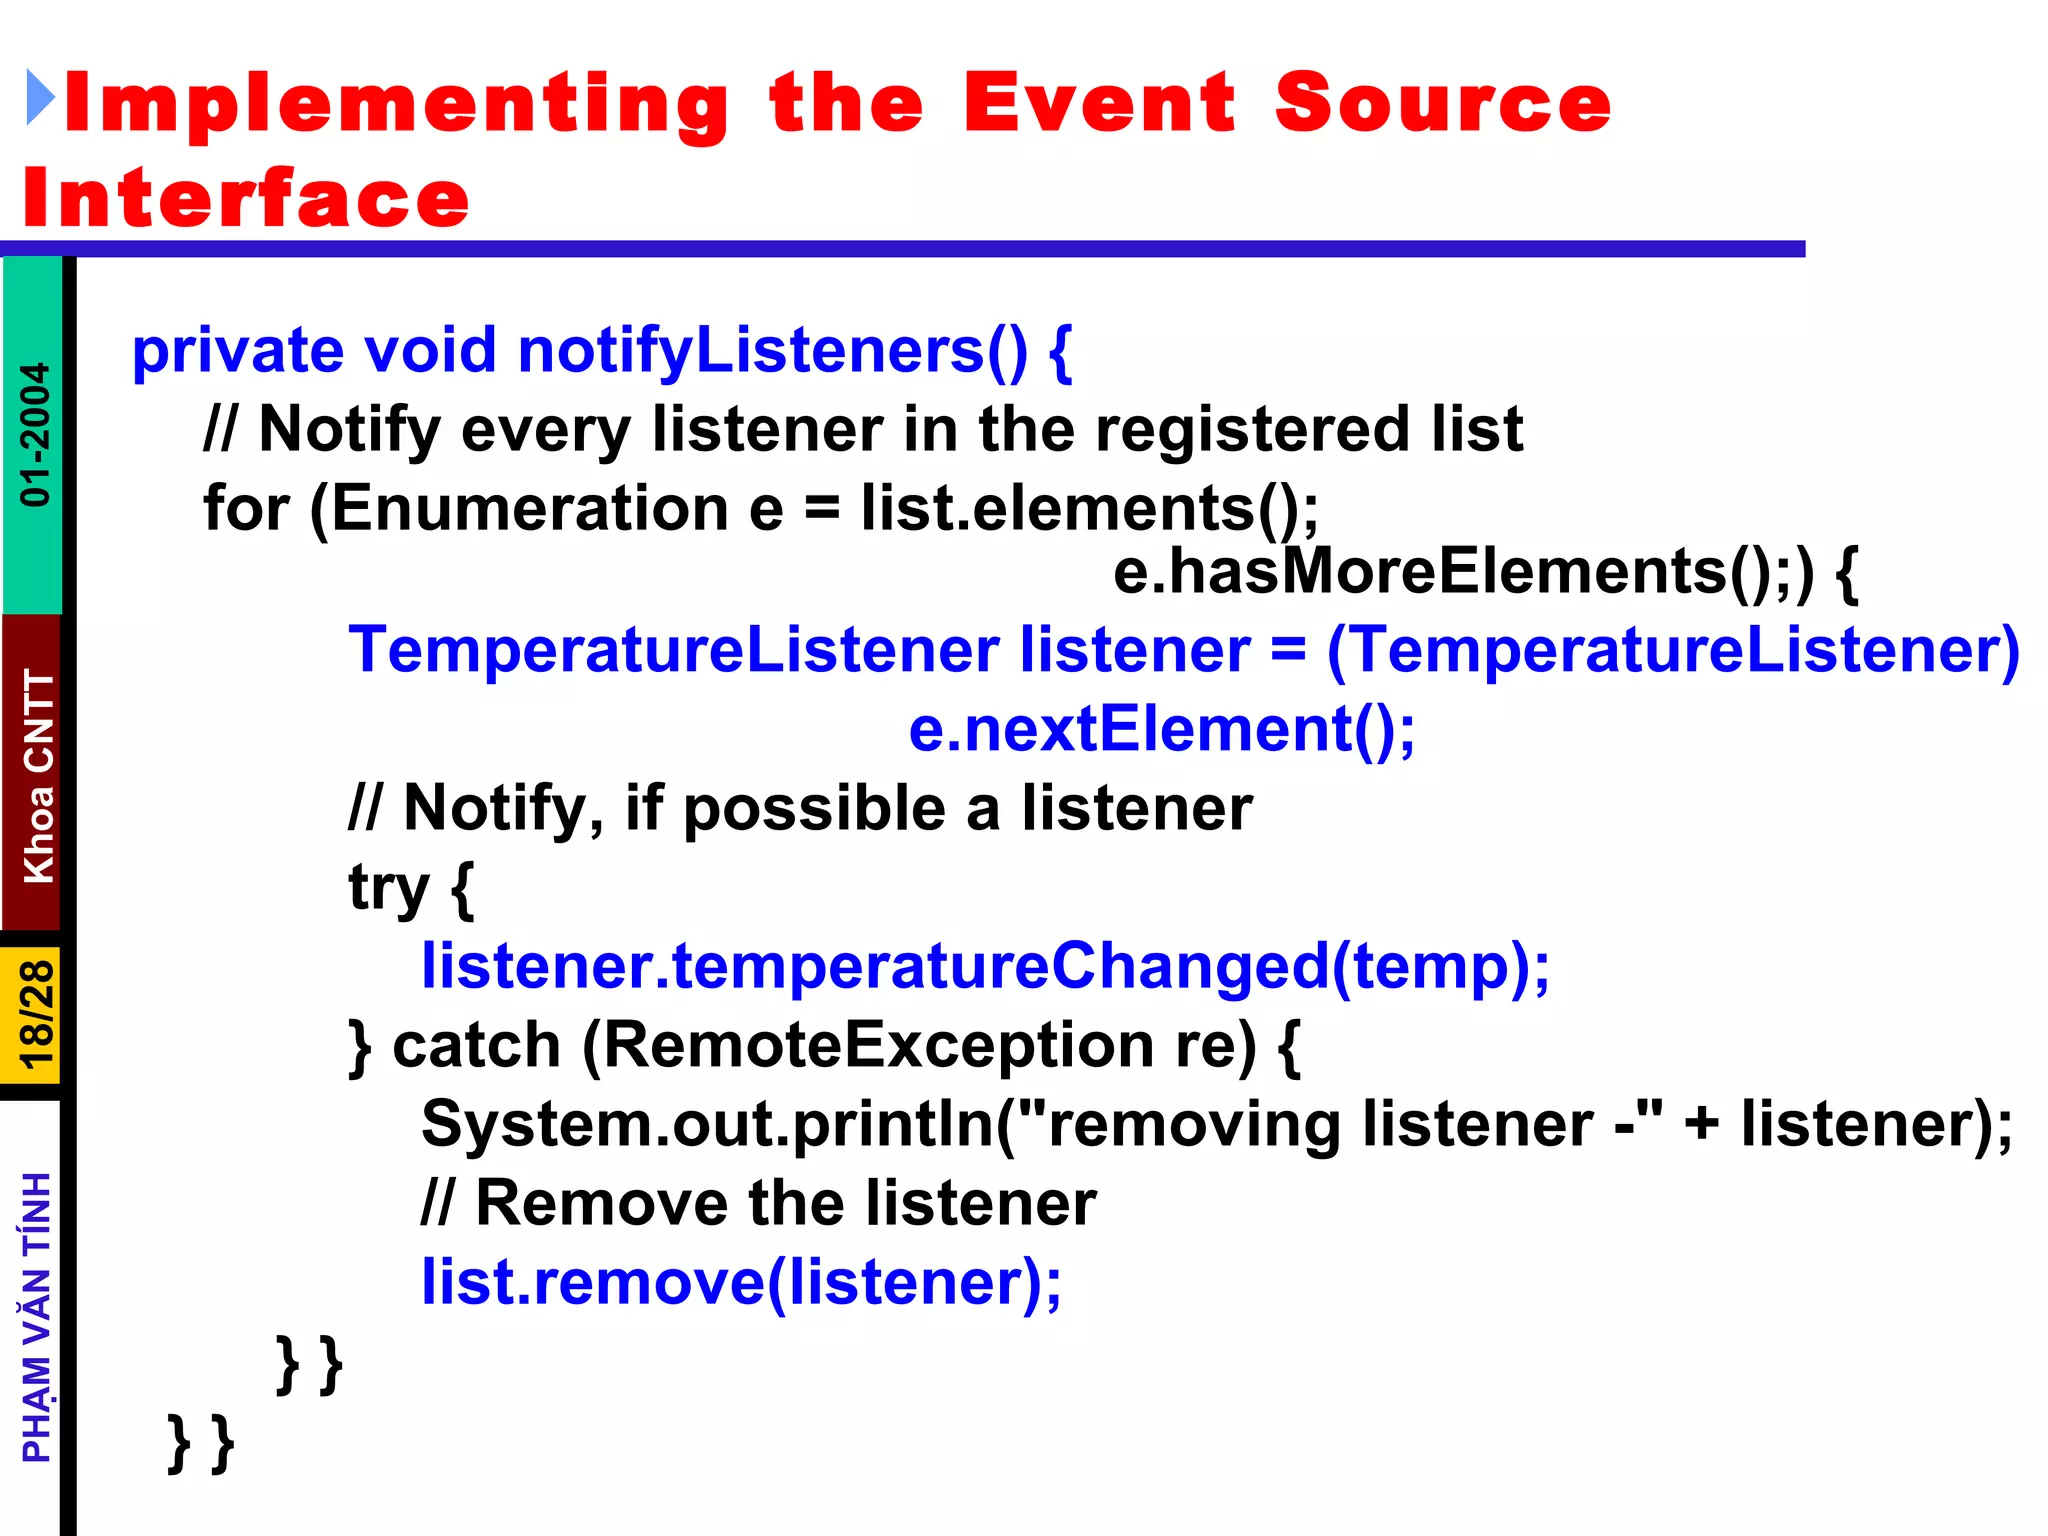
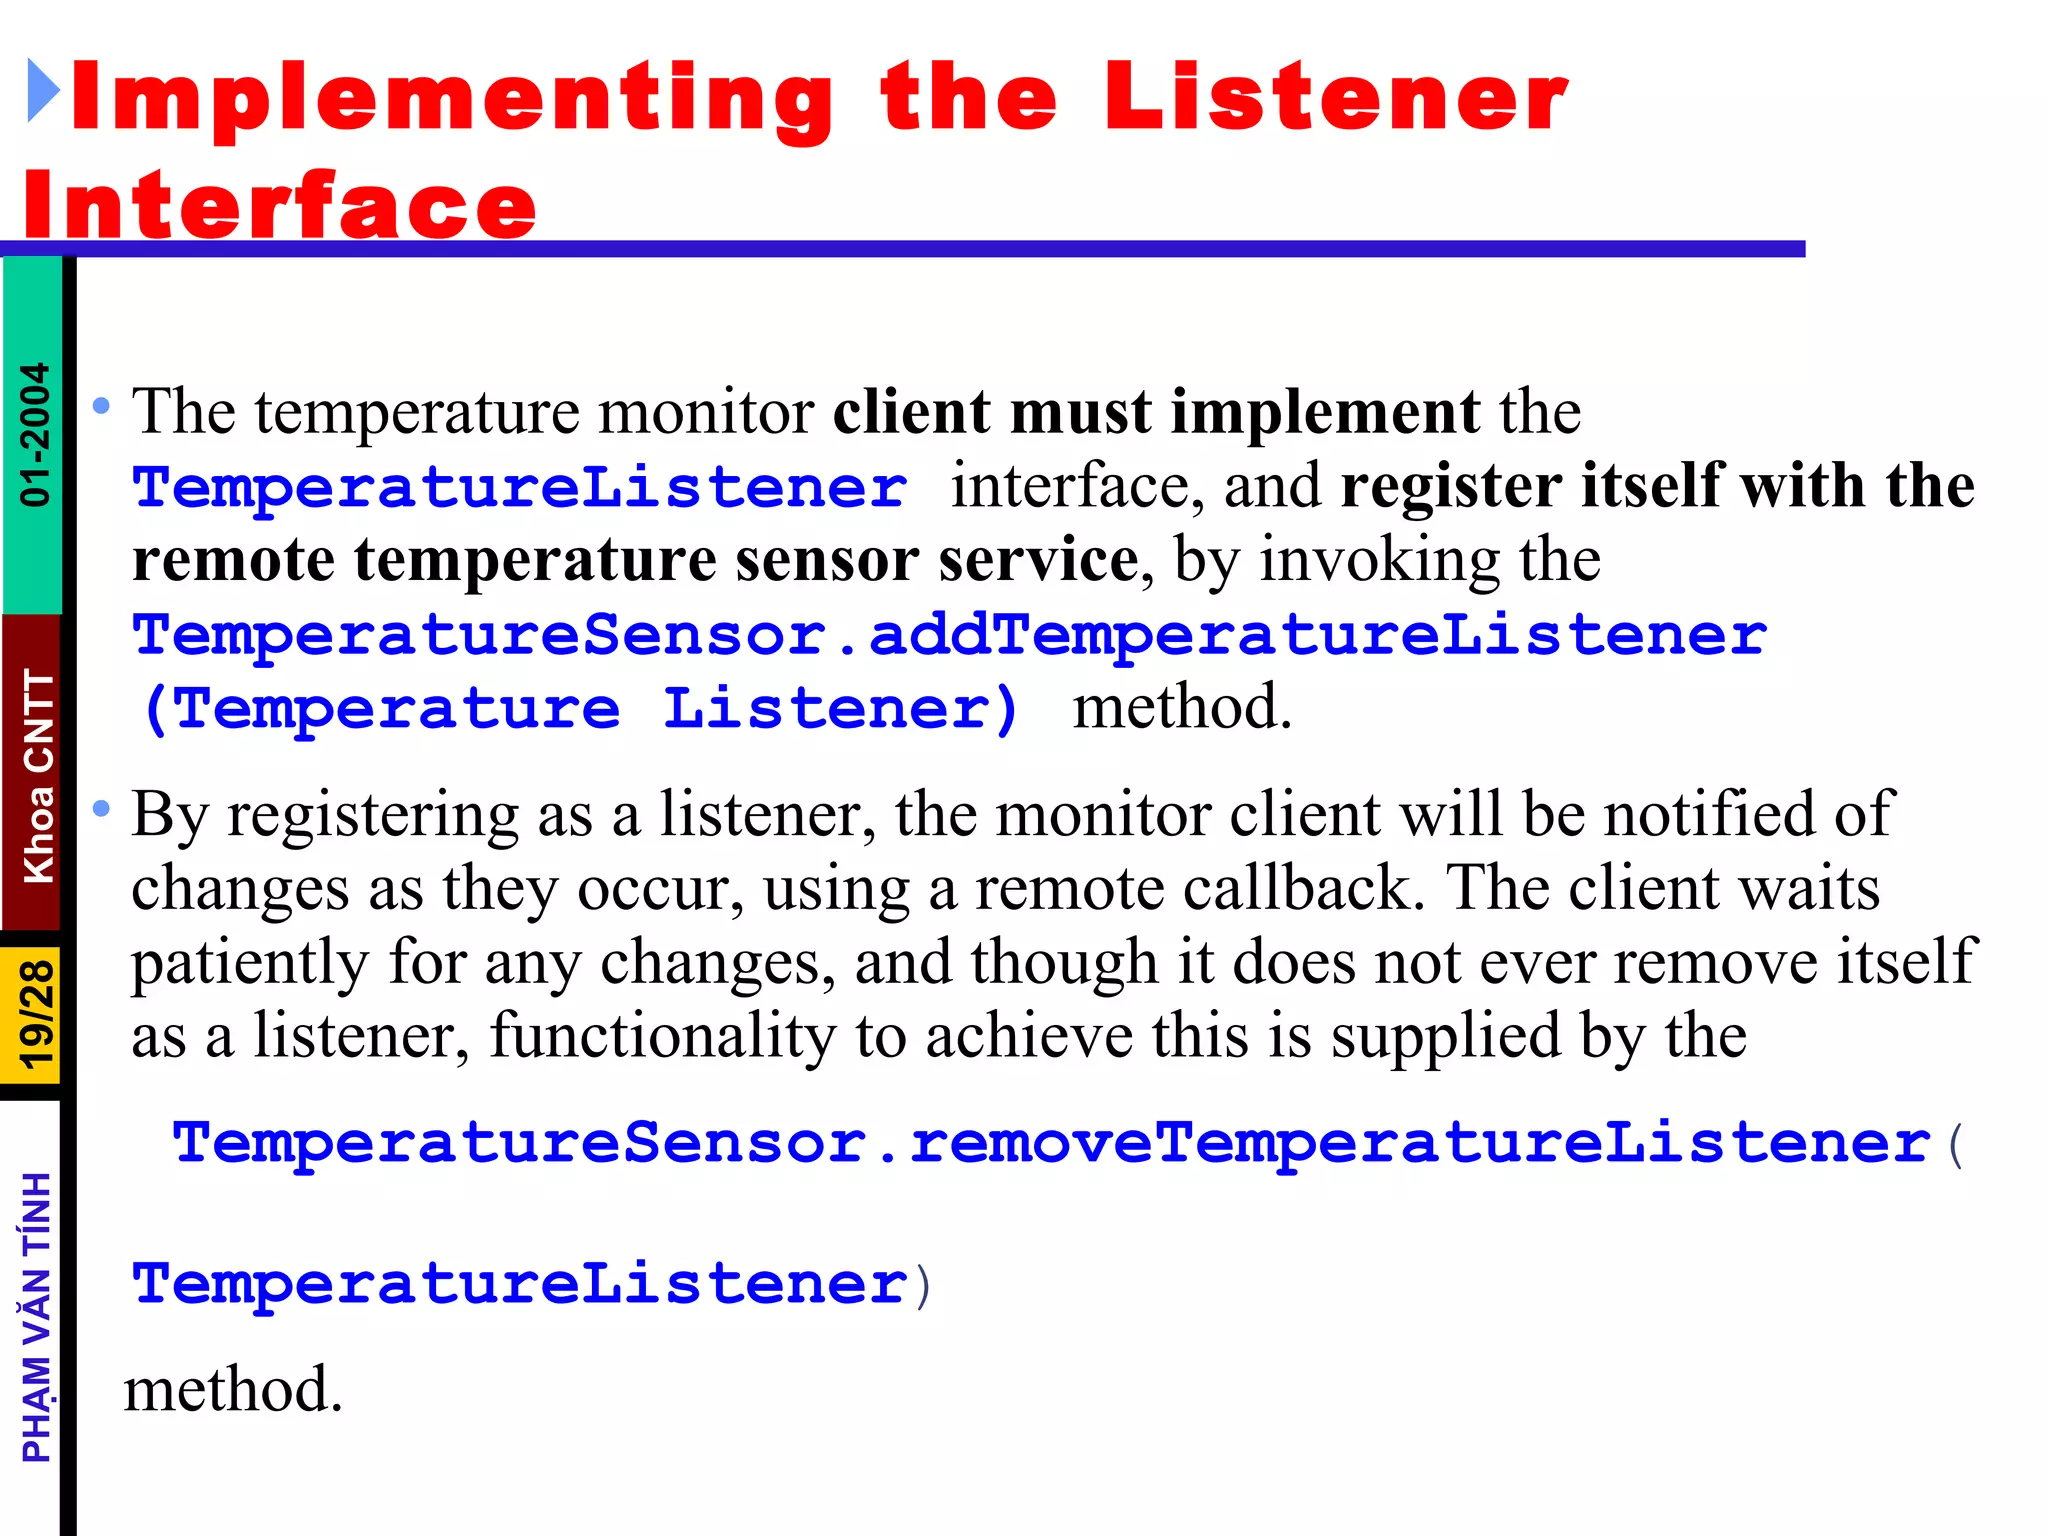
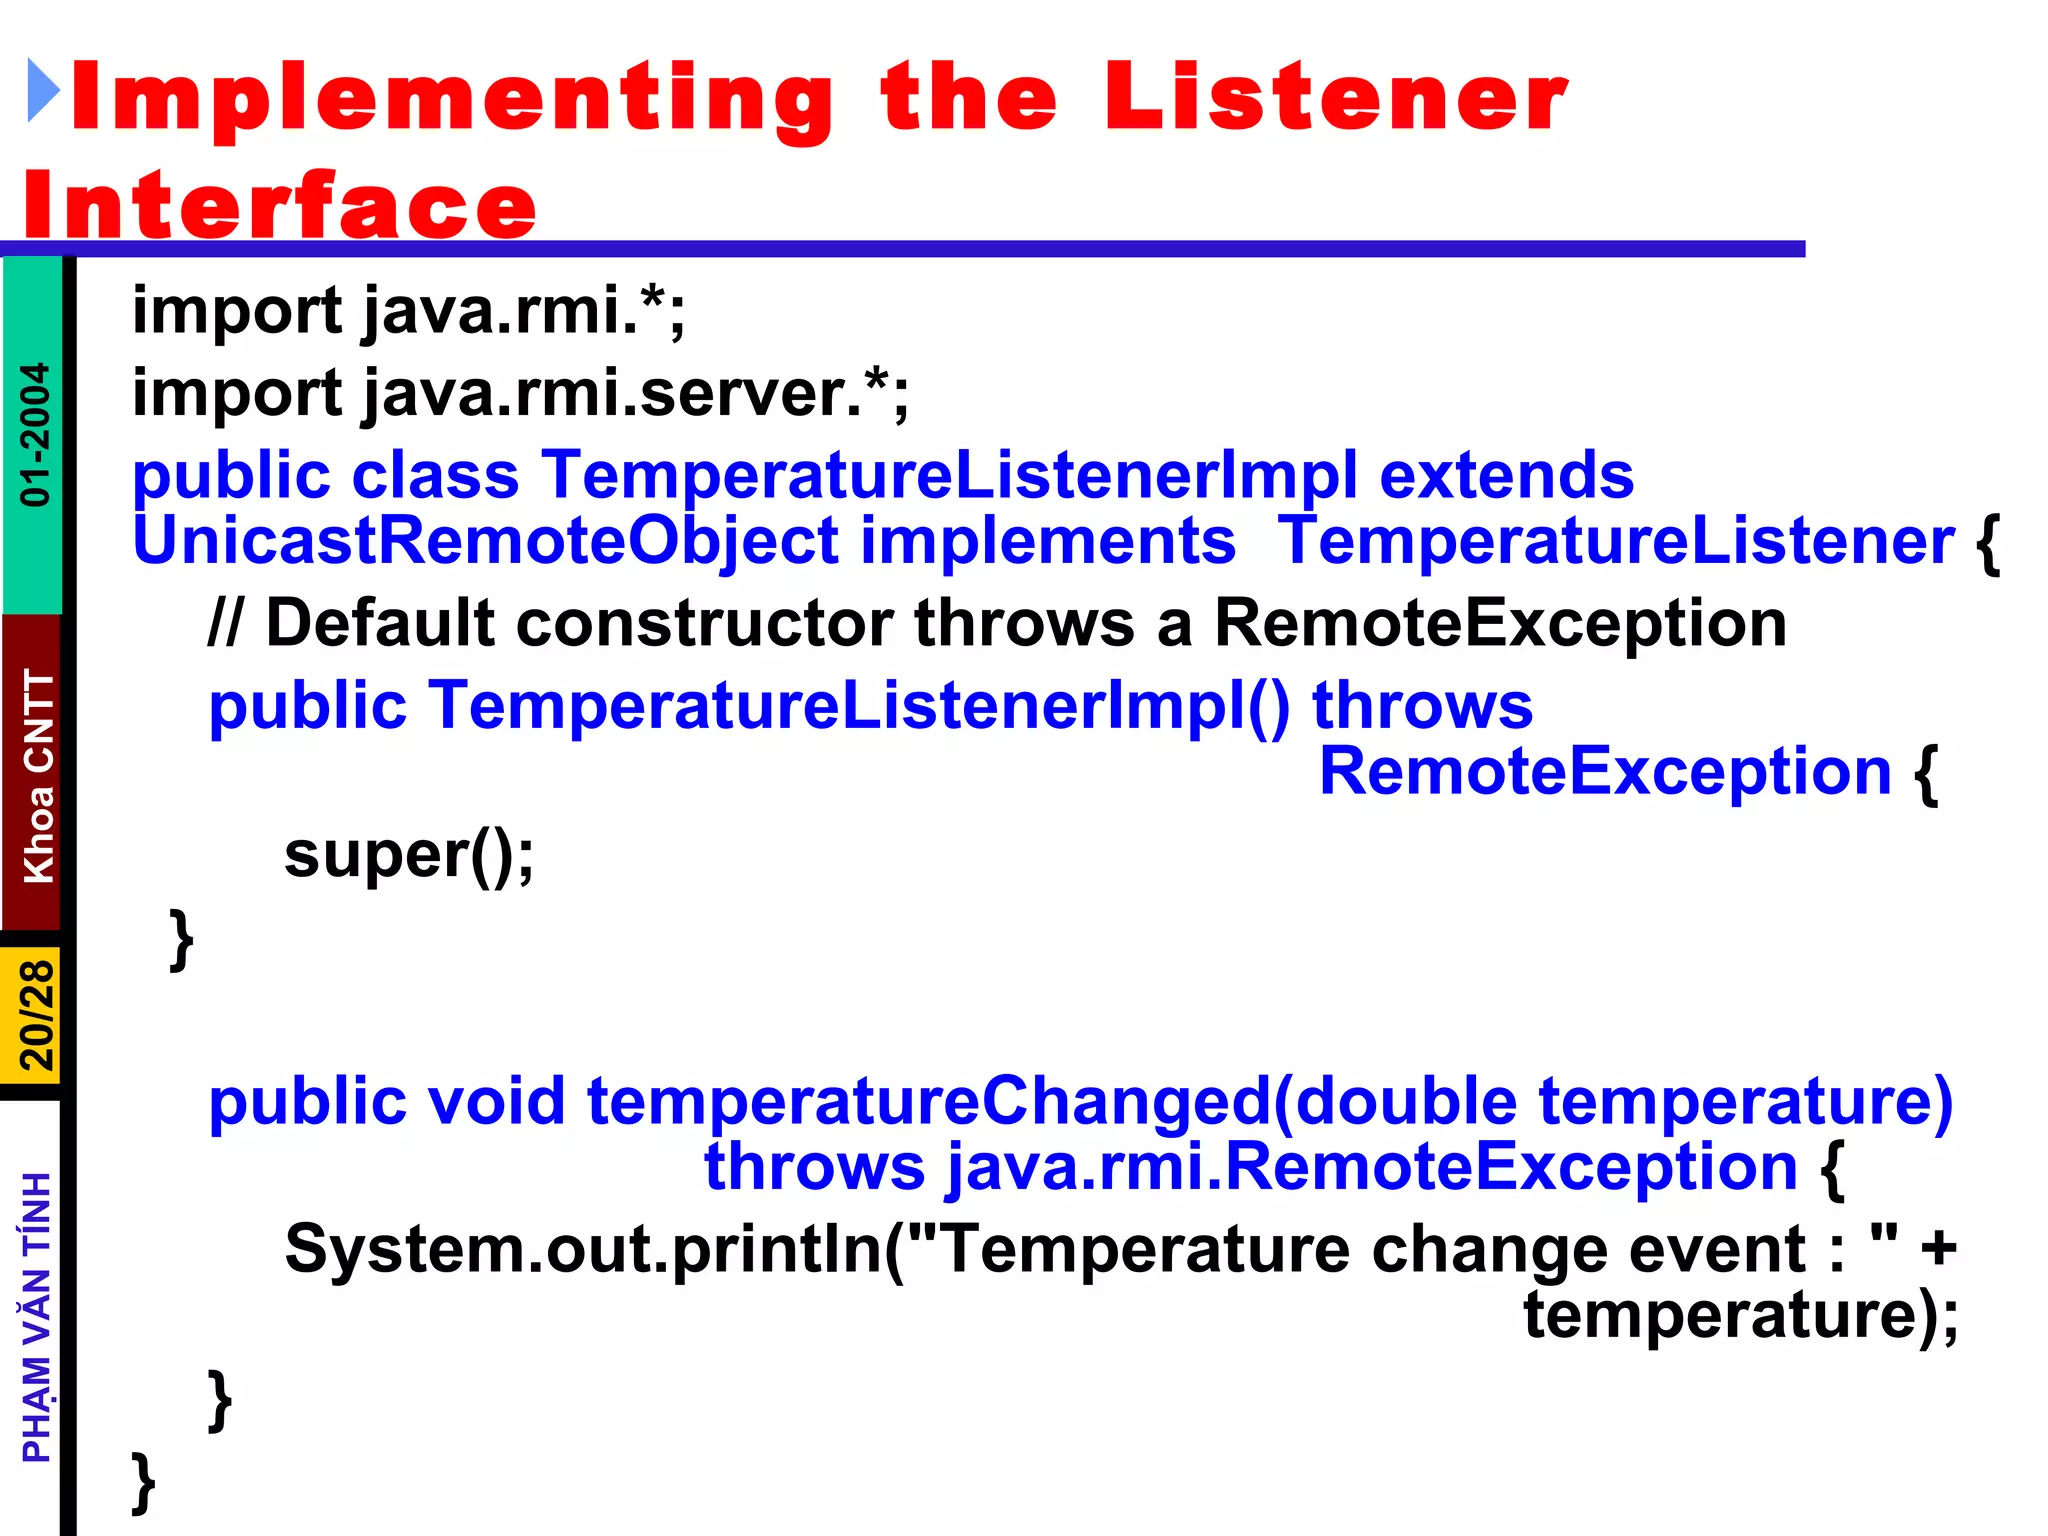
Using Remote Method Invocation to Implement Callbacks
Java RMI Client Server Interaction
CodeBase A codebase can be defined as a source, or a place, from which to load classes into a virtual machine
CodeBase The remote object's  codebase  is specified by the remote object's server by setting the  java.rmi.server.codebase   property . The Java RMI server registers a remote object, bound to a name, with the Java RMI registry. The codebase set on the server VM is annotated to the remote object reference in the Java RMI registry.  The Java RMI client requests a reference to a named remote object . The reference (the remote object's  stub  instance) is what the client will use to make remote method calls to the remote object.  The Java RMI registry returns a reference  (the  stub  instance) to the requested class. If the class definition for the stub instance can be found locally in the client's  CLASSPATH  , which is always searched before the codebase, the client will load the class locally. However,  if the definition for the stub is not found in the client's CLASSPATH, the client will attempt to retrieve the class definition from the remote object's codebase .
CodeBase The client requests the class definition from the codebase . The codebase the client uses is the URL that was annotated to the stub instance when the stub class was loaded by the registry.  The class definition for the stub (and any other class(es) that it needs) is downloaded to the client .  Now the client has all the information that it needs to invoke remote methods on the remote object. The stub instance acts as a proxy to the remote object that exists on the server ; so unlike the applet which uses a codebase to execute code in its local VM, the Java RMI client uses the remote object's codebase to execute code in another, potentially remote VM  In addition to downloading stubs and their associated classes to clients, the java.rmi.server.codebase property can be used to specify a location from which any class, not only stubs, can be downloaded.
CodeBase Java RMI client making a remote method call
CodeBase Java RMI client making a remote method call, passing an unknown subtype as a method parameter
Preparing for Deployment  Deploying an application that uses RMI can be tricky because so many things can go wrong and the error messages that you get when something does go wrong are so poor. Separate the class files into three subdirectories: server download client The server directory contains all files that are needed to run the server . You will later move these files to the machine running the server process. In our example, the server directory contains the following files: server/ ProductServer.class ProductImpl.class Product.class
Preparing for Deployment The client directory contains the files that are needed to start the client . These are client/ ProductClient.class Product.class client.policy You will deploy these files on the client computer. Finally, the  download directory contains those class files needed by the RMI registry, the client, and the server, as well as the classes they depend on . In our example, the download directory looks like this: download/ ProductImpl_Stub.class java - Djava.rmi.server.codebase = http://localhost:8080/  download/ ProductServer &
Using RMI to Implement Callbacks Multiple listeners can register with one or more event sources.
Using RMI to Implement Callbacks Callback notification of event, for every registered listener
Callback Client-Server Interactions
Defining the Listener Interface The listener interface defines a remote object with a single method . This method should be invoked by an event source whenever an event occurs, so as to act as notification that the event occurred. The method signifies a change in temperature, and allows the new temperature to be passed as a parameter. interface TemperatureListener  extends java.rmi.Remote  { public void temperatureChanged(double temperature) throws java.rmi.RemoteException; }
Defining the Event Source Interface The event source must allow a listener to be registered and unregistered , and may optionally provide additional methods. In this case, a method to request the temperature on demand is offered. interface TemperatureSensor extends java.rmi.Remote{ public double getTemperature()   throws  java.rmi.RemoteException ; public void addTemperatureListener (TemperatureListener listener ) throws java.rmi.RemoteException; public void removeTemperatureListener (TemperatureListener listener ) throws java.rmi.RemoteException; }
Implementing the Event Source Interface Once interfaces have been defined, the next step is to implement them. A  TemperatureSensorServerImpl   class is defined, which acts as an RMI server.  To notify registered listeners as a client ( The server must extend   UnicastRemoteObject , to offer a service, and  implement the   Temperature   Sensor   interface.  To create an instance of the service and registering it with the  rmiregistry   To launch a new thread, responsible for updating the value of the temperature , based on randomly generated numbers. Both the amount (plus or minus 0.5 degrees) and the time delay between changes are generated randomly.  As each change occurs, registered listeners are notified, by reading from a list of listeners stored in a  java.util.Vector   object. This list is modified by the remote  addTemperatureListener(TemperatureListener )  and  removeTemperatureListener(Tempera   tureListener)   methods.
Implementing the Event Source Interface public class TemperatureSensorImpl extends UnicastRemoteObject  implements  TemperatureSensor, Runnable { private volatile double temp; private Vector list = new Vector(); public TemperatureSensorImpl() throws java.rmi.RemoteException { super(); temp = 98.0; // Assign a default setting for the temperature } public double getTemperature() throws java.rmi.RemoteException  { return temp; } public void addTemperatureListener(TemperatureListener listener)  throws java.rmi.RemoteException  { System.out.println("adding listener -" + listener); list.add(listener); } public void removeTemperatureListener(TemperatureListener listener)  throws java.rmi.RemoteException { System.out.println("removing listener -" + listener); list.remove(listener); }
Implementing the Event Source Interface public void run() { Random r = new Random(); for (; ; ) { try { // Sleep for a random amount of time int duration = r.nextInt() % 10000 + 2000; // Check to see if negative, if so, reverse if (duration < 0) duration = duration * -1; Thread.sleep(duration); } catch (InterruptedException ie) {} // Get a number, to see if temp goes up or down int num = r.nextInt(); if (num < 0)  temp += 0.5; else  temp -= 0.5;   notifyListeners();  // Notify registered listeners }}
Implementing the Event Source Interface private void notifyListeners() { // Notify every listener in the registered list for (Enumeration e = list.elements();  e.hasMoreElements();) { TemperatureListener listener = (TemperatureListener) e.nextElement(); // Notify, if possible a listener try { listener.temperatureChanged(temp); } catch (RemoteException re) { System.out.println(&quot;removing listener -&quot; + listener); // Remove the listener list.remove(listener); } } } }
Implementing the Listener Interface The temperature monitor  client must implement  the  TemperatureListener   interface, and  register itself with the remote temperature sensor service , by invoking the  TemperatureSensor.addTemperatureListener   (Temperature   Listener)   method.  By registering as a listener, the monitor client will be notified of changes as they occur, using a remote callback. The client waits patiently for any changes, and though it does not ever remove itself as a listener, functionality to achieve this is supplied by the TemperatureSensor.removeTemperatureListener (  TemperatureListener ) method.
Implementing the Listener Interface import java.rmi.*; import java.rmi.server.*; public class TemperatureListenerImpl extends UnicastRemoteObject implements  TemperatureListener  { // Default constructor throws a RemoteException public TemperatureListenerImpl() throws  RemoteException  { super(); } public void temperatureChanged(double temperature)  throws java.rmi.RemoteException  { System.out.println(&quot;Temperature change event : &quot; +  temperature); } }
TemperatureSensorServer public class TemperatureSensorServer{ public static void main(String args[]) { System.out.println(&quot;Loading temperature service&quot;); try { // Load the service TemperatureSensorImpl sensor = new  TemperatureSensorImpl(); // Register with service so that clients can find us String registry = &quot;localhost&quot;; String registration = &quot;rmi://&quot; + registry + &quot;/TemperatureSensor&quot;; Naming.rebind(registration, sensor); // Create a thread, and pass the sensor server.  This will activate the  //run()  method, and  trigger regular temperature changes. Thread thread = new Thread(sensor); thread.start(); } catch (RemoteException re) { System.err.println(&quot;Remote Error - &quot; + re); } catch (Exception e) { System.err.println(&quot;Error - &quot; + e); } }}
TemperatureMonitor public static void main(String args[]) { System.out.println(&quot;Looking for temperature sensor&quot;); try { // Lookup the service in the registry, and obtain a remote service String registry = &quot;localhost&quot;; String registration = &quot;rmi://&quot; + registry +  &quot;/TemperatureSensor&quot;; Remote remoteService = Naming.lookup(registration); // Cast to a TemperatureSensor interface TemperatureSensor sensor = (TemperatureSensor) remoteService; // Get and display current temperature double reading = sensor.getTemperature(); System.out.println(&quot;Original temp : &quot; + reading); // Create a new monitor and register it as a listener with remote sensor TemperatureListenerImpl monitor = new TemperatureListenerImpl(); sensor.addTemperatureListener(monitor); } catch (RemoteException re) { System.out.println(&quot;RMI Error - &quot; + re); } catch (Exception e) { System.out.println(&quot;Error - &quot; + e); } }
Remote Object Activation One of the chief disadvantages of using RMI for large and complex systems is the amount of overhead generated by RMI server software . Suppose you are constructing a massive system, with many different RMI service interfaces and server implementations.  Each server would have to be running continually, even if it was seldom used by client software . Servers must create and export remote objects that implement RMI service interfaces, which consumes memory and CPU time.  If each implementation is created as a separate server, this means that there will be as many JVM instances as there are services . Remote object activation is a technique that solves the problem of running a large number of idle RMI services . It allows services to be registered with the rmiregistry, but not instantiated. Instead, they remain inactive, until called upon by a client, when they will awaken and perform their operation.  A special daemon process called the  remote method invocation activation system daemon  (rmid)  listens for these requests and instantiates RMI services on demand.
Creating an Activatable Remote Object Creation  of an activatable remote object is a little different from that of a  UnicastRemoteObject , but the code is fairly similar. public interface MyRemoteInterface extends  java.rmi.Remote{  public void doSomething () throws  java.rmi.RemoteException; } The next step is to  create an   implementation  that extends the  java.rmi.activation.Activatable   class. It must implement our RMI interface and provide both a constructor and a  doSomething ()  method. Unlike classes that extend the  UnicastRemoteObject   class, a different constructor signature is used. This constructor calls the parent constructor and exports the object on any available port. The service is then available for use by clients.
Implementing an Activatable Remote Object public class MyRemoteInterfaceImpl extends  java.rmi.activation.Activatable implements MyRemoteInterface{ public MyRemoteInterfaceImpl (java.rmi.activation.ActivationID activationID, java.rmi.MarshalledObject data) throws java.rmi.RemoteException { // call the Activatable(ActivationID activationID, // int port) parent constructor super (activationID, 0);   } public void doSomething(){ System.out.println (&quot;Doing something....&quot;); } }
Registering an Activatable Remote Object Step One The first step is to create an activation group descriptor. This descriptor is associated with an activation group, and allows you to specify system properties. In this example, no system properties are required and a new instance of the Properties class is created. // Step one : create an ActivationGroupDesc instance ActivationGroupDesc groupDescriptor = new ActivationGroupDesc(new Properties(), null); Step Two The second step is to register the activation group descriptor with the RMI activation daemon process. This process is represented by the  Activation   System   interface. Applications do not create or extend this interface. Instead, a reference to the activation daemon process is obtained by invoking the static  ActivationGroup.getSystem()   method. // Step two : register that activation group descriptor // with the activation system, and get groupID ActivationSystem system = ActivationGroup.getSystem();
Registering an Activatable Remote Object Once a reference to the  ActivationSystem   class is obtained, the group descriptor is registered using the  ActivationSystem.registerGroup   method, which returns an  ActivationGroupID   instance. // Register the group descriptor - without registering the // group, no execution ActivationGroupID groupID = system.registerGroup(groupDescriptor); Step Three Once a group descriptor has been registered with the activation system and a valid  ActivationGroupID   obtained, the next step is to actually create the activation group. The act of registering it is not sufficient—one must be created, by calling the static  ActivationGroup.createGroup( ActivationGroupID id ,  ActivationGroupDesc  descriptor )   method. This creates and assigns an activation group for the JVM, and notifies the activation system that the group is active. // Step three: create an activation group, passing the // group ID and descriptor as parameters ActivationGroup.createGroup(groupID, groupDescriptor, 0);
Registering an Activatable Remote Object Step Four The fourth step is to create an activation descriptor, which describes an activatable remote object. It stores three key pieces of information: the class name of the remote object, the URL location of the remote object, and (optionally) a  MarshalledObject  that contains a serialized version of the remote object.  String strLoc = new  File(&quot;.&quot;).getCanonicalFile().toURI().toString(); // whose constructor requires the class name, codebase, //and an optional marshalled object ActivationDesc desc = new  ActivationDesc(&quot;RMIActivationLightBulbImpl&quot;,  strLoc, null); Step Five The fifth step is to register the activation descriptor with the activation system. This instructs the activation system of the class name and the location of the class definition file. A remote stub will be returned, which can then be registered as an RMI service. // Step five : Register the object with the activation system // Returns a stub, which may be registered with rmiregistry Remote stub = Activatable.register(desc);
Registering an Activatable Remote Object Step Six The sixth and final step is to add a registry entry for the RMI service, so that clients may locate the service. The code for this is similar to that of the previous RMI lightbulb server, except that a remote stub is registered, not an instance of a remote object. // Check to see if a registry was specified  String registry = &quot;localhost&quot;; // Registration format //registry_hostname:port/service // Note the :port field is optional String registration = &quot;rmi://&quot; + registry + &quot;/RMILightBulb&quot;; // Step six : Register the stub with the rmiregistry Naming.rebind(registration, stub); System.out.println(&quot;Service registered with rmid. Now terminating...&quot;); System.exit(0);
Configuring a RMID

Call Back

  • 1.
    Using Remote MethodInvocation to Implement Callbacks
  • 2.
    Java RMI ClientServer Interaction
  • 3.
    CodeBase A codebasecan be defined as a source, or a place, from which to load classes into a virtual machine
  • 4.
    CodeBase The remoteobject's codebase is specified by the remote object's server by setting the java.rmi.server.codebase property . The Java RMI server registers a remote object, bound to a name, with the Java RMI registry. The codebase set on the server VM is annotated to the remote object reference in the Java RMI registry. The Java RMI client requests a reference to a named remote object . The reference (the remote object's stub instance) is what the client will use to make remote method calls to the remote object. The Java RMI registry returns a reference (the stub instance) to the requested class. If the class definition for the stub instance can be found locally in the client's CLASSPATH , which is always searched before the codebase, the client will load the class locally. However, if the definition for the stub is not found in the client's CLASSPATH, the client will attempt to retrieve the class definition from the remote object's codebase .
  • 5.
    CodeBase The clientrequests the class definition from the codebase . The codebase the client uses is the URL that was annotated to the stub instance when the stub class was loaded by the registry. The class definition for the stub (and any other class(es) that it needs) is downloaded to the client . Now the client has all the information that it needs to invoke remote methods on the remote object. The stub instance acts as a proxy to the remote object that exists on the server ; so unlike the applet which uses a codebase to execute code in its local VM, the Java RMI client uses the remote object's codebase to execute code in another, potentially remote VM In addition to downloading stubs and their associated classes to clients, the java.rmi.server.codebase property can be used to specify a location from which any class, not only stubs, can be downloaded.
  • 6.
    CodeBase Java RMIclient making a remote method call
  • 7.
    CodeBase Java RMIclient making a remote method call, passing an unknown subtype as a method parameter
  • 8.
    Preparing for Deployment Deploying an application that uses RMI can be tricky because so many things can go wrong and the error messages that you get when something does go wrong are so poor. Separate the class files into three subdirectories: server download client The server directory contains all files that are needed to run the server . You will later move these files to the machine running the server process. In our example, the server directory contains the following files: server/ ProductServer.class ProductImpl.class Product.class
  • 9.
    Preparing for DeploymentThe client directory contains the files that are needed to start the client . These are client/ ProductClient.class Product.class client.policy You will deploy these files on the client computer. Finally, the download directory contains those class files needed by the RMI registry, the client, and the server, as well as the classes they depend on . In our example, the download directory looks like this: download/ ProductImpl_Stub.class java - Djava.rmi.server.codebase = http://localhost:8080/ download/ ProductServer &
  • 10.
    Using RMI toImplement Callbacks Multiple listeners can register with one or more event sources.
  • 11.
    Using RMI toImplement Callbacks Callback notification of event, for every registered listener
  • 12.
  • 13.
    Defining the ListenerInterface The listener interface defines a remote object with a single method . This method should be invoked by an event source whenever an event occurs, so as to act as notification that the event occurred. The method signifies a change in temperature, and allows the new temperature to be passed as a parameter. interface TemperatureListener extends java.rmi.Remote { public void temperatureChanged(double temperature) throws java.rmi.RemoteException; }
  • 14.
    Defining the EventSource Interface The event source must allow a listener to be registered and unregistered , and may optionally provide additional methods. In this case, a method to request the temperature on demand is offered. interface TemperatureSensor extends java.rmi.Remote{ public double getTemperature() throws java.rmi.RemoteException ; public void addTemperatureListener (TemperatureListener listener ) throws java.rmi.RemoteException; public void removeTemperatureListener (TemperatureListener listener ) throws java.rmi.RemoteException; }
  • 15.
    Implementing the EventSource Interface Once interfaces have been defined, the next step is to implement them. A TemperatureSensorServerImpl class is defined, which acts as an RMI server. To notify registered listeners as a client ( The server must extend UnicastRemoteObject , to offer a service, and implement the Temperature Sensor interface. To create an instance of the service and registering it with the rmiregistry To launch a new thread, responsible for updating the value of the temperature , based on randomly generated numbers. Both the amount (plus or minus 0.5 degrees) and the time delay between changes are generated randomly. As each change occurs, registered listeners are notified, by reading from a list of listeners stored in a java.util.Vector object. This list is modified by the remote addTemperatureListener(TemperatureListener ) and removeTemperatureListener(Tempera tureListener) methods.
  • 16.
    Implementing the EventSource Interface public class TemperatureSensorImpl extends UnicastRemoteObject implements TemperatureSensor, Runnable { private volatile double temp; private Vector list = new Vector(); public TemperatureSensorImpl() throws java.rmi.RemoteException { super(); temp = 98.0; // Assign a default setting for the temperature } public double getTemperature() throws java.rmi.RemoteException { return temp; } public void addTemperatureListener(TemperatureListener listener) throws java.rmi.RemoteException { System.out.println(&quot;adding listener -&quot; + listener); list.add(listener); } public void removeTemperatureListener(TemperatureListener listener) throws java.rmi.RemoteException { System.out.println(&quot;removing listener -&quot; + listener); list.remove(listener); }
  • 17.
    Implementing the EventSource Interface public void run() { Random r = new Random(); for (; ; ) { try { // Sleep for a random amount of time int duration = r.nextInt() % 10000 + 2000; // Check to see if negative, if so, reverse if (duration < 0) duration = duration * -1; Thread.sleep(duration); } catch (InterruptedException ie) {} // Get a number, to see if temp goes up or down int num = r.nextInt(); if (num < 0) temp += 0.5; else temp -= 0.5; notifyListeners(); // Notify registered listeners }}
  • 18.
    Implementing the EventSource Interface private void notifyListeners() { // Notify every listener in the registered list for (Enumeration e = list.elements(); e.hasMoreElements();) { TemperatureListener listener = (TemperatureListener) e.nextElement(); // Notify, if possible a listener try { listener.temperatureChanged(temp); } catch (RemoteException re) { System.out.println(&quot;removing listener -&quot; + listener); // Remove the listener list.remove(listener); } } } }
  • 19.
    Implementing the ListenerInterface The temperature monitor client must implement the TemperatureListener interface, and register itself with the remote temperature sensor service , by invoking the TemperatureSensor.addTemperatureListener (Temperature Listener) method. By registering as a listener, the monitor client will be notified of changes as they occur, using a remote callback. The client waits patiently for any changes, and though it does not ever remove itself as a listener, functionality to achieve this is supplied by the TemperatureSensor.removeTemperatureListener ( TemperatureListener ) method.
  • 20.
    Implementing the ListenerInterface import java.rmi.*; import java.rmi.server.*; public class TemperatureListenerImpl extends UnicastRemoteObject implements TemperatureListener { // Default constructor throws a RemoteException public TemperatureListenerImpl() throws RemoteException { super(); } public void temperatureChanged(double temperature) throws java.rmi.RemoteException { System.out.println(&quot;Temperature change event : &quot; + temperature); } }
  • 21.
    TemperatureSensorServer public classTemperatureSensorServer{ public static void main(String args[]) { System.out.println(&quot;Loading temperature service&quot;); try { // Load the service TemperatureSensorImpl sensor = new TemperatureSensorImpl(); // Register with service so that clients can find us String registry = &quot;localhost&quot;; String registration = &quot;rmi://&quot; + registry + &quot;/TemperatureSensor&quot;; Naming.rebind(registration, sensor); // Create a thread, and pass the sensor server. This will activate the //run() method, and trigger regular temperature changes. Thread thread = new Thread(sensor); thread.start(); } catch (RemoteException re) { System.err.println(&quot;Remote Error - &quot; + re); } catch (Exception e) { System.err.println(&quot;Error - &quot; + e); } }}
  • 22.
    TemperatureMonitor public staticvoid main(String args[]) { System.out.println(&quot;Looking for temperature sensor&quot;); try { // Lookup the service in the registry, and obtain a remote service String registry = &quot;localhost&quot;; String registration = &quot;rmi://&quot; + registry + &quot;/TemperatureSensor&quot;; Remote remoteService = Naming.lookup(registration); // Cast to a TemperatureSensor interface TemperatureSensor sensor = (TemperatureSensor) remoteService; // Get and display current temperature double reading = sensor.getTemperature(); System.out.println(&quot;Original temp : &quot; + reading); // Create a new monitor and register it as a listener with remote sensor TemperatureListenerImpl monitor = new TemperatureListenerImpl(); sensor.addTemperatureListener(monitor); } catch (RemoteException re) { System.out.println(&quot;RMI Error - &quot; + re); } catch (Exception e) { System.out.println(&quot;Error - &quot; + e); } }
  • 23.
    Remote Object ActivationOne of the chief disadvantages of using RMI for large and complex systems is the amount of overhead generated by RMI server software . Suppose you are constructing a massive system, with many different RMI service interfaces and server implementations. Each server would have to be running continually, even if it was seldom used by client software . Servers must create and export remote objects that implement RMI service interfaces, which consumes memory and CPU time. If each implementation is created as a separate server, this means that there will be as many JVM instances as there are services . Remote object activation is a technique that solves the problem of running a large number of idle RMI services . It allows services to be registered with the rmiregistry, but not instantiated. Instead, they remain inactive, until called upon by a client, when they will awaken and perform their operation. A special daemon process called the remote method invocation activation system daemon (rmid) listens for these requests and instantiates RMI services on demand.
  • 24.
    Creating an ActivatableRemote Object Creation of an activatable remote object is a little different from that of a UnicastRemoteObject , but the code is fairly similar. public interface MyRemoteInterface extends java.rmi.Remote{ public void doSomething () throws java.rmi.RemoteException; } The next step is to create an implementation that extends the java.rmi.activation.Activatable class. It must implement our RMI interface and provide both a constructor and a doSomething () method. Unlike classes that extend the UnicastRemoteObject class, a different constructor signature is used. This constructor calls the parent constructor and exports the object on any available port. The service is then available for use by clients.
  • 25.
    Implementing an ActivatableRemote Object public class MyRemoteInterfaceImpl extends java.rmi.activation.Activatable implements MyRemoteInterface{ public MyRemoteInterfaceImpl (java.rmi.activation.ActivationID activationID, java.rmi.MarshalledObject data) throws java.rmi.RemoteException { // call the Activatable(ActivationID activationID, // int port) parent constructor super (activationID, 0); } public void doSomething(){ System.out.println (&quot;Doing something....&quot;); } }
  • 26.
    Registering an ActivatableRemote Object Step One The first step is to create an activation group descriptor. This descriptor is associated with an activation group, and allows you to specify system properties. In this example, no system properties are required and a new instance of the Properties class is created. // Step one : create an ActivationGroupDesc instance ActivationGroupDesc groupDescriptor = new ActivationGroupDesc(new Properties(), null); Step Two The second step is to register the activation group descriptor with the RMI activation daemon process. This process is represented by the Activation System interface. Applications do not create or extend this interface. Instead, a reference to the activation daemon process is obtained by invoking the static ActivationGroup.getSystem() method. // Step two : register that activation group descriptor // with the activation system, and get groupID ActivationSystem system = ActivationGroup.getSystem();
  • 27.
    Registering an ActivatableRemote Object Once a reference to the ActivationSystem class is obtained, the group descriptor is registered using the ActivationSystem.registerGroup method, which returns an ActivationGroupID instance. // Register the group descriptor - without registering the // group, no execution ActivationGroupID groupID = system.registerGroup(groupDescriptor); Step Three Once a group descriptor has been registered with the activation system and a valid ActivationGroupID obtained, the next step is to actually create the activation group. The act of registering it is not sufficient—one must be created, by calling the static ActivationGroup.createGroup( ActivationGroupID id , ActivationGroupDesc descriptor ) method. This creates and assigns an activation group for the JVM, and notifies the activation system that the group is active. // Step three: create an activation group, passing the // group ID and descriptor as parameters ActivationGroup.createGroup(groupID, groupDescriptor, 0);
  • 28.
    Registering an ActivatableRemote Object Step Four The fourth step is to create an activation descriptor, which describes an activatable remote object. It stores three key pieces of information: the class name of the remote object, the URL location of the remote object, and (optionally) a MarshalledObject that contains a serialized version of the remote object. String strLoc = new File(&quot;.&quot;).getCanonicalFile().toURI().toString(); // whose constructor requires the class name, codebase, //and an optional marshalled object ActivationDesc desc = new ActivationDesc(&quot;RMIActivationLightBulbImpl&quot;, strLoc, null); Step Five The fifth step is to register the activation descriptor with the activation system. This instructs the activation system of the class name and the location of the class definition file. A remote stub will be returned, which can then be registered as an RMI service. // Step five : Register the object with the activation system // Returns a stub, which may be registered with rmiregistry Remote stub = Activatable.register(desc);
  • 29.
    Registering an ActivatableRemote Object Step Six The sixth and final step is to add a registry entry for the RMI service, so that clients may locate the service. The code for this is similar to that of the previous RMI lightbulb server, except that a remote stub is registered, not an instance of a remote object. // Check to see if a registry was specified String registry = &quot;localhost&quot;; // Registration format //registry_hostname:port/service // Note the :port field is optional String registration = &quot;rmi://&quot; + registry + &quot;/RMILightBulb&quot;; // Step six : Register the stub with the rmiregistry Naming.rebind(registration, stub); System.out.println(&quot;Service registered with rmid. Now terminating...&quot;); System.exit(0);
  • 30.