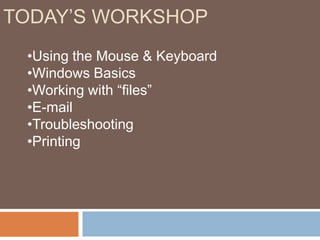
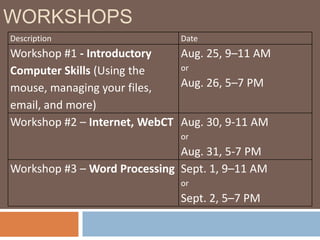
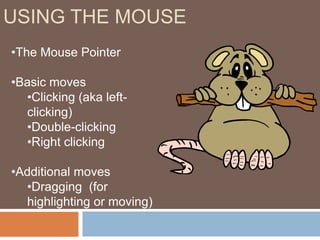
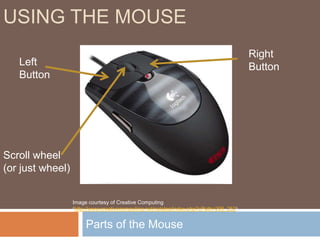
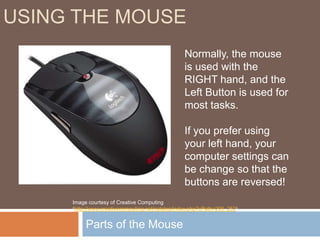
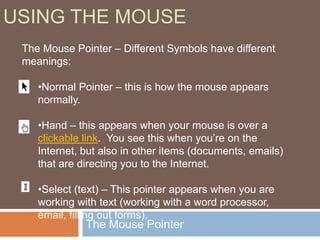
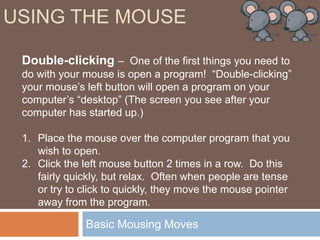
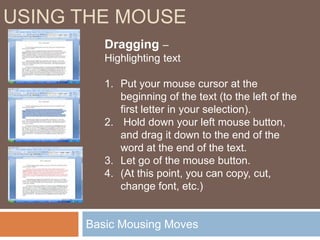
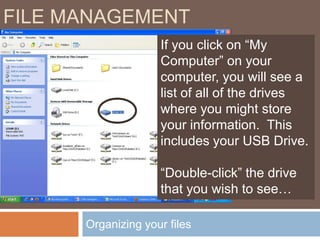
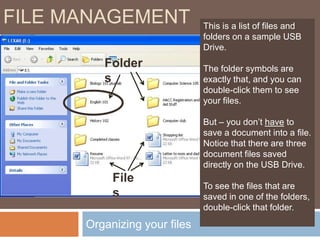
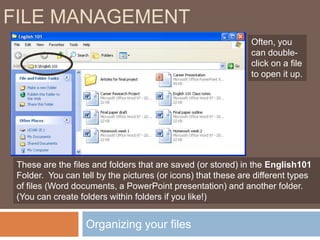
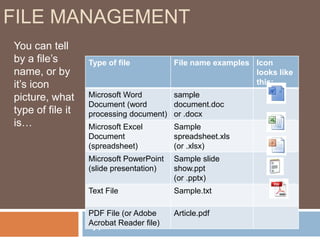
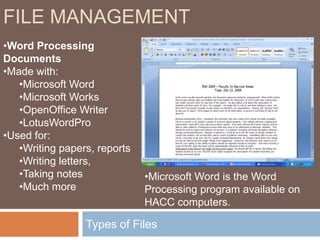
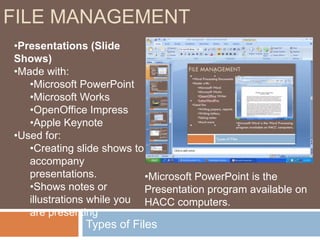
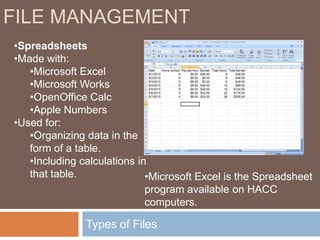
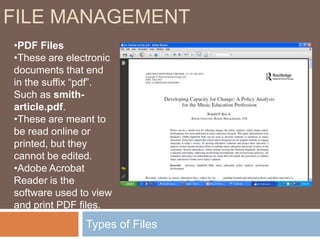
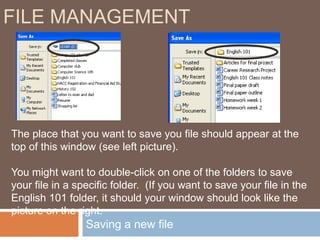
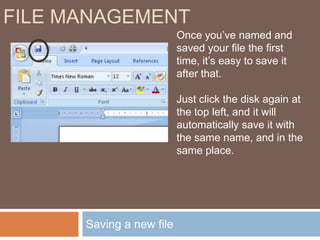
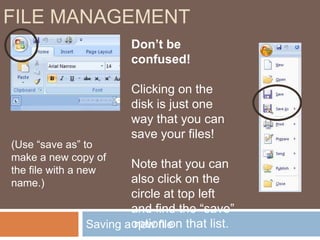
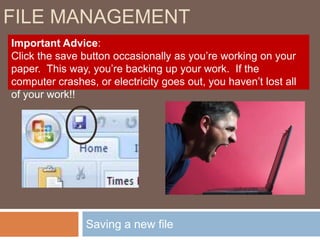
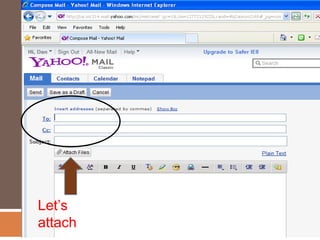
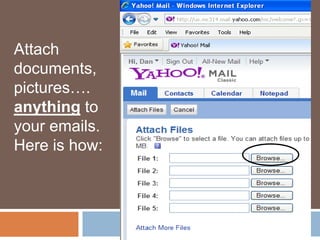
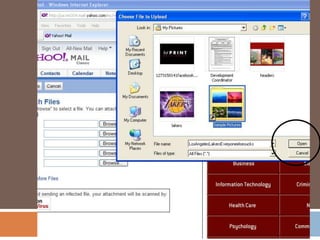
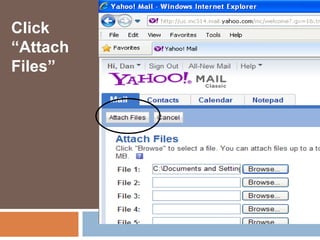
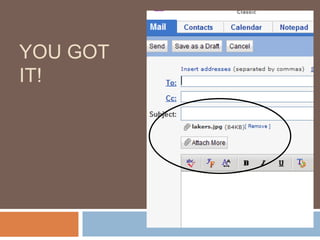
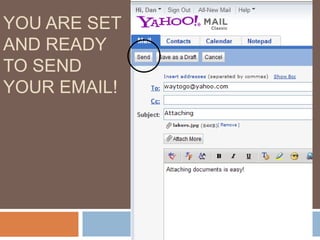
Basic Computer Skills WorkshopPresented By: Lisa Hartman & Dan Houloose
Today’s workshopUsing the Mouse & Keyboard
Windows Basics
Working with “files”
E-mail
Troubleshooting
PrintingAdditional Workshops
Today’s workshopRemember:Ask questions, stop us if you feel lost!
We are not computer scientists, either!  (But we’ll do our best to answer what we can!
 The examples are from HACC computers, with Windows XP.  Your personal computer screens may look slightly different.
This information is from and about Windows computers (not Macs), which are used in HACC libraries, learning centers, and labs.
Be willing to play and practice.Today’s workshop“Computerese”Need help learning the computer “jargon”?See www.techterms.comfor a glossary!
Using the mouseThe Mouse Pointer
Basic moves
Clicking (aka left-clicking)
Double-clicking
Right clicking
Additional moves
Dragging  (for highlighting or moving)Parts of the MouseUsing the mouseRight ButtonLeft ButtonScroll wheel (or just wheel)Image courtesy of Creative Computing (http://www.creativecomputing.net/catalog/index.php?cPath=209_252).
Parts of the MouseUsing the mouseNormally, the mouse is used with the RIGHT hand, and the Left Button is used for most tasks.If you prefer using your left hand, your computer settings can be change so that the buttons are reversed!Image courtesy of Creative Computing (http://www.creativecomputing.net/catalog/index.php?cPath=209_252).
The Mouse PointerUsing the mouseThe Mouse Pointer – Different Symbols have different meanings:Normal Pointer – this is how the mouse appears normally.
Hand – this appears when your mouse is over a clickable link.  You see this when you’re on the Internet, but also in other items (documents, emails) that are directing you to the Internet.
Select (text) – This pointer appears when you are working with text (working with a word processor, email, filling out forms).The Mouse PointerUsing the mouseThe Mouse Pointer – Different Symbols have different meanings:Busy – these symbols appear when the computer is processing.  Wait for the pointer to change back to another type before continuing.
Move – When this appears, you can move the window or other item that you’ve selected .  You would drag it to another place on the screen or in your document.
Resize – when these symbols appear, you can change an item such as a photo or window to a larger or smaller size.  Basic Mousing MovesUsing the mouseDouble-clicking–  One of the first things you need to do with your mouse is open a program!  “Double-clicking” your mouse’s left button will open a program on your computer’s “desktop” (The screen you see after your computer has started up.)Place the mouse over the computer program that you wish to open.Click the left mouse button 2 times in a row.  Do this fairly quickly, but relax.  Often when people are tense or try to click to quickly, they move the mouse pointer away from the program.
Basic Mousing MovesUsing the mouseSingle-clicking –  Another common move is the single-click with the left mouse button.  Use this when pressing a button or selecting a link, and in many other cases.Place the mouse over the item you wish to select.Gently click the left mouse button one time.
Basic Mousing MovesUsing the mouseRight-clicking–  This is a function that many people don’t even know about!  Right clicking in various places gives you shortcuts to common tasks.  Place the mouse over the item you wish to select.Gently click the right mouse button one time.Image courtesy of Dave’s Computer Tips (http://www.davescomputertips.com/newsletters/2007/20071201.php)
Basic Mousing MovesUsing the mouseDragging–  This move allows you to do a variety of things.  You can move items around (pictures, windows), and you can also highlight sections of text.
Basic Mousing MovesUsing the mouseDragging –  Moving items aroundPut your mouse on the item that you wish to move.Click the left mouse button, and HOLD IT DOWN.Drag the picture to the new location.Let go of the left mouse button.
Basic Mousing MovesUsing the mouseDragging –  Moving items around – moving a window:Put your mouse on the item that you wish to move.Click the left mouse button, and HOLD IT DOWN.Drag the window to the new location.Let go of the left mouse button.
Basic Mousing MovesUsing the mouseDragging –  Highlighting textPut your mouse cursor at the beginning of the text (to the left of the first letter in your selection). Hold down your left mouse button, and drag it down to the end of the word at the end of the text.Let go of the mouse button.(At this point, you can copy, cut, change font, etc.)
What About Laptops? (Using Track Pads)Using the mouseTo move the mouse, move your finger along the track pad.Use the left and right buttons as you would on the mouse.Track PadScroll area (not on all track pads)Right Mouse ButtonLeft Mouse ButtonBoard by Striatic from http://www.flickr.com/photos/striatic/222741410/ (Creative Commons license).
Basic Mousing MovesUsing the mouseKeep Practicing:Palm Beach County Library’s (PBCL) Tutorial: http://www.pbclibrary.org/mousing/
PBCL’s “mousercise” practice: http://www.pbclibrary.org/mousing/mousercise.htm
PBCL’s games practice site: http://www.pbclibrary.org/mousing/games.htm
Central Kansas Library System’s “mouserobics”: http://www.ckls.org/~crippel/computerlab/tutorials/mouse/page1.htmlWindows Basic
Windows BasicFollow along on your computer for a basic understanding of Windows and its features.
File ManagementDrives, Files and FoldersAs you work on a computer, you will probably be working with files.  These can be documents, spreadsheets, pictures, and many other things.You need a place to store and manage these files.
Drives, Files & Folders, What are they?File ManagementThis file cabinet (Drive) contains all of your school work.You might have a folder for each of your classes.Each file folder contains all of your work for that class (research papers, homework, notes, etc.)
Organizing your filesFile ManagementHow would you organize your files after purchasing a USB drive?The following slides will show you a sample of how you might want to organize your documents.Flash Drive – also known as:USB Drive
Jump Drive
Thumb Drive
Portable Drive…Image courtesyAmbujSaxena via Creative Commons search (www.flickr.com/photos/ambuj/345356294/)
Organizing your filesFile ManagementIf you click on “My Computer” on your computer, you will see a list of all of the drives where you might store your information.  This includes your USB Drive.“Double-click” the drive that you wish to see…
Organizing your filesFile ManagementThis is a list of files and folders on a sample USB Drive.The folder symbols are exactly that, and you can double-click them to see your files.But – you don’t have to save a document into a file. Notice that there are three document files saved directly on the USB Drive.To see the files that are saved in one of the folders, double-click that folder. FoldersFiles
Organizing your filesFile ManagementOften, you can double-click on a file to open it up.These are the files and folders that are saved (or stored) in the English101 Folder.  You can tell by the pictures (or icons) that these are different types of files (Word documents, a PowerPoint presentation) and another folder.  (You can create folders within folders if you like!)
Types of FilesFile ManagementYou can tell by a file’s name, or by it’s icon picture, what type of file it is…
Types of FilesFile ManagementThere are probably hundreds of types of files – the next slides will show you some common file types that you might work with in school
File ManagementTypes of FilesWord Processing Documents
Made with:
Microsoft Word
Microsoft Works
OpenOffice Writer
LotusWordPro
Used for:
Writing papers, reports
Writing letters,
Taking notes
Much more
Microsoft Word is the Word Processing program available on HACC computers.File ManagementTypes of FilesPresentations (Slide Shows)
Made with:
Microsoft PowerPoint
Microsoft Works
OpenOffice Impress
Apple Keynote
Used for:
Creating slide shows to accompany presentations.
Shows notes or illustrations while you are presenting
Microsoft PowerPoint is the Presentation program available on HACC computers.File ManagementTypes of FilesSpreadsheets
Made with:
Microsoft Excel
Microsoft Works
OpenOffice Calc
Apple Numbers
Used for:
Organizing data in the form of a table.
Including calculations in that table.
Microsoft Excel is the Spreadsheet program available on HACC computers.File ManagementTypes of FilesPDF Files
These are electronic documents that end in the suffix “pdf”. Such as smith-article.pdf.
These are meant to be read online or printed, but they cannot be edited.
Adobe Acrobat Reader is the software used to view and print PDF files.Saving a new fileFile ManagementThe next group of slides will show you how to save a file. A Microsoft Word document is the example, but it will work with other programs as well.Image courtesymolotalk via Creative Commons search (www.flickr.com/photos/molotalk/3483050501/)
Saving a new fileFile ManagementWhen you first create your document, save it right away.  (Do this at the very beginning – don’t wait until you’ve finished all of your typing!)Click on the “disk” symbol at the top left.
Saving a new fileFile ManagementAfter you’ve clicked the disk, a window like this will appear.First you need to say where to save it.  If you have a USB drive, you need to find this first.Click on the drop-down list at the top to find your USB drive.
Saving a new fileFile ManagementFind your USB Drive (or any other drive or folder you need) here, and click it.Note that all different USB drives will look different on the menu.Click on the drop-down list at the top to find your USB drive.
Saving a new fileFile ManagementThe place that you want to save you file should appear at the top of this window (see left picture).You might want to double-click on one of the folders to save your file in a specific folder.  (If you want to save your file in the English 101 folder, it should your window should look like the picture on the right.
Saving a new fileFile ManagementChoose a good name for your document and type it next to “File Name”Click save after you’ve named your document.
Saving a new fileFile ManagementOnce you’ve named and saved your file the first time, it’s easy to save it after that.  Just click the disk again at the top left, and it will automatically save it with the same name, and in the same place.
Saving a new fileFile ManagementDon’t be confused!Clicking on the disk is just one way that you can save your files!Note that you can also click on the circle at top left and find the “save” option on that list.(Use “save as” to make a new copy of the file with a new name.)
Saving a new fileFile ManagementImportant Advice:Click the save button occasionally as you’re working on your paper.  This way, you’re backing up your work.  If the computer crashes, or electricity goes out, you haven’t lost all of your work!!
Opening a fileFile ManagementOpening your FileOnce you have a saved file, you may need to re-open it (to continue working,  to read it, print it, etc.)
Opening a fileFile Management2 Ways to Open a File1 – Double-clicking on the file name.2 – Opening the program, first, and then the file
Opening a fileFile ManagementDouble-clickingFind and double-click you’re My Computer option on your computer. (This depends on the type of Windows that you have.)  Usually, there is an icon on the desktop.(Note – if the file is saved on your home computer, you may need to click on “My Documents”)
Opening a fileFile ManagementFind your USB Drive & double-click – continue double-clicking the folders until you see your file
Opening a fileFile ManagementDouble-clicking a file is usually the fastest way to open it.  However, sometimes, the computer doesn’t understand what program to use.  In this case, open your program, first!This example is for a Microsoft Excel Spreadsheet.Open up Excel, by double-clicking the icon on your desktop, or selecting it from your start menu.
Opening a fileFile ManagementClick on the circle at top-left of window.Then, choose “Open” from the menu that appears.
Opening a fileFile ManagementFind your drive and folder in the “Open” window.Note that there are many ways to find files here.

HACC-York Basic computer skills workshop

  • 1.
    Basic Computer SkillsWorkshopPresented By: Lisa Hartman & Dan Houloose
  • 2.
  • 3.
  • 4.
  • 5.
  • 6.
  • 7.
  • 8.
  • 9.
    We are notcomputer scientists, either! (But we’ll do our best to answer what we can!
  • 10.
    The examplesare from HACC computers, with Windows XP. Your personal computer screens may look slightly different.
  • 11.
    This information isfrom and about Windows computers (not Macs), which are used in HACC libraries, learning centers, and labs.
  • 12.
    Be willing toplay and practice.Today’s workshop“Computerese”Need help learning the computer “jargon”?See www.techterms.comfor a glossary!
  • 13.
    Using the mouseTheMouse Pointer
  • 14.
  • 15.
  • 16.
  • 17.
  • 18.
  • 19.
    Dragging (forhighlighting or moving)Parts of the MouseUsing the mouseRight ButtonLeft ButtonScroll wheel (or just wheel)Image courtesy of Creative Computing (http://www.creativecomputing.net/catalog/index.php?cPath=209_252).
  • 20.
    Parts of theMouseUsing the mouseNormally, the mouse is used with the RIGHT hand, and the Left Button is used for most tasks.If you prefer using your left hand, your computer settings can be change so that the buttons are reversed!Image courtesy of Creative Computing (http://www.creativecomputing.net/catalog/index.php?cPath=209_252).
  • 21.
    The Mouse PointerUsingthe mouseThe Mouse Pointer – Different Symbols have different meanings:Normal Pointer – this is how the mouse appears normally.
  • 22.
    Hand – thisappears when your mouse is over a clickable link. You see this when you’re on the Internet, but also in other items (documents, emails) that are directing you to the Internet.
  • 23.
    Select (text) –This pointer appears when you are working with text (working with a word processor, email, filling out forms).The Mouse PointerUsing the mouseThe Mouse Pointer – Different Symbols have different meanings:Busy – these symbols appear when the computer is processing. Wait for the pointer to change back to another type before continuing.
  • 24.
    Move – Whenthis appears, you can move the window or other item that you’ve selected . You would drag it to another place on the screen or in your document.
  • 25.
    Resize – whenthese symbols appear, you can change an item such as a photo or window to a larger or smaller size. Basic Mousing MovesUsing the mouseDouble-clicking– One of the first things you need to do with your mouse is open a program! “Double-clicking” your mouse’s left button will open a program on your computer’s “desktop” (The screen you see after your computer has started up.)Place the mouse over the computer program that you wish to open.Click the left mouse button 2 times in a row. Do this fairly quickly, but relax. Often when people are tense or try to click to quickly, they move the mouse pointer away from the program.
  • 26.
    Basic Mousing MovesUsingthe mouseSingle-clicking – Another common move is the single-click with the left mouse button. Use this when pressing a button or selecting a link, and in many other cases.Place the mouse over the item you wish to select.Gently click the left mouse button one time.
  • 27.
    Basic Mousing MovesUsingthe mouseRight-clicking– This is a function that many people don’t even know about! Right clicking in various places gives you shortcuts to common tasks. Place the mouse over the item you wish to select.Gently click the right mouse button one time.Image courtesy of Dave’s Computer Tips (http://www.davescomputertips.com/newsletters/2007/20071201.php)
  • 28.
    Basic Mousing MovesUsingthe mouseDragging– This move allows you to do a variety of things. You can move items around (pictures, windows), and you can also highlight sections of text.
  • 29.
    Basic Mousing MovesUsingthe mouseDragging – Moving items aroundPut your mouse on the item that you wish to move.Click the left mouse button, and HOLD IT DOWN.Drag the picture to the new location.Let go of the left mouse button.
  • 30.
    Basic Mousing MovesUsingthe mouseDragging – Moving items around – moving a window:Put your mouse on the item that you wish to move.Click the left mouse button, and HOLD IT DOWN.Drag the window to the new location.Let go of the left mouse button.
  • 31.
    Basic Mousing MovesUsingthe mouseDragging – Highlighting textPut your mouse cursor at the beginning of the text (to the left of the first letter in your selection). Hold down your left mouse button, and drag it down to the end of the word at the end of the text.Let go of the mouse button.(At this point, you can copy, cut, change font, etc.)
  • 32.
    What About Laptops?(Using Track Pads)Using the mouseTo move the mouse, move your finger along the track pad.Use the left and right buttons as you would on the mouse.Track PadScroll area (not on all track pads)Right Mouse ButtonLeft Mouse ButtonBoard by Striatic from http://www.flickr.com/photos/striatic/222741410/ (Creative Commons license).
  • 33.
    Basic Mousing MovesUsingthe mouseKeep Practicing:Palm Beach County Library’s (PBCL) Tutorial: http://www.pbclibrary.org/mousing/
  • 34.
    PBCL’s “mousercise” practice:http://www.pbclibrary.org/mousing/mousercise.htm
  • 35.
    PBCL’s games practicesite: http://www.pbclibrary.org/mousing/games.htm
  • 36.
    Central Kansas LibrarySystem’s “mouserobics”: http://www.ckls.org/~crippel/computerlab/tutorials/mouse/page1.htmlWindows Basic
  • 38.
    Windows BasicFollow alongon your computer for a basic understanding of Windows and its features.
  • 39.
    File ManagementDrives, Filesand FoldersAs you work on a computer, you will probably be working with files. These can be documents, spreadsheets, pictures, and many other things.You need a place to store and manage these files.
  • 40.
    Drives, Files &Folders, What are they?File ManagementThis file cabinet (Drive) contains all of your school work.You might have a folder for each of your classes.Each file folder contains all of your work for that class (research papers, homework, notes, etc.)
  • 41.
    Organizing your filesFileManagementHow would you organize your files after purchasing a USB drive?The following slides will show you a sample of how you might want to organize your documents.Flash Drive – also known as:USB Drive
  • 42.
  • 43.
  • 44.
    Portable Drive…Image courtesyAmbujSaxenavia Creative Commons search (www.flickr.com/photos/ambuj/345356294/)
  • 45.
    Organizing your filesFileManagementIf you click on “My Computer” on your computer, you will see a list of all of the drives where you might store your information. This includes your USB Drive.“Double-click” the drive that you wish to see…
  • 46.
    Organizing your filesFileManagementThis is a list of files and folders on a sample USB Drive.The folder symbols are exactly that, and you can double-click them to see your files.But – you don’t have to save a document into a file. Notice that there are three document files saved directly on the USB Drive.To see the files that are saved in one of the folders, double-click that folder. FoldersFiles
  • 47.
    Organizing your filesFileManagementOften, you can double-click on a file to open it up.These are the files and folders that are saved (or stored) in the English101 Folder. You can tell by the pictures (or icons) that these are different types of files (Word documents, a PowerPoint presentation) and another folder. (You can create folders within folders if you like!)
  • 48.
    Types of FilesFileManagementYou can tell by a file’s name, or by it’s icon picture, what type of file it is…
  • 49.
    Types of FilesFileManagementThere are probably hundreds of types of files – the next slides will show you some common file types that you might work with in school
  • 50.
    File ManagementTypes ofFilesWord Processing Documents
  • 51.
  • 52.
  • 53.
  • 54.
  • 55.
  • 56.
  • 57.
  • 58.
  • 59.
  • 60.
  • 61.
    Microsoft Word isthe Word Processing program available on HACC computers.File ManagementTypes of FilesPresentations (Slide Shows)
  • 62.
  • 63.
  • 64.
  • 65.
  • 66.
  • 67.
  • 68.
    Creating slide showsto accompany presentations.
  • 69.
    Shows notes orillustrations while you are presenting
  • 70.
    Microsoft PowerPoint isthe Presentation program available on HACC computers.File ManagementTypes of FilesSpreadsheets
  • 71.
  • 72.
  • 73.
  • 74.
  • 75.
  • 76.
  • 77.
    Organizing data inthe form of a table.
  • 78.
  • 79.
    Microsoft Excel isthe Spreadsheet program available on HACC computers.File ManagementTypes of FilesPDF Files
  • 80.
    These are electronicdocuments that end in the suffix “pdf”. Such as smith-article.pdf.
  • 81.
    These are meantto be read online or printed, but they cannot be edited.
  • 82.
    Adobe Acrobat Readeris the software used to view and print PDF files.Saving a new fileFile ManagementThe next group of slides will show you how to save a file. A Microsoft Word document is the example, but it will work with other programs as well.Image courtesymolotalk via Creative Commons search (www.flickr.com/photos/molotalk/3483050501/)
  • 83.
    Saving a newfileFile ManagementWhen you first create your document, save it right away. (Do this at the very beginning – don’t wait until you’ve finished all of your typing!)Click on the “disk” symbol at the top left.
  • 84.
    Saving a newfileFile ManagementAfter you’ve clicked the disk, a window like this will appear.First you need to say where to save it. If you have a USB drive, you need to find this first.Click on the drop-down list at the top to find your USB drive.
  • 85.
    Saving a newfileFile ManagementFind your USB Drive (or any other drive or folder you need) here, and click it.Note that all different USB drives will look different on the menu.Click on the drop-down list at the top to find your USB drive.
  • 86.
    Saving a newfileFile ManagementThe place that you want to save you file should appear at the top of this window (see left picture).You might want to double-click on one of the folders to save your file in a specific folder. (If you want to save your file in the English 101 folder, it should your window should look like the picture on the right.
  • 87.
    Saving a newfileFile ManagementChoose a good name for your document and type it next to “File Name”Click save after you’ve named your document.
  • 88.
    Saving a newfileFile ManagementOnce you’ve named and saved your file the first time, it’s easy to save it after that. Just click the disk again at the top left, and it will automatically save it with the same name, and in the same place.
  • 89.
    Saving a newfileFile ManagementDon’t be confused!Clicking on the disk is just one way that you can save your files!Note that you can also click on the circle at top left and find the “save” option on that list.(Use “save as” to make a new copy of the file with a new name.)
  • 90.
    Saving a newfileFile ManagementImportant Advice:Click the save button occasionally as you’re working on your paper. This way, you’re backing up your work. If the computer crashes, or electricity goes out, you haven’t lost all of your work!!
  • 91.
    Opening a fileFileManagementOpening your FileOnce you have a saved file, you may need to re-open it (to continue working, to read it, print it, etc.)
  • 92.
    Opening a fileFileManagement2 Ways to Open a File1 – Double-clicking on the file name.2 – Opening the program, first, and then the file
  • 93.
    Opening a fileFileManagementDouble-clickingFind and double-click you’re My Computer option on your computer. (This depends on the type of Windows that you have.) Usually, there is an icon on the desktop.(Note – if the file is saved on your home computer, you may need to click on “My Documents”)
  • 94.
    Opening a fileFileManagementFind your USB Drive & double-click – continue double-clicking the folders until you see your file
  • 95.
    Opening a fileFileManagementDouble-clicking a file is usually the fastest way to open it. However, sometimes, the computer doesn’t understand what program to use. In this case, open your program, first!This example is for a Microsoft Excel Spreadsheet.Open up Excel, by double-clicking the icon on your desktop, or selecting it from your start menu.
  • 96.
    Opening a fileFileManagementClick on the circle at top-left of window.Then, choose “Open” from the menu that appears.
  • 97.
    Opening a fileFileManagementFind your drive and folder in the “Open” window.Note that there are many ways to find files here.

Editor's Notes

  • #13 Return to IE: (All of the following are single-clicks)Move mouse over any link, and note the change to a hand, click link.Go to Quick links, select anything, click “go”Close
  • #14 Return to desktop.Right-click over an icon.Right-click the desktopThe taskbar…
  • #15 Return to desktop.Right-click over an icon.Right-click the desktopThe taskbar…
  • #17 Return to desktop.Click once on an item.Drag it somewhere else on the desktop.
  • #18 Open internet explorer.On HACC web page, click “About Us”Select some text.(Right click, or
  • #19 Open internet explorer.On HACC web page, click “About Us”Select some text.(Right click, or