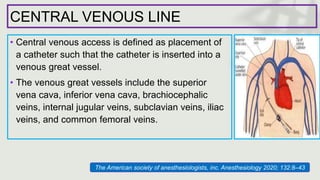
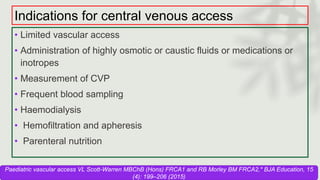
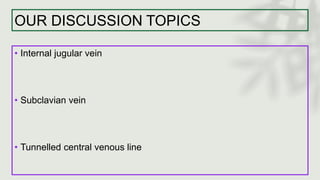
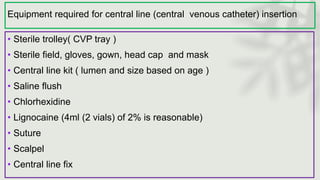
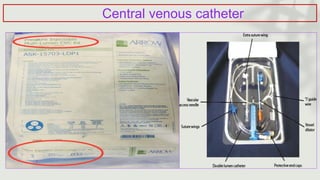
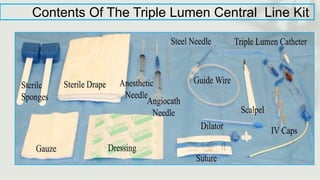
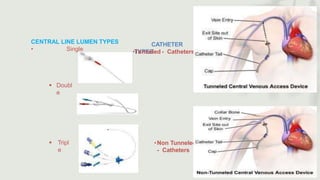
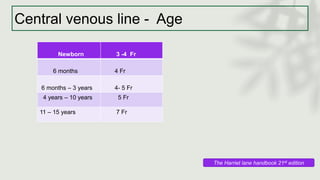
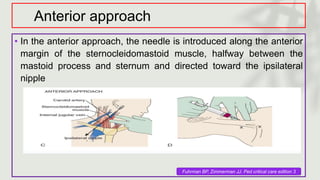
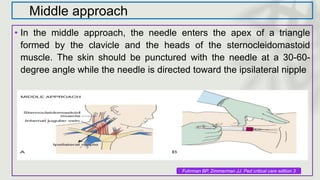
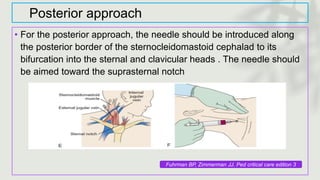
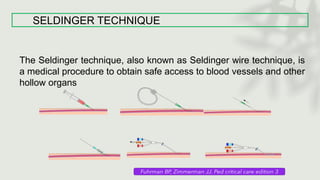
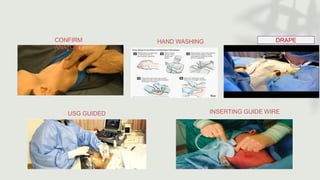
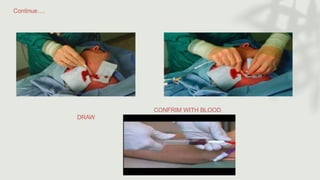
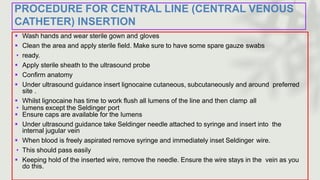
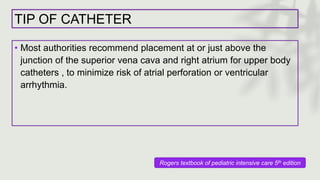
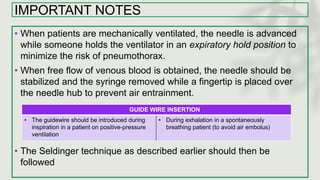
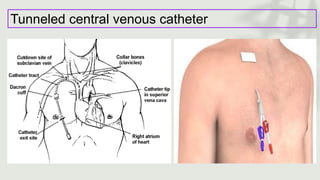
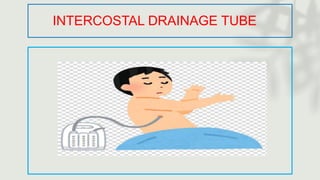
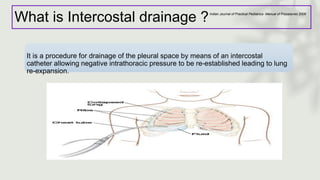
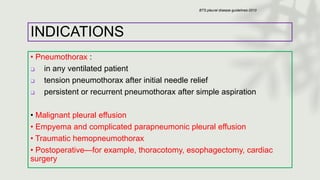
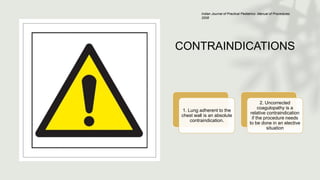
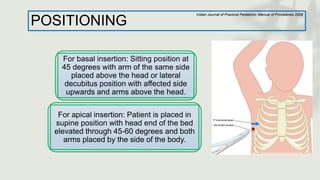
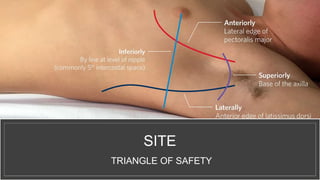
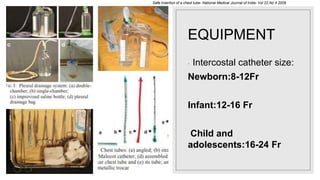
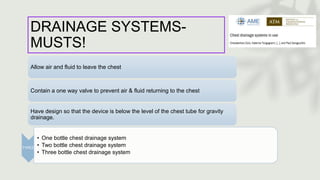
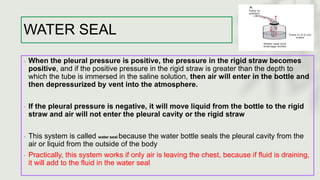
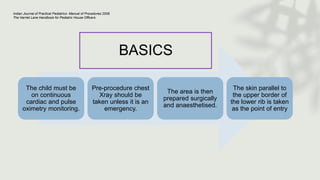
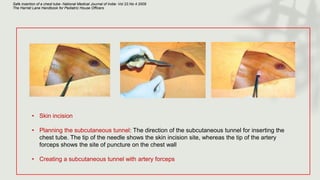
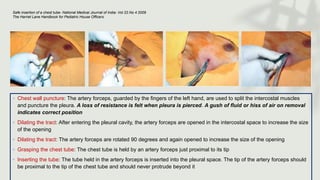
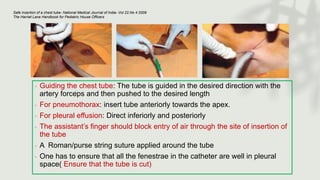
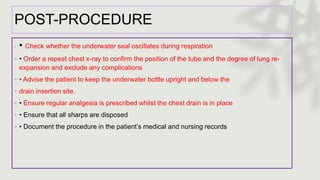
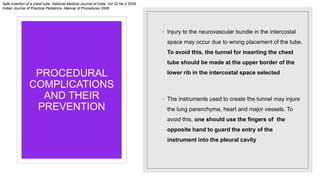
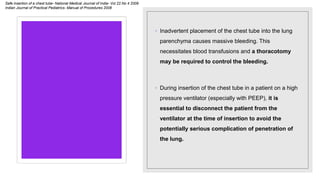
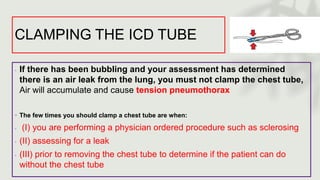
This document provides information on procedures in the pediatric intensive care unit (PICU) with a focus on central venous line insertion and intercostal drainage tube insertion. It discusses indications, contraindications, equipment, positioning, approaches and complications for central line placement via the internal jugular vein and subclavian vein. It also covers tunneled central venous catheters. For intercostal drainage, it reviews indications, contraindications, tube size, drainage systems, positioning, site selection and the basic procedure steps. Complications associated with both central lines and chest tubes are also summarized.
2. CENTRAL VENOUS LINE
• Central venous access is defined as placement of
a catheter such that the catheter is inserted into a
venous great vessel.
• The venous great vessels include the superior
vena cava, inferior vena cava, brachiocephalic
veins, internal jugular veins, subclavian veins, iliac
veins, and common femoral veins.
The American society of anesthesiologists, inc. Anesthesiology 2020; 132:8–43
3. Indications for central venous access
• Limited vascular access
• Administration of highly osmotic or caustic fluids or medications or
inotropes
• Measurement of CVP
• Frequent blood sampling
• Haemodialysis
• Hemofiltration and apheresis
• Parenteral nutrition
Paediatric vascular access VL Scott-Warren MBChB (Hons) FRCA1 and RB Morley BM FRCA2,* BJA Education, 15
(4): 199–206 (2015)
4. Contraindications
• Infection at the Site of Access
• Proximal Vascular Injury
• Bleeding Disorders or Anticoagulation
• thrombosis, air or clot embolus
• Wire induced arrythmia
• Catheter displacement
• Distorted Anatomy
Rogers textbook of pediatric intensive care 5th edition
5. Complications
Bleeding
Infection
Puncture of adjacent structures (such as other veins or
arteries)
Air embolism (air in the veins)
Collapse of the lung (pneumothorax)
Bleeding into the chest (hemothorax)
Catheter breakage (when it is being removed)
6. OUR DISCUSSION TOPICS
• Internal jugular vein
• Subclavian vein
• Tunnelled central venous line
7. Pre procedure workup
• Consent patient ( patient attender) if conscious( bigger children verbal
instruction ) otherwise document why the procedure is in the patient’s
best interests.
• Consent should include complications explanation such as
• Infection, bleeding (arterial puncture, hematoma, hemothorax), pain,
• Failure risk
• Set up sterile trolley.
• Position patient with head down if they can tolerate it, with head facing
away from side of insertion
• Having a nurse or assistant is helpful.
8. Equipment required for central line (central venous catheter) insertion
• Sterile trolley( CVP tray )
• Sterile field, gloves, gown, head cap and mask
• Central line kit ( lumen and size based on age )
• Saline flush
• Chlorhexidine
• Lignocaine (4ml (2 vials) of 2% is reasonable)
• Suture
• Scalpel
• Central line fix
11. CENTRAL LINE LUMEN TYPES
• Single
Doubl
e
Tripl
e
CATHETER
TYPES
•Tunneled - Catheters
•Non Tunneled
- Catheters
12. Central venous line - Age
Newborn 3 -4 Fr
6 months 4 Fr
6 months – 3 years 4- 5 Fr
4 years – 10 years 5 Fr
11 – 15 years 7 Fr
The Harriet lane handbook 21st edition
13. INTERNAL JUGULAR VEIN APPROACH
• Internal jugular catheterization can be achieved via multiple approaches. When
available, ultrasound guidance is preferable.
• Right-sided approaches are preferred owing to potential injury to the thoracic
duct on the left side.
• For all approaches, the patient should be positioned supine and in a slight (15-
30 degree) Trendelenburg position, with a roll under the shoulders and with the
head turned away from the puncture site.
• Consider performing beside ultrasound before positioning and draping, and
using ultrasound dynamically during needle insertion
Rogers textbook of pediatric intensive critical care
15. Anterior approach
• In the anterior approach, the needle is introduced along the anterior
margin of the sternocleidomastoid muscle, halfway between the
mastoid process and sternum and directed toward the ipsilateral
nipple
Fuhrman BP, Zimmerman JJ. Ped critical care edition 3
16. Middle approach
• In the middle approach, the needle enters the apex of a triangle
formed by the clavicle and the heads of the sternocleidomastoid
muscle. The skin should be punctured with the needle at a 30-60-
degree angle while the needle is directed toward the ipsilateral nipple
Fuhrman BP, Zimmerman JJ. Ped critical care edition 3
17. Posterior approach
• For the posterior approach, the needle should be introduced along
the posterior border of the sternocleidomastoid cephalad to its
bifurcation into the sternal and clavicular heads . The needle should
be aimed toward the suprasternal notch
Fuhrman BP, Zimmerman JJ. Ped critical care edition 3
18. SELDINGER TECHNIQUE
The Seldinger technique, also known as Seldinger wire technique, is
a medical procedure to obtain safe access to blood vessels and other
hollow organs
22. PROCEDURE FOR CENTRAL LINE (CENTRAL VENOUS
CATHETER) INSERTION
Wash hands and wear sterile gown and gloves
Clean the area and apply sterile field. Make sure to have some spare gauze swabs
• ready.
Apply sterile sheath to the ultrasound probe
Confirm anatomy
Under ultrasound guidance insert lignocaine cutaneous, subcutaneously and around preferred
site .
Whilst lignocaine has time to work flush all lumens of the line and then clamp all
• lumens except the Seldinger port
Ensure caps are available for the lumens
Under ultrasound guidance take Seldinger needle attached to syringe and insert into the
internal jugular vein
When blood is freely aspirated remove syringe and immediately inset Seldinger wire.
• This should pass easily
Keeping hold of the inserted wire, remove the needle. Ensure the wire stays in the vein as you
do this.
23. Important notes:
• The needle should be advanced during
exhalation to minimize the chance of
pneumothorax, and the syringe should be
aspirated as the needle is advanced.
• When the vein is entered and free flow of
venous blood is established, the needle
should be stabilized and the syringe
removed while the hub of the needle is
covered to prevent air entrainment.
• The guidewire should then be introduced
and advanced a distance that
approximates the distance to the junction
of the superior vena cava and right atrium.
• During guidewire introduction it is helpful
to have an assistant watching the patient's
electrocardiogram (ECG) and announcing
the provocation of dysrhythmias by the
guidewire
24. TIP OF CATHETER
• Most authorities recommend placement at or just above the
junction of the superior vena cava and right atrium for upper body
catheters , to minimize risk of atrial perforation or ventricular
arrhythmia.
Rogers textbook of pediatric intensive care 5th edition
25. Ultrasound Assistance in Central Venous Catheter Placement
• Ultrasonography is used increasingly at the bedside to assist in the
placement of CVCs. Ultrasound is recommended for routine use in CVC
placement; reports demonstrate that its use reduces complications in
infants and children.
Rogers textbook of pediatric intensive care 5th edition
26. SUBCLAVIAN VENOUS LINE
• For cannulation of the subclavian vein, positioning of the patient in a
head-down position (Trendelenburg) of ˜30 degrees increases upper
body venous pressures, which causes distention of the central veins.
• This positioning also minimizes the risk of introduced air embolism
traveling to the brain. Positioning of the patient to optimize
cannulation is important, but controversial.
Rogers textbook of pediatric intensive critical care 5Th edition
27. Approach To Subclavian Venous Line
The infraclavicular approach is most commonly used
The junction of the middle and proximal thirds of the clavicle should be located, and a small (25
gauge) needle should be used to infiltrate local anesthesia when the patient is not anesthetized.
The needle should be introduced just under the clavicle at the junction of the middle and medial
thirds and slowly advanced while negative pressure is applied with an attached syringe.
The needle should be inserted parallel with the frontal plane and directed medially and slightly
cephalad, under the clavicle toward the lower end of the fingertip in the sternal notch.
Rogers textbook of pediatric intensive critical care 5Th edition
31. IMPORTANT NOTES
• When patients are mechanically ventilated, the needle is advanced
while someone holds the ventilator in an expiratory hold position to
minimize the risk of pneumothorax.
• When free flow of venous blood is obtained, the needle should be
stabilized and the syringe removed while a fingertip is placed over
the needle hub to prevent air entrainment.
• The Seldinger technique as described earlier should then be
followed
GUIDE WIRE INSERTION
• The guidewire should be introduced during
inspiration in a patient on positive-pressure
ventilation
• During exhalation in a spontaneously
breathing patient (to avoid air embolus)
32. Post procedure
• Nonarterial cannulation should be determined – catheter blood gas
• the catheter should be secured with suture or with a suture less
securement device
• chest Xray / USG should be obtained to verify catheter location prior
to using the catheter and to rule out complications, such as
pneumothorax or hemothorax.
• Documentation of procedure
Rogers textbook of pediatric intensive critical care 5Th edition
33. Tunneled central venous catheter
• A tunneled central venous catheter is a long silicone or polyurethane tube open at
each end.
• It is inserted into a central vein at one location (neck, chest or groin) and tunneled
under the skin to a separate exit site, typically the chest. It exits the body several
inches away from the vein.
• A Dacron cuff, located and anchored just under the skin at the exit site, provides
stability and helps reduce risks of infection.
• Though more comfortable and discreet for patients than non-tunneled catheters, they
still carry the same risks of hemorrhage, pneumothorax, and infection.
35. Advantages
• Infection rates are reported to be lower with tunneled
• With proper care a tunneled catheter can remain in place for several
years
• Tunneled catheters are generally surgically placed or placed in
radiology.
39. What is Intercostal drainage ?
It is a procedure for drainage of the pleural space by means of an intercostal
catheter allowing negative intrathoracic pressure to be re-established leading to lung
re-expansion.
Indian Journal of Practical Pediatrics- Manual of Procedures 2008
40. INDICATIONS
• Pneumothorax :
❑ in any ventilated patient
❑ tension pneumothorax after initial needle relief
❑ persistent or recurrent pneumothorax after simple aspiration
• Malignant pleural effusion
• Empyema and complicated parapneumonic pleural effusion
• Traumatic hemopneumothorax
• Postoperative—for example, thoracotomy, esophagectomy, cardiac
surgery
BTS pleural disease guidelines-2010
41. CONTRAINDICATIONS
1. Lung adherent to the
chest wall is an absolute
contraindication.
2. Uncorrected
coagulopathy is a
relative contraindication
if the procedure needs
to be done in an elective
situation
Indian Journal of Practical Pediatrics- Manual of Procedures
2008
42. POSITIONING
For basal insertion: Sitting position at
45 degrees with arm of the same side
placed above the head or lateral
decubitus position with affected side
upwards and arms above the head.
For apical insertion: Patient is placed in
supine position with head end of the bed
elevated through 45-60 degrees and both
arms placed by the side of the body.
Indian Journal of Practical Pediatrics- Manual of Procedures 2008
44. EQUIPMENT
◦ Intercostal catheter size:
Newborn:8-12Fr
Infant:12-16 Fr
Child and
adolescents:16-24 Fr
Safe insertion of a chest tube- National Medical Journal of India- Vol 22.No 4 2009
45. DRAINAGE SYSTEMS-
MUSTS!
Allow air and fluid to leave the chest
Contain a one way valve to prevent air & fluid returning to the chest
Have design so that the device is below the level of the chest tube for gravity
drainage.
TYPES:
• One bottle chest drainage system
• Two bottle chest drainage system
• Three bottle chest drainage system
46. WATER SEAL
◦ When the pleural pressure is positive, the pressure in the rigid straw becomes
positive, and if the positive pressure in the rigid straw is greater than the depth to
which the tube is immersed in the saline solution, then air will enter in the bottle and
then depressurized by vent into the atmosphere.
◦ If the pleural pressure is negative, it will move liquid from the bottle to the rigid
straw and air will not enter the pleural cavity or the rigid straw
◦ This system is called water seal because the water bottle seals the pleural cavity from the
air or liquid from the outside of the body
◦ Practically, this system works if only air is leaving the chest, because if fluid is draining,
it will add to the fluid in the water seal
47. BASICS
The child must be
on continuous
cardiac and pulse
oximetry monitoring.
Pre-procedure chest
Xray should be
taken unless it is an
emergency.
The area is then
prepared surgically
and anaesthetised.
The skin parallel to
the upper border of
the lower rib is taken
as the point of entry
Indian Journal of Practical Pediatrics- Manual of Procedures 2008
The Harriet Lane Handbook for Pediatric House Officers
48. Safe insertion of a chest tube- National Medical Journal of India- Vol 22.No 4 2009
The Harriet Lane Handbook for Pediatric House Officers
• Skin incision
• Planning the subcutaneous tunnel: The direction of the subcutaneous tunnel for inserting the
chest tube. The tip of the needle shows the skin incision site, whereas the tip of the artery
forceps shows the site of puncture on the chest wall
• Creating a subcutaneous tunnel with artery forceps
49. ◦ Chest wall puncture: The artery forceps, guarded by the fingers of the left hand, are used to split the intercostal muscles
and puncture the pleura. A loss of resistance is felt when pleura is pierced. A gush of fluid or hiss of air on removal
indicates correct position
◦ Dilating the tract: After entering the pleural cavity, the artery forceps are opened in the intercostal space to increase the size
of the opening
◦ Dilating the tract: The artery forceps are rotated 90 degrees and again opened to increase the size of the opening
◦ Grasping the chest tube: The chest tube is held by an artery forceps just proximal to its tip
◦ Inserting the tube: The tube held in the artery forceps is inserted into the pleural space. The tip of the artery forceps should
be proximal to the tip of the chest tube and should never protrude beyond it
Safe insertion of a chest tube- National Medical Journal of India- Vol 22.No 4 2009
The Harriet Lane Handbook for Pediatric House Officers
50. ◦ Guiding the chest tube: The tube is guided in the desired direction with the
artery forceps and then pushed to the desired length
◦ For pneumothorax: insert tube anteriorly towards the apex.
◦ For pleural effusion: Direct inferiorly and posteriorly
◦ The assistant’s finger should block entry of air through the site of insertion of
the tube
◦ A Roman/purse string suture applied around the tube
◦ One has to ensure that all the fenestrae in the catheter are well in pleural
space( Ensure that the tube is cut)
Safe insertion of a chest tube- National Medical Journal of India- Vol 22.No 4 2009
The Harriet Lane Handbook for Pediatric House Officers
51. POST-PROCEDURE
◦ • Check whether the underwater seal oscillates during respiration
◦ • Order a repeat chest x-ray to confirm the position of the tube and the degree of lung re-
expansion and exclude any complications
◦ • Advise the patient to keep the underwater bottle upright and below the
◦ drain insertion site.
◦ • Ensure regular analgesia is prescribed whilst the chest drain is in place
◦ • Ensure that all sharps are disposed
◦ • Document the procedure in the patient’s medical and nursing records
52. PROCEDURAL
COMPLICATIONS
AND THEIR
PREVENTION
◦ Injury to the neurovascular bundle in the intercostal
space may occur due to wrong placement of the tube.
To avoid this, the tunnel for inserting the chest
tube should be made at the upper border of the
lower rib in the intercostal space selected
◦ The instruments used to create the tunnel may injure
the lung parenchyma, heart and major vessels. To
avoid this, one should use the fingers of the
opposite hand to guard the entry of the
instrument into the pleural cavity
Safe insertion of a chest tube- National Medical Journal of India- Vol 22.No 4 2009
Indian Journal of Practical Pediatrics- Manual of Procedures 2008
53. ◦ Inadvertent placement of the chest tube into the lung
parenchyma causes massive bleeding. This
necessitates blood transfusions and a thoracotomy
may be required to control the bleeding.
◦ During insertion of the chest tube in a patient on a high
pressure ventilator (especially with PEEP), it is
essential to disconnect the patient from the
ventilator at the time of insertion to avoid the
potentially serious complication of penetration of
the lung.
Safe insertion of a chest tube- National Medical Journal of India- Vol 22.No 4 2009
Indian Journal of Practical Pediatrics- Manual of Procedures 2008
54. CLAMPING THE ICD TUBE
◦ If there has been bubbling and your assessment has determined
there is an air leak from the lung, you must not clamp the chest tube,
Air will accumulate and cause tension pneumothorax
◦ The few times you should clamp a chest tube are when:
◦ (I) you are performing a physician ordered procedure such as sclerosing
◦ (II) assessing for a leak
◦ (III) prior to removing the chest tube to determine if the patient can do
without the chest tube
55. REMEMBER!
Avoid clamping the drain other than at the time of
changing the ICD bag as it can result in a tension
pneumothorax.
Avoid
Always keep drain below the level of the patient or
else the drain contents can siphon back into the chest
Keep
When there is a block in the tube, remove it and
reinsert a new tube at the same site if there is no
improvement after flushing.
Remove
Observe for post expansion pulmonary edema.
Observe
Indian Journal of Practical Pediatrics- Manual of Procedures 2008