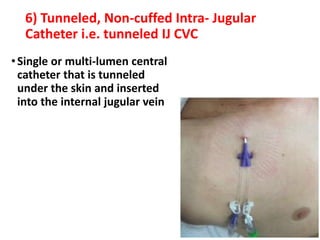
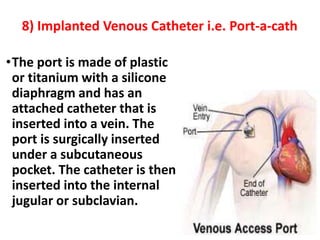
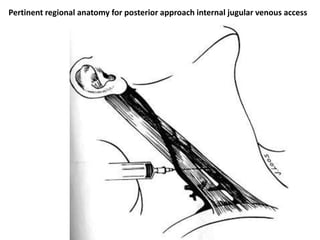
Akram AL Sharaee
CENTRAL LINE
DEFINATION:
In medicine, a central venous catheter ("central line", "CVC", "central
venous line" or "central venous access catheter") is a catheter placed
into a large vein in the neck (internal jugular vein), chest (subclavian
vein or axillary vein) or groin (femoral vein).
Large vessel lumens lessen the risks of vessel irritation and phlebitis
and provide rapid administration of medications to the central
circulation.
 Femoral venous access is used as a site of last resort because of the
increased risk of thrombosis, embolism, and infection.
 Complications can be minimized by good sterile technique during
placement, proper patient positioning and procedure
performance, appropriate catheter maintenance postplacement,
and proper removal technique.
Indications for central venous access
Inadequate peripheral venous access
Need for total parenteral nutrition administration
Invasive hemodynamic monitoring
Transvenous pacing Hemodialysis
Placement of pulmonary artery catheters
Drugs that are prone to cause phlebitis in peripheral veins such as
 Calcium chloride
 Hyperosmotic fluids
Chemotherapy
Potassium chloride (KCl)
• Frequent blood draws , or if the patient needs blood products
• Monitoring of the central venous pressure (CVP).
Contraindications to central venous access
• Venous thrombosis
• Untreated coagulopathy
• Thrombocytopenia (<50,000)
• Fungating tricuspid valve endocarditis
• Renal cell tumor extending into the right atrium
• Anticoagulation, patient who is excessively underweight or overweight,
Uncooperative patient, (relative contraindication)
• Distorted anatomy
• Local skin infection
• Damage of the vein distal/ proximal
Complications associated with various
central venous access sites
• Vascular
• Arterial puncture Air embolism
• Hemorrhage Arteriovenous fistula
• Thrombosis (2% - 40%) Hematoma
• Catheter or wire embolization
• Infectious (CLABSI) (2% - 10%)
• Sepsis, cellulitis, osteomyelitis, septic arthritis
• Miscellaneous
• Catheter misplacement (0% - 3%)
• Thoracic duct injury Nerve injury eg; Brachial plexus injury
• Extravasation of fluids, medications, hyperalimentation, and so in.
• Cardiac Dysrhythmias ( irregular heart rate)
 Collapse of the lung (pneumothorax)
 Bleeding into the chest (hemothorax)
 accumulation of fluid in the chest (Hydrothorax)
 PATIENT EDUCATION :
• Explain the procedure to the patient and family
members.
• Explain the need of central line and benefits, risk an
complications.
 PRE-PROCEDURE
 Consent patient if conscious otherwise document why
the procedure is in the patient’s best interests.
 Consent should include:
Infection, bleeding (arterial puncture, haematoma,
haemothorax), pain, failure.
Central Line Insertion, Equipment
EQUIPMENT USED:
• Patient on a tilting bed, trolley or operating table
• Standard multiple lumen kit
• Guide wire
• Sterile gloves
• Sterile gown
• Drapes
• Disinfectant (Povidone-iodine solution/ chlorhexidine)
• Suturing needle
• Scalpel
• Local Anaesthetic (lidocaine)
• Sterile saline flush
A= small syringe and vial of 1% Lidocaine (L.A)
B= guide needle
C= IV syringe with catheter attached- D
E= Disinfectant sponge Guidewire: J-shaped tip to reduce
risk of vessel perforation
Dilator
Triple lumen
catheter
IN this presentation we will discuss obtaining
central venous access with multilumen Silastic
catheters in 3 sites: internal jugular vein, subclavian
vein, and femoral vein.
1. Internal jugular venous access
A specific contraindication to internal jugular venous access
is ipsilateral carotid endarterectomy if image guidance is not
used. Internal jugular catheterization is intermediate in risk
between subclavian venous catheterization and femoral
artery catheterization for postplacement infection.
The anatomy of internal jugular, subclavian and axillary veins. AA, axillary
artery; AV, axillary vein; CA, carotid artery; IJV, internal jugular vein;
SA, subclavian artery; SV, subclavian vein
Pertinent regional anatomy for central approach internal jugular venous access
Pertinent regional anatomy for posterior approach internal jugular venous access
Technique
• There are 2 approaches for internal jugular venous catheterization, the central
approach and the posterior approach. Right internal jugular veins have the
straightest course to the right atrium and the lowest complication rate.
•Central approach:
• 1. Place absorbent pads beneath the patient (Fig. 5).
• 2. Position patient in Trendelenburg position.
patient supine on surface inclined 45 degrees, head at the lower end and
legs flexed over upper end. ( This distends the central veins and prevents air
embolism)
• 3. Rotate the patient’s head 45 to the contralateral side.
• 4. Locate the apex of the triangle formed by the heads of the
sternocleidomastoid muscle and the clavicle.
• 5. Prepare and drape the neck.
• 6. Scrub and gown for sterile procedure.
• 7. Using the 3-mL Luer lock syringe and 25-gauge needle,
anesthetize the skin and subcutaneous tissues at the apex of the
triangle.
• 8. Palpate the carotid pulse and apply gentle medial traction.
• 9. Insert the finder needle, 22 gauge with a 5-mL Luer lock
syringe attached, at the apex of the triangle at a 45 to 60
angle to the skin surface advancing slowly toward the ipsilateral
nipple and aspirating:
a. If venous blood return is not noted after the needle has been
inserted 3 cm, slowly withdraw the needle while aspirating.
b. If venous blood return is still not noted, reintroduce the needle
through the same puncture site but direct the needle 1 to 3 cm
more laterally.
c. If venous blood return is still not noted, reintroduce the needle
through the same puncture site but direct the needle 1 cm
medially.
d. If venous blood return is still not noted, consider changing to
the posterior approach.
• 10. If good venous blood return is noted, leave the finder needle in
place as a guide for the introducer needle. Using
a Raulerson syringe on the introducer needle, follow the tract of the
finder needle while aspirating.
11. Once venous blood return is noted in the introducer needle, insert
the guidewire through the Raulerson syringe (Seldinger technique). If a
Raulerson syringe is not available, remove the syringe and occlude the
needle to prevent air embolism and then introduce the guidewire.
• a. Never lose control of the guidewire (Fig. 6).
• b. The guidewire should advance freely.
• c. If resistance is encountered, remove the wire and confirm positive
venous blood return before reintroducing the guidewire.
d. Insert the wire to about 20 cm.
12. Make a nick in the skin with the scalpel blade.
13. Place the dilator over the guidewire and push the dilator into the
vein. Do not push the dilator in more than half its length to avoid vein
injury.
14. Remove dilator while maintaining control of the guidewire.
15. Insert catheter over the guidewire to proper depth (15 cm for
right internal jugular catheterization and 17 cm for left internal
jugular catheterization).
16. Remove the guidewire.
17. Secure the line to the skin with suture.
18. Aspirate each lumen to fill line with blood and then flush with
a saline flush, clearing all blood from each lumen.
19. Place appropriate sterile dressing over site.
20. Obtain chest radiograph to verify catheter position.
Central
approach,
internal
jugular
venous
access
Use of guidewire.
1.Disinfection, L.A and
sterile drape
2. Insert needle into IJV
and aspirate
3. Hold tip of needle with
one hand
4. Place wire through needle
and remove needle
5. Insert catheter over wire
then remove wire
6. Once catheter is in
place , secure and apply
dressing
CONFIRM ANATOMY HAND WASHING
USG GUIDED INSERTING GUIDE WIRE
Continue….
CONFRIM WITH BLOOD DRAW
FLUSH THE LINE
SUTURING SECURING THE LINE
Posterior approach
• The same procedures of central approach except when:
4. Identify the point where the external jugular vein crosses the lateral
border of the sternocleidomastoid muscle, about 4 to 5 cm above the clavicle
8. Insert the finder needle, 22 gauge with a 5-mL Luer lock syringe attached,
at the point 0.5 cm superior to where the external jugular vein crosses the
lateral border of the sternocleidomastoid muscle, approximately 3
fingerbreadths above the clavicle, directing the needle anterior to the sternal
notch at a 45 angle to the sagittal and horizontal planes.
Potential pitfalls
• If air or arterial blood is encountered during the performance of
the procedure, stop immediately. If arterial blood is encountered,
remove the needle immediately and apply manual pressure. If
catheterization occurred, surgical intervention may be required. If
air is encountered, attempt to withdraw the air by aspirating
through the catheter. If stable, position the patient in the lateral
decubitus and Trendelenburg position to contain the air in the
right ventricle. If hemodynamically unstable (cardiac arrest),
initiate advanced cardiovascular life support (ACLS) and consider a
thoracic surgery consult for a thoracotomy. If a tension
pneumothorax is suspected, perform immediate needle
decompression and consider a tube thoracostomy.
If a pneumothorax is suspected and is less than 10% of lung volume
and the patient is stable, the patient can be managed with 100%
oxygen and serial chest radiographs every 4 hours until resolution.
Subclavian venous access
• Subclavian venous access has the lowest risk of post-
catheterization infection. However, subclavian venous
catheterization also has the highest risk of mechanical and
malposition complications.
• Absolute contraindications for the subclavian approach are as
follows:
• Trauma to the ipsilateral clavicle, anterior proximal rib, or
subclavian vessels
• Coagulopathy (direct pressure to stop bleeding cannot be applied
to the subclavian vein or artery, because of their location beneath
the clavicle)
• Relative contraindications for the subclavian approach are as
follows:
• Chest-wall deformity
• Chronic obstructive pulmonary disease (COPD)
Technique
• The same procedures of central approach except:
3. In the case of obese patients, a towel roll can be placed between the
scapulae underneath the thoracic vertebrae to facilitate better access to the
site.
6. Identify the sternal notch and the intersection of the clavicle and first rib.
7. Using the nondominant hand, the index finger can be placed at the
sternal notch and the thumb at the intersection of the clavicle and first rib
to act as a guide. Using the 3-mL Luer lock syringe and 25-gauge needle,
anesthetize the skin and subcutaneous tissues.
8. Insert the finder needle, 22 gauge, with a 5-mL Luer lock syringe
attached, just lateral to the thumb between 0.5 cm and 1 cm inferior to the
clavicle. While aspirating, slowly advance the needle, bevel up, deep to the
clavicle and toward the index finger at the sternal notch. The needle should
be maintained in a horizontal plane at all times to avoid a pneumothorax.
A supraclavicular approach is possible but has a higher incidence of arterial
puncture and is not recommended. If venous blood return is not noted after
the needle has been inserted 5 cm, slowly withdraw the needle while
aspirating.
Subclavian venous access
Pertinent regional anatomy for subclavian venous access
Femoral venous access
•Femoral venous access is used as a site of last resort
because of the increased risk of iliofemoral thrombosis
and infection. If femoral venous access is obtained in an
urgent/emergent situation, it is recommended to obtain
central venous access through either the subclavian or
internal jugular veins once the patient is stabilized and
preferably within 48 hours to reduce the risk of CLABSI.
The femoral venous catheter should then be removed.
Pertinent regional anatomy for femoral venous access. IVC, inferior vena cava
The anatomy of the femoral vein. ALM, adductor longus muscle; FA, femoral
artery; FV, femoral vein; GSV, great saphenous vein; IL, inguinal ligament; SM,
sartorius muscle.
Technique
•The same procedures of central approach except:
2. Position patient supine in reverse Trendelenburg position with
the leg slightly abducted and rotated externally.
3. Shave, prepare, and drape the groin area.
5. Identify the femoral artery pulse and the inguinal ligament.
7. Insert the finder needle, 22 gauge with a 5-mL Luer lock syringe
attached, 1 cm medial and 2 to 3 cm below the inguinal ligament
angling 30 to 40 to the floor and aiming sagittally toward the head
and slightly medially.
Potential pitfalls:
If arterial blood is encountered, remove the needle immediately
and apply manual pressure for a minimum of 20 minutes.
A sandbag is then placed over the site for an additional 30 minutes.
The patient must maintain bed rest for a minimum of 4 hours.
Femoral venous access.
Central venous catheter maintenance
• A sterile dressing is applied over the catheter; the dressing should be
changed weekly.
• Topical antibiotic use at the insertion site has not been shown to reduce
CLABSI rates and is not recommended.
• Catheters should not be routinely replaced unless there is evidence of
localized infection or sepsis. It is recommended that the infusion tubing
be changed every 48 to 72 hours. Confirmation of internal jugular and
subclavian catheters by chest imaging is recommended. The catheter tip
should lie within the superior vena cava, outside of the right atrium. On
chest radiographs for internal jugular and subclavian vein catheters, the
tip should lie above the level of the carina (Box 5,Fig. 12).
Chest radiograph demonstrating proper catheter tip location.
Application of ultrasonography in central
venous catheterization
•European and American societies recommend
application of ultrasonography to decrease the
high risk of failure and complications.
•Preliminary ultrasonographic examination allows
for assessment of local anatomical relations as
well as vessel morphology (diameter, patency),
while real-time ultrasonography increases
chances of successful needle insertion.
Removal of catheters
• It is recommended to remove central venous catheters as soon as
the patient’s medical condition has improved to the point where
central venous access is no longer required.
• For internal jugular and subclavian catheters, the patient is
positioned in the Trendelenburg position and removal of the
catheter is synchronized with active exhalation if the patient is
awake, cooperative, and spontaneously breathing. In cooperative
patients, the Valsalva maneuver is recommended over breath
holding to reduce the risk of an air embolism.
• Special attention should be paid to occlusion of the entry site on
catheter removal
Venous Access Comparison Guide
1) Midline Catheter:
• A single or multi-
lumen percutaneously
peripherally inserted
venous catheter that
has only been
advanced 4-8 inches
and the tip does NOT
reach the central
circulation.
It is NOT a central line
2) Central Venous Catheter: Peripherally
Inserted Central Catheter (PICC)
• A single or multi-lumen
central venous catheter
inserted in a peripheral vein,
such as the cephalic vein,
basilic vein or brachial vein
and then advanced through
increasingly larger veins,
toward the heart until the
tip rests in the lower third of
the superior vena cava at the
artrio-caval junction or just
slightly into the right atrium.
Peripherally inserted central catheters[PICC]
3) Non-tunneled, Non cuffed,
Large Bore Catheter
i.e. Introducer
•Sometimes called by the brand
name “Cordis” or referred to
as a “sheath.” Typically
inserted into the jugular,
subclavian or femoral vein for
the purpose of rapid fluid
administration or to facilitate
the placement of a pulmonary
artery catheter (PAC),
temporary venous pacemaker
or a Single Lumen Infusion
Catheter (SLIC) or multi-lumen
SLIC style catheter
4) Non-tunneled, Non cuffed, Large Bore
Catheter i.e. Vas Cath
•Used for hemodialysis or
plasmapheresis. Usually
inserted directly into jugular,
subclavian, or femoral vein
At minimum, it has two large
bore lumens, one to take blood
from the body and the other to
return it.
WARNING: Increased risk of air
embolism. Be sure to leave lines
clamped at all times when not
in use
5) Tunneled, cuffed Large Bore Catheter i.e.
Perma Cath
• Dual lumen central venous
catheter that functions as a
bridge device during fistula
maturation or a long term
vascular access for hemodialysis
or plasmapheresis. Catheter may
also be used for bone marrow
transplants. Surgically tunneled
under the skin several inches
away from the left internal
jugular vein where it will be
inserted
• WARNING: Increased risk of air
embolism. Be sure to leave lines
clamped at all times when not in
use
6) Tunneled, Non-cuffed Intra- Jugular
Catheter i.e. tunneled IJ CVC
•Single or multi-lumen central
catheter that is tunneled
under the skin and inserted
into the internal jugular vein
7) Tunneled, Cuffed Catheter
i.e. Groshong, Hickman,
Broviac
•Single or multi-lumen central
catheter that is tunneled
under the skin and inserted
into the subclavian or jugular
vein. It is then advanced
toward the proximal vena cava
or atrial-caval junction. The
catheter has a cuff hat keeps
the line firmly positioned.
8) Implanted Venous Catheter i.e. Port-a-cath
•The port is made of plastic
or titanium with a silicone
diaphragm and has an
attached catheter that is
inserted into a vein. The
port is surgically inserted
under a subcutaneous
pocket. The catheter is then
inserted into the internal
jugular or subclavian.
CENTRAL LINE LUMEN TYPES
 Single
 Double
 Triple
CATHETER TYPES
•Tunneled -
Catheters
• PICC Line
•Non Tunneled -
Catheters
For All Catheters:
•Normal Saline and Heparin Flush : 10 units/ml is
commonly used for younger infants ( less than 10kg)
while 100 units/ml is used for older infants, children,
and adults. after completion of any infusion or blood
sampling, at least once every 24 hours.
•End cap change : Every 96 hours Immediately after
administration of blood products Every 24 hours if patient
receiving lipids or albumin
• Central line maintenance:
• Apply sterile dressing postcatheter placement, change weekly
• Replace catheters only if there is evidence of localized infection
or sepsis.
• Change infusion tubing every 48 to 72 hours.
• Perform chest imaging for confirmation of internal jugular and
subclavian catheterization.
LOCATION BENEFITS RISKS
INTERNAL JUGULAR VEIN •Bleeding can be seen
and controlled
•Decreased risk of
pneumothorax
•Risk of Carotid artery
puncture
•Pneumothorax
SUBCLAVIAN VEIN •Most comfortable for
concious patients
•Increased risk of
pneumothorax
•Should not be done on
less than 2yrs
•Vein is non-
compressible
FEMORAL VEIN •Easy to locate
•Less bad
complications
•No risk of
pneumothorax
•Preffered in
emergencies
•Highest risk of
infection
•Risk of DVT
• Exit site infection
• Erythema or induration within
2 cm of the catheter insertion site
COMPLICATIONS
• Tunnel infection
• Tenderness, erythema or
induration over the subcutaneous
tunnel around
2 cm from the exit site
COMPLICATIONS
• Pocket infection
• Accompanied by
subcutaneous purulent
material with overlying
erythema, tenderness or
skin necrosis
COMPLICATIONS
Resource's
Atlas Oral Maxillofacial Surg Clin N Am 23 (2015)
Document Reviewed: 04.20.2021
THANK YOU

central line.pptx

  • 1.
  • 2.
    DEFINATION: In medicine, acentral venous catheter ("central line", "CVC", "central venous line" or "central venous access catheter") is a catheter placed into a large vein in the neck (internal jugular vein), chest (subclavian vein or axillary vein) or groin (femoral vein). Large vessel lumens lessen the risks of vessel irritation and phlebitis and provide rapid administration of medications to the central circulation.  Femoral venous access is used as a site of last resort because of the increased risk of thrombosis, embolism, and infection.  Complications can be minimized by good sterile technique during placement, proper patient positioning and procedure performance, appropriate catheter maintenance postplacement, and proper removal technique.
  • 3.
    Indications for centralvenous access Inadequate peripheral venous access Need for total parenteral nutrition administration Invasive hemodynamic monitoring Transvenous pacing Hemodialysis Placement of pulmonary artery catheters Drugs that are prone to cause phlebitis in peripheral veins such as  Calcium chloride  Hyperosmotic fluids Chemotherapy Potassium chloride (KCl) • Frequent blood draws , or if the patient needs blood products • Monitoring of the central venous pressure (CVP).
  • 4.
    Contraindications to centralvenous access • Venous thrombosis • Untreated coagulopathy • Thrombocytopenia (<50,000) • Fungating tricuspid valve endocarditis • Renal cell tumor extending into the right atrium • Anticoagulation, patient who is excessively underweight or overweight, Uncooperative patient, (relative contraindication) • Distorted anatomy • Local skin infection • Damage of the vein distal/ proximal
  • 5.
    Complications associated withvarious central venous access sites • Vascular • Arterial puncture Air embolism • Hemorrhage Arteriovenous fistula • Thrombosis (2% - 40%) Hematoma • Catheter or wire embolization • Infectious (CLABSI) (2% - 10%) • Sepsis, cellulitis, osteomyelitis, septic arthritis • Miscellaneous • Catheter misplacement (0% - 3%) • Thoracic duct injury Nerve injury eg; Brachial plexus injury • Extravasation of fluids, medications, hyperalimentation, and so in. • Cardiac Dysrhythmias ( irregular heart rate)  Collapse of the lung (pneumothorax)  Bleeding into the chest (hemothorax)  accumulation of fluid in the chest (Hydrothorax)
  • 6.
     PATIENT EDUCATION: • Explain the procedure to the patient and family members. • Explain the need of central line and benefits, risk an complications.  PRE-PROCEDURE  Consent patient if conscious otherwise document why the procedure is in the patient’s best interests.  Consent should include: Infection, bleeding (arterial puncture, haematoma, haemothorax), pain, failure.
  • 7.
  • 8.
    EQUIPMENT USED: • Patienton a tilting bed, trolley or operating table • Standard multiple lumen kit • Guide wire • Sterile gloves • Sterile gown • Drapes • Disinfectant (Povidone-iodine solution/ chlorhexidine) • Suturing needle • Scalpel • Local Anaesthetic (lidocaine) • Sterile saline flush
  • 9.
    A= small syringeand vial of 1% Lidocaine (L.A) B= guide needle C= IV syringe with catheter attached- D E= Disinfectant sponge Guidewire: J-shaped tip to reduce risk of vessel perforation Dilator Triple lumen catheter
  • 10.
    IN this presentationwe will discuss obtaining central venous access with multilumen Silastic catheters in 3 sites: internal jugular vein, subclavian vein, and femoral vein. 1. Internal jugular venous access A specific contraindication to internal jugular venous access is ipsilateral carotid endarterectomy if image guidance is not used. Internal jugular catheterization is intermediate in risk between subclavian venous catheterization and femoral artery catheterization for postplacement infection.
  • 11.
    The anatomy ofinternal jugular, subclavian and axillary veins. AA, axillary artery; AV, axillary vein; CA, carotid artery; IJV, internal jugular vein; SA, subclavian artery; SV, subclavian vein
  • 12.
    Pertinent regional anatomyfor central approach internal jugular venous access
  • 13.
    Pertinent regional anatomyfor posterior approach internal jugular venous access
  • 14.
    Technique • There are2 approaches for internal jugular venous catheterization, the central approach and the posterior approach. Right internal jugular veins have the straightest course to the right atrium and the lowest complication rate. •Central approach: • 1. Place absorbent pads beneath the patient (Fig. 5). • 2. Position patient in Trendelenburg position. patient supine on surface inclined 45 degrees, head at the lower end and legs flexed over upper end. ( This distends the central veins and prevents air embolism) • 3. Rotate the patient’s head 45 to the contralateral side. • 4. Locate the apex of the triangle formed by the heads of the sternocleidomastoid muscle and the clavicle. • 5. Prepare and drape the neck. • 6. Scrub and gown for sterile procedure.
  • 15.
    • 7. Usingthe 3-mL Luer lock syringe and 25-gauge needle, anesthetize the skin and subcutaneous tissues at the apex of the triangle. • 8. Palpate the carotid pulse and apply gentle medial traction. • 9. Insert the finder needle, 22 gauge with a 5-mL Luer lock syringe attached, at the apex of the triangle at a 45 to 60 angle to the skin surface advancing slowly toward the ipsilateral nipple and aspirating: a. If venous blood return is not noted after the needle has been inserted 3 cm, slowly withdraw the needle while aspirating. b. If venous blood return is still not noted, reintroduce the needle through the same puncture site but direct the needle 1 to 3 cm more laterally. c. If venous blood return is still not noted, reintroduce the needle through the same puncture site but direct the needle 1 cm medially. d. If venous blood return is still not noted, consider changing to the posterior approach.
  • 16.
    • 10. Ifgood venous blood return is noted, leave the finder needle in place as a guide for the introducer needle. Using a Raulerson syringe on the introducer needle, follow the tract of the finder needle while aspirating. 11. Once venous blood return is noted in the introducer needle, insert the guidewire through the Raulerson syringe (Seldinger technique). If a Raulerson syringe is not available, remove the syringe and occlude the needle to prevent air embolism and then introduce the guidewire. • a. Never lose control of the guidewire (Fig. 6). • b. The guidewire should advance freely. • c. If resistance is encountered, remove the wire and confirm positive venous blood return before reintroducing the guidewire. d. Insert the wire to about 20 cm. 12. Make a nick in the skin with the scalpel blade. 13. Place the dilator over the guidewire and push the dilator into the vein. Do not push the dilator in more than half its length to avoid vein injury.
  • 17.
    14. Remove dilatorwhile maintaining control of the guidewire. 15. Insert catheter over the guidewire to proper depth (15 cm for right internal jugular catheterization and 17 cm for left internal jugular catheterization). 16. Remove the guidewire. 17. Secure the line to the skin with suture. 18. Aspirate each lumen to fill line with blood and then flush with a saline flush, clearing all blood from each lumen. 19. Place appropriate sterile dressing over site. 20. Obtain chest radiograph to verify catheter position.
  • 18.
  • 19.
  • 20.
    1.Disinfection, L.A and steriledrape 2. Insert needle into IJV and aspirate 3. Hold tip of needle with one hand 4. Place wire through needle and remove needle 5. Insert catheter over wire then remove wire 6. Once catheter is in place , secure and apply dressing
  • 21.
    CONFIRM ANATOMY HANDWASHING USG GUIDED INSERTING GUIDE WIRE
  • 22.
  • 23.
    FLUSH THE LINE SUTURINGSECURING THE LINE
  • 24.
    Posterior approach • Thesame procedures of central approach except when: 4. Identify the point where the external jugular vein crosses the lateral border of the sternocleidomastoid muscle, about 4 to 5 cm above the clavicle 8. Insert the finder needle, 22 gauge with a 5-mL Luer lock syringe attached, at the point 0.5 cm superior to where the external jugular vein crosses the lateral border of the sternocleidomastoid muscle, approximately 3 fingerbreadths above the clavicle, directing the needle anterior to the sternal notch at a 45 angle to the sagittal and horizontal planes.
  • 25.
    Potential pitfalls • Ifair or arterial blood is encountered during the performance of the procedure, stop immediately. If arterial blood is encountered, remove the needle immediately and apply manual pressure. If catheterization occurred, surgical intervention may be required. If air is encountered, attempt to withdraw the air by aspirating through the catheter. If stable, position the patient in the lateral decubitus and Trendelenburg position to contain the air in the right ventricle. If hemodynamically unstable (cardiac arrest), initiate advanced cardiovascular life support (ACLS) and consider a thoracic surgery consult for a thoracotomy. If a tension pneumothorax is suspected, perform immediate needle decompression and consider a tube thoracostomy. If a pneumothorax is suspected and is less than 10% of lung volume and the patient is stable, the patient can be managed with 100% oxygen and serial chest radiographs every 4 hours until resolution.
  • 26.
    Subclavian venous access •Subclavian venous access has the lowest risk of post- catheterization infection. However, subclavian venous catheterization also has the highest risk of mechanical and malposition complications. • Absolute contraindications for the subclavian approach are as follows: • Trauma to the ipsilateral clavicle, anterior proximal rib, or subclavian vessels • Coagulopathy (direct pressure to stop bleeding cannot be applied to the subclavian vein or artery, because of their location beneath the clavicle) • Relative contraindications for the subclavian approach are as follows: • Chest-wall deformity • Chronic obstructive pulmonary disease (COPD)
  • 27.
    Technique • The sameprocedures of central approach except: 3. In the case of obese patients, a towel roll can be placed between the scapulae underneath the thoracic vertebrae to facilitate better access to the site. 6. Identify the sternal notch and the intersection of the clavicle and first rib. 7. Using the nondominant hand, the index finger can be placed at the sternal notch and the thumb at the intersection of the clavicle and first rib to act as a guide. Using the 3-mL Luer lock syringe and 25-gauge needle, anesthetize the skin and subcutaneous tissues. 8. Insert the finder needle, 22 gauge, with a 5-mL Luer lock syringe attached, just lateral to the thumb between 0.5 cm and 1 cm inferior to the clavicle. While aspirating, slowly advance the needle, bevel up, deep to the clavicle and toward the index finger at the sternal notch. The needle should be maintained in a horizontal plane at all times to avoid a pneumothorax. A supraclavicular approach is possible but has a higher incidence of arterial puncture and is not recommended. If venous blood return is not noted after the needle has been inserted 5 cm, slowly withdraw the needle while aspirating.
  • 28.
  • 29.
    Pertinent regional anatomyfor subclavian venous access
  • 30.
    Femoral venous access •Femoralvenous access is used as a site of last resort because of the increased risk of iliofemoral thrombosis and infection. If femoral venous access is obtained in an urgent/emergent situation, it is recommended to obtain central venous access through either the subclavian or internal jugular veins once the patient is stabilized and preferably within 48 hours to reduce the risk of CLABSI. The femoral venous catheter should then be removed.
  • 31.
    Pertinent regional anatomyfor femoral venous access. IVC, inferior vena cava
  • 32.
    The anatomy ofthe femoral vein. ALM, adductor longus muscle; FA, femoral artery; FV, femoral vein; GSV, great saphenous vein; IL, inguinal ligament; SM, sartorius muscle.
  • 33.
    Technique •The same proceduresof central approach except: 2. Position patient supine in reverse Trendelenburg position with the leg slightly abducted and rotated externally. 3. Shave, prepare, and drape the groin area. 5. Identify the femoral artery pulse and the inguinal ligament. 7. Insert the finder needle, 22 gauge with a 5-mL Luer lock syringe attached, 1 cm medial and 2 to 3 cm below the inguinal ligament angling 30 to 40 to the floor and aiming sagittally toward the head and slightly medially. Potential pitfalls: If arterial blood is encountered, remove the needle immediately and apply manual pressure for a minimum of 20 minutes. A sandbag is then placed over the site for an additional 30 minutes. The patient must maintain bed rest for a minimum of 4 hours.
  • 34.
  • 35.
    Central venous cathetermaintenance • A sterile dressing is applied over the catheter; the dressing should be changed weekly. • Topical antibiotic use at the insertion site has not been shown to reduce CLABSI rates and is not recommended. • Catheters should not be routinely replaced unless there is evidence of localized infection or sepsis. It is recommended that the infusion tubing be changed every 48 to 72 hours. Confirmation of internal jugular and subclavian catheters by chest imaging is recommended. The catheter tip should lie within the superior vena cava, outside of the right atrium. On chest radiographs for internal jugular and subclavian vein catheters, the tip should lie above the level of the carina (Box 5,Fig. 12).
  • 36.
    Chest radiograph demonstratingproper catheter tip location.
  • 37.
    Application of ultrasonographyin central venous catheterization •European and American societies recommend application of ultrasonography to decrease the high risk of failure and complications. •Preliminary ultrasonographic examination allows for assessment of local anatomical relations as well as vessel morphology (diameter, patency), while real-time ultrasonography increases chances of successful needle insertion.
  • 38.
    Removal of catheters •It is recommended to remove central venous catheters as soon as the patient’s medical condition has improved to the point where central venous access is no longer required. • For internal jugular and subclavian catheters, the patient is positioned in the Trendelenburg position and removal of the catheter is synchronized with active exhalation if the patient is awake, cooperative, and spontaneously breathing. In cooperative patients, the Valsalva maneuver is recommended over breath holding to reduce the risk of an air embolism. • Special attention should be paid to occlusion of the entry site on catheter removal
  • 39.
    Venous Access ComparisonGuide 1) Midline Catheter: • A single or multi- lumen percutaneously peripherally inserted venous catheter that has only been advanced 4-8 inches and the tip does NOT reach the central circulation. It is NOT a central line
  • 40.
    2) Central VenousCatheter: Peripherally Inserted Central Catheter (PICC) • A single or multi-lumen central venous catheter inserted in a peripheral vein, such as the cephalic vein, basilic vein or brachial vein and then advanced through increasingly larger veins, toward the heart until the tip rests in the lower third of the superior vena cava at the artrio-caval junction or just slightly into the right atrium.
  • 41.
  • 42.
    3) Non-tunneled, Noncuffed, Large Bore Catheter i.e. Introducer •Sometimes called by the brand name “Cordis” or referred to as a “sheath.” Typically inserted into the jugular, subclavian or femoral vein for the purpose of rapid fluid administration or to facilitate the placement of a pulmonary artery catheter (PAC), temporary venous pacemaker or a Single Lumen Infusion Catheter (SLIC) or multi-lumen SLIC style catheter
  • 43.
    4) Non-tunneled, Noncuffed, Large Bore Catheter i.e. Vas Cath •Used for hemodialysis or plasmapheresis. Usually inserted directly into jugular, subclavian, or femoral vein At minimum, it has two large bore lumens, one to take blood from the body and the other to return it. WARNING: Increased risk of air embolism. Be sure to leave lines clamped at all times when not in use
  • 44.
    5) Tunneled, cuffedLarge Bore Catheter i.e. Perma Cath • Dual lumen central venous catheter that functions as a bridge device during fistula maturation or a long term vascular access for hemodialysis or plasmapheresis. Catheter may also be used for bone marrow transplants. Surgically tunneled under the skin several inches away from the left internal jugular vein where it will be inserted • WARNING: Increased risk of air embolism. Be sure to leave lines clamped at all times when not in use
  • 45.
    6) Tunneled, Non-cuffedIntra- Jugular Catheter i.e. tunneled IJ CVC •Single or multi-lumen central catheter that is tunneled under the skin and inserted into the internal jugular vein
  • 46.
    7) Tunneled, CuffedCatheter i.e. Groshong, Hickman, Broviac •Single or multi-lumen central catheter that is tunneled under the skin and inserted into the subclavian or jugular vein. It is then advanced toward the proximal vena cava or atrial-caval junction. The catheter has a cuff hat keeps the line firmly positioned.
  • 47.
    8) Implanted VenousCatheter i.e. Port-a-cath •The port is made of plastic or titanium with a silicone diaphragm and has an attached catheter that is inserted into a vein. The port is surgically inserted under a subcutaneous pocket. The catheter is then inserted into the internal jugular or subclavian.
  • 48.
    CENTRAL LINE LUMENTYPES  Single  Double  Triple CATHETER TYPES •Tunneled - Catheters • PICC Line •Non Tunneled - Catheters
  • 49.
    For All Catheters: •NormalSaline and Heparin Flush : 10 units/ml is commonly used for younger infants ( less than 10kg) while 100 units/ml is used for older infants, children, and adults. after completion of any infusion or blood sampling, at least once every 24 hours. •End cap change : Every 96 hours Immediately after administration of blood products Every 24 hours if patient receiving lipids or albumin • Central line maintenance: • Apply sterile dressing postcatheter placement, change weekly • Replace catheters only if there is evidence of localized infection or sepsis. • Change infusion tubing every 48 to 72 hours. • Perform chest imaging for confirmation of internal jugular and subclavian catheterization.
  • 50.
    LOCATION BENEFITS RISKS INTERNALJUGULAR VEIN •Bleeding can be seen and controlled •Decreased risk of pneumothorax •Risk of Carotid artery puncture •Pneumothorax SUBCLAVIAN VEIN •Most comfortable for concious patients •Increased risk of pneumothorax •Should not be done on less than 2yrs •Vein is non- compressible FEMORAL VEIN •Easy to locate •Less bad complications •No risk of pneumothorax •Preffered in emergencies •Highest risk of infection •Risk of DVT
  • 51.
    • Exit siteinfection • Erythema or induration within 2 cm of the catheter insertion site COMPLICATIONS
  • 52.
    • Tunnel infection •Tenderness, erythema or induration over the subcutaneous tunnel around 2 cm from the exit site COMPLICATIONS
  • 53.
    • Pocket infection •Accompanied by subcutaneous purulent material with overlying erythema, tenderness or skin necrosis COMPLICATIONS
  • 54.
    Resource's Atlas Oral MaxillofacialSurg Clin N Am 23 (2015) Document Reviewed: 04.20.2021
  • 55.

Editor's Notes

  • #11 Pertinent anatomy The internal jugular vein arises at the base of the skull and is located in the carotid sheath posterior to the internal carotid artery. The internal jugular vein terminates as the subclavian vein anterior and lateral to the common carotid artery. The course of the internal jugular vein is medial to the sternocleidomastoid muscle at its superior extent and posterior in the triangle formed by the sternal and clavicular heads. At the inferior part, the vein is deep to the clavicular head (Figs. 3 and 4).
  • #27 Pertinent anatomy: The subclavian vein is a continuation of the axillary vein at the lateral border of the first rib. The vein passes over the first rib anterior to the anterior scalene muscle. The vein then courses deep to the medial third of the clavicle. The subclavian vein then joins with the internal jugular vein to form the innominate vein deep to the sternoclavicular joint. At the medial third of the clavicle, the subclavian artery and apical pleura are deep to the vein.
  • #31 Pertinent anatomy The femoral artery may be found at the midpoint of a line connecting the anterior superior iliac spine and the pubic symphysis. The femoral vein is typically 1 fingerbreadth medial to the artery in the femoral sheath inferior to the inguinal ligament.