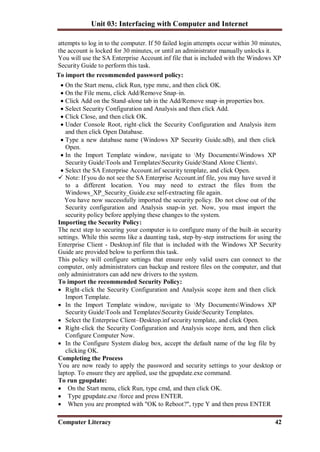
SlideShare a Scribd company logo
Unit 03: Interfacing with Computer and Internet
Computer Literacy 23
A Handling Operating System:
Introduction:
A Microsoft window is the most widely used graphical user use interface operating
system for personal computers. Windows uses graphics to make the program easier to
use and sometimes called GUI (Graphical User Interface). All windows operating
system support the use of mouse, icons and menus. We can open several applications
at the same time and easily move data from one application to another.
Windows XP:
Windows XP is developed by Microsoft. It was released in 2001. XP stands for
Experience. It is more powerful than previous version of Windows. Its new interface
makes XP home, XP Professional and XP Media Center. Windows XP Professional
has all the features of XP home and many more. It is often used in business
environments and by home users with greater computing needs. The Media Center is
built on XP Professional.
Features of Windows XP:
Some important features of Windows XP are as follows:
1. New User Interface:
Windows XP provides a new user interface with different visual style. Windows XP
desktop and taskbar are more attractive and easier to use. Windows layout has also
been changed for windows XP. The design of Stat menu is also changed.
2. Easier To Use:
Windows XP provides an easier way to work with files and folders. It saves all files in
My Documents folder on Desktop by default. It also manages a list of recently used
files by Quick access later.
3. Easier To Manage:
Windows XP is easier to manage for user and network administrator. It can install and
repair some programs automatically. The user can also add and remove programs
easily.
4. Clean Desktop Wizard:
Clean Desktop wizard is an important feature of Windows XP. By default, the
Desktop clean Wizard runs every sixty days. It clean up desktop by moving unused
desktop shortcuts to a folder called Unused Desktop Shortcuts.
5. Multi-User:
Windows XP is a multi user operating System. It means that many users can use the
computer and utilities multiple processors in a computer. These can be connected to a
computer over the internet.
6. Multi Processing:
Windows ZP supports multiple processing. Multi-processing is the capability to
support and utilize multiple processors in a computer. Two or more processors can
execute different programs at the same time. It increases the output of the computer.
7. Plug and Play:
Plug and play is the capability to detect and configure a device and install appropriate
device drive. Windows XP has the feature of plug and play. It contains a large number
of device drivers. When a new hardware device is attached to computer, it detects the
device and installs its driver if it is available.
8. Digital Media:
Windows XP provides many features to enjoy and share digital music, movies and
pictures. Windows Media Player is used to listen to music, watch movies etc.
Windows XP also makes it easier to manage and enjoy digital pictures. My Pictures
folder provides an easier way to organize photos. The user can view the pictures in
Unit 03: Interfacing with Computer and Internet
Computer Literacy 24
My Pictures folder in several Movie Maker can be used to create and edit home
movies.
9. System Restore:
System Restore feature of Windows XP is used to restore operating system in case of
any problem. The operating system is restored to a previous state without any loss of
data.
10. Remote Assistance:
Remote Assistance feature allows a friend at a different location to connect to your
computer and view its screen. Both persons can chat in real time to discuss any
problem. One user can allow other person to use his mouse and keyboard to fix the
problem of computer.
11. User Accounts and Fast User Switching:
Microsoft Windows XP provides multi-user access to single computer. Multiple users
can share a computer and switch between user sessions without closing the programs.
12. Browsing the Internet:
Windows XP provides improved facilities for browsing the Internet. It offers better
security and privacy when browsing the Internet. It also provides new features for
MSN and windows Messenger users.
File Management:
1. Computer Storage:
Computer data storage, often called storage or memory, refers to computer
components, devices, and recording media that retain digital data used for computing
for some interval of time. Computer data storage provides one of the core functions of
the modern computer, that of information retention. It is one of the fundamental
components of all modern computers, and coupled with a central processing unit
(CPU, a processor), implements the basic computer model.
2. Windows Explorer:
Windows explorer acts as a file manager in windows operating system, it is used to
mange files and folder on computer. Files and folders are the basic file management
units in windows. Many actions can be performed files and folders using windows
explorer. It can be used to cut, copy, paste, rename or delete a file or folder. It shows
files and folder in a hierarchical way. It contains two panes:
1. Left Pane: It displays folders and drives on the computer in a tree view shape.
The left Pane allows you to see all of the variable drives and folders on your
computer including those parts of the network to which you have access.
2. Right Pane: It shows the detailed view of the folder or drive selected in the left
pane.
3. Creating a New Folder:
1. Open My Computer or Windows Explorer.
2. Open the drive or directory where you want to create a folder.
3. Select File>New>Folder.
4. Type in a name for the folder.
5. Press the Enter key.
4. Renaming a File or Folder:
1. Click on the file or folder to rename.
2. Click again on the file or folder name.
3. Type in a new name for the file or folder
4. Press the Enter key OR
1. Right-click the file or folder’s icon.
2. Select Rename.
Unit 03: Interfacing with Computer and Internet
Computer Literacy 25
3. Type in a new name for the file or folder.
4. Press the Enter key.
5. Creating Sub-Folders:
1. Open the folder or directory where you want to create a sub folder.
2. Select File>New>Folder.
3. Type in a name for the folder.
4. Press the Enter key.
6. Expanding Folders and Sub-Folders:
1. Open the folder or directory where you want to create a sub folder.
2. Select File>New>Folder.
3. Type in a name for the folder.
4. Press the Enter key
7. Coping Files and Folders:
1. Select the file or folder to be copied in Window Explorer.
2. Click Edit > Copy OR right click on the files or folder and select Copy
command
3. Go to the folder where you want to paste it.
4. Click Edit > Paste. OR Right click and select Paste command.
8. Copying File using Drag and Drop
1. Highlight the file you wish to copy.
2. Press CTRL key.
3. Drag the file from one location to another.
9. Moving Files and Folders
1. Select the file or folder to be moved in Windows Explorer.
2. Select Edit > Cut. OR Right click on the file or folder and select Cut.
3. Go to the folder where you want to move it.
4. Select Edit >Paste. OR Right click and select Paste.
10. Moving Files using Drag and Drop
1. Highlight the file to copy and press Shift key.
2. Drag the file form one location to another.
Troubleshooting:
Trapshooting is a form of problem solving most often applied to repair of failed
products or processes. It is a logical, systematic search for the source of a problem so
that it can be solved, and so the product or process can be made operational again.
Troubleshooting is needed to develop and maintain complex systems where the
symptoms of a problem can have many possible causes.
1. Checking the of Configuration Our PC:
First, go to Start>All Programs>Accessories>System Tools>System Information
Under the System Summary Tag you will find:
1. Next, under Components, click on the “+” to expand the listing, then click on
“USB”.
2. Next go to Conflicts/Sharing under Hardware Resources. Although this is no
prefect way to determine your type of video slot/card (AGP or PCI-e), this is probably
the best method.
2. Modifying Desktop Settings:
The windows operation system provides a variety options to customize graphical
interface. The options include color, font size, display resolution, icons and taskbar
options etc. the Display Properties dialog box is used to customize their properties.
Unit 03: Interfacing with Computer and Internet
Computer Literacy 26
The Display propertied dialog box has five tabs:
1. Desktop Theme:
A desktop theme affects the appearance of desktop. It includes desktop background,
screen saver, window appearance, pointers and sounds. The user can choose between
the Windows XP theme and windows Classic theme. By default, Windows XP theme
is applied.
2. Wallpaper:
Wallpaper is the background image that appears on desktop. Windows XP provides
many wallpaper options. The desktop background can be customized with a picture,
texture or color. The user can choose from window XP background or use different
images.
3. Screen Saver:
A screen saver is a moving image that appears on screen if the computer is not used
for specified period of time. It saves screen from possible damage called burn-in. the
damages may occur if screen displays a static image for a long time. The screen saver
displays a moving images to prevent this damage.
4. Appearance:
The Appearance tab of Display Properties dialog box is used to change color, size
and fonts of windows interface. Desktop color and icon fonts can be changed using
this option. It provides difference color schemes.
5. Screen Setting:
The user can increase screen resolution to view more information at one time. Higher
resolution displays everything smaller including windows, stat menu and icons etc. it
increases space on desktop.
6. Changing Desktop Theme:
1. Right click on desktop. A popup menu will appear.
2. Select properties. The Display Properties dialog box will appear.
3. Select a theme from Theme drop- down menu. The selected theme will be
applied.
4. Click Ok
OR
1. Click Start > Control panel > Appearance and Themes,
2. Click Change the computer’s theme in Pick a Task are of click Display in or
Pick a Control Panel icon area. The Display properties dialog box will appear.
3. Select a theme from Theme drop-down menu.
4. Click OK. The selected theme will be applied.
7. Changing Desktop Background:
1. Right click on desktop. A pop-up menu will appear
2. Select Properties. The Display properties dialog box will appear.
3. Click Desktop tab.
4. Select a background from background list.
5. Select how image should appear on screen. Choose from the following
a. Center: place the image in the center of the screen
b. Tile: Have the image display as tiles across and down the screen.
c. Stretch: Stretch the image so the image covers the entire screen.
6. Use the drop down boxes to alter wallpaper color.
7. Click OK. The selected background will be applied.
OR
1. Click Start > Control Panel > Appearance and themes.
Unit 03: Interfacing with Computer and Internet
Computer Literacy 27
2. Click Change the desktop background in Pick a Task area. The Display
Properties dialog box open with Desktop tab selected.
3. Click or use the arrow keys to view background from Background list.
4. Use drop down boxes to alter wallpaper Position or Color.
5. Click OK. The selected background will be applied.
8. Applying your own image to Desktop Background:
1. Click Start > My Pictures.
2. Select the picture from My Pictures folder to apply as desktop background.
3. Click Set as Desktop background link in a task panel.
9. Apply Screen Saver:
1. Right click on desktop. A pop-up menu will appear.
2. Click on Screen saver tabs.
3. Select desire screen saver from Screen Saver drop-down menu.
4. Click on Setting to set display option associated with screen saver.
5. Check the on resume, password protect box.
6. Set the number of minutes of inactivity before the screen saver starts in Wait
box.
7. Click Preview button to preview the screen saver.
8. Click Ok. The screen saver will be applied.
OR
1. Click Start > Control Panel > Appearances and themes.
2. Click; choose a screen saver in the Pick a Task area. A Display properties
dialog box will appear with the Screen Saver tab Selected.
3. Repeat the above steps from 4 to 9.
10. Changing Window Appearances:
1. Right click on desktop. A pop-up menu will appear.
2. Click on Properties. A Display Properties dialog box will appear.
3. Click on appearance tab.
4. Select the color form Color Scheme drop-down menu.
5. Select the font size form the font size drop-down menu.
6. Click OK.
11. Displaying folder on the Desktop:
1. Right click on desktop. A pop-up menu will appear.
2. Select properties. The display properties dialog box will appear.
3. Click Desktop tab.
4. Click Customize Desktop button.
5. Check the icons to be displayed on desktop in Desktop icons area.
6. Click OK.
7. Click OK to close Display Properties dialog box.
12. Changing Desktop Icons:
1. Right click on desktop. A pop-up menu will appear.
2. Click on Properties. A display properties dialog box will appear.
3. Click on Desktop tab.
4. Click Customize Desktop button. A Desktop items dialog box opens.
5. Select the icon to change.
6. Click change icon button.
7. Select an icon from the list.
8. Click OK.
9. Click OK to close Desktop Items dialog box.
10. Click Ok to close Display Properties dialog box.
Unit 03: Interfacing with Computer and Internet
Computer Literacy 28
Getting Help:
The help of windows XP can be used to solve some of the questions regarding the use
of a Windows XP component or tool. Windows help consists of different pages that
are similar in navigation as the pages on a web site. The user can search information
about a particular theme from keywords and key phrases. The main part of window
help is called help center and technical support.
Opening Help and Support Center:
The following procedure is used to access the Help and Support Center:
Click; Start → Help and Support. The Help and Support Center window opens.
The home section is displayed. The home section is displayed when the user opens
Help and Support Center for the first time. The user can pick a help topic, pick a task,
search and ask for outside assistance. The Home section looks and acts much like a
web page. Some Help files are stored on computer and others are stored on the
Internet.
1. The Index:
The Index option provides a fast and easy way to locate topics and resources.
 Open the Help and Support Center.
 Click Index button. The Index opens. The entire index appears in alphabetical
order in the left pane.
 Type and keyword.
 Double click a topic to explore in the left pane. Information about the topic
displays in the right pane or a Topics Found dialog box appears.
 Click Display or Cancel if a Topics Found dialog box appears. Information
about the topic displays in the right pane if the user clicks Display.
 Click Cancel to close the dialog box and begin in a new search.
2. Favorites and History:
The Favorites option works much like Favorites in Internet Explore. The user can
add any search page here to visit it again easily by clicking Add to Favorites button.
The user can review Help Favorites by opening Help and Support Center and
clicking the Favorites button. The History option keeps track of all of Help and
Support Center pages visited on the Internet. The user can click History button to
review the visited pages.
3. Support:
The Support option is used to solve a problem that cannot be solved by the user. The
user can access support by clicking the support button. The user can get support as
follows:
 Ask a friend to help: The user can invite any friend to chat, view desktop and
work on computer by using Internet connection.
 Get help from Microsoft: The user can also allow Microsoft support professional
to answer questions via email, chat, view screen, or work on computer.
 Go to a Windows Web site forum: Windows Newsgroups are online resources
to communicate with other windows users about any problems.
4. Help’s Search Function:
Searching for help topics is the fastest and most useful way to use the Help and
Support Center. The following procedure is used to use the search function:
 Open Help and Support Center.
 Type and keyword in Search box.
 Click the green arrow key. The search result will appear in the left pane.
Unit 03: Interfacing with Computer and Internet
Computer Literacy 29
 Click to select the desired result. The explanation will display in the right pane.
Recovering Files from the Recycle Bin:
Restoring a file from Recycle Bin:
The process of bringing back the deleted file from Recycle Bin to its original location
is called restoring recycle Bin.
1. Restoring All Items:
 Double click on Recycle bin icon. A Recycle Bin window will appear.
 Click Restore All Items lick in Recycle Bin Tasks list. The items are restored to
their original location.
2. Restoring One File:
 Double Click Recycle Bin on Desktop. A Recycle Bin window will appear.
 Select the items to be restored.
 Click restore this item link in recycle bin tasks area. The item is restored to its
original location.
Working with Windows Defender:
Windows Defender is software that helps protect your computer against pop-ups, slow
performance, and security threats caused by spyware and other unwanted software by
detecting and removing known spyware from your computer. Windows Defender
features Real-Time Protection, a monitoring system that recommends actions against
spyware when it's detected, minimizes interruptions, and helps you stay productive.
The benefits of installing Windows Defender include:
1. Spyware Detection and Removal:
 Windows Defender quickly and easily finds spyware and other unwanted
programs that can slow down your computer, display annoying pop-up ads,
change Internet settings, or use your private information without your consent.
 Windows Defender eliminates detected spyware easily at your direction, and if
you inadvertently remove programs that you actually want, it's easy to get them
back.
 Windows Defender allows you to schedule your scanning and removal times
when it's convenient for you, whether it's on-demand or on a schedule that you
set.
2. Improved Internet Browsing Safety:
 Windows Defender helps stop spyware before it infiltrates your computer.
Windows Defender also offers a continuous safeguard designed to target all the
ways that spyware can infiltrate your computer.
 Windows Defender works without distracting you. It runs in the background and
automatically handles spyware based on preferences that you set. You can use
your computer with minimal interruption.
3. Protection against the latest threats
 A dedicated team of Microsoft researchers continuously searches the Internet to
discover new spyware and develop methods to counteract it.
 A voluntary, worldwide network of Windows Defender users helps Microsoft
determine which suspicious programs to classify as spyware. Participants help
discover new threats quickly and notify Microsoft analysts, so that everyone is
better protected. Anyone who uses Windows Defender can join this network and
help report potential spyware to Microsoft.
 To help protect your computer from the latest threats, you can choose to have
updates that counteract new spyware automatically downloaded to your computer.
Firewall:
Unit 03: Interfacing with Computer and Internet
Computer Literacy 30
A firewall is a part of a computer system or network that is designed to block
unauthorized access while permitting authorized communications. It is a device or set
of devices configured to permit, deny, encrypt, decrypt, or proxy all (in and out)
computer traffic between different security domains based upon a set of rules and
other criteria. Firewalls can be implemented in either hardware or software, or a
combination of both. Firewalls are frequently used to prevent unauthorized Internet
users from accessing private networks connected to the Internet, especially intranets.
All messages entering or leaving the intranet pass through the firewall, which
examines each message and blocks those that do not meet the specified security
criteria.
There are several types of firewall techniques:
1. Packet filter: Packet filtering inspects each packet passing through the network and
accepts or rejects it based on user-defined rules. Although difficult to configure, it
is fairly effective and mostly transparent to its users. In addition, it is susceptible to
IP spoofing.
2. Application gateway: Applies security mechanisms to specific applications, such as
FTP and Telnet servers. This is very effective, but can impose a performance
degradation.
3. Circuit-level gateway: Applies security mechanisms when a TCP or UDP
connection is established. Once the connection has been made, packets can flow
between the hosts without further checking.
4. Proxy server: Intercepts all messages entering and leaving the network. The proxy
server effectively hides the true network addresses.
System Restore and Back Up:
One of the greatest utilities in newer versions of Windows (Windows 2000 and
Windows XP) is that of system restore. This is a backup system built into your
computer that will allow you to restore your computer to a previous state in the case
that something happens to your computer making it inoperable or greatly limiting
your computing abilities. If you are infected with a computer virus or have other
problems with your system, using system restore to revert to a backup setting for your
computer can greatly assist you in restoring your computer to normal in the event of
damage to your system. Operating systems which allow for system restore will
usually automatically save settings periodically to ensure that you always have a
working system in backup, and will also allow you to backup your settings yourself if
you feel that you:
1. Creating different Restore Points:
To use System Restore to restore Windows XP to a previous state, follow these steps:
1. Log on to Windows as Administrator.
2. Click Start, point to All Programs, point to Accessories, point to System Tools,
and then click System Restore. System Restore starts.
3. On the Welcome to System Restore page, click Restore my computer to an
earlier time (if it is not already selected), and then click Next.
4. On the Select a Restore Point page, click the most recent system restore point in
the On this list, click a restore point list, and then click Next.
Note A System Restore message may appear that lists configuration changes that
System Restore will make. Click OK.
5. On the Confirm Restore Point Selection page, click Next. System Restore
restores the previous Windows XP configuration, and then restarts the computer.
Unit 03: Interfacing with Computer and Internet
Computer Literacy 31
6. Log on to the computer as Administrator. The System Restore Restoration
Complete page is displayed.
7. Click OK.
2. How to undo a system restoration after you perform a System Restore:
You may have unintentionally restored Windows XP to a previous configuration that
you do not want. To undo the restoration, follow these steps:
1. Log on to Windows as Administrator.
2. Click Start, point to All Programs, point to Accessories, point to System Tools,
and then click System Restore. System Restore starts.
3. On the Welcome to System Restore page, click Undo my last restoration, and
then click Next.
Note A System Restore message may appear that lists configuration changes that
System Restore will make. Click OK.
4. On the Confirm Restoration Undo page, click Next. System Restore restores the
original Windows XP configuration, and then restarts the computer.
5. Log on to the computer as Administrator. The System Restore Undo Complete
page appears.
6. Click OK. You can now run System Restore again from a different restore point.
3. Covering to Some Restore Points
Windows XP includes its own backup program, although you may need to do some
digging to find it. If you use Windows XP Professional, the Windows Backup utility
(Ntbackup.exe) should be ready for use. If you use Windows XP Home Edition, you'll
need to follow these steps to install the utility:
1. Insert your Windows XP CD into the drive and, if necessary, double-click the CD
icon in My Computer.
2. On the Welcome to Microsoft Windows XP screen, click Perform Additional
Tasks
3. Click Browse this CD.
4. In Windows Explorer, double-click the Value Add folder, then Msft, and then
Ntbackup.
5. Double-click Ntbackup.msi to install the Backup utility.
By default, the Backup utility uses a wizard that makes the process straightforward.
To start Backup:
1. Click Start, point to All Programs, point to Accessories, point to System Tools,
and then click Backup to start the wizard.
2. Click Next to skip past the opening page, choose Back up files and settings from
the second page, and then click Next.
3. Now choose the location of the data, which you want to take backup
4. Now after taking the backup click on finish.
Using Desktop:
The Windows Desktop:
The on-screen work area that contains windows, icons, menus and dialog boxes is
called Desktop. The Desktop is the entering point in windows. Desktop is the first
object that appears when windows is started the user can also changed the look of the
desktop.
Element of Desktop:
Different elements of Desktop are as follows.
1. Icon:
An icon is a small graphic that represent a program, drive, folder or document
windows operating system used icons frequently to make the environment user-
Unit 03: Interfacing with Computer and Internet
Computer Literacy 32
friendly. Some important icon that appears on Desktop is My Computer, My
Documents, and Recycle etc.
2. Taskbar:
The Taskbar appears at the bottom of desktop. It includes start button and a button for
each open application. It also includes Quick Launch icons and notification area. By
default the taskbar is always displayed on top of any opened windows.
3. Start Button:
Start button is used to access most of the Programs installed on the Computer. It is
used to perform the following tasks easily:
 Open or search a document
 Change Windows settings
 Manage Files
 Getting Help
 Maintain System etc
Icons on Desktop:
Following are the important icons that appear on Desktop
1. My Documents:
My Document is as folder that is automatically created by Windows during
installation. It is used for saving documents; many application programs like MS
word use this folder as default location for storing files
The following procedure is used to open My Documents folder.
 Click Start > My Documents
2. My Computer:
My Computer icon is a graphical representation of everything on the computer. It is
displayed on Desktop. It is used to view difference resources of computer. The user
can double-click my Computer icon to view these resources. The resources include
the drives, files and folders etc. My computer also contains Control Panel option. The
control panel provides different tools to configure the computer
Locating a File Using My Computer:
 Double c-click the My Computer icon on Desktop.
 Double Click a drive icon.
 Scroll through the list of folders (if necessary), and double click a folder.
 Repeat Step for any subfolder if necessary.
 Double-Click the file too open it.
3. My Network Places:
My Network Places is a folder on the Desktop. It contains icons that represent all the
computer System Connected via a network. It is used to access the computers and
printers that are connected to the network. It is also used to access the shared devices
and folder in the network. The user can connect and disconnect form the My
Network Places using My Network places. The following procedure is used to open
My Network Places folder.
 Click Start> My Network Places.
4. Recycle Bin:
Recycle Bin is a temporary storage area. It appears on Desktop. It is used to keep
deleted files. When a file or folder is deleting, it is not removed from the disk
permanently. Windows moves it to Recycle Bin. The files remain there until the user
recovers them or deletes them permanently. Recycle Bin can be helpful to recover a
file that is detected accidentally.
Unit 03: Interfacing with Computer and Internet
Computer Literacy 33
Deleting a Files or Folder from Desktop:
The following procedure is used to delete a file of folder from Desktop:
 Click and hold down the left mouse button on the desired file or folder
 Drag the icon into the Recycle Bin icon. The files are now in the recycle bin and
will remain the recycle bin until the recycle bin is empty.
OR
 Right click the file or folder to be deleted. A pop-up menu will appear.
 Choose Delete. A dialog Box will appear.
 Click yes.
Empty Recycle Bin:
Empty Recycle Bin is a process of removing the contents of Recycle Bin. The file or
folder is removed from the disk permanently when the user deletes it from Recycle
Bin. The files or folder deleted from Recycle Bin cannot be restored later. Windows
automatically removes older files from Recycle Bin if its size becomes full.
The following procedure is used to empty recycle bin:
Double-click Click the left mouse button on the Recycle Bin icon. A Recycle bin
windows appear. Select the Empty Recycle Bin option from File menu OR click
Empty the Recycle Bin link in Recycle Bin Tasks area. All items will be deleted
permanently.
OR
 Right Click Recycle Bin on Desktop. A pop-up menu will appear.
 Select Empty Recycle Bin. All items will be deleted permanently.
The Start Menu:
The Start menu appears when start button on Taskbar is activated. All programs in
the computer are accessible from start menu. The start menu has been redesigned in
Windows XP. It is divided into two panes. The left pane displays the most recently
used program. The right pane contains useful icons to access files, configure computer
and find information and assistance. It also displays the name of the use that is logged
onto the computer. The classic start menu contains only a single pane.
Common Option on Start Menu:
The following options appear on start menu:
1. Most Frequently Used Programs:
The most frequently used programs are automatically displayed at the beginning of
start menu. Only five programs are displayed when windows XP is used for the first
time. The start menu displays up to sic frequently used programs by default. The
following procedure is used to access the most frequently used programs.
 Click start button.
 Select the program to open.
2. Internet and Email:
By default, Internet and email programs are displayed above the most frequently used
programs. Internet Explorer is built - in web browser. It provides an interface to
access the internet. E- Mail option starts the default email application such an
Outlook Express. A separator line divides the two sections. The top section above
the most frequently used programs is known as pinned items list. The pinned items
list does not change like the most frequently used programs.
The following procedure is used to access internet and email programs:
 Click the start button.
 Select the Internet or E – mail program you want to open.
Unit 03: Interfacing with Computer and Internet
Computer Literacy 34
3. All Programs:
The All Programs in start menu displays a list of programs installed on computer.
The following procedure is used to access all programs:
 Click Start > All Programs.
 Select the program to open.
4. My Recent Documents:
The My Recent Document folder on start menu gives quick access to most recently
opened documents. It displays the document sub – menu. The submenu displays a list
of files that are used recently. The following procedure is used to open My Recent
Documents folder:
 Click start > My Recent documents. Most recently used documents will appear.
5. My Documents:
My documents folder stores all files. Many application programs like MS Word use
this folder as default location for storing files. The following procedure is used to
open My Documents folder:
 Click start > My Documents.
6. My Pictures:
My Pictures folder provides a convenient way to organize photos. The user can view
pictures in My Pictures folder in several ways. The filmstrip and thumbnail views
show pictures without opening them. My picture folder also contains sample pictures.
By default, it is located in My Document folder. The following procedure is used to
open My Pictures.
 Click Start > My Pictures.
7. My Music:
Windows XP stores music in My Music folder by default. It contains some sample
music. By default, My Music folder is located in My Documents folder. The
following procedure is used to open My Music folder:
 Click start > My Music.
8. My Computer:
My Computer is used to view different resources of computer. The resources include
drives, files and folders etc. It also contains Control Panel option that provides
different tools to configure computer. The following procedure is used to open My
Computer:
 Click start > My computer.
9. Control Panel:
The control panel provides different tools to configure the computer. It determines the
appearance of desktop and controls the performance of hardware. The following
procedure is used to open the Control Panel:
 Click start > Control Panel.
10. Printers and Faxes:
Printers and Faxes are used to connect, create or manage printer and fax resources.
The following procedure is used to open the Printers and Faxes:
 Click start > Printers and Faxes.
11. Help and Support:
It is used to access Windows XP Help and Support resources. It provides description
of different concepts and commands of windows operating system. It provides
different methods to search help topic. The following procedure is used to open Help
and Support:
 Click start > Help and Support OR Press F1 on Desktop.
Unit 03: Interfacing with Computer and Internet
Computer Literacy 35
12. Search:
Search Companion makes it easy to search files and folders, printers, people and
others computers on network. It also has and indexing service to maintain and index
of all the files on computer for faster searches. The user can specify several search
criteria using search companion. The following procedure is used to use the Search:
 Click start > Search to open Search companion.
 Choose the type of search.
 Type search criteria in the boxes. The search criteria changes depending on type of
search.
 Click Search to start the search
 When the search completes, the user can refine the search or click Yes, Finished
searching to close the search panel.
13. Run:
The Run command is used to run a program or open folders and document etc. It
opens a Run dialog box. The user types the name or path of a program in Run dialog
box to start the program. The following procedure is used to open Run dialog box:
 Click start > Run. The Run dialog box will appear.
 Type the name of the program, folder, document or website to open.
 Click OK.
14. Log off:
Log off option does not shut down the computer. It closes all open programs. The
following procedure is used to close all programs and log off:
 Click start > Log Off. Log Off dialog box will open.
 Click Log Off.
15. Switching Between Users:
A Computer can be used by more than one person. Windows XP allows everyone to
create separate computer accounts. When the user switches between user accounts, all
programs keep running and the computer switches to another user account. The
following procedure is used to switch between users:
 Click Start > Log Off. Log Off dialog box will open.
 Click Switch user.
16. Restarting Computer:
The process of starting a computer again without turning the power off is called
restarting computer. The following procedure is used to restart the computer:
 Click start > Turn Off Computer. The Turn off Computer dialog box will open.
 Click Restart.
17. Properly Shutting Down the Computer:
Turn Off Computer is used to close all files and shuts down the computer. It is very
important to use this option to shut down the operating system before turning off the
power. The following procedure is used to shut down the computer:
 Click start > Turn Off. Turn Off dialog box will open.
 Click Turn off.
Stand by Computers:
The following in standby mode consume less electricity but it is ready for immediate
use. The following procedure is used to put the computer in standby mode.
 Click Start > Turn Off Computers. The Turn Off Computers dialog box will
open.
 Click Stand By.
Unit 03: Interfacing with Computer and Internet
Computer Literacy 36
Introduction to the Control Panel:
You don't have to be a computer genius to use Windows XP, but if you know
something about how to set up some basic features and functions, it will do a lot more
for you. Windows XP makes this easier than ever with the Control Panel. The
Control Panel features a number of tools that will help you control how Windows XP
features look and act. But first you must learn how to access the Control Panel.
To access the Control Panel:
 Click Start.
 Click Control Panel.
 The Control Panel opens.
OR
 Type Control Panel in the Address dialog box found on any Windows XP
window.
OR
 Many folders feature a link to the Control Panel in the See Also dialog box (only
in XP view). No matter how you get to the Control Panel.
Navigate the Control Panel:
If you're used to a previous version of Windows, you'll notice that the Control Panel
in Windows XP looks very different.
The Windows XP Control Panel is divided into Categories. If you click a Category,
the window presents a List of Tasks and related Control Panel icons.
Note: Task and Control Panel icons perform basically the same functions. For
example, notice that you can "Choose a screen saver" in the Pick a Task list. Clicking
this link opens the Display Properties dialog box. However, if you were to choose
the Display icon, the Display Properties dialog box opens.
If you look at the left side of the window, you'll notice that they See Also and
Troubleshooters dialog boxes provides several more related options.
The new Control Panel design provides multiple ways to do something, thereby
making it more user-friendly. However, the new Control Panel design doesn't
provide you with access to every available Control Panel tool - it only provides
you access to the most commonly used tools.
To access ALL of your Control Panel tools, you must switch to Classic View.
To switch to Classic View:
 Click the Classic View link on the left side of your Control Panel.
 Click the Switch to Category View link to switch back.
Use the menu bar and toolbar buttons to navigate and further explore Control Panel
options.
1. Set the Time and Date
In the following pages, we'll explain how to perform some common Control Panel
tools.
To change the time and date:
1. Open the Control Panel (located in Start menu).
2. Under Pick a Category, click Date, Time, Language, and Regional Options.
3. Under Pick a Task, click Change the date and time.
4. The Date and Time Properties dialog box opens.
5. Use the drop down box to set the month and year.
6. Click the correct date on the calendar.
7. Click and select the current time to make a change.
Unit 03: Interfacing with Computer and Internet
Computer Literacy 37
8. If necessary, click the Time Zone tab and use the drop down box to change the
time zone.
9. Click OK to close the dialog box.
OR
1. Right-click the time in the lower right on your desktop.
2. Choose Adjust Date/Time.
3. The Date and Time Properties dialog box opens.
4. Follow above steps 5-9.
2. Changing the Wallpaper:
Wallpaper is the background image that appears on your desktop. Windows XP
offers many wallpaper choices.
To change the wallpaper:
1. Open the Control Panel (located in Start menu).
2. Under Pick a Category, click Appearance and Themes.
3. Under Pick a Task, click Change the desktop background.
4. The Display Properties dialog box opens with the Desktop tab selected.
5. In the Background box, click or use the arrow keys to view the choices.
6. Use the drop down boxes to alter wallpaper position or color.
7. Click OK to close the dialog box.
Advanced Users:
 Click Browse to choose a picture from the My Pictures folder (or navigate to a
picture located in another folder.)
 Click the Customize Desktop button to alter your desktop icons or display a web
page on your desktop.
3. Changing the Screensaver
In the early days of computing, screen savers helped prevent images from being
burned into the monitor. Now, screen savers entertain us, provide some privacy, and
enhance or work or home environment. Windows XP comes with several screen
savers.
To change the screensaver:
 Open the Control Panel (located in Start menu).
 Under Pick a Category, click Appearance and Themes.
 Under Pick a Task, click Choose a screen saver.
 The Display Properties dialog box opens with the Screen Saver tab selected.
 Click the arrow to open a drop down box. Click or use the arrow keys to view the
choices. Or, click Preview to view each option on your computer screen. Press any
key on your keyboard to return to the dialog box.
 Click Settings to customize the appearance or your chosen screen saver.
(A dialog box will notify you if your choice doesn’t have any options.
 In the Wait box, determine how many minutes should pass before your screen
saver turns on.
 Click OK to close the dialog box.
4. Customizing the Taskbar:
You already know about the Taskbar, but did you know you can customize its
appearance?
To customize the Start menu:
 Open the Control Panel (located in Start menu).
 Under Pick a Category, click Appearance and Themes.
 Under Pick a Control Panel icon, click Taskbar and Start Menu.
Unit 03: Interfacing with Computer and Internet
Computer Literacy 38
 The Taskbar and Start Menu Properties dialog box opens with the Taskbar tab
displayed.
 Use the checkboxes to customize its appearance and click OK.
Click the Start Menu tab to switch between the XP Start menu and Classic
Start menu. Classic Start menu is the Start menu featured in older versions of
Windows.
Challenge!
 If necessary, adjust the date and time on your computer
 Choose new wallpaper and a screen saver for your desktop
5. The Printers and Faxes Folder
Windows XP stores any information about any printer or fax machines connected to
your computer in a Printers and Faxes folder, making it easy to install, manage, and
use printers and fax machines.
To view the Printers and Faxes folder:
 Open the Control Panel.
 Under Pick a Category, choose Printers and Other Hardware.
 The Printers and Other Hardware folder opens.
 Under Pick A Task, choose View installed printer or fax printers or Add a
printer.
 The Printers and Faxes folder opens.
 In the left pane, you'll see several helpful links.
 In the right pane, you see a list of any printers or faxes that are installed on your
machine.
Adding a Printer:
Adding a printer is simple using the Add Printer Wizard available in the Printers
and Faxes folder.
Before trying to add a printer:
 Make sure your printer is compatible with Windows XP. If buying a new printer,
make sure to do your research before you make a purchase.
 Get out your printer's manual or CD-ROM and read it.
 Set up your printer and attach it to your computer using a printer's cable and
correct port on your computer.
Note: Many of the latest Plug and Play printers connect through a USB port. If
your printer falls into this category, you may not need the Add a Printer Wizard.
If you do have to use the wizard and your printer isn't listed in the Windows XP
list (which usually displays when you try to add a new printer) you may have to
contact the printer manufacturer for a driver. When you get the driver, follow the
Add a Printer instructions on your computer.
Having Trouble Printing It?
Perhaps you've written a great report and you want to share it with your boss. The
problem is, you're having trouble printing it.
Try these troubleshooting techniques:
 Take care of the basics. Make sure the printer is plugged in, turned on and has
paper in it.
 Make sure the printer cable is properly connected to the printer and to the
computer.
 Check to see if there is a paper jam. Most printers have a flashing light to indicate
a jam. Also, if the paper size selected differs from the one in the paper tray, you
Unit 03: Interfacing with Computer and Internet
Computer Literacy 39
will not be able to print. To choose a paper size, select File Page Setup. Click
the Paper Size tab.
 Check to see that the printer toner, cartridge or ribbon is fresh and adequate. If
not, printed documents may appear streaky, blotchy, or even blank.
 Make sure the printer switched to Online mode. There is usually a button on your
printer's control panel. If it is switched to Offline mode, it will not print.
 Make sure the computer knows what printer you are using. Check this by clicking
Start Control Panel Printers and Other Hardware View installed
printers or fax printers. If an icon for your printer doesn't appear, try restarting
your computer. If you printer still doesn't appear, you may need to add it. Click
Add a Printer and follow the instructions in the Add Printer Wizard.
Using Systems Tools for Basic Maintenance:
What are Systems Tools?
Do some basic maintenance from time to time to keep Windows XP running
smoothly. Luckily, Windows XP provides you with some basic tools to make the
maintenance process as painless as possible. You can access these tools via the
System Tools menu.
To open the System Tools menu:
 Choose Start All Programs Accessories System Tools.
 A cascading System Tools menu opens.
Disk Defragmenter:
All Windows XP computers have at least one hard disk. The hard disk acts as your
computer's storage area. Almost everything installed on your computer - applications,
files, folders, and operating system - is stored here.
With general use, (creating new files, deleting files, installing new software, etc) your
hard disk can become fragmented. This means that parts of the same disk file
become scattered over different areas of the disk. A fragmented hard disk slows down
your computer and hinders its performance.
To keep your hard disk running smoothly, you must routinely defragment or
"defrag" the hard disk. The Disk Defragmenter tool can help you do this.
To use Disk Defragmenter:
 Choose Start All Programs Accessories System Tools Disk
Defragmenter.
 The Disk Defragmenter opens.
To open Microsoft Management Console:
 Open Disk Defragmenter.
 Open the Action menu.
 Click Help.
 A Microsoft Management Console opens and explains how to run Disk
Defragmenter.
Note: You may need to be logged in as an administrator or as a member of the
Administrators group to perform some tasks associated with the Disk Defragmenter.
Disk Defragmenter should be run every three months.
Disk Cleanup:
Disk Cleanup is another tool that helps keep Windows XP operating as it should. It
inspects your hard disk and looks for files that can be safely deleted. Deleting
unnecessary files frees up valuable disk space.
To run Disk Cleanup:
 Choose Start All Programs Accessories System Tools Disk Cleanup.
Unit 03: Interfacing with Computer and Internet
Computer Literacy 40
 The Disk Cleanup window opens. Click the Disk Cleanup tab if it's not showing.
 Disk Cleanup lists several potential files that can be deleted and the amount of disk
space you'll gain by emptying each one.
 To learn more about a file category, click it and click the View Files button. A
description appears.
 Click the checkboxes next to the categories you want to delete and click OK.
 A dialog box appears, stating, "Are you are sure you want to perform these
actions?" Click Yes or No as appropriate.
The More Options tab gives you even more disk cleanup options.
Note: It's recommended that you run Disk Cleanup every three months.
The Scheduled Task Wizard:
Fortunately, you don't need to remember to run each of these utilities. Windows XP
includes a Scheduled Task Wizard that runs each of them for you.
To open the Scheduled Task Wizard:
 Choose Start All Programs Accessories System Tools Scheduled
Tasks.
OR
 Choose Start Control Panel Performance and Maintenance Scheduled
Tasks.
THEN
 The Scheduled Tasks folder opens.
 Double-click Add a Scheduled Task.
 The Scheduled Tasks Wizard opens.
 Keep clicking Next to select the program(s) you want Windows to run. If the task
you want is not listed, click the Browse button to locate it. Then schedule a
convenient time.
Dealing with an Unresponsive Computer:
While doing regular maintenance on your computer should keep it running smoothly,
your computer may occasionally freeze up or become unresponsive to the click of a
mouse or keyboard.
 If your computer freezes, try waiting it out. Sometimes it takes your computer a
few seconds to complete a task.
OR
 Press the ESC on your keyboard.
OR
 Press Ctrl + Alt + Delete on your keyboard. The Windows Task Manager opens.
Here, monitor applications, processes, performance, networking, and users. If you
need to restart your computer, choose Shut Down Restart. If you need to turn
off your computer, choose Shut Down Turn Off.
Challenge!
 Locate the Systems Tools menu.
 Open the Disk Defragmenter. Open the Action menu. Click Help. Learn more
about running Disk Defragmenter.
 Open Disk Cleanup. Run Disk Cleanup if necessary in order to free up hard disk
space.
Windows XP Security Features:
With the over-growing that of malicious code such as worms, virus, and hacker
threats -- it is critical that all customers take immediate action to help lock-down their
desktop and laptop systems. This guide explains how to implement the security
Unit 03: Interfacing with Computer and Internet
Computer Literacy 41
measures recommended in the Windows XP Security Guide in a small or medium
business environment without an Active Directory deployment. These
recommendations help ensure that your desktop and laptop systems running Windows
XP Professional SP1 are more secure from the majority of current security threats,
while ensuring that users can continue to be efficient and productive on their
computers. In addition to the advanced step-by-step guidance in this document, you
will also find information on the top security recommendations that Microsoft is
making to all customers, from the home to the enterprise. These include:
 Use a firewall, like the Internet Connection Firewall already in Windows XP
 Use Microsoft Windows Update to get and keep your PC up-to-date
 Install antivirus software and ensure it’s up-to-date
This section provides you step–by–step instruction for downloading and installing the
password and security templates provided with the Windows XP Security Guide, and
other key steps to help you secure your Windows XP systems. The first step you take
is to download the security templates to your Windows XP client. The next step is to
import the password and security policies. Finally, you apply these policies to your
desktop or laptop computer.
Downloading the Windows XP Security Templates:
A security template is a file that represents a recommended security configuration.
Security templates are applied to a system by importing them on the desktop or
laptop. This section shows you how to download the pre-built security templates,
which are detailed in the Windows XP Security Guide, to secure your desktop and
laptop systems.
To download the Security Templates:
 Log in to the Windows XP Client with an account that has administrative rights.
 Open a Web browser and navigate to:
http://go.microsoft.com/fwlink/?LinkId=14840.
 On the bottom of the page, in the Files in this Download section, select the
Windows_XP_Security_Guide.exe.
 In the File Download window, click Save.
 When prompted for a location, select the Desktop, and click Save.
 In the Download Complete window, click Open.
 In the WinZip Self-Extractor window, click Browse.
 Select My Documents and click OK.
 In the WinZip Self-Extractor window, click Unzip.
 After all files have finished extracting click OK.
 In the WinZip Self-Extractor window, click Close.
Importing the Security Templates:
After you have downloaded and extracted the security templates, use the Microsoft
Management Console (MMC) snap–in for the Security Configuration and Analysis
tool to apply these policies on the stand–alone machine.
Importing the Password Policy:
This security template enforces the requirement that users of the system choose
complex passwords that are greater than 8 characters in length. Additionally, it
requires them to change their password every 42 days. The policy monitors for failed
Unit 03: Interfacing with Computer and Internet
Computer Literacy 42
attempts to log in to the computer. If 50 failed login attempts occur within 30 minutes,
the account is locked for 30 minutes, or until an administrator manually unlocks it.
You will use the SA Enterprise Account.inf file that is included with the Windows XP
Security Guide to perform this task.
To import the recommended password policy:
 On the Start menu, click Run, type mmc, and then click OK.
 On the File menu, click Add/Remove Snap–in.
 Click Add on the Stand–alone tab in the Add/Remove snap–in properties box.
 Select Security Configuration and Analysis and then click Add.
 Click Close, and then click OK.
 Under Console Root, right–click the Security Configuration and Analysis item
and then click Open Database.
 Type a new database name (Windows XP Security Guide.sdb), and then click
Open.
 In the Import Template window, navigate to My DocumentsWindows XP
Security GuideTools and TemplatesSecurity GuideStand Alone Clients.
 Select the SA Enterprise Account.inf security template, and click Open.
 Note: If you do not see the SA Enterprise Account.inf file, you may have saved it
to a different location. You may need to extract the files from the
Windows_XP_Security_Guide.exe self-extracting file again.
You have now successfully imported the security policy. Do not close out of the
Security configuration and Analysis snap-in yet. Now, you must import the
security policy before applying these changes to the system.
Importing the Security Policy:
The next step to securing your computer is to configure many of the built–in security
settings. While this seems like a daunting task, step–by–step instructions for using the
Enterprise Client - Desktop.inf file that is included with the Windows XP Security
Guide are provided below to perform this task.
This policy will configure settings that ensure only valid users can connect to the
computer, only administrators can backup and restore files on the computer, and that
only administrators can add new drivers to the system.
To import the recommended Security Policy:
 Right–click the Security Configuration and Analysis scope item and then click
Import Template.
 In the Import Template window, navigate to My DocumentsWindows XP
Security GuideTools and TemplatesSecurity GuideSecurity Templates.
 Select the Enterprise Client–Desktop.inf security template, and click Open.
 Right–click the Security Configuration and Analysis scope item, and then click
Configure Computer Now.
 In the Configure System dialog box, accept the default name of the log file by
clicking OK.
Completing the Process
You are now ready to apply the password and security settings to your desktop or
laptop. To ensure they are applied, use the gpupdate.exe command.
To run gpupdate:
 On the Start menu, click Run, type cmd, and then click OK.
 Type gpupdate.exe /force and press ENTER.
 When you are prompted with "OK to Reboot?", type Y and then press ENTER
Unit 03: Interfacing with Computer and Internet
Computer Literacy 43
After the system restarts, the password and security policies are successfully applied.
After pressing Control + Alt + Delete to log in, you should see the "It is an offense to
continue without proper authorization" dialog box. Click OK and log in as normal. If
you have trouble, refer to the Troubleshooting section below..
Using Antivirus Software
An antivirus software program will help protect your computer against most viruses,
worms, Trojan horses, and other malicious code. Many new computers come with
antivirus software already installed. However, antivirus software requires a
subscription to stay up to date. If you don't have a current subscription for these
updates, your computer is likely to be vulnerable to new threats. Computer viruses are
programs that are loaded on to your system without your knowledge or approval.
Viruses and other forms of malicious software have been around for years. Today's
viruses can replicate themselves and use the Internet and e-mail applications to spread
across the world within hours.
Antivirus software continually scans your computer for viruses and helps detect and
remove them. Installing antivirus software only solves part of the problem - keeping
the antivirus signature files up to date is critical to maintain a secure desktop or
laptop.
User education regarding safe email practices is another critical step in preventing
virus attacks. Users should not open an email or take action on an email attachment
unless they are expecting the file. All email attachments should be scanned with the
antivirus software prior to its execution.
Unit 03: Interfacing with Computer and Internet
Computer Literacy 44
Hypermedia:
Defining Media:
Media refers to any material, methodology, procedure and / or technique that are used
to complete a task. In other words, media includes helping tools and technologies
used to generate a product. This product can be some work, relaying information,
presenting views etc.
1. Basics of Hypermedia and its Significance: To understand the term
“Hypermedia”, one should be familiar with “Hypertext”. Hypertext is the type of
text which has some references and / or links to other media associated with it.
Usually, these references can be followed by using a single mouse-click. For
example, by clicking on the following hypertext one can directly link to the
Google Website. www.google.com In short, hypertext is the text having link
and / or relation with some other information. Hypermedia is the arrangement of
various inter-linked media including (text, image, video etc.). These inter-linked
media (with embedded hyperlinks) are together used to relay a single idea,
scheme or information. Communicating information using the hypermedia is
very helpful for the readers (information gathers) as well as for writers
(information providers). A single concept may be delivered using simple text,
with some embedded link to the video or to the some sound file depicting the
same concept in some different manner etc.
2. Significance of Hypermedia in teaching: For lecture delivery, hypermedia is
regarded as a very powerful tool. For example, if a teacher is teaching the
students “How to Check E-Mail” then oral explanation may not be enough.
However, if a video representation guiding how it can be done is shown, it will
be much more understandable to the students and also fewer efforts will be
required by the teacher. A video representation of “How to Check E-Mail” can be
shown by clicking on the text directly. Moreover, if there are scarce resources for
the practical implementation or experiment during lecture delivery, the use of
hypermedia will support both teacher and student. For example, if the topic of the
lecture is: “How to install a computer memory”, and all the required resources
are not available, then Hypermedia may be used. Using Hypermedia also helps in
maintaining the lecture’s sequence and avoids skipping important points during
lecture delivery.
3. Comparison between normal media sources and hypermedia The normal media
sources include the media (as discussed earlier) without having embedded links
to other media. However, the hypermedia provides a complete system, structure
and / or scheme which include all necessary links, and the information is
communicated in a more effective manner.
Internet and Intranet:
1. Basic Definitions and History of Internet and Intranet:
Internet is defined as a global network that is publicly accessible. This is the network
which allows the user to access various networks in the world. A simple way of
defining the Internet is that it is a network that comprises of many other networks. On
the other hand, intranet is regarded as a proprietary or private network of any
organization, company or enterprise. Before the emergence and popularity of inter-
communication of various networks, the organizations had their own concealed
networks (regarded as intranets). These intranets were limited to their domains and
people were facing many problems when need to communicate from outside domain.
The need of communication and sharing became stronger and stronger and the
researchers started thinking of some effective and readily accessible way
Unit 03: Interfacing with Computer and Internet
Computer Literacy 45
communication. In late sixty’s network linkage was established among various
universities and research organizations networks. This linkage was named as
“ARPANET”. ARPANET forms the basis of the modern world Internet.
2. Comparison between Internet and Intranet:
 Internet is a publicly shared network while Intranet is limited to the employees
or people of a particular organization
 Internet covers much wider scope, while the Intranet’s scope is limited to its
organization’s domain
 The data is more secure within the Intranet then that of Internet
 As, Intranet is a localized network of an organization, it provides much higher
speed then that of the Internet
3. Introduction to emergence of World Wide Web (WWW):
The World Wide Web (WWW or W3) is the collection of various hypermedia which
is accessible (using web browser) on Internet and / or intranet. The sharing and
communication of ideas and knowledge is the pilot thinking behind the development
of WWW. Using the WWW teachers are able to share their lectures on Internet, make
use of the various research results found by other people and to participate in various
projects (teaching, learning, research etc.) placed miles apart.
Internet Connectivity:
1. Overview:
Internet connectivity is a very vital issue. This is the point where the accessibility and
availability of different networks (incorporated in Internet) is involved. The main
challenge in the evolution of the Internet is the development of a common
connectivity protocol and / or tool, which is used by all the networks involved in the
Internet. The common protocol developed and used by the Internet is TCP/IP. TCP/IP
is used as a common standard protocol to send and / or receive data in the packet
network. The Internet connectivity needs both software and hardware. The software
part is usually covered with the common protocol (i.e., TCP/IP) on the other hand
various hardware technologies are introduced for the said purpose. The next section
discusses various emerging technologies used for Internet connectivity.
2. Current and Emerging Technologies for Internet Connectivity (DSL, Wi-
Max etc):
Internet connectivity and / or Internet connection is of the following types:
a. Dial-up connection:
Dial-up connections are the most inexpensive and slowest connection usually
provided by Internet Service Providers (ISPs). A modem is needed to dial to the ISPs
server using PSTN (telephone connection) and connect to the Internet.
b. DSL/ADSL:
Digital Subscriber Line (DSL) / Asymmetric Digital Subscriber Line (ADSL) are now
becoming more and more popular. DSL and ADSL splits the telephone line into two
portions i.e., one for data and other is for voice. The users and / or subscribers can use
Internet and attend a telephone call simultaneously. DSL connection guarantees
quality of service (QoS) while QoS is not guaranteed in ADSL connection.
c. ISDN:
Integrated Services Digital Network (ISDN) provides multiple services included
voice, data, fax etc. via a single telephone connection / line. Not only the single line is
used for the provision of various services but also it provides high data rate i.e., fast
access to Internet. There are many other Internet Connections available e.g., T1/E1
connection, broadband connections including WiMAX etc.
Unit 03: Interfacing with Computer and Internet
Computer Literacy 46
3. Popular Web Browsers used for Web Surfing (IE, Netscape, Navigator,
Mozilla FireFox etc):
Surfing the World Wide Web (WWW) means that we visit various web pages and
web sites which provide and communicates information, for this purpose the software
and / or application used is known as Web Browser. Web Browsers are the most
popular software used for retrieving and sharing information from WWW. Most
popular web browsers used for web surfing are Internet Explorer (IE), Mozilla
Firefox, Google Chrome etc. All of the stated web browsers help the user to browse
the web, they maintain some history and also provide easy navigation between web
pages. Other than the features mentioned here, each browser is having its localized
features.
Applications of Internet and WWW:
Internet and World Wide Web (WWW) are used in many domains. Together the
Internet and WWW provides solutions to many problems. The usage and / or
application of Internet and WWW are very wide however, some of the applications
are discussed below:
1. Web Browsing/Surfing:
Web Browsing/surfing is the method of exploring the web. Any Web Browser
software (e.g., Internet Explorer, Netscape Navigator etc.) can be used for the said
purpose. Web Browsing/Surfing makes use of Hypermedia. Different web pages, text,
audio and video files and other information are linked together using “Hyper links”.
Hyper linking of the documents provides easy navigation and helped in visiting inter-
related web pages.
2. E-Learning/ Distance Learning:
E-learning can be defined as learning via technology. The technology here refers
explicitly to the electronic media. However, Distance Learning is the learning
provided at remote location. Distance learning may also be regarded as the E-learning
as most of the time electronic media is used for the provision of distance learning.
Internet and WWW provides the facility to put lectures online at one place and then
those lectures can be downloaded at some other place. This sharing of educational
material for learning process, when the two or more users are geographically apart is
an example of e-learning / distance learning. Another very important feature of e-
learning / distance learning is that it provides a self-learning environment. Internet
and WWW provide a good platform for self-learning. Thus people can develop
expertise and try to excel in their respective domains.
3. Digital Libraries and E-Books:
Another very important application of Internet and WWW is the provision of digital
libraries. Now the researchers and educators need not pile their desks with numerous
hard covered books. The books in electronic format are readily available on Internet.
People get access to those books using the Digital Libraries. Digital Libraries not only
provides the books, but also help the researchers in getting the latest and updated
research results. Various magazines, journals, articles, papers are also available in
Digital Libraries. The Higher Education Commission (HEC), Pakistan, also provides
access to the Digital Library. Information and access to the HEC’s digital library can
be achieved through HEC website or direct access to the HEC’s digital library
program (http://www.digitallibrary.edu.pk/)
4. E-Commerce:
Internet and WWW not only supports the education sector but also focuses on the
business division. All the business activities those take place using the Internet and /
or WWW becomes part of the E-Commerce. Almost all the business giants, small
Unit 03: Interfacing with Computer and Internet
Computer Literacy 47
corporate and private commercial companies, make use of Internet and WWW in their
business. Internet and WWW provide information regarding current market trends
and on-going business activities. One of the most important features of E-Commerce
is the provision of comparative studies and status of different business enterprises of a
particular domain.
5. Sharing of Information and Knowledge:
Internet and WWW provides a platform where information and knowledge is shared
publicly. There are number of ways, tools and techniques used for sharing
information. A few are explained below:
 Web Communication (Emails, Discussion forums, Individual and Group
chatting etc):
Web communication is nowadays one of the most popular way of sharing
information, knowledge, news, events etc. Most commonly used and effective tool of
web communication is electronic mail (E-Mail). There are a number of platforms
which provide the e-mail services free of cost. Users create their own e-mail address
and then using that e-mail address; communicate with their friends, co-workers,
family and other professionals. The detail of how to create e-mail address and how to
use it is covered in later in the following chapters. Discussion forums are another
important tool used for sharing ideas and knowledge. Many people become part of a
forum. On the forum different topics are posted to be discussed publicly with all the
forum members. These discussions may include solution for a specific problem, latest
research about any particular topic and / or comments on current affairs issues.
Chatting is also like discussion forums. The difference is that for chatting all the
members need to be online. The geographically apart users can be online at the same
time and discuss any topic among them. The chatting can between two or more users.
 Weblogs and Resource sharing
Weblogs are the websites which have discussions and / or comments on some topic.
The discussions and comments are added to the website on regular basis. Usually,
there is a person who owns a weblog, i.e., creator of that particular weblog. The
weblogs is an important tool through which students and teachers can communicate
on some on-going course issues, projects, assignments and /or research. These
weblogs help teachers and students in solving their problems and / or sharing
information in more effective way.
 Web-Casting/Pod-Casting:
Web-casting / pod-casting is another useful application which is provided on Web.
Web-casting / pod-casting includes sharing of live or recorded streaming multimedia
files (audio, video etc.) over the Internet. This sharing may be in the form of
entertainment i.e., showing the recorded or on-going matches, live broadcasting of the
TV channels etc. Similarly, the application of web-casting / pod-casting is also in the
domain of education. Live lectures from one university campus can be viewed in
some other university campus. Moreover, teachers can evaluate a student’s project,
research etc. while viewing the recorded or live presentation of the student.
 Search Engines:
Search engines are also one of the very useful and most popular applications of
Internet and WWW. Whenever we need to search something, we connect to the
Internet and then use a search engine for searching our requested item. Widely used
search engines are Google, Yahoo Search, MSN Search etc. The mechanism to search
a particular topic is similar in all the search engines. We open the webpage of a search
engine e.g, (www.google.com) in the browser. On that page there is a search bar
followed by a search button. In case of Google the search button has given the caption
Unit 03: Interfacing with Computer and Internet
Computer Literacy 48
of “Google”. Type the word or word-phrase (search query) in the search bar and then
press the search button. The search engine looks for the given words and phrases in all
the documents, files, figures etc. it can access and usually returns the research results
in order of their relevance to the search query. For example if we search the string
“Higher Education in Pakistan” the top most result which Google search engine gives
us is the link to the “Higher Education Commission of Pakistan”.
 Social Networking:
Social networking is one of the most effective ways of communications over the
Internet. People having similar interests group together to form a network. This
network is usually built among friends, family and/or colleagues. Facebook is one of
the popular social networks now days. It is used to share educational, professional and
entertainment information among people. Such type of networks not only supports the
educational and professional life of a person but also help in building good relations
among colleagues, friends and family.
Web Page/Site Designing:
Designing a website is very important. However, from teacher’s view point its
important to understand the design of a website. It is also important to know how
changes can be made to a particular website to accommodate a teacher’s need.
Before going into more details about web page/site design, lets us first discusses the
broad categories of websites, as follows:
 Static Websites:
Static websites are those websites which presents static information. The website
developer creates some web pages (static web pages) which contain information that
does not change or update automatically. Such static web pages are useful for
displaying the history of a university, presenting some past event etc.
 Dynamic Websites
On the other hand dynamic websites are those which either have some input form user
at the runtime or retrieve information from the database or some other server. The
information presented by such web pages is dynamic in nature i.e., it changes on
runtime and varies from user to user. A very good example of dynamic websites is the
“Course Management System (CMS)” explained later in the following chapter.
1. Hypertext Mark Up Language (HTML):
To design a web page/site, some language needs to be used. The most widely used
language for the development of web pages (that also incorporates hyper media) is
known as Hyper Text Mark-Up Language (HTML). HTML is used to create and
develop organized / structured web site. Different web pages are linked together to
present the information effectively. Moreover, various hyper media and multi-media
may be incorporated in a web page using the HTML.
2. Web Graphics and their formats:
Another important domain to be discussed is the Web graphics and their formats.
Most of the time teachers search and download some image from the Internet.
Pictures can effectively present the whole idea or theme of the work therefore most of
the teachers make use of images in their lectures. One of the problems usually faced
by the users is how to save a web graphic and what should be its format. To save a
web graphic you just need to right click on the image and click “Save Picture As”. It
then opens a dialog box asking at which location to save the image and in which
format. The place or location of the image to be saved, can be selected from the “Save
in” box. To select that in which format that image can be saved is selected from the
“Save as type” box at the bottom of the screen. From this box different image formats
can be selected. Most commonly used image formats include .bmp, .jpg, .gif, .tif etc.
Unit 03: Interfacing with Computer and Internet
Computer Literacy 49
3. Site Map Construction:
Another important feature of the web site development is the construction of site map.
Site map is the textual and / or pictorial representation of web pages and their linking
among them. Site map is a very important tool which help the visitor of any web site
to find out how to access some particular information or how (following which path)
to reach to some specific web page.
4. Saving Files of different formats in Hypertext Format:
Whenever, a web site is developed, different information and data need to be added as
multiple web pages to that web site. Most of the time the data or information to be
added as a web page is not in the Hypertext (HTML) file format. So, there is a need to
convert that files or documents from different file formats to the one compatible with
WWW. In other words, we need to find the way to convert other format documents
into the hypertext format. Almost all the application software which provide facility
to develop such types of documents have the feature to save the same document in the
hypertext format. For example, if there is a document written in MS-Word, then to
convert that document to hypertext format we need to go to the “File” menu then
select “Save As” option. A dialog box will open asking to save the document where
and in which format. At the bottom of the dialog box there is “Save as type”, from
there select “Web Page (*.htm;*.html). and then saved the document. This will save
the currently opened MS-Word document to the hypertext (HTML) format.
Self Course Management:
1. Introduction of Self Course Management:
As a teacher or instructor, we need to be organized so that we can conduct courses
effectively and efficiently. Self course management includes:
 Planning a course
 Deciding course contents
 Lecture wise course breakdown and scheduling
 Grading policy
 Evaluation plans
 Result generation and display
 Attendance management etc.
2. Online Applications for Course Management:
Due to Internet, applications/programs available online can be accessed anywhere and
anytime. Many educational institutes are now using online course management
systems (CMS). This facilitates both teachers and students.
Online CMS allows the administrator user (teacher) to add course outlines, course
related announcements, lectures/notes, lab manuals, book references, samples papers,
upload of quizzes and assignments, etc. The student user can download these
resources and upload completed assignments. Course Management can be done using
proprietary software which can be custom developed or by using freely available
software on internet.
3. Database Driven Websites:
All the course management systems (CMS) used now days are database driven i.e.,
CMS websites get and / or retrieve their data from the database every time they load.
Data of each faculty member along with the detail of courses that faculty member is
teaching is stored / maintained in a database. Whenever, a teacher performs a login
operation in CMS, the CMS website looks for his/her details and data in the database.
The data retrieved from the database is then presented in an organized way on the
CMS website. The CMS website provides a user friendly interface that allows the
Unit 03: Interfacing with Computer and Internet
Computer Literacy 50
teacher to add new data and update/delete existing data in the database. For example,
whenever, a new lecture or assignment is uploaded by a teacher, the CMS stores this
information in the database.
4. Course Tracking:
Planning the course ahead of time is a good practice. This plan should involve lecture-
wise break down of course contents to be covered. The plan can be developed using
specialized software, e.g. Microsoft Project’s Gantt charts or even simply using tables
in Microsoft office Word or Excel, etc. Once the course has started, it is also
important to keep track of the course progress according to the plan. The teacher must
cover up for any lapse in the course plan or scheduled activities.
5. Sharing Lectures/Assignments and Results:
There are many ways in which students and teachers share course related resources. A
popular way is using group-based emails, for example yahoo groups. Another
interesting way of handling this is through CMS.
6. Online Discussion forums for Teachers, Students:
These days the Internet provides discussion platforms for sorting out different
problems whether general or educational. Many technical discussion forums provide a
healthy environment for exchanging ideas and sharing knowledge. Discussion can be
initiated by anyone and experienced people of the related field give their suggested
answers. Discussion forums are available for a diverse range of fields, for example,
programming languages, operating systems, configuration and use of software,
research topics, etc. Teachers and students can gain benefit from such forums. These
forums can help them build knowledge bonds with peers all around the world. The
same idea of forums can be used for online discussions among teachers and students
after university hours.
7. Online Teachers Evaluation:
Many educational institutes use the “teacher evaluation forms” as a tool for analyzing
teachers’ performance. These forms contain a number of questions. There are
different answer options against each question. For example:
 Does the teacher always come prepared in class?
Answers options: (a) Always (b) Sometimes (c) Never
 Does the teacher encourage students to ask questions?
Answers options: (a) Always (b) Sometimes (c) Never
These forms (if truthfully) filled by students can provide performance analysis data.
These forms are usually distributed to the students towards end of the term/semester.
This involves taking hard copies of forms, getting them filled form students,
collecting them and analyzing results.
The same forms if placed online can save the cost of forms printing, the exercise of
forms distribution and collection. Online availability of forms will also facilitate
students as they will be able to fill forms whenever they have free time.
8. Resource Management:
All course related resources including lecture notes and tutorials can be managed
either at a central server or on the online course management website. The teachers
should update these resources after every lecture so that students can get the latest
copy of lectures and other reference material.
Email Management:
1. Selecting an email service:
 For Personal Use:
Many email services are commercially available and most of them are free of cost.
Using a free email service like yahoo, hotmail, etc. is appropriate for personal
Unit 03: Interfacing with Computer and Internet
Computer Literacy 51
communications. Personal use can include sending emails to your friends and family
members.
 For Professional Use:
If available, you must use the professional email service hosted by your university
domain server or email provider for all professional communication. Professional
emails can be written to your students, peers, seniors and colleagues from other
universities. The professional email services build a better repute for you as a teacher.
2. Choosing an email ID:
Your email ID (address) is your reflection. Choosing an appropriate ID is very
important especially for professional communication. If you are using a professional
email service hosted on your university domain server, then this can be taken care of
by the email/web administrator. Example of appropriate email IDs are:
sana.zahid@uettaxila.edu.pk, ProfessorAliKhan@gmail.com, etc.
3. Defining the Email Subject:
Just like news paper headlines, your email subject line should be precise and
meaningful that draws the reader’s attention. It should clearly state what the email is
about. In other words, the subject line should deliver the message’s bottom line. A
simple rule that may be followed in writing the subject is “What” + “what about
What”, i.e., what the email is about + any relevant brief description about that what.
For example, if you want to announce a faculty meeting by your email, you would
write this in the subject: “Faculty Meeting for Course Allocation, Monday 4-Jan-09”.
Another example of email subject line can be for inviting participants for a seminar,
“Two days seminar on Education and Culture”.
4. Learning how to handle email recipients
To:
This includes email addresses of the primary recipients of your email
CC:
It is short for carbon copy. This feature is just like the CC used in official hard copy
letters. It should include email addresses of people who are not the primary recipients
of your email but will receive it as a copy (for their information). The email addresses
entered in this section are also visible to the primary recipients.
BCC:
It is short for blind carbon copy. Many times you want to send emails to other people
as a copy without letting the primary users know about it. BCC should include all
such email addresses.
5. Managing Emails Content:
The email content should be brief. A lengthy email will overwhelm the reader and the
real content will be lost in the details. Try to keep the emails as concise as possible.
Like any other professional write-up, your email will consist of three parts:
 Introductory statement
 Actual matter
 Closing statements
Avoid using too many font styles and colors for your email text. Use plain text and
avoid such character representations which may not be properly displayed in the
recipients email application.
6. Emails Attachments:
You can attach documents, spread sheets, images and any other content on your
computer along with emails. It is very important that your email attachments do not
exceed a reasonable size limit. Sending huge attachments with email can choke the
Unit 03: Interfacing with Computer and Internet
Computer Literacy 52
network by consuming available bandwidth. This will also affect both you and your
colleagues who are sharing the network bandwidth.
7. Configuring an email program (Outlook, Eudora, etc.):
Learning about your email program is very important even if you are a technology
expert and know most of the things already. In this regard, tutorials available on the
manufacturer’s website can help you build a better understanding of the email
program. The better you understand your email program, the more you will utilize its
benefits.
Let us consider Microsoft Outlook 2003 as an example. Launch this email program:
Start -> Programs -> Microsoft Office-> Microsoft Office Outlook 2003
After launching Outlook, you can use the Help menu to look for solution of any thing
that you want to do in Outlook. Press F1 function key to start using help or select
Microsoft Office Outlook Help option from the Help menu.
On left panel of your Outlook application, you will see a number of Folders.
 Inbox contains the received emails
 Sent Items contains the emails that you have sent
 Drafts contains emails that you have composed but saved them to be sent later
 Junk-Email contains all emails that may be spam
 Outbox contains out-bound emails which are in the process of being sent
 Deleted items contain all emails that have been deleted from any of the above
folders.
8. Adding a New Email Account:
Activate Outlook Help from Help menu as mentioned earlier. To set up a new
account, type “add email account” in the search box of help window. It will provide
you a step by step guide to add email account.
OR
If you do not want to use the Help menu, then go to Tools menu and select Email
accounts option. This will launch a wizard that will help you set up your email
account. Select the option Add a new e-mail account from the wizard. Click Next
button to proceed.
Select POP3 (POP3 is used to download email from mail server to local email client).
Click Next.
In the next dialog box, enter your name, email address, user name, password and mail
server info. Outgoing mail is based on smtp protocol as smtp delivers emails from
email client to mail server. Click More Settings button
A dialog box for Internet email Settings appears. Select the Outgoing Server Tab.
Place a check in box labeled My outgoing server (SMTP) requires authentication.
Also select the option use same settings as my incoming mail server.
Click OK to return to previous window. In that window, when you click Test Account
Settings, all entered fields will be tested and following will be displayed. Click on
Close. Click Next when you return back to settings window.
On clicking Next, the following window is displayed. Click on Finish to close the
wizard.
9. Setting Folder Options:
To manage folder settings, go to Tools menu and select Options. This will display the
following dialog box. You can explore each tab and change settings. Select Email
Options button in the Preferences Tab to manage message handling options.
10. Setting Outgoing Mail Format:
Select Mail Format Tab. You can choose the message format (HTML, Rich text, Plain
text) of your choice for your outgoing emails.
Unit 03: Interfacing with Computer and Internet
Computer Literacy 53
11. Creating Signatures:
You can select the Signatures button to create your signature. The following appears.
Select New… button to create a new signature. A signature can be edited once created
or removed. Enter Signature text, format it and click on Finish button. When you
return to the previous window, click on OK button. This signature can be
automatically inserted whenever you compose an email.
12. Setting Auto-replies / Out of Office Assistant:
When you are away from office (for conference, workshop, vacation or some other
reason), you can set up an automatic reply option so that your emails do not remain
unanswered for a long time during the time you are away.
Reference: http://support.microsoft.com/kb/311107 : The Out of Office Assistant
feature in Microsoft Outlook is a Microsoft Exchange Server service. It is available
only when the Exchange Server transport service is included in an Outlook user's
profile. You can emulate this feature by creating an e-mail template and defining a
rule in the Rules Wizard to automatically reply with the template.
13. Backup Of Emails:
A regular backup of important emails will ensure email recovery in case your system
or email server crashes. In case of Microsoft Outlook 2003, email messages in
particular folders can be archived in .pst file format (export operation) and later
retrieved (import operation) using either of the two ways:
1. From File menu, select New, then select Outlook Data File. A dialog box asks for
type of storage. Select Office Outlook Personal Folder File (.pst) and click OK.
Next dialog box asks for storage location and name of the backup file, give a
name and click OK.
2. From File menu, select Import and Export option. When the following window
appears, select Export to a file option as shown below. Click Next
Select the file type as shown above and click Next. The next window lets you choose
a folder whose contents will be exported. Select Inbox and Click Next.
The next window required name of the exported file. Specify a name and click on
Finish.
To restore/ retrieve the file, use either of the two options.
1. From File menu, select option Open, then Outlook Data File. A dialog box opens
so that you can browse the file to be opened. Select the file and click Open. The
file will be imported in the Personal Folders.
2. Use the option Import and export from the File menu. This time select the import
from another program or file option. Click Next.
3. Select Personal Folder File (.pst) and click Next.
4. Browse the file to be imported and click Next.
5. Select destination where file will be imported and click Finish.

More Related Content

What's hot

Windows xp install
Windows xp installWindows xp install
Windows xp install
Veronica Alejandro
 
Introduction to Windows XP
Introduction to Windows XPIntroduction to Windows XP
Introduction to Windows XP
Roselyn Villanueva
 
Windows environment
Windows environmentWindows environment
Tricks N Tips By Ravish Roshan
Tricks N Tips By Ravish RoshanTricks N Tips By Ravish Roshan
Tricks N Tips By Ravish Roshanravish roshan
 
Windows 7- Introduction and Features
Windows 7- Introduction and FeaturesWindows 7- Introduction and Features
Windows 7- Introduction and Features
Rajashri Bhairamadgi
 
Introduction to windows xp
Introduction to windows xpIntroduction to windows xp
Introduction to windows xp
Abenezer Abiti
 
File windows local
File windows localFile windows local
File windows local
yarden hanan
 
Windows xp and windows 7 installaton
Windows xp and windows 7 installatonWindows xp and windows 7 installaton
Windows xp and windows 7 installaton
Siddharth Jain
 
The basics of windows
The basics of windowsThe basics of windows
The basics of windows
Veronica Alejandro
 
Windows 7
Windows 7Windows 7
Windows 7
Faimin Khan
 
Windows 7 OS
Windows 7 OSWindows 7 OS
Windows 7 OS
guestcee36e34
 
Windows 7 Unit A PPT
Windows 7 Unit A PPTWindows 7 Unit A PPT
Windows 7 Unit A PPTokmomwalking
 
Computer fundamentals
Computer fundamentalsComputer fundamentals
Computer fundamentals
mukulmittal545
 
Presentation on window 7
Presentation on window 7Presentation on window 7
Presentation on window 7
Muhammadusmanyar
 
Windows Basic
Windows BasicWindows Basic
Windows Basic
Jack Frost
 
Session 1
Session 1Session 1

What's hot (17)

Windows xp install
Windows xp installWindows xp install
Windows xp install
 
Introduction to Windows XP
Introduction to Windows XPIntroduction to Windows XP
Introduction to Windows XP
 
Windows environment
Windows environmentWindows environment
Windows environment
 
Tricks N Tips By Ravish Roshan
Tricks N Tips By Ravish RoshanTricks N Tips By Ravish Roshan
Tricks N Tips By Ravish Roshan
 
Windows 7- Introduction and Features
Windows 7- Introduction and FeaturesWindows 7- Introduction and Features
Windows 7- Introduction and Features
 
Introduction to windows xp
Introduction to windows xpIntroduction to windows xp
Introduction to windows xp
 
File windows local
File windows localFile windows local
File windows local
 
Windows xp and windows 7 installaton
Windows xp and windows 7 installatonWindows xp and windows 7 installaton
Windows xp and windows 7 installaton
 
The basics of windows
The basics of windowsThe basics of windows
The basics of windows
 
Windows 7
Windows 7Windows 7
Windows 7
 
Windows 7 OS
Windows 7 OSWindows 7 OS
Windows 7 OS
 
Windows 7 Unit A PPT
Windows 7 Unit A PPTWindows 7 Unit A PPT
Windows 7 Unit A PPT
 
Computer fundamentals
Computer fundamentalsComputer fundamentals
Computer fundamentals
 
Presentation on window 7
Presentation on window 7Presentation on window 7
Presentation on window 7
 
Windows Basic
Windows BasicWindows Basic
Windows Basic
 
Unit A Windows 7
Unit A Windows 7Unit A Windows 7
Unit A Windows 7
 
Session 1
Session 1Session 1
Session 1
 

Viewers also liked

Theoreticalfoundationscoaching
TheoreticalfoundationscoachingTheoreticalfoundationscoaching
TheoreticalfoundationscoachingVanHalen
 
Lineadetiempo vrosky
Lineadetiempo vroskyLineadetiempo vrosky
Lineadetiempo vroskyVroskyhann
 
Livros Infantis de Isabel Ricardo Amaral Ana 6ºC
Livros Infantis de Isabel Ricardo Amaral Ana 6ºCLivros Infantis de Isabel Ricardo Amaral Ana 6ºC
Livros Infantis de Isabel Ricardo Amaral Ana 6ºCguest38291d
 
Como facturar en excel
Como facturar en excelComo facturar en excel
Como facturar en excel
damian andres foreroramirez
 
Nationalization
NationalizationNationalization
Nationalization
13023901-016
 
Introd diseño mecanico rev00
Introd diseño mecanico rev00Introd diseño mecanico rev00
Introd diseño mecanico rev00
Jesús Ildemaro Garcia
 
HootSuite
HootSuiteHootSuite
HootSuite
Mauricio Duque
 
Keterampilan bertanya
Keterampilan bertanyaKeterampilan bertanya
Keterampilan bertanyaSayeti Melik
 
LinkedIn Storyboard
LinkedIn StoryboardLinkedIn Storyboard
LinkedIn Storyboard
Karen Belch
 
F&g presentation general...
F&g presentation  general...F&g presentation  general...
F&g presentation general...
Monday Imarhiagbe
 
Leary értelmezés 001
Leary értelmezés 001Leary értelmezés 001
Leary értelmezés 001
VanHalen
 
Paul Biya - Président du Cameroun - Mot du capitaine des Lions Indomptables l...
Paul Biya - Président du Cameroun - Mot du capitaine des Lions Indomptables l...Paul Biya - Président du Cameroun - Mot du capitaine des Lions Indomptables l...
Paul Biya - Président du Cameroun - Mot du capitaine des Lions Indomptables l...
Paul Biya
 
Peter Green
Peter GreenPeter Green
Peter Green
RAVoyce
 
cropped_Page 1 - Kochi - Malayalai Rich List June 4 2015
cropped_Page 1 - Kochi - Malayalai Rich List June 4 2015cropped_Page 1 - Kochi - Malayalai Rich List June 4 2015
cropped_Page 1 - Kochi - Malayalai Rich List June 4 2015Shenoy Karun
 

Viewers also liked (20)

Theoreticalfoundationscoaching
TheoreticalfoundationscoachingTheoreticalfoundationscoaching
Theoreticalfoundationscoaching
 
Ther All
Ther AllTher All
Ther All
 
Book Signing Flier
Book Signing FlierBook Signing Flier
Book Signing Flier
 
Lineadetiempo vrosky
Lineadetiempo vroskyLineadetiempo vrosky
Lineadetiempo vrosky
 
Livros Infantis de Isabel Ricardo Amaral Ana 6ºC
Livros Infantis de Isabel Ricardo Amaral Ana 6ºCLivros Infantis de Isabel Ricardo Amaral Ana 6ºC
Livros Infantis de Isabel Ricardo Amaral Ana 6ºC
 
Como facturar en excel
Como facturar en excelComo facturar en excel
Como facturar en excel
 
Historia de la bicicleta
Historia de la bicicletaHistoria de la bicicleta
Historia de la bicicleta
 
Nationalization
NationalizationNationalization
Nationalization
 
EponaLogoFINAL
EponaLogoFINALEponaLogoFINAL
EponaLogoFINAL
 
Recado
RecadoRecado
Recado
 
Introd diseño mecanico rev00
Introd diseño mecanico rev00Introd diseño mecanico rev00
Introd diseño mecanico rev00
 
HootSuite
HootSuiteHootSuite
HootSuite
 
Keterampilan bertanya
Keterampilan bertanyaKeterampilan bertanya
Keterampilan bertanya
 
LinkedIn Storyboard
LinkedIn StoryboardLinkedIn Storyboard
LinkedIn Storyboard
 
F&g presentation general...
F&g presentation  general...F&g presentation  general...
F&g presentation general...
 
Anava dua-jalan1
Anava dua-jalan1Anava dua-jalan1
Anava dua-jalan1
 
Leary értelmezés 001
Leary értelmezés 001Leary értelmezés 001
Leary értelmezés 001
 
Paul Biya - Président du Cameroun - Mot du capitaine des Lions Indomptables l...
Paul Biya - Président du Cameroun - Mot du capitaine des Lions Indomptables l...Paul Biya - Président du Cameroun - Mot du capitaine des Lions Indomptables l...
Paul Biya - Président du Cameroun - Mot du capitaine des Lions Indomptables l...
 
Peter Green
Peter GreenPeter Green
Peter Green
 
cropped_Page 1 - Kochi - Malayalai Rich List June 4 2015
cropped_Page 1 - Kochi - Malayalai Rich List June 4 2015cropped_Page 1 - Kochi - Malayalai Rich List June 4 2015
cropped_Page 1 - Kochi - Malayalai Rich List June 4 2015
 

Similar to Unit3

Topic # 10 of outline SNA.pptx
Topic # 10 of outline SNA.pptxTopic # 10 of outline SNA.pptx
Topic # 10 of outline SNA.pptx
AyeCS11
 
Windows Operating system.pptx
Windows  Operating system.pptxWindows  Operating system.pptx
Windows Operating system.pptx
SIMNchannel
 
ICT-CONTACTSJDHJBQFFVEGVCGSVCHCHDCHDCVCKACH
ICT-CONTACTSJDHJBQFFVEGVCGSVCHCHDCHDCVCKACHICT-CONTACTSJDHJBQFFVEGVCGSVCHCHDCHDCVCKACH
ICT-CONTACTSJDHJBQFFVEGVCGSVCHCHDCHDCVCKACH
JamaicaCabrales
 
Microsoft windows operating concept
Microsoft windows operating conceptMicrosoft windows operating concept
Microsoft windows operating concept
Mi L
 
Windows enviroment
Windows enviromentWindows enviroment
Windows enviroment
MozaSaid
 
Windows
WindowsWindows
Windows
NICT
 
Operating system windows XP
Operating system windows XPOperating system windows XP
Operating system windows XP
Rohan Bhatkar
 
Window xp by nishant raghav
Window xp by nishant raghavWindow xp by nishant raghav
Window xp by nishant raghav
Nishant Raghav
 
5. window 98 and window 2000
5. window 98 and window 20005. window 98 and window 2000
5. window 98 and window 2000
ayeshasafdar8
 
Windows 2000
Windows 2000Windows 2000
Windows 2000
ihsanarn
 
Windows Operating System
Windows Operating SystemWindows Operating System
Windows Operating System
Tarun Nayak
 
Computer 2 Q3 - 2nd The Windows Desktop.pptx
Computer 2 Q3 - 2nd The Windows Desktop.pptxComputer 2 Q3 - 2nd The Windows Desktop.pptx
Computer 2 Q3 - 2nd The Windows Desktop.pptx
LiezlCaguiat1
 
ICT Skills.pptx
ICT Skills.pptxICT Skills.pptx
ICT Skills.pptx
Ankita Shirke
 
Computer applications for management
Computer applications for managementComputer applications for management
Computer applications for management
Dharshanaa.C Mohan
 
Neww
NewwNeww
os.ppt
os.pptos.ppt
os.ppt
banu236831
 
Operating system
Operating systemOperating system
Operating system
himabindukursam
 
Operating systems 2
Operating systems 2Operating systems 2
Operating systems 2mariacalji
 
ITC 3001, Personal Computer Fundamentals 1 Course Lea.docx
 ITC 3001, Personal Computer Fundamentals 1 Course Lea.docx ITC 3001, Personal Computer Fundamentals 1 Course Lea.docx
ITC 3001, Personal Computer Fundamentals 1 Course Lea.docx
MARRY7
 
What is new in Windows XP? - R.D.Sivakumar
What is new in Windows XP? - R.D.SivakumarWhat is new in Windows XP? - R.D.Sivakumar
What is new in Windows XP? - R.D.Sivakumar
Sivakumar R D .
 

Similar to Unit3 (20)

Topic # 10 of outline SNA.pptx
Topic # 10 of outline SNA.pptxTopic # 10 of outline SNA.pptx
Topic # 10 of outline SNA.pptx
 
Windows Operating system.pptx
Windows  Operating system.pptxWindows  Operating system.pptx
Windows Operating system.pptx
 
ICT-CONTACTSJDHJBQFFVEGVCGSVCHCHDCHDCVCKACH
ICT-CONTACTSJDHJBQFFVEGVCGSVCHCHDCHDCVCKACHICT-CONTACTSJDHJBQFFVEGVCGSVCHCHDCHDCVCKACH
ICT-CONTACTSJDHJBQFFVEGVCGSVCHCHDCHDCVCKACH
 
Microsoft windows operating concept
Microsoft windows operating conceptMicrosoft windows operating concept
Microsoft windows operating concept
 
Windows enviroment
Windows enviromentWindows enviroment
Windows enviroment
 
Windows
WindowsWindows
Windows
 
Operating system windows XP
Operating system windows XPOperating system windows XP
Operating system windows XP
 
Window xp by nishant raghav
Window xp by nishant raghavWindow xp by nishant raghav
Window xp by nishant raghav
 
5. window 98 and window 2000
5. window 98 and window 20005. window 98 and window 2000
5. window 98 and window 2000
 
Windows 2000
Windows 2000Windows 2000
Windows 2000
 
Windows Operating System
Windows Operating SystemWindows Operating System
Windows Operating System
 
Computer 2 Q3 - 2nd The Windows Desktop.pptx
Computer 2 Q3 - 2nd The Windows Desktop.pptxComputer 2 Q3 - 2nd The Windows Desktop.pptx
Computer 2 Q3 - 2nd The Windows Desktop.pptx
 
ICT Skills.pptx
ICT Skills.pptxICT Skills.pptx
ICT Skills.pptx
 
Computer applications for management
Computer applications for managementComputer applications for management
Computer applications for management
 
Neww
NewwNeww
Neww
 
os.ppt
os.pptos.ppt
os.ppt
 
Operating system
Operating systemOperating system
Operating system
 
Operating systems 2
Operating systems 2Operating systems 2
Operating systems 2
 
ITC 3001, Personal Computer Fundamentals 1 Course Lea.docx
 ITC 3001, Personal Computer Fundamentals 1 Course Lea.docx ITC 3001, Personal Computer Fundamentals 1 Course Lea.docx
ITC 3001, Personal Computer Fundamentals 1 Course Lea.docx
 
What is new in Windows XP? - R.D.Sivakumar
What is new in Windows XP? - R.D.SivakumarWhat is new in Windows XP? - R.D.Sivakumar
What is new in Windows XP? - R.D.Sivakumar
 

More from 13023901-016

Solar system
Solar systemSolar system
Solar system
13023901-016
 
Years months and days model presentation (semester 7)
Years months and days model presentation (semester 7)Years months and days model presentation (semester 7)
Years months and days model presentation (semester 7)
13023901-016
 
Questions (teaching of ISL) Dr. zaman UOG EDU
Questions (teaching of ISL) Dr. zaman UOG EDU Questions (teaching of ISL) Dr. zaman UOG EDU
Questions (teaching of ISL) Dr. zaman UOG EDU
13023901-016
 
Teacher education assinment
Teacher education assinmentTeacher education assinment
Teacher education assinment
13023901-016
 
The bear & something to talk about play
The bear & something to talk about play The bear & something to talk about play
The bear & something to talk about play
13023901-016
 
Happy Prince & New Constitution questions
Happy Prince & New Constitution questionsHappy Prince & New Constitution questions
Happy Prince & New Constitution questions
13023901-016
 
what is poetry & Figures of Speech (Hyperbole, Assonance, Anaphora, Allitera...
what is poetry & Figures of Speech  (Hyperbole, Assonance, Anaphora, Allitera...what is poetry & Figures of Speech  (Hyperbole, Assonance, Anaphora, Allitera...
what is poetry & Figures of Speech (Hyperbole, Assonance, Anaphora, Allitera...
13023901-016
 
Formal, non formal & in-formal education
Formal, non formal & in-formal educationFormal, non formal & in-formal education
Formal, non formal & in-formal education
13023901-016
 
Educational trends, issues & problems
Educational trends, issues & problemsEducational trends, issues & problems
Educational trends, issues & problems
13023901-016
 
Educational guidance & counseling study material for mid term b.ed. 6th (e.g....
Educational guidance & counseling study material for mid term b.ed. 6th (e.g....Educational guidance & counseling study material for mid term b.ed. 6th (e.g....
Educational guidance & counseling study material for mid term b.ed. 6th (e.g....
13023901-016
 
My tailor by Stephen Leacock
My tailor by Stephen LeacockMy tailor by Stephen Leacock
My tailor by Stephen Leacock
13023901-016
 
Teaching of social studies culture
Teaching of social studies cultureTeaching of social studies culture
Teaching of social studies culture
13023901-016
 
Concept of culture & cultural diversity
Concept of culture & cultural diversityConcept of culture & cultural diversity
Concept of culture & cultural diversity
13023901-016
 
Websites & its types 1 page
Websites & its types 1 pageWebsites & its types 1 page
Websites & its types 1 page
13023901-016
 
Website
WebsiteWebsite
Website
13023901-016
 
Website content
Website contentWebsite content
Website content
13023901-016
 
Use of co curriculam activites
Use of co curriculam activitesUse of co curriculam activites
Use of co curriculam activites
13023901-016
 
Unit4
Unit4Unit4
Unit2
Unit2Unit2
ICT 3rd Semester Unit1
ICT 3rd Semester Unit1ICT 3rd Semester Unit1
ICT 3rd Semester Unit1
13023901-016
 

More from 13023901-016 (20)

Solar system
Solar systemSolar system
Solar system
 
Years months and days model presentation (semester 7)
Years months and days model presentation (semester 7)Years months and days model presentation (semester 7)
Years months and days model presentation (semester 7)
 
Questions (teaching of ISL) Dr. zaman UOG EDU
Questions (teaching of ISL) Dr. zaman UOG EDU Questions (teaching of ISL) Dr. zaman UOG EDU
Questions (teaching of ISL) Dr. zaman UOG EDU
 
Teacher education assinment
Teacher education assinmentTeacher education assinment
Teacher education assinment
 
The bear & something to talk about play
The bear & something to talk about play The bear & something to talk about play
The bear & something to talk about play
 
Happy Prince & New Constitution questions
Happy Prince & New Constitution questionsHappy Prince & New Constitution questions
Happy Prince & New Constitution questions
 
what is poetry & Figures of Speech (Hyperbole, Assonance, Anaphora, Allitera...
what is poetry & Figures of Speech  (Hyperbole, Assonance, Anaphora, Allitera...what is poetry & Figures of Speech  (Hyperbole, Assonance, Anaphora, Allitera...
what is poetry & Figures of Speech (Hyperbole, Assonance, Anaphora, Allitera...
 
Formal, non formal & in-formal education
Formal, non formal & in-formal educationFormal, non formal & in-formal education
Formal, non formal & in-formal education
 
Educational trends, issues & problems
Educational trends, issues & problemsEducational trends, issues & problems
Educational trends, issues & problems
 
Educational guidance & counseling study material for mid term b.ed. 6th (e.g....
Educational guidance & counseling study material for mid term b.ed. 6th (e.g....Educational guidance & counseling study material for mid term b.ed. 6th (e.g....
Educational guidance & counseling study material for mid term b.ed. 6th (e.g....
 
My tailor by Stephen Leacock
My tailor by Stephen LeacockMy tailor by Stephen Leacock
My tailor by Stephen Leacock
 
Teaching of social studies culture
Teaching of social studies cultureTeaching of social studies culture
Teaching of social studies culture
 
Concept of culture & cultural diversity
Concept of culture & cultural diversityConcept of culture & cultural diversity
Concept of culture & cultural diversity
 
Websites & its types 1 page
Websites & its types 1 pageWebsites & its types 1 page
Websites & its types 1 page
 
Website
WebsiteWebsite
Website
 
Website content
Website contentWebsite content
Website content
 
Use of co curriculam activites
Use of co curriculam activitesUse of co curriculam activites
Use of co curriculam activites
 
Unit4
Unit4Unit4
Unit4
 
Unit2
Unit2Unit2
Unit2
 
ICT 3rd Semester Unit1
ICT 3rd Semester Unit1ICT 3rd Semester Unit1
ICT 3rd Semester Unit1
 

Recently uploaded

Sectors of the Indian Economy - Class 10 Study Notes pdf
Sectors of the Indian Economy - Class 10 Study Notes pdfSectors of the Indian Economy - Class 10 Study Notes pdf
Sectors of the Indian Economy - Class 10 Study Notes pdf
Vivekanand Anglo Vedic Academy
 
Home assignment II on Spectroscopy 2024 Answers.pdf
Home assignment II on Spectroscopy 2024 Answers.pdfHome assignment II on Spectroscopy 2024 Answers.pdf
Home assignment II on Spectroscopy 2024 Answers.pdf
Tamralipta Mahavidyalaya
 
Palestine last event orientationfvgnh .pptx
Palestine last event orientationfvgnh .pptxPalestine last event orientationfvgnh .pptx
Palestine last event orientationfvgnh .pptx
RaedMohamed3
 
The Roman Empire A Historical Colossus.pdf
The Roman Empire A Historical Colossus.pdfThe Roman Empire A Historical Colossus.pdf
The Roman Empire A Historical Colossus.pdf
kaushalkr1407
 
Ethnobotany and Ethnopharmacology ......
Ethnobotany and Ethnopharmacology ......Ethnobotany and Ethnopharmacology ......
Ethnobotany and Ethnopharmacology ......
Ashokrao Mane college of Pharmacy Peth-Vadgaon
 
Operation Blue Star - Saka Neela Tara
Operation Blue Star   -  Saka Neela TaraOperation Blue Star   -  Saka Neela Tara
Operation Blue Star - Saka Neela Tara
Balvir Singh
 
Unit 2- Research Aptitude (UGC NET Paper I).pdf
Unit 2- Research Aptitude (UGC NET Paper I).pdfUnit 2- Research Aptitude (UGC NET Paper I).pdf
Unit 2- Research Aptitude (UGC NET Paper I).pdf
Thiyagu K
 
Chapter 3 - Islamic Banking Products and Services.pptx
Chapter 3 - Islamic Banking Products and Services.pptxChapter 3 - Islamic Banking Products and Services.pptx
Chapter 3 - Islamic Banking Products and Services.pptx
Mohd Adib Abd Muin, Senior Lecturer at Universiti Utara Malaysia
 
aaaaaaaaaaaaaaaaaaaaaaaaaaaaaaaaaaaaaaaaa
aaaaaaaaaaaaaaaaaaaaaaaaaaaaaaaaaaaaaaaaaaaaaaaaaaaaaaaaaaaaaaaaaaaaaaaaaaaaaaaaaa
aaaaaaaaaaaaaaaaaaaaaaaaaaaaaaaaaaaaaaaaa
siemaillard
 
Template Jadual Bertugas Kelas (Boleh Edit)
Template Jadual Bertugas Kelas (Boleh Edit)Template Jadual Bertugas Kelas (Boleh Edit)
Template Jadual Bertugas Kelas (Boleh Edit)
rosedainty
 
How to Make a Field invisible in Odoo 17
How to Make a Field invisible in Odoo 17How to Make a Field invisible in Odoo 17
How to Make a Field invisible in Odoo 17
Celine George
 
CLASS 11 CBSE B.St Project AIDS TO TRADE - INSURANCE
CLASS 11 CBSE B.St Project AIDS TO TRADE - INSURANCECLASS 11 CBSE B.St Project AIDS TO TRADE - INSURANCE
CLASS 11 CBSE B.St Project AIDS TO TRADE - INSURANCE
BhavyaRajput3
 
Instructions for Submissions thorugh G- Classroom.pptx
Instructions for Submissions thorugh G- Classroom.pptxInstructions for Submissions thorugh G- Classroom.pptx
Instructions for Submissions thorugh G- Classroom.pptx
Jheel Barad
 
Language Across the Curriculm LAC B.Ed.
Language Across the  Curriculm LAC B.Ed.Language Across the  Curriculm LAC B.Ed.
Language Across the Curriculm LAC B.Ed.
Atul Kumar Singh
 
Mule 4.6 & Java 17 Upgrade | MuleSoft Mysore Meetup #46
Mule 4.6 & Java 17 Upgrade | MuleSoft Mysore Meetup #46Mule 4.6 & Java 17 Upgrade | MuleSoft Mysore Meetup #46
Mule 4.6 & Java 17 Upgrade | MuleSoft Mysore Meetup #46
MysoreMuleSoftMeetup
 
How to Split Bills in the Odoo 17 POS Module
How to Split Bills in the Odoo 17 POS ModuleHow to Split Bills in the Odoo 17 POS Module
How to Split Bills in the Odoo 17 POS Module
Celine George
 
Cambridge International AS A Level Biology Coursebook - EBook (MaryFosbery J...
Cambridge International AS  A Level Biology Coursebook - EBook (MaryFosbery J...Cambridge International AS  A Level Biology Coursebook - EBook (MaryFosbery J...
Cambridge International AS A Level Biology Coursebook - EBook (MaryFosbery J...
AzmatAli747758
 
How to Break the cycle of negative Thoughts
How to Break the cycle of negative ThoughtsHow to Break the cycle of negative Thoughts
How to Break the cycle of negative Thoughts
Col Mukteshwar Prasad
 
Synthetic Fiber Construction in lab .pptx
Synthetic Fiber Construction in lab .pptxSynthetic Fiber Construction in lab .pptx
Synthetic Fiber Construction in lab .pptx
Pavel ( NSTU)
 
Supporting (UKRI) OA monographs at Salford.pptx
Supporting (UKRI) OA monographs at Salford.pptxSupporting (UKRI) OA monographs at Salford.pptx
Supporting (UKRI) OA monographs at Salford.pptx
Jisc
 

Recently uploaded (20)

Sectors of the Indian Economy - Class 10 Study Notes pdf
Sectors of the Indian Economy - Class 10 Study Notes pdfSectors of the Indian Economy - Class 10 Study Notes pdf
Sectors of the Indian Economy - Class 10 Study Notes pdf
 
Home assignment II on Spectroscopy 2024 Answers.pdf
Home assignment II on Spectroscopy 2024 Answers.pdfHome assignment II on Spectroscopy 2024 Answers.pdf
Home assignment II on Spectroscopy 2024 Answers.pdf
 
Palestine last event orientationfvgnh .pptx
Palestine last event orientationfvgnh .pptxPalestine last event orientationfvgnh .pptx
Palestine last event orientationfvgnh .pptx
 
The Roman Empire A Historical Colossus.pdf
The Roman Empire A Historical Colossus.pdfThe Roman Empire A Historical Colossus.pdf
The Roman Empire A Historical Colossus.pdf
 
Ethnobotany and Ethnopharmacology ......
Ethnobotany and Ethnopharmacology ......Ethnobotany and Ethnopharmacology ......
Ethnobotany and Ethnopharmacology ......
 
Operation Blue Star - Saka Neela Tara
Operation Blue Star   -  Saka Neela TaraOperation Blue Star   -  Saka Neela Tara
Operation Blue Star - Saka Neela Tara
 
Unit 2- Research Aptitude (UGC NET Paper I).pdf
Unit 2- Research Aptitude (UGC NET Paper I).pdfUnit 2- Research Aptitude (UGC NET Paper I).pdf
Unit 2- Research Aptitude (UGC NET Paper I).pdf
 
Chapter 3 - Islamic Banking Products and Services.pptx
Chapter 3 - Islamic Banking Products and Services.pptxChapter 3 - Islamic Banking Products and Services.pptx
Chapter 3 - Islamic Banking Products and Services.pptx
 
aaaaaaaaaaaaaaaaaaaaaaaaaaaaaaaaaaaaaaaaa
aaaaaaaaaaaaaaaaaaaaaaaaaaaaaaaaaaaaaaaaaaaaaaaaaaaaaaaaaaaaaaaaaaaaaaaaaaaaaaaaaa
aaaaaaaaaaaaaaaaaaaaaaaaaaaaaaaaaaaaaaaaa
 
Template Jadual Bertugas Kelas (Boleh Edit)
Template Jadual Bertugas Kelas (Boleh Edit)Template Jadual Bertugas Kelas (Boleh Edit)
Template Jadual Bertugas Kelas (Boleh Edit)
 
How to Make a Field invisible in Odoo 17
How to Make a Field invisible in Odoo 17How to Make a Field invisible in Odoo 17
How to Make a Field invisible in Odoo 17
 
CLASS 11 CBSE B.St Project AIDS TO TRADE - INSURANCE
CLASS 11 CBSE B.St Project AIDS TO TRADE - INSURANCECLASS 11 CBSE B.St Project AIDS TO TRADE - INSURANCE
CLASS 11 CBSE B.St Project AIDS TO TRADE - INSURANCE
 
Instructions for Submissions thorugh G- Classroom.pptx
Instructions for Submissions thorugh G- Classroom.pptxInstructions for Submissions thorugh G- Classroom.pptx
Instructions for Submissions thorugh G- Classroom.pptx
 
Language Across the Curriculm LAC B.Ed.
Language Across the  Curriculm LAC B.Ed.Language Across the  Curriculm LAC B.Ed.
Language Across the Curriculm LAC B.Ed.
 
Mule 4.6 & Java 17 Upgrade | MuleSoft Mysore Meetup #46
Mule 4.6 & Java 17 Upgrade | MuleSoft Mysore Meetup #46Mule 4.6 & Java 17 Upgrade | MuleSoft Mysore Meetup #46
Mule 4.6 & Java 17 Upgrade | MuleSoft Mysore Meetup #46
 
How to Split Bills in the Odoo 17 POS Module
How to Split Bills in the Odoo 17 POS ModuleHow to Split Bills in the Odoo 17 POS Module
How to Split Bills in the Odoo 17 POS Module
 
Cambridge International AS A Level Biology Coursebook - EBook (MaryFosbery J...
Cambridge International AS  A Level Biology Coursebook - EBook (MaryFosbery J...Cambridge International AS  A Level Biology Coursebook - EBook (MaryFosbery J...
Cambridge International AS A Level Biology Coursebook - EBook (MaryFosbery J...
 
How to Break the cycle of negative Thoughts
How to Break the cycle of negative ThoughtsHow to Break the cycle of negative Thoughts
How to Break the cycle of negative Thoughts
 
Synthetic Fiber Construction in lab .pptx
Synthetic Fiber Construction in lab .pptxSynthetic Fiber Construction in lab .pptx
Synthetic Fiber Construction in lab .pptx
 
Supporting (UKRI) OA monographs at Salford.pptx
Supporting (UKRI) OA monographs at Salford.pptxSupporting (UKRI) OA monographs at Salford.pptx
Supporting (UKRI) OA monographs at Salford.pptx
 

Unit3

  • 1. Unit 03: Interfacing with Computer and Internet Computer Literacy 23 A Handling Operating System: Introduction: A Microsoft window is the most widely used graphical user use interface operating system for personal computers. Windows uses graphics to make the program easier to use and sometimes called GUI (Graphical User Interface). All windows operating system support the use of mouse, icons and menus. We can open several applications at the same time and easily move data from one application to another. Windows XP: Windows XP is developed by Microsoft. It was released in 2001. XP stands for Experience. It is more powerful than previous version of Windows. Its new interface makes XP home, XP Professional and XP Media Center. Windows XP Professional has all the features of XP home and many more. It is often used in business environments and by home users with greater computing needs. The Media Center is built on XP Professional. Features of Windows XP: Some important features of Windows XP are as follows: 1. New User Interface: Windows XP provides a new user interface with different visual style. Windows XP desktop and taskbar are more attractive and easier to use. Windows layout has also been changed for windows XP. The design of Stat menu is also changed. 2. Easier To Use: Windows XP provides an easier way to work with files and folders. It saves all files in My Documents folder on Desktop by default. It also manages a list of recently used files by Quick access later. 3. Easier To Manage: Windows XP is easier to manage for user and network administrator. It can install and repair some programs automatically. The user can also add and remove programs easily. 4. Clean Desktop Wizard: Clean Desktop wizard is an important feature of Windows XP. By default, the Desktop clean Wizard runs every sixty days. It clean up desktop by moving unused desktop shortcuts to a folder called Unused Desktop Shortcuts. 5. Multi-User: Windows XP is a multi user operating System. It means that many users can use the computer and utilities multiple processors in a computer. These can be connected to a computer over the internet. 6. Multi Processing: Windows ZP supports multiple processing. Multi-processing is the capability to support and utilize multiple processors in a computer. Two or more processors can execute different programs at the same time. It increases the output of the computer. 7. Plug and Play: Plug and play is the capability to detect and configure a device and install appropriate device drive. Windows XP has the feature of plug and play. It contains a large number of device drivers. When a new hardware device is attached to computer, it detects the device and installs its driver if it is available. 8. Digital Media: Windows XP provides many features to enjoy and share digital music, movies and pictures. Windows Media Player is used to listen to music, watch movies etc. Windows XP also makes it easier to manage and enjoy digital pictures. My Pictures folder provides an easier way to organize photos. The user can view the pictures in
  • 2. Unit 03: Interfacing with Computer and Internet Computer Literacy 24 My Pictures folder in several Movie Maker can be used to create and edit home movies. 9. System Restore: System Restore feature of Windows XP is used to restore operating system in case of any problem. The operating system is restored to a previous state without any loss of data. 10. Remote Assistance: Remote Assistance feature allows a friend at a different location to connect to your computer and view its screen. Both persons can chat in real time to discuss any problem. One user can allow other person to use his mouse and keyboard to fix the problem of computer. 11. User Accounts and Fast User Switching: Microsoft Windows XP provides multi-user access to single computer. Multiple users can share a computer and switch between user sessions without closing the programs. 12. Browsing the Internet: Windows XP provides improved facilities for browsing the Internet. It offers better security and privacy when browsing the Internet. It also provides new features for MSN and windows Messenger users. File Management: 1. Computer Storage: Computer data storage, often called storage or memory, refers to computer components, devices, and recording media that retain digital data used for computing for some interval of time. Computer data storage provides one of the core functions of the modern computer, that of information retention. It is one of the fundamental components of all modern computers, and coupled with a central processing unit (CPU, a processor), implements the basic computer model. 2. Windows Explorer: Windows explorer acts as a file manager in windows operating system, it is used to mange files and folder on computer. Files and folders are the basic file management units in windows. Many actions can be performed files and folders using windows explorer. It can be used to cut, copy, paste, rename or delete a file or folder. It shows files and folder in a hierarchical way. It contains two panes: 1. Left Pane: It displays folders and drives on the computer in a tree view shape. The left Pane allows you to see all of the variable drives and folders on your computer including those parts of the network to which you have access. 2. Right Pane: It shows the detailed view of the folder or drive selected in the left pane. 3. Creating a New Folder: 1. Open My Computer or Windows Explorer. 2. Open the drive or directory where you want to create a folder. 3. Select File>New>Folder. 4. Type in a name for the folder. 5. Press the Enter key. 4. Renaming a File or Folder: 1. Click on the file or folder to rename. 2. Click again on the file or folder name. 3. Type in a new name for the file or folder 4. Press the Enter key OR 1. Right-click the file or folder’s icon. 2. Select Rename.
  • 3. Unit 03: Interfacing with Computer and Internet Computer Literacy 25 3. Type in a new name for the file or folder. 4. Press the Enter key. 5. Creating Sub-Folders: 1. Open the folder or directory where you want to create a sub folder. 2. Select File>New>Folder. 3. Type in a name for the folder. 4. Press the Enter key. 6. Expanding Folders and Sub-Folders: 1. Open the folder or directory where you want to create a sub folder. 2. Select File>New>Folder. 3. Type in a name for the folder. 4. Press the Enter key 7. Coping Files and Folders: 1. Select the file or folder to be copied in Window Explorer. 2. Click Edit > Copy OR right click on the files or folder and select Copy command 3. Go to the folder where you want to paste it. 4. Click Edit > Paste. OR Right click and select Paste command. 8. Copying File using Drag and Drop 1. Highlight the file you wish to copy. 2. Press CTRL key. 3. Drag the file from one location to another. 9. Moving Files and Folders 1. Select the file or folder to be moved in Windows Explorer. 2. Select Edit > Cut. OR Right click on the file or folder and select Cut. 3. Go to the folder where you want to move it. 4. Select Edit >Paste. OR Right click and select Paste. 10. Moving Files using Drag and Drop 1. Highlight the file to copy and press Shift key. 2. Drag the file form one location to another. Troubleshooting: Trapshooting is a form of problem solving most often applied to repair of failed products or processes. It is a logical, systematic search for the source of a problem so that it can be solved, and so the product or process can be made operational again. Troubleshooting is needed to develop and maintain complex systems where the symptoms of a problem can have many possible causes. 1. Checking the of Configuration Our PC: First, go to Start>All Programs>Accessories>System Tools>System Information Under the System Summary Tag you will find: 1. Next, under Components, click on the “+” to expand the listing, then click on “USB”. 2. Next go to Conflicts/Sharing under Hardware Resources. Although this is no prefect way to determine your type of video slot/card (AGP or PCI-e), this is probably the best method. 2. Modifying Desktop Settings: The windows operation system provides a variety options to customize graphical interface. The options include color, font size, display resolution, icons and taskbar options etc. the Display Properties dialog box is used to customize their properties.
  • 4. Unit 03: Interfacing with Computer and Internet Computer Literacy 26 The Display propertied dialog box has five tabs: 1. Desktop Theme: A desktop theme affects the appearance of desktop. It includes desktop background, screen saver, window appearance, pointers and sounds. The user can choose between the Windows XP theme and windows Classic theme. By default, Windows XP theme is applied. 2. Wallpaper: Wallpaper is the background image that appears on desktop. Windows XP provides many wallpaper options. The desktop background can be customized with a picture, texture or color. The user can choose from window XP background or use different images. 3. Screen Saver: A screen saver is a moving image that appears on screen if the computer is not used for specified period of time. It saves screen from possible damage called burn-in. the damages may occur if screen displays a static image for a long time. The screen saver displays a moving images to prevent this damage. 4. Appearance: The Appearance tab of Display Properties dialog box is used to change color, size and fonts of windows interface. Desktop color and icon fonts can be changed using this option. It provides difference color schemes. 5. Screen Setting: The user can increase screen resolution to view more information at one time. Higher resolution displays everything smaller including windows, stat menu and icons etc. it increases space on desktop. 6. Changing Desktop Theme: 1. Right click on desktop. A popup menu will appear. 2. Select properties. The Display Properties dialog box will appear. 3. Select a theme from Theme drop- down menu. The selected theme will be applied. 4. Click Ok OR 1. Click Start > Control panel > Appearance and Themes, 2. Click Change the computer’s theme in Pick a Task are of click Display in or Pick a Control Panel icon area. The Display properties dialog box will appear. 3. Select a theme from Theme drop-down menu. 4. Click OK. The selected theme will be applied. 7. Changing Desktop Background: 1. Right click on desktop. A pop-up menu will appear 2. Select Properties. The Display properties dialog box will appear. 3. Click Desktop tab. 4. Select a background from background list. 5. Select how image should appear on screen. Choose from the following a. Center: place the image in the center of the screen b. Tile: Have the image display as tiles across and down the screen. c. Stretch: Stretch the image so the image covers the entire screen. 6. Use the drop down boxes to alter wallpaper color. 7. Click OK. The selected background will be applied. OR 1. Click Start > Control Panel > Appearance and themes.
  • 5. Unit 03: Interfacing with Computer and Internet Computer Literacy 27 2. Click Change the desktop background in Pick a Task area. The Display Properties dialog box open with Desktop tab selected. 3. Click or use the arrow keys to view background from Background list. 4. Use drop down boxes to alter wallpaper Position or Color. 5. Click OK. The selected background will be applied. 8. Applying your own image to Desktop Background: 1. Click Start > My Pictures. 2. Select the picture from My Pictures folder to apply as desktop background. 3. Click Set as Desktop background link in a task panel. 9. Apply Screen Saver: 1. Right click on desktop. A pop-up menu will appear. 2. Click on Screen saver tabs. 3. Select desire screen saver from Screen Saver drop-down menu. 4. Click on Setting to set display option associated with screen saver. 5. Check the on resume, password protect box. 6. Set the number of minutes of inactivity before the screen saver starts in Wait box. 7. Click Preview button to preview the screen saver. 8. Click Ok. The screen saver will be applied. OR 1. Click Start > Control Panel > Appearances and themes. 2. Click; choose a screen saver in the Pick a Task area. A Display properties dialog box will appear with the Screen Saver tab Selected. 3. Repeat the above steps from 4 to 9. 10. Changing Window Appearances: 1. Right click on desktop. A pop-up menu will appear. 2. Click on Properties. A Display Properties dialog box will appear. 3. Click on appearance tab. 4. Select the color form Color Scheme drop-down menu. 5. Select the font size form the font size drop-down menu. 6. Click OK. 11. Displaying folder on the Desktop: 1. Right click on desktop. A pop-up menu will appear. 2. Select properties. The display properties dialog box will appear. 3. Click Desktop tab. 4. Click Customize Desktop button. 5. Check the icons to be displayed on desktop in Desktop icons area. 6. Click OK. 7. Click OK to close Display Properties dialog box. 12. Changing Desktop Icons: 1. Right click on desktop. A pop-up menu will appear. 2. Click on Properties. A display properties dialog box will appear. 3. Click on Desktop tab. 4. Click Customize Desktop button. A Desktop items dialog box opens. 5. Select the icon to change. 6. Click change icon button. 7. Select an icon from the list. 8. Click OK. 9. Click OK to close Desktop Items dialog box. 10. Click Ok to close Display Properties dialog box.
  • 6. Unit 03: Interfacing with Computer and Internet Computer Literacy 28 Getting Help: The help of windows XP can be used to solve some of the questions regarding the use of a Windows XP component or tool. Windows help consists of different pages that are similar in navigation as the pages on a web site. The user can search information about a particular theme from keywords and key phrases. The main part of window help is called help center and technical support. Opening Help and Support Center: The following procedure is used to access the Help and Support Center: Click; Start → Help and Support. The Help and Support Center window opens. The home section is displayed. The home section is displayed when the user opens Help and Support Center for the first time. The user can pick a help topic, pick a task, search and ask for outside assistance. The Home section looks and acts much like a web page. Some Help files are stored on computer and others are stored on the Internet. 1. The Index: The Index option provides a fast and easy way to locate topics and resources.  Open the Help and Support Center.  Click Index button. The Index opens. The entire index appears in alphabetical order in the left pane.  Type and keyword.  Double click a topic to explore in the left pane. Information about the topic displays in the right pane or a Topics Found dialog box appears.  Click Display or Cancel if a Topics Found dialog box appears. Information about the topic displays in the right pane if the user clicks Display.  Click Cancel to close the dialog box and begin in a new search. 2. Favorites and History: The Favorites option works much like Favorites in Internet Explore. The user can add any search page here to visit it again easily by clicking Add to Favorites button. The user can review Help Favorites by opening Help and Support Center and clicking the Favorites button. The History option keeps track of all of Help and Support Center pages visited on the Internet. The user can click History button to review the visited pages. 3. Support: The Support option is used to solve a problem that cannot be solved by the user. The user can access support by clicking the support button. The user can get support as follows:  Ask a friend to help: The user can invite any friend to chat, view desktop and work on computer by using Internet connection.  Get help from Microsoft: The user can also allow Microsoft support professional to answer questions via email, chat, view screen, or work on computer.  Go to a Windows Web site forum: Windows Newsgroups are online resources to communicate with other windows users about any problems. 4. Help’s Search Function: Searching for help topics is the fastest and most useful way to use the Help and Support Center. The following procedure is used to use the search function:  Open Help and Support Center.  Type and keyword in Search box.  Click the green arrow key. The search result will appear in the left pane.
  • 7. Unit 03: Interfacing with Computer and Internet Computer Literacy 29  Click to select the desired result. The explanation will display in the right pane. Recovering Files from the Recycle Bin: Restoring a file from Recycle Bin: The process of bringing back the deleted file from Recycle Bin to its original location is called restoring recycle Bin. 1. Restoring All Items:  Double click on Recycle bin icon. A Recycle Bin window will appear.  Click Restore All Items lick in Recycle Bin Tasks list. The items are restored to their original location. 2. Restoring One File:  Double Click Recycle Bin on Desktop. A Recycle Bin window will appear.  Select the items to be restored.  Click restore this item link in recycle bin tasks area. The item is restored to its original location. Working with Windows Defender: Windows Defender is software that helps protect your computer against pop-ups, slow performance, and security threats caused by spyware and other unwanted software by detecting and removing known spyware from your computer. Windows Defender features Real-Time Protection, a monitoring system that recommends actions against spyware when it's detected, minimizes interruptions, and helps you stay productive. The benefits of installing Windows Defender include: 1. Spyware Detection and Removal:  Windows Defender quickly and easily finds spyware and other unwanted programs that can slow down your computer, display annoying pop-up ads, change Internet settings, or use your private information without your consent.  Windows Defender eliminates detected spyware easily at your direction, and if you inadvertently remove programs that you actually want, it's easy to get them back.  Windows Defender allows you to schedule your scanning and removal times when it's convenient for you, whether it's on-demand or on a schedule that you set. 2. Improved Internet Browsing Safety:  Windows Defender helps stop spyware before it infiltrates your computer. Windows Defender also offers a continuous safeguard designed to target all the ways that spyware can infiltrate your computer.  Windows Defender works without distracting you. It runs in the background and automatically handles spyware based on preferences that you set. You can use your computer with minimal interruption. 3. Protection against the latest threats  A dedicated team of Microsoft researchers continuously searches the Internet to discover new spyware and develop methods to counteract it.  A voluntary, worldwide network of Windows Defender users helps Microsoft determine which suspicious programs to classify as spyware. Participants help discover new threats quickly and notify Microsoft analysts, so that everyone is better protected. Anyone who uses Windows Defender can join this network and help report potential spyware to Microsoft.  To help protect your computer from the latest threats, you can choose to have updates that counteract new spyware automatically downloaded to your computer. Firewall:
  • 8. Unit 03: Interfacing with Computer and Internet Computer Literacy 30 A firewall is a part of a computer system or network that is designed to block unauthorized access while permitting authorized communications. It is a device or set of devices configured to permit, deny, encrypt, decrypt, or proxy all (in and out) computer traffic between different security domains based upon a set of rules and other criteria. Firewalls can be implemented in either hardware or software, or a combination of both. Firewalls are frequently used to prevent unauthorized Internet users from accessing private networks connected to the Internet, especially intranets. All messages entering or leaving the intranet pass through the firewall, which examines each message and blocks those that do not meet the specified security criteria. There are several types of firewall techniques: 1. Packet filter: Packet filtering inspects each packet passing through the network and accepts or rejects it based on user-defined rules. Although difficult to configure, it is fairly effective and mostly transparent to its users. In addition, it is susceptible to IP spoofing. 2. Application gateway: Applies security mechanisms to specific applications, such as FTP and Telnet servers. This is very effective, but can impose a performance degradation. 3. Circuit-level gateway: Applies security mechanisms when a TCP or UDP connection is established. Once the connection has been made, packets can flow between the hosts without further checking. 4. Proxy server: Intercepts all messages entering and leaving the network. The proxy server effectively hides the true network addresses. System Restore and Back Up: One of the greatest utilities in newer versions of Windows (Windows 2000 and Windows XP) is that of system restore. This is a backup system built into your computer that will allow you to restore your computer to a previous state in the case that something happens to your computer making it inoperable or greatly limiting your computing abilities. If you are infected with a computer virus or have other problems with your system, using system restore to revert to a backup setting for your computer can greatly assist you in restoring your computer to normal in the event of damage to your system. Operating systems which allow for system restore will usually automatically save settings periodically to ensure that you always have a working system in backup, and will also allow you to backup your settings yourself if you feel that you: 1. Creating different Restore Points: To use System Restore to restore Windows XP to a previous state, follow these steps: 1. Log on to Windows as Administrator. 2. Click Start, point to All Programs, point to Accessories, point to System Tools, and then click System Restore. System Restore starts. 3. On the Welcome to System Restore page, click Restore my computer to an earlier time (if it is not already selected), and then click Next. 4. On the Select a Restore Point page, click the most recent system restore point in the On this list, click a restore point list, and then click Next. Note A System Restore message may appear that lists configuration changes that System Restore will make. Click OK. 5. On the Confirm Restore Point Selection page, click Next. System Restore restores the previous Windows XP configuration, and then restarts the computer.
  • 9. Unit 03: Interfacing with Computer and Internet Computer Literacy 31 6. Log on to the computer as Administrator. The System Restore Restoration Complete page is displayed. 7. Click OK. 2. How to undo a system restoration after you perform a System Restore: You may have unintentionally restored Windows XP to a previous configuration that you do not want. To undo the restoration, follow these steps: 1. Log on to Windows as Administrator. 2. Click Start, point to All Programs, point to Accessories, point to System Tools, and then click System Restore. System Restore starts. 3. On the Welcome to System Restore page, click Undo my last restoration, and then click Next. Note A System Restore message may appear that lists configuration changes that System Restore will make. Click OK. 4. On the Confirm Restoration Undo page, click Next. System Restore restores the original Windows XP configuration, and then restarts the computer. 5. Log on to the computer as Administrator. The System Restore Undo Complete page appears. 6. Click OK. You can now run System Restore again from a different restore point. 3. Covering to Some Restore Points Windows XP includes its own backup program, although you may need to do some digging to find it. If you use Windows XP Professional, the Windows Backup utility (Ntbackup.exe) should be ready for use. If you use Windows XP Home Edition, you'll need to follow these steps to install the utility: 1. Insert your Windows XP CD into the drive and, if necessary, double-click the CD icon in My Computer. 2. On the Welcome to Microsoft Windows XP screen, click Perform Additional Tasks 3. Click Browse this CD. 4. In Windows Explorer, double-click the Value Add folder, then Msft, and then Ntbackup. 5. Double-click Ntbackup.msi to install the Backup utility. By default, the Backup utility uses a wizard that makes the process straightforward. To start Backup: 1. Click Start, point to All Programs, point to Accessories, point to System Tools, and then click Backup to start the wizard. 2. Click Next to skip past the opening page, choose Back up files and settings from the second page, and then click Next. 3. Now choose the location of the data, which you want to take backup 4. Now after taking the backup click on finish. Using Desktop: The Windows Desktop: The on-screen work area that contains windows, icons, menus and dialog boxes is called Desktop. The Desktop is the entering point in windows. Desktop is the first object that appears when windows is started the user can also changed the look of the desktop. Element of Desktop: Different elements of Desktop are as follows. 1. Icon: An icon is a small graphic that represent a program, drive, folder or document windows operating system used icons frequently to make the environment user-
  • 10. Unit 03: Interfacing with Computer and Internet Computer Literacy 32 friendly. Some important icon that appears on Desktop is My Computer, My Documents, and Recycle etc. 2. Taskbar: The Taskbar appears at the bottom of desktop. It includes start button and a button for each open application. It also includes Quick Launch icons and notification area. By default the taskbar is always displayed on top of any opened windows. 3. Start Button: Start button is used to access most of the Programs installed on the Computer. It is used to perform the following tasks easily:  Open or search a document  Change Windows settings  Manage Files  Getting Help  Maintain System etc Icons on Desktop: Following are the important icons that appear on Desktop 1. My Documents: My Document is as folder that is automatically created by Windows during installation. It is used for saving documents; many application programs like MS word use this folder as default location for storing files The following procedure is used to open My Documents folder.  Click Start > My Documents 2. My Computer: My Computer icon is a graphical representation of everything on the computer. It is displayed on Desktop. It is used to view difference resources of computer. The user can double-click my Computer icon to view these resources. The resources include the drives, files and folders etc. My computer also contains Control Panel option. The control panel provides different tools to configure the computer Locating a File Using My Computer:  Double c-click the My Computer icon on Desktop.  Double Click a drive icon.  Scroll through the list of folders (if necessary), and double click a folder.  Repeat Step for any subfolder if necessary.  Double-Click the file too open it. 3. My Network Places: My Network Places is a folder on the Desktop. It contains icons that represent all the computer System Connected via a network. It is used to access the computers and printers that are connected to the network. It is also used to access the shared devices and folder in the network. The user can connect and disconnect form the My Network Places using My Network places. The following procedure is used to open My Network Places folder.  Click Start> My Network Places. 4. Recycle Bin: Recycle Bin is a temporary storage area. It appears on Desktop. It is used to keep deleted files. When a file or folder is deleting, it is not removed from the disk permanently. Windows moves it to Recycle Bin. The files remain there until the user recovers them or deletes them permanently. Recycle Bin can be helpful to recover a file that is detected accidentally.
  • 11. Unit 03: Interfacing with Computer and Internet Computer Literacy 33 Deleting a Files or Folder from Desktop: The following procedure is used to delete a file of folder from Desktop:  Click and hold down the left mouse button on the desired file or folder  Drag the icon into the Recycle Bin icon. The files are now in the recycle bin and will remain the recycle bin until the recycle bin is empty. OR  Right click the file or folder to be deleted. A pop-up menu will appear.  Choose Delete. A dialog Box will appear.  Click yes. Empty Recycle Bin: Empty Recycle Bin is a process of removing the contents of Recycle Bin. The file or folder is removed from the disk permanently when the user deletes it from Recycle Bin. The files or folder deleted from Recycle Bin cannot be restored later. Windows automatically removes older files from Recycle Bin if its size becomes full. The following procedure is used to empty recycle bin: Double-click Click the left mouse button on the Recycle Bin icon. A Recycle bin windows appear. Select the Empty Recycle Bin option from File menu OR click Empty the Recycle Bin link in Recycle Bin Tasks area. All items will be deleted permanently. OR  Right Click Recycle Bin on Desktop. A pop-up menu will appear.  Select Empty Recycle Bin. All items will be deleted permanently. The Start Menu: The Start menu appears when start button on Taskbar is activated. All programs in the computer are accessible from start menu. The start menu has been redesigned in Windows XP. It is divided into two panes. The left pane displays the most recently used program. The right pane contains useful icons to access files, configure computer and find information and assistance. It also displays the name of the use that is logged onto the computer. The classic start menu contains only a single pane. Common Option on Start Menu: The following options appear on start menu: 1. Most Frequently Used Programs: The most frequently used programs are automatically displayed at the beginning of start menu. Only five programs are displayed when windows XP is used for the first time. The start menu displays up to sic frequently used programs by default. The following procedure is used to access the most frequently used programs.  Click start button.  Select the program to open. 2. Internet and Email: By default, Internet and email programs are displayed above the most frequently used programs. Internet Explorer is built - in web browser. It provides an interface to access the internet. E- Mail option starts the default email application such an Outlook Express. A separator line divides the two sections. The top section above the most frequently used programs is known as pinned items list. The pinned items list does not change like the most frequently used programs. The following procedure is used to access internet and email programs:  Click the start button.  Select the Internet or E – mail program you want to open.
  • 12. Unit 03: Interfacing with Computer and Internet Computer Literacy 34 3. All Programs: The All Programs in start menu displays a list of programs installed on computer. The following procedure is used to access all programs:  Click Start > All Programs.  Select the program to open. 4. My Recent Documents: The My Recent Document folder on start menu gives quick access to most recently opened documents. It displays the document sub – menu. The submenu displays a list of files that are used recently. The following procedure is used to open My Recent Documents folder:  Click start > My Recent documents. Most recently used documents will appear. 5. My Documents: My documents folder stores all files. Many application programs like MS Word use this folder as default location for storing files. The following procedure is used to open My Documents folder:  Click start > My Documents. 6. My Pictures: My Pictures folder provides a convenient way to organize photos. The user can view pictures in My Pictures folder in several ways. The filmstrip and thumbnail views show pictures without opening them. My picture folder also contains sample pictures. By default, it is located in My Document folder. The following procedure is used to open My Pictures.  Click Start > My Pictures. 7. My Music: Windows XP stores music in My Music folder by default. It contains some sample music. By default, My Music folder is located in My Documents folder. The following procedure is used to open My Music folder:  Click start > My Music. 8. My Computer: My Computer is used to view different resources of computer. The resources include drives, files and folders etc. It also contains Control Panel option that provides different tools to configure computer. The following procedure is used to open My Computer:  Click start > My computer. 9. Control Panel: The control panel provides different tools to configure the computer. It determines the appearance of desktop and controls the performance of hardware. The following procedure is used to open the Control Panel:  Click start > Control Panel. 10. Printers and Faxes: Printers and Faxes are used to connect, create or manage printer and fax resources. The following procedure is used to open the Printers and Faxes:  Click start > Printers and Faxes. 11. Help and Support: It is used to access Windows XP Help and Support resources. It provides description of different concepts and commands of windows operating system. It provides different methods to search help topic. The following procedure is used to open Help and Support:  Click start > Help and Support OR Press F1 on Desktop.
  • 13. Unit 03: Interfacing with Computer and Internet Computer Literacy 35 12. Search: Search Companion makes it easy to search files and folders, printers, people and others computers on network. It also has and indexing service to maintain and index of all the files on computer for faster searches. The user can specify several search criteria using search companion. The following procedure is used to use the Search:  Click start > Search to open Search companion.  Choose the type of search.  Type search criteria in the boxes. The search criteria changes depending on type of search.  Click Search to start the search  When the search completes, the user can refine the search or click Yes, Finished searching to close the search panel. 13. Run: The Run command is used to run a program or open folders and document etc. It opens a Run dialog box. The user types the name or path of a program in Run dialog box to start the program. The following procedure is used to open Run dialog box:  Click start > Run. The Run dialog box will appear.  Type the name of the program, folder, document or website to open.  Click OK. 14. Log off: Log off option does not shut down the computer. It closes all open programs. The following procedure is used to close all programs and log off:  Click start > Log Off. Log Off dialog box will open.  Click Log Off. 15. Switching Between Users: A Computer can be used by more than one person. Windows XP allows everyone to create separate computer accounts. When the user switches between user accounts, all programs keep running and the computer switches to another user account. The following procedure is used to switch between users:  Click Start > Log Off. Log Off dialog box will open.  Click Switch user. 16. Restarting Computer: The process of starting a computer again without turning the power off is called restarting computer. The following procedure is used to restart the computer:  Click start > Turn Off Computer. The Turn off Computer dialog box will open.  Click Restart. 17. Properly Shutting Down the Computer: Turn Off Computer is used to close all files and shuts down the computer. It is very important to use this option to shut down the operating system before turning off the power. The following procedure is used to shut down the computer:  Click start > Turn Off. Turn Off dialog box will open.  Click Turn off. Stand by Computers: The following in standby mode consume less electricity but it is ready for immediate use. The following procedure is used to put the computer in standby mode.  Click Start > Turn Off Computers. The Turn Off Computers dialog box will open.  Click Stand By.
  • 14. Unit 03: Interfacing with Computer and Internet Computer Literacy 36 Introduction to the Control Panel: You don't have to be a computer genius to use Windows XP, but if you know something about how to set up some basic features and functions, it will do a lot more for you. Windows XP makes this easier than ever with the Control Panel. The Control Panel features a number of tools that will help you control how Windows XP features look and act. But first you must learn how to access the Control Panel. To access the Control Panel:  Click Start.  Click Control Panel.  The Control Panel opens. OR  Type Control Panel in the Address dialog box found on any Windows XP window. OR  Many folders feature a link to the Control Panel in the See Also dialog box (only in XP view). No matter how you get to the Control Panel. Navigate the Control Panel: If you're used to a previous version of Windows, you'll notice that the Control Panel in Windows XP looks very different. The Windows XP Control Panel is divided into Categories. If you click a Category, the window presents a List of Tasks and related Control Panel icons. Note: Task and Control Panel icons perform basically the same functions. For example, notice that you can "Choose a screen saver" in the Pick a Task list. Clicking this link opens the Display Properties dialog box. However, if you were to choose the Display icon, the Display Properties dialog box opens. If you look at the left side of the window, you'll notice that they See Also and Troubleshooters dialog boxes provides several more related options. The new Control Panel design provides multiple ways to do something, thereby making it more user-friendly. However, the new Control Panel design doesn't provide you with access to every available Control Panel tool - it only provides you access to the most commonly used tools. To access ALL of your Control Panel tools, you must switch to Classic View. To switch to Classic View:  Click the Classic View link on the left side of your Control Panel.  Click the Switch to Category View link to switch back. Use the menu bar and toolbar buttons to navigate and further explore Control Panel options. 1. Set the Time and Date In the following pages, we'll explain how to perform some common Control Panel tools. To change the time and date: 1. Open the Control Panel (located in Start menu). 2. Under Pick a Category, click Date, Time, Language, and Regional Options. 3. Under Pick a Task, click Change the date and time. 4. The Date and Time Properties dialog box opens. 5. Use the drop down box to set the month and year. 6. Click the correct date on the calendar. 7. Click and select the current time to make a change.
  • 15. Unit 03: Interfacing with Computer and Internet Computer Literacy 37 8. If necessary, click the Time Zone tab and use the drop down box to change the time zone. 9. Click OK to close the dialog box. OR 1. Right-click the time in the lower right on your desktop. 2. Choose Adjust Date/Time. 3. The Date and Time Properties dialog box opens. 4. Follow above steps 5-9. 2. Changing the Wallpaper: Wallpaper is the background image that appears on your desktop. Windows XP offers many wallpaper choices. To change the wallpaper: 1. Open the Control Panel (located in Start menu). 2. Under Pick a Category, click Appearance and Themes. 3. Under Pick a Task, click Change the desktop background. 4. The Display Properties dialog box opens with the Desktop tab selected. 5. In the Background box, click or use the arrow keys to view the choices. 6. Use the drop down boxes to alter wallpaper position or color. 7. Click OK to close the dialog box. Advanced Users:  Click Browse to choose a picture from the My Pictures folder (or navigate to a picture located in another folder.)  Click the Customize Desktop button to alter your desktop icons or display a web page on your desktop. 3. Changing the Screensaver In the early days of computing, screen savers helped prevent images from being burned into the monitor. Now, screen savers entertain us, provide some privacy, and enhance or work or home environment. Windows XP comes with several screen savers. To change the screensaver:  Open the Control Panel (located in Start menu).  Under Pick a Category, click Appearance and Themes.  Under Pick a Task, click Choose a screen saver.  The Display Properties dialog box opens with the Screen Saver tab selected.  Click the arrow to open a drop down box. Click or use the arrow keys to view the choices. Or, click Preview to view each option on your computer screen. Press any key on your keyboard to return to the dialog box.  Click Settings to customize the appearance or your chosen screen saver. (A dialog box will notify you if your choice doesn’t have any options.  In the Wait box, determine how many minutes should pass before your screen saver turns on.  Click OK to close the dialog box. 4. Customizing the Taskbar: You already know about the Taskbar, but did you know you can customize its appearance? To customize the Start menu:  Open the Control Panel (located in Start menu).  Under Pick a Category, click Appearance and Themes.  Under Pick a Control Panel icon, click Taskbar and Start Menu.
  • 16. Unit 03: Interfacing with Computer and Internet Computer Literacy 38  The Taskbar and Start Menu Properties dialog box opens with the Taskbar tab displayed.  Use the checkboxes to customize its appearance and click OK. Click the Start Menu tab to switch between the XP Start menu and Classic Start menu. Classic Start menu is the Start menu featured in older versions of Windows. Challenge!  If necessary, adjust the date and time on your computer  Choose new wallpaper and a screen saver for your desktop 5. The Printers and Faxes Folder Windows XP stores any information about any printer or fax machines connected to your computer in a Printers and Faxes folder, making it easy to install, manage, and use printers and fax machines. To view the Printers and Faxes folder:  Open the Control Panel.  Under Pick a Category, choose Printers and Other Hardware.  The Printers and Other Hardware folder opens.  Under Pick A Task, choose View installed printer or fax printers or Add a printer.  The Printers and Faxes folder opens.  In the left pane, you'll see several helpful links.  In the right pane, you see a list of any printers or faxes that are installed on your machine. Adding a Printer: Adding a printer is simple using the Add Printer Wizard available in the Printers and Faxes folder. Before trying to add a printer:  Make sure your printer is compatible with Windows XP. If buying a new printer, make sure to do your research before you make a purchase.  Get out your printer's manual or CD-ROM and read it.  Set up your printer and attach it to your computer using a printer's cable and correct port on your computer. Note: Many of the latest Plug and Play printers connect through a USB port. If your printer falls into this category, you may not need the Add a Printer Wizard. If you do have to use the wizard and your printer isn't listed in the Windows XP list (which usually displays when you try to add a new printer) you may have to contact the printer manufacturer for a driver. When you get the driver, follow the Add a Printer instructions on your computer. Having Trouble Printing It? Perhaps you've written a great report and you want to share it with your boss. The problem is, you're having trouble printing it. Try these troubleshooting techniques:  Take care of the basics. Make sure the printer is plugged in, turned on and has paper in it.  Make sure the printer cable is properly connected to the printer and to the computer.  Check to see if there is a paper jam. Most printers have a flashing light to indicate a jam. Also, if the paper size selected differs from the one in the paper tray, you
  • 17. Unit 03: Interfacing with Computer and Internet Computer Literacy 39 will not be able to print. To choose a paper size, select File Page Setup. Click the Paper Size tab.  Check to see that the printer toner, cartridge or ribbon is fresh and adequate. If not, printed documents may appear streaky, blotchy, or even blank.  Make sure the printer switched to Online mode. There is usually a button on your printer's control panel. If it is switched to Offline mode, it will not print.  Make sure the computer knows what printer you are using. Check this by clicking Start Control Panel Printers and Other Hardware View installed printers or fax printers. If an icon for your printer doesn't appear, try restarting your computer. If you printer still doesn't appear, you may need to add it. Click Add a Printer and follow the instructions in the Add Printer Wizard. Using Systems Tools for Basic Maintenance: What are Systems Tools? Do some basic maintenance from time to time to keep Windows XP running smoothly. Luckily, Windows XP provides you with some basic tools to make the maintenance process as painless as possible. You can access these tools via the System Tools menu. To open the System Tools menu:  Choose Start All Programs Accessories System Tools.  A cascading System Tools menu opens. Disk Defragmenter: All Windows XP computers have at least one hard disk. The hard disk acts as your computer's storage area. Almost everything installed on your computer - applications, files, folders, and operating system - is stored here. With general use, (creating new files, deleting files, installing new software, etc) your hard disk can become fragmented. This means that parts of the same disk file become scattered over different areas of the disk. A fragmented hard disk slows down your computer and hinders its performance. To keep your hard disk running smoothly, you must routinely defragment or "defrag" the hard disk. The Disk Defragmenter tool can help you do this. To use Disk Defragmenter:  Choose Start All Programs Accessories System Tools Disk Defragmenter.  The Disk Defragmenter opens. To open Microsoft Management Console:  Open Disk Defragmenter.  Open the Action menu.  Click Help.  A Microsoft Management Console opens and explains how to run Disk Defragmenter. Note: You may need to be logged in as an administrator or as a member of the Administrators group to perform some tasks associated with the Disk Defragmenter. Disk Defragmenter should be run every three months. Disk Cleanup: Disk Cleanup is another tool that helps keep Windows XP operating as it should. It inspects your hard disk and looks for files that can be safely deleted. Deleting unnecessary files frees up valuable disk space. To run Disk Cleanup:  Choose Start All Programs Accessories System Tools Disk Cleanup.
  • 18. Unit 03: Interfacing with Computer and Internet Computer Literacy 40  The Disk Cleanup window opens. Click the Disk Cleanup tab if it's not showing.  Disk Cleanup lists several potential files that can be deleted and the amount of disk space you'll gain by emptying each one.  To learn more about a file category, click it and click the View Files button. A description appears.  Click the checkboxes next to the categories you want to delete and click OK.  A dialog box appears, stating, "Are you are sure you want to perform these actions?" Click Yes or No as appropriate. The More Options tab gives you even more disk cleanup options. Note: It's recommended that you run Disk Cleanup every three months. The Scheduled Task Wizard: Fortunately, you don't need to remember to run each of these utilities. Windows XP includes a Scheduled Task Wizard that runs each of them for you. To open the Scheduled Task Wizard:  Choose Start All Programs Accessories System Tools Scheduled Tasks. OR  Choose Start Control Panel Performance and Maintenance Scheduled Tasks. THEN  The Scheduled Tasks folder opens.  Double-click Add a Scheduled Task.  The Scheduled Tasks Wizard opens.  Keep clicking Next to select the program(s) you want Windows to run. If the task you want is not listed, click the Browse button to locate it. Then schedule a convenient time. Dealing with an Unresponsive Computer: While doing regular maintenance on your computer should keep it running smoothly, your computer may occasionally freeze up or become unresponsive to the click of a mouse or keyboard.  If your computer freezes, try waiting it out. Sometimes it takes your computer a few seconds to complete a task. OR  Press the ESC on your keyboard. OR  Press Ctrl + Alt + Delete on your keyboard. The Windows Task Manager opens. Here, monitor applications, processes, performance, networking, and users. If you need to restart your computer, choose Shut Down Restart. If you need to turn off your computer, choose Shut Down Turn Off. Challenge!  Locate the Systems Tools menu.  Open the Disk Defragmenter. Open the Action menu. Click Help. Learn more about running Disk Defragmenter.  Open Disk Cleanup. Run Disk Cleanup if necessary in order to free up hard disk space. Windows XP Security Features: With the over-growing that of malicious code such as worms, virus, and hacker threats -- it is critical that all customers take immediate action to help lock-down their desktop and laptop systems. This guide explains how to implement the security
  • 19. Unit 03: Interfacing with Computer and Internet Computer Literacy 41 measures recommended in the Windows XP Security Guide in a small or medium business environment without an Active Directory deployment. These recommendations help ensure that your desktop and laptop systems running Windows XP Professional SP1 are more secure from the majority of current security threats, while ensuring that users can continue to be efficient and productive on their computers. In addition to the advanced step-by-step guidance in this document, you will also find information on the top security recommendations that Microsoft is making to all customers, from the home to the enterprise. These include:  Use a firewall, like the Internet Connection Firewall already in Windows XP  Use Microsoft Windows Update to get and keep your PC up-to-date  Install antivirus software and ensure it’s up-to-date This section provides you step–by–step instruction for downloading and installing the password and security templates provided with the Windows XP Security Guide, and other key steps to help you secure your Windows XP systems. The first step you take is to download the security templates to your Windows XP client. The next step is to import the password and security policies. Finally, you apply these policies to your desktop or laptop computer. Downloading the Windows XP Security Templates: A security template is a file that represents a recommended security configuration. Security templates are applied to a system by importing them on the desktop or laptop. This section shows you how to download the pre-built security templates, which are detailed in the Windows XP Security Guide, to secure your desktop and laptop systems. To download the Security Templates:  Log in to the Windows XP Client with an account that has administrative rights.  Open a Web browser and navigate to: http://go.microsoft.com/fwlink/?LinkId=14840.  On the bottom of the page, in the Files in this Download section, select the Windows_XP_Security_Guide.exe.  In the File Download window, click Save.  When prompted for a location, select the Desktop, and click Save.  In the Download Complete window, click Open.  In the WinZip Self-Extractor window, click Browse.  Select My Documents and click OK.  In the WinZip Self-Extractor window, click Unzip.  After all files have finished extracting click OK.  In the WinZip Self-Extractor window, click Close. Importing the Security Templates: After you have downloaded and extracted the security templates, use the Microsoft Management Console (MMC) snap–in for the Security Configuration and Analysis tool to apply these policies on the stand–alone machine. Importing the Password Policy: This security template enforces the requirement that users of the system choose complex passwords that are greater than 8 characters in length. Additionally, it requires them to change their password every 42 days. The policy monitors for failed
  • 20. Unit 03: Interfacing with Computer and Internet Computer Literacy 42 attempts to log in to the computer. If 50 failed login attempts occur within 30 minutes, the account is locked for 30 minutes, or until an administrator manually unlocks it. You will use the SA Enterprise Account.inf file that is included with the Windows XP Security Guide to perform this task. To import the recommended password policy:  On the Start menu, click Run, type mmc, and then click OK.  On the File menu, click Add/Remove Snap–in.  Click Add on the Stand–alone tab in the Add/Remove snap–in properties box.  Select Security Configuration and Analysis and then click Add.  Click Close, and then click OK.  Under Console Root, right–click the Security Configuration and Analysis item and then click Open Database.  Type a new database name (Windows XP Security Guide.sdb), and then click Open.  In the Import Template window, navigate to My DocumentsWindows XP Security GuideTools and TemplatesSecurity GuideStand Alone Clients.  Select the SA Enterprise Account.inf security template, and click Open.  Note: If you do not see the SA Enterprise Account.inf file, you may have saved it to a different location. You may need to extract the files from the Windows_XP_Security_Guide.exe self-extracting file again. You have now successfully imported the security policy. Do not close out of the Security configuration and Analysis snap-in yet. Now, you must import the security policy before applying these changes to the system. Importing the Security Policy: The next step to securing your computer is to configure many of the built–in security settings. While this seems like a daunting task, step–by–step instructions for using the Enterprise Client - Desktop.inf file that is included with the Windows XP Security Guide are provided below to perform this task. This policy will configure settings that ensure only valid users can connect to the computer, only administrators can backup and restore files on the computer, and that only administrators can add new drivers to the system. To import the recommended Security Policy:  Right–click the Security Configuration and Analysis scope item and then click Import Template.  In the Import Template window, navigate to My DocumentsWindows XP Security GuideTools and TemplatesSecurity GuideSecurity Templates.  Select the Enterprise Client–Desktop.inf security template, and click Open.  Right–click the Security Configuration and Analysis scope item, and then click Configure Computer Now.  In the Configure System dialog box, accept the default name of the log file by clicking OK. Completing the Process You are now ready to apply the password and security settings to your desktop or laptop. To ensure they are applied, use the gpupdate.exe command. To run gpupdate:  On the Start menu, click Run, type cmd, and then click OK.  Type gpupdate.exe /force and press ENTER.  When you are prompted with "OK to Reboot?", type Y and then press ENTER
  • 21. Unit 03: Interfacing with Computer and Internet Computer Literacy 43 After the system restarts, the password and security policies are successfully applied. After pressing Control + Alt + Delete to log in, you should see the "It is an offense to continue without proper authorization" dialog box. Click OK and log in as normal. If you have trouble, refer to the Troubleshooting section below.. Using Antivirus Software An antivirus software program will help protect your computer against most viruses, worms, Trojan horses, and other malicious code. Many new computers come with antivirus software already installed. However, antivirus software requires a subscription to stay up to date. If you don't have a current subscription for these updates, your computer is likely to be vulnerable to new threats. Computer viruses are programs that are loaded on to your system without your knowledge or approval. Viruses and other forms of malicious software have been around for years. Today's viruses can replicate themselves and use the Internet and e-mail applications to spread across the world within hours. Antivirus software continually scans your computer for viruses and helps detect and remove them. Installing antivirus software only solves part of the problem - keeping the antivirus signature files up to date is critical to maintain a secure desktop or laptop. User education regarding safe email practices is another critical step in preventing virus attacks. Users should not open an email or take action on an email attachment unless they are expecting the file. All email attachments should be scanned with the antivirus software prior to its execution.
  • 22. Unit 03: Interfacing with Computer and Internet Computer Literacy 44 Hypermedia: Defining Media: Media refers to any material, methodology, procedure and / or technique that are used to complete a task. In other words, media includes helping tools and technologies used to generate a product. This product can be some work, relaying information, presenting views etc. 1. Basics of Hypermedia and its Significance: To understand the term “Hypermedia”, one should be familiar with “Hypertext”. Hypertext is the type of text which has some references and / or links to other media associated with it. Usually, these references can be followed by using a single mouse-click. For example, by clicking on the following hypertext one can directly link to the Google Website. www.google.com In short, hypertext is the text having link and / or relation with some other information. Hypermedia is the arrangement of various inter-linked media including (text, image, video etc.). These inter-linked media (with embedded hyperlinks) are together used to relay a single idea, scheme or information. Communicating information using the hypermedia is very helpful for the readers (information gathers) as well as for writers (information providers). A single concept may be delivered using simple text, with some embedded link to the video or to the some sound file depicting the same concept in some different manner etc. 2. Significance of Hypermedia in teaching: For lecture delivery, hypermedia is regarded as a very powerful tool. For example, if a teacher is teaching the students “How to Check E-Mail” then oral explanation may not be enough. However, if a video representation guiding how it can be done is shown, it will be much more understandable to the students and also fewer efforts will be required by the teacher. A video representation of “How to Check E-Mail” can be shown by clicking on the text directly. Moreover, if there are scarce resources for the practical implementation or experiment during lecture delivery, the use of hypermedia will support both teacher and student. For example, if the topic of the lecture is: “How to install a computer memory”, and all the required resources are not available, then Hypermedia may be used. Using Hypermedia also helps in maintaining the lecture’s sequence and avoids skipping important points during lecture delivery. 3. Comparison between normal media sources and hypermedia The normal media sources include the media (as discussed earlier) without having embedded links to other media. However, the hypermedia provides a complete system, structure and / or scheme which include all necessary links, and the information is communicated in a more effective manner. Internet and Intranet: 1. Basic Definitions and History of Internet and Intranet: Internet is defined as a global network that is publicly accessible. This is the network which allows the user to access various networks in the world. A simple way of defining the Internet is that it is a network that comprises of many other networks. On the other hand, intranet is regarded as a proprietary or private network of any organization, company or enterprise. Before the emergence and popularity of inter- communication of various networks, the organizations had their own concealed networks (regarded as intranets). These intranets were limited to their domains and people were facing many problems when need to communicate from outside domain. The need of communication and sharing became stronger and stronger and the researchers started thinking of some effective and readily accessible way
  • 23. Unit 03: Interfacing with Computer and Internet Computer Literacy 45 communication. In late sixty’s network linkage was established among various universities and research organizations networks. This linkage was named as “ARPANET”. ARPANET forms the basis of the modern world Internet. 2. Comparison between Internet and Intranet:  Internet is a publicly shared network while Intranet is limited to the employees or people of a particular organization  Internet covers much wider scope, while the Intranet’s scope is limited to its organization’s domain  The data is more secure within the Intranet then that of Internet  As, Intranet is a localized network of an organization, it provides much higher speed then that of the Internet 3. Introduction to emergence of World Wide Web (WWW): The World Wide Web (WWW or W3) is the collection of various hypermedia which is accessible (using web browser) on Internet and / or intranet. The sharing and communication of ideas and knowledge is the pilot thinking behind the development of WWW. Using the WWW teachers are able to share their lectures on Internet, make use of the various research results found by other people and to participate in various projects (teaching, learning, research etc.) placed miles apart. Internet Connectivity: 1. Overview: Internet connectivity is a very vital issue. This is the point where the accessibility and availability of different networks (incorporated in Internet) is involved. The main challenge in the evolution of the Internet is the development of a common connectivity protocol and / or tool, which is used by all the networks involved in the Internet. The common protocol developed and used by the Internet is TCP/IP. TCP/IP is used as a common standard protocol to send and / or receive data in the packet network. The Internet connectivity needs both software and hardware. The software part is usually covered with the common protocol (i.e., TCP/IP) on the other hand various hardware technologies are introduced for the said purpose. The next section discusses various emerging technologies used for Internet connectivity. 2. Current and Emerging Technologies for Internet Connectivity (DSL, Wi- Max etc): Internet connectivity and / or Internet connection is of the following types: a. Dial-up connection: Dial-up connections are the most inexpensive and slowest connection usually provided by Internet Service Providers (ISPs). A modem is needed to dial to the ISPs server using PSTN (telephone connection) and connect to the Internet. b. DSL/ADSL: Digital Subscriber Line (DSL) / Asymmetric Digital Subscriber Line (ADSL) are now becoming more and more popular. DSL and ADSL splits the telephone line into two portions i.e., one for data and other is for voice. The users and / or subscribers can use Internet and attend a telephone call simultaneously. DSL connection guarantees quality of service (QoS) while QoS is not guaranteed in ADSL connection. c. ISDN: Integrated Services Digital Network (ISDN) provides multiple services included voice, data, fax etc. via a single telephone connection / line. Not only the single line is used for the provision of various services but also it provides high data rate i.e., fast access to Internet. There are many other Internet Connections available e.g., T1/E1 connection, broadband connections including WiMAX etc.
  • 24. Unit 03: Interfacing with Computer and Internet Computer Literacy 46 3. Popular Web Browsers used for Web Surfing (IE, Netscape, Navigator, Mozilla FireFox etc): Surfing the World Wide Web (WWW) means that we visit various web pages and web sites which provide and communicates information, for this purpose the software and / or application used is known as Web Browser. Web Browsers are the most popular software used for retrieving and sharing information from WWW. Most popular web browsers used for web surfing are Internet Explorer (IE), Mozilla Firefox, Google Chrome etc. All of the stated web browsers help the user to browse the web, they maintain some history and also provide easy navigation between web pages. Other than the features mentioned here, each browser is having its localized features. Applications of Internet and WWW: Internet and World Wide Web (WWW) are used in many domains. Together the Internet and WWW provides solutions to many problems. The usage and / or application of Internet and WWW are very wide however, some of the applications are discussed below: 1. Web Browsing/Surfing: Web Browsing/surfing is the method of exploring the web. Any Web Browser software (e.g., Internet Explorer, Netscape Navigator etc.) can be used for the said purpose. Web Browsing/Surfing makes use of Hypermedia. Different web pages, text, audio and video files and other information are linked together using “Hyper links”. Hyper linking of the documents provides easy navigation and helped in visiting inter- related web pages. 2. E-Learning/ Distance Learning: E-learning can be defined as learning via technology. The technology here refers explicitly to the electronic media. However, Distance Learning is the learning provided at remote location. Distance learning may also be regarded as the E-learning as most of the time electronic media is used for the provision of distance learning. Internet and WWW provides the facility to put lectures online at one place and then those lectures can be downloaded at some other place. This sharing of educational material for learning process, when the two or more users are geographically apart is an example of e-learning / distance learning. Another very important feature of e- learning / distance learning is that it provides a self-learning environment. Internet and WWW provide a good platform for self-learning. Thus people can develop expertise and try to excel in their respective domains. 3. Digital Libraries and E-Books: Another very important application of Internet and WWW is the provision of digital libraries. Now the researchers and educators need not pile their desks with numerous hard covered books. The books in electronic format are readily available on Internet. People get access to those books using the Digital Libraries. Digital Libraries not only provides the books, but also help the researchers in getting the latest and updated research results. Various magazines, journals, articles, papers are also available in Digital Libraries. The Higher Education Commission (HEC), Pakistan, also provides access to the Digital Library. Information and access to the HEC’s digital library can be achieved through HEC website or direct access to the HEC’s digital library program (http://www.digitallibrary.edu.pk/) 4. E-Commerce: Internet and WWW not only supports the education sector but also focuses on the business division. All the business activities those take place using the Internet and / or WWW becomes part of the E-Commerce. Almost all the business giants, small
  • 25. Unit 03: Interfacing with Computer and Internet Computer Literacy 47 corporate and private commercial companies, make use of Internet and WWW in their business. Internet and WWW provide information regarding current market trends and on-going business activities. One of the most important features of E-Commerce is the provision of comparative studies and status of different business enterprises of a particular domain. 5. Sharing of Information and Knowledge: Internet and WWW provides a platform where information and knowledge is shared publicly. There are number of ways, tools and techniques used for sharing information. A few are explained below:  Web Communication (Emails, Discussion forums, Individual and Group chatting etc): Web communication is nowadays one of the most popular way of sharing information, knowledge, news, events etc. Most commonly used and effective tool of web communication is electronic mail (E-Mail). There are a number of platforms which provide the e-mail services free of cost. Users create their own e-mail address and then using that e-mail address; communicate with their friends, co-workers, family and other professionals. The detail of how to create e-mail address and how to use it is covered in later in the following chapters. Discussion forums are another important tool used for sharing ideas and knowledge. Many people become part of a forum. On the forum different topics are posted to be discussed publicly with all the forum members. These discussions may include solution for a specific problem, latest research about any particular topic and / or comments on current affairs issues. Chatting is also like discussion forums. The difference is that for chatting all the members need to be online. The geographically apart users can be online at the same time and discuss any topic among them. The chatting can between two or more users.  Weblogs and Resource sharing Weblogs are the websites which have discussions and / or comments on some topic. The discussions and comments are added to the website on regular basis. Usually, there is a person who owns a weblog, i.e., creator of that particular weblog. The weblogs is an important tool through which students and teachers can communicate on some on-going course issues, projects, assignments and /or research. These weblogs help teachers and students in solving their problems and / or sharing information in more effective way.  Web-Casting/Pod-Casting: Web-casting / pod-casting is another useful application which is provided on Web. Web-casting / pod-casting includes sharing of live or recorded streaming multimedia files (audio, video etc.) over the Internet. This sharing may be in the form of entertainment i.e., showing the recorded or on-going matches, live broadcasting of the TV channels etc. Similarly, the application of web-casting / pod-casting is also in the domain of education. Live lectures from one university campus can be viewed in some other university campus. Moreover, teachers can evaluate a student’s project, research etc. while viewing the recorded or live presentation of the student.  Search Engines: Search engines are also one of the very useful and most popular applications of Internet and WWW. Whenever we need to search something, we connect to the Internet and then use a search engine for searching our requested item. Widely used search engines are Google, Yahoo Search, MSN Search etc. The mechanism to search a particular topic is similar in all the search engines. We open the webpage of a search engine e.g, (www.google.com) in the browser. On that page there is a search bar followed by a search button. In case of Google the search button has given the caption
  • 26. Unit 03: Interfacing with Computer and Internet Computer Literacy 48 of “Google”. Type the word or word-phrase (search query) in the search bar and then press the search button. The search engine looks for the given words and phrases in all the documents, files, figures etc. it can access and usually returns the research results in order of their relevance to the search query. For example if we search the string “Higher Education in Pakistan” the top most result which Google search engine gives us is the link to the “Higher Education Commission of Pakistan”.  Social Networking: Social networking is one of the most effective ways of communications over the Internet. People having similar interests group together to form a network. This network is usually built among friends, family and/or colleagues. Facebook is one of the popular social networks now days. It is used to share educational, professional and entertainment information among people. Such type of networks not only supports the educational and professional life of a person but also help in building good relations among colleagues, friends and family. Web Page/Site Designing: Designing a website is very important. However, from teacher’s view point its important to understand the design of a website. It is also important to know how changes can be made to a particular website to accommodate a teacher’s need. Before going into more details about web page/site design, lets us first discusses the broad categories of websites, as follows:  Static Websites: Static websites are those websites which presents static information. The website developer creates some web pages (static web pages) which contain information that does not change or update automatically. Such static web pages are useful for displaying the history of a university, presenting some past event etc.  Dynamic Websites On the other hand dynamic websites are those which either have some input form user at the runtime or retrieve information from the database or some other server. The information presented by such web pages is dynamic in nature i.e., it changes on runtime and varies from user to user. A very good example of dynamic websites is the “Course Management System (CMS)” explained later in the following chapter. 1. Hypertext Mark Up Language (HTML): To design a web page/site, some language needs to be used. The most widely used language for the development of web pages (that also incorporates hyper media) is known as Hyper Text Mark-Up Language (HTML). HTML is used to create and develop organized / structured web site. Different web pages are linked together to present the information effectively. Moreover, various hyper media and multi-media may be incorporated in a web page using the HTML. 2. Web Graphics and their formats: Another important domain to be discussed is the Web graphics and their formats. Most of the time teachers search and download some image from the Internet. Pictures can effectively present the whole idea or theme of the work therefore most of the teachers make use of images in their lectures. One of the problems usually faced by the users is how to save a web graphic and what should be its format. To save a web graphic you just need to right click on the image and click “Save Picture As”. It then opens a dialog box asking at which location to save the image and in which format. The place or location of the image to be saved, can be selected from the “Save in” box. To select that in which format that image can be saved is selected from the “Save as type” box at the bottom of the screen. From this box different image formats can be selected. Most commonly used image formats include .bmp, .jpg, .gif, .tif etc.
  • 27. Unit 03: Interfacing with Computer and Internet Computer Literacy 49 3. Site Map Construction: Another important feature of the web site development is the construction of site map. Site map is the textual and / or pictorial representation of web pages and their linking among them. Site map is a very important tool which help the visitor of any web site to find out how to access some particular information or how (following which path) to reach to some specific web page. 4. Saving Files of different formats in Hypertext Format: Whenever, a web site is developed, different information and data need to be added as multiple web pages to that web site. Most of the time the data or information to be added as a web page is not in the Hypertext (HTML) file format. So, there is a need to convert that files or documents from different file formats to the one compatible with WWW. In other words, we need to find the way to convert other format documents into the hypertext format. Almost all the application software which provide facility to develop such types of documents have the feature to save the same document in the hypertext format. For example, if there is a document written in MS-Word, then to convert that document to hypertext format we need to go to the “File” menu then select “Save As” option. A dialog box will open asking to save the document where and in which format. At the bottom of the dialog box there is “Save as type”, from there select “Web Page (*.htm;*.html). and then saved the document. This will save the currently opened MS-Word document to the hypertext (HTML) format. Self Course Management: 1. Introduction of Self Course Management: As a teacher or instructor, we need to be organized so that we can conduct courses effectively and efficiently. Self course management includes:  Planning a course  Deciding course contents  Lecture wise course breakdown and scheduling  Grading policy  Evaluation plans  Result generation and display  Attendance management etc. 2. Online Applications for Course Management: Due to Internet, applications/programs available online can be accessed anywhere and anytime. Many educational institutes are now using online course management systems (CMS). This facilitates both teachers and students. Online CMS allows the administrator user (teacher) to add course outlines, course related announcements, lectures/notes, lab manuals, book references, samples papers, upload of quizzes and assignments, etc. The student user can download these resources and upload completed assignments. Course Management can be done using proprietary software which can be custom developed or by using freely available software on internet. 3. Database Driven Websites: All the course management systems (CMS) used now days are database driven i.e., CMS websites get and / or retrieve their data from the database every time they load. Data of each faculty member along with the detail of courses that faculty member is teaching is stored / maintained in a database. Whenever, a teacher performs a login operation in CMS, the CMS website looks for his/her details and data in the database. The data retrieved from the database is then presented in an organized way on the CMS website. The CMS website provides a user friendly interface that allows the
  • 28. Unit 03: Interfacing with Computer and Internet Computer Literacy 50 teacher to add new data and update/delete existing data in the database. For example, whenever, a new lecture or assignment is uploaded by a teacher, the CMS stores this information in the database. 4. Course Tracking: Planning the course ahead of time is a good practice. This plan should involve lecture- wise break down of course contents to be covered. The plan can be developed using specialized software, e.g. Microsoft Project’s Gantt charts or even simply using tables in Microsoft office Word or Excel, etc. Once the course has started, it is also important to keep track of the course progress according to the plan. The teacher must cover up for any lapse in the course plan or scheduled activities. 5. Sharing Lectures/Assignments and Results: There are many ways in which students and teachers share course related resources. A popular way is using group-based emails, for example yahoo groups. Another interesting way of handling this is through CMS. 6. Online Discussion forums for Teachers, Students: These days the Internet provides discussion platforms for sorting out different problems whether general or educational. Many technical discussion forums provide a healthy environment for exchanging ideas and sharing knowledge. Discussion can be initiated by anyone and experienced people of the related field give their suggested answers. Discussion forums are available for a diverse range of fields, for example, programming languages, operating systems, configuration and use of software, research topics, etc. Teachers and students can gain benefit from such forums. These forums can help them build knowledge bonds with peers all around the world. The same idea of forums can be used for online discussions among teachers and students after university hours. 7. Online Teachers Evaluation: Many educational institutes use the “teacher evaluation forms” as a tool for analyzing teachers’ performance. These forms contain a number of questions. There are different answer options against each question. For example:  Does the teacher always come prepared in class? Answers options: (a) Always (b) Sometimes (c) Never  Does the teacher encourage students to ask questions? Answers options: (a) Always (b) Sometimes (c) Never These forms (if truthfully) filled by students can provide performance analysis data. These forms are usually distributed to the students towards end of the term/semester. This involves taking hard copies of forms, getting them filled form students, collecting them and analyzing results. The same forms if placed online can save the cost of forms printing, the exercise of forms distribution and collection. Online availability of forms will also facilitate students as they will be able to fill forms whenever they have free time. 8. Resource Management: All course related resources including lecture notes and tutorials can be managed either at a central server or on the online course management website. The teachers should update these resources after every lecture so that students can get the latest copy of lectures and other reference material. Email Management: 1. Selecting an email service:  For Personal Use: Many email services are commercially available and most of them are free of cost. Using a free email service like yahoo, hotmail, etc. is appropriate for personal
  • 29. Unit 03: Interfacing with Computer and Internet Computer Literacy 51 communications. Personal use can include sending emails to your friends and family members.  For Professional Use: If available, you must use the professional email service hosted by your university domain server or email provider for all professional communication. Professional emails can be written to your students, peers, seniors and colleagues from other universities. The professional email services build a better repute for you as a teacher. 2. Choosing an email ID: Your email ID (address) is your reflection. Choosing an appropriate ID is very important especially for professional communication. If you are using a professional email service hosted on your university domain server, then this can be taken care of by the email/web administrator. Example of appropriate email IDs are: sana.zahid@uettaxila.edu.pk, ProfessorAliKhan@gmail.com, etc. 3. Defining the Email Subject: Just like news paper headlines, your email subject line should be precise and meaningful that draws the reader’s attention. It should clearly state what the email is about. In other words, the subject line should deliver the message’s bottom line. A simple rule that may be followed in writing the subject is “What” + “what about What”, i.e., what the email is about + any relevant brief description about that what. For example, if you want to announce a faculty meeting by your email, you would write this in the subject: “Faculty Meeting for Course Allocation, Monday 4-Jan-09”. Another example of email subject line can be for inviting participants for a seminar, “Two days seminar on Education and Culture”. 4. Learning how to handle email recipients To: This includes email addresses of the primary recipients of your email CC: It is short for carbon copy. This feature is just like the CC used in official hard copy letters. It should include email addresses of people who are not the primary recipients of your email but will receive it as a copy (for their information). The email addresses entered in this section are also visible to the primary recipients. BCC: It is short for blind carbon copy. Many times you want to send emails to other people as a copy without letting the primary users know about it. BCC should include all such email addresses. 5. Managing Emails Content: The email content should be brief. A lengthy email will overwhelm the reader and the real content will be lost in the details. Try to keep the emails as concise as possible. Like any other professional write-up, your email will consist of three parts:  Introductory statement  Actual matter  Closing statements Avoid using too many font styles and colors for your email text. Use plain text and avoid such character representations which may not be properly displayed in the recipients email application. 6. Emails Attachments: You can attach documents, spread sheets, images and any other content on your computer along with emails. It is very important that your email attachments do not exceed a reasonable size limit. Sending huge attachments with email can choke the
  • 30. Unit 03: Interfacing with Computer and Internet Computer Literacy 52 network by consuming available bandwidth. This will also affect both you and your colleagues who are sharing the network bandwidth. 7. Configuring an email program (Outlook, Eudora, etc.): Learning about your email program is very important even if you are a technology expert and know most of the things already. In this regard, tutorials available on the manufacturer’s website can help you build a better understanding of the email program. The better you understand your email program, the more you will utilize its benefits. Let us consider Microsoft Outlook 2003 as an example. Launch this email program: Start -> Programs -> Microsoft Office-> Microsoft Office Outlook 2003 After launching Outlook, you can use the Help menu to look for solution of any thing that you want to do in Outlook. Press F1 function key to start using help or select Microsoft Office Outlook Help option from the Help menu. On left panel of your Outlook application, you will see a number of Folders.  Inbox contains the received emails  Sent Items contains the emails that you have sent  Drafts contains emails that you have composed but saved them to be sent later  Junk-Email contains all emails that may be spam  Outbox contains out-bound emails which are in the process of being sent  Deleted items contain all emails that have been deleted from any of the above folders. 8. Adding a New Email Account: Activate Outlook Help from Help menu as mentioned earlier. To set up a new account, type “add email account” in the search box of help window. It will provide you a step by step guide to add email account. OR If you do not want to use the Help menu, then go to Tools menu and select Email accounts option. This will launch a wizard that will help you set up your email account. Select the option Add a new e-mail account from the wizard. Click Next button to proceed. Select POP3 (POP3 is used to download email from mail server to local email client). Click Next. In the next dialog box, enter your name, email address, user name, password and mail server info. Outgoing mail is based on smtp protocol as smtp delivers emails from email client to mail server. Click More Settings button A dialog box for Internet email Settings appears. Select the Outgoing Server Tab. Place a check in box labeled My outgoing server (SMTP) requires authentication. Also select the option use same settings as my incoming mail server. Click OK to return to previous window. In that window, when you click Test Account Settings, all entered fields will be tested and following will be displayed. Click on Close. Click Next when you return back to settings window. On clicking Next, the following window is displayed. Click on Finish to close the wizard. 9. Setting Folder Options: To manage folder settings, go to Tools menu and select Options. This will display the following dialog box. You can explore each tab and change settings. Select Email Options button in the Preferences Tab to manage message handling options. 10. Setting Outgoing Mail Format: Select Mail Format Tab. You can choose the message format (HTML, Rich text, Plain text) of your choice for your outgoing emails.
  • 31. Unit 03: Interfacing with Computer and Internet Computer Literacy 53 11. Creating Signatures: You can select the Signatures button to create your signature. The following appears. Select New… button to create a new signature. A signature can be edited once created or removed. Enter Signature text, format it and click on Finish button. When you return to the previous window, click on OK button. This signature can be automatically inserted whenever you compose an email. 12. Setting Auto-replies / Out of Office Assistant: When you are away from office (for conference, workshop, vacation or some other reason), you can set up an automatic reply option so that your emails do not remain unanswered for a long time during the time you are away. Reference: http://support.microsoft.com/kb/311107 : The Out of Office Assistant feature in Microsoft Outlook is a Microsoft Exchange Server service. It is available only when the Exchange Server transport service is included in an Outlook user's profile. You can emulate this feature by creating an e-mail template and defining a rule in the Rules Wizard to automatically reply with the template. 13. Backup Of Emails: A regular backup of important emails will ensure email recovery in case your system or email server crashes. In case of Microsoft Outlook 2003, email messages in particular folders can be archived in .pst file format (export operation) and later retrieved (import operation) using either of the two ways: 1. From File menu, select New, then select Outlook Data File. A dialog box asks for type of storage. Select Office Outlook Personal Folder File (.pst) and click OK. Next dialog box asks for storage location and name of the backup file, give a name and click OK. 2. From File menu, select Import and Export option. When the following window appears, select Export to a file option as shown below. Click Next Select the file type as shown above and click Next. The next window lets you choose a folder whose contents will be exported. Select Inbox and Click Next. The next window required name of the exported file. Specify a name and click on Finish. To restore/ retrieve the file, use either of the two options. 1. From File menu, select option Open, then Outlook Data File. A dialog box opens so that you can browse the file to be opened. Select the file and click Open. The file will be imported in the Personal Folders. 2. Use the option Import and export from the File menu. This time select the import from another program or file option. Click Next. 3. Select Personal Folder File (.pst) and click Next. 4. Browse the file to be imported and click Next. 5. Select destination where file will be imported and click Finish.