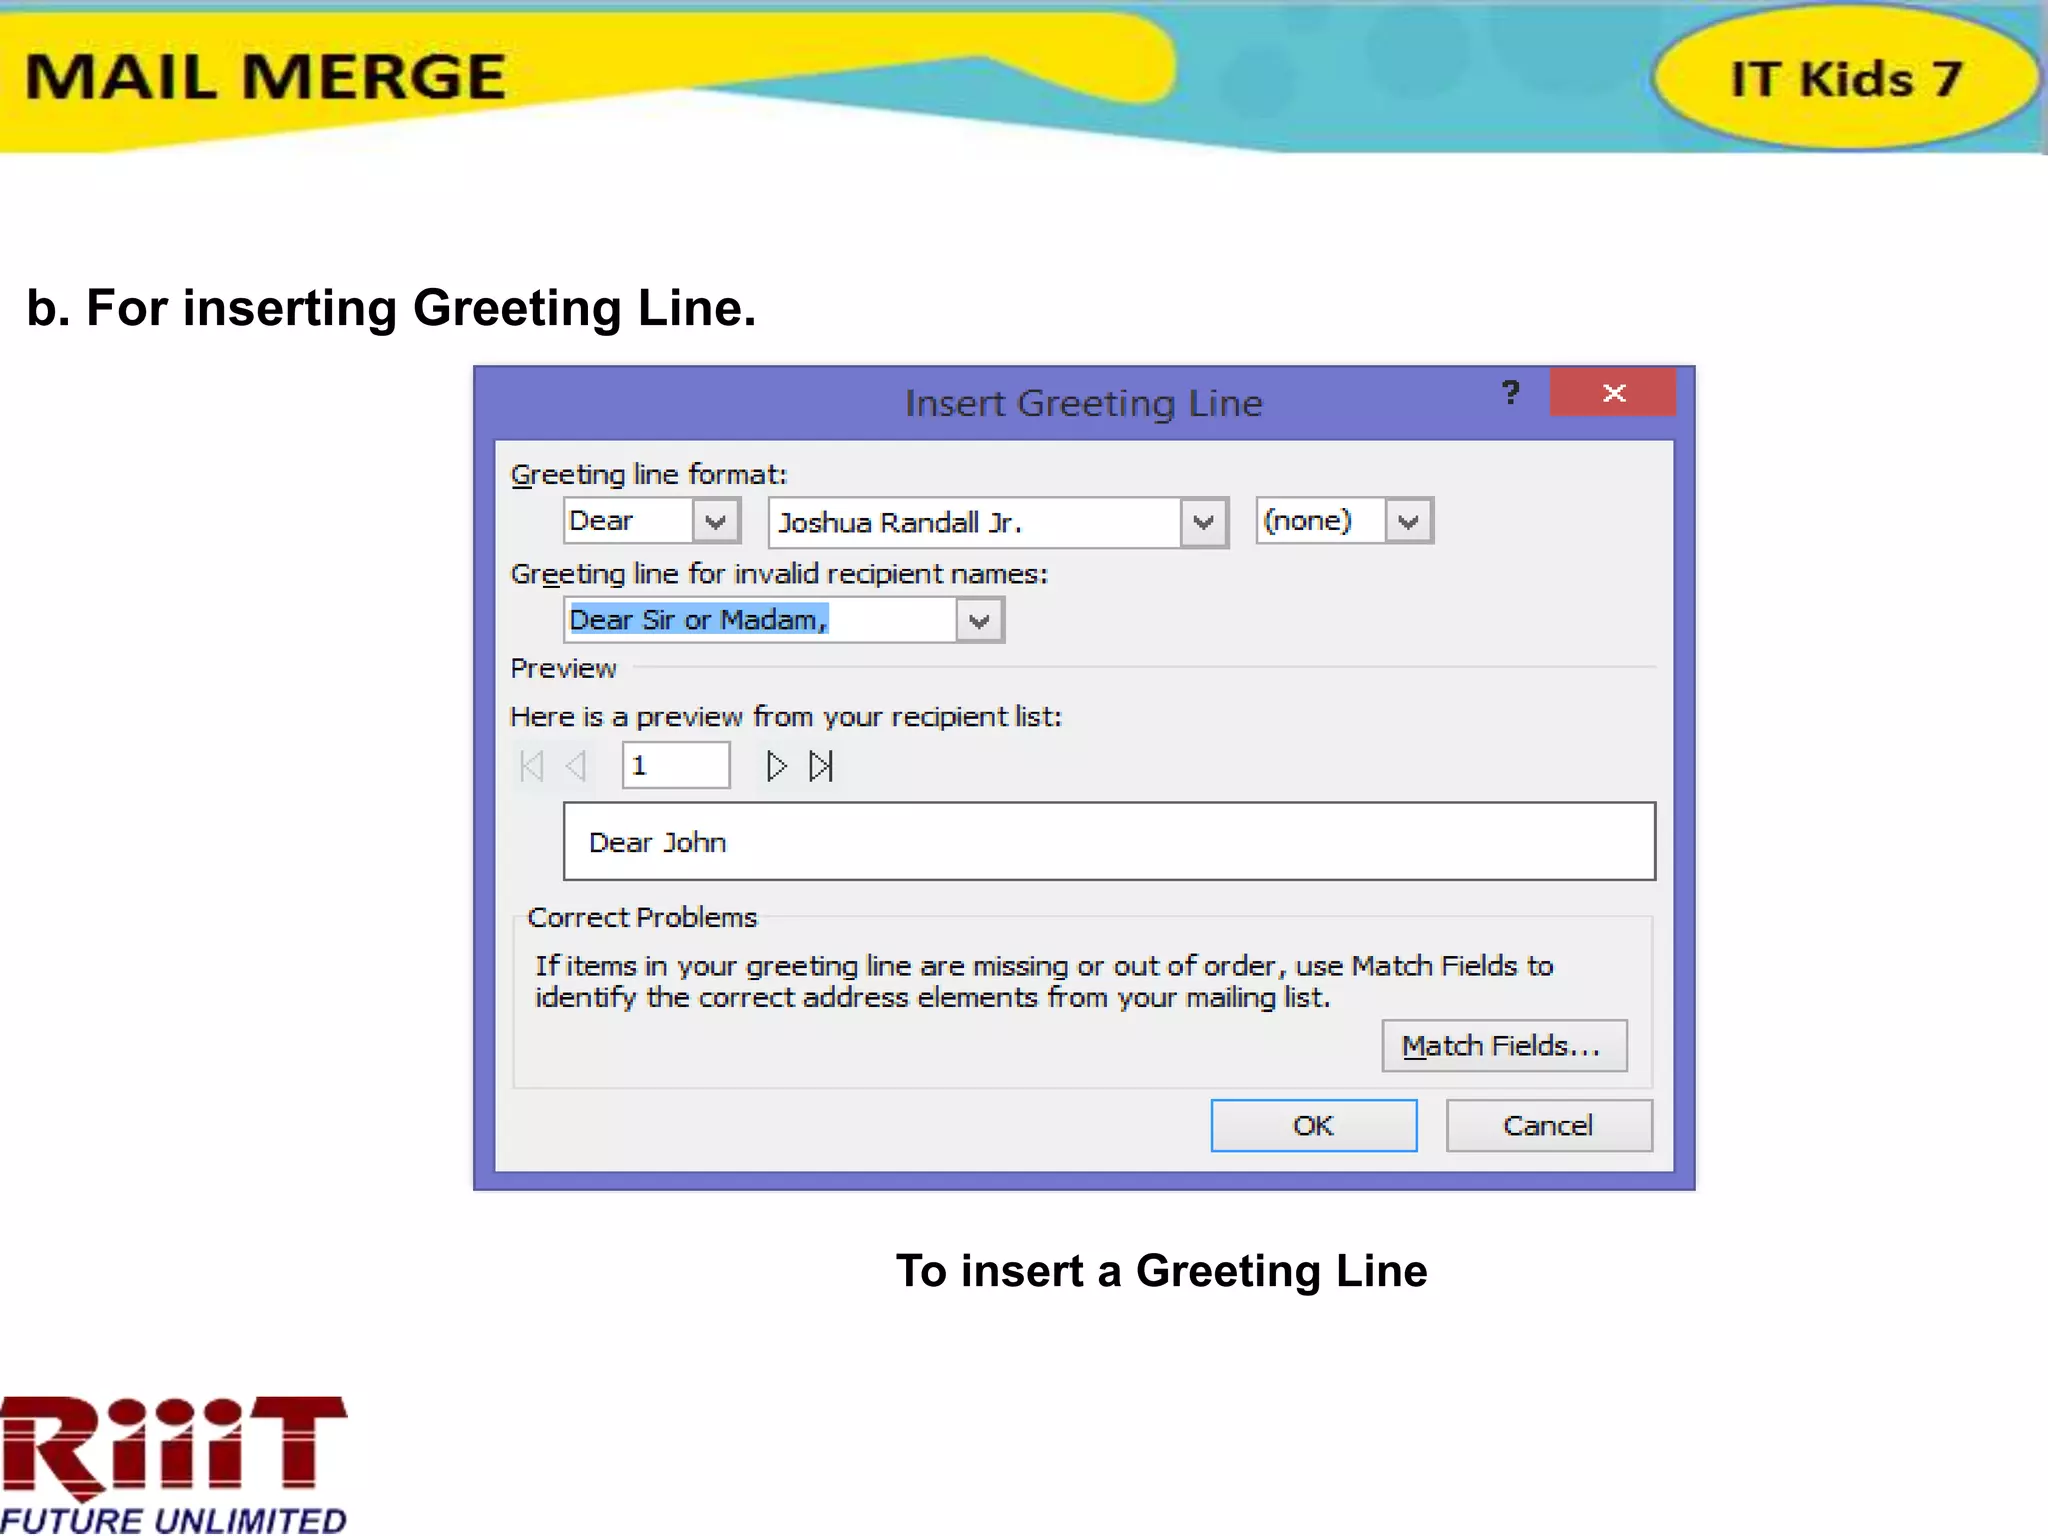
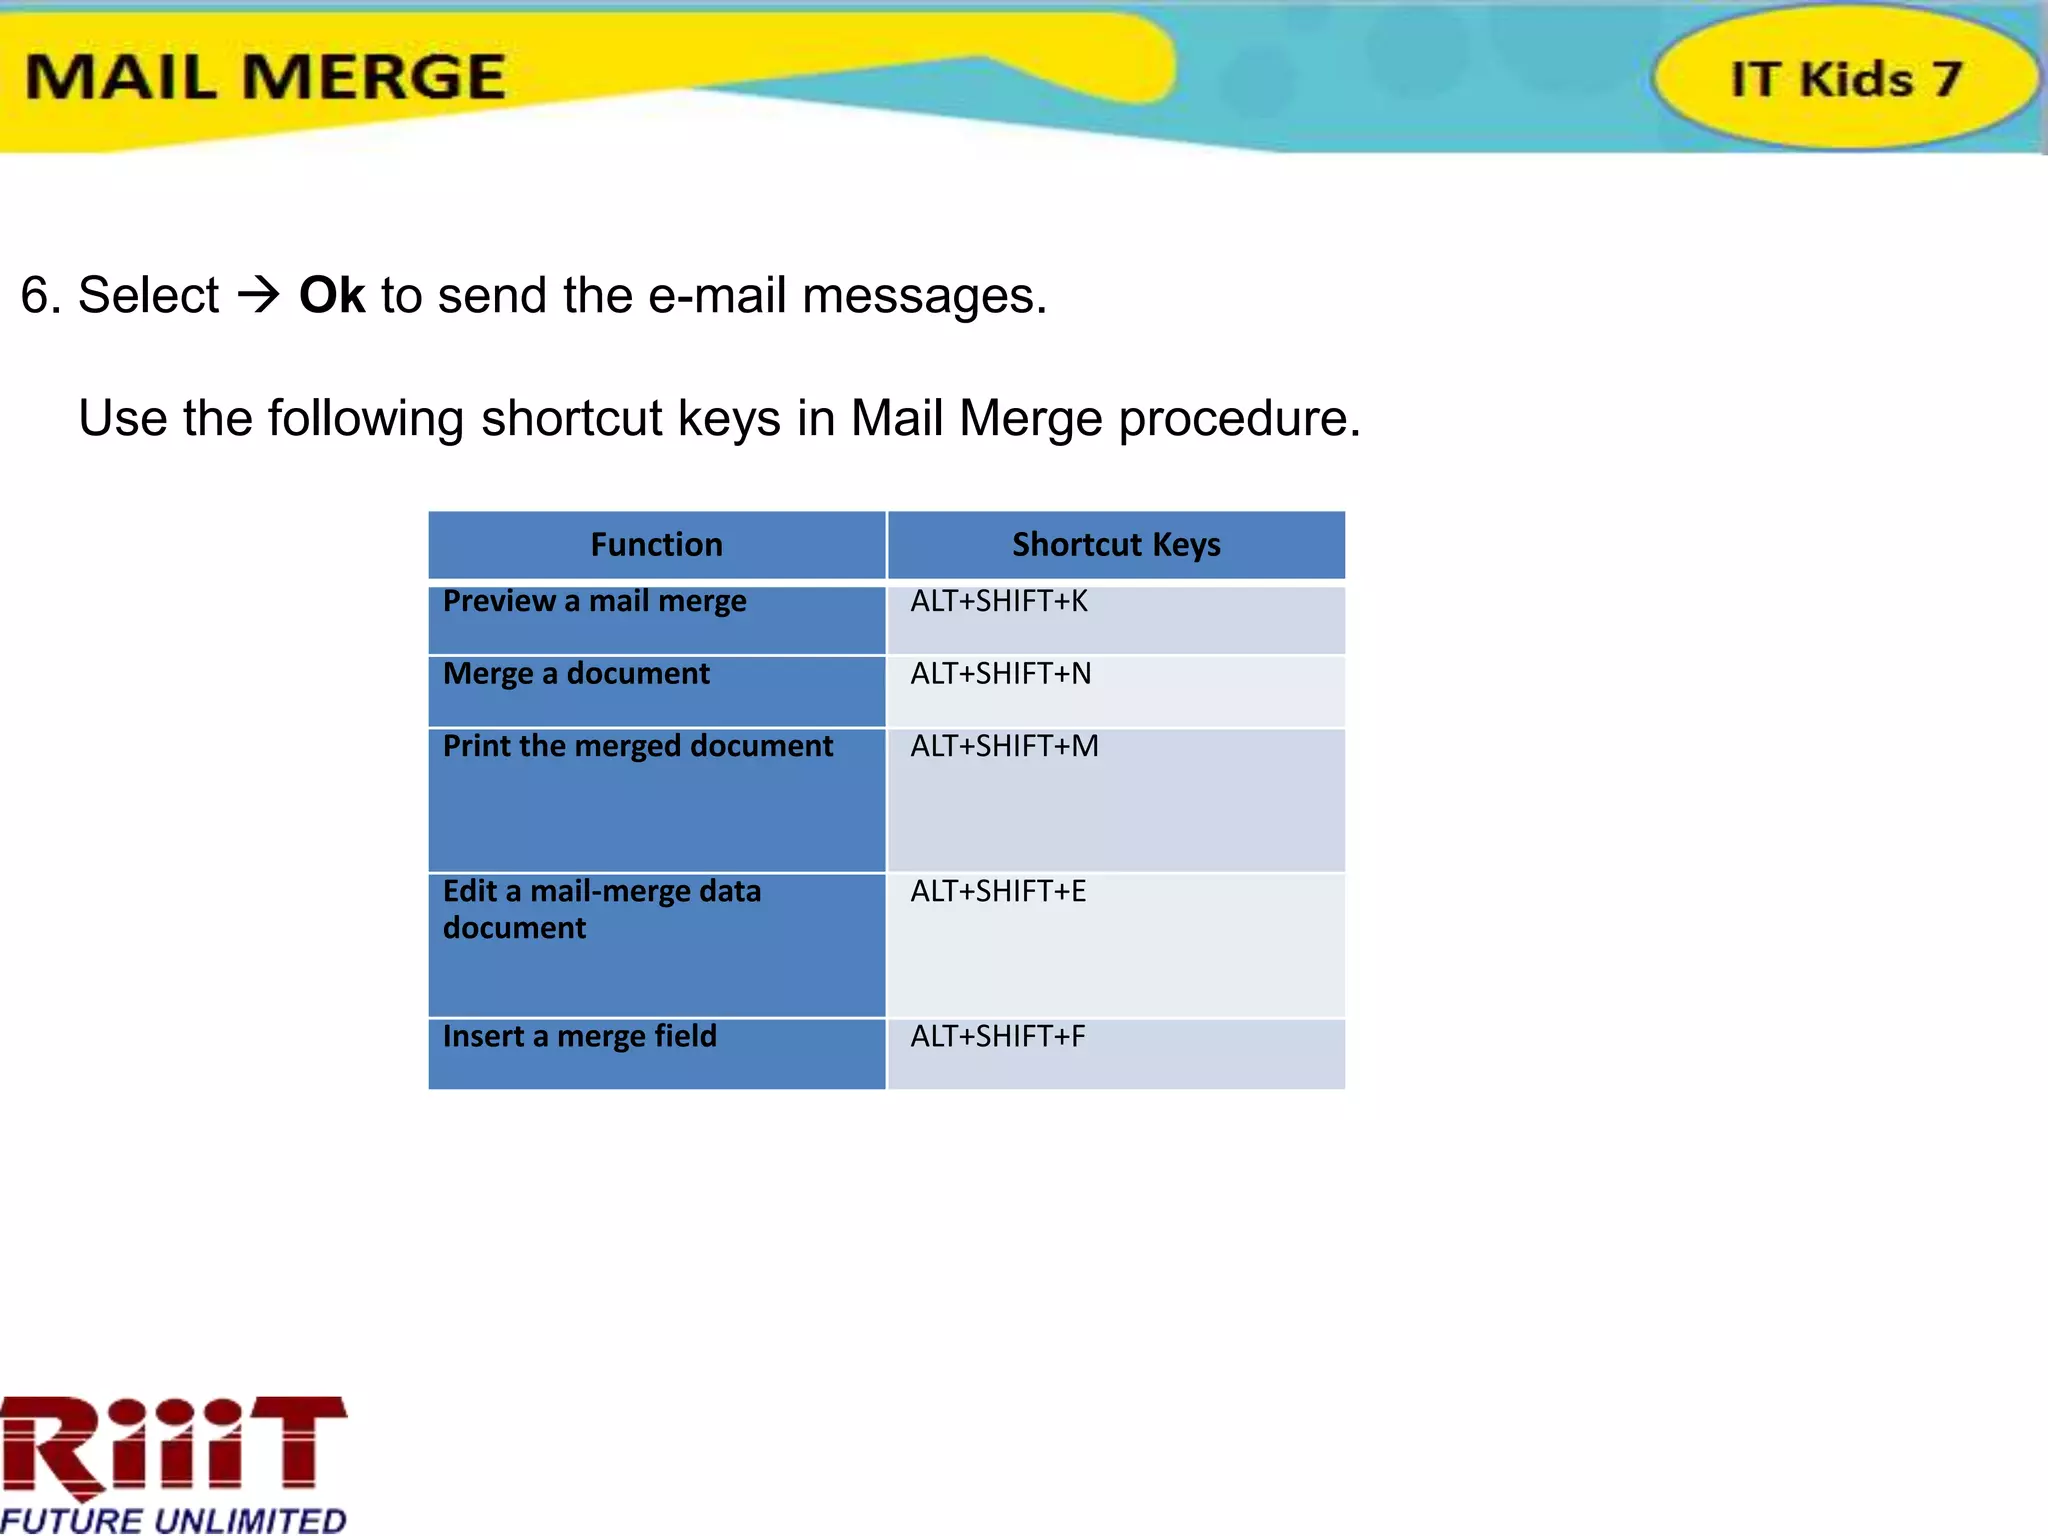
Session objective
 Introduction
 Main document
 Data source document
 Create Mail Merge
 To Insert Merge Fields
Introduction
Mail Merge is an advanced feature of Word. This feature allows you to send a
common document to different recipients. Generally Mail merge is used to print
envelopes, labels, lists, catalogues, letters, etc.
• Main Document
This document contains the text format that is merged with the data source.
• Data Source Document
This document contains the information that needs to be attached to the
main document such as name, address, phone number.
Step 2
Select  Use the current document.
Select Next: Select recipients to move to Step 3
Mail Merge Step 2
Step 3
Now, you need an address list .The list can be in an
existing file, such as an Excel workbook, or you can
type a new address list using the Mail Merge Wizard.
1. From the Mail Merge task pane select a new list, and
then select create…. A New Address list is opened.
New Address List
2. This dialog box offers a list of commonly used field (column headings such as Title,
First Name, Last Name, Company Name……..etc) names. Type recipient information in
the table. The unwanted fields can be deleted and you can add extra field names to the
list. To delete a field name, select and click on the Remove Field Name button.
4. In the Mail Merge Recipients dialog box, you can check or uncheck each recipient to
control which ones are to be used in the merge.
3. After entering the information, Select Ok and save the file, A dialog box
appears.
5. After selecting, select OK to close the dialog box and move to step 4.
In step 3, if you select the use an existing document option,
1. In the Mail Merge, click Browse.
Select Data Source
2. Select name, address from file or a database and then select Open.
3. selectNext: Write your e-mail messages to move to Step 4
Step 4:
Now, you are ready to write e-mail messages. When it's printed,
each copy of the letter will basically be the same, except the
recipient data—such as the name and address—will be
different.
To insert the recipient data:
1. Place the insertion point in the document
2. Select Address block, Greeting line,
Electronic postage or more items from the task pane.
3. Depending on your selection, a dialog box may
appear with various options. Select the desired
option then, click OK. Mail Merge Step 4
a. For inserting an Address Block
To Insert an Address Block
b. For inserting Greeting Line.
To insert a Greeting Line
4. A placeholder appears in your document as shown below.
from mailings toolbox also you can insert
merge field.
Insert Merge Field
5. Use the enter key to move the cursor to the next line and repeat step4, to insert the
rest of the fields from the data source.
6. In the Mail Merge task pane, click  Next Preview your e-mail messages to
move to Step 5.
Step 5:
1. Preview the letters to make sure information from
the recipient list appears correctly in the
letter. You can use the left and right scroll
arrows to view each document.
Mail Merge Step 5
2. Select Next: Complete the merge to move to Step 6.
Step 6:
1. Mail merge is ready to produce the e-mail messages.
2. If you click  previous you can preview your
e-mail messages.
3. Select the Electronic Mail you get a dialog box.
Mail Merge Step6
4. Add Subject Line, you can select mail format as an
Attachment, Plain text, HTML from dropdown box.
5. In Send records you can select All records, Current
record and From number to To number of records
Merge to E-mail
6. Select  Ok to send the e-mail messages.
Use the following shortcut keys in Mail Merge procedure.
Function Shortcut Keys
Preview a mail merge ALT+SHIFT+K
Merge a document ALT+SHIFT+N
Print the merged document ALT+SHIFT+M
Edit a mail-merge data
document
ALT+SHIFT+E
Insert a merge field ALT+SHIFT+F
Summary

Session 1

  • 1.
    Session objective  Introduction Main document  Data source document  Create Mail Merge  To Insert Merge Fields
  • 2.
    Introduction Mail Merge isan advanced feature of Word. This feature allows you to send a common document to different recipients. Generally Mail merge is used to print envelopes, labels, lists, catalogues, letters, etc. • Main Document This document contains the text format that is merged with the data source. • Data Source Document This document contains the information that needs to be attached to the main document such as name, address, phone number.
  • 3.
    Step 2 Select Use the current document. Select Next: Select recipients to move to Step 3 Mail Merge Step 2 Step 3 Now, you need an address list .The list can be in an existing file, such as an Excel workbook, or you can type a new address list using the Mail Merge Wizard. 1. From the Mail Merge task pane select a new list, and then select create…. A New Address list is opened.
  • 4.
    New Address List 2.This dialog box offers a list of commonly used field (column headings such as Title, First Name, Last Name, Company Name……..etc) names. Type recipient information in the table. The unwanted fields can be deleted and you can add extra field names to the list. To delete a field name, select and click on the Remove Field Name button.
  • 5.
    4. In theMail Merge Recipients dialog box, you can check or uncheck each recipient to control which ones are to be used in the merge. 3. After entering the information, Select Ok and save the file, A dialog box appears.
  • 6.
    5. After selecting,select OK to close the dialog box and move to step 4. In step 3, if you select the use an existing document option, 1. In the Mail Merge, click Browse. Select Data Source 2. Select name, address from file or a database and then select Open. 3. selectNext: Write your e-mail messages to move to Step 4
  • 7.
    Step 4: Now, youare ready to write e-mail messages. When it's printed, each copy of the letter will basically be the same, except the recipient data—such as the name and address—will be different. To insert the recipient data: 1. Place the insertion point in the document 2. Select Address block, Greeting line, Electronic postage or more items from the task pane. 3. Depending on your selection, a dialog box may appear with various options. Select the desired option then, click OK. Mail Merge Step 4
  • 8.
    a. For insertingan Address Block To Insert an Address Block
  • 9.
    b. For insertingGreeting Line. To insert a Greeting Line
  • 10.
    4. A placeholderappears in your document as shown below. from mailings toolbox also you can insert merge field. Insert Merge Field 5. Use the enter key to move the cursor to the next line and repeat step4, to insert the rest of the fields from the data source. 6. In the Mail Merge task pane, click  Next Preview your e-mail messages to move to Step 5.
  • 11.
    Step 5: 1. Previewthe letters to make sure information from the recipient list appears correctly in the letter. You can use the left and right scroll arrows to view each document. Mail Merge Step 5 2. Select Next: Complete the merge to move to Step 6.
  • 12.
    Step 6: 1. Mailmerge is ready to produce the e-mail messages. 2. If you click  previous you can preview your e-mail messages. 3. Select the Electronic Mail you get a dialog box. Mail Merge Step6 4. Add Subject Line, you can select mail format as an Attachment, Plain text, HTML from dropdown box. 5. In Send records you can select All records, Current record and From number to To number of records Merge to E-mail
  • 13.
    6. Select Ok to send the e-mail messages. Use the following shortcut keys in Mail Merge procedure. Function Shortcut Keys Preview a mail merge ALT+SHIFT+K Merge a document ALT+SHIFT+N Print the merged document ALT+SHIFT+M Edit a mail-merge data document ALT+SHIFT+E Insert a merge field ALT+SHIFT+F
  • 14.