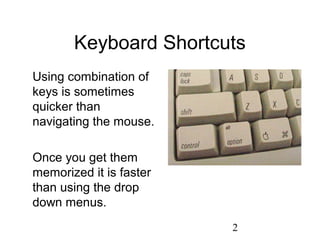
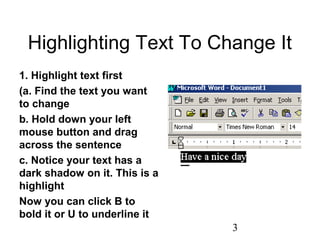
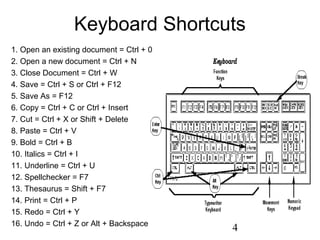
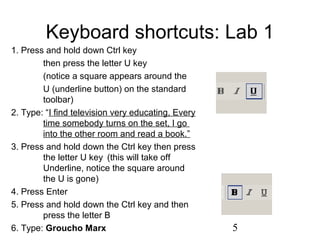
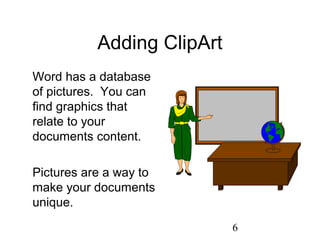
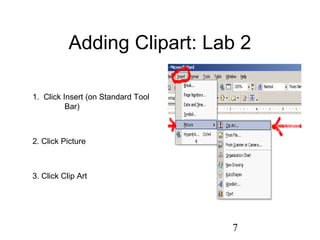
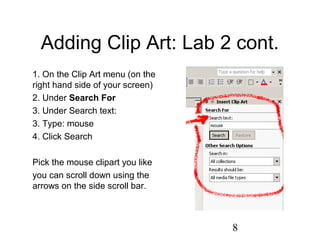
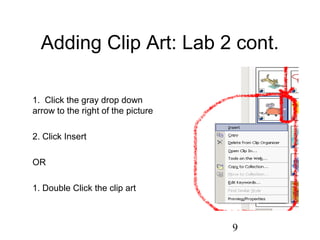
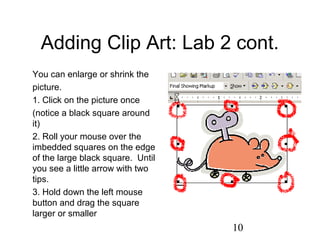
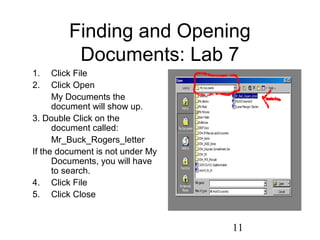
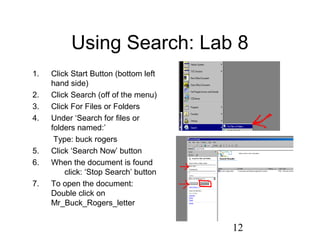
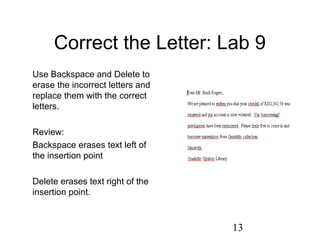
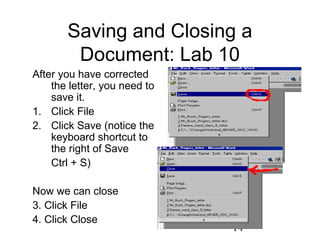
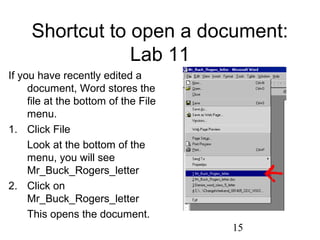
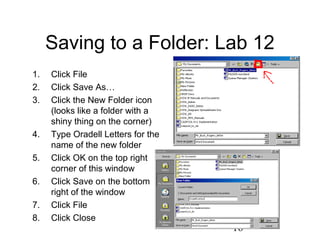
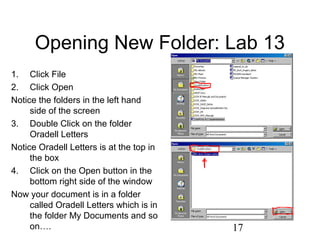
1
Microsoft Word
Class 5
Shortcuts and other helpful tools
2
Keyboard Shortcuts
Using combination of
keys is sometimes
quicker than
navigating the mouse.
Once you get them
memorized it is faster
than using the drop
down menus.
3
Highlighting Text To Change It
1. Highlight text first
(a. Find the text you want
to change
b. Hold down your left
mouse button and drag
across the sentence
c. Notice your text has a
dark shadow on it. This is a
highlight
Now you can click B to
bold it or U to underline it
4
Keyboard Shortcuts
1. Open an existing document = Ctrl + 0
2. Open a new document = Ctrl + N
3. Close Document = Ctrl + W
4. Save = Ctrl + S or Ctrl + F12
5. Save As = F12
6. Copy = Ctrl + C or Ctrl + Insert
7. Cut = Ctrl + X or Shift + Delete
8. Paste = Ctrl + V
9. Bold = Ctrl + B
10. Italics = Ctrl + I
11. Underline = Ctrl + U
12. Spellchecker = F7
13. Thesaurus = Shift + F7
14. Print = Ctrl + P
15. Redo = Ctrl + Y
16. Undo = Ctrl + Z or Alt + Backspace
5
Keyboard shortcuts: Lab 1
1. Press and hold down Ctrl key
then press the letter U key
(notice a square appears around the
U (underline button) on the standard
toolbar)
2. Type: “I find television very educating, Every
time somebody turns on the set, I go
into the other room and read a book.”
3. Press and hold down the Ctrl key then press
the letter U key (this will take off
Underline, notice the square around
the U is gone)
4. Press Enter
5. Press and hold down the Ctrl key and then
press the letter B
6. Type: Groucho Marx
6
Adding ClipArt
Word has a database
of pictures. You can
find graphics that
relate to your
documents content.
Pictures are a way to
make your documents
unique.
7
Adding Clipart: Lab 2
1. Click Insert (on Standard Tool
Bar)
2. Click Picture
3. Click Clip Art
8
Adding Clip Art: Lab 2 cont.
1. On the Clip Art menu (on the
right hand side of your screen)
2. Under Search For
3. Under Search text:
3. Type: mouse
4. Click Search
Pick the mouse clipart you like
you can scroll down using the
arrows on the side scroll bar.
9
Adding Clip Art: Lab 2 cont.
1. Click the gray drop down
arrow to the right of the picture
2. Click Insert
OR
1. Double Click the clip art
10
Adding Clip Art: Lab 2 cont.
You can enlarge or shrink the
picture.
1. Click on the picture once
(notice a black square around
it)
2. Roll your mouse over the
imbedded squares on the edge
of the large black square. Until
you see a little arrow with two
tips.
3. Hold down the left mouse
button and drag the square
larger or smaller
11
Finding and Opening
Documents: Lab 7
1. Click File
2. Click Open
My Documents the
document will show up.
3. Double Click on the
document called:
Mr_Buck_Rogers_letter
If the document is not under My
Documents, you will have
to search.
4. Click File
5. Click Close
12
Using Search: Lab 8
1. Click Start Button (bottom left
hand side)
2. Click Search (off of the menu)
3. Click For Files or Folders
4. Under ‘Search for files or
folders named:’
Type: buck rogers
5. Click ‘Search Now’ button
6. When the document is found
click: ‘Stop Search’ button
7. To open the document:
Double click on
Mr_Buck_Rogers_letter
13
Correct the Letter: Lab 9
Use Backspace and Delete to
erase the incorrect letters and
replace them with the correct
letters.
Review:
Backspace erases text left of
the insertion point
Delete erases text right of the
insertion point.
14
Saving and Closing a
Document: Lab 10
After you have corrected
the letter, you need to
save it.
1. Click File
2. Click Save (notice the
keyboard shortcut to
the right of Save
Ctrl + S)
Now we can close
3. Click File
4. Click Close
15
Shortcut to open a document:
Lab 11
If you have recently edited a
document, Word stores the
file at the bottom of the File
menu.
1. Click File
Look at the bottom of the
menu, you will see
Mr_Buck_Rogers_letter
2. Click on
Mr_Buck_Rogers_letter
This opens the document.
16
Saving to a Folder: Lab 12
1. Click File
2. Click Save As…
3. Click the New Folder icon
(looks like a folder with a
shiny thing on the corner)
4. Type Oradell Letters for the
name of the new folder
5. Click OK on the top right
corner of this window
6. Click Save on the bottom
right of the window
7. Click File
8. Click Close
17
Opening New Folder: Lab 13
1. Click File
2. Click Open
Notice the folders in the left hand
side of the screen
3. Double Click on the folder
Oradell Letters
Notice Oradell Letters is at the top in
the box
4. Click on the Open button in the
bottom right side of the window
Now your document is in a folder
called Oradell Letters which is in
the folder My Documents and so
on….
18
Questions?
We have learned a lot during
these past 5 weeks.
There are some very good
books that go into much more
detail.
If you have any questions you
can call at 201-262-2613 or
stop by my desk.
It was a pleasure to have you in
class.

Beginner word class_5

  • 1.
    1 Microsoft Word Class 5 Shortcutsand other helpful tools
  • 2.
    2 Keyboard Shortcuts Using combinationof keys is sometimes quicker than navigating the mouse. Once you get them memorized it is faster than using the drop down menus.
  • 3.
    3 Highlighting Text ToChange It 1. Highlight text first (a. Find the text you want to change b. Hold down your left mouse button and drag across the sentence c. Notice your text has a dark shadow on it. This is a highlight Now you can click B to bold it or U to underline it
  • 4.
    4 Keyboard Shortcuts 1. Openan existing document = Ctrl + 0 2. Open a new document = Ctrl + N 3. Close Document = Ctrl + W 4. Save = Ctrl + S or Ctrl + F12 5. Save As = F12 6. Copy = Ctrl + C or Ctrl + Insert 7. Cut = Ctrl + X or Shift + Delete 8. Paste = Ctrl + V 9. Bold = Ctrl + B 10. Italics = Ctrl + I 11. Underline = Ctrl + U 12. Spellchecker = F7 13. Thesaurus = Shift + F7 14. Print = Ctrl + P 15. Redo = Ctrl + Y 16. Undo = Ctrl + Z or Alt + Backspace
  • 5.
    5 Keyboard shortcuts: Lab1 1. Press and hold down Ctrl key then press the letter U key (notice a square appears around the U (underline button) on the standard toolbar) 2. Type: “I find television very educating, Every time somebody turns on the set, I go into the other room and read a book.” 3. Press and hold down the Ctrl key then press the letter U key (this will take off Underline, notice the square around the U is gone) 4. Press Enter 5. Press and hold down the Ctrl key and then press the letter B 6. Type: Groucho Marx
  • 6.
    6 Adding ClipArt Word hasa database of pictures. You can find graphics that relate to your documents content. Pictures are a way to make your documents unique.
  • 7.
    7 Adding Clipart: Lab2 1. Click Insert (on Standard Tool Bar) 2. Click Picture 3. Click Clip Art
  • 8.
    8 Adding Clip Art:Lab 2 cont. 1. On the Clip Art menu (on the right hand side of your screen) 2. Under Search For 3. Under Search text: 3. Type: mouse 4. Click Search Pick the mouse clipart you like you can scroll down using the arrows on the side scroll bar.
  • 9.
    9 Adding Clip Art:Lab 2 cont. 1. Click the gray drop down arrow to the right of the picture 2. Click Insert OR 1. Double Click the clip art
  • 10.
    10 Adding Clip Art:Lab 2 cont. You can enlarge or shrink the picture. 1. Click on the picture once (notice a black square around it) 2. Roll your mouse over the imbedded squares on the edge of the large black square. Until you see a little arrow with two tips. 3. Hold down the left mouse button and drag the square larger or smaller
  • 11.
    11 Finding and Opening Documents:Lab 7 1. Click File 2. Click Open My Documents the document will show up. 3. Double Click on the document called: Mr_Buck_Rogers_letter If the document is not under My Documents, you will have to search. 4. Click File 5. Click Close
  • 12.
    12 Using Search: Lab8 1. Click Start Button (bottom left hand side) 2. Click Search (off of the menu) 3. Click For Files or Folders 4. Under ‘Search for files or folders named:’ Type: buck rogers 5. Click ‘Search Now’ button 6. When the document is found click: ‘Stop Search’ button 7. To open the document: Double click on Mr_Buck_Rogers_letter
  • 13.
    13 Correct the Letter:Lab 9 Use Backspace and Delete to erase the incorrect letters and replace them with the correct letters. Review: Backspace erases text left of the insertion point Delete erases text right of the insertion point.
  • 14.
    14 Saving and Closinga Document: Lab 10 After you have corrected the letter, you need to save it. 1. Click File 2. Click Save (notice the keyboard shortcut to the right of Save Ctrl + S) Now we can close 3. Click File 4. Click Close
  • 15.
    15 Shortcut to opena document: Lab 11 If you have recently edited a document, Word stores the file at the bottom of the File menu. 1. Click File Look at the bottom of the menu, you will see Mr_Buck_Rogers_letter 2. Click on Mr_Buck_Rogers_letter This opens the document.
  • 16.
    16 Saving to aFolder: Lab 12 1. Click File 2. Click Save As… 3. Click the New Folder icon (looks like a folder with a shiny thing on the corner) 4. Type Oradell Letters for the name of the new folder 5. Click OK on the top right corner of this window 6. Click Save on the bottom right of the window 7. Click File 8. Click Close
  • 17.
    17 Opening New Folder:Lab 13 1. Click File 2. Click Open Notice the folders in the left hand side of the screen 3. Double Click on the folder Oradell Letters Notice Oradell Letters is at the top in the box 4. Click on the Open button in the bottom right side of the window Now your document is in a folder called Oradell Letters which is in the folder My Documents and so on….
  • 18.
    18 Questions? We have learneda lot during these past 5 weeks. There are some very good books that go into much more detail. If you have any questions you can call at 201-262-2613 or stop by my desk. It was a pleasure to have you in class.