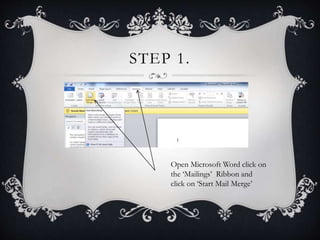
LETTER MAIL MERGE 
TUTORIAL
INTRODUCTION 
 Mail Merges allow companies to send the same letter to a large 
number of people without having to manually change the name, 
address and other contact details of the recipients. 
 Mail Merges are beneficial as they are much faster and automatic 
compared to manually change the address and name of the recipients 
manually.
STEP 1. 
Open Microsoft Word click on 
the ‘Mailings’ Ribbon and 
click on ‘Start Mail Merge’
STEP 2. 
A drop down box will appear 
where you can select what 
document you would like to 
use a mail merge for. In this 
tutorial I will be using the 
Letters document type.
STEP 3. 
Next click on the Select 
Recipients Button which is 
next to the Start Mail 
Merge Button. Once 
Clicked a drop down list 
will appear where you can 
select a data source for your 
mail merge. If you do not 
have a database to use or an 
address book you can type 
a new list which I will be 
using in this guide.
STEP 4. 
A Dialog Box will appear where 
you can enter details about 
customers you want included in 
the mail merge. If you want to 
add a new record you can click 
the New Entry button and if you 
wish to delete it you can click the 
Delete Entry button.
STEP 5. 
Press OK after all 
your records have 
been entered and 
save the data source 
with an appropriate 
title such as 
“Customer Records”
STEP 6. 
When writing a letter insert merge 
fields for things that are unique to 
each person such as First & Last 
Name or Address. To do this click 
on the Insert Merge Field Button 
where a drop down list will appear 
where you can select the Fields.
STEP 7. 
Eventually you’re letter 
should look something 
like this Merged Fields 
have “<<“ and “>>” 
between them. Such as 
“<<Last_Name>>”
STEP 8. 
Once you’re merge 
fields are entered into 
Microsoft Word, click 
Finish & Merge button 
which can be found at 
the top of the Mailings 
Ribbon. When clicked 
you can choose to 
either send as e-mails 
to each person or print 
the documents.
PLENARY 
 I hope you have found this tutorial helpful. 
 A more detailed tutorial can be found here : 
https://www.youtube.com/watch?v=13ErZxwVecg

Microsoft Word - Mail Merge Tutorial

  • 1.
  • 2.
    INTRODUCTION  MailMerges allow companies to send the same letter to a large number of people without having to manually change the name, address and other contact details of the recipients.  Mail Merges are beneficial as they are much faster and automatic compared to manually change the address and name of the recipients manually.
  • 3.
    STEP 1. OpenMicrosoft Word click on the ‘Mailings’ Ribbon and click on ‘Start Mail Merge’
  • 4.
    STEP 2. Adrop down box will appear where you can select what document you would like to use a mail merge for. In this tutorial I will be using the Letters document type.
  • 5.
    STEP 3. Nextclick on the Select Recipients Button which is next to the Start Mail Merge Button. Once Clicked a drop down list will appear where you can select a data source for your mail merge. If you do not have a database to use or an address book you can type a new list which I will be using in this guide.
  • 6.
    STEP 4. ADialog Box will appear where you can enter details about customers you want included in the mail merge. If you want to add a new record you can click the New Entry button and if you wish to delete it you can click the Delete Entry button.
  • 7.
    STEP 5. PressOK after all your records have been entered and save the data source with an appropriate title such as “Customer Records”
  • 8.
    STEP 6. Whenwriting a letter insert merge fields for things that are unique to each person such as First & Last Name or Address. To do this click on the Insert Merge Field Button where a drop down list will appear where you can select the Fields.
  • 9.
    STEP 7. Eventuallyyou’re letter should look something like this Merged Fields have “<<“ and “>>” between them. Such as “<<Last_Name>>”
  • 10.
    STEP 8. Onceyou’re merge fields are entered into Microsoft Word, click Finish & Merge button which can be found at the top of the Mailings Ribbon. When clicked you can choose to either send as e-mails to each person or print the documents.
  • 11.
    PLENARY  Ihope you have found this tutorial helpful.  A more detailed tutorial can be found here : https://www.youtube.com/watch?v=13ErZxwVecg