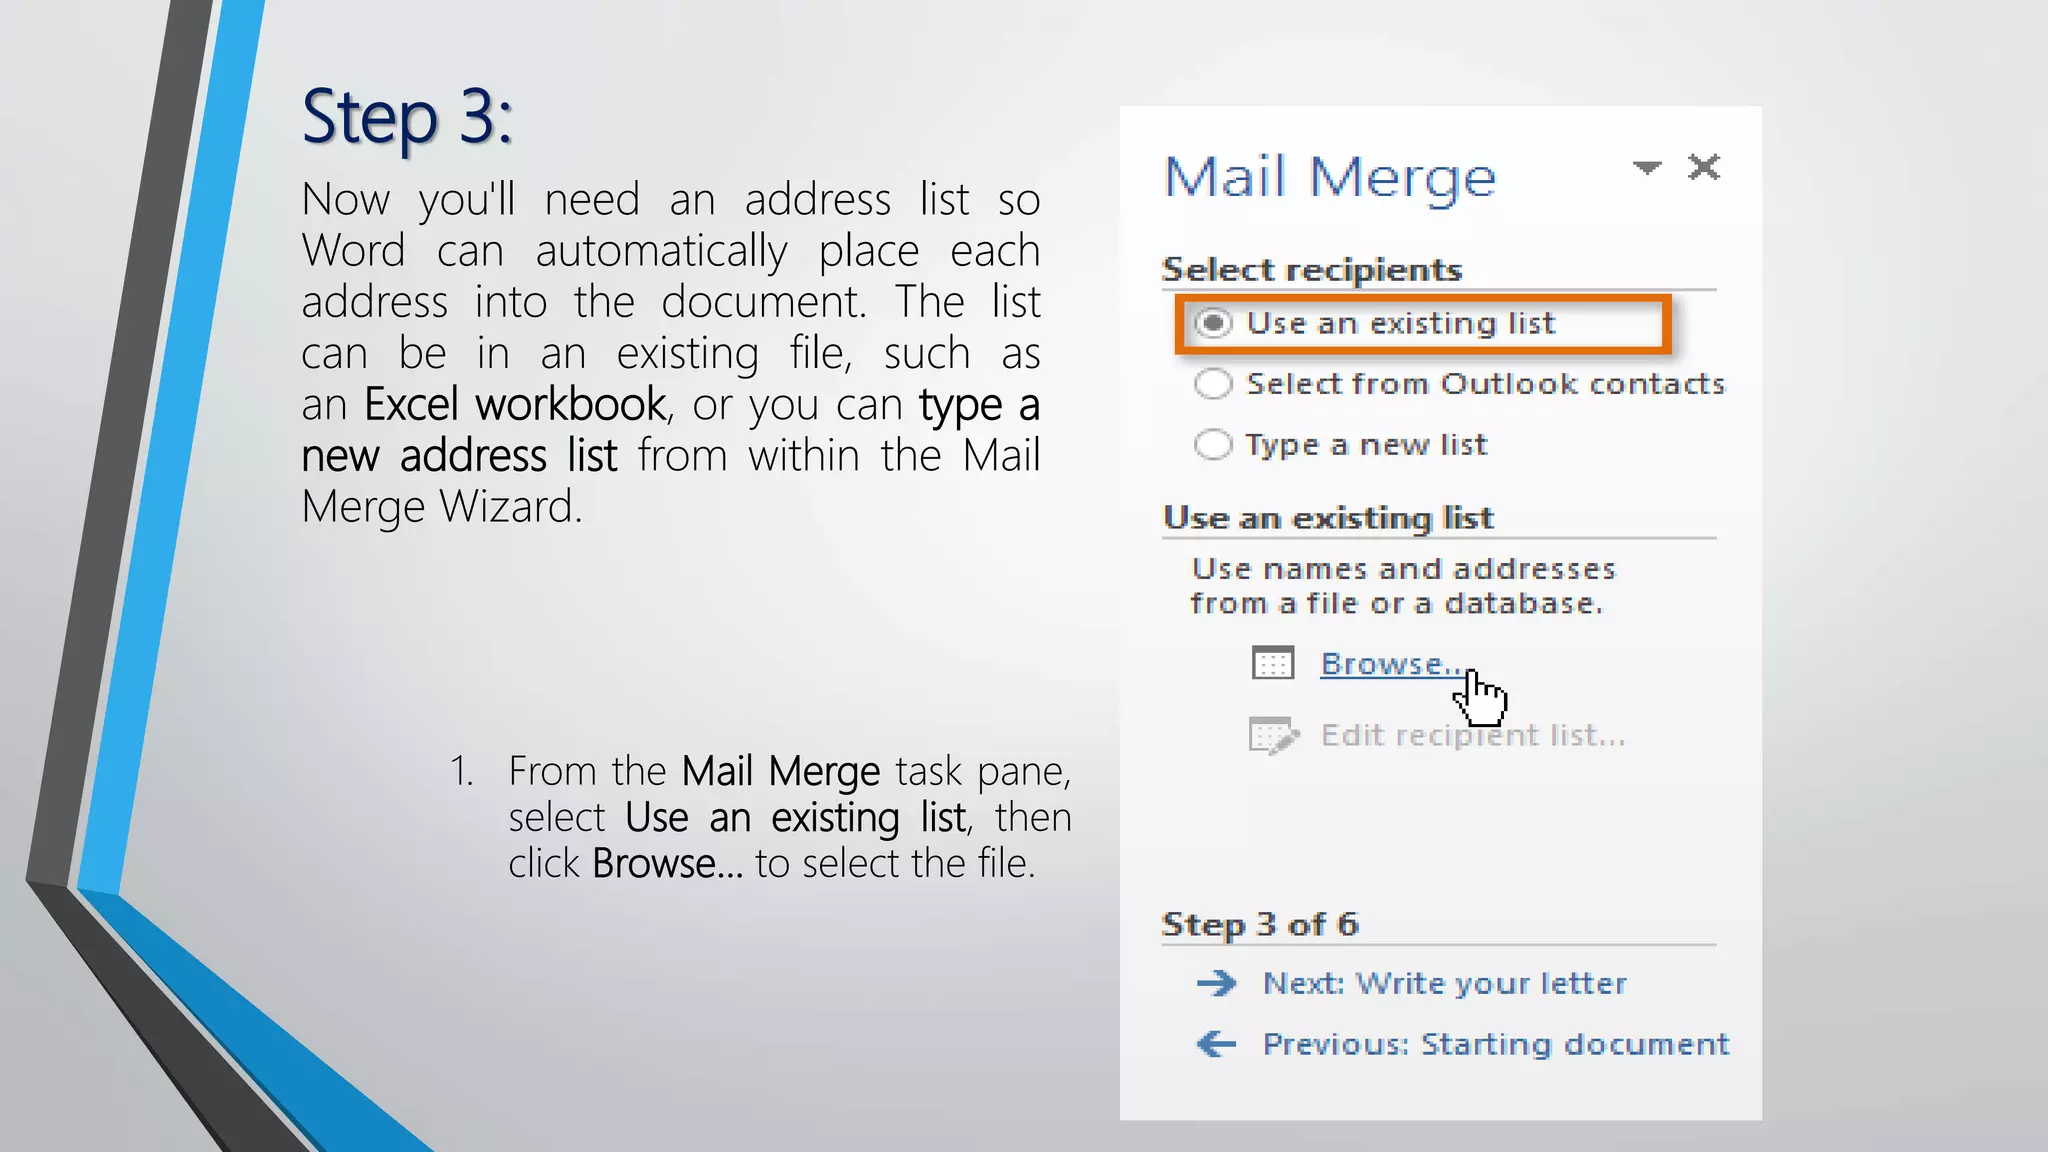
MAIL MERGE
MICHAEL B. BOTALON
Instructor
MAIL MERGE
MS WORD 2013
Mail Merge is a useful tool that allows you to produce
multiple letters, labels, envelopes, name tags, and more
using information stored in a list, database, or
spreadsheet. When performing a Mail Merge, you will
need a Word document (you can start with an existing
one or create a new one) and a recipient list, which is
typically an Excel workbook.
To use Mail Merge:
1. Open and existing Word document, or create a
new one.
2. From the Mailings tab, click the Start Mail Merge
command and select Step by Step Mail Merge
Wizard…from the drop-down menu.
The Mail Merge pane appears and will guide you through the six main steps to complete a
merge. The following example demonstrates how to complete a form letter and merge the
letter with recipient list.
Step 1:
Choose the type of document
you wish to create. In our
example, we will select Letters.
Then click Next: Starting
document to move to Step 2.
Step 2:
Select Use the current
document, then click Next:
Select recipients to move to
Step 3.
Step 3:
Now you'll need an address list so
Word can automatically place each
address into the document. The list
can be in an existing file, such as
an Excel workbook, or you can type a
new address list from within the Mail
Merge Wizard.
1. From the Mail Merge task pane,
select Use an existing list, then
click Browse... to select the file.
Step 3:
2. Locate your file and click Open.
Step 3:
3. If the address list is in an Excel workbook,
select the worksheet that contains the list and
click OK.
Step 3:
4. In the Mail Merge
Recipients dialog
box, you
can check or unch
eck each box to
control which
recipients are
included in the
merge. By default,
all recipients
should be selected.
When you're done,
click OK.
Step 3:
5. From the Mail Merge task pane,
click Next: Write your letter to
move to Step 4.
If you don't have an
existing address list, you
can click the Type a new
list button and
click Create. You can
then type your address
list.
Step 4:
Now you're ready to write your letter. When it's
printed, each copy of the letter will basically be the
same; only the recipient data (such as
the name and address) will be different. You'll
need to add placeholders for the recipient data so
Mail Merge knows exactly where to add the data.
Step 4:
1. Place the insertion
point in the
document where
you want the
information to
appear.
To insert recipient data:
Step 4:
2. Choose one of the
four placeholder options: Address
block, Greeting line, Electronic
postage, or More items.
Step 4:
3. Depending on your selection, a dialog box may appear with various options.
Select the desired options and click OK.
Step 4:
4. A placeholder will appear in your document (for
example, «AddressBlock»).
Step 4:
5. Repeat these steps each time you need to enter information from your
data record. In our example, we'll add a Greeting line.
Step 4:
6. When you're done,
click Next: Preview your
letters to move to Step 5.
For some letters,
you'll only need to
add an Address
block and Greetin
g line. Sometimes,
however, you may
want to
place recipient
data within the
body of the letter
to personalize
it even further.
Step 5: 1. Preview the letters to make sure the information from the recipient list
appears correctly in the letter. You can use the left and right scroll
arrows to view each document.
Step 5:
2. Click Next: Complete the
merge to move to Step 6.
Step 6:
1. Click Print... to print the
letters.
Step 6:
2. A dialog box will appear.
Click All, then click OK.
Step 6:
3. The Print dialog
box will appear.
Adjust the print
settings if needed,
then click OK. The
letters will be
printed.
Challenge!
1. Open an existing Word document. If you want, you can use
our Practice document (Word document) and Address
list (Excel workbook).
2. Use the Mail Merge Wizard to merge the letter with
the recipient list.
3. Place an Address Block at the top of the page and a Greeting
line above the body of the letter.
4. Print the document.

Mail merge

  • 1.
    MAIL MERGE MICHAEL B.BOTALON Instructor
  • 2.
    MAIL MERGE MS WORD2013 Mail Merge is a useful tool that allows you to produce multiple letters, labels, envelopes, name tags, and more using information stored in a list, database, or spreadsheet. When performing a Mail Merge, you will need a Word document (you can start with an existing one or create a new one) and a recipient list, which is typically an Excel workbook.
  • 3.
    To use MailMerge: 1. Open and existing Word document, or create a new one. 2. From the Mailings tab, click the Start Mail Merge command and select Step by Step Mail Merge Wizard…from the drop-down menu.
  • 4.
    The Mail Mergepane appears and will guide you through the six main steps to complete a merge. The following example demonstrates how to complete a form letter and merge the letter with recipient list.
  • 5.
    Step 1: Choose thetype of document you wish to create. In our example, we will select Letters. Then click Next: Starting document to move to Step 2.
  • 6.
    Step 2: Select Usethe current document, then click Next: Select recipients to move to Step 3.
  • 7.
    Step 3: Now you'llneed an address list so Word can automatically place each address into the document. The list can be in an existing file, such as an Excel workbook, or you can type a new address list from within the Mail Merge Wizard. 1. From the Mail Merge task pane, select Use an existing list, then click Browse... to select the file.
  • 8.
    Step 3: 2. Locateyour file and click Open.
  • 9.
    Step 3: 3. Ifthe address list is in an Excel workbook, select the worksheet that contains the list and click OK.
  • 10.
    Step 3: 4. Inthe Mail Merge Recipients dialog box, you can check or unch eck each box to control which recipients are included in the merge. By default, all recipients should be selected. When you're done, click OK.
  • 11.
    Step 3: 5. Fromthe Mail Merge task pane, click Next: Write your letter to move to Step 4. If you don't have an existing address list, you can click the Type a new list button and click Create. You can then type your address list.
  • 12.
    Step 4: Now you'reready to write your letter. When it's printed, each copy of the letter will basically be the same; only the recipient data (such as the name and address) will be different. You'll need to add placeholders for the recipient data so Mail Merge knows exactly where to add the data.
  • 13.
    Step 4: 1. Placethe insertion point in the document where you want the information to appear. To insert recipient data:
  • 14.
    Step 4: 2. Chooseone of the four placeholder options: Address block, Greeting line, Electronic postage, or More items.
  • 15.
    Step 4: 3. Dependingon your selection, a dialog box may appear with various options. Select the desired options and click OK.
  • 16.
    Step 4: 4. Aplaceholder will appear in your document (for example, «AddressBlock»).
  • 17.
    Step 4: 5. Repeatthese steps each time you need to enter information from your data record. In our example, we'll add a Greeting line.
  • 18.
    Step 4: 6. Whenyou're done, click Next: Preview your letters to move to Step 5. For some letters, you'll only need to add an Address block and Greetin g line. Sometimes, however, you may want to place recipient data within the body of the letter to personalize it even further.
  • 19.
    Step 5: 1.Preview the letters to make sure the information from the recipient list appears correctly in the letter. You can use the left and right scroll arrows to view each document.
  • 20.
    Step 5: 2. ClickNext: Complete the merge to move to Step 6.
  • 21.
    Step 6: 1. ClickPrint... to print the letters.
  • 22.
    Step 6: 2. Adialog box will appear. Click All, then click OK.
  • 23.
    Step 6: 3. ThePrint dialog box will appear. Adjust the print settings if needed, then click OK. The letters will be printed.
  • 25.
    Challenge! 1. Open anexisting Word document. If you want, you can use our Practice document (Word document) and Address list (Excel workbook). 2. Use the Mail Merge Wizard to merge the letter with the recipient list. 3. Place an Address Block at the top of the page and a Greeting line above the body of the letter. 4. Print the document.