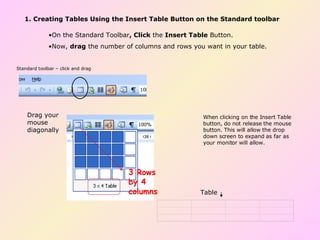
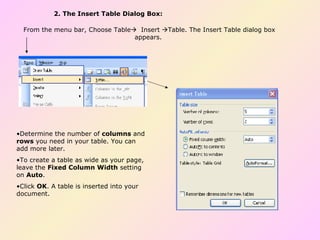
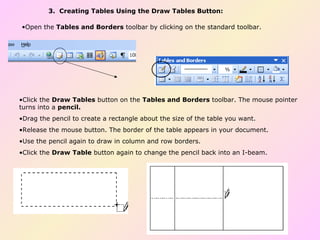
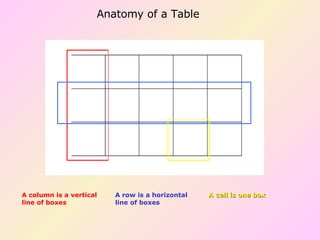
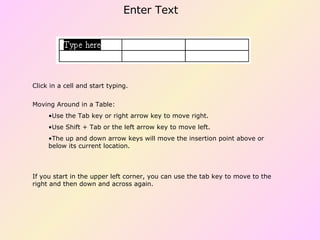
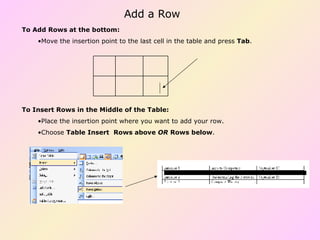
Tables can be used in Microsoft Word to organize text, numbers, and graphics. There are several ways to insert tables, including using the Insert Table button on the standard toolbar or drawing a table. Text, rows, columns, borders, and other table elements can be formatted and modified. Word offers features like autoformatting, resizing, moving, and adjusting text flow around tables.
2. Why Use Tables ? Microsoft Word tables can help you arrange your thoughts and data in ways that make sense to the people you're trying to reach. Tables can be a great way to present numbers, but it also does a great job of presenting text and graphics. Just about anything can be put into the table. It's all up to you. In short, a table is a collection of rows and columns that allows you organize text, graphics and data. You have learned how to present information in parallel columns using tabs and columns in Word. Using Word's Tables feature, you can format, edit, delete, and move text without affecting the rest of your document. There are several ways to create tables in WordâŚâŚ.
3.
4.
5.
6. Anatomy of a Table A column is a vertical line of boxes A row is a horizontal line of boxes A cell is one box
7.
8.
9.
10.
11.
12. You can combine two or more cells in your table to create one large cell. This is useful when you want to display a title in the cell at the top of your table. Highlight the adjacent cells that you want to merge . Right click select merge cells Type your title into the merged cell 1 2 3 Merge Cells
13. You can split one cell in your table into several smaller cells. Click the cell you want to split On the table menu choose split cell Double click and type the number of columns and rows that you want inside the cell. Click OK Split Cells
14. Formatting Text Selecting Text in Tables: A cell : triple click inside cell. A row : Move mouse to left of margins, the I beam becomes an arrow. Point to the row, and click. Multiple rows : Select the first row, click and drag the number of rows desired. A column: Move the mouse above the column. It turns into a downward pointing arrow. Click once. Multiple columns: Select the first column, click and drag the number of columns desired. Entire Table: Choose Table Select Table from the menu bar. Whatever you do to format text in a paragraph (make it bold green, for example), you can do to text in a table cell. Use the Formatting menu, the Tables and Borders toolbar, or keyboard shortcuts to format text in a table.
15. You have the option to place text exactly where you want it in a cell. To select the text you want to align differently, drag your mouse across the cells From the tables and borders toolbar click the arrow to display your options Click the icon on the toolbar to display the tables and borders toolbar Align Text in Cells
16. You can change the direction of text to emphasize text or to fit long column headings into a narrow column. Click the icon on the toolbar to display the tables and borders toolbar To select the text you want to align differently, drag your mouse across the cells Click the button to change the direction of the text. Repeat this step until the text appears the way you want. Change Text Direction
17. You can enhance the appearance of your tables by changing the borders. You can change all of borders, or just specific cells. Changing the border on individual cells can help to emphasize important information. Select the cells, rows, columns, or entire table that you wish to change. If you wish to change the color, set that first, then select the line style and line weight desired. Next, click on this arrow to display the possible borders you can change. Click to indicate the border you want to change Your table will reflect the changes. To remove all borders choose the option 2 nd from the left on the bottom. Change or Remove Table Borders
18. You can draw attention to an area of your table by adding shading to cells. Select the cells, rows, columns, or entire table that you wish to change. The arrow displays your options. Click to choose one. Add Shading to Cells
19.
20. Autofit to contents changes the size of your table based on the amount of text in the table. Autofit to window spreads out your table so that it fits between the margins on you paper or adjusts to fit your window in web view Use fixed Column Width if you want to control the width of each column separately Distribute Rows / Columns Evenly allows you to readjust and space each cell evenly. AUTO FIT CONTROLS
21. The Flow Of Text Around Your Table If your document contains a table and regular paragraph text, you may need to tell Word how you would like the flow of text around your table. Right clicking on the table will give you a context menu. The last item on that menu is Properties. You can experiment with these options and decide which option is best for your presentation.
22. Move a Table You can move a table from one location to another in your document. You must be in print layout or web layout view. Position the mouse over the table you want to move. A handle appears in the upper left corner Position the mouse over the handle and your cursor changes to the same 2 arrow symbol. Drag your table with the handle. table
23. Resize a Table You can change the size of a table to improve the layout of your document. Position the mouse over the table you want to resize. A square handle appears in the lower right corner Position the mouse over the handle and your cursor changes to a two way arrow symbol. Drag to resize your table with the handle. table