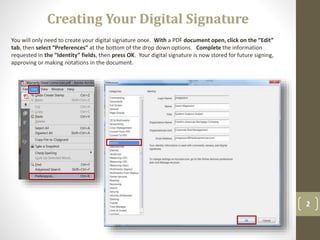
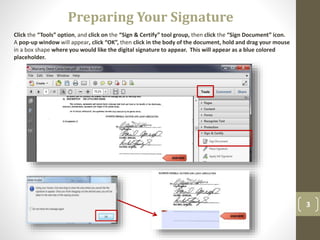
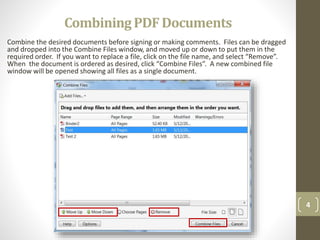
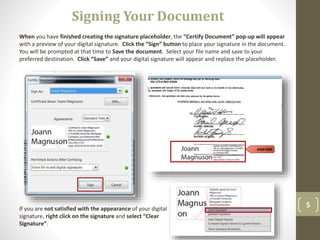
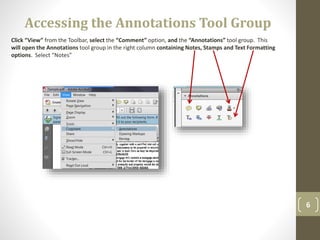
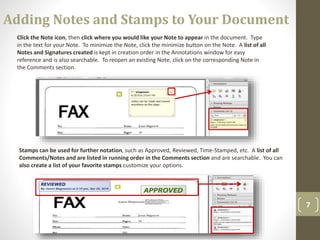
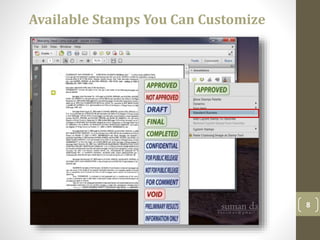
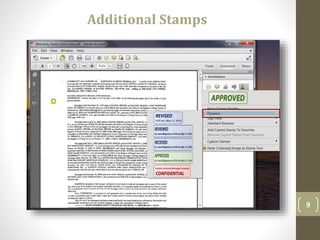
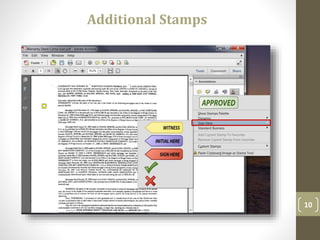
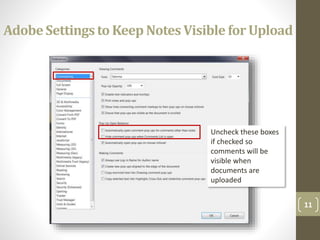
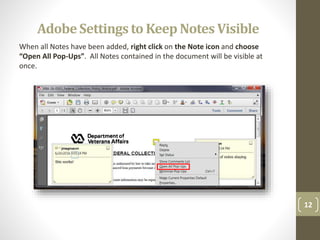
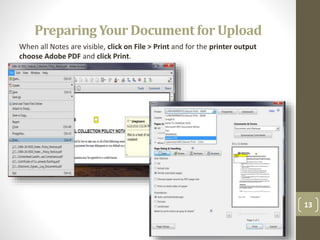
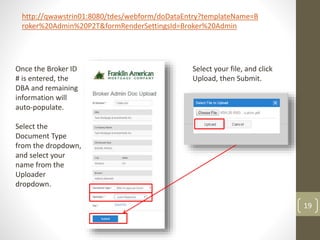
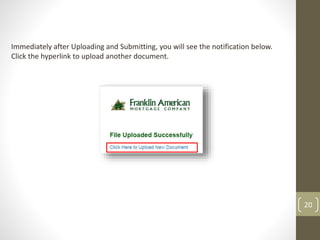
This document provides instructions for electronically managing PDF workflows, including creating digital signatures, combining PDF documents, adding notes and stamps, and preparing documents for upload. Key steps include creating a digital signature by entering identity information, signing documents by dragging a signature box and clicking sign, and combining files by dragging and dropping them into a combine window. Notes and stamps can be added for annotations and comments. Documents should be printed to PDF to make notes visible before uploading.
2. 2
You will only need to create your digital signature once. With a PDF document open, click on the “Edit”
tab, then select “Preferences” at the bottom of the drop down options. Complete the information
requested in the “Identity” fields, then press OK. Your digital signature is now stored for future signing,
approving or making notations in the document.
Creating Your Digital Signature
3. 3
Click the “Tools” option, and click on the “Sign & Certify” tool group, then click the “Sign Document” icon.
A pop-up window will appear, click “OK”, then click in the body of the document, hold and drag your mouse
in a box shape where you would like the digital signature to appear. This will appear as a blue colored
placeholder.
Preparing Your Signature
4. CombiningPDFDocuments
Combine the desired documents before signing or making comments. Files can be dragged
and dropped into the Combine Files window, and moved up or down to put them in the
required order. If you want to replace a file, click on the file name, and select “Remove”.
When the document is ordered as desired, click “Combine Files”. A new combined file
window will be opened showing all files as a single document.
4
5. 5
When you have finished creating the signature placeholder, the “Certify Document” pop-up will appear
with a preview of your digital signature. Click the “Sign” button to place your signature in the document.
You will be prompted at that time to Save the document. Select your file name and save to your
preferred destination. Click “Save” and your digital signature will appear and replace the placeholder.
Signing Your Document
If you are not satisfied with the appearance of your digital
signature, right click on the signature and select “Clear
Signature”.
6. 6
Click “View” from the Toolbar, select the “Comment” option, and the “Annotations” tool group. This
will open the Annotations tool group in the right column containing Notes, Stamps and Text Formatting
options. Select “Notes”
Accessing the Annotations Tool Group
7. 7
Stamps can be used for further notation, such as Approved, Reviewed, Time-Stamped, etc. A list of all
Comments/Notes and are listed in running order in the Comments section and are searchable. You can
also create a list of your favorite stamps customize your options.
Click the Note icon, then click where you would like your Note to appear in the document. Type
in the text for your Note. To minimize the Note, click the minimize button on the Note. A list of all
Notes and Signatures created is kept in creation order in the Annotations window for easy
reference and is also searchable. To reopen an existing Note, click on the corresponding Note in
the Comments section.
Adding Notes and Stamps to Your Document
11. AdobeSettingsto Keep Notes Visible for Upload
11
Uncheck these boxes
if checked so
comments will be
visible when
documents are
uploaded
12. AdobeSettingsto Keep Notes Visible
12
When all Notes have been added, right click on the Note icon and choose
“Open All Pop-Ups”. All Notes contained in the document will be visible at
once.
14. 14
Your “Save As” window will pop up for you to choose a location, such as your
desktop. A progress window will indicate the file save progress.
When the PDF creation process completes, a new window opens showing
the new document with the Notes fully viewable. This is the version you
will upload to OnBase.
PreparingYour Documentfor Upload
15. 15
Tips
If merging documents together, complete the merge first before signing or
certifying signatures. Documents cannot be merged after those actions
have occurred.
17. 17
Formerly printed out and handwritten, this form was converted to a PDF form fill
document from the original and has free text fields that can be filled in
electronically, and it will also serve to take the place of the scan sheet.
Fields with a red border are required information and must be completed. The box
next to “Currently Set Up” is a text field - enter W for Wholesale or C for
Correspondent.
The TPO Application Form
19. 19
Once the Broker ID
# is entered, the
DBA and remaining
information will
auto-populate.
Select the
Document Type
from the dropdown,
and select your
name from the
Uploader
dropdown.
Select your file, and click
Upload, then Submit.
http://qwawstrin01:8080/tdes/webform/doDataEntry?templateName=B
roker%20Admin%20P2T&formRenderSettingsId=Broker%20Admin
20. 20
Immediately after Uploading and Submitting, you will see the notification below.
Click the hyperlink to upload another document.