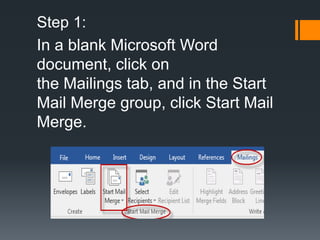
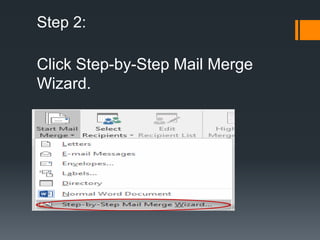
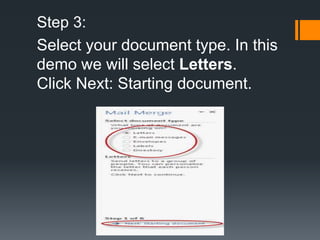
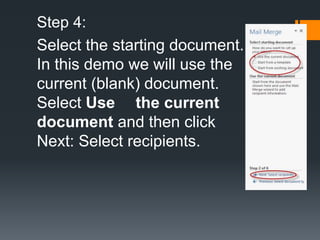
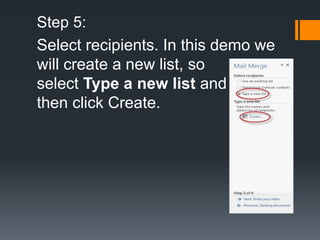
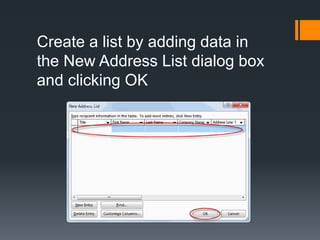
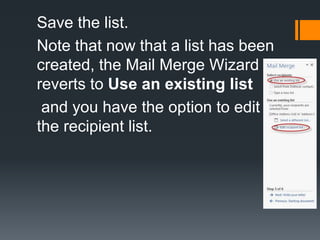
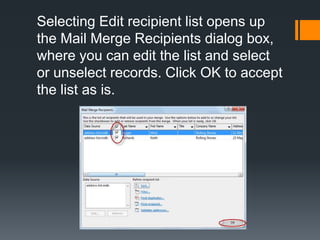
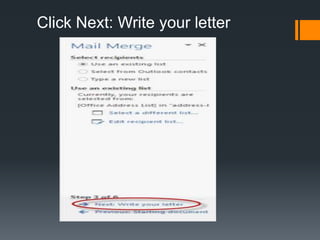
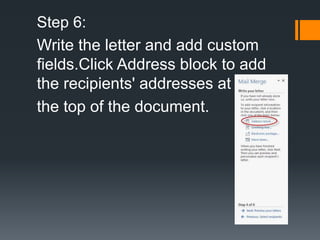
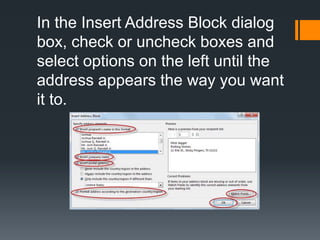
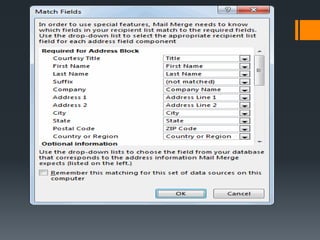
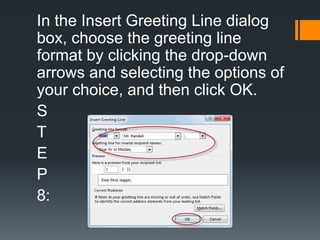
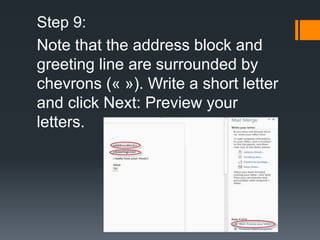
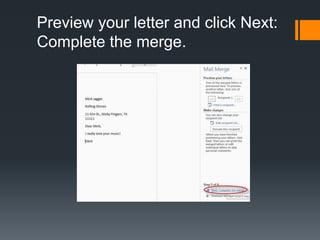
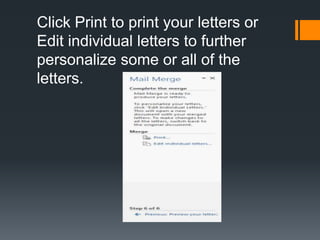
How to use mail merge?
Step 1:
In a blank Microsoft Word
document, click on
the Mailings tab, and in the Start
Mail Merge group, click Start Mail
Merge.
Step 2:
Click Step-by-Step Mail Merge
Wizard.
Step 3:
Select your document type. In this
demo we will select Letters.
Click Next: Starting document.
Step 4:
Select the starting document.
In this demo we will use the
current (blank) document.
Select Use the current
document and then click
Next: Select recipients.
Step 5:
Select recipients. In this demo we
will create a new list, so
select Type a new list and
then click Create.
Create a list by adding data in
the New Address List dialog box
and clicking OK
Save the list.
Note that now that a list has been
created, the Mail Merge Wizard
reverts to Use an existing list
and you have the option to edit
the recipient list.
Selecting Edit recipient list opens up
the Mail Merge Recipients dialog box,
where you can edit the list and select
or unselect records. Click OK to accept
the list as is.
Click Next: Write your letter
Step 6:
Write the letter and add custom
fields.Click Address block to add
the recipients' addresses at
the top of the document.
In the Insert Address Block dialog
box, check or uncheck boxes and
select options on the left until the
address appears the way you want
it to.
Note that you can use Match
Fields to correct any problems.
Clicking Match Fields opens up
the Match Fields dialog box, in
which you can associate the fields
from your list with the fields
required by the wizard.
Step 7:
Press Enter on your keyboard and
click Greeting line... to enter a
greeting
In the Insert Greeting Line dialog
box, choose the greeting line
format by clicking the drop-down
arrows and selecting the options of
your choice, and then click OK.
S
T
E
P
8:
Step 9:
Note that the address block and
greeting line are surrounded by
chevrons (« »). Write a short letter
and click Next: Preview your
letters.
Preview your letter and click Next:
Complete the merge.
Click Print to print your letters or
Edit individual letters to further
personalize some or all of the
letters.
That’s all thank you!

Hyperlink

  • 2.
    How to usemail merge?
  • 3.
    Step 1: In ablank Microsoft Word document, click on the Mailings tab, and in the Start Mail Merge group, click Start Mail Merge.
  • 4.
    Step 2: Click Step-by-StepMail Merge Wizard.
  • 5.
    Step 3: Select yourdocument type. In this demo we will select Letters. Click Next: Starting document.
  • 6.
    Step 4: Select thestarting document. In this demo we will use the current (blank) document. Select Use the current document and then click Next: Select recipients.
  • 7.
    Step 5: Select recipients.In this demo we will create a new list, so select Type a new list and then click Create.
  • 8.
    Create a listby adding data in the New Address List dialog box and clicking OK
  • 9.
    Save the list. Notethat now that a list has been created, the Mail Merge Wizard reverts to Use an existing list and you have the option to edit the recipient list.
  • 10.
    Selecting Edit recipientlist opens up the Mail Merge Recipients dialog box, where you can edit the list and select or unselect records. Click OK to accept the list as is.
  • 11.
    Click Next: Writeyour letter
  • 12.
    Step 6: Write theletter and add custom fields.Click Address block to add the recipients' addresses at the top of the document.
  • 13.
    In the InsertAddress Block dialog box, check or uncheck boxes and select options on the left until the address appears the way you want it to.
  • 14.
    Note that youcan use Match Fields to correct any problems. Clicking Match Fields opens up the Match Fields dialog box, in which you can associate the fields from your list with the fields required by the wizard.
  • 16.
    Step 7: Press Enteron your keyboard and click Greeting line... to enter a greeting
  • 17.
    In the InsertGreeting Line dialog box, choose the greeting line format by clicking the drop-down arrows and selecting the options of your choice, and then click OK. S T E P 8:
  • 18.
    Step 9: Note thatthe address block and greeting line are surrounded by chevrons (« »). Write a short letter and click Next: Preview your letters.
  • 19.
    Preview your letterand click Next: Complete the merge.
  • 20.
    Click Print toprint your letters or Edit individual letters to further personalize some or all of the letters.
  • 21.