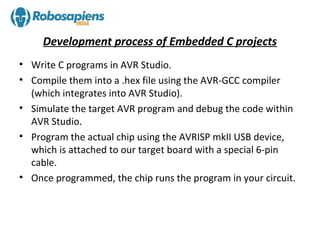
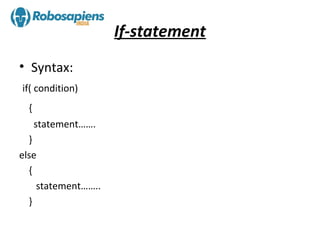
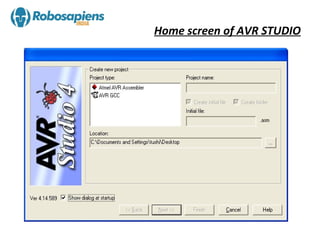
Introduction of Embedded C and demo programs

•   Development process of AVR projects
•   Control structures in C
•   Algorithms to be studied
•   AVR studio
Embedded system
• An Embedded system is combination of
  computer hardware and software, and
  perhaps additional mechanical or others parts,
  designed to perform a specific task.
• Example:
  microwave oven, AC etc
What is Embedded C?
• Embedded C is nothing but a subset of C language which is
  compatible with certain microcontrollers.
• Some features are added using header files like <avr/io.h>,
  <util/delay.h>.
• scanf() and printf() are removed as the inputs are scanned
  from the sensors and outputs are given to the ports.
• Control structures remain the same like if-statement, for
  loop, do-while etc.
Development process of Embedded C projects
• Write C programs in AVR Studio.
• Compile them into a .hex file using the AVR-GCC compiler
  (which integrates into AVR Studio).
• Simulate the target AVR program and debug the code within
  AVR Studio.
• Program the actual chip using the AVRISP mkII USB device,
  which is attached to our target board with a special 6-pin
  cable.
• Once programmed, the chip runs the program in your circuit.
If-statement
• Syntax:
if( condition)
 {
     statement…….
  }
else
  {
    statement……..
  }
Program for if-statement
Int a=4;
Int b=5;
If(a>b)
 printf(“ a is largest”);
else
 printf(“ b is largest”);
Do- while statement
• Syntax:
Initial counter
Do
{
  statement…….
  update statement
}
While(condition);
Program for do-while
Int a=4;
Do
 {
  a++;
 }
  while(a>5);
For- statement
• Syntax:
For( initial counter; test condition; update stmt)
 {
   statement……..
   statement……...
 }
• Program:
for(int i=0;i<5;i++)
 sprintf(str, “Hello Robosapiens”);
Algorithms to be studied:
1.   Blinking LED
2.   Line follower robot
3.   Edge avoider robot
4.   Light searching robot
5.   Wall follower robot
1. Blinking LED
Program:
main()
 {
  DDRB=0XFF;
  while(1)
 {
   PORTB=0XFF;
   _delay_ms(255);
   PORTB=0X00;
 _delay_ms(255);
}
Creation of AVR Projects with AVR
              studio
Home screen of AVR STUDIO
Naming project as Line follower
Selecting Platform and Device
Coding window
Building the code
Build and Run the code
How to burn the .hex file in MCU
Select the HID boot flash icon
Click on to the find device.
Click on the browse button to
      browse the hex file.
Browse the file from your project folder ,
   select the hex file and click open.
Finally click on to the write button
 to burn the hex file in the MCU.
THANK YOU…

Embedded c & working with avr studio

  • 1.
    Introduction of EmbeddedC and demo programs • Development process of AVR projects • Control structures in C • Algorithms to be studied • AVR studio
  • 2.
    Embedded system • AnEmbedded system is combination of computer hardware and software, and perhaps additional mechanical or others parts, designed to perform a specific task. • Example: microwave oven, AC etc
  • 3.
    What is EmbeddedC? • Embedded C is nothing but a subset of C language which is compatible with certain microcontrollers. • Some features are added using header files like <avr/io.h>, <util/delay.h>. • scanf() and printf() are removed as the inputs are scanned from the sensors and outputs are given to the ports. • Control structures remain the same like if-statement, for loop, do-while etc.
  • 4.
    Development process ofEmbedded C projects • Write C programs in AVR Studio. • Compile them into a .hex file using the AVR-GCC compiler (which integrates into AVR Studio). • Simulate the target AVR program and debug the code within AVR Studio. • Program the actual chip using the AVRISP mkII USB device, which is attached to our target board with a special 6-pin cable. • Once programmed, the chip runs the program in your circuit.
  • 5.
    If-statement • Syntax: if( condition) { statement……. } else { statement…….. }
  • 6.
    Program for if-statement Inta=4; Int b=5; If(a>b) printf(“ a is largest”); else printf(“ b is largest”);
  • 7.
    Do- while statement •Syntax: Initial counter Do { statement……. update statement } While(condition);
  • 8.
    Program for do-while Inta=4; Do { a++; } while(a>5);
  • 9.
    For- statement • Syntax: For(initial counter; test condition; update stmt) { statement…….. statement……... } • Program: for(int i=0;i<5;i++) sprintf(str, “Hello Robosapiens”);
  • 10.
    Algorithms to bestudied: 1. Blinking LED 2. Line follower robot 3. Edge avoider robot 4. Light searching robot 5. Wall follower robot
  • 11.
    1. Blinking LED Program: main() { DDRB=0XFF; while(1) { PORTB=0XFF; _delay_ms(255); PORTB=0X00; _delay_ms(255); }
  • 12.
    Creation of AVRProjects with AVR studio
  • 13.
    Home screen ofAVR STUDIO
  • 14.
    Naming project asLine follower
  • 15.
  • 16.
  • 17.
  • 18.
    Build and Runthe code
  • 19.
    How to burnthe .hex file in MCU
  • 20.
    Select the HIDboot flash icon
  • 21.
    Click on tothe find device.
  • 22.
    Click on thebrowse button to browse the hex file.
  • 23.
    Browse the filefrom your project folder , select the hex file and click open.
  • 24.
    Finally click onto the write button to burn the hex file in the MCU.
  • 25.