Manufacturing, Engineering & Technology, Fifth Edition, by Serope
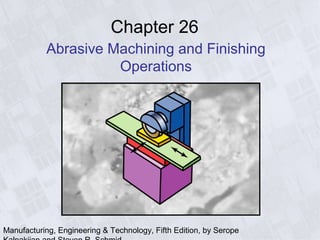
Chapter 26
Abrasive Machining and Finishing
Operations
Manufacturing, Engineering & Technology, Fifth Edition, by Serope
Bonded Abrasives Used in Abrasive-Machining Processes
Figure 25.1 A variety of bonded abrasives used in abrasive-
machining processes. Source: Courtesy of Norton Company.
Manufacturing, Engineering & Technology, Fifth Edition, by Serope
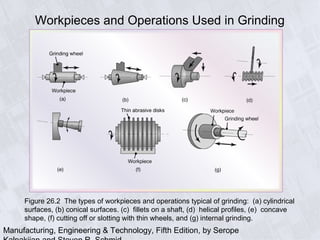
Workpieces and Operations Used in Grinding
Figure 26.2 The types of workpieces and operations typical of grinding: (a) cylindrical
surfaces, (b) conical surfaces. (c) fillets on a shaft, (d) helical profiles, (e) concave
shape, (f) cutting off or slotting with thin wheels, and (g) internal grinding.
Manufacturing, Engineering & Technology, Fifth Edition, by Serope
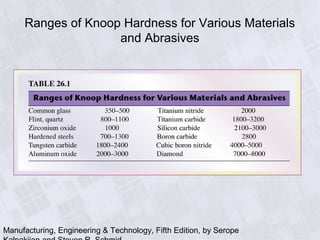
Ranges of Knoop Hardness for Various Materials
and Abrasives
Manufacturing, Engineering & Technology, Fifth Edition, by Serope
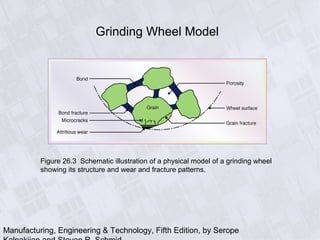
Grinding Wheel Model
Figure 26.3 Schematic illustration of a physical model of a grinding wheel
showing its structure and wear and fracture patterns.
Manufacturing, Engineering & Technology, Fifth Edition, by Serope
Grinding Wheels
Figure 26.4 Common
types of grinding wheels
made with conventional
abrasives. Note that
each wheel has a specific
grinding face; grinding on
other surfaces is
improper and unsafe.
Manufacturing, Engineering & Technology, Fifth Edition, by Serope
Superabrasive Wheel Configurations
Figure 26.5 Examples of superabrasive wheel configurations. The annular regions
(rim) are superabrasive grinding surfaces, and the wheel itself (core) generally is made
of metal or composites. The bonding materials for the superabrasives are: (a), (d) and
(e) resinoid, metal, or vitrified; (b) metal; (c) vitrified; and (f) resinoid.
Manufacturing, Engineering & Technology, Fifth Edition, by Serope
Standard Marking System for Aluminum-Oxide and Silicon-
Carbide Bonded Abrasives
Figure 26.6 Standard marking system for aluminum-
oxide and silicon-carbide bonded abrasives.
Manufacturing, Engineering & Technology, Fifth Edition, by Serope
Standard Marking System for Cubic-Boron-Nitride and
Diamond Bonded Abrasives
Figure 26.7 Standard marking system for cubic-boron-nitride and diamond bonded abrasives.
Manufacturing, Engineering & Technology, Fifth Edition, by Serope
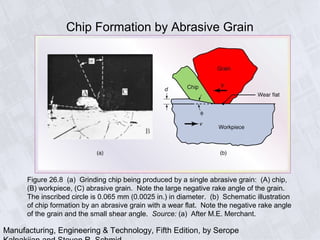
Chip Formation by Abrasive Grain
Figure 26.8 (a) Grinding chip being produced by a single abrasive grain: (A) chip,
(B) workpiece, (C) abrasive grain. Note the large negative rake angle of the grain.
The inscribed circle is 0.065 mm (0.0025 in.) in diameter. (b) Schematic illustration
of chip formation by an abrasive grain with a wear flat. Note the negative rake angle
of the grain and the small shear angle. Source: (a) After M.E. Merchant.
Manufacturing, Engineering & Technology, Fifth Edition, by Serope
Grinding Wheel Surface
Figure 26.9 The surface of a grinding wheel (A46-J8V) showing abrasive grains,
wheel porosity, wear flats on grains, and metal chips from the workpiece adhering to
the grains. Note the random distribution and shape of the abrasive grains.
Magnification: 50x. Source: S. Kalpakjian.
Manufacturing, Engineering & Technology, Fifth Edition, by Serope
Surface-Grinding
Figure 26.10 Schematic illustration of
the surface-grinding process, showing
various process variables. The figure
depicts conventional (up) grinding.
Undeformed chip length, l = Dd
Undeformed chip thickness, t =
4v
VCr
⎛
⎝
⎜
⎞
⎠
⎟
d
D
⎛
⎝
⎜
⎞
⎠
⎟
Grain force ∝
v
V
d
D
⎛
⎝
⎜
⎞
⎠
⎟ strength of the material( )
Temperature rise ∝ D1/4
d3/4 V
v
⎛
⎝
⎜
⎞
⎠
⎟
1/2
Grinding ratio, G =
Volume of material removed
Volume of wheel wear
Manufacturing, Engineering & Technology, Fifth Edition, by Serope
Abrasive Grain Plowing Workpiece Surface
Figure 26.11 Chip formation and plowing of the workpiece surface by an abrasive grain.
Manufacturing, Engineering & Technology, Fifth Edition, by Serope
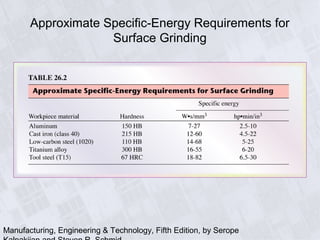
Approximate Specific-Energy Requirements for
Surface Grinding
Manufacturing, Engineering & Technology, Fifth Edition, by Serope
Grinding-Wheel
Dressing
Figure 26.12 (a) Forms of grinding-wheel dressing. (b) Shaping the grinding face of a
wheel by dressing it with computer control. Note that the diamond dressing tool is normal
to the surface at point of contact with the wheel. Source: Courtesy of Okuma Machinery
Works Ltd.
Manufacturing, Engineering & Technology, Fifth Edition, by Serope
Typical Ranges of Speeds and Feeds for Abrasive
Processes
Manufacturing, Engineering & Technology, Fifth Edition, by Serope
General Characteristics of Abrasive Machining
Processes and Machines
Manufacturing, Engineering & Technology, Fifth Edition, by Serope
Various Surface-Grinding Operations
Figure 26.13 Schematic illustrations of various surface-grinding operations. (a) Traverse
grinding with a horizontal-spindle surface grinder. (b) Plunge grinding with a horizontal-
spindle surface grinder. (c) A vertical-spindle rotary-table grinder (also known as the
Blanchard type.)
Manufacturing, Engineering & Technology, Fifth Edition, by Serope
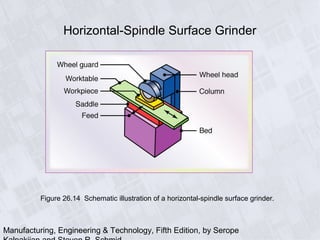
Horizontal-Spindle Surface Grinder
Figure 26.14 Schematic illustration of a horizontal-spindle surface grinder.
Manufacturing, Engineering & Technology, Fifth Edition, by Serope
Grinding of Balls
Figure 26.15 (a) Rough grinding of steel balls on a vertical-spindle grinder. The balls
are guided by a special rotary fixture. (b) Finish grinding of balls in a multiple-groove
fixture. The balls are ground to within 0.013 mm (0.0005 in.) of their final size.
Manufacturing, Engineering & Technology, Fifth Edition, by Serope
Cylindrical-Grinding Operations
Figure 26.16 Examples of various cylindrical-grinding operations. (a) Traverse grinding,
(b) plunge grinding, and (c) profile grinding. Source: Courtesy of Okuma Machinery
Works Ltd.
Manufacturing, Engineering & Technology, Fifth Edition, by Serope
Plunge Grinding on Cylindrical Grinder
Figure 26.17 Plunge grinding of a workpiece on a cylindrical
grinder with the wheel dressed to a stepped shape.
Manufacturing, Engineering & Technology, Fifth Edition, by Serope
Grinding a Noncylindrical Part on Cylindrical Grinder
Figure 26.18 Schematic illustration of grinding a noncylindrical part on a
cylindrical grinder with computer controls to produce the shape. The part
rotation and the distance x between centers is varied and synchronized to
grind the particular workpiece shape.
Manufacturing, Engineering & Technology, Fifth Edition, by Serope
Thread Grinding
Figure 26.19 Thread grinding by (a) traverse and (b) plunge grinding.
Manufacturing, Engineering & Technology, Fifth Edition, by Serope
Cycle Parts in Cylindrical Grinding
Figure 26.20 - Cycle Patterns in Cylindrical Grinding
Manufacturing, Engineering & Technology, Fifth Edition, by Serope
Internal Grinding Operations
Figure 26.21 Schematic illustrations of internal grinding operations:
(a) traverse grinding, (b) plunge grinding, and (c) profile grinding.
Manufacturing, Engineering & Technology, Fifth Edition, by Serope
Centerless Grinding Operations
Figure 26.22 Schematic
illustration of centerless
grinding operations: (a)
through-feed grinding, (b)
plunge grinding, (c) internal
grinding, and (d) a
computer numerical-control
cylindrical-grinding
machine. Source:
Courtesy of Cincinnati
Milacron, Inc.
Manufacturing, Engineering & Technology, Fifth Edition, by Serope
Creep-Feed Grinding
Figure 26.23 (a) Schematic illustration of the creep-feed grinding process. Note
the large wheel depth-of-cut, d. (b) A shaped groove produced on a flat surface
by creep-grinding in one pass. Groove depth is typically on the order of a few mm.
(c) An example of creep-feed grinding with a shaped wheel. This operation also
can be performed by some of the processes described in Chapter 27. Source:
Courtesy of Blohm, Inc.
Manufacturing, Engineering & Technology, Fifth Edition, by Serope
General Recommendations for Grinding Fluids
Manufacturing, Engineering & Technology, Fifth Edition, by Serope
Ultrasonic Machining Process
Figure 26.24 (a) Schematic illustration of the ultrasonic machining process. (b) and
(c) Types of parts made by this process. Note the small size of holes produced.
Manufacturing, Engineering & Technology, Fifth Edition, by Serope
Coated Abrasive
Figure 26.25 Schematic illustration of the structure of a coated
abrasive. Sandpaper (developed in the 16th
century) and
emery cloth are common examples of coated abrasives.
Manufacturing, Engineering & Technology, Fifth Edition, by Serope
Belt Grinding of Turbine Nozzle Vanes
Figure 26.26 – Belt grinding of turbine nozzle vanes.
Manufacturing, Engineering & Technology, Fifth Edition, by Serope
Honing Tool
Figure 26.27 Schematic illustration of a honing tool used
to improve the surface finish of bored or ground holes.
Manufacturing, Engineering & Technology, Fifth Edition, by Serope
Superfinishing Process
Figure 26.28 Schematic illustration of the superfinishing process for a cylindrical
part. (a) Cylindrical microhoning. (b) Centerless microhoning.
Manufacturing, Engineering & Technology, Fifth Edition, by Serope
Production Lapping
Figure 26.29 (a) Schematic illustration of the lapping process. (b) Production
lapping on flat surfaces. (c) Production lapping on cylindrical surfaces.
Manufacturing, Engineering & Technology, Fifth Edition, by Serope
CMP Process
Figure 26.30 (a) Schematic illustration of the chemical-mechanical polishing
(CMP) process. This process is used widely in the manufacture of silicon wafers
and integrated circuits and also is known as chemical-mechanical planarization.
For other materials, more carriers and more disks per carrier are possible.
Manufacturing, Engineering & Technology, Fifth Edition, by Serope
Polishing Using Magnetic Fields
Figure 26.31 Schematic illustration of polishing of balls and rollers using magnetic
fields. (a) Magnetic-float polishing of ceramic balls. (b) Magnetic-field-assisted
polishing of rollers. Source: After R. Komanduri, M. Doc, and M. Fox.
Manufacturing, Engineering & Technology, Fifth Edition, by Serope
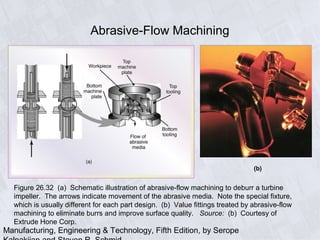
Abrasive-Flow Machining
Figure 26.32 (a) Schematic illustration of abrasive-flow machining to deburr a turbine
impeller. The arrows indicate movement of the abrasive media. Note the special fixture,
which is usually different for each part design. (b) Value fittings treated by abrasive-flow
machining to eliminate burrs and improve surface quality. Source: (b) Courtesy of
Extrude Hone Corp.
(b)
Manufacturing, Engineering & Technology, Fifth Edition, by Serope
Deburring Operation on a Die-Cast Part Using
Grinding Wheel
Figure 26.33 A deburring operation on a
robot-held die-cast part for an outboard
motor housing using a grinding wheel.
Abrasive belts (Fig. 26.26) or flexible
abrasive radial-wheel brushes also can
be used for such operations. Source:
Courtesy of Acme Manufacturing
Company.
Manufacturing, Engineering & Technology, Fifth Edition, by Serope
Increase in
Machining and
Finishing Cost as a
Function of Surface
Finish Required
Figure 26.34 Increase in
the cost of machining and
finishing a part as a
function of the surface
finish required. This is the
main reason that the
surface finish specified on
parts should not be any
finer than necessary for the
part to function properly.

Ch26

  • 1.
    Manufacturing, Engineering &Technology, Fifth Edition, by Serope Chapter 26 Abrasive Machining and Finishing Operations
  • 2.
    Manufacturing, Engineering &Technology, Fifth Edition, by Serope Bonded Abrasives Used in Abrasive-Machining Processes Figure 25.1 A variety of bonded abrasives used in abrasive- machining processes. Source: Courtesy of Norton Company.
  • 3.
    Manufacturing, Engineering &Technology, Fifth Edition, by Serope Workpieces and Operations Used in Grinding Figure 26.2 The types of workpieces and operations typical of grinding: (a) cylindrical surfaces, (b) conical surfaces. (c) fillets on a shaft, (d) helical profiles, (e) concave shape, (f) cutting off or slotting with thin wheels, and (g) internal grinding.
  • 4.
    Manufacturing, Engineering &Technology, Fifth Edition, by Serope Ranges of Knoop Hardness for Various Materials and Abrasives
  • 5.
    Manufacturing, Engineering &Technology, Fifth Edition, by Serope Grinding Wheel Model Figure 26.3 Schematic illustration of a physical model of a grinding wheel showing its structure and wear and fracture patterns.
  • 6.
    Manufacturing, Engineering &Technology, Fifth Edition, by Serope Grinding Wheels Figure 26.4 Common types of grinding wheels made with conventional abrasives. Note that each wheel has a specific grinding face; grinding on other surfaces is improper and unsafe.
  • 7.
    Manufacturing, Engineering &Technology, Fifth Edition, by Serope Superabrasive Wheel Configurations Figure 26.5 Examples of superabrasive wheel configurations. The annular regions (rim) are superabrasive grinding surfaces, and the wheel itself (core) generally is made of metal or composites. The bonding materials for the superabrasives are: (a), (d) and (e) resinoid, metal, or vitrified; (b) metal; (c) vitrified; and (f) resinoid.
  • 8.
    Manufacturing, Engineering &Technology, Fifth Edition, by Serope Standard Marking System for Aluminum-Oxide and Silicon- Carbide Bonded Abrasives Figure 26.6 Standard marking system for aluminum- oxide and silicon-carbide bonded abrasives.
  • 9.
    Manufacturing, Engineering &Technology, Fifth Edition, by Serope Standard Marking System for Cubic-Boron-Nitride and Diamond Bonded Abrasives Figure 26.7 Standard marking system for cubic-boron-nitride and diamond bonded abrasives.
  • 10.
    Manufacturing, Engineering &Technology, Fifth Edition, by Serope Chip Formation by Abrasive Grain Figure 26.8 (a) Grinding chip being produced by a single abrasive grain: (A) chip, (B) workpiece, (C) abrasive grain. Note the large negative rake angle of the grain. The inscribed circle is 0.065 mm (0.0025 in.) in diameter. (b) Schematic illustration of chip formation by an abrasive grain with a wear flat. Note the negative rake angle of the grain and the small shear angle. Source: (a) After M.E. Merchant.
  • 11.
    Manufacturing, Engineering &Technology, Fifth Edition, by Serope Grinding Wheel Surface Figure 26.9 The surface of a grinding wheel (A46-J8V) showing abrasive grains, wheel porosity, wear flats on grains, and metal chips from the workpiece adhering to the grains. Note the random distribution and shape of the abrasive grains. Magnification: 50x. Source: S. Kalpakjian.
  • 12.
    Manufacturing, Engineering &Technology, Fifth Edition, by Serope Surface-Grinding Figure 26.10 Schematic illustration of the surface-grinding process, showing various process variables. The figure depicts conventional (up) grinding. Undeformed chip length, l = Dd Undeformed chip thickness, t = 4v VCr ⎛ ⎝ ⎜ ⎞ ⎠ ⎟ d D ⎛ ⎝ ⎜ ⎞ ⎠ ⎟ Grain force ∝ v V d D ⎛ ⎝ ⎜ ⎞ ⎠ ⎟ strength of the material( ) Temperature rise ∝ D1/4 d3/4 V v ⎛ ⎝ ⎜ ⎞ ⎠ ⎟ 1/2 Grinding ratio, G = Volume of material removed Volume of wheel wear
  • 13.
    Manufacturing, Engineering &Technology, Fifth Edition, by Serope Abrasive Grain Plowing Workpiece Surface Figure 26.11 Chip formation and plowing of the workpiece surface by an abrasive grain.
  • 14.
    Manufacturing, Engineering &Technology, Fifth Edition, by Serope Approximate Specific-Energy Requirements for Surface Grinding
  • 15.
    Manufacturing, Engineering &Technology, Fifth Edition, by Serope Grinding-Wheel Dressing Figure 26.12 (a) Forms of grinding-wheel dressing. (b) Shaping the grinding face of a wheel by dressing it with computer control. Note that the diamond dressing tool is normal to the surface at point of contact with the wheel. Source: Courtesy of Okuma Machinery Works Ltd.
  • 16.
    Manufacturing, Engineering &Technology, Fifth Edition, by Serope Typical Ranges of Speeds and Feeds for Abrasive Processes
  • 17.
    Manufacturing, Engineering &Technology, Fifth Edition, by Serope General Characteristics of Abrasive Machining Processes and Machines
  • 18.
    Manufacturing, Engineering &Technology, Fifth Edition, by Serope Various Surface-Grinding Operations Figure 26.13 Schematic illustrations of various surface-grinding operations. (a) Traverse grinding with a horizontal-spindle surface grinder. (b) Plunge grinding with a horizontal- spindle surface grinder. (c) A vertical-spindle rotary-table grinder (also known as the Blanchard type.)
  • 19.
    Manufacturing, Engineering &Technology, Fifth Edition, by Serope Horizontal-Spindle Surface Grinder Figure 26.14 Schematic illustration of a horizontal-spindle surface grinder.
  • 20.
    Manufacturing, Engineering &Technology, Fifth Edition, by Serope Grinding of Balls Figure 26.15 (a) Rough grinding of steel balls on a vertical-spindle grinder. The balls are guided by a special rotary fixture. (b) Finish grinding of balls in a multiple-groove fixture. The balls are ground to within 0.013 mm (0.0005 in.) of their final size.
  • 21.
    Manufacturing, Engineering &Technology, Fifth Edition, by Serope Cylindrical-Grinding Operations Figure 26.16 Examples of various cylindrical-grinding operations. (a) Traverse grinding, (b) plunge grinding, and (c) profile grinding. Source: Courtesy of Okuma Machinery Works Ltd.
  • 22.
    Manufacturing, Engineering &Technology, Fifth Edition, by Serope Plunge Grinding on Cylindrical Grinder Figure 26.17 Plunge grinding of a workpiece on a cylindrical grinder with the wheel dressed to a stepped shape.
  • 23.
    Manufacturing, Engineering &Technology, Fifth Edition, by Serope Grinding a Noncylindrical Part on Cylindrical Grinder Figure 26.18 Schematic illustration of grinding a noncylindrical part on a cylindrical grinder with computer controls to produce the shape. The part rotation and the distance x between centers is varied and synchronized to grind the particular workpiece shape.
  • 24.
    Manufacturing, Engineering &Technology, Fifth Edition, by Serope Thread Grinding Figure 26.19 Thread grinding by (a) traverse and (b) plunge grinding.
  • 25.
    Manufacturing, Engineering &Technology, Fifth Edition, by Serope Cycle Parts in Cylindrical Grinding Figure 26.20 - Cycle Patterns in Cylindrical Grinding
  • 26.
    Manufacturing, Engineering &Technology, Fifth Edition, by Serope Internal Grinding Operations Figure 26.21 Schematic illustrations of internal grinding operations: (a) traverse grinding, (b) plunge grinding, and (c) profile grinding.
  • 27.
    Manufacturing, Engineering &Technology, Fifth Edition, by Serope Centerless Grinding Operations Figure 26.22 Schematic illustration of centerless grinding operations: (a) through-feed grinding, (b) plunge grinding, (c) internal grinding, and (d) a computer numerical-control cylindrical-grinding machine. Source: Courtesy of Cincinnati Milacron, Inc.
  • 28.
    Manufacturing, Engineering &Technology, Fifth Edition, by Serope Creep-Feed Grinding Figure 26.23 (a) Schematic illustration of the creep-feed grinding process. Note the large wheel depth-of-cut, d. (b) A shaped groove produced on a flat surface by creep-grinding in one pass. Groove depth is typically on the order of a few mm. (c) An example of creep-feed grinding with a shaped wheel. This operation also can be performed by some of the processes described in Chapter 27. Source: Courtesy of Blohm, Inc.
  • 29.
    Manufacturing, Engineering &Technology, Fifth Edition, by Serope General Recommendations for Grinding Fluids
  • 30.
    Manufacturing, Engineering &Technology, Fifth Edition, by Serope Ultrasonic Machining Process Figure 26.24 (a) Schematic illustration of the ultrasonic machining process. (b) and (c) Types of parts made by this process. Note the small size of holes produced.
  • 31.
    Manufacturing, Engineering &Technology, Fifth Edition, by Serope Coated Abrasive Figure 26.25 Schematic illustration of the structure of a coated abrasive. Sandpaper (developed in the 16th century) and emery cloth are common examples of coated abrasives.
  • 32.
    Manufacturing, Engineering &Technology, Fifth Edition, by Serope Belt Grinding of Turbine Nozzle Vanes Figure 26.26 – Belt grinding of turbine nozzle vanes.
  • 33.
    Manufacturing, Engineering &Technology, Fifth Edition, by Serope Honing Tool Figure 26.27 Schematic illustration of a honing tool used to improve the surface finish of bored or ground holes.
  • 34.
    Manufacturing, Engineering &Technology, Fifth Edition, by Serope Superfinishing Process Figure 26.28 Schematic illustration of the superfinishing process for a cylindrical part. (a) Cylindrical microhoning. (b) Centerless microhoning.
  • 35.
    Manufacturing, Engineering &Technology, Fifth Edition, by Serope Production Lapping Figure 26.29 (a) Schematic illustration of the lapping process. (b) Production lapping on flat surfaces. (c) Production lapping on cylindrical surfaces.
  • 36.
    Manufacturing, Engineering &Technology, Fifth Edition, by Serope CMP Process Figure 26.30 (a) Schematic illustration of the chemical-mechanical polishing (CMP) process. This process is used widely in the manufacture of silicon wafers and integrated circuits and also is known as chemical-mechanical planarization. For other materials, more carriers and more disks per carrier are possible.
  • 37.
    Manufacturing, Engineering &Technology, Fifth Edition, by Serope Polishing Using Magnetic Fields Figure 26.31 Schematic illustration of polishing of balls and rollers using magnetic fields. (a) Magnetic-float polishing of ceramic balls. (b) Magnetic-field-assisted polishing of rollers. Source: After R. Komanduri, M. Doc, and M. Fox.
  • 38.
    Manufacturing, Engineering &Technology, Fifth Edition, by Serope Abrasive-Flow Machining Figure 26.32 (a) Schematic illustration of abrasive-flow machining to deburr a turbine impeller. The arrows indicate movement of the abrasive media. Note the special fixture, which is usually different for each part design. (b) Value fittings treated by abrasive-flow machining to eliminate burrs and improve surface quality. Source: (b) Courtesy of Extrude Hone Corp. (b)
  • 39.
    Manufacturing, Engineering &Technology, Fifth Edition, by Serope Deburring Operation on a Die-Cast Part Using Grinding Wheel Figure 26.33 A deburring operation on a robot-held die-cast part for an outboard motor housing using a grinding wheel. Abrasive belts (Fig. 26.26) or flexible abrasive radial-wheel brushes also can be used for such operations. Source: Courtesy of Acme Manufacturing Company.
  • 40.
    Manufacturing, Engineering &Technology, Fifth Edition, by Serope Increase in Machining and Finishing Cost as a Function of Surface Finish Required Figure 26.34 Increase in the cost of machining and finishing a part as a function of the surface finish required. This is the main reason that the surface finish specified on parts should not be any finer than necessary for the part to function properly.