Fiber light for olympus microscope
•Download as PPT, PDF•
1 like•835 views

Fiber-light i invented for Olympus microscope for Optical Tweezers.

Recommended
More Related Content
What's hot
What's hot (20)
Viewers also liked
Viewers also liked (20)
Similar to Fiber light for olympus microscope
Similar to Fiber light for olympus microscope (20)
More from Dr. Pranav Rathi
More from Dr. Pranav Rathi (20)
Recently uploaded
Recently uploaded (20)
Fiber light for olympus microscope
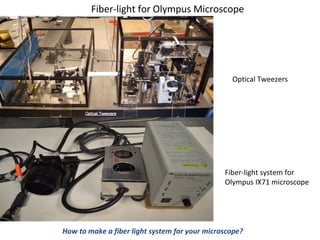
- 1. Fiber-light for Olympus Microscope Optical Tweezers Fiber-light system for Olympus IX71 microscope How to make a fiber light system for your microscope?
- 3. Microscope wall temperature inside enclosure compared: Halogen lamp Vs Fiber-light
- 4. Why fiber-light is important ? • DNA experiments are really sensitive to temperature (thermal energy) even few degrees make a big difference. • Microscope (optical trap) is enclosed inside an enclosure (to avoid airborne noise and currents), so within few hours temperature of the microscope wall rises almost twice due to the halogen lamp used for illumination, this heats up the entire enclosure so as the sample. • Temperature hike may make two similar data sets which are taken some time apart different. • Fiber light solves the problem of temperature hike by providing clean light and by removing heat production through the lamp and conduction through the microscope skin. • With fiber light temperature inside the enclosure goes from 23.7 to 25.5 total 1.8 degree Celsius hike in comparison to halogen lamp where temperature goes from 23.7 to 49 total 25.3 degree hike over a period of 10 hours (see slide 3).
- 5. Construction of Fiber-light system Fiber light has 4 parts Olympus power supply Model TH4-100 Dolan Jenner optical fiber bundle Fiber-light feeder Illuminator & fiber plugin adapter
- 6. Olympus Power supply Model TH4-100 TH4-100 has 4 holes Connect +ve 12V and ground with a wire at one end and other end is banana connectors
- 7. Construction of fiber plugin adapter at illuminator Illuminator Fiber plugin adapter
- 8. Construction Steps Remove illuminator from microscope Remove the Halogen lamp Remove all the enclosures
- 9. Assemble the fiber plugin ER2-thorlsba 2’’ cage assembly rod AD11F-thorlabs adapter S1TM08-thorlabs lens cell adapter SM1L03-thorlabs lens tube CP02-thorlabs cage plate
- 10. Put lens cell adapter on the cage plate Put lens tube on different cage plate and assemble Put other lens cell on one end of cage plate and adapter on other end
- 11. Fixing the Illuminator center wall Little stage Make 2 notches aligned with center of holes on the cage
- 12. Make a through hole ¾ cm from the notch and from the edge
- 13. Make a metal piece looks like in the picture the hole are aligned with each other
- 14. Put the piece such the hole are aligned
- 15. Put the plugin on the illuminator Put the screws
- 16. Put a screw and a nut
- 17. Illuminator with fiber plugin adapter is complete
- 18. Cushion Z- adjustment Screws Put a rubber cushion (optional) and insert the fiber through the opening and tight the screws
- 19. Construction of Fiber-feeder Lamp mount Lens assembly Fiber outlet adapter 6 X3X2.5 inches aluminum box
- 20. Banana connectors Prepare the box 3/8’’ hole for 3/8’’ holes for rubber legs lamp mount 1.25’’ 2.25’’ .5’’ .5’’ 50mm .25’’ Lamp side Bottom side ¼’’ hole for lens assembly 3/8’’ hole for fiber outlet adapter 1’’ hole for fiber outlet Fiber outlet side
- 21. Preparing Lamp Mount PCB plates Banana connectors Metal plates Halogen lamp 4/40’’ blind hole ½’’ long in PCB WARNING: Lamp gets really HOT so DON’T use plastic, wood or anything which burns below 500o Celsius
- 22. 3/8’’ through holes • I used 6 fold of PCB plates to mount the metal plates with ½’’ long blind screws. • Metal plates are aluminum plates which I machined to fit the lamp wire connectors. • Metal plates are attached into PCB plates with 4/40’’ blind screws. • PCB plates are screwed to the wall with 3/8’’ screws. • PCB plate can tolerate high temperatures and provide good isolation for the metal plates. 4/40’’ screw on 3/8’’ holes in metal
- 23. Preparing Fiber outlet adapter CP02T-thorlabs cage plate SM1T2-Thorlabs coupler SM1A1-Thorlabs adapter
- 24. Insert adapter into coupler and then coupler into cage plate • On wood side cage plate do not use the wood like shown in the picture. • Put another cage plate on that side with another adapter and coupler. • I did not have extra set in my lab so I used wood.
- 25. Mount in with 3/8’’ screw to the box Do not use wood use 2 cage plates with 2 couplers and 2 adapters
- 26. Preparing Lens assembly CP02T-thorlabs cage plates LA1951-A thorlabs f25mm lens RA90-thorlabs post clamp ER2-thorlsba 3’’ cage assembly rod TR2-thorlabs post Lens is to focus the light on the fiber inlet
- 27. Put lens assembly on the box Slide in z-direction to get optimum spot on the fiber inlet 50mm xy-adjustment to center the spot (lamp image) on the fiber inlet Lens assembly gives 3-D adjustment to the lens
- 29. Spot can be further optimized by looking into illuminator
- 30. Illuminator at low intensity
- 31. Prepare the cover • Halogen lamp heats up the box • I did not put any fan inside because fan generates vibrations which can travel through the fiber bundle to the microscope and make optical trap noisy. • So fan has to be outside with no physical contact with the box. • To accommodate that I made 2’’ diameter holes. • Fan will be mounted from top trough the roof.
- 32. Mounted Fan
- 33. Bundle is now complete
- 34. Mount the illuminator on the microscope
- 35. Fiber-light with Optical Tweezers