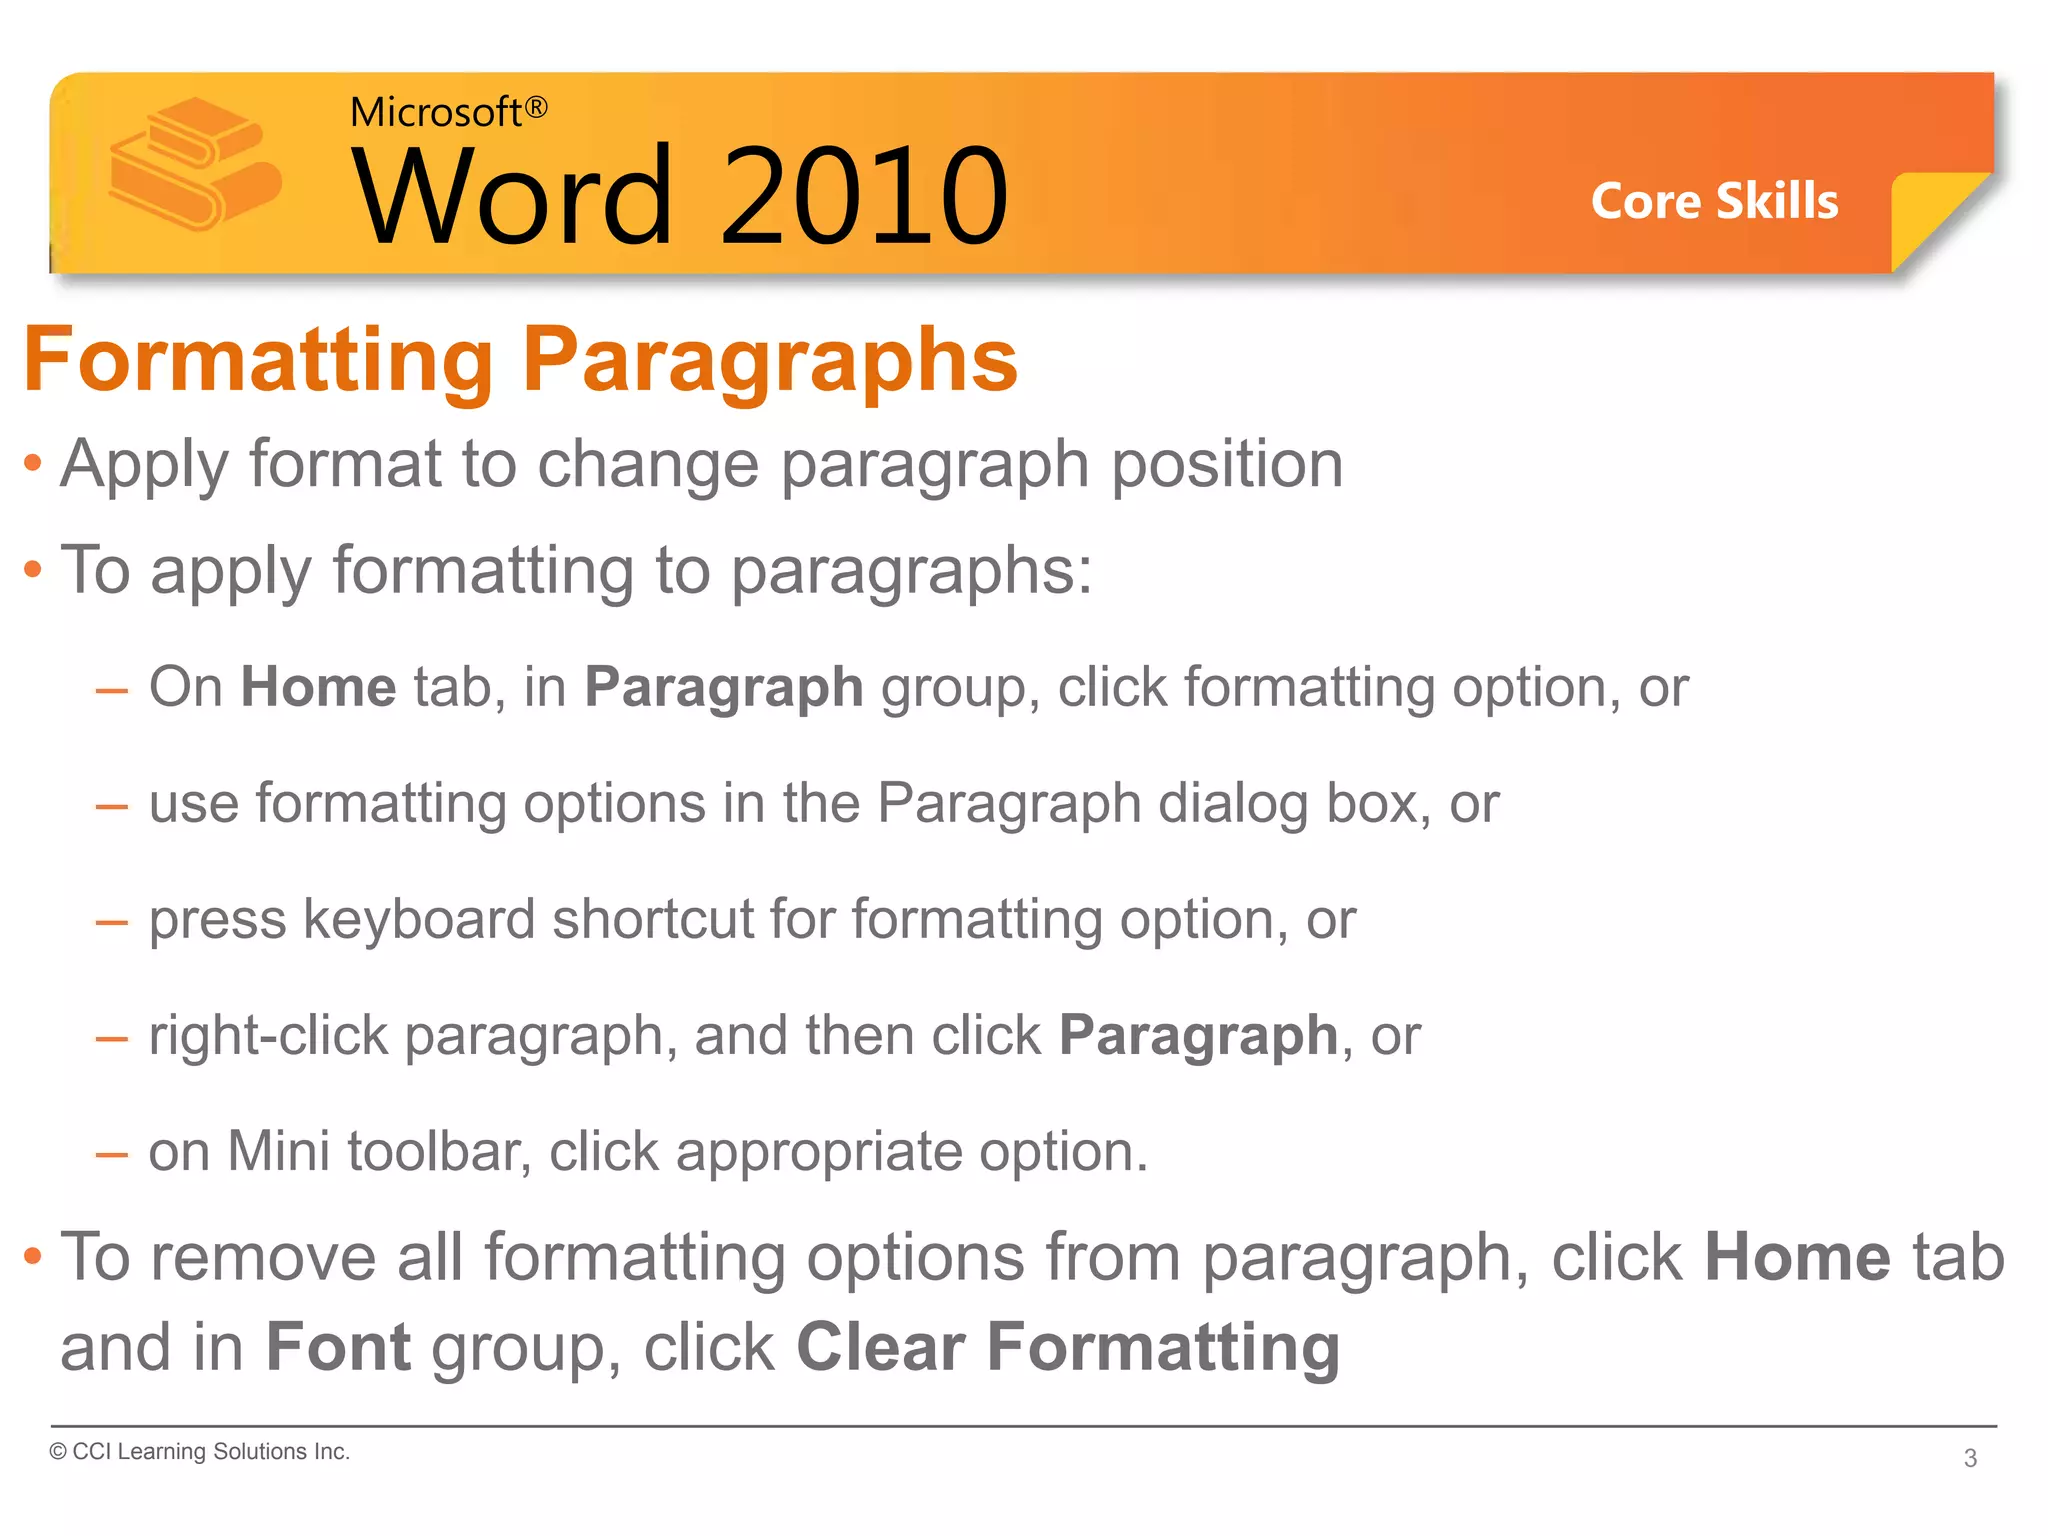
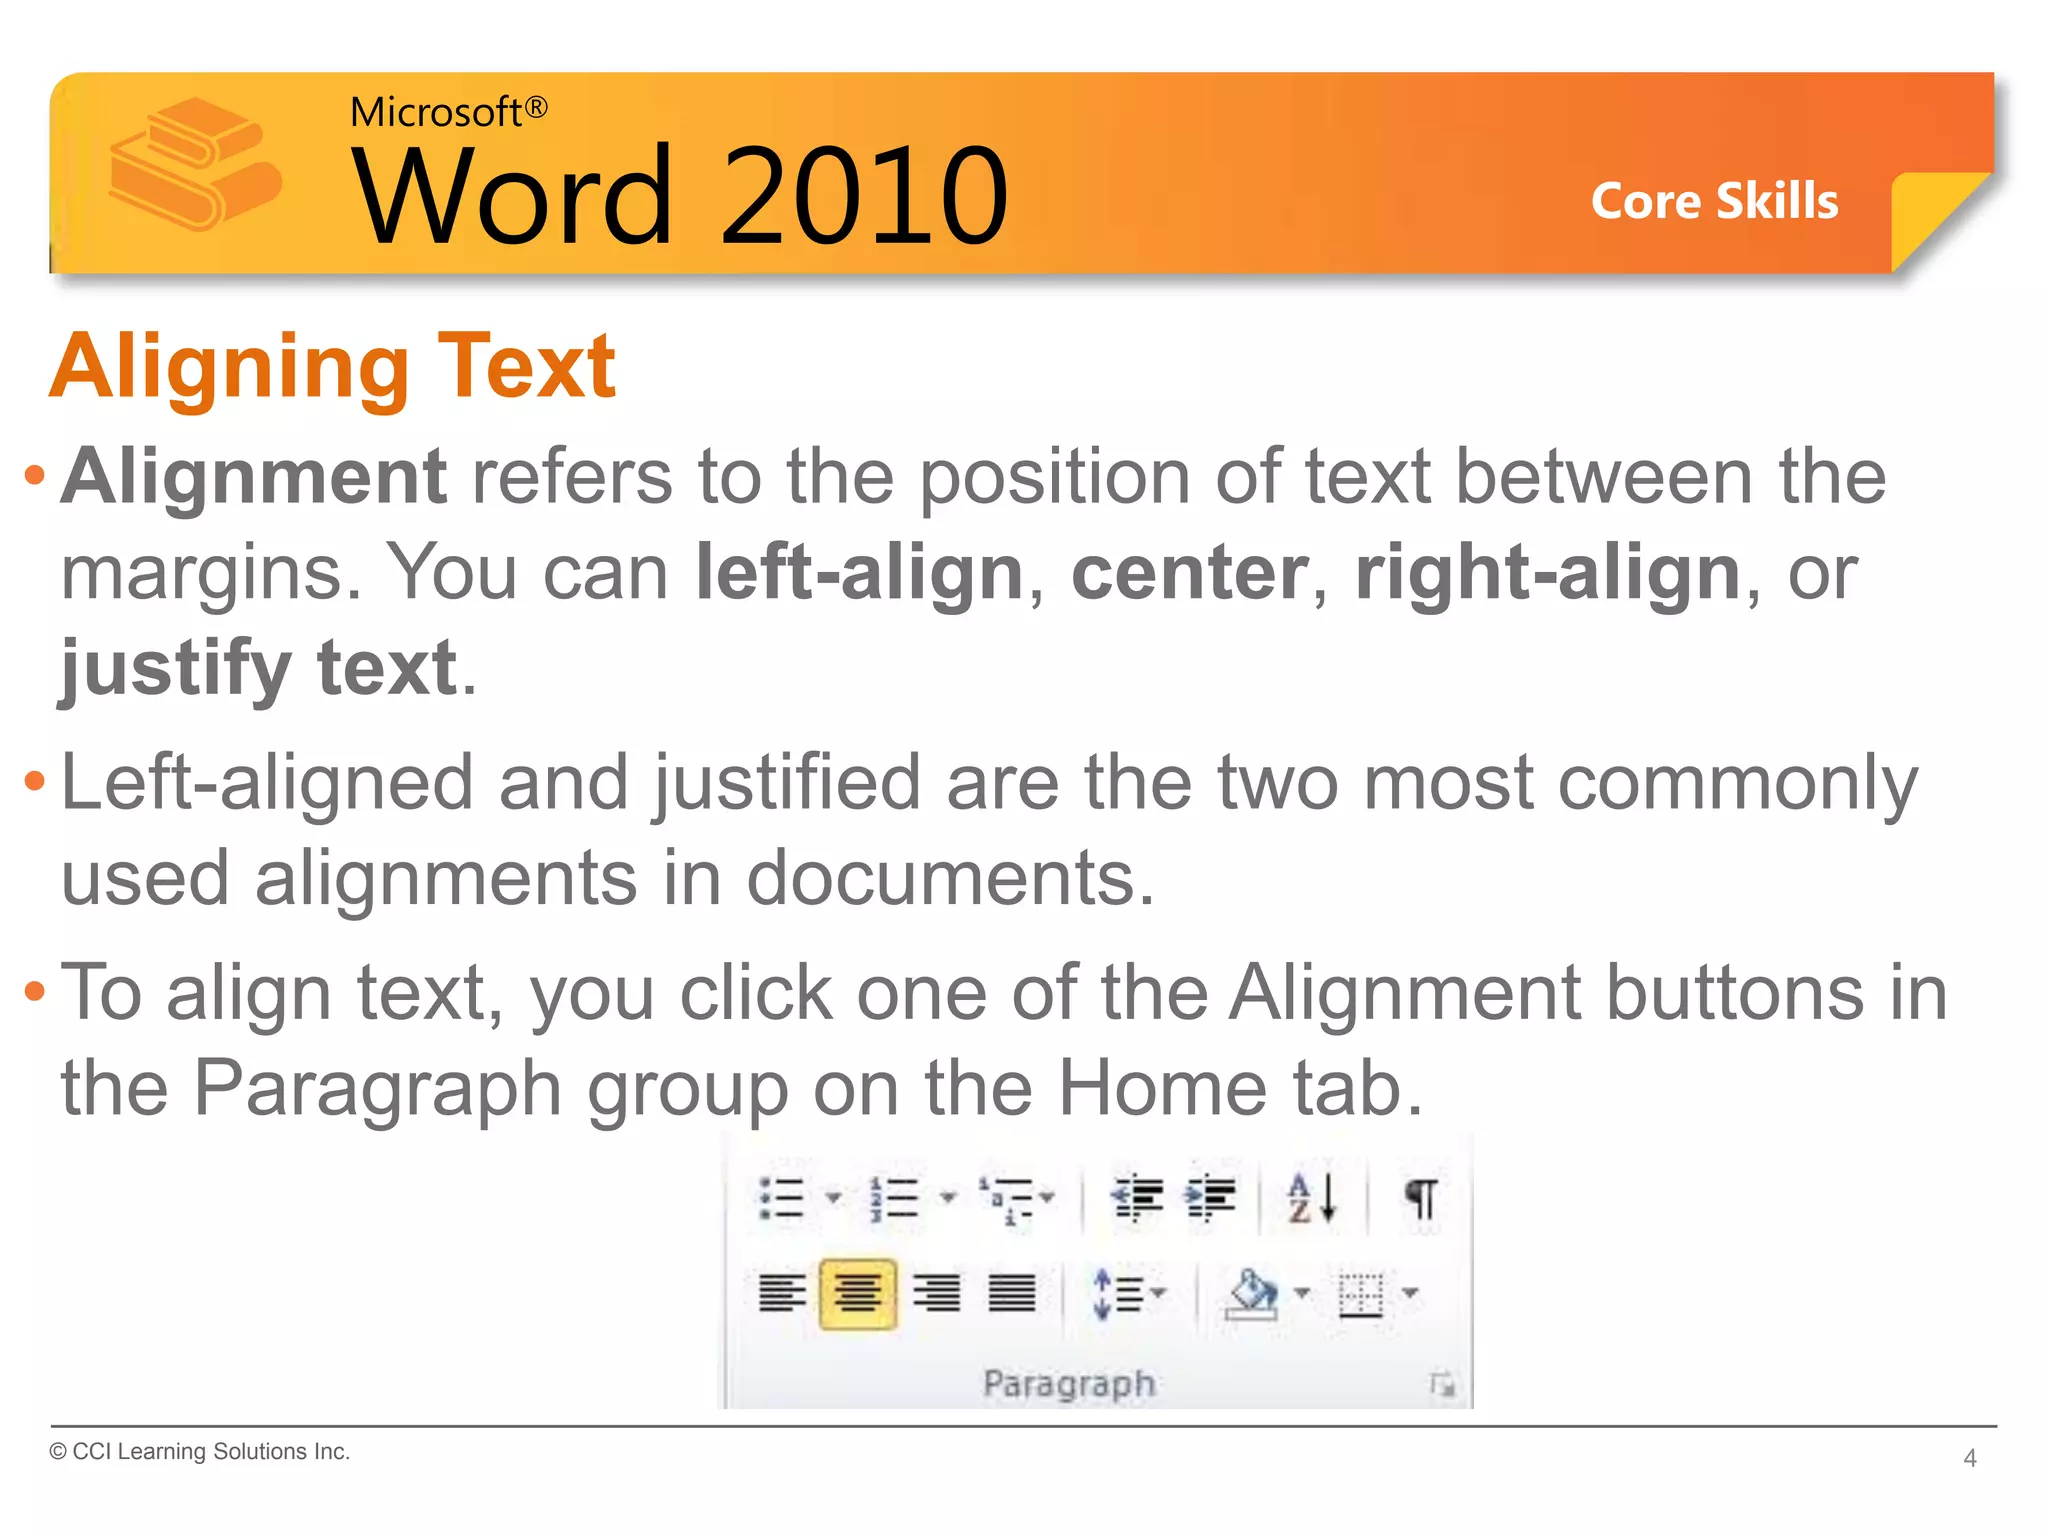
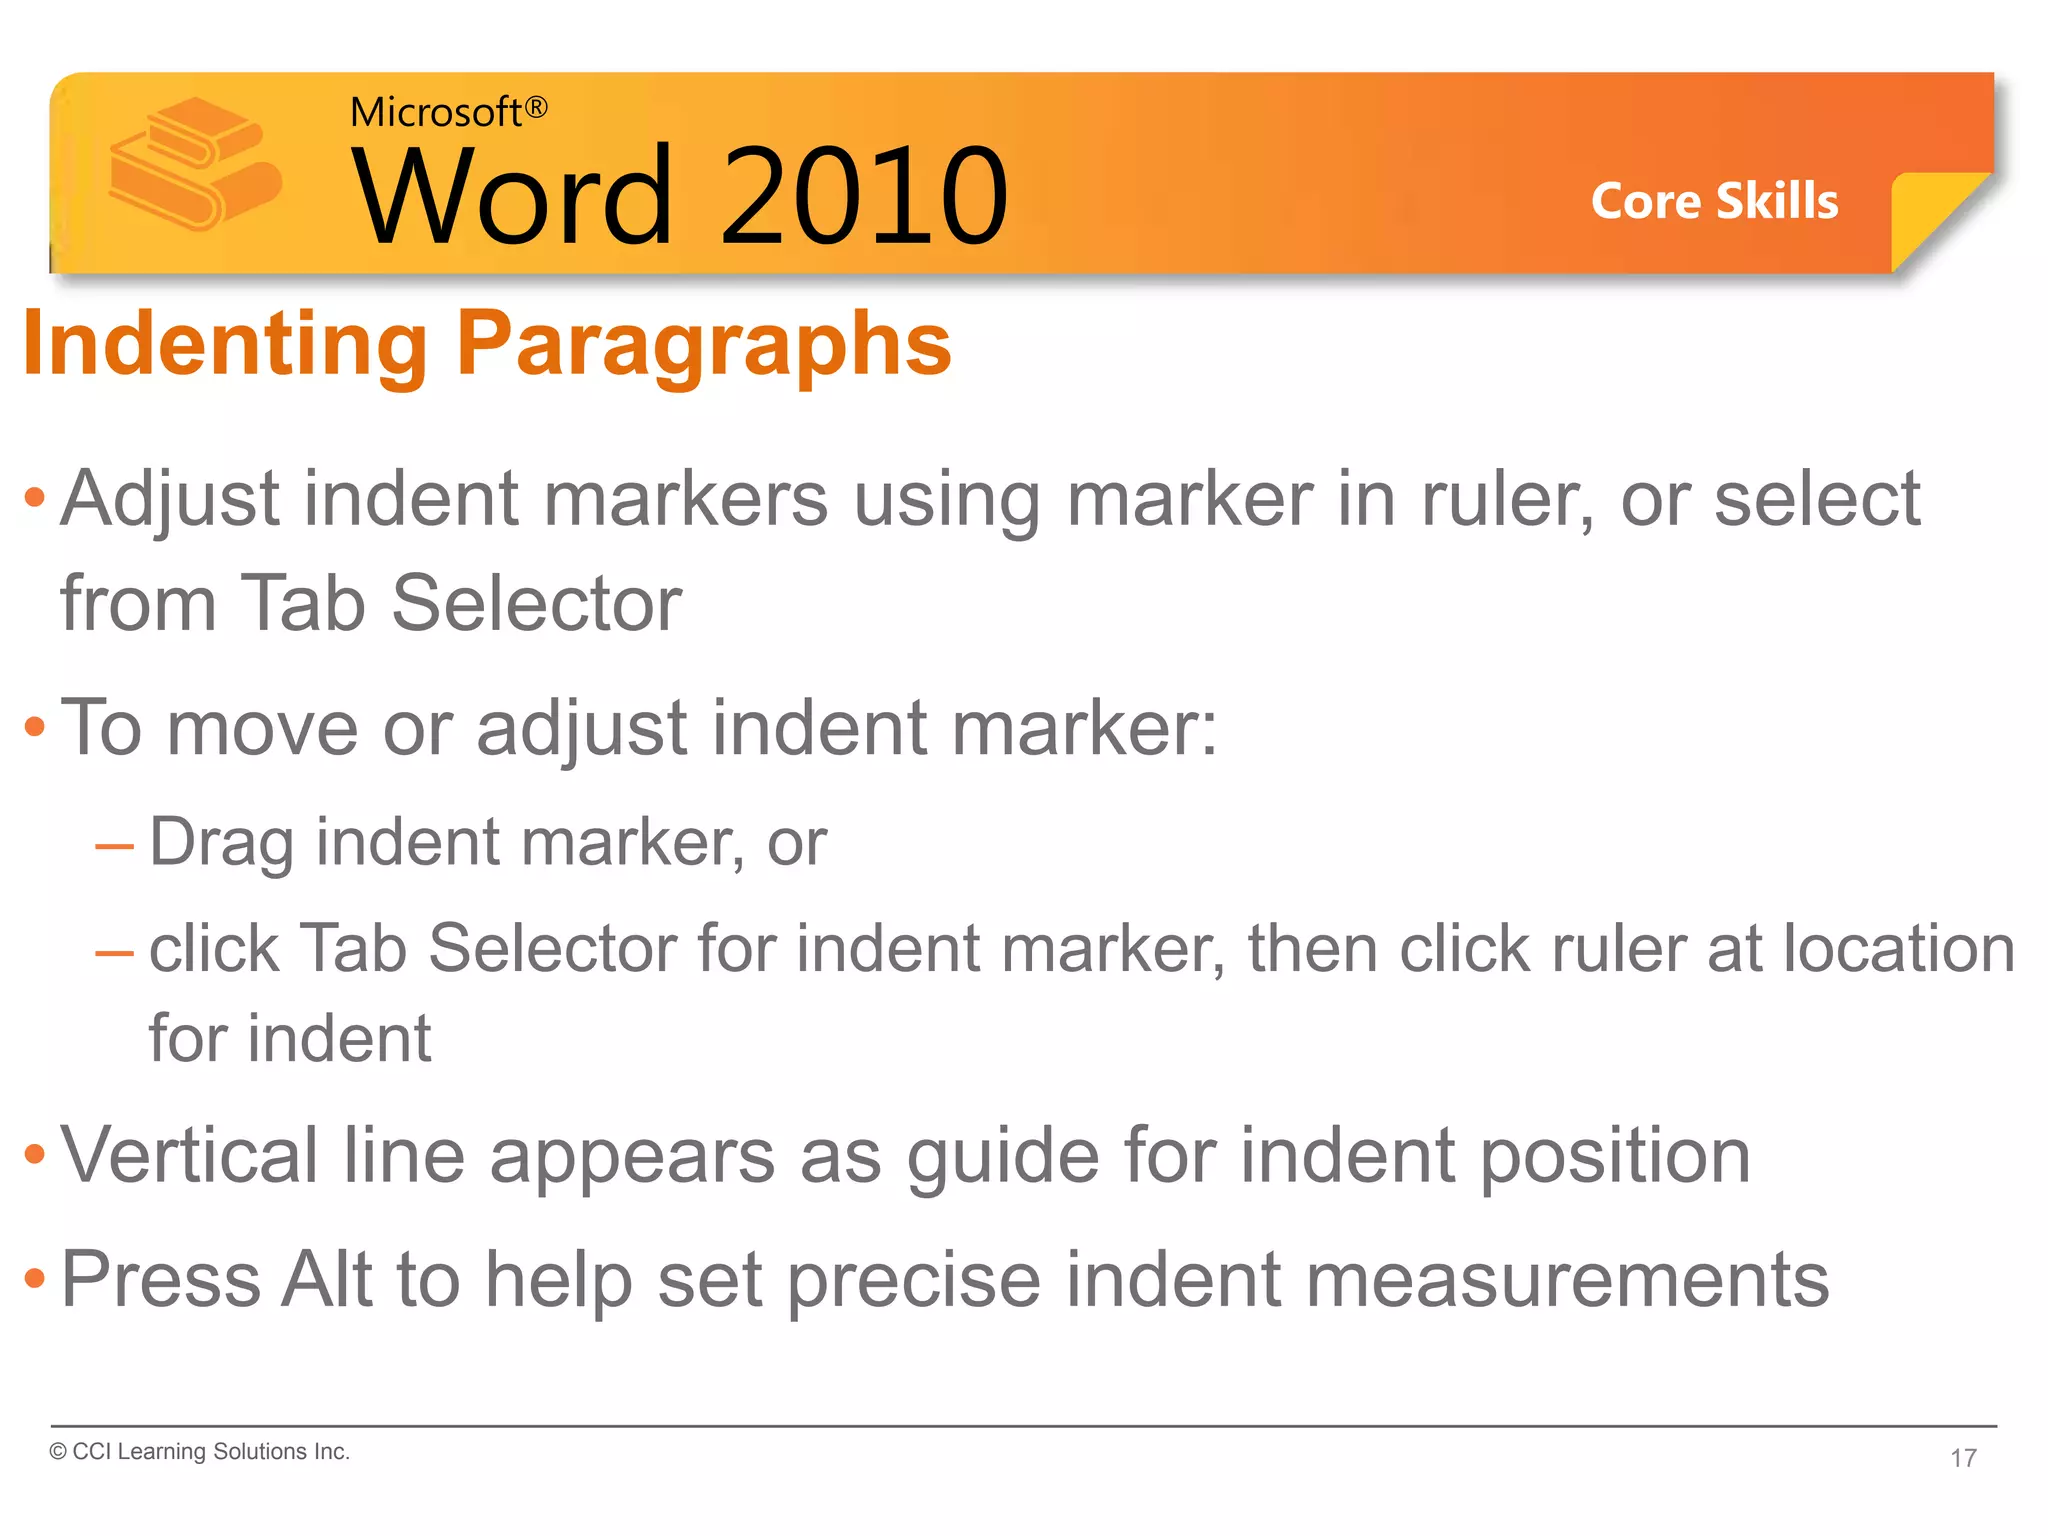
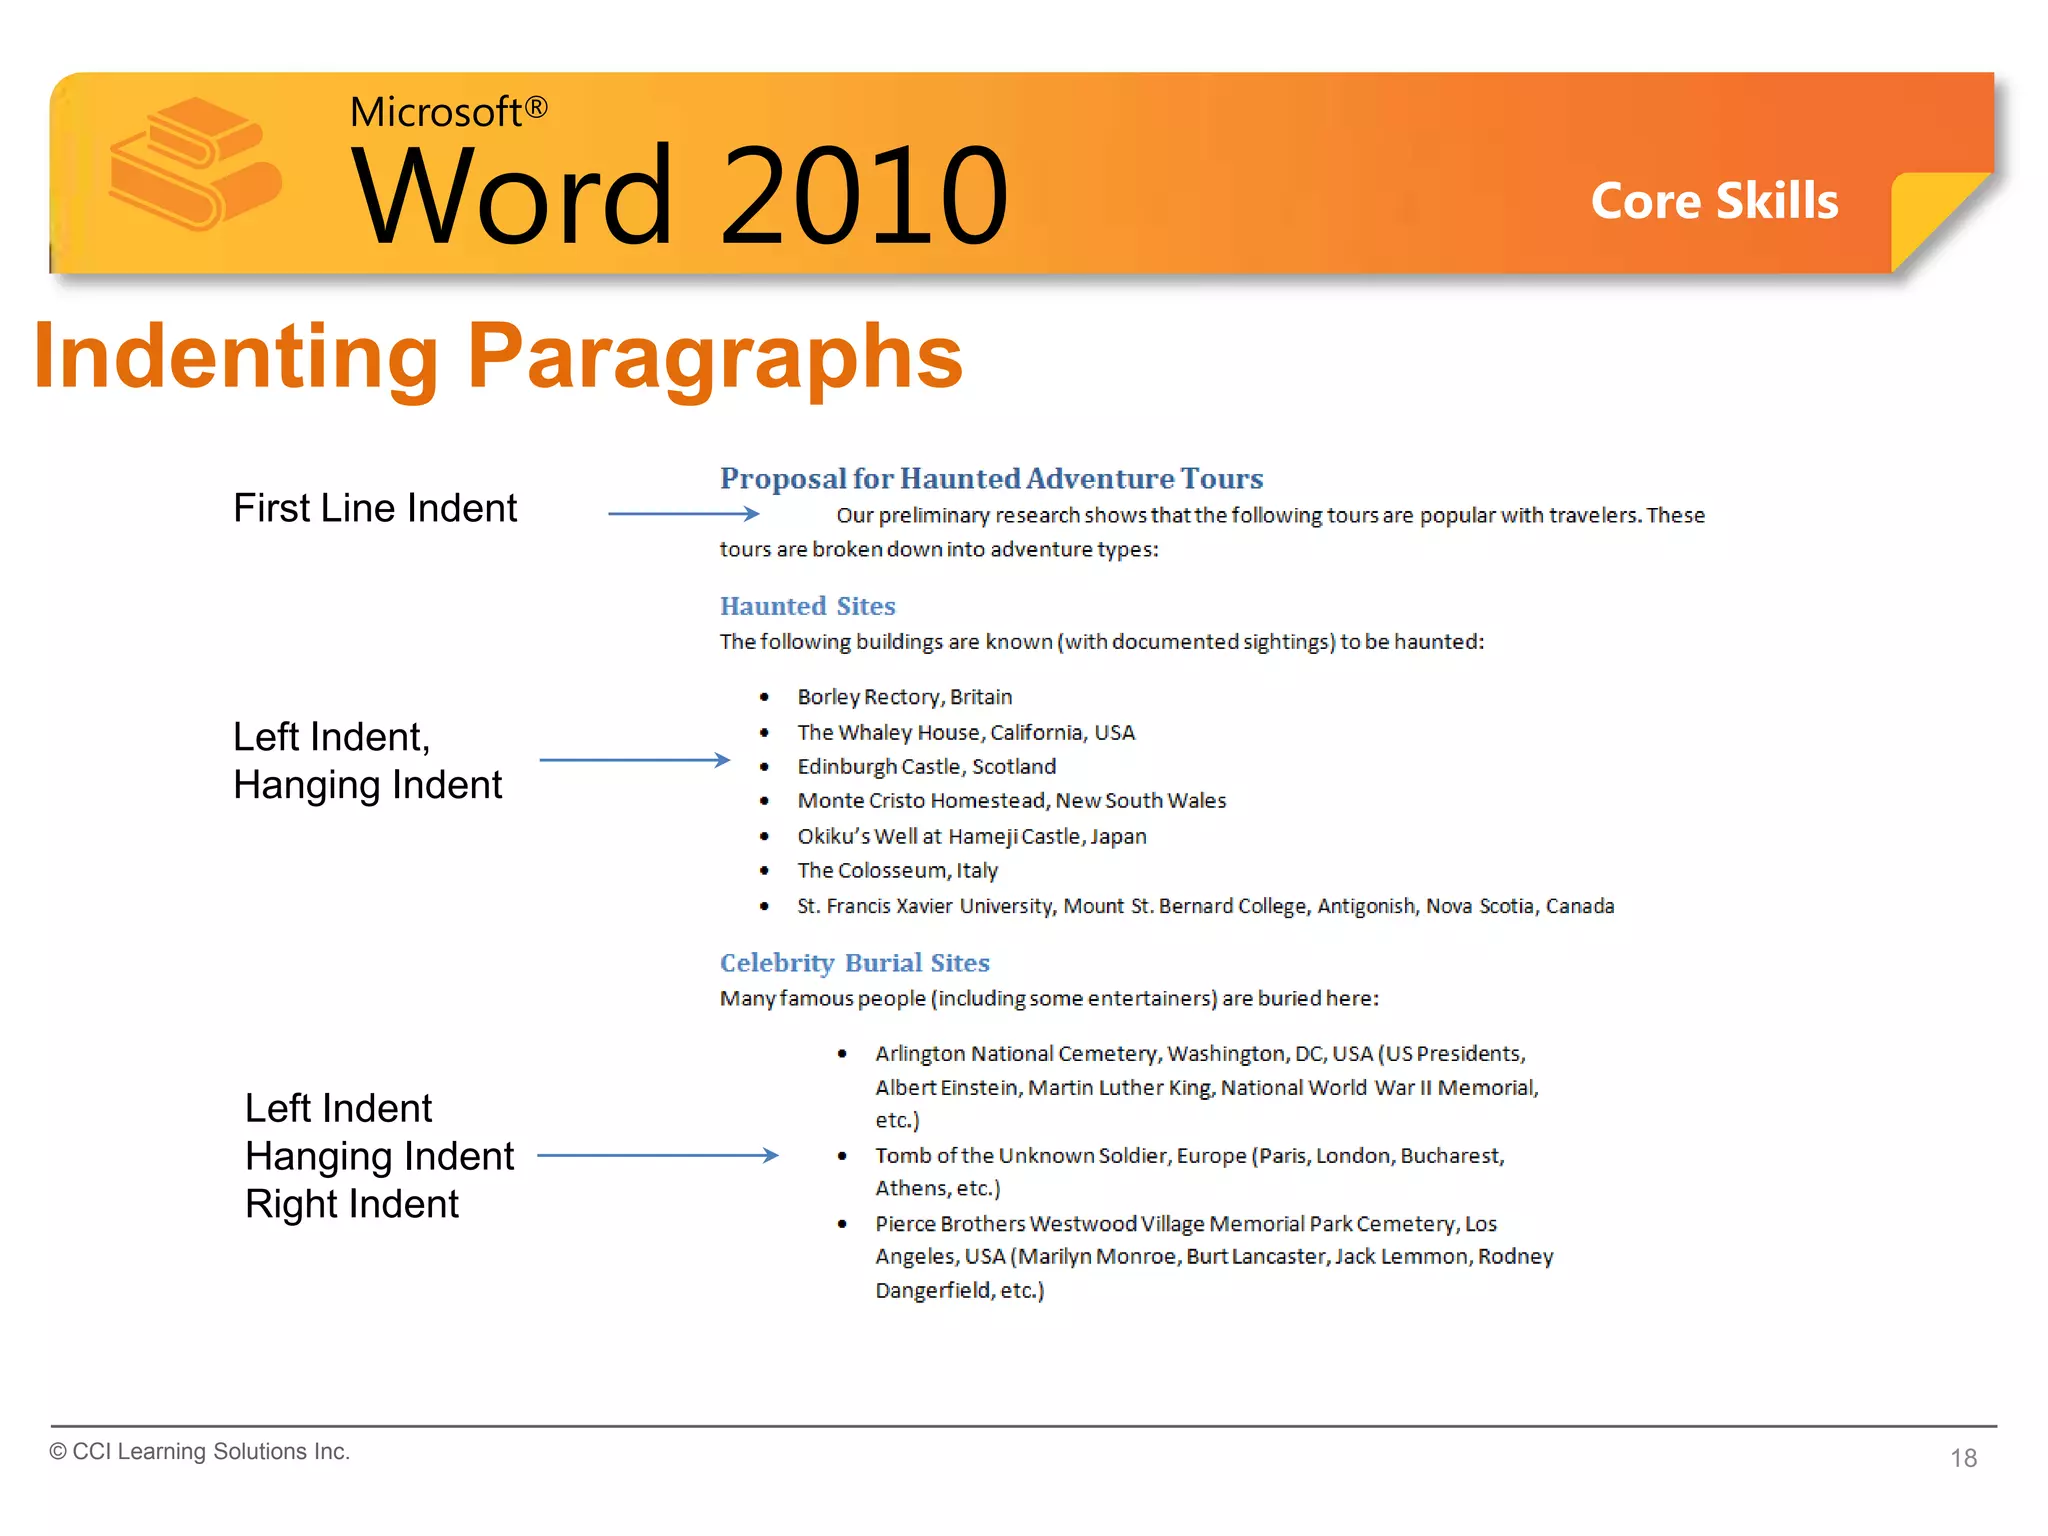
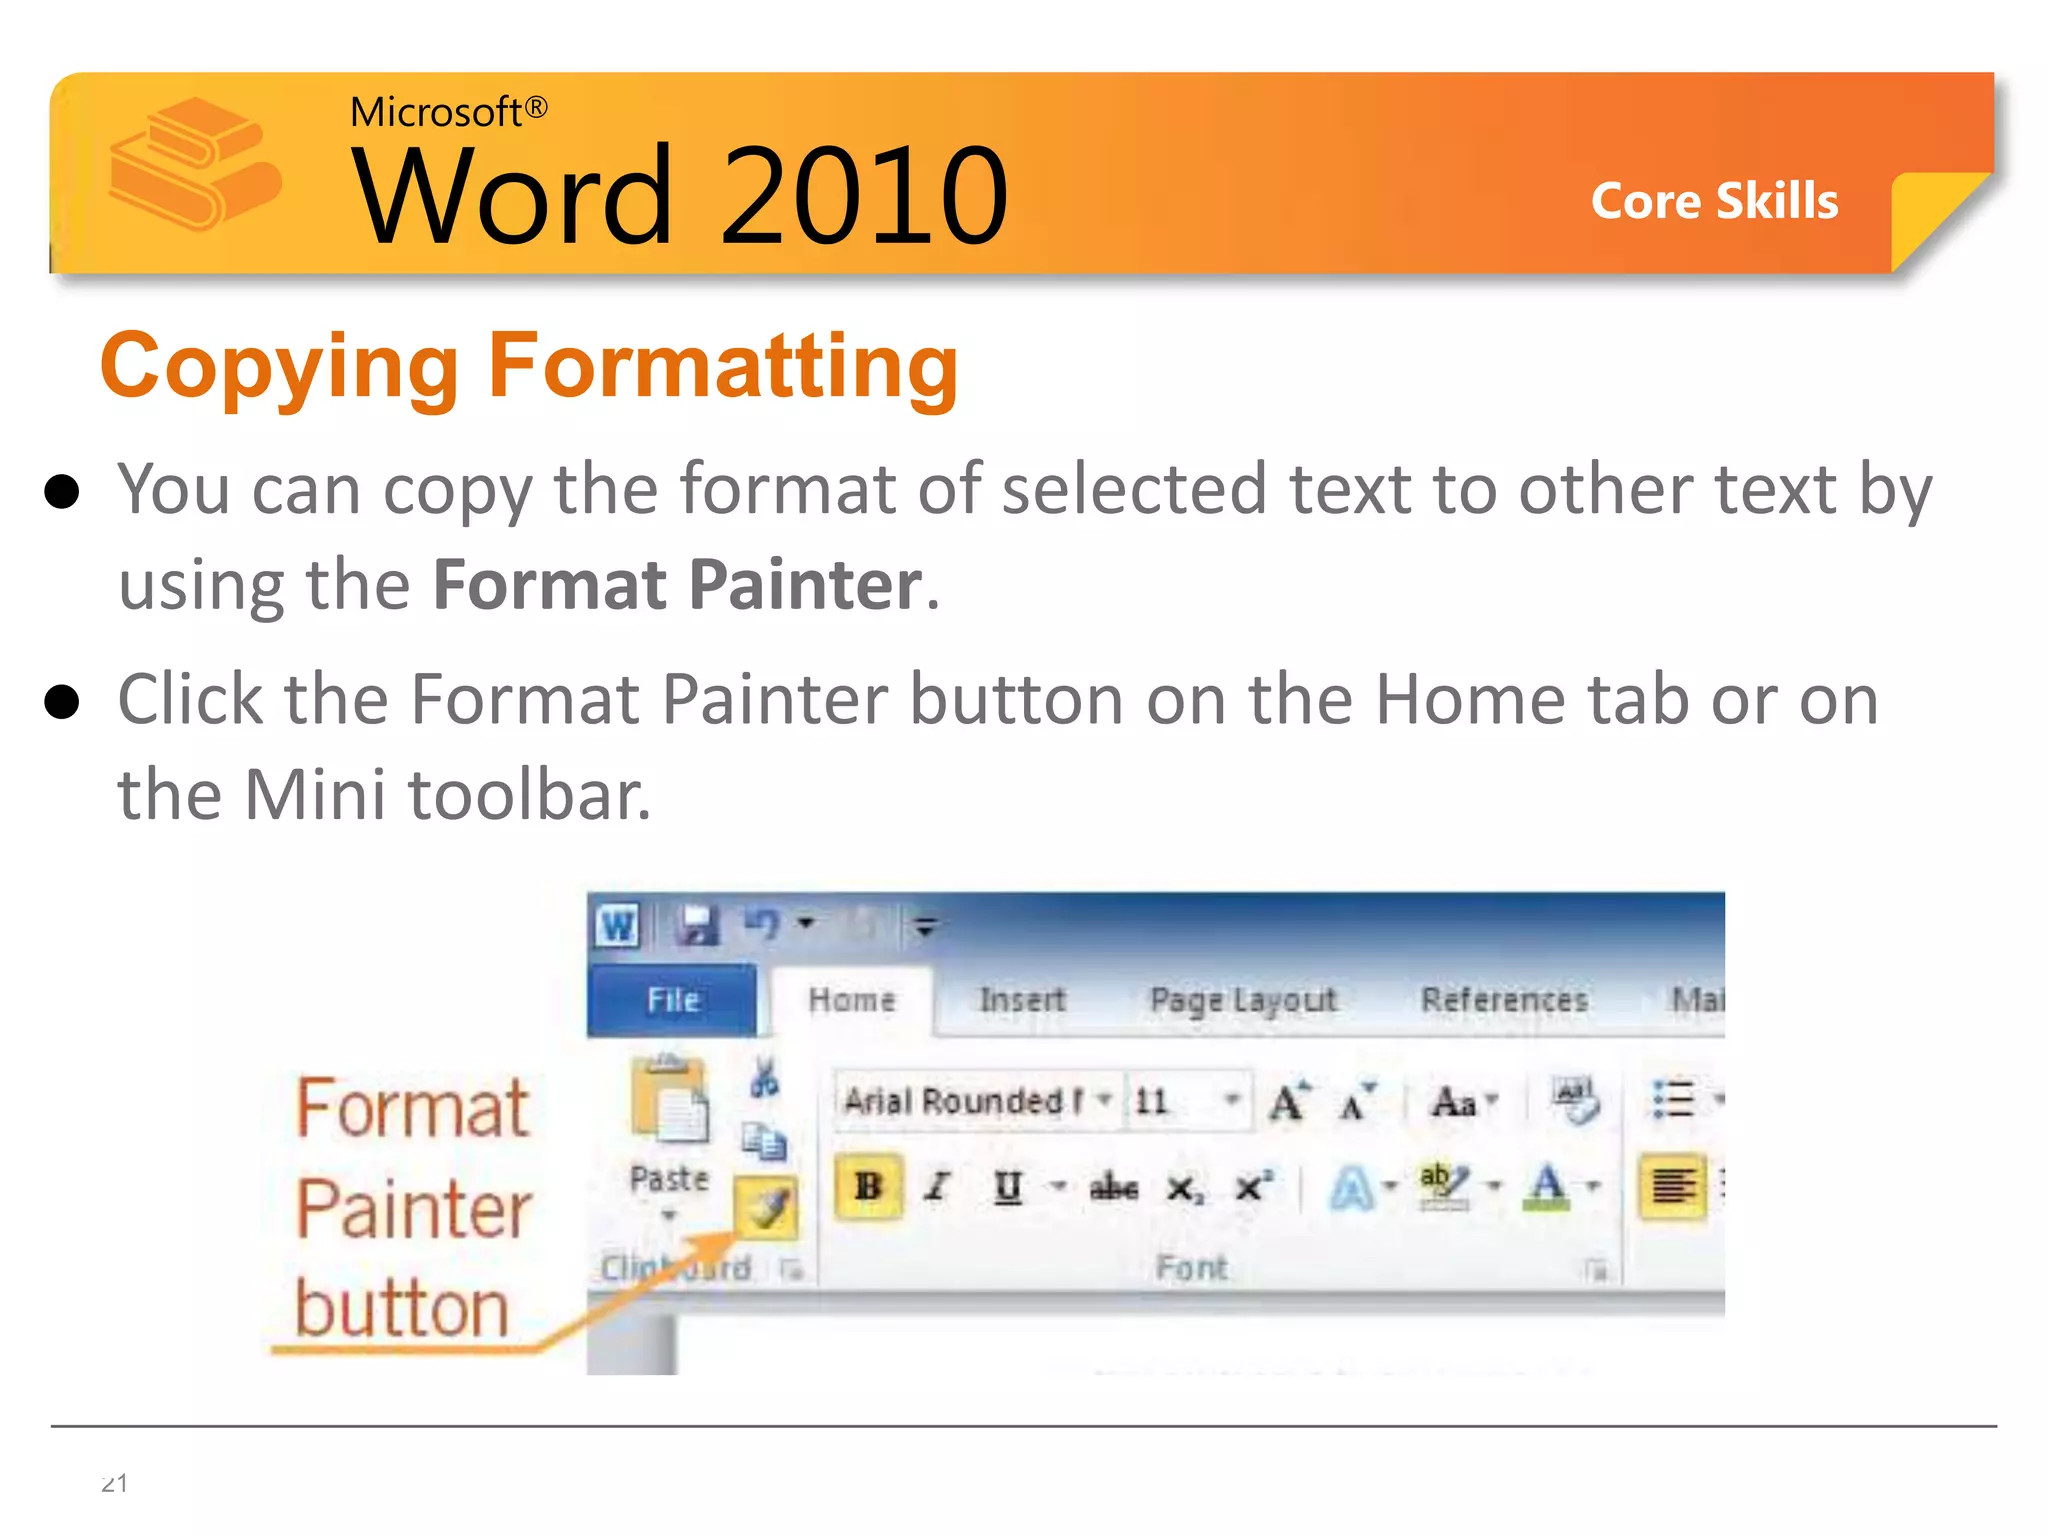
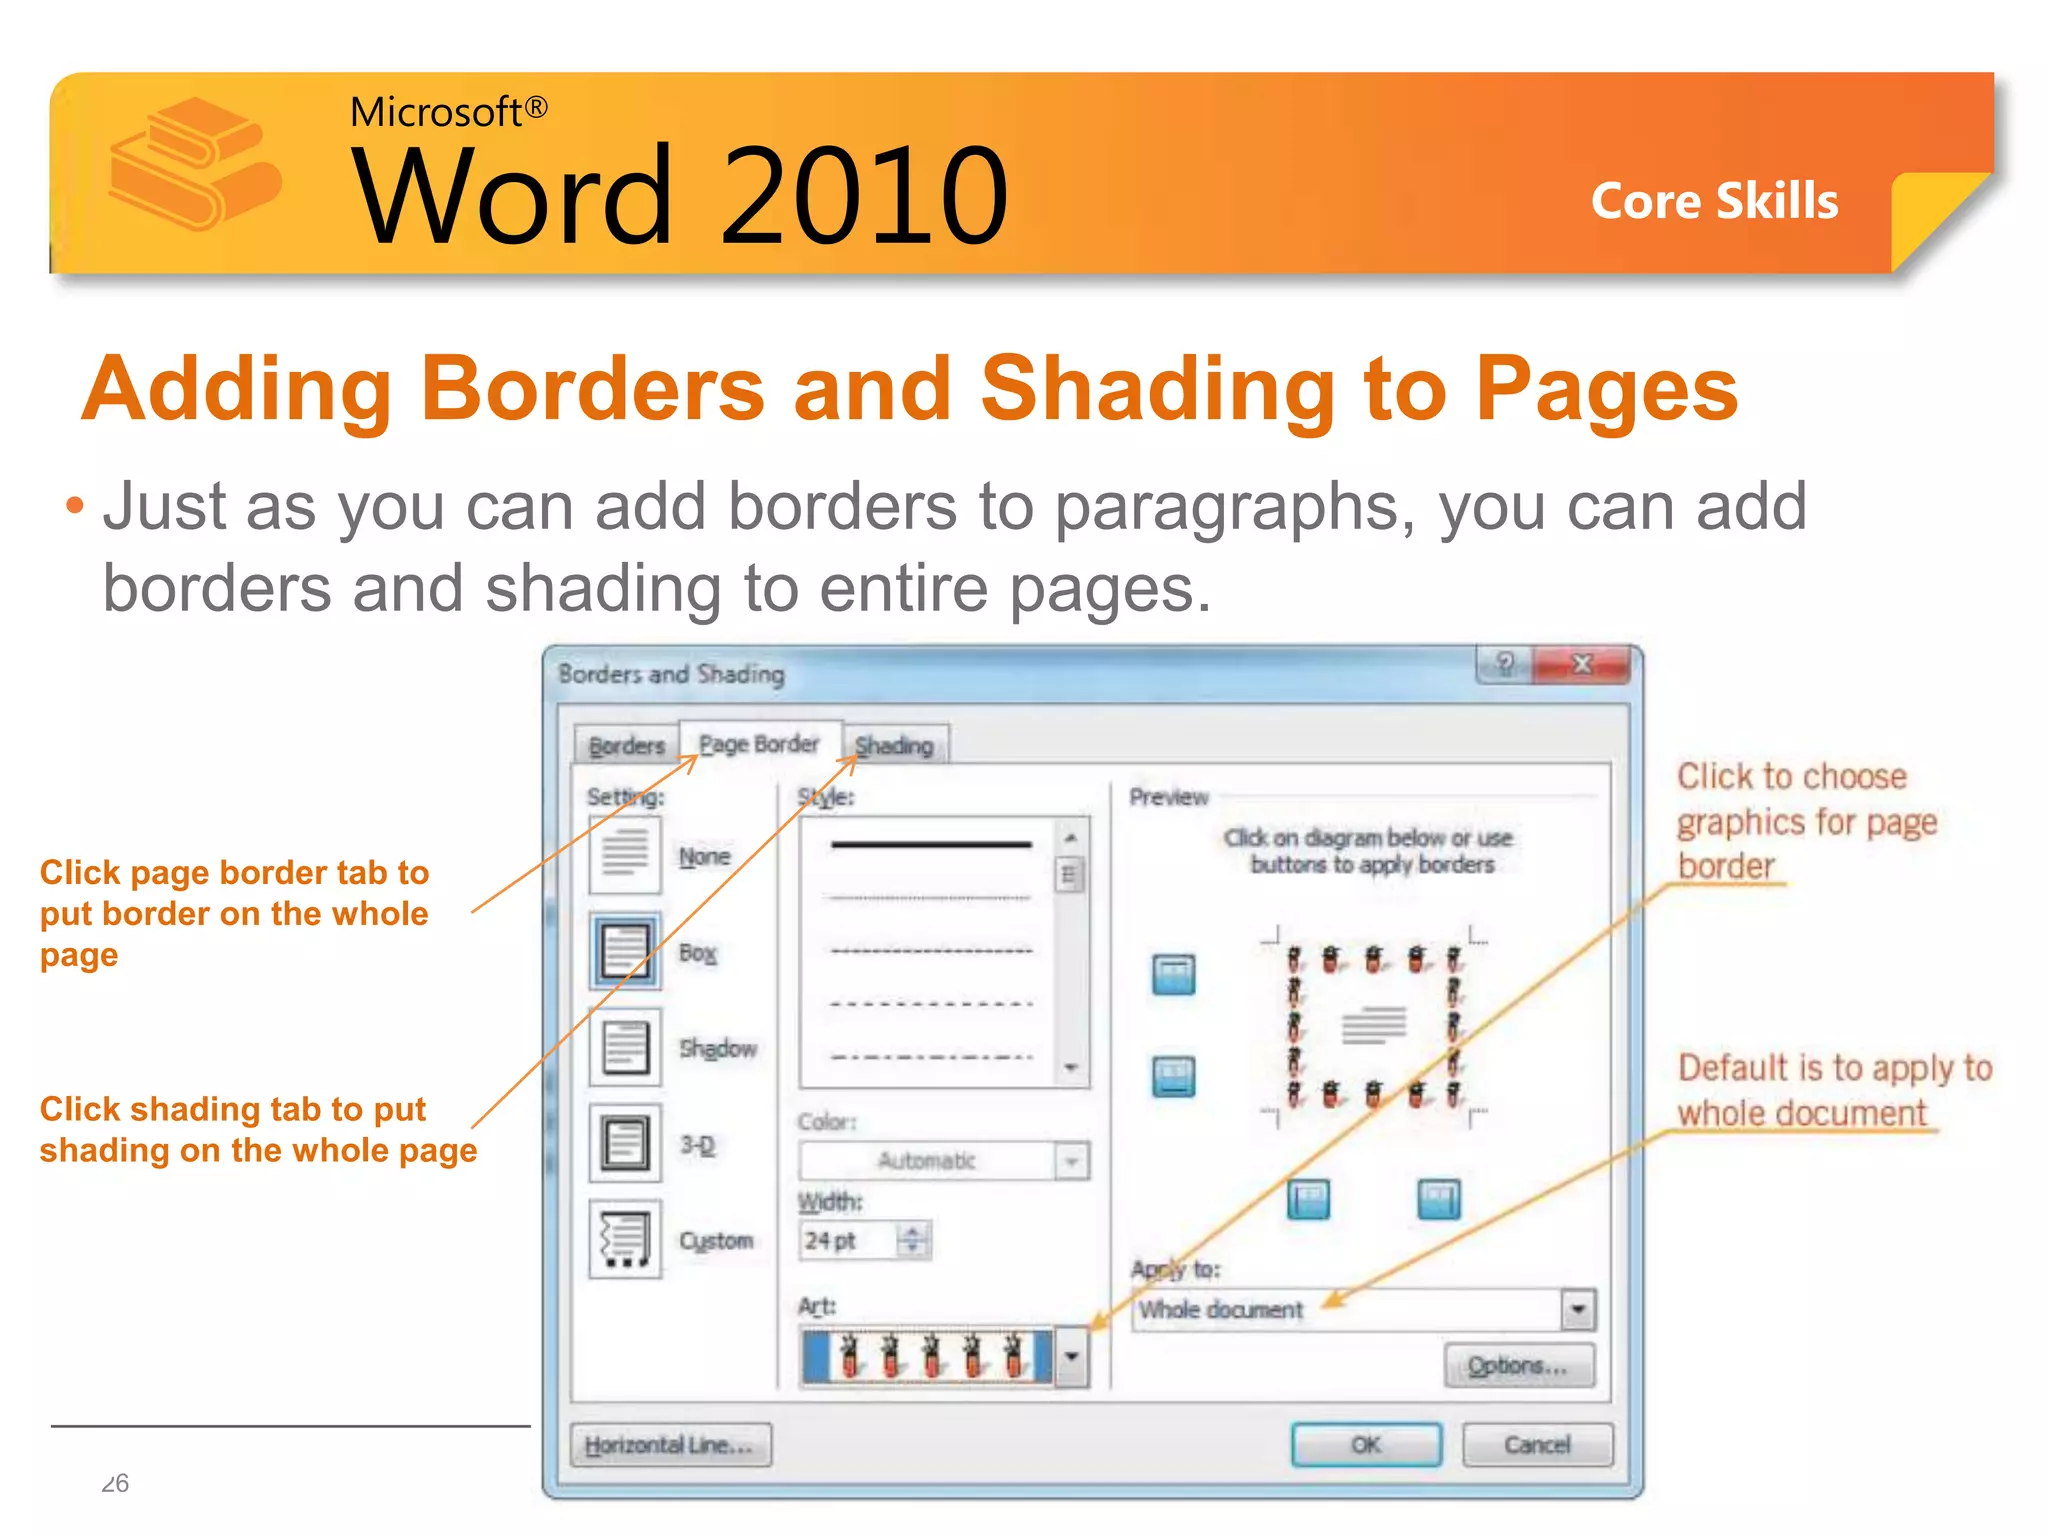
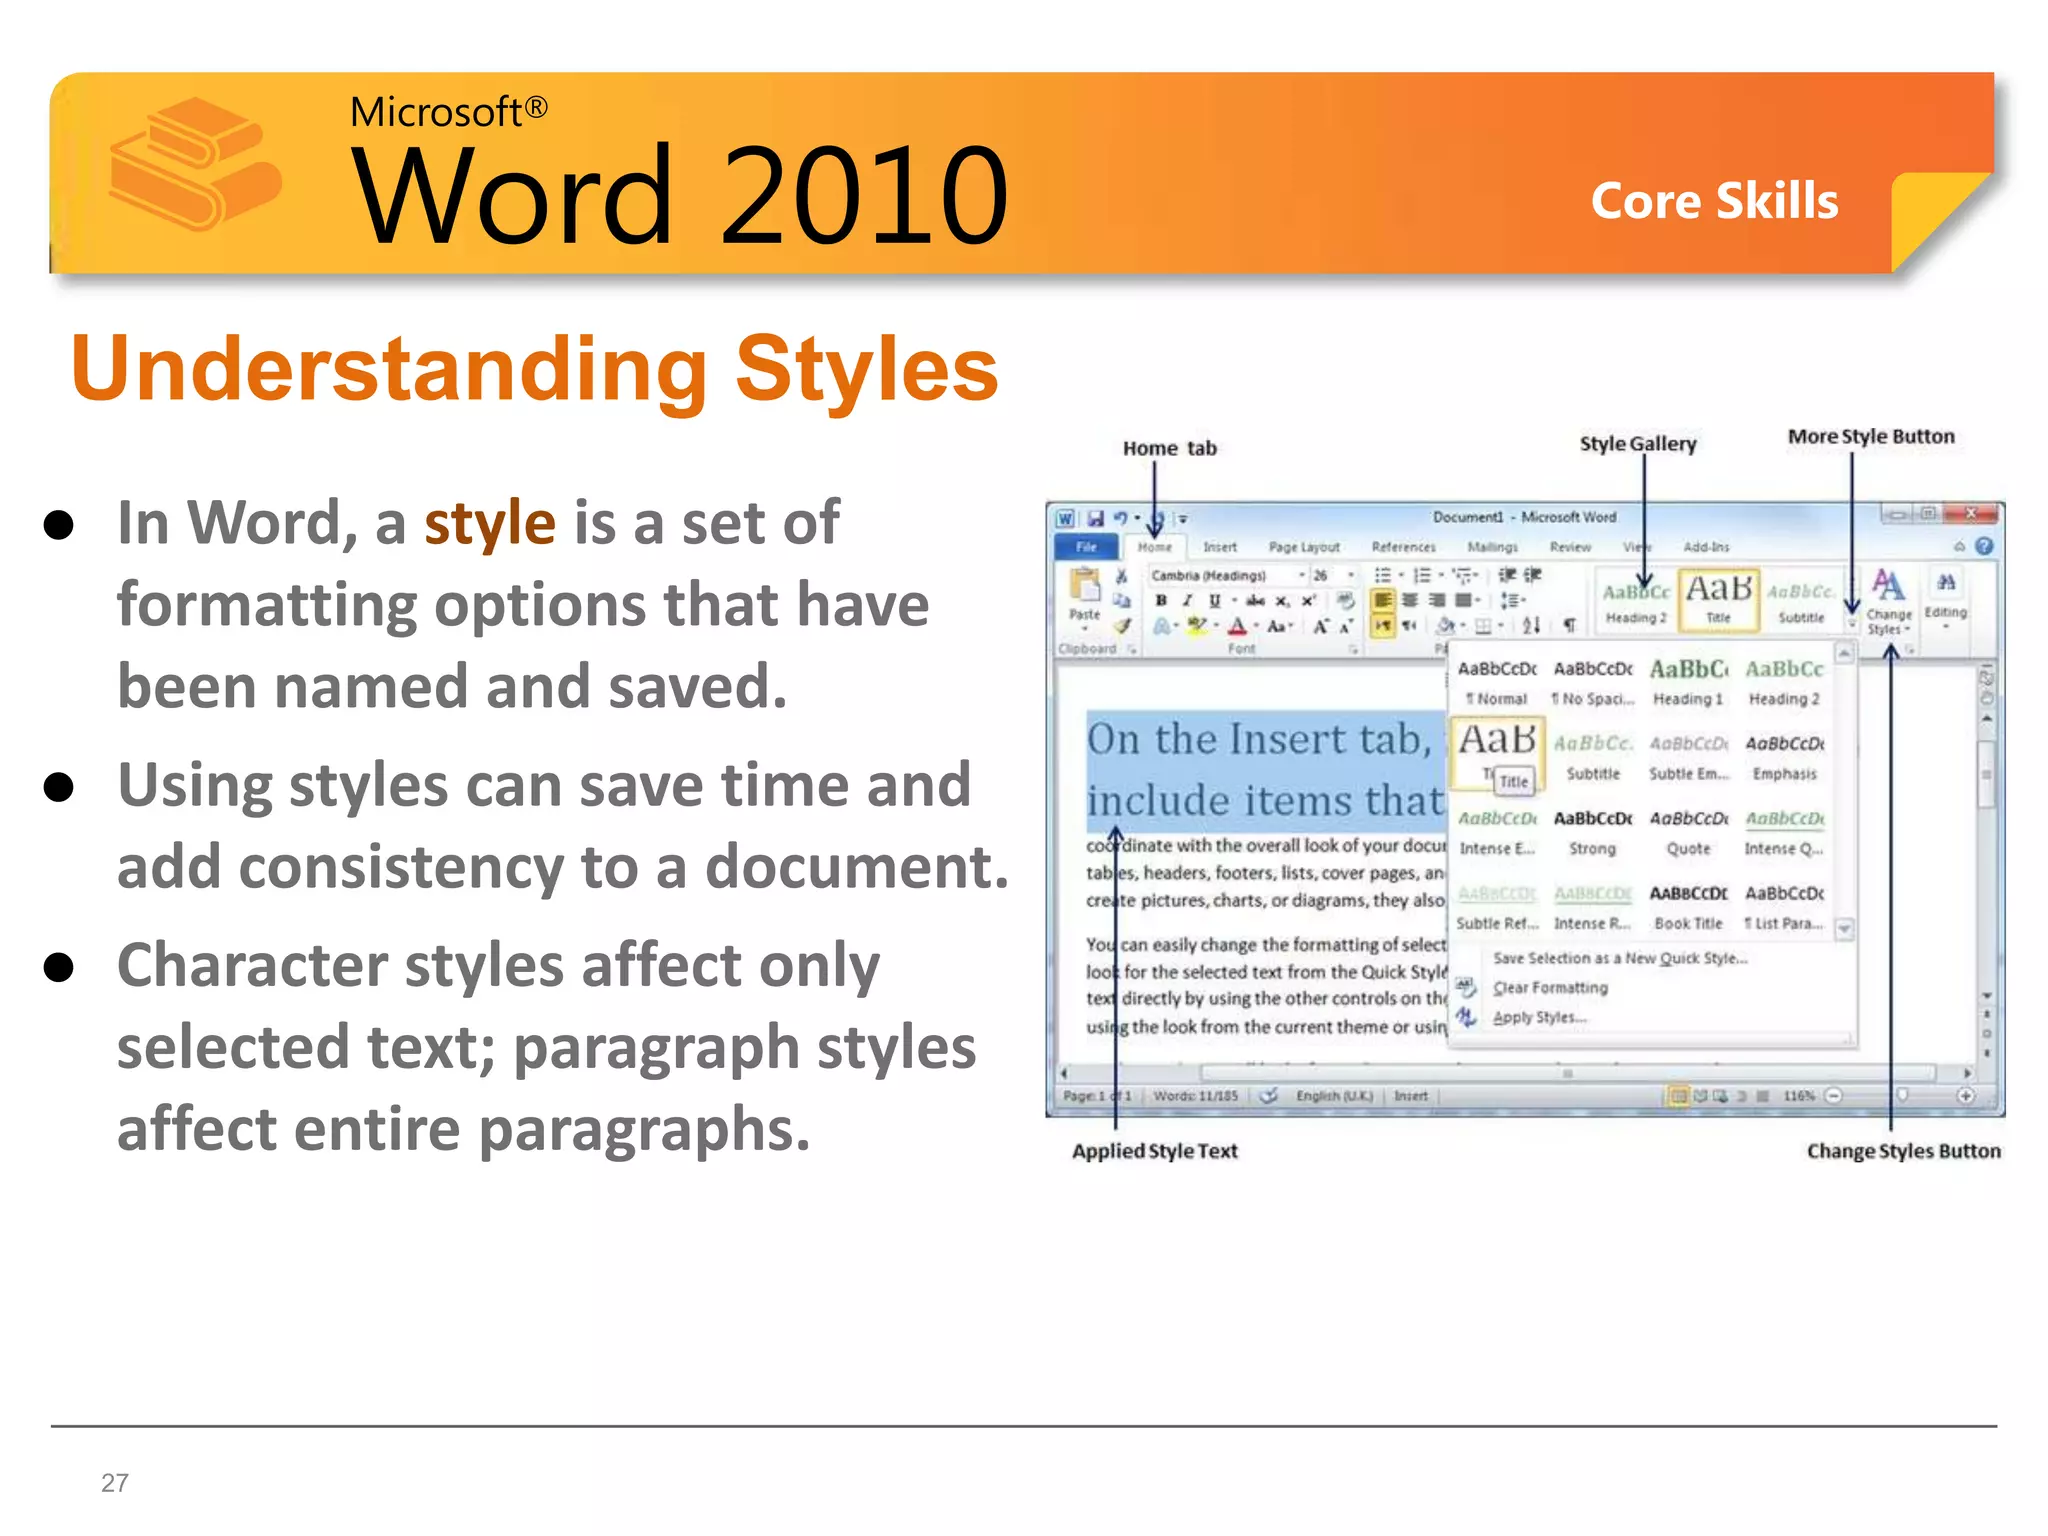
Microsoft®

        Word 2010              Core Skills


Microsoft Office Word
2010
Lesson 3: Formatting Content
Courseware #: 3240


                                             1
Microsoft®

                            Word 2010    Core Skills


  Lesson 3 Objectives

     •adjust text alignment
     •indent paragraphs
     •change line and paragraph spacing
     •use the Format Painter


© CCI Learning Solutions Inc.                          2
Microsoft®

                            Word 2010                          Core Skills


Formatting Paragraphs
• Apply format to change paragraph position
• To apply formatting to paragraphs:
    – On Home tab, in Paragraph group, click formatting option, or

    – use formatting options in the Paragraph dialog box, or

    – press keyboard shortcut for formatting option, or

    – right-click paragraph, and then click Paragraph, or

    – on Mini toolbar, click appropriate option.
• To remove all formatting options from paragraph, click Home tab
  and in Font group, click Clear Formatting
© CCI Learning Solutions Inc.                                                3
Microsoft®

                            Word 2010          Core Skills


Aligning Text
• Alignment refers to the position of text between the
  margins. You can left-align, center, right-align, or
  justify text.
• Left-aligned and justified are the two most commonly
  used alignments in documents.
• To align text, you click one of the Alignment buttons in
  the Paragraph group on the Home tab.


© CCI Learning Solutions Inc.                                4
Microsoft®

        Word 2010                            Core Skills


Aligning Text (continued)
• Choose the appropriate button for alignment on
  the Paragraph Group.
•     Align Left: the text is aligned with your left
  margin
•     Center: The text is centered within your
  margins
•     Align Right: Aligns text with the right margin
•     Justify: Aligns text to both the left and right
  margins.

 5
Microsoft®

        Word 2010                         Core Skills


Aligning Text (continued)
• Examples of different text alignments


 6
Microsoft®

                            Word 2010          Core Skills


Aligning Text Keyboard Shortcuts
• Align Left
                                          +L
• Center                                 +E
• Align Right                             +R
• Justify
© CCI Learning Solutions Inc.
                                         +J                  7
Microsoft®

        Word 2010                        Core Skills


Adjusting Line Spacing
 Line spacing is the amount of space between lines
  of text.
 Single-spaced text has no extra space between
  each line; double-spaced text has an extra line of
  space between each line of text.
 The default setting in a Word document is 1.15
  lines, not single spaced.

8   8
Microsoft®

                            Word 2010      Core Skills


Setting the Line Spacing
• To set line spacing:
   – On Home tab, in Paragraph group, click Line
     spacing, or
   – on Home tab, in Paragraph group, click Paragraph
     Dialog Box. On Indents and Spacing tab, click
     arrow for Line spacing and click line spacing, or


© CCI Learning Solutions Inc.                            9
Microsoft®

                            Word 2010                Core Skills


Setting the Line Spacing (continued)
• To set line spacing:
   – press shortcut key for most commonly used line
     spacing options, or
      • Single                           +1
           • One and a Half                   +1.5
       • Double                          +2
    – right-click paragraph, click Paragraph, click arrow for
      Line spacing and click spacing.
© CCI Learning Solutions Inc.                                      10
Microsoft®

       Word 2010                          Core Skills


Adjusting Paragraph Spacing
 Paragraph spacing is the amount of space
  between paragraphs.
 The default is to add 10 points of space after
  each paragraph.
 Often heading styles include space before or
  after the heading paragraph as part of the
  style definition.

11
 11
Microsoft®

                            Word 2010                         Core Skills


Setting Paragraph Spacing
• To set or change paragraph spacing:
    – On Home tab, in Paragraph group,
      click Paragraph Dialog Box. In
      Spacing area, set measurement, or
    – on Page Layout tab, in Paragraph group, click
      incremental buttons or type measurement for
      Before or After, or
    – right-click paragraph, click Paragraph, and in Spacing area, choose
      spacing for Before, After, or both.


© CCI Learning Solutions Inc.                                               12
Microsoft®

                            Word 2010     Core Skills


  Learn the Skill (p. 63-64)
     •This exercise will show you how to change
      the alignment on the title & then change the
      spacing for the paragraphs of text in the
      employee list
     •You will need the Tolano Adventures
      Employee List to complete the skill


© CCI Learning Solutions Inc.                           13
Microsoft®

            Word 2010                                            Core Skills


Indents
• An indent is the space between text and a document's margin.
  – Indent from the left margin, right margin, or both margins.
  – Indent only the first line of a paragraph or all the lines in a paragraph
    except the first line.
• To indent a paragraph one-half inch at a time, click the
  Increase Indent or Decrease Indent buttons on the Home tab.


1414
Microsoft®

                            Word 2010                                               Core Skills

Indenting Paragraphs
 Left Indent                           Entire paragraph indents from left margin.


 Right Indent                          Entire paragraph indents from right margin.


 First Line                            Only first line of paragraph indents from left margin.
 Indent
 Hanging Indent Paragraph indents from left margin, with first line “hanging”
                at left margin.

  Tab                     First Line     Hanging
  Selector                   Indent      Indent


                                            Left Indent                           Right Indent
© CCI Learning Solutions Inc.                                                                     15
Microsoft®

             Word 2010                                       Core Skills


Indenting Paragraphs (continued)
    You can create hanging indents in which the first full line of text is
     not indented but the following lines are.
    Hanging indents appear commonly in lists and documents such as
     glossaries and bibliographies.


16  16
Microsoft®

                            Word 2010                   Core Skills


Indenting Paragraphs
• Adjust indent markers using marker in ruler, or select
  from Tab Selector
• To move or adjust indent marker:
    – Drag indent marker, or
    – click Tab Selector for indent marker, then click ruler at location
      for indent
• Vertical line appears as guide for indent position
• Press Alt to help set precise indent measurements
© CCI Learning Solutions Inc.                                         17
Microsoft®

                            Word 2010    Core Skills


Indenting Paragraphs
                 First Line Indent


                 Left Indent,
                 Hanging Indent


                  Left Indent
                  Hanging Indent
                  Right Indent


© CCI Learning Solutions Inc.                          18
Microsoft®

                            Word 2010                    Core Skills


  Indenting Paragraphs
      • To set precise paragraph indents:
             – On Page Layout tab, in Paragraph group, set
               indent measurement from Left or Right margin, or


             – on Home tab, in Paragraph group, click Paragraph
               Dialog Box


© CCI Learning Solutions Inc.                                          19
Microsoft®

                            Word 2010       Core Skills


  Learn the Skill (p. 66-68)
     •In this exercise, you will practice setting
      different types of indents for Proposal for
      Haunted Tour Adventures Flyer Draft


© CCI Learning Solutions Inc.                             20
Microsoft®

            Word 2010                              Core Skills


    Copying Formatting
    You can copy the format of selected text to other text by
     using the Format Painter.
    Click the Format Painter button on the Home tab or on
     the Mini toolbar.


21  21
Microsoft®

        Word 2010                        Core Skills


 Copying Formatting
 To copy the format to more than one block of text,
  double-click the Format Painter button.


22
 22
Microsoft®

           Word 2010                  Core Skills


Adding Borders and Shading to Paragraphs
 • Borders around a paragraph draw
   the reader’s attention to the
   paragraph
 • You can specify where the border
   will appear around the paragraph
      – All four sides (like a box)
      – Two sides
      – One side


23
 23
Microsoft®

          Word 2010                                    Core Skills


Adding Borders and Shading to Paragraphs
 • To add borders and shading:
      – On Home tab, in Paragraph
        group, choose the borders
        command, or

 • on Home tab, in
   Paragraph group,
   click Borders &
   shading from the
   Borders drop
   down box                         Borders tab in the Borders and Shading
                                    dialog box
24
 24
Microsoft®

                 Word 2010                                     Core Skills

Borders and Shading dialog box
                                        Scroll to see line
                                        styles for border


                                                             Click sides of preview
Places border on all
                                                             paragraph to place or
four sides at once
                                                             remove individual
                                                             borders


Places border on each
side individually

                                                              Click to change the
                                                              border color


                              Click to change the width of
                              the border line

  2525
Microsoft®

                   Word 2010                     Core Skills


  Adding Borders and Shading to Pages
 • Just as you can add borders to paragraphs, you can add
   borders and shading to entire pages.


Click page border tab to
put border on the whole
page


Click shading tab to put
shading on the whole page


26 26
Microsoft®

             Word 2010                 Core Skills


Understanding Styles
    In Word, a style is a set of
     formatting options that have
     been named and saved.
    Using styles can save time and
     add consistency to a document.
    Character styles affect only
     selected text; paragraph styles
     affect entire paragraphs.


27  27
Microsoft®

            Word 2010                                    Core Skills


Applying Quick Styles
    A Quick Style is a style that is
     available by clicking a button in    Styles Group

     the Styles group on the Home    Quick Styles
                                                               More button in the
                                                               Styles group
                                     Gallery
     tab.
    When the Quick Styles gallery is
     open, you can point to a Quick
     Style to see a Live Preview of the
     formatting in the document.
    The default style for text is the
     Normal Quick Style.
28  28
Microsoft®

                            Word 2010                     Core Skills


  Summary of Lesson 3
    • format text using                  • adjust text
      bold, italics and                    alignment
      underline
                                         • indent paragraphs
    • change the font,
                                         • change line and
      font size and font
                                           paragraph spacing
      color of text
                                         • using the Format
    • adjust the
                                           Painter
      character spacing
      or position
© CCI Learning Solutions Inc.                                           29
Microsoft®

                            Word 2010          Core Skills


  Review Questions
     1. What does formatting characters refer to?
     2. When would you want to change the character
        spacing?
     3. What does paragraph formatting refer to?
     4. When or why would you want to change the
        paragraph spacing?
     5. Explain the different indent types and when or
        how you might use each.
© CCI Learning Solutions Inc.                                30

Word Lesson 3B PPT

  • 1.
    Microsoft® Word 2010 Core Skills Microsoft Office Word 2010 Lesson 3: Formatting Content Courseware #: 3240 1
  • 2.
    Microsoft® Word 2010 Core Skills Lesson 3 Objectives •adjust text alignment •indent paragraphs •change line and paragraph spacing •use the Format Painter © CCI Learning Solutions Inc. 2
  • 3.
    Microsoft® Word 2010 Core Skills Formatting Paragraphs • Apply format to change paragraph position • To apply formatting to paragraphs: – On Home tab, in Paragraph group, click formatting option, or – use formatting options in the Paragraph dialog box, or – press keyboard shortcut for formatting option, or – right-click paragraph, and then click Paragraph, or – on Mini toolbar, click appropriate option. • To remove all formatting options from paragraph, click Home tab and in Font group, click Clear Formatting © CCI Learning Solutions Inc. 3
  • 4.
    Microsoft® Word 2010 Core Skills Aligning Text • Alignment refers to the position of text between the margins. You can left-align, center, right-align, or justify text. • Left-aligned and justified are the two most commonly used alignments in documents. • To align text, you click one of the Alignment buttons in the Paragraph group on the Home tab. © CCI Learning Solutions Inc. 4
  • 5.
    Microsoft® Word 2010 Core Skills Aligning Text (continued) • Choose the appropriate button for alignment on the Paragraph Group. • Align Left: the text is aligned with your left margin • Center: The text is centered within your margins • Align Right: Aligns text with the right margin • Justify: Aligns text to both the left and right margins. 5
  • 6.
    Microsoft® Word 2010 Core Skills Aligning Text (continued) • Examples of different text alignments 6
  • 7.
    Microsoft® Word 2010 Core Skills Aligning Text Keyboard Shortcuts • Align Left +L • Center +E • Align Right +R • Justify © CCI Learning Solutions Inc. +J 7
  • 8.
    Microsoft® Word 2010 Core Skills Adjusting Line Spacing  Line spacing is the amount of space between lines of text.  Single-spaced text has no extra space between each line; double-spaced text has an extra line of space between each line of text.  The default setting in a Word document is 1.15 lines, not single spaced. 8 8
  • 9.
    Microsoft® Word 2010 Core Skills Setting the Line Spacing • To set line spacing: – On Home tab, in Paragraph group, click Line spacing, or – on Home tab, in Paragraph group, click Paragraph Dialog Box. On Indents and Spacing tab, click arrow for Line spacing and click line spacing, or © CCI Learning Solutions Inc. 9
  • 10.
    Microsoft® Word 2010 Core Skills Setting the Line Spacing (continued) • To set line spacing: – press shortcut key for most commonly used line spacing options, or • Single +1 • One and a Half +1.5 • Double +2 – right-click paragraph, click Paragraph, click arrow for Line spacing and click spacing. © CCI Learning Solutions Inc. 10
  • 11.
    Microsoft® Word 2010 Core Skills Adjusting Paragraph Spacing  Paragraph spacing is the amount of space between paragraphs.  The default is to add 10 points of space after each paragraph.  Often heading styles include space before or after the heading paragraph as part of the style definition. 11 11
  • 12.
    Microsoft® Word 2010 Core Skills Setting Paragraph Spacing • To set or change paragraph spacing: – On Home tab, in Paragraph group, click Paragraph Dialog Box. In Spacing area, set measurement, or – on Page Layout tab, in Paragraph group, click incremental buttons or type measurement for Before or After, or – right-click paragraph, click Paragraph, and in Spacing area, choose spacing for Before, After, or both. © CCI Learning Solutions Inc. 12
  • 13.
    Microsoft® Word 2010 Core Skills Learn the Skill (p. 63-64) •This exercise will show you how to change the alignment on the title & then change the spacing for the paragraphs of text in the employee list •You will need the Tolano Adventures Employee List to complete the skill © CCI Learning Solutions Inc. 13
  • 14.
    Microsoft® Word 2010 Core Skills Indents • An indent is the space between text and a document's margin. – Indent from the left margin, right margin, or both margins. – Indent only the first line of a paragraph or all the lines in a paragraph except the first line. • To indent a paragraph one-half inch at a time, click the Increase Indent or Decrease Indent buttons on the Home tab. 1414
  • 15.
    Microsoft® Word 2010 Core Skills Indenting Paragraphs Left Indent Entire paragraph indents from left margin. Right Indent Entire paragraph indents from right margin. First Line Only first line of paragraph indents from left margin. Indent Hanging Indent Paragraph indents from left margin, with first line “hanging” at left margin. Tab First Line Hanging Selector Indent Indent Left Indent Right Indent © CCI Learning Solutions Inc. 15
  • 16.
    Microsoft® Word 2010 Core Skills Indenting Paragraphs (continued)  You can create hanging indents in which the first full line of text is not indented but the following lines are.  Hanging indents appear commonly in lists and documents such as glossaries and bibliographies. 16 16
  • 17.
    Microsoft® Word 2010 Core Skills Indenting Paragraphs • Adjust indent markers using marker in ruler, or select from Tab Selector • To move or adjust indent marker: – Drag indent marker, or – click Tab Selector for indent marker, then click ruler at location for indent • Vertical line appears as guide for indent position • Press Alt to help set precise indent measurements © CCI Learning Solutions Inc. 17
  • 18.
    Microsoft® Word 2010 Core Skills Indenting Paragraphs First Line Indent Left Indent, Hanging Indent Left Indent Hanging Indent Right Indent © CCI Learning Solutions Inc. 18
  • 19.
    Microsoft® Word 2010 Core Skills Indenting Paragraphs • To set precise paragraph indents: – On Page Layout tab, in Paragraph group, set indent measurement from Left or Right margin, or – on Home tab, in Paragraph group, click Paragraph Dialog Box © CCI Learning Solutions Inc. 19
  • 20.
    Microsoft® Word 2010 Core Skills Learn the Skill (p. 66-68) •In this exercise, you will practice setting different types of indents for Proposal for Haunted Tour Adventures Flyer Draft © CCI Learning Solutions Inc. 20
  • 21.
    Microsoft® Word 2010 Core Skills Copying Formatting  You can copy the format of selected text to other text by using the Format Painter.  Click the Format Painter button on the Home tab or on the Mini toolbar. 21 21
  • 22.
    Microsoft® Word 2010 Core Skills Copying Formatting  To copy the format to more than one block of text, double-click the Format Painter button. 22 22
  • 23.
    Microsoft® Word 2010 Core Skills Adding Borders and Shading to Paragraphs • Borders around a paragraph draw the reader’s attention to the paragraph • You can specify where the border will appear around the paragraph – All four sides (like a box) – Two sides – One side 23 23
  • 24.
    Microsoft® Word 2010 Core Skills Adding Borders and Shading to Paragraphs • To add borders and shading: – On Home tab, in Paragraph group, choose the borders command, or • on Home tab, in Paragraph group, click Borders & shading from the Borders drop down box Borders tab in the Borders and Shading dialog box 24 24
  • 25.
    Microsoft® Word 2010 Core Skills Borders and Shading dialog box Scroll to see line styles for border Click sides of preview Places border on all paragraph to place or four sides at once remove individual borders Places border on each side individually Click to change the border color Click to change the width of the border line 2525
  • 26.
    Microsoft® Word 2010 Core Skills Adding Borders and Shading to Pages • Just as you can add borders to paragraphs, you can add borders and shading to entire pages. Click page border tab to put border on the whole page Click shading tab to put shading on the whole page 26 26
  • 27.
    Microsoft® Word 2010 Core Skills Understanding Styles  In Word, a style is a set of formatting options that have been named and saved.  Using styles can save time and add consistency to a document.  Character styles affect only selected text; paragraph styles affect entire paragraphs. 27 27
  • 28.
    Microsoft® Word 2010 Core Skills Applying Quick Styles  A Quick Style is a style that is available by clicking a button in Styles Group the Styles group on the Home Quick Styles More button in the Styles group Gallery tab.  When the Quick Styles gallery is open, you can point to a Quick Style to see a Live Preview of the formatting in the document.  The default style for text is the Normal Quick Style. 28 28
  • 29.
    Microsoft® Word 2010 Core Skills Summary of Lesson 3 • format text using • adjust text bold, italics and alignment underline • indent paragraphs • change the font, • change line and font size and font paragraph spacing color of text • using the Format • adjust the Painter character spacing or position © CCI Learning Solutions Inc. 29
  • 30.
    Microsoft® Word 2010 Core Skills Review Questions 1. What does formatting characters refer to? 2. When would you want to change the character spacing? 3. What does paragraph formatting refer to? 4. When or why would you want to change the paragraph spacing? 5. Explain the different indent types and when or how you might use each. © CCI Learning Solutions Inc. 30

Editor's Notes

  • #3 Pg 55Briefly introduce the topics that will be covered in this lesson so students are aware of the new skills they will learn. Remind students also that all the information is available in the book as a reference so they don’t need to commit anything to memory or take notes.
  • #4 Pg 61Objective 2.1Again, ensure students understand the difference between formatting characters and paragraphs. Formatting is a process that can be applied, causing different effects based on the formatting used or the selected text.As with character formatting, take a few seconds to discuss the features for paragraph formatting, and introduce them here as you will speak to them later in this course. You may want to reiterate how once text is typed, the text must be selected before you can apply any formatting. A hint for them is when they want to change the paragraph formatting, they need only to ensure the cursor is somewhere in that paragraph for the formatting to be applied. For multiple paragraphs, they still need to select some part of each paragraph.
  • #5 Pg 61-62Objective 2.1This image is provided in the gallery as well in the Extra IR Files folder for you to use, as needed. It is meant as a quick view of how the four different alignment options affect text. Be prepared to provide examples of when you might use each one, especially for the Align Right option (e.g., technical documents, date and case # on legal documents, etc.).
  • #8 Pg 61-62Objective 2.1For those students who are new to word processing concepts, you may need to spend a bit more time giving examples of what alignment is and when you might need to change the default. For instance, relate to business documents and how most companies use a left alignment as this makes reading long pieces of text easier (your eyes don’t get as tired from reading). Other companies and publications may use justified text to provide a nice even edge at the left and right side but this can lead to rivers of space, as well as the reader getting more tired from reading from edge to edge.Centering text is one feature that most students want to know how to do, and in some cases, students may have done this previously by using tabs or spaces. This is an example of how typing the text first can be handy especially with paragraph formatting – you need only to position the cursor somewhere in that paragraph to apply the alignment option. With character formatting, you would need to select the characters first.Be sure to show them the pros and cons of applying paragraph formatting as you type, versus selecting and applying with existing text.
  • #10 Pg 62Objective 2.1Ensure you are familiar with the default line spacing that Word sets up for each new document. This setting makes reading the text easier but can cause some confusion for those who are used to single line spacing, and who may want to know how to change the default for all documents. For those who do, encourage them to take the Expert level or show them outside of regular class time used for features covered in this level. The process is not difficult but will require a bit of time as well as a handout that they can take away with them to do in their own environment (included with the Extra IR Files folder in instructor area of our microsite).Be prepared to provide examples of when you might use the different types of line spacing.
  • #11 Pg 62Objective 2.1Ensure you are familiar with the default line spacing that Word sets up for each new document. This setting makes reading the text easier but can cause some confusion for those who are used to single line spacing, and who may want to know how to change the default for all documents. For those who do, encourage them to take the Expert level or show them outside of regular class time used for features covered in this level. The process is not difficult but will require a bit of time as well as a handout that they can take away with them to do in their own environment (included with the Extra IR Files folder in instructor area of our microsite).Be prepared to provide examples of when you might use the different types of line spacing.
  • #13 Pg 63Objective 2.4Ensure you are aware of the default paragraph spacing for new Word documents (set up as part of the Normal style) and how it affects text if you change the paragraph spacing only (may not affect the text if you leave the spacing at 1.15).Point out the different ways to change the paragraph spacing, giving examples of when you may want or need to have the spacing to be different than the default, e.g., newsletters, using styles with large documents, need the spacing between certain paragraphs to be a bit smaller to fit a line of text on that page, etc.
  • #16 Pg 65Objective 2.3Discuss the different reasons when or why you might set indents on a document, e.g., legal documents that use first line indents for each paragraph, quotes, list items, etc.
  • #18 Pg 65Objective 2.3Demonstrate how to change the indents using all the methods so students get a chance to decide which works for them. There is no firm method they should use; they will likely do a combination as there may be times when they don’t need specific indent measurements so using the Increase or Decrease Indent option is the faster option. Another example is when they need a precise indent measurement and want to enter it in the Paragraph dialog box instead of trying to find the measurement using Alt while dragging.
  • #19 Pg 64-65Objective 2.3This image is provided in the gallery as well in the Extra IR Files folder for you to use, as required. Use this as an example of how you can use indents to offset parts of text or as an alignment option.If you’ve used CCI Word courseware previously, you will recognize this topic has moved from being with tabs to being included now with formatting paragraphs. This appears to be a better fit for aligning text as well as setting an introduction to how to use indents for automatic lists (covered in the next lesson).
  • #20 Pg 66Objective 2.3Thefirst method here may be the faster way to set paragraph spacing and indents at the same time instead of using the Paragraph dialog box. This is another example of how you can discuss which methods work best for each person, or a combination of methods.
  • #30 Pg 70Briefly review the topics that were covered in this lesson so students are aware of the new skills they learned. Remind students also that all the information is available in the book as a reference.
  • #31 Pg 70As time permits, go through the questions with students, or choose to assign these for groups or homework review.