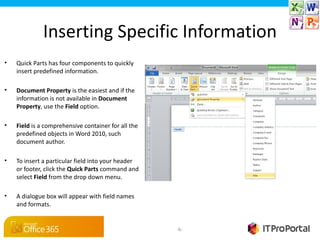
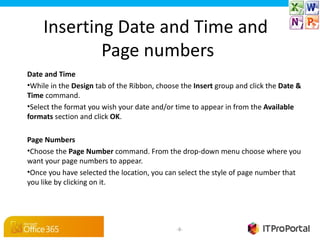
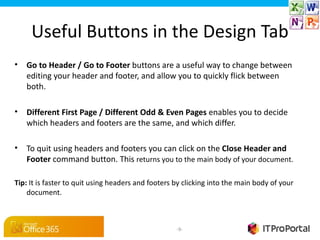
Word 2010: Working with headers,
   footers and page numbers
Introduction
 In this slideshow you will learn about headers,
footers, and page numbers and how to use them
             effectively in a document.


                          -2-
Headers and Footers


    1. Insert tab
    2.Header/Footer command

• Headers and footers contain information or graphics at the top or bottom of a page.

• Headers and footers have traditionally been one of the least used components.

• To work with the header or footer in your document, click on the Insert tab of the
  ribbon and click the Header or Footer command from the Header & Footer group.


                                                -3-
Headers and Footers
                                •   A drop-down menu will appear which allows you to
                                    choose whether to use a built-in header or footer,
                                    create your own, or remove an existing header or
                                    footer.

                                •   If you would like to use a built-in header or footer,
                                    simply click on the one you wish to use.

                                •   To browse through the list of headers and footers
                                    available, use the scroll bar on the right-hand side of
                                    the drop-down menu.
                                •   Once you have chosen your header or footer style, you
                                    are ready to input the information.


1.   Built-in headers
2.   Scroll Bar
3.   Edit and Remove commands


                                                 -4-
The Design Tab


•   Now that you are working on the header or footer, a new tab will be available in the
    Ribbon called Header& Footer Tools - Design. Most of the commands you need will
    appear here.

•   Type and insert (via copy and paste) information into the Header or Footer in the
    same way as in the body of a document. The standard commands and functions are
    available in the other tabs of the Ribbon.

                                                   -5-
Inserting Specific Information
•   Quick Parts has four components to quickly
    insert predefined information.

•   Document Property is the easiest and if the
    information is not available in Document 
    Property, use the Field option.

•   Field is a comprehensive container for all the
    predefined objects in Word 2010, such
    document author.

•   To insert a particular field into your header
    or footer, click the Quick Parts command and
    select Field from the drop down menu.

•   A dialogue box will appear with field names
    and formats.


                                                     -6-
Inserting Specific
Information (Cont)
 •   Select the field from the Field 
     names box.

 •   Edit the Field properties to suit your
     needs and then click the OK button.

 •   If you are not sure what is included in
     the various Field components, try
     honing in on the exact information by
     changing the Categories from All to a
     specific set of data such as Date and 
     Time.

 •   Autotext and Building Blocks 
     Organisers are other Quick Part 
     components that can add predefined
     information to your headers and footers
     .


                                               -7-
Inserting Date and Time and
            Page numbers
Date and Time
•While in the Design tab of the Ribbon, choose the Insert group and click the Date & 
Time command.
•Select the format you wish your date and/or time to appear in from the Available 
formats section and click OK.

Page Numbers
•Choose the Page Number command. From the drop-down menu choose where you
want your page numbers to appear.
•Once you have selected the location, you can select the style of page number that
you like by clicking on it.


                                              -8-
Useful Buttons in the Design Tab
•   Go to Header / Go to Footer buttons are a useful way to change between
    editing your header and footer, and allow you to quickly flick between
    both.

•   Different First Page / Different Odd & Even Pages enables you to decide
    which headers and footers are the same, and which differ.

•   To quit using headers and footers you can click on the Close Header and 
    Footer command button. This returns you to the main body of your document.

Tip: It is faster to quit using headers and footers by clicking into the main body of your
    document.


                                                    -9-
Wrap Up

In this article we've shown you how to improve
 the look of your business document by using
headers and footers and taking full advantage of
        the design tools at your disposal.

Word 2010 Headers and Footers

  • 1.
    Word 2010: Workingwith headers, footers and page numbers
  • 2.
    Introduction In thisslideshow you will learn about headers, footers, and page numbers and how to use them effectively in a document. -2-
  • 3.
    Headers and Footers 1. Insert tab 2.Header/Footer command • Headers and footers contain information or graphics at the top or bottom of a page. • Headers and footers have traditionally been one of the least used components. • To work with the header or footer in your document, click on the Insert tab of the ribbon and click the Header or Footer command from the Header & Footer group. -3-
  • 4.
    Headers and Footers • A drop-down menu will appear which allows you to choose whether to use a built-in header or footer, create your own, or remove an existing header or footer. • If you would like to use a built-in header or footer, simply click on the one you wish to use. • To browse through the list of headers and footers available, use the scroll bar on the right-hand side of the drop-down menu. • Once you have chosen your header or footer style, you are ready to input the information. 1. Built-in headers 2. Scroll Bar 3. Edit and Remove commands -4-
  • 5.
    The Design Tab • Now that you are working on the header or footer, a new tab will be available in the Ribbon called Header& Footer Tools - Design. Most of the commands you need will appear here. • Type and insert (via copy and paste) information into the Header or Footer in the same way as in the body of a document. The standard commands and functions are available in the other tabs of the Ribbon. -5-
  • 6.
    Inserting Specific Information • Quick Parts has four components to quickly insert predefined information. • Document Property is the easiest and if the information is not available in Document  Property, use the Field option. • Field is a comprehensive container for all the predefined objects in Word 2010, such document author. • To insert a particular field into your header or footer, click the Quick Parts command and select Field from the drop down menu. • A dialogue box will appear with field names and formats. -6-
  • 7.
    Inserting Specific Information (Cont) • Select the field from the Field  names box. • Edit the Field properties to suit your needs and then click the OK button. • If you are not sure what is included in the various Field components, try honing in on the exact information by changing the Categories from All to a specific set of data such as Date and  Time. • Autotext and Building Blocks  Organisers are other Quick Part  components that can add predefined information to your headers and footers . -7-
  • 8.
    Inserting Date andTime and Page numbers Date and Time •While in the Design tab of the Ribbon, choose the Insert group and click the Date &  Time command. •Select the format you wish your date and/or time to appear in from the Available  formats section and click OK. Page Numbers •Choose the Page Number command. From the drop-down menu choose where you want your page numbers to appear. •Once you have selected the location, you can select the style of page number that you like by clicking on it. -8-
  • 9.
    Useful Buttons inthe Design Tab • Go to Header / Go to Footer buttons are a useful way to change between editing your header and footer, and allow you to quickly flick between both. • Different First Page / Different Odd & Even Pages enables you to decide which headers and footers are the same, and which differ. • To quit using headers and footers you can click on the Close Header and  Footer command button. This returns you to the main body of your document. Tip: It is faster to quit using headers and footers by clicking into the main body of your document. -9-
  • 10.
    Wrap Up In thisarticle we've shown you how to improve the look of your business document by using headers and footers and taking full advantage of the design tools at your disposal.

Editor's Notes