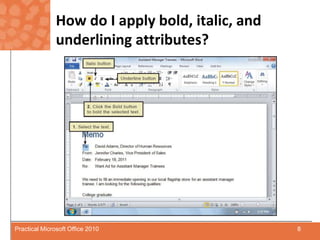
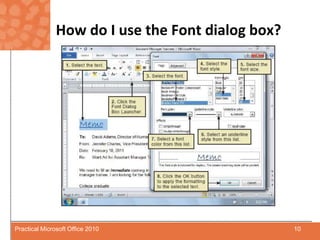
SlideShare a Scribd company logo
Chapter 3 Formatting a Document
What’s Inside and on the CD? In this chapter, you will learn how to format text, using features such as: Bold and italic text Different fonts and font sizes Line Spacing and Paragraph alignment Tables, Bulleted and numbered lists 2 Practical Microsoft Office 2010
How do I select different font, font sizes, and text colors? You can use the commands on the Home tab to select different text attributes for: Letters Words Sentences Paragraphs Fontrefers to design or typeface of each character Limit number of fonts for professional look 3 Practical Microsoft Office 2010
How do I select different fonts, font sizes, and text colors? Text attributes Font Font size Normal font size 9 – 12 point Range from 8 – 72 points Larger font by typing in number larger than 72  Bold Italic Underline Text color 4 Practical Microsoft Office 2010
How do I select different fonts, font sizes, and text colors? Selected text Change, add, delete formatting options When finished, click outside highlighted area to deselect it Font effects include: Super and sub script Strikethrough  Small caps and all caps Emboss Click Editing, Select, then Select All on the Home tab to apply any text attributes to entire document  5 Practical Microsoft Office 2010
How do I select different fonts, font sizes, and text colors? 6 Practical Microsoft Office 2010
How do I apply bold, italic, and underlining attributes? Use commands in the Font group to apply text attributes Bold Italic Underlining Typically, you’ll apply attributes to text you’ve already typed, but you can apply attributes before typing new text Toolbar buttons both apply and remove attributes Hyperlinks are automatically formatted with blue text and underlined 7 Practical Microsoft Office 2010
How do I apply bold, italic, and underlining attributes? 8 Practical Microsoft Office 2010
How do I use the Font dialog box? Some text attributes are available only from Font dialog box, such as character spacing option Font dialog box allows applying multiple formatting options to selected text Use the Advanced tab to change the scale, spacing, vertical position, or kerning of selected text The Preview area shows how your formatting affects the selected text 9 Practical Microsoft Office 2010
How do I use the Font dialog box? 10 Practical Microsoft Office 2010
How do I center and align text? Left-aligned text  Positioned straight against left margin Appears uneven on right margin Centeredtext Positioned between margins Typically used for titles 11 Practical Microsoft Office 2010
How do I center and align text? Justified text Both left and right margins aligned Typically used in formal documents More professional look Right-alignedtext Rarely used Can be useful for headings in a paper, or return address in a letter 12 Practical Microsoft Office 2010
How do I center and align text? Alignment options apply to entire paragraph Click in paragraph to align, then click appropriate align button You don’t have to select all the text To center title Press Enter key after title Click anywhere in title Click Center button 13 Practical Microsoft Office 2010
How do I center and align text? 14 Practical Microsoft Office 2010
How do I use styles? Style consists of predefined formatting applied to selected text Advantages of styles: Consistency in formatting Avoid design errors 15 Practical Microsoft Office 2010
How do I use styles? Create style  Styles Dialog Box Launcher New Style Removestyle Select text Select Normal style Delete style Styles Dialog Box Launcher Right-click style to delete Click Delete Click Yes Click Close 16 Practical Microsoft Office 2010
How do I use styles? 17 Practical Microsoft Office 2010
How do I add numbering and bullets to a list? Bullet is symbol placed before each item in list Set off list without implying specific order Numbered lists imply order to listed items Bullets and numbering work same way:  Select items in list Click      Numbering button or Bullet button 18 Practical Microsoft Office 2010
How do I add numbering and bullets to a list? If list has not been typed: Click Bullet or Numbering button Type list At end of list, click button to discontinue To remove numbering or bullets: Select list Click appropriate button 19 Practical Microsoft Office 2010
How do I add numbering and bullets to a list? Word automatically renumbers list if you add, delete, or move items  If numbering is incorrect: Select list Click numbering button twice To change style: Right-click selected list Highlight Bullets and Numbering Select a format 20 Practical Microsoft Office 2010
How do I add numbering and bullets to a list? 21 Practical Microsoft Office 2010
How do I add numbering and bullets to a list? A multilevel list displays list items in levels and sublevels Used in outlines and legal documents You can apply bullets or numbering after entering the list Press the Tab key to change a list item to the next level down, or Shift+Tab to move a list item up a level 22 Practical Microsoft Office 2010
How do I add numbering and bullets to a list? You can define custom styles for text, numbers, and bullets Click the arrow next to the Multilevel List button Select Define New List Style Change a number manually by right-clicking the number and selecting Set Numbering Value 23 Practical Microsoft Office 2010
How do I add numbering and bullets to a list? 24 Practical Microsoft Office 2010
How do I adjust line spacing? Word defaults to single-spacing Other spacing options can be applied to paragraph, group of paragraphs, or entire document Space between paragraphs can also be adjusted 25 Practical Microsoft Office 2010
How do I adjust line spacing? Double-space document by setting line spacing to double-space To set line spacing for one paragraph: Position insertion point in paragraph, click the Paragraph Dialog Box Launcher on Home Or Page Layout tab Select desired line spacing from Line-spacing drop-down list on Indents and Spacing tab To adjust line spacing for more than one paragraph, select paragraphs, then follow above guidelines 26 Practical Microsoft Office 2010
How do I adjust line spacing? To set line spacing for entire document before you begin typing: Click Editing, Select, then click Select All Click the Paragraph Dialog Box Launcher on Home or Page Layout tab Select desired line spacing, then click OK As you type, text appears with selected line spacing 27 Practical Microsoft Office 2010
How do I adjust line spacing? 28 Practical Microsoft Office 2010
How do I use tabs? Use Tabs to align text in columns Default tab stops – every ½ inch Tab stops can be changed Personal tab stops can be added Many types of tab stops: Left tab stop aligns text on left side of tab Right tab stop aligns text on right side of tab Center tab stop centers text at that location Decimal tab stop aligns numbers with decimal at tab location Bar tab stop places vertical bar at tab location 29 Practical Microsoft Office 2010
How do I use tabs? Leader– line of punctuation characters that fills area from text to tab stop Typically used in table of contents To clear tab stop: Click it in Tab stop position box Click Clear button To clear all tab stops: Click Clear All button in Tabs dialog box 30 Practical Microsoft Office 2010
How do I use tabs? Tab stops on Word ruler bar are represented by these icons: 31 Practical Microsoft Office 2010
How do I use tabs? To set tab stops using ruler: Click appropriate icon at left end of ruler Click location on ruler to set tab stop To change position of tab stop, select it and slide left or right If the ruler bar is not displayed: Click the View tab Select the Ruler option in the Show/Hide group 32 Practical Microsoft Office 2010
How do I use tabs? 33 Practical Microsoft Office 2010
How do I indent text? Text can be indented from left, right, or both margins First line of text can be indented differently from rest of paragraph Hanging indent will move first line of text more to left than rest of text 34 Practical Microsoft Office 2010
How do I indent text? To indent a paragraph from left or right: Click spin box buttons in appropriate Indentation box to increase or decrease indent distance Check Preview section to see how indentation affects paragraph To indent first line: Select First Line from Special pull-down list Select amount of indentation from By spin box 35 Practical Microsoft Office 2010
How do I indent text? To create hanging indent: Select Hanging from Special pull-down list Select amount of negative indent from By spin box Indent settings apply to paragraph that contains insertion point To apply indent settings to more than one paragraph: Select paragraphs Use Paragraph dialog box to set indent 36 Practical Microsoft Office 2010
How do I indent text? 37 Practical Microsoft Office 2010
How do I add footnotes or endnotes to a document? Footnotes and endnotes typically used to add comments to blocks of text or cite references to other documents Footnoteappears at bottom of page containing corresponding superscript number Endnoteappears at end of section or chapter 38 Practical Microsoft Office 2010
How do I add footnotes or endnotes to a document? Click References tab, click Insert Footnote or Insert Endnote button Footnote and Endnote dialog box appears Click appropriate option Delete footnote or endnote by selecting number that corresponds to note in text, and pressing Delete key The References tab contains several tools for adding citations to a document 39 Practical Microsoft Office 2010
How do I add footnotes or endnotes to a document? 40 Practical Microsoft Office 2010
How do I work with outlines and other document views? Word provides several ways to view documents: Format marks reveal hidden symbols that indicate paragraph breaks ¶, spaces ·, and tab stops . To display, click      Show/Hide toolbar button Print Layout View Web Layout View Outline View Change views by clicking one of the View buttons in the lower-right corner of document window, or clicking View tab    41 Practical Microsoft Office 2010
How do I work with outlines and other document views? Outline view handy for organizing content Assign outline levels to each title, heading, and paragraph View any level of outline to get overview, or include all details Easy to rearrange sections to streamline document’s organization 42 Practical Microsoft Office 2010
How do I work with outlines and other document views? Microsoft Word uses following conventions to indicate outline levels: Plus sign indicates heading with subtext Small solid circle indicates body text at lowest level of outline Gray line under heading indicates subordinate text not displayed Dash indicates heading without subordinate text 43 Practical Microsoft Office 2010
How do I work with outlines and other document views? 44 Practical Microsoft Office 2010
How do I create a table? A table is a grid of rows and columns Cell – intersection of each row and column  Cell can hold text, numbers, or a graphic Format an entire table or individual cells Place insertion point where you want table Click Insert tab, click Table, then click Insert Table Set number of rows and columns, then click OK 45 Practical Microsoft Office 2010
How do I create a table? To add text, click cell, type text Word wrap expands size of cell Move to another cell using arrow keys, or Tab key, or click desired cell Select table style from the Table Styles group for formatting options 46 Practical Microsoft Office 2010
How do I create a table? To insert new column or row: Place insertion point in cell closest to where you want new row or column Click Layout tab, choose from among the options to specify a placement To delete column or row:  Click Layout tab, click the Delete command, select from among the options To adjust width of column: Position pointer over dividing line between columns When pointer changes to    , press left mouse button and drag column to correct width 47 Practical Microsoft Office 2010
How do I create a table? 48 Practical Microsoft Office 2010
Can I format a document into columns? Three ways to format text into columns: Tabs Effective for parallel text Tables Typically used for resumes Columns Columns allow you to fill the left column entirely with text and then continue into the right column 49 Practical Microsoft Office 2010
Can I format a document into columns? 50 Practical Microsoft Office 2010

More Related Content

What's hot

Office productivity tools (part ii) (5.71 mb)
Office productivity tools (part ii) (5.71 mb)Office productivity tools (part ii) (5.71 mb)
Office productivity tools (part ii) (5.71 mb)IMRAN KHAN
 
Libre Office Writer Lesson 3: Using Styles and Templates
Libre Office Writer Lesson 3: Using Styles and TemplatesLibre Office Writer Lesson 3: Using Styles and Templates
Libre Office Writer Lesson 3: Using Styles and Templates
Smart Chicago Collaborative
 
Formatting text & formatting paragraphs(word 2007) Hudsongwambe
Formatting text &  formatting paragraphs(word 2007) HudsongwambeFormatting text &  formatting paragraphs(word 2007) Hudsongwambe
Formatting text & formatting paragraphs(word 2007) Hudsongwambe
Hudson Gwambe
 
Office productivity tools (part ii) (2.74 mb)
Office productivity tools (part ii) (2.74 mb)Office productivity tools (part ii) (2.74 mb)
Office productivity tools (part ii) (2.74 mb)IMRAN KHAN
 
Manual for Fillable Form
Manual for Fillable FormManual for Fillable Form
Manual for Fillable FormClayton Boessen
 
Form4 cd4
Form4 cd4Form4 cd4
Form4 cd4smktsj2
 
11th computer-applications-chapter-6-study-material-english-medium
11th computer-applications-chapter-6-study-material-english-medium11th computer-applications-chapter-6-study-material-english-medium
11th computer-applications-chapter-6-study-material-english-medium
Emmanuel Matric Higher Secondary School
 
Pranavi verma-class-9-word-processing
Pranavi verma-class-9-word-processingPranavi verma-class-9-word-processing
Pranavi verma-class-9-word-processing
PranaviVerma
 
Computer applications in business assignment
Computer applications in business assignmentComputer applications in business assignment
Computer applications in business assignmentYogesh Singla
 
Excel Intro Part2 2007
Excel Intro Part2 2007Excel Intro Part2 2007
Excel Intro Part2 2007simply_coool
 
Word processing in english ms word
Word processing in english   ms wordWord processing in english   ms word
Word processing in english ms word
eVidhya
 

What's hot (18)

Office productivity tools (part ii) (5.71 mb)
Office productivity tools (part ii) (5.71 mb)Office productivity tools (part ii) (5.71 mb)
Office productivity tools (part ii) (5.71 mb)
 
Libre Office Writer Lesson 3: Using Styles and Templates
Libre Office Writer Lesson 3: Using Styles and TemplatesLibre Office Writer Lesson 3: Using Styles and Templates
Libre Office Writer Lesson 3: Using Styles and Templates
 
Formatting text & formatting paragraphs(word 2007) Hudsongwambe
Formatting text &  formatting paragraphs(word 2007) HudsongwambeFormatting text &  formatting paragraphs(word 2007) Hudsongwambe
Formatting text & formatting paragraphs(word 2007) Hudsongwambe
 
Office productivity tools (part ii) (2.74 mb)
Office productivity tools (part ii) (2.74 mb)Office productivity tools (part ii) (2.74 mb)
Office productivity tools (part ii) (2.74 mb)
 
Manual for Fillable Form
Manual for Fillable FormManual for Fillable Form
Manual for Fillable Form
 
Form4 cd4
Form4 cd4Form4 cd4
Form4 cd4
 
Excel Intro Part2
Excel Intro Part2Excel Intro Part2
Excel Intro Part2
 
11th computer-applications-chapter-6-study-material-english-medium
11th computer-applications-chapter-6-study-material-english-medium11th computer-applications-chapter-6-study-material-english-medium
11th computer-applications-chapter-6-study-material-english-medium
 
Chapter.10
Chapter.10Chapter.10
Chapter.10
 
04 formatting text
04 formatting text04 formatting text
04 formatting text
 
Pranavi verma-class-9-word-processing
Pranavi verma-class-9-word-processingPranavi verma-class-9-word-processing
Pranavi verma-class-9-word-processing
 
Lect09
Lect09Lect09
Lect09
 
Computer applications in business assignment
Computer applications in business assignmentComputer applications in business assignment
Computer applications in business assignment
 
Chapter.09
Chapter.09Chapter.09
Chapter.09
 
Excel Intro Part2 2007
Excel Intro Part2 2007Excel Intro Part2 2007
Excel Intro Part2 2007
 
Turorial Coreldraw_4
Turorial Coreldraw_4Turorial Coreldraw_4
Turorial Coreldraw_4
 
Ms excel 2007
Ms excel 2007Ms excel 2007
Ms excel 2007
 
Word processing in english ms word
Word processing in english   ms wordWord processing in english   ms word
Word processing in english ms word
 

Viewers also liked

Community coordinator perfomance appraisal 2
Community coordinator perfomance appraisal 2Community coordinator perfomance appraisal 2
Community coordinator perfomance appraisal 2tonychoper2404
 
Parents-with-Heart
Parents-with-HeartParents-with-Heart
Parents-with-HeartSirajRock
 
Ctw8mov
Ctw8movCtw8mov
Ctw8mov
archana75
 
Casting Off Our Desktop Shackles
Casting Off Our Desktop ShacklesCasting Off Our Desktop Shackles
Casting Off Our Desktop Shackles
Jason Grigsby
 
Creating Web Sites with HTML and CSS
Creating Web Sites with HTML and CSSCreating Web Sites with HTML and CSS
Creating Web Sites with HTML and CSSBG Java EE Course
 
Introduction to XML
Introduction to XMLIntroduction to XML
Introduction to XML
BG Java EE Course
 

Viewers also liked (7)

Community coordinator perfomance appraisal 2
Community coordinator perfomance appraisal 2Community coordinator perfomance appraisal 2
Community coordinator perfomance appraisal 2
 
Parents-with-Heart
Parents-with-HeartParents-with-Heart
Parents-with-Heart
 
Ctw8mov
Ctw8movCtw8mov
Ctw8mov
 
Casting Off Our Desktop Shackles
Casting Off Our Desktop ShacklesCasting Off Our Desktop Shackles
Casting Off Our Desktop Shackles
 
CSS
CSSCSS
CSS
 
Creating Web Sites with HTML and CSS
Creating Web Sites with HTML and CSSCreating Web Sites with HTML and CSS
Creating Web Sites with HTML and CSS
 
Introduction to XML
Introduction to XMLIntroduction to XML
Introduction to XML
 

Similar to Chapter.03

Chapter.02
Chapter.02Chapter.02
Chapter.02klivsie
 
Chapter.06
Chapter.06Chapter.06
Chapter.06klivsie
 
Microsoft Word 2007 training.ppt
Microsoft Word 2007 training.pptMicrosoft Word 2007 training.ppt
Microsoft Word 2007 training.ppt
workinehwogaso1
 
Word Chapter 3 - Formatting Paragraphs
Word Chapter 3 - Formatting ParagraphsWord Chapter 3 - Formatting Paragraphs
Word Chapter 3 - Formatting Paragraphsdpd
 
Chapter 7 - Finalizing a Worksheet
Chapter 7 - Finalizing a WorksheetChapter 7 - Finalizing a Worksheet
Chapter 7 - Finalizing a WorksheetBeverly Murphy
 
Chapter.07
Chapter.07Chapter.07
Chapter.07klivsie
 
Microsoft word features
Microsoft word featuresMicrosoft word features
Microsoft word features
Saira Randhawa
 
Computer Word Lec2
Computer  Word Lec2Computer  Word Lec2
Computer Word Lec2Moiz Barry
 
Word lecture 3
Word lecture 3Word lecture 3
Word lecture 3
Christinliao
 
Formatting Features of Writer
Formatting Features of WriterFormatting Features of Writer
Formatting Features of Writertclanton4
 
Chapter.04
Chapter.04Chapter.04
Chapter.04klivsie
 
GRADE 7 LESSON 5 MS WORD INTRO.ppt
GRADE 7 LESSON 5 MS WORD INTRO.pptGRADE 7 LESSON 5 MS WORD INTRO.ppt
GRADE 7 LESSON 5 MS WORD INTRO.ppt
LimEchYrr
 
Microsoft Word Intermediate
Microsoft Word  IntermediateMicrosoft Word  Intermediate
Microsoft Word Intermediate
University of Puerto Rico
 
Intermediate Microsoft Word Advanced User Option
Intermediate Microsoft Word Advanced User OptionIntermediate Microsoft Word Advanced User Option
Intermediate Microsoft Word Advanced User OptionHeather Lambert
 

Similar to Chapter.03 (20)

Chapter.02
Chapter.02Chapter.02
Chapter.02
 
Chapter.06
Chapter.06Chapter.06
Chapter.06
 
Microsoft Word 2007 training.ppt
Microsoft Word 2007 training.pptMicrosoft Word 2007 training.ppt
Microsoft Word 2007 training.ppt
 
Word Chapter 3 - Formatting Paragraphs
Word Chapter 3 - Formatting ParagraphsWord Chapter 3 - Formatting Paragraphs
Word Chapter 3 - Formatting Paragraphs
 
Chapter.07
Chapter.07Chapter.07
Chapter.07
 
Chapter 7 - Finalizing a Worksheet
Chapter 7 - Finalizing a WorksheetChapter 7 - Finalizing a Worksheet
Chapter 7 - Finalizing a Worksheet
 
Chapter.07
Chapter.07Chapter.07
Chapter.07
 
Bullets and Styles
Bullets and StylesBullets and Styles
Bullets and Styles
 
Microsoft word features
Microsoft word featuresMicrosoft word features
Microsoft word features
 
Word
WordWord
Word
 
Computer Word Lec2
Computer  Word Lec2Computer  Word Lec2
Computer Word Lec2
 
Word lecture 3
Word lecture 3Word lecture 3
Word lecture 3
 
Formatting Features of Writer
Formatting Features of WriterFormatting Features of Writer
Formatting Features of Writer
 
Chapter.04
Chapter.04Chapter.04
Chapter.04
 
Chapter.04
Chapter.04Chapter.04
Chapter.04
 
GRADE 7 LESSON 5 MS WORD INTRO.ppt
GRADE 7 LESSON 5 MS WORD INTRO.pptGRADE 7 LESSON 5 MS WORD INTRO.ppt
GRADE 7 LESSON 5 MS WORD INTRO.ppt
 
Word
WordWord
Word
 
MS Word 2010 tutorial 4
MS Word 2010 tutorial 4MS Word 2010 tutorial 4
MS Word 2010 tutorial 4
 
Microsoft Word Intermediate
Microsoft Word  IntermediateMicrosoft Word  Intermediate
Microsoft Word Intermediate
 
Intermediate Microsoft Word Advanced User Option
Intermediate Microsoft Word Advanced User OptionIntermediate Microsoft Word Advanced User Option
Intermediate Microsoft Word Advanced User Option
 

More from jdswitzer

Windows 7 - Unit A
Windows 7 - Unit AWindows 7 - Unit A
Windows 7 - Unit Ajdswitzer
 
Windows 7 - Unit B
Windows 7 - Unit BWindows 7 - Unit B
Windows 7 - Unit Bjdswitzer
 

More from jdswitzer (6)

Chapter.08
Chapter.08Chapter.08
Chapter.08
 
Chapter.11
Chapter.11Chapter.11
Chapter.11
 
Chapter.05
Chapter.05Chapter.05
Chapter.05
 
Windows 7 - Unit A
Windows 7 - Unit AWindows 7 - Unit A
Windows 7 - Unit A
 
Windows 7 - Unit B
Windows 7 - Unit BWindows 7 - Unit B
Windows 7 - Unit B
 
Chapter.01
Chapter.01Chapter.01
Chapter.01
 

Chapter.03

  • 1. Chapter 3 Formatting a Document
  • 2. What’s Inside and on the CD? In this chapter, you will learn how to format text, using features such as: Bold and italic text Different fonts and font sizes Line Spacing and Paragraph alignment Tables, Bulleted and numbered lists 2 Practical Microsoft Office 2010
  • 3. How do I select different font, font sizes, and text colors? You can use the commands on the Home tab to select different text attributes for: Letters Words Sentences Paragraphs Fontrefers to design or typeface of each character Limit number of fonts for professional look 3 Practical Microsoft Office 2010
  • 4. How do I select different fonts, font sizes, and text colors? Text attributes Font Font size Normal font size 9 – 12 point Range from 8 – 72 points Larger font by typing in number larger than 72 Bold Italic Underline Text color 4 Practical Microsoft Office 2010
  • 5. How do I select different fonts, font sizes, and text colors? Selected text Change, add, delete formatting options When finished, click outside highlighted area to deselect it Font effects include: Super and sub script Strikethrough Small caps and all caps Emboss Click Editing, Select, then Select All on the Home tab to apply any text attributes to entire document 5 Practical Microsoft Office 2010
  • 6. How do I select different fonts, font sizes, and text colors? 6 Practical Microsoft Office 2010
  • 7. How do I apply bold, italic, and underlining attributes? Use commands in the Font group to apply text attributes Bold Italic Underlining Typically, you’ll apply attributes to text you’ve already typed, but you can apply attributes before typing new text Toolbar buttons both apply and remove attributes Hyperlinks are automatically formatted with blue text and underlined 7 Practical Microsoft Office 2010
  • 8. How do I apply bold, italic, and underlining attributes? 8 Practical Microsoft Office 2010
  • 9. How do I use the Font dialog box? Some text attributes are available only from Font dialog box, such as character spacing option Font dialog box allows applying multiple formatting options to selected text Use the Advanced tab to change the scale, spacing, vertical position, or kerning of selected text The Preview area shows how your formatting affects the selected text 9 Practical Microsoft Office 2010
  • 10. How do I use the Font dialog box? 10 Practical Microsoft Office 2010
  • 11. How do I center and align text? Left-aligned text Positioned straight against left margin Appears uneven on right margin Centeredtext Positioned between margins Typically used for titles 11 Practical Microsoft Office 2010
  • 12. How do I center and align text? Justified text Both left and right margins aligned Typically used in formal documents More professional look Right-alignedtext Rarely used Can be useful for headings in a paper, or return address in a letter 12 Practical Microsoft Office 2010
  • 13. How do I center and align text? Alignment options apply to entire paragraph Click in paragraph to align, then click appropriate align button You don’t have to select all the text To center title Press Enter key after title Click anywhere in title Click Center button 13 Practical Microsoft Office 2010
  • 14. How do I center and align text? 14 Practical Microsoft Office 2010
  • 15. How do I use styles? Style consists of predefined formatting applied to selected text Advantages of styles: Consistency in formatting Avoid design errors 15 Practical Microsoft Office 2010
  • 16. How do I use styles? Create style Styles Dialog Box Launcher New Style Removestyle Select text Select Normal style Delete style Styles Dialog Box Launcher Right-click style to delete Click Delete Click Yes Click Close 16 Practical Microsoft Office 2010
  • 17. How do I use styles? 17 Practical Microsoft Office 2010
  • 18. How do I add numbering and bullets to a list? Bullet is symbol placed before each item in list Set off list without implying specific order Numbered lists imply order to listed items Bullets and numbering work same way: Select items in list Click Numbering button or Bullet button 18 Practical Microsoft Office 2010
  • 19. How do I add numbering and bullets to a list? If list has not been typed: Click Bullet or Numbering button Type list At end of list, click button to discontinue To remove numbering or bullets: Select list Click appropriate button 19 Practical Microsoft Office 2010
  • 20. How do I add numbering and bullets to a list? Word automatically renumbers list if you add, delete, or move items If numbering is incorrect: Select list Click numbering button twice To change style: Right-click selected list Highlight Bullets and Numbering Select a format 20 Practical Microsoft Office 2010
  • 21. How do I add numbering and bullets to a list? 21 Practical Microsoft Office 2010
  • 22. How do I add numbering and bullets to a list? A multilevel list displays list items in levels and sublevels Used in outlines and legal documents You can apply bullets or numbering after entering the list Press the Tab key to change a list item to the next level down, or Shift+Tab to move a list item up a level 22 Practical Microsoft Office 2010
  • 23. How do I add numbering and bullets to a list? You can define custom styles for text, numbers, and bullets Click the arrow next to the Multilevel List button Select Define New List Style Change a number manually by right-clicking the number and selecting Set Numbering Value 23 Practical Microsoft Office 2010
  • 24. How do I add numbering and bullets to a list? 24 Practical Microsoft Office 2010
  • 25. How do I adjust line spacing? Word defaults to single-spacing Other spacing options can be applied to paragraph, group of paragraphs, or entire document Space between paragraphs can also be adjusted 25 Practical Microsoft Office 2010
  • 26. How do I adjust line spacing? Double-space document by setting line spacing to double-space To set line spacing for one paragraph: Position insertion point in paragraph, click the Paragraph Dialog Box Launcher on Home Or Page Layout tab Select desired line spacing from Line-spacing drop-down list on Indents and Spacing tab To adjust line spacing for more than one paragraph, select paragraphs, then follow above guidelines 26 Practical Microsoft Office 2010
  • 27. How do I adjust line spacing? To set line spacing for entire document before you begin typing: Click Editing, Select, then click Select All Click the Paragraph Dialog Box Launcher on Home or Page Layout tab Select desired line spacing, then click OK As you type, text appears with selected line spacing 27 Practical Microsoft Office 2010
  • 28. How do I adjust line spacing? 28 Practical Microsoft Office 2010
  • 29. How do I use tabs? Use Tabs to align text in columns Default tab stops – every ½ inch Tab stops can be changed Personal tab stops can be added Many types of tab stops: Left tab stop aligns text on left side of tab Right tab stop aligns text on right side of tab Center tab stop centers text at that location Decimal tab stop aligns numbers with decimal at tab location Bar tab stop places vertical bar at tab location 29 Practical Microsoft Office 2010
  • 30. How do I use tabs? Leader– line of punctuation characters that fills area from text to tab stop Typically used in table of contents To clear tab stop: Click it in Tab stop position box Click Clear button To clear all tab stops: Click Clear All button in Tabs dialog box 30 Practical Microsoft Office 2010
  • 31. How do I use tabs? Tab stops on Word ruler bar are represented by these icons: 31 Practical Microsoft Office 2010
  • 32. How do I use tabs? To set tab stops using ruler: Click appropriate icon at left end of ruler Click location on ruler to set tab stop To change position of tab stop, select it and slide left or right If the ruler bar is not displayed: Click the View tab Select the Ruler option in the Show/Hide group 32 Practical Microsoft Office 2010
  • 33. How do I use tabs? 33 Practical Microsoft Office 2010
  • 34. How do I indent text? Text can be indented from left, right, or both margins First line of text can be indented differently from rest of paragraph Hanging indent will move first line of text more to left than rest of text 34 Practical Microsoft Office 2010
  • 35. How do I indent text? To indent a paragraph from left or right: Click spin box buttons in appropriate Indentation box to increase or decrease indent distance Check Preview section to see how indentation affects paragraph To indent first line: Select First Line from Special pull-down list Select amount of indentation from By spin box 35 Practical Microsoft Office 2010
  • 36. How do I indent text? To create hanging indent: Select Hanging from Special pull-down list Select amount of negative indent from By spin box Indent settings apply to paragraph that contains insertion point To apply indent settings to more than one paragraph: Select paragraphs Use Paragraph dialog box to set indent 36 Practical Microsoft Office 2010
  • 37. How do I indent text? 37 Practical Microsoft Office 2010
  • 38. How do I add footnotes or endnotes to a document? Footnotes and endnotes typically used to add comments to blocks of text or cite references to other documents Footnoteappears at bottom of page containing corresponding superscript number Endnoteappears at end of section or chapter 38 Practical Microsoft Office 2010
  • 39. How do I add footnotes or endnotes to a document? Click References tab, click Insert Footnote or Insert Endnote button Footnote and Endnote dialog box appears Click appropriate option Delete footnote or endnote by selecting number that corresponds to note in text, and pressing Delete key The References tab contains several tools for adding citations to a document 39 Practical Microsoft Office 2010
  • 40. How do I add footnotes or endnotes to a document? 40 Practical Microsoft Office 2010
  • 41. How do I work with outlines and other document views? Word provides several ways to view documents: Format marks reveal hidden symbols that indicate paragraph breaks ¶, spaces ·, and tab stops . To display, click Show/Hide toolbar button Print Layout View Web Layout View Outline View Change views by clicking one of the View buttons in the lower-right corner of document window, or clicking View tab    41 Practical Microsoft Office 2010
  • 42. How do I work with outlines and other document views? Outline view handy for organizing content Assign outline levels to each title, heading, and paragraph View any level of outline to get overview, or include all details Easy to rearrange sections to streamline document’s organization 42 Practical Microsoft Office 2010
  • 43. How do I work with outlines and other document views? Microsoft Word uses following conventions to indicate outline levels: Plus sign indicates heading with subtext Small solid circle indicates body text at lowest level of outline Gray line under heading indicates subordinate text not displayed Dash indicates heading without subordinate text 43 Practical Microsoft Office 2010
  • 44. How do I work with outlines and other document views? 44 Practical Microsoft Office 2010
  • 45. How do I create a table? A table is a grid of rows and columns Cell – intersection of each row and column Cell can hold text, numbers, or a graphic Format an entire table or individual cells Place insertion point where you want table Click Insert tab, click Table, then click Insert Table Set number of rows and columns, then click OK 45 Practical Microsoft Office 2010
  • 46. How do I create a table? To add text, click cell, type text Word wrap expands size of cell Move to another cell using arrow keys, or Tab key, or click desired cell Select table style from the Table Styles group for formatting options 46 Practical Microsoft Office 2010
  • 47. How do I create a table? To insert new column or row: Place insertion point in cell closest to where you want new row or column Click Layout tab, choose from among the options to specify a placement To delete column or row: Click Layout tab, click the Delete command, select from among the options To adjust width of column: Position pointer over dividing line between columns When pointer changes to , press left mouse button and drag column to correct width 47 Practical Microsoft Office 2010
  • 48. How do I create a table? 48 Practical Microsoft Office 2010
  • 49. Can I format a document into columns? Three ways to format text into columns: Tabs Effective for parallel text Tables Typically used for resumes Columns Columns allow you to fill the left column entirely with text and then continue into the right column 49 Practical Microsoft Office 2010
  • 50. Can I format a document into columns? 50 Practical Microsoft Office 2010