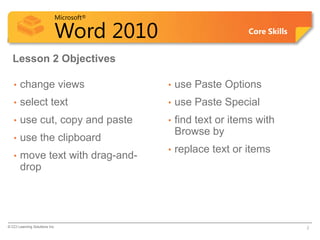
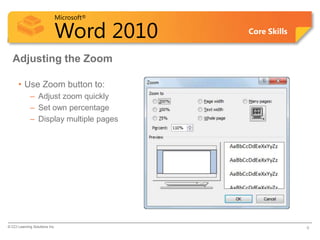
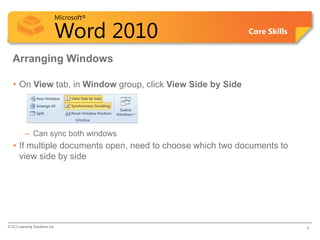
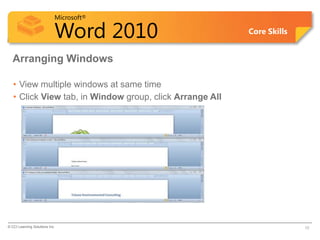
SlideShare a Scribd company logo
1 of 28
Microsoft®

        Word 2010             Core Skills


Microsoft Office
Word 2010
Lesson 2: Manipulating Text
Courseware #: 3240
Microsoft®

                            Word 2010                         Core Skills


  Lesson 2 Objectives

   •   change views                      •   use Paste Options
   •   select text                       •   use Paste Special
   •   use cut, copy and paste           •   find text or items with
                                             Browse by
   •   use the clipboard
                                         •   replace text or items
   •   move text with drag-and-
       drop


© CCI Learning Solutions Inc.                                               2
Microsoft®

                            Word 2010                                             Core Skills


  Changing the View

    Print Layout                  Adjust overall layout of document.

    Full Screen                   View document adapted to monitor size for ease of reading.
    Reading

   Web Layout                     Text wraps to screen size; backgrounds and pictures appear
                                  as if using Web browser to view.
   Outline                        Promote or demote headings in hierarchical layout, or
                                  collapse to show headings and subheadings only.

   Draft                          Appropriate for most typing, editing and formatting tasks.


© CCI Learning Solutions Inc.                                                                   3
Microsoft®

                            Word 2010                                 Core Skills


  Changing the View

   • To change view:
          – Click View tab and click option in Document Views group, or


          – use View Buttons on status bar


© CCI Learning Solutions Inc.                                                       4
Microsoft®

                            Word 2010                       Core Skills


  Adjusting the Zoom

   • On View tab, in Zoom group, click option, or


   • Zoom level button on status bar, or

   • Zoom slider or incremental buttons of slider

   • Press Ctrl as you move the wheel to increase or decrease zoom


© CCI Learning Solutions Inc.                                             5
Microsoft®

                            Word 2010    Core Skills


  Adjusting the Zoom

      • Use Zoom button to:
             – Adjust zoom quickly
             – Set own percentage
             – Display multiple pages


© CCI Learning Solutions Inc.                          6
Microsoft®

                            Word 2010                                     Core Skills


  Splitting the Window

      • Can only split windows horizontally
      • Two windows only of same document
      • To split the window:
             – On View tab, in Window group, click Split and drag dark line to height for
               second window, or
             – drag Split Horizontal to height for second window


© CCI Learning Solutions Inc.                                                               7
Microsoft®

                            Word 2010                                  Core Skills


  Splitting the Window

   • To switch windows:
          – Click in window for that document, or
          – press F6 or Ctrl+F6 to move from one window to other, or
          – drag split bar to display more or less of either window
   • To remove split pane:
          – On View tab, in Window group, click Remove Split, or
          – double-click split bar between windows


© CCI Learning Solutions Inc.                                                        8
Microsoft®

                            Word 2010                        Core Skills


  Arranging Windows

   • On View tab, in Window group, click View Side by Side


          – Can sync both windows
   • If multiple documents open, need to choose which two documents to
     view side by side


© CCI Learning Solutions Inc.                                              9
Microsoft®

                            Word 2010                     Core Skills


  Arranging Windows

   • View multiple windows at same time
   • Click View tab, in Window group, click Arrange All


© CCI Learning Solutions Inc.                                           10
Microsoft®

                            Word 2010                           Core Skills


  Selecting Text

      • If text typed, must select text before action applied
      • Shading stays on selected text for multiple actions


             – Click away from selection to return to normal


© CCI Learning Solutions Inc.                                                 11
Microsoft®

                            Word 2010                                      Core Skills


  Selecting Consecutive Text

      • Click at beginning of text to select, and then drag to “mark” text
             – Can increase or decrease selection holding mouse button
             – If using keyboard, position cursor, hold Shift, and press arrow keys
      • To select entire word, double-click word.
      • To select entire sentence, press Ctrl and click in sentence
      • To select entire paragraph, triple-click in paragraph
      • To select all text:
             – On Home tab, in Editing group, click Select, click Select All, or
             – press Ctrl+A

© CCI Learning Solutions Inc.                                                            12
Microsoft®

                            Word 2010                                       Core Skills


  Selecting Non-Consecutive Text

   • To select multiple pieces of text, select first piece of text and then press
     Ctrl to select each piece of text
   • Select blocks of text using Alt
          – Position cursor at beginning of block of text to select, press Alt as you drag to
            bottom right of block


© CCI Learning Solutions Inc.                                                               13
Microsoft®

                            Word 2010                             Core Skills


  Using the Selection Bar

   • In “left margin” area of screen
   • To select line of text, click at left of line of text
   • To select entire paragraph, double-click at left of that paragraph
   • To select entire document, triple-click in selection bar, or press Ctrl and
     click once in selection bar
   • To select multiple lines, drag to select text.
   • Use Ctrl to select non-consecutive text


© CCI Learning Solutions Inc.                                                      14
Microsoft®

                            Word 2010                    Core Skills


  Using Undo

   • To activate Undo:
          – In Quick Access Toolbar, click Undo, or
          – Click button itself to undo last action or
            command
          – Click arrow to undo up to last 100
            consecutive actions or commands
            performed
          – press Ctrl+Z to undo last action
            performed


© CCI Learning Solutions Inc.                                          15
Microsoft®

                            Word 2010                          Core Skills


  Using Repeat

      • To repeat the action just performed:
             – In the Quick Access Toolbar, click Repeat, or

             – press Ctrl+Y


© CCI Learning Solutions Inc.                                                16
Microsoft®

                            Word 2010                                            Core Skills


  Using Cut, Copy and Paste
     Cut                        Remove from original location in current document, and place in
                                Clipboard.
     Copy                       Copy from original location in current document, and place in
                                Clipboard.
     Paste                      Insert item from Clipboard into document at current cursor
                                position.
     Clipboard                  Temporarily stores cut or copied items


© CCI Learning Solutions Inc.                                                                     17
Microsoft®

                            Word 2010                                              Core Skills


  Using Cut, Copy and Paste

      • To cut or move item, after selecting it:
             – On Home tab, in Clipboard group, click Cut, or
             – press Ctrl+X, or
             – right-click item and then click Cut
      • To copy an item, after selecting it:
             – On Home tab, in Clipboard group, click Copy, or
             – press Ctrl+C, or
             – right-click item and then click Copy
      • To paste item, place insertion point where you want to paste item:
             –    On Home tab, in Clipboard group, click Paste, or
             –    press Ctrl+V, or
             –    right-click item and then click Paste, or
             –    click item in Office Clipboard, or
             –    click arrow for item in Office Clipboard, and then click Paste
© CCI Learning Solutions Inc.                                                                    18
Microsoft®

                            Word 2010                                                           Core Skills


  Using Cut, Copy and Paste
                                         •   Paste Options button appears with pasted item
                                         •   Click to display how pasted item can appear here
                                         •   Number and type of options vary based on item
      Keep Source                        Keep formatting for item as it was in original document.
      Formatting (K)
      Merge Formatting (M) Merge formatting from original document with formatting in
                           this document.
      Use Destination                    Use style that exists for this document on pasted item.
      Styles (S)

      Keep Text Only (T)                 Remove any existing formatting with original item and keep
                                         text only.

      Set Default Paste                  Set how all pasted items of this type to appear.


© CCI Learning Solutions Inc.                                                                                 19
Microsoft®

                            Word 2010                                          Core Skills


  Using the Office Clipboard
      • On Home tab, in Clipboard group, click Office
        Clipboard Task Pane
             Paste All             Paste all items currently in Clipboard in
                                   same order as in Clipboard.
             Clear All             Clear all items from Clipboard.

             Options               Select options for Clipboard.


© CCI Learning Solutions Inc.                                                                20
Microsoft®

                            Word 2010                            Core Skills


  Moving Text Using Drag-and-Drop

   •   Drag text to move text selection
   •   Best used to move text short distances
   •   Does not use Clipboard, leaving contents of Clipboard intact
   •   Select text, drag text and drop it to new location
          – “ghost” cursor appears as guide


© CCI Learning Solutions Inc.                                                  21
Microsoft®

                            Word 2010                       Core Skills


  Using Paste Special

   • Copy from another program into document and links to update both
     copies
   • On Home tab, in Clipboard
     group, click arrow for Paste
     and then click Paste Special


© CCI Learning Solutions Inc.                                             22
Microsoft®

                            Word 2010                                   Core Skills


  Finding and Replacing Items

      • Use to move insertion point to specified location
      • Can find specific word, phrase, symbol or code, or any combination
             – Can then choose to replace item, or continue working with document
      • To activate Find feature:
             –    On Home tab, in Editing group, click Find, or
             –    press Ctrl+F, or
             –    click Find tab in Find and Replace dialog box, or
             –    click Select Browse Object and then click Find


© CCI Learning Solutions Inc.                                                         23
Microsoft®

                            Word 2010                                          Core Skills


  Finding and Replacing Items
                                         Browse the headings Display outline or
                                         in your document    hierarchical structure for
                                                             headings used this
                                                             document.

                                         Browse the results     Display each page of
                                         from your current      document to show where
                                         search                 search criteria exist.

                                         Browse the pages in    Display each occurrence
                                         your document          the document where search
                                                                criteria were found.


© CCI Learning Solutions Inc.                                                                24
Microsoft®

                            Word 2010                                   Core Skills


  Finding and Replacing Items

   • Can instruct Word to find text that:
          – Matches characters exactly as typed
          – Find whole words or parts of words
          – Specific types of formatting
   • Replace individually, or replace all in document
   • To replace item:
          – On Home tab, in Editing group, click Replace, or
          – press Ctrl+H, or
          – if Find and Replace dialog box is open, click Replace tab


© CCI Learning Solutions Inc.                                                         25
Microsoft®

                            Word 2010                   Core Skills


  Finding and Replacing Items
                                         Find what Enter search
                                                   criteria to find.

                                         Replace     Enter what will
                                         with        replace search
                                                     criteria.
                                         More        Display more
                                                     options for
                                                     search criteria.
                                         Reading Highlights all
                                         Highlight items found in
                                                   document.


© CCI Learning Solutions Inc.                                           26
Microsoft®

                            Word 2010                         Core Skills


  Summary of Lesson 2

   •   change views                      •   use Paste Options
   •   select text                       •   use Paste Special
   •   use cut, copy and paste           •   find text or items with
                                             Browse by
   •   use the clipboard
                                         •   replace text or items
   •   move text with drag-and-
       drop


© CCI Learning Solutions Inc.                                               27
Microsoft®

                            Word 2010                        Core Skills


  Review Questions

   1. Explain what the differences are between using the Print Layout and
      Draft view modes.
   2. Discuss the difference between using Paste versus Paste Special.
   3. How could you use the Paste Options for text you have copied?
   4. Give an example of why you might want to collect multiple items to the
      Office Clipboard.
   5. When might you use the Browse the pages in your document tab in
      the Navigation pane?


© CCI Learning Solutions Inc.                                               28

More Related Content

What's hot

Word Lesson 8B Shapes
Word Lesson 8B ShapesWord Lesson 8B Shapes
Word Lesson 8B Shapesdeborahburns
 
Word Lesson 5C Columns, Header, Footers, Page No.
Word Lesson 5C Columns, Header, Footers, Page No.Word Lesson 5C Columns, Header, Footers, Page No.
Word Lesson 5C Columns, Header, Footers, Page No.deborahburns
 
Lesson 2C PPT
Lesson 2C PPTLesson 2C PPT
Lesson 2C PPTdeborahburns
 
Word Lesson 5A Orientation & Margins
Word Lesson 5A Orientation & MarginsWord Lesson 5A Orientation & Margins
Word Lesson 5A Orientation & Marginsdeborahburns
 
Word Lesson 5D Backgrounds
Word Lesson 5D BackgroundsWord Lesson 5D Backgrounds
Word Lesson 5D Backgroundsdeborahburns
 
Word Lesson 3B PPT
Word Lesson 3B PPTWord Lesson 3B PPT
Word Lesson 3B PPTdeborahburns
 
Word Lesson 8C Smartart & Screenshots
Word Lesson 8C Smartart & ScreenshotsWord Lesson 8C Smartart & Screenshots
Word Lesson 8C Smartart & Screenshotsdeborahburns
 
Word Lesson 7C PPT
Word Lesson 7C PPTWord Lesson 7C PPT
Word Lesson 7C PPTdeborahburns
 
Word Lesson 4B PPT
Word Lesson 4B PPTWord Lesson 4B PPT
Word Lesson 4B PPTdeborahburns
 
Word Lesson 7A PPT
Word Lesson 7A PPTWord Lesson 7A PPT
Word Lesson 7A PPTdeborahburns
 
Word Lesson 10 PPT
Word Lesson 10 PPTWord Lesson 10 PPT
Word Lesson 10 PPTdeborahburns
 
Word Lesson 1C PPT
Word Lesson 1C PPTWord Lesson 1C PPT
Word Lesson 1C PPTdeborahburns
 
Word Lesson 5B Page & Section Breaks
Word Lesson 5B Page & Section BreaksWord Lesson 5B Page & Section Breaks
Word Lesson 5B Page & Section Breaksdeborahburns
 
Word Lesson 6A Proofing
Word Lesson 6A ProofingWord Lesson 6A Proofing
Word Lesson 6A Proofingdeborahburns
 
Word Lesson 3A PPT
Word Lesson 3A PPTWord Lesson 3A PPT
Word Lesson 3A PPTdeborahburns
 
PPT Lesson 1
PPT Lesson 1 PPT Lesson 1
PPT Lesson 1 deborahburns
 
PPT Lesson 2
PPT Lesson 2 PPT Lesson 2
PPT Lesson 2 deborahburns
 
PPT Lesson 4
PPT Lesson 4PPT Lesson 4
PPT Lesson 4deborahburns
 
PPT Lesson 5
PPT Lesson 5PPT Lesson 5
PPT Lesson 5deborahburns
 
PPT Lesson 7
PPT Lesson 7 PPT Lesson 7
PPT Lesson 7 deborahburns
 

What's hot (20)

Word Lesson 8B Shapes
Word Lesson 8B ShapesWord Lesson 8B Shapes
Word Lesson 8B Shapes
 
Word Lesson 5C Columns, Header, Footers, Page No.
Word Lesson 5C Columns, Header, Footers, Page No.Word Lesson 5C Columns, Header, Footers, Page No.
Word Lesson 5C Columns, Header, Footers, Page No.
 
Lesson 2C PPT
Lesson 2C PPTLesson 2C PPT
Lesson 2C PPT
 
Word Lesson 5A Orientation & Margins
Word Lesson 5A Orientation & MarginsWord Lesson 5A Orientation & Margins
Word Lesson 5A Orientation & Margins
 
Word Lesson 5D Backgrounds
Word Lesson 5D BackgroundsWord Lesson 5D Backgrounds
Word Lesson 5D Backgrounds
 
Word Lesson 3B PPT
Word Lesson 3B PPTWord Lesson 3B PPT
Word Lesson 3B PPT
 
Word Lesson 8C Smartart & Screenshots
Word Lesson 8C Smartart & ScreenshotsWord Lesson 8C Smartart & Screenshots
Word Lesson 8C Smartart & Screenshots
 
Word Lesson 7C PPT
Word Lesson 7C PPTWord Lesson 7C PPT
Word Lesson 7C PPT
 
Word Lesson 4B PPT
Word Lesson 4B PPTWord Lesson 4B PPT
Word Lesson 4B PPT
 
Word Lesson 7A PPT
Word Lesson 7A PPTWord Lesson 7A PPT
Word Lesson 7A PPT
 
Word Lesson 10 PPT
Word Lesson 10 PPTWord Lesson 10 PPT
Word Lesson 10 PPT
 
Word Lesson 1C PPT
Word Lesson 1C PPTWord Lesson 1C PPT
Word Lesson 1C PPT
 
Word Lesson 5B Page & Section Breaks
Word Lesson 5B Page & Section BreaksWord Lesson 5B Page & Section Breaks
Word Lesson 5B Page & Section Breaks
 
Word Lesson 6A Proofing
Word Lesson 6A ProofingWord Lesson 6A Proofing
Word Lesson 6A Proofing
 
Word Lesson 3A PPT
Word Lesson 3A PPTWord Lesson 3A PPT
Word Lesson 3A PPT
 
PPT Lesson 1
PPT Lesson 1 PPT Lesson 1
PPT Lesson 1
 
PPT Lesson 2
PPT Lesson 2 PPT Lesson 2
PPT Lesson 2
 
PPT Lesson 4
PPT Lesson 4PPT Lesson 4
PPT Lesson 4
 
PPT Lesson 5
PPT Lesson 5PPT Lesson 5
PPT Lesson 5
 
PPT Lesson 7
PPT Lesson 7 PPT Lesson 7
PPT Lesson 7
 

Viewers also liked

Word Lesson 9 power point
Word Lesson 9 power pointWord Lesson 9 power point
Word Lesson 9 power pointfgc013
 
Word lesson 10 PowerPoint
Word lesson 10 PowerPointWord lesson 10 PowerPoint
Word lesson 10 PowerPointfgc013
 
Word lesson 8 power point
Word lesson 8 power pointWord lesson 8 power point
Word lesson 8 power pointfgc013
 
Triad 2010 word_chapter_1
Triad 2010 word_chapter_1Triad 2010 word_chapter_1
Triad 2010 word_chapter_1Dalia Saeed
 
Word lesson 3 power point
Word lesson 3 power pointWord lesson 3 power point
Word lesson 3 power pointfgc013
 
Word 2010 Unit A PPT
Word 2010 Unit A PPTWord 2010 Unit A PPT
Word 2010 Unit A PPTokmomwalking
 
E-Book 25 Tips and Tricks MS Excel Functions & Formulaes
E-Book 25 Tips and Tricks MS Excel Functions & FormulaesE-Book 25 Tips and Tricks MS Excel Functions & Formulaes
E-Book 25 Tips and Tricks MS Excel Functions & FormulaesBurCom Consulting Ltd.
 

Viewers also liked (8)

Word 2007 Unit D
Word 2007 Unit DWord 2007 Unit D
Word 2007 Unit D
 
Word Lesson 9 power point
Word Lesson 9 power pointWord Lesson 9 power point
Word Lesson 9 power point
 
Word lesson 10 PowerPoint
Word lesson 10 PowerPointWord lesson 10 PowerPoint
Word lesson 10 PowerPoint
 
Word lesson 8 power point
Word lesson 8 power pointWord lesson 8 power point
Word lesson 8 power point
 
Triad 2010 word_chapter_1
Triad 2010 word_chapter_1Triad 2010 word_chapter_1
Triad 2010 word_chapter_1
 
Word lesson 3 power point
Word lesson 3 power pointWord lesson 3 power point
Word lesson 3 power point
 
Word 2010 Unit A PPT
Word 2010 Unit A PPTWord 2010 Unit A PPT
Word 2010 Unit A PPT
 
E-Book 25 Tips and Tricks MS Excel Functions & Formulaes
E-Book 25 Tips and Tricks MS Excel Functions & FormulaesE-Book 25 Tips and Tricks MS Excel Functions & Formulaes
E-Book 25 Tips and Tricks MS Excel Functions & Formulaes
 

Similar to Word 2 PowerPoint

Lesson 1 power point
Lesson 1 power pointLesson 1 power point
Lesson 1 power pointfgc013
 
Word Lesson 5 power point
Word Lesson 5 power pointWord Lesson 5 power point
Word Lesson 5 power pointfgc013
 
Word Lesson 7 power point
Word Lesson 7 power pointWord Lesson 7 power point
Word Lesson 7 power pointfgc013
 
Word Lesson 4 PowerPoint
Word Lesson 4 PowerPointWord Lesson 4 PowerPoint
Word Lesson 4 PowerPointfgc013
 
Working with Text
Working with TextWorking with Text
Working with TextKem Arconada
 
font size type colour.pdf
font size type colour.pdffont size type colour.pdf
font size type colour.pdfyogeshkute
 
Word Lesson 9 Creating Mass Mailing Documents
Word Lesson 9 Creating Mass Mailing DocumentsWord Lesson 9 Creating Mass Mailing Documents
Word Lesson 9 Creating Mass Mailing Documentsdeborahburns
 
PPT Lesson 6
PPT Lesson 6PPT Lesson 6
PPT Lesson 6deborahburns
 
PPT Lesson 3
PPT Lesson 3 PPT Lesson 3
PPT Lesson 3 deborahburns
 
Triad 2010 office
Triad 2010 officeTriad 2010 office
Triad 2010 officeDalia Saeed
 

Similar to Word 2 PowerPoint (11)

Lesson 1 power point
Lesson 1 power pointLesson 1 power point
Lesson 1 power point
 
Word Lesson 5 power point
Word Lesson 5 power pointWord Lesson 5 power point
Word Lesson 5 power point
 
Word Lesson 7 power point
Word Lesson 7 power pointWord Lesson 7 power point
Word Lesson 7 power point
 
Word Lesson 4 PowerPoint
Word Lesson 4 PowerPointWord Lesson 4 PowerPoint
Word Lesson 4 PowerPoint
 
Exploring Visio
Exploring VisioExploring Visio
Exploring Visio
 
Working with Text
Working with TextWorking with Text
Working with Text
 
font size type colour.pdf
font size type colour.pdffont size type colour.pdf
font size type colour.pdf
 
Word Lesson 9 Creating Mass Mailing Documents
Word Lesson 9 Creating Mass Mailing DocumentsWord Lesson 9 Creating Mass Mailing Documents
Word Lesson 9 Creating Mass Mailing Documents
 
PPT Lesson 6
PPT Lesson 6PPT Lesson 6
PPT Lesson 6
 
PPT Lesson 3
PPT Lesson 3 PPT Lesson 3
PPT Lesson 3
 
Triad 2010 office
Triad 2010 officeTriad 2010 office
Triad 2010 office
 

Recently uploaded

A Critique of the Proposed National Education Policy Reform
A Critique of the Proposed National Education Policy ReformA Critique of the Proposed National Education Policy Reform
A Critique of the Proposed National Education Policy ReformChameera Dedduwage
 
Alper Gobel In Media Res Media Component
Alper Gobel In Media Res Media ComponentAlper Gobel In Media Res Media Component
Alper Gobel In Media Res Media ComponentInMediaRes1
 
Separation of Lanthanides/ Lanthanides and Actinides
Separation of Lanthanides/ Lanthanides and ActinidesSeparation of Lanthanides/ Lanthanides and Actinides
Separation of Lanthanides/ Lanthanides and ActinidesFatimaKhan178732
 
MENTAL STATUS EXAMINATION format.docx
MENTAL     STATUS EXAMINATION format.docxMENTAL     STATUS EXAMINATION format.docx
MENTAL STATUS EXAMINATION format.docxPoojaSen20
 
Solving Puzzles Benefits Everyone (English).pptx
Solving Puzzles Benefits Everyone (English).pptxSolving Puzzles Benefits Everyone (English).pptx
Solving Puzzles Benefits Everyone (English).pptxOH TEIK BIN
 
How to Configure Email Server in Odoo 17
How to Configure Email Server in Odoo 17How to Configure Email Server in Odoo 17
How to Configure Email Server in Odoo 17Celine George
 
Kisan Call Centre - To harness potential of ICT in Agriculture by answer farm...
Kisan Call Centre - To harness potential of ICT in Agriculture by answer farm...Kisan Call Centre - To harness potential of ICT in Agriculture by answer farm...
Kisan Call Centre - To harness potential of ICT in Agriculture by answer farm...Krashi Coaching
 
Contemporary philippine arts from the regions_PPT_Module_12 [Autosaved] (1).pptx
Contemporary philippine arts from the regions_PPT_Module_12 [Autosaved] (1).pptxContemporary philippine arts from the regions_PPT_Module_12 [Autosaved] (1).pptx
Contemporary philippine arts from the regions_PPT_Module_12 [Autosaved] (1).pptxRoyAbrique
 
Presentation by Andreas Schleicher Tackling the School Absenteeism Crisis 30 ...
Presentation by Andreas Schleicher Tackling the School Absenteeism Crisis 30 ...Presentation by Andreas Schleicher Tackling the School Absenteeism Crisis 30 ...
Presentation by Andreas Schleicher Tackling the School Absenteeism Crisis 30 ...EduSkills OECD
 
Class 11 Legal Studies Ch-1 Concept of State .pdf
Class 11 Legal Studies Ch-1 Concept of State .pdfClass 11 Legal Studies Ch-1 Concept of State .pdf
Class 11 Legal Studies Ch-1 Concept of State .pdfakmcokerachita
 
_Math 4-Q4 Week 5.pptx Steps in Collecting Data
_Math 4-Q4 Week 5.pptx Steps in Collecting Data_Math 4-Q4 Week 5.pptx Steps in Collecting Data
_Math 4-Q4 Week 5.pptx Steps in Collecting DataJhengPantaleon
 
POINT- BIOCHEMISTRY SEM 2 ENZYMES UNIT 5.pptx
POINT- BIOCHEMISTRY SEM 2 ENZYMES UNIT 5.pptxPOINT- BIOCHEMISTRY SEM 2 ENZYMES UNIT 5.pptx
POINT- BIOCHEMISTRY SEM 2 ENZYMES UNIT 5.pptxSayali Powar
 
microwave assisted reaction. General introduction
microwave assisted reaction. General introductionmicrowave assisted reaction. General introduction
microwave assisted reaction. General introductionMaksud Ahmed
 
Presiding Officer Training module 2024 lok sabha elections
Presiding Officer Training module 2024 lok sabha electionsPresiding Officer Training module 2024 lok sabha elections
Presiding Officer Training module 2024 lok sabha electionsanshu789521
 
Interactive Powerpoint_How to Master effective communication
Interactive Powerpoint_How to Master effective communicationInteractive Powerpoint_How to Master effective communication
Interactive Powerpoint_How to Master effective communicationnomboosow
 
Software Engineering Methodologies (overview)
Software Engineering Methodologies (overview)Software Engineering Methodologies (overview)
Software Engineering Methodologies (overview)eniolaolutunde
 
Organic Name Reactions for the students and aspirants of Chemistry12th.pptx
Organic Name Reactions  for the students and aspirants of Chemistry12th.pptxOrganic Name Reactions  for the students and aspirants of Chemistry12th.pptx
Organic Name Reactions for the students and aspirants of Chemistry12th.pptxVS Mahajan Coaching Centre
 
CARE OF CHILD IN INCUBATOR..........pptx
CARE OF CHILD IN INCUBATOR..........pptxCARE OF CHILD IN INCUBATOR..........pptx
CARE OF CHILD IN INCUBATOR..........pptxGaneshChakor2
 

Recently uploaded (20)

A Critique of the Proposed National Education Policy Reform
A Critique of the Proposed National Education Policy ReformA Critique of the Proposed National Education Policy Reform
A Critique of the Proposed National Education Policy Reform
 
Alper Gobel In Media Res Media Component
Alper Gobel In Media Res Media ComponentAlper Gobel In Media Res Media Component
Alper Gobel In Media Res Media Component
 
Separation of Lanthanides/ Lanthanides and Actinides
Separation of Lanthanides/ Lanthanides and ActinidesSeparation of Lanthanides/ Lanthanides and Actinides
Separation of Lanthanides/ Lanthanides and Actinides
 
MENTAL STATUS EXAMINATION format.docx
MENTAL     STATUS EXAMINATION format.docxMENTAL     STATUS EXAMINATION format.docx
MENTAL STATUS EXAMINATION format.docx
 
Solving Puzzles Benefits Everyone (English).pptx
Solving Puzzles Benefits Everyone (English).pptxSolving Puzzles Benefits Everyone (English).pptx
Solving Puzzles Benefits Everyone (English).pptx
 
9953330565 Low Rate Call Girls In Rohini Delhi NCR
9953330565 Low Rate Call Girls In Rohini  Delhi NCR9953330565 Low Rate Call Girls In Rohini  Delhi NCR
9953330565 Low Rate Call Girls In Rohini Delhi NCR
 
How to Configure Email Server in Odoo 17
How to Configure Email Server in Odoo 17How to Configure Email Server in Odoo 17
How to Configure Email Server in Odoo 17
 
Kisan Call Centre - To harness potential of ICT in Agriculture by answer farm...
Kisan Call Centre - To harness potential of ICT in Agriculture by answer farm...Kisan Call Centre - To harness potential of ICT in Agriculture by answer farm...
Kisan Call Centre - To harness potential of ICT in Agriculture by answer farm...
 
Contemporary philippine arts from the regions_PPT_Module_12 [Autosaved] (1).pptx
Contemporary philippine arts from the regions_PPT_Module_12 [Autosaved] (1).pptxContemporary philippine arts from the regions_PPT_Module_12 [Autosaved] (1).pptx
Contemporary philippine arts from the regions_PPT_Module_12 [Autosaved] (1).pptx
 
Presentation by Andreas Schleicher Tackling the School Absenteeism Crisis 30 ...
Presentation by Andreas Schleicher Tackling the School Absenteeism Crisis 30 ...Presentation by Andreas Schleicher Tackling the School Absenteeism Crisis 30 ...
Presentation by Andreas Schleicher Tackling the School Absenteeism Crisis 30 ...
 
Class 11 Legal Studies Ch-1 Concept of State .pdf
Class 11 Legal Studies Ch-1 Concept of State .pdfClass 11 Legal Studies Ch-1 Concept of State .pdf
Class 11 Legal Studies Ch-1 Concept of State .pdf
 
_Math 4-Q4 Week 5.pptx Steps in Collecting Data
_Math 4-Q4 Week 5.pptx Steps in Collecting Data_Math 4-Q4 Week 5.pptx Steps in Collecting Data
_Math 4-Q4 Week 5.pptx Steps in Collecting Data
 
POINT- BIOCHEMISTRY SEM 2 ENZYMES UNIT 5.pptx
POINT- BIOCHEMISTRY SEM 2 ENZYMES UNIT 5.pptxPOINT- BIOCHEMISTRY SEM 2 ENZYMES UNIT 5.pptx
POINT- BIOCHEMISTRY SEM 2 ENZYMES UNIT 5.pptx
 
Model Call Girl in Tilak Nagar Delhi reach out to us at 🔝9953056974🔝
Model Call Girl in Tilak Nagar Delhi reach out to us at 🔝9953056974🔝Model Call Girl in Tilak Nagar Delhi reach out to us at 🔝9953056974🔝
Model Call Girl in Tilak Nagar Delhi reach out to us at 🔝9953056974🔝
 
microwave assisted reaction. General introduction
microwave assisted reaction. General introductionmicrowave assisted reaction. General introduction
microwave assisted reaction. General introduction
 
Presiding Officer Training module 2024 lok sabha elections
Presiding Officer Training module 2024 lok sabha electionsPresiding Officer Training module 2024 lok sabha elections
Presiding Officer Training module 2024 lok sabha elections
 
Interactive Powerpoint_How to Master effective communication
Interactive Powerpoint_How to Master effective communicationInteractive Powerpoint_How to Master effective communication
Interactive Powerpoint_How to Master effective communication
 
Software Engineering Methodologies (overview)
Software Engineering Methodologies (overview)Software Engineering Methodologies (overview)
Software Engineering Methodologies (overview)
 
Organic Name Reactions for the students and aspirants of Chemistry12th.pptx
Organic Name Reactions  for the students and aspirants of Chemistry12th.pptxOrganic Name Reactions  for the students and aspirants of Chemistry12th.pptx
Organic Name Reactions for the students and aspirants of Chemistry12th.pptx
 
CARE OF CHILD IN INCUBATOR..........pptx
CARE OF CHILD IN INCUBATOR..........pptxCARE OF CHILD IN INCUBATOR..........pptx
CARE OF CHILD IN INCUBATOR..........pptx
 

Word 2 PowerPoint

  • 1. Microsoft® Word 2010 Core Skills Microsoft Office Word 2010 Lesson 2: Manipulating Text Courseware #: 3240
  • 2. Microsoft® Word 2010 Core Skills Lesson 2 Objectives • change views • use Paste Options • select text • use Paste Special • use cut, copy and paste • find text or items with Browse by • use the clipboard • replace text or items • move text with drag-and- drop © CCI Learning Solutions Inc. 2
  • 3. Microsoft® Word 2010 Core Skills Changing the View Print Layout Adjust overall layout of document. Full Screen View document adapted to monitor size for ease of reading. Reading Web Layout Text wraps to screen size; backgrounds and pictures appear as if using Web browser to view. Outline Promote or demote headings in hierarchical layout, or collapse to show headings and subheadings only. Draft Appropriate for most typing, editing and formatting tasks. © CCI Learning Solutions Inc. 3
  • 4. Microsoft® Word 2010 Core Skills Changing the View • To change view: – Click View tab and click option in Document Views group, or – use View Buttons on status bar © CCI Learning Solutions Inc. 4
  • 5. Microsoft® Word 2010 Core Skills Adjusting the Zoom • On View tab, in Zoom group, click option, or • Zoom level button on status bar, or • Zoom slider or incremental buttons of slider • Press Ctrl as you move the wheel to increase or decrease zoom © CCI Learning Solutions Inc. 5
  • 6. Microsoft® Word 2010 Core Skills Adjusting the Zoom • Use Zoom button to: – Adjust zoom quickly – Set own percentage – Display multiple pages © CCI Learning Solutions Inc. 6
  • 7. Microsoft® Word 2010 Core Skills Splitting the Window • Can only split windows horizontally • Two windows only of same document • To split the window: – On View tab, in Window group, click Split and drag dark line to height for second window, or – drag Split Horizontal to height for second window © CCI Learning Solutions Inc. 7
  • 8. Microsoft® Word 2010 Core Skills Splitting the Window • To switch windows: – Click in window for that document, or – press F6 or Ctrl+F6 to move from one window to other, or – drag split bar to display more or less of either window • To remove split pane: – On View tab, in Window group, click Remove Split, or – double-click split bar between windows © CCI Learning Solutions Inc. 8
  • 9. Microsoft® Word 2010 Core Skills Arranging Windows • On View tab, in Window group, click View Side by Side – Can sync both windows • If multiple documents open, need to choose which two documents to view side by side © CCI Learning Solutions Inc. 9
  • 10. Microsoft® Word 2010 Core Skills Arranging Windows • View multiple windows at same time • Click View tab, in Window group, click Arrange All © CCI Learning Solutions Inc. 10
  • 11. Microsoft® Word 2010 Core Skills Selecting Text • If text typed, must select text before action applied • Shading stays on selected text for multiple actions – Click away from selection to return to normal © CCI Learning Solutions Inc. 11
  • 12. Microsoft® Word 2010 Core Skills Selecting Consecutive Text • Click at beginning of text to select, and then drag to “mark” text – Can increase or decrease selection holding mouse button – If using keyboard, position cursor, hold Shift, and press arrow keys • To select entire word, double-click word. • To select entire sentence, press Ctrl and click in sentence • To select entire paragraph, triple-click in paragraph • To select all text: – On Home tab, in Editing group, click Select, click Select All, or – press Ctrl+A © CCI Learning Solutions Inc. 12
  • 13. Microsoft® Word 2010 Core Skills Selecting Non-Consecutive Text • To select multiple pieces of text, select first piece of text and then press Ctrl to select each piece of text • Select blocks of text using Alt – Position cursor at beginning of block of text to select, press Alt as you drag to bottom right of block © CCI Learning Solutions Inc. 13
  • 14. Microsoft® Word 2010 Core Skills Using the Selection Bar • In “left margin” area of screen • To select line of text, click at left of line of text • To select entire paragraph, double-click at left of that paragraph • To select entire document, triple-click in selection bar, or press Ctrl and click once in selection bar • To select multiple lines, drag to select text. • Use Ctrl to select non-consecutive text © CCI Learning Solutions Inc. 14
  • 15. Microsoft® Word 2010 Core Skills Using Undo • To activate Undo: – In Quick Access Toolbar, click Undo, or – Click button itself to undo last action or command – Click arrow to undo up to last 100 consecutive actions or commands performed – press Ctrl+Z to undo last action performed © CCI Learning Solutions Inc. 15
  • 16. Microsoft® Word 2010 Core Skills Using Repeat • To repeat the action just performed: – In the Quick Access Toolbar, click Repeat, or – press Ctrl+Y © CCI Learning Solutions Inc. 16
  • 17. Microsoft® Word 2010 Core Skills Using Cut, Copy and Paste Cut Remove from original location in current document, and place in Clipboard. Copy Copy from original location in current document, and place in Clipboard. Paste Insert item from Clipboard into document at current cursor position. Clipboard Temporarily stores cut or copied items © CCI Learning Solutions Inc. 17
  • 18. Microsoft® Word 2010 Core Skills Using Cut, Copy and Paste • To cut or move item, after selecting it: – On Home tab, in Clipboard group, click Cut, or – press Ctrl+X, or – right-click item and then click Cut • To copy an item, after selecting it: – On Home tab, in Clipboard group, click Copy, or – press Ctrl+C, or – right-click item and then click Copy • To paste item, place insertion point where you want to paste item: – On Home tab, in Clipboard group, click Paste, or – press Ctrl+V, or – right-click item and then click Paste, or – click item in Office Clipboard, or – click arrow for item in Office Clipboard, and then click Paste © CCI Learning Solutions Inc. 18
  • 19. Microsoft® Word 2010 Core Skills Using Cut, Copy and Paste • Paste Options button appears with pasted item • Click to display how pasted item can appear here • Number and type of options vary based on item Keep Source Keep formatting for item as it was in original document. Formatting (K) Merge Formatting (M) Merge formatting from original document with formatting in this document. Use Destination Use style that exists for this document on pasted item. Styles (S) Keep Text Only (T) Remove any existing formatting with original item and keep text only. Set Default Paste Set how all pasted items of this type to appear. © CCI Learning Solutions Inc. 19
  • 20. Microsoft® Word 2010 Core Skills Using the Office Clipboard • On Home tab, in Clipboard group, click Office Clipboard Task Pane Paste All Paste all items currently in Clipboard in same order as in Clipboard. Clear All Clear all items from Clipboard. Options Select options for Clipboard. © CCI Learning Solutions Inc. 20
  • 21. Microsoft® Word 2010 Core Skills Moving Text Using Drag-and-Drop • Drag text to move text selection • Best used to move text short distances • Does not use Clipboard, leaving contents of Clipboard intact • Select text, drag text and drop it to new location – “ghost” cursor appears as guide © CCI Learning Solutions Inc. 21
  • 22. Microsoft® Word 2010 Core Skills Using Paste Special • Copy from another program into document and links to update both copies • On Home tab, in Clipboard group, click arrow for Paste and then click Paste Special © CCI Learning Solutions Inc. 22
  • 23. Microsoft® Word 2010 Core Skills Finding and Replacing Items • Use to move insertion point to specified location • Can find specific word, phrase, symbol or code, or any combination – Can then choose to replace item, or continue working with document • To activate Find feature: – On Home tab, in Editing group, click Find, or – press Ctrl+F, or – click Find tab in Find and Replace dialog box, or – click Select Browse Object and then click Find © CCI Learning Solutions Inc. 23
  • 24. Microsoft® Word 2010 Core Skills Finding and Replacing Items Browse the headings Display outline or in your document hierarchical structure for headings used this document. Browse the results Display each page of from your current document to show where search search criteria exist. Browse the pages in Display each occurrence your document the document where search criteria were found. © CCI Learning Solutions Inc. 24
  • 25. Microsoft® Word 2010 Core Skills Finding and Replacing Items • Can instruct Word to find text that: – Matches characters exactly as typed – Find whole words or parts of words – Specific types of formatting • Replace individually, or replace all in document • To replace item: – On Home tab, in Editing group, click Replace, or – press Ctrl+H, or – if Find and Replace dialog box is open, click Replace tab © CCI Learning Solutions Inc. 25
  • 26. Microsoft® Word 2010 Core Skills Finding and Replacing Items Find what Enter search criteria to find. Replace Enter what will with replace search criteria. More Display more options for search criteria. Reading Highlights all Highlight items found in document. © CCI Learning Solutions Inc. 26
  • 27. Microsoft® Word 2010 Core Skills Summary of Lesson 2 • change views • use Paste Options • select text • use Paste Special • use cut, copy and paste • find text or items with Browse by • use the clipboard • replace text or items • move text with drag-and- drop © CCI Learning Solutions Inc. 27
  • 28. Microsoft® Word 2010 Core Skills Review Questions 1. Explain what the differences are between using the Print Layout and Draft view modes. 2. Discuss the difference between using Paste versus Paste Special. 3. How could you use the Paste Options for text you have copied? 4. Give an example of why you might want to collect multiple items to the Office Clipboard. 5. When might you use the Browse the pages in your document tab in the Navigation pane? © CCI Learning Solutions Inc. 28

Editor's Notes

  1. Pg 31Briefly introduce the topics that will be covered in this lesson so students are aware of the new skills they will learn. Remind students also that all the information is available in the book as a reference so they don’t need to commit anything to memory or take notes.
  2. Pg 32This feature can sometimes get lost between the exciting things you introduce to students. Be sure to point out the different view types and what each is best used for. You may want to draw their attention to the fact that the status bar sits in the same location for all Office programs, providing consistency on the screen.
  3. Pg 32Include in your demo all the different views, pointing out the differences on screen and when each view is most appropriate for text. For example, Draft can be used to focus on entering or editing text. It doesn’t matter where pictures or headers/footers fall, the focus here is ensuring the text is correct. On the other hand, Full Screen Reading can be handy when you want to read your document. Even with a single page document, you can still point out the hand at the bottom of the page that will flip pages in the document. Also point out that this is the view that appears when you open a Word attachment from an e-mail. Although not discussed in the book, you can mention you can turn this view off for viewing attachments, if preferred.
  4. Pg 35Provide examples of how the zoom option can be advantageous, especially when they are editing a lot of text, or working with small pictures. You may want to have a picture of a small object such as the Expand or Collapse button from Windows Explorer inserted in a document as an example of when zooming in can determine what is in the document.Be sure to go over all methods of using zoom, especially the ability to customize the size or specific number of pages.
  5. Pg 35Take advantage of the options here to show students how they can choose to view several pages at once, even if they have a single page document on screen. The point is how they can manipulate what they see and how much of it simply by entering a zoom percentage, using a preset one, or setting multiple pages.
  6. Pg 37This option may confuse some students as to when or why you would want more than one copy of the same document on the screen. Be sure to have several examples as reference such as comparing two different parts of a document (sales figures for exact price), viewing layout and design elements in a document, etc.
  7. Pg 37Provide a demo using a file that may be longer than half a page and have students try moving from one window to the other. Then show them how they can see different parts of the same document using this option. Include examples here of the types of documents where this can be handy, e.g., need to enter the stock price at Dec 31 which can be found on page 23 that contains statistics showing the stock price history over the 12-month period, adding signature lines at the bottom of a meeting report but you need to see all the names on page 1, etc.
  8. Pg 39The previous topic can lead to this option where they can view two documents side by side instead of the same document. Therefore building on an example from the previous slide, adding a name with a specific spelling into a contract using another contract that verifies the correct spelling, comparing estimated figures in a monthly sales report to the actual sales for the month, reviewing topics entered in last month’s newsletter that you may want to summarize or re-emphasize in this month’s newsletter, etc.
  9. Pg 40For those who may find themselves needing to compare or work on more than two documents at a time, this option is available. You may also want to point out how all the options for arranging windows are available in all Office apps, not just Word. The content will vary, of course, but the process remains the same.Be sure students understand that how much they see of each window depends on the size of the screen and by default, Windows will size each Word window equally. As time permits, you may want to demo how to change the size of one or all windows, as well as how to return to full screen for all windows.
  10. Pg 41This topic cannot be stressed enough. Once text has been entered, it must be selected before you can do any action to it, including deleting the text. Once students comprehend this concept, you should find there will be fewer questions regarding why something doesn’t happen later in the course simply because the text/item was not selected.Include in your discussion how this is true for all applications, not just Word. Once text or data has been entered into a program, you must select that data before it can be changed, deleted, or formatted.Discuss the benefits of selecting text when you want to apply more than one action at a time, e.g., change the text and then copy it, several formatting options, etc.With regards to the “Selecting is also called highlighting.” phrase, be sure your students understand that highlighting here refers to the color of the selection, not the actual Highlight feature which is not included in the exam objectives. However, it is a noticeable tool on the Ribbon as well as in the Mini toolbar. Some instructors use the “highlighting” term to refer to selected text so be sure students understand the difference.
  11. Pg 41This is likely the most common method for selecting text that students have used to this point in the course (or on their own). Discuss the different ways to select simple pieces of text and then how to select multiple pieces of text that are consecutive.Introduce the Shift key as well to extend or shrink the selection, including how they can combine several methods to select specific text, e.g., drag to select two lines of a long paragraph, release the mouse, and then press Shift to click at end of paragraph to extend the selection. Another example could be to select three consecutive words by clicking at the beginning of the three words, pressing Shift and then pressing Ctrl+Right to select the three words. In this case, you may also want to point out how sometimes it can be handy to use the keyboard to select smaller pieces of text such as this, given that there is a Shift and Ctrl key on either side of the keyboard. The left hand can press Shift while the right hand presses Ctrl+Right several times for the selection.
  12. Pg 42Most people are not aware it is possible to select multiple pieces of text from anywhere in the document, or a block of text. If they’ve used Excel, they may be aware this is possible there and wondered if it exists for Word.Be sure to demo this and emphasize how the Ctrl key needs to be pressed only after the first selection. If it makes it easier for them to remember, they can press Ctrl as they select the first one but the selection they want may not occur based on whether they single or double-click in that spot.The Alt key selection option can be very tricky with new users and you may want to delay discussing this topic until you are working with the Tabs lesson so you have an example you can go through the demo slowly with them.
  13. Pg 42This method is often not used by new students as they tend to drag to select. This can often be a faster way to select several paragraphs or lines of text without worrying about where the cursor is.Point out how the cursor changes direction to show the cursor is in the Selection Bar area (a visual clue they can use to guide them on screen).As with selecting with the Alt key, you may want to delay spending a lot of time on how to select items using the Selection Bar until there is a document where you may want to use the Selection Bar such as with tables.
  14. Pg 43Include in your discussion what editing means, and how it is more than just changing the text or checking the spelling.Discuss how Undo is a common feature for many applications and works similar between the Office apps, e.g., you have a history of up to 100 undos, must undo sequentially, etc.In your demo, ensure students understand that each click (or pressing Ctrl+Z) undoes one action. This can be another example to get students used to pressing and holding the Ctrl key while tapping another key, as in this case with the Z key for each instance to undo. Students who find that the keyboard seems to offer more control or seems faster, often try to press both keys at the same time, especially if they have not done a Windows course (or other pre-requisite). You may need to review or remind students that the first key is usually a non-functional key on its own and has no impact on the document or program until you press the second key. That way, they can hold it down, and the control comes from tapping the second key (or last key in a case where there are three keys to press such as Ctrl+Shift+key, or Ctrl+Alt+Delete).
  15. Pg 44Do not mix students up by using the term Redo as the Office apps do not use this term any longer. It is labeled as Repeat to repeat the last action performed, no matter what the action is. Make sure students understand it repeats only the last action, not a combination or anything in a list (as with earlier versions).Make sure your demo clearly identifies this purpose, throwing in examples of when you may want to repeat an action, e.g., apply this color to text for specific pieces of text. Remember it is only one action so don’t include any examples of multiple formatting that can be handled with the Format Painter, which is not covered in the Core objectives.
  16. Pg 44Although it seems rather simple and obvious, you may find the occasional student who doesn’t quite understand how this process works and the difference between cut and copy. If they have taken a Windows course, they may also mention that a recommendation is to copy files to a new location rather than cutting them (better to copy files from a network drive to another drive as a system failure may result in the files being permanently lost – in this scenario, you always have the files in the original location).Relate this process to something in real life that most everyone has used – creating a report using pictures from magazines. To put a picture on one page, you have to cut the picture out and then paste it onto that page of the report. If you find an article in the magazine you want to use but there is another picture on its back side, you can’t cut that article so chose to copy it instead so you can then paste that copy into another page of the report. The Clipboard could be the tray you use to store all the items you’ve cut or copied from magazines, books, etc. that eventually will be pasted into the typed report.
  17. Pg 44Discuss the different ways students can activate these commands, having them try one main method first (Home tab, Clipboard group) before having them work with the other methods. It isn’t necessary to go through all the different ways although you may want to mention that these methods are applicable to all the Office apps, and the keyboard shortcuts are available in other programs.
  18. Pg 44While it isn’t necessary to show all the different options for the Paste Options button, be sure students understand what the purpose of this button is and how it can help with simple formatting, especially if copying from one document to another.
  19. Pg 45Discuss why the Office Clipboard is handy to use, especially when you need to paste items from different programs, not necessarily Office apps.For instance, an example of when having 24 items in the Clipboard can be beneficial is when you have items you need to copy from several Word documents, text or graphics from your web site, an address from a contact in Outlook or a contact management program, figures from an Excel file, information from different web sites, etc.Point out how the Clipboard gives you a visual clue as to the information and which program was used to create that item.Introduce the items on the Clipboard but it isn’t necessarily to go through them in any detail.
  20. Pg 46To demonstrate why this option is best for smaller documents, use a full page document such as the Tolano Adventures Employees list. Select any two lines and then have students reposition the cursor so they can do the drag-and-drop with this selection. Have them then try scrolling down to near the middle of page 2. Some students may have no problems with this while others will find they have little control as to where they are moving to in the document as the text can scroll by quickly.Be sure to point out the visual clue of the mouse cursor when drag-and-drop is active. This will be handy when you move to Lesson 8 and manipulate inline graphics.
  21. Pg 47-48This can be considered an advanced topic for users at this stage; however, there may be someone in the audience who has been looking for a solution on how to paste information from one file to another and set up links between the two.There isn’t a need to spend a lot of time on this topic as there isn’t a large emphasis on this on the exam; be sure to demo it and let students go through the exercise to understand the concept and process. Be prepared with a number of examples of when you might use the Paste Special feature with a Word document. Some of the discussion may stray into intermediate or advanced skill sets, but you can use these as teasers for what students can look forward to in the next few lessons or in the Expert certification.
  22. Pg 49If you’ve used CCI’s Word courseware, you will notice that this topic has been moved to Lesson 2 from later in the courseware with earlier versions. The main reason for the redesign was that this feature is a way to manipulate text (or other items) and should be included in the editing portion to demonstrate how to find or change items. As well, there is more demand for knowledge on how to use this feature.Be sure you review this section on your own prior to class because it has been enhanced with 2010, especially when it comes to pressing Ctrl+F. This no longer displays the Find dialog box but now moves to the Navigation Pane (as seen on the next slide). Once you’ve done a search for items, be sure to note the display in the Navigation Pane, and not just the document.Ensure you demo includes the different methods to find an item, although the Select Browse Object is not emphasized on the exam.
  23. Pg 49-50Don’t spend a lot of time showing them how to search for graphic items as this will be covered in the Expert level. The focus at this level should be on finding text, usually with the purpose of replacing it with something else.It isn’t necessary to show each of the tabs during your demo, but do show how to enter the search criteria and note how Word highlights it in both the document as well as the Navigation Pane. In the case of the latter, discuss the advantage of this option as it shows only those paragraphs where the search criteria matches versus you having to scroll through the entire document to find the occurrence you may be looking for.
  24. Pg 50Most people tend to find something with the intent to replace it with something else. If you haven’t introduced the More button prior to this point, you may want to have students look at the different options (also shown on next slide). This can give them an idea of what they can search for, as well as what to replace. Be prepared with examples of the types and why you might want to replace items, e.g., document has too many paragraph returns, too many spaces, wrong color on text, etc.
  25. Pg 50-51Don’t spend a lot of time showing them how to search for graphic items as this will be covered in the Expert level. The focus at this level should be on finding text, usually with the purpose of replacing it with something else.As demonstrations for how to make find and replace more interesting, have them try finding and replacing formatting options. Be sure to provide explanations of items that some users may not be aware of from a grammatical side or proofreading side. For example, which dash is appropriate for the text, if the document is a speech? In this case, you will want to demonstrate verbally as well as onscreen so they can see the longer the dash, the longer the pause (as with a pause during the speech to emphasize a point or wait for the laughter). Demonstrate how reading highlight can draw attention to text.
  26. Pg 53Briefly review the topics that were covered in this lesson so students are aware of the new skills they learned. Remind students also that all the information is available in the book as a reference.
  27. Pg 53As time permits, go through the questions with students, or choose to assign these for groups or homework review.