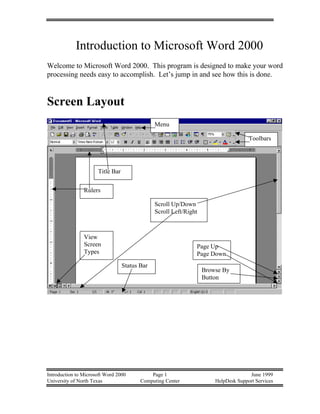
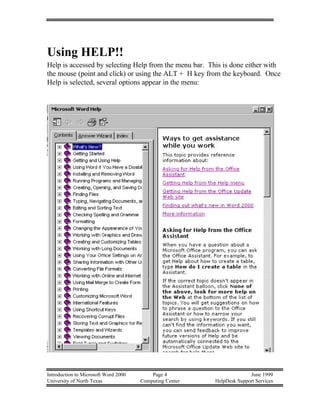
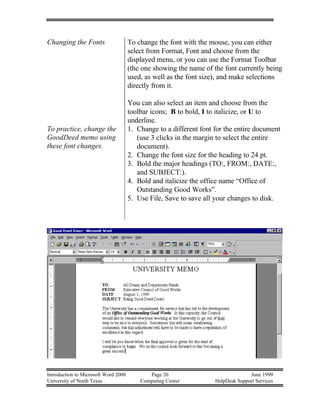
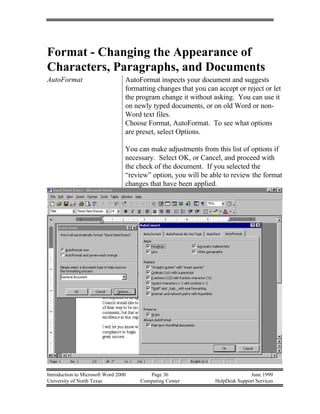
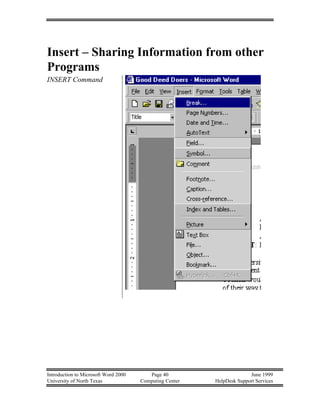
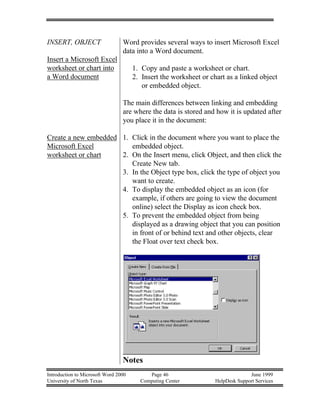
SlideShare a Scribd company logo
1 of 66
Download to read offline
Microsoft Word 2000 Introduction June 1999
University of North Texas Computing Center HelpDesk Support Services
Introduction to
Microsoft Word 2000
Microsoft Word 2000 Introduction Page i June 1999
University of North Texas Computing Center HelpDesk Support Services
Table of Contents
Screen Layout ...............................................................................................1
Title Bar.....................................................................................................2
Menu..........................................................................................................2
Toolbars.....................................................................................................2
Ruler Bar....................................................................................................3
Scroll Bars..................................................................................................3
Status Bar...................................................................................................3
Full Screen Edit..........................................................................................3
Using Help....................................................................................................4
Microsoft Word Help .................................................................................5
Contents and Index.....................................................................................5
What’s This?..............................................................................................6
Microsoft on the Web.................................................................................6
WordPerfect Help.......................................................................................6
Detect and Repair.......................................................................................6
About Microsoft Word ...............................................................................6
Word Processing Basics................................................................................7
Insertion Point Movement...........................................................................8
Inserting Today’s Date ...............................................................................9
Saving the Document..................................................................................9
File, Save .................................................................................................10
File, Save As ............................................................................................10
Printing a Document.................................................................................10
Print to a File............................................................................................11
Centering Text..........................................................................................11
Add Title to Memo...................................................................................11
Change the font for the entire document....................................................12
Selecting Text...........................................................................................13
Select Word...........................................................................................13
Select Entire Line ..................................................................................13
Select Entire Sentence ...........................................................................13
Select Entire Paragraph..........................................................................14
Select Entire Document .........................................................................14
Selecting Rectangular Areas ..................................................................14
Microsoft Word 2000 Introduction Page ii June 1999
University of North Texas Computing Center HelpDesk Support Services
Deleting Text............................................................................................14
Undo ........................................................................................................14
Redo.........................................................................................................15
Replacing Text .........................................................................................15
Using Tabs ...............................................................................................16
Setting Tab Stops with the Ruler Bar .....................................................17
Setting Tab Stops with the Tabs Dialog Box..........................................17
Changing the Fonts...................................................................................19
Practice – Change GoodDeed memo.........................................................19
Cut, Copy and Paste .................................................................................20
Edit: Cut................................................................................................20
Edit: Copy .............................................................................................20
Edit: Paste .............................................................................................21
Specific Tools .............................................................................................22
Creating a New Document (File, New).....................................................22
Templates.................................................................................................22
Changing the Capitalization of Text..........................................................24
Spelling and Grammar Checker ...............................................................25
Grammar Checker ....................................................................................25
Inserting Text with AutoCorrect ...............................................................27
Inserting Text with AutoText....................................................................28
Using the Thesaurus .................................................................................30
Establishing the Look of a Page...................................................................31
Setting Up Document Pages .....................................................................31
File, Page Setup........................................................................................31
Creating Headers and Footers...................................................................33
Page Numbers in Headers and Footers......................................................34
Format – Changing the Appearance of Characters,
Paragraphs, and Documents.........................................................................35
AutoFormat ..............................................................................................35
Style Gallery.............................................................................................36
Formatting Characters ..............................................................................36
Formatting Paragraphs..............................................................................37
Insert – Sharing Information from other Programs .......................................39
Insert Command .......................................................................................39
Microsoft Word 2000 Introduction Page iii June 1999
University of North Texas Computing Center HelpDesk Support Services
Symbol – Insert symbols or special characters ..........................................40
Insert common typographical characters ................................................41
Insert symbols not on the keyboard........................................................41
Create arrows, faces, and other symbols automatically...........................41
Type international characters .................................................................42
Assign a symbol to a shortcut key..........................................................42
Insert File .................................................................................................43
Insert a second document into an open document...................................43
Insert a Microsoft Excel File as a Table .................................................43
Insert Object.............................................................................................44
Insert a Microsoft Excel Worksheet or chart into a Word document.......44
Create a new embedded MS Excel Worksheet or chart..........................44
Insert Picture ............................................................................................46
About Working with Pictures in a Document .........................................47
Tools, Options -- Changing the Defaults......................................................49
View ........................................................................................................49
General.....................................................................................................50
Edit ..........................................................................................................50
Print .........................................................................................................51
Save .........................................................................................................51
Spelling and Grammar..............................................................................52
Track Changes..........................................................................................53
User Information ......................................................................................53
Compatibility............................................................................................54
File Locations...........................................................................................54
Appendix A.................................................................................................55
Function Key Charts.................................................................................55
Quick Reference to some Common Shortcut Keys....................................59
Index...........................................................................................................60
Introduction to Microsoft Word 2000 Page 1 June 1999
University of North Texas Computing Center HelpDesk Support Services
Introduction to Microsoft Word 2000
Welcome to Microsoft Word 2000. This program is designed to make your word
processing needs easy to accomplish. Let’s jump in and see how this is done.
Screen Layout
Title Bar
Rulers
Menu
Toolbars
Page Up
Page Down
Browse By
Button
Scroll Up/Down
Scroll Left/Right
Status Bar
View
Screen
Types
Introduction to Microsoft Word 2000 Page 2 June 1999
University of North Texas Computing Center HelpDesk Support Services
Title Bar At the very top of the screen is the Title Bar. If the
Title Bar is colored, it designates the active
window. On the left side of the title bar is the
Word Icon. On the right side of the title bar is the
minimize button, the maximize or restore button,
and the Exit “X”.
Menu The second line is the menu. Use the mouse to
click on the option desired, or ALT key plus the
underlined character of the option for keyboard
access to the menu.
Toolbars The next line has toolbars. Word provides over a
dozen different toolbars, although you’ll normally
display only two or three at any one time.
Microsoft’s “factory settings” display only the
Standard and Formatting toolbars. The other
toolbars include those listed at the left.
You can display any available toolbar by right-
clicking on any toolbar displayed on your screen
and selecting the toolbar from the drop-down menu
that appears.
Placing the mouse pointer on the icon brings up a
word description of what the icon does. The
Toolbars provide a quicker access to functions
normally found in the menu, maybe buried under
several selections.
You can select or unselect Toolbars by choosing
View, Toolbar. or by clicking on the toolbar with
the right mouse button and unselecting, or selecting
from the list.
Introduction to Microsoft Word 2000 Page 3 June 1999
University of North Texas Computing Center HelpDesk Support Services
Ruler Bar The Ruler Bar allows for quick changes to the Left
and Right Margins, as well as Tabs. Clicking on
the icon in the far left side of the Ruler Bar will
change the type of Tab.
Scroll Bars The Scroll Bars allow quick movement both
Vertically (on the right side of the document
window, and Horizontally (at the bottom of the
document window). Included on the Vertical scroll
bar are the Page Up and Page Down icons.
Included on the Horizontal scroll bar are the icons
to change to the different ways to view the
document: Normal, Page Layout, and Outline
Views.
Status Bar The bottom line of the document window is the
Status Bar. The Status Bar will show Page
location, cursor location, time of day, etc. It is
always present unless you choose the Full Screen
view.
Full Screen Edit BUT, for those wanting a “clean screen” with
nothing else showing, select View, and then Full
Screen. To change back, click on the icon at the
bottom of the screen that says “FULL” or press the
ESCape key to return to the normal screen.
Introduction to Microsoft Word 2000 Page 4 June 1999
University of North Texas Computing Center HelpDesk Support Services
Using HELP!!
Help is accessed by selecting Help from the menu bar. This is done either with
the mouse (point and click) or using the ALT + H key from the keyboard. Once
Help is selected, several options appear in the menu:
Introduction to Microsoft Word 2000 Page 5 June 1999
University of North Texas Computing Center HelpDesk Support Services
Microsoft Word Help
The Microsoft Assistant is there to help you. Or
you can hide it and just use the regular Help by
pressing F1 function key or selecting Help. The
earlier graphic shows the normal Help Screen
complete with Contents, Answer Wizard, and
Index. See an explanation for using Contents and
Index in the next row.
Contents and Index Contents is set up like a book with chapters and
articles within a chapter. When trying to learn all
you can about something, this will be a good way
to cruise articles about this item.
The Index shows a comprehensive list of functions.
It is designed for those who know what they want
to do (the terminology) and just want to go directly
to the “how to” without a lot of extra reading.
When pointing at a feature, the mouse should
Introduction to Microsoft Word 2000 Page 6 June 1999
University of North Texas Computing Center HelpDesk Support Services
change to a hand. Select with the hand icon, and
additional information about the topic will appear.
What’s This? After selecting “What’s This”, the cursor changes
to show a question mark along with the arrow.
You can now point to any icon, or character on the
screen. The dialog box will then tell you what this
icon is for.
Microsoft on the Web Pointers to the Microsoft Web Pages.
WordPerfect Help WordPerfect Help provides crossover training for
WordPerfect users. The program will show the
function name in WordPerfect, the WP key used,
and Word’s interpretation of this function.
Detect and Repair Detect and Repair will automatically find and fix
errors in this application. During this process you
may be asked to provide the installation source
(the CD or the location on your network drive that
original software is stored) and/or exit open
applications. It will also give you the option to
restore any shortcuts while repairing.
About Microsoft Word This will give you the version, and release of Word
2000 you are working with so you can share that
with those trying to help you with your software.
Sometimes the solution is updating your software if
you are having a strange bug.
Introduction to Microsoft Word 2000 Page 7 June 1999
University of North Texas Computing Center HelpDesk Support Services
Word Processing Basics
Creating a Document - Type the following text. Use Backspace key if you
make a mistake.
The University has a commitment for service that has
led to the development of an Office of Outstanding
Good Works. In this capacity, the Council would like
to remind everyone working at the University to go
out of their way to be nice to everyone. Sometimes
this will mean swallowing comments, but that
adjustment will have to be made to have a reputation
of excellence in this regard.
I will let you know when the final approval is given
for the start of compliance to begin. We on the
council look forward to this becoming a great
success.
• Never use the spacebar to center or otherwise position text. Use the Center-
alignment button on the Standard toolbar instead.
• Don’t use the spacebar to make columns. Instead use tabs, Word’s
multicolumn features, or tables.
• Do not press ENTER repeatedly to start a new page. Instead use Word’s
Insert Page Break command.
Introduction to Microsoft Word 2000 Page 8 June 1999
University of North Texas Computing Center HelpDesk Support Services
Insertion Point Movement You can quickly move to another location in your
document by using the mouse and the scroll bars.
With keys, the document scrolls automatically when
you move the insertion point.
To move the insertion point by using the mouse:
1. Using the scroll bars, scroll until you reach the
location you want.
2. Click the location where you want to position the
insertion point.
Introduction to Microsoft Word 2000 Page 9 June 1999
University of North Texas Computing Center HelpDesk Support Services
Move the cursor to the top of the paragraph you just typed.
Add two blank lines by pressing Enter twice.
Move cursor to top of document by pressing Ctrl + Home.
Add the memo heading.
TO: All Deans and Department Heads
FROM: Executive Council of Good Works
DATE:
SUBJECT: Being Good Deed Doers
Introduction to Microsoft Word 2000 Page 10 June 1999
University of North Texas Computing Center HelpDesk Support Services
Inserting Today’s Date To insert the current date, move the cursor to the
Date line, and press END. Select INSERT, Date
and Time, and then the date that is formatted the
way you desire.
Saving the Document Save the file with the name “Good Deed Doers” by
selecting FILE, SAVE, and typing the entire file
name. Because Windows 95 supports long file
names, you can be creative up to 255 characters.
Press Enter or select OK when finished typing the
name.
Introduction to Microsoft Word 2000 Page 11 June 1999
University of North Texas Computing Center HelpDesk Support Services
File, Save FILE, SAVE is used the first time you save the file,
and anytime you want to save all the changes you are
making.
The Ctrl+S keyboard shortcut is a convenient way to
save without visiting the File menu.
File, Save As FILE, SAVE AS is used when you want to save the
existing file, but with a different name or file TYPE.
To change the file Type, click the icon after Save
File as Type: to see the different types. These
include MS-DOS text, WordPerfect, MS Word
6.0/95, Word 2.x version, etc. When saved as MS-
DOS text, it is in ASCII format and can be read by
any package.
Printing a Document Printing is handled through the File menu.
Select File, Print, OK.
To Preview on the screen before printing:
Select File, Print Preview. When finished
previewing, select CLOSE.
Introduction to Microsoft Word 2000 Page 12 June 1999
University of North Texas Computing Center HelpDesk Support Services
Print to a File Printing to a File:
1. Edit and polish document as usual.
2. Consider printing a paper copy.
3. Select FILE, PRINT.
4. Check the “Print to File” box in the Print dialog
box.
5. Click OK. You’ll see the Print to File dialog box.
6. Pick a folder from the folder list.
7. Name the file in the File Name box.
8. Click OK to create the file.
Centering Text Word is preset to align text flush left with the left
margin. However you have the options..
To center selected text:
1. Highlight the text to be centered.
2. On the Formatting Toolbar, select Center.
Add Title to Memo We need to add a title to our Good Deed memo.
Move the cursor to the top of the document, press
enter 3 times to add a couple of lines. Move the
cursor back to the top and type UNIVERSITY
MEMO.
To center or align text:
1. Select the line or paragraph you want to center or
align. Quick Tip to select a line: Click the
mouse once in the blank left margin area to
select an entire line. Click twice to select a
paragraph, click three times to select the entire
document.
2. On the formatting toolbar, click the button for the
Introduction to Microsoft Word 2000 Page 13 June 1999
University of North Texas Computing Center HelpDesk Support Services
alignment you want.
Change the font for the
entire document
To change the font for the entire document, you must
first select it. In our “Good Deed Doers” document,
we can do this by :
1. Position cursor at the beginning of the
document (the title) in the far left margin.
2. Click the mouse button 3 times in quick
succession. (Click one moves the cursor, click
two, selects the entire paragraph, and click
three the entire document).
3. Now go to the format toolbar and the font size
(usually 10 or 12) and press the down arrow
key next to the number. Change it to 14 point.
4. The entire document should be a bigger font.
While the document is highlighted, you can also
select other functions, like changing all text to bold,
italics, color of text to red, etc.
Introduction to Microsoft Word 2000 Page 14 June 1999
University of North Texas Computing Center HelpDesk Support Services
Selecting Text Word lets you do a lot with text after you’ve typed it.
You can change its appearance, move it around,
delete it, and copy it.
The first step is always to select the text you want to
work with. You can drag your mouse pointer over
the text while holding down the primary mouse
button. There are shortcuts for selecting individual
words, lines, sentences, and paragraphs.
Select Word Double-click anywhere on a word to select the entire
word and the space that follows it.
To select adjacent words, drag after double-clicking
on the first word of interest. Entire words will be
selected when you drag this way.
Select Entire Line 1. Move the mouse pointer to the selection bar (an
invisible strip running down the extreme left edge
of the document window). The mouse pointer
will change from the I-beam to an arrow.
2. Click the primary mouse button only once. The
entire line to the right of where you’ve clicked
will be selected.
3. Continue dragging down to select additional lines.
Select Entire Sentence 1. Hold down the Ctrl key while you click anywhere
in the sentence of interest.
2. This also selects the sentence’s punctuation mark
and the space following the sentence, if there is
one.
3. Drag after you click this way to select additional
sentences.
Introduction to Microsoft Word 2000 Page 15 June 1999
University of North Texas Computing Center HelpDesk Support Services
Select Entire Paragraph 1. Triple-click anywhere in the paragraph after
pointing to the paragraph.
2. Using the Selection Bar, move the mouse pointer
to the selection bar (the invisible strip running
down the extreme left edge of the document
window). The pointer will become an arrow.
3. Double-click. The adjacent paragraph will be
selected.
Select Entire Document 1. Move mouse pointer to the selection bar at the
left edge of the document and the pointer will
become an arrow.
2. Hold down the Ctrl key and click. The entire
document will be selected. Alternately, triple-
click on the selection bar to select the whole
document.
Selecting Rectangular
Areas
1. Hold down Alt key while you drag to mouse to
select rectangular areas (like columns in a tabbed
list).
Deleting Text Press Backspace key immediately after typing
character.
Select test, and press Delete.
Use Clear command on Edit menu to delete single
character or select text, the Edit,Clear.
Undo The exact name of the Undo choice on the Edit menu
changes as you work. It remembers which steps you
last took, and so can sometimes say Undo Typing,
Undo Formatting, Undo Sort, etc.
There are three ways to Undo.
1. Edit, Undo reverses your last action. Choose
Edit, Undo again to reverse the action before that,
and so on.
Introduction to Microsoft Word 2000 Page 16 June 1999
University of North Texas Computing Center HelpDesk Support Services
2. If you press Ctrl + Z repeatedly, it will reverse
previous actions.
3. The Undo toolbar button and its associated drop-
down list menu let you undo multiple actions in
sequence.
Redo Use the Redo command to undo an Undo. To redo
your last action only, choose Edit, Redo. You can
also press the keyboard shortcut F4, or click the
Redo button on the Standard toolbar.
Replacing Text Combine the steps of deleting unwanted text,
positioning the insertion point, and inserting
replacement text.
1. Highlight the unwanted text.
2. Start typing.
The old text disappears, and the new text appears
across the screen as you type.
Introduction to Microsoft Word 2000 Page 17 June 1999
University of North Texas Computing Center HelpDesk Support Services
Using Tabs For creating lists in columns, the easiest way is to
create a table. But to create quick, relatively simple
lists, tabs can be very useful. Word offers five
specialized types of tab stops:
1. Left - Text typed at these tab stops bumps up
against the left edge of the stop.
2. Center - Center your text around the tab stop.
3. Right - Position whatever you type to the left of
the tab stop. This is a great way to type long lists
of numbers and have them line up.
4. Decimal - Align columns of numbers on the
decimal point and are perfect for simple financial
reports.
5. Bar - Creates nice, thin vertical lines that separate
columns. You can only specify bar tabs from the
Tabs dialog box. The bar is not an actual tab stop
(you can’t use them to place text), but they can be
placed and moved like stops.
Introduction to Microsoft Word 2000 Page 18 June 1999
University of North Texas Computing Center HelpDesk Support Services
Setting Tab Stops with
the Ruler Bar
You can set custom tabs as you type or you can use
the standard 1/2” tabs initially and then go back to
fine tune. Here are the general steps.
1. With the ruler in view, click the button at the left
edge of the horizontal ruler repeatedly until it
shows the icon for the desired tab stop type (Left,
Right, Decimal, or Center.)
2. Click on the ruler where you want to place a tab
stop. If you make a mistake, drag the stop off the
ruler and try again.
3. When you type, press the Tab key to move the
insertion point to the new tab positions.
To move tab stops before you’ve entered text, simply
point to the stop you need and drag to the right or
left.
If you have already entered text that uses the tab
stops you want to move, first select all of that text
before moving the tab stop.
Setting Tab Stops with
the Tabs Dialog Box
Although using the ruler is easy, you may want to use
the Tabs dialog box for some projects. It provides
ways to set tab stops precisely and it offers some
additional tab-related options. Select FORMAT,
TABS, or select FORMAT, PARAGRAPH, TABS.
Remember to select all the intended text and
paragraph markers before you move tab stops.
Introduction to Microsoft Word 2000 Page 19 June 1999
University of North Texas Computing Center HelpDesk Support Services
You can only add Tab Leader characters from the
Tabs dialog box. Leader characters make it easy to
read wide, sparsely populated lines without losing
your place. Word’s leader characters are dots,
dashes, and solid lines. To create leaders, follow
these steps:
1. Select the paragraph(s) to be used.
2. Click on the tab where you want the leaders.
3. Choose the leader style you desire from the Tabs
dialog box.
4. Click OK.
Introduction to Microsoft Word 2000 Page 20 June 1999
University of North Texas Computing Center HelpDesk Support Services
Changing the Fonts To change the font with the mouse, you can either
select from Format, Font and choose from the
displayed menu, or you can use the Format Toolbar
(the one showing the name of the font currently being
used, as well as the font size), and make selections
directly from it.
You can also select an item and choose from the
toolbar icons; B to bold, I to italicize, or U to
underline.
To practice, change the
GoodDeed memo using
these font changes.
1. Change to a different font for the entire document
(use 3 clicks in the margin to select the entire
document).
2. Change the font size for the heading to 24 pt.
3. Bold the major headings (TO:, FROM:, DATE:,
and SUBJECT:).
4. Bold and italicize the office name “Office of
Outstanding Good Works”.
5. Use File, Save to save all your changes to disk.
Introduction to Microsoft Word 2000 Page 21 June 1999
University of North Texas Computing Center HelpDesk Support Services
Cut, Copy and Paste The Cut, Copy and Paste features use the Windows
Clipboard to store information temporarily. By
placing information on the Clipboard, you can move
and copy text and graphics from one location to
another.
Information remains in Clipboard until Windows is
exited, or another text or graphics replaces the
existing block. With Office 2000, you can store up
to 12 items in Clipboard at a time.
Edit: Cut When you cut text and graphics, you remove it and
place it on the Clipboard.
To Cut Data or Graphic:
1. Select the information.
2. Choose Edit, Cut. (or the scissors icon, or Ctrl-
X)
Information is moved to the Clipboard.
Edit: Copy When you copy text, you place only a copy of the
text and graphics on the Clipboard without removing
the original.
Introduction to Microsoft Word 2000 Page 22 June 1999
University of North Texas Computing Center HelpDesk Support Services
To Copy Data or Graphic:
1. Select the information
2. Choose Edit, Copy. (or the Copy icon, or Ctrl-C)
A copy of the information is moved to the Clipboard
with original information still in place.
Edit: Paste When you paste text, you retrieve a copy from the
Clipboard and insert it into the active document
window at the insertion point. You can paste the text
in the same document window, another document, or
another program.
To Paste Data or Graphic:
1. Move cursor to insertion point.
2. Choose Edit, Paste. (or the Paste icon, or Ctrl-V)
A copy of the information is inserted at cursor
location with copy still in Clipboard.
Specific Tools
Creating a New
Document
File, New
When you start Word, a new, blank document named
DOCUMENT1 opens. To begin working on it, just
start typing. You do not have to type and format
each new document from scratch. You can save time
by using one of the supplied templates for common
documents such as letters and memos.
To see the templates available to use, select FILE,
NEW. The screen above will appear showing
different types of predesigned letter formats.
There are several categories of templates that may fit
your specific need – look at letters and memos that
are formatted for formal, contemporary, or casual
looks. There are preformatted pages for Fax cover
Introduction to Microsoft Word 2000 Page 23 June 1999
University of North Texas Computing Center HelpDesk Support Services
sheets, and publication layouts.
You can also create your own templates from one of
the predefined templates by opening it as a template
instead of a document. Any changes you make will
be saved as a new template when you save and
rename.
Introduction to Microsoft Word 2000 Page 24 June 1999
University of North Texas Computing Center HelpDesk Support Services
Templates To start a new document from a template:
1. From the File menu, choose New.
2. Under New, select the Document option button.
3. In the Template box, do one of the following:
To create a new document from an existing
template, select the template that you want to
use and then choose OK.
Word gives the new document a temporary name,
such as Document2, until you save it with a unique
filename.
You can change templates just as you would any
other Word document. The only difference is one
additional stop you must take when saving your
work.
1. Use FILE, NEW to open the template to be
changed.
2. Make the changes, such as adding your logo and
other embellishments.
3. Print out a sample and check your work.
4. When satisfied, choose FILE, SAVE AS.
5. Type the exact same file name as the old template
Introduction to Microsoft Word 2000 Page 25 June 1999
University of North Texas Computing Center HelpDesk Support Services
if you want to replace the old template, or type a
new file name if you want to keep both the old
and new. Make sure to type the extension .DOT
if you choose a new filename.
Introduction to Microsoft Word 2000 Page 26 June 1999
University of North Texas Computing Center HelpDesk Support Services
Changing the
Capitalization of Text
You can quickly change the capitalization of text
without retyping, making selected text all lowercase
or all uppercase letters, capitalizing only the first
letter of each word, capitalizing the first word of a
selection, or switching existing uppercase letters to
lowercase letters or vice versa.
To change the capitalization of text:
1. Select the text to be changed.
2. From the Format menu, choose Change Case.
3. Choose from the options provided, then choose
the OK button.
You can also change the capitalization of text by
using the keyboard.
Select the text. Press Shift+F3 until the text has the
capitalization you want.
Spelling and Grammar
Checker
TOOLS, SPELLING
AND GRAMMAR
Start the Spelling checker with the F7 shortcut or by
picking Tools, Spelling and Grammar. The spelling
dialog box appears (If there are no mistakes in the
text, you won’t see the dialog box.)
Grammar Checker The Grammar checker runs at the same time. Unless
you select a portion of your document, Word will
check the whole thing.
Once suggestions have been made to improve the
grammar, if you have marked that you want this in
your Spelling and Grammar options, you will see
Introduction to Microsoft Word 2000 Page 27 June 1999
University of North Texas Computing Center HelpDesk Support Services
statistics relating to this document.
These statistics include:
Counts - number of words, characters, paragraphs,
and sentences.
Averages - Average number of sentences per
paragraph, words per sentence and characters per
word.
Readability - the percentage of sentences written in
passive voice, as well as other readability indexes.
Flesch Reading Ease - computes readability based
on the average number of syllables per word and the
average number of words per sentence. The higher
the score (0-100), the greater the number of people
who can readily understand the document.
Flesch-Kincaid Grade Level - computes readability
based on average number of syllables per word and
the average number of words per sentence. The
score in this case indicates a grade-school level.
Introduction to Microsoft Word 2000 Page 28 June 1999
University of North Texas Computing Center HelpDesk Support Services
Inserting Text with
AutoCorrect
TOOLS,
AUTOCORRECT
Tools, AutoCorrect opens a four part tab menu to set
up AutoCorrect, AutoFormat As You Type,
AutoText, and AutoFormat.
AutoCorrect moves into action every time you press
the spacebar, the Tab key, or the Enter key after
entering a letter or a word. If the previous word is
stored as an AutoCorrect entry, AutoCorrect changes
it; if it is not stored as an AutoCorrect entry, nothing
happens.
It can also cause confusion if you don’t realize the
settings will catch and correct such things as catching
two initial caps, capitalizing the first word of a
sentence, and replacing words as you type that have
been set up in auto correct.
Introduction to Microsoft Word 2000 Page 29 June 1999
University of North Texas Computing Center HelpDesk Support Services
Inserting Text with
AutoText
AutoText is the way to store and retrieve
“boilerplate” text, graphics, etc. To create an
AutoText item, first highlight the item, then choose
Tools, AutoCorrect, AutoText. A suggested name
will be given (names can be up to 32 characters and
spaces), or you can give your own name. Click the
Add button.
For example, when referring to our university, we
typically have to describe where we are in relation to
Dallas. So an Autotext item could be the following
paragraph:
The University of North Texas is located 35 miles
north of the Dallas/Fort Worth Metroplex on I-35.
Select this paragraph, and then select Tools,
AutoCorrect, AUTOTEXT. Keep the default name
and select ADD.
Introduction to Microsoft Word 2000 Page 30 June 1999
University of North Texas Computing Center HelpDesk Support Services
Now when you start typing “The University” you
should see a screen tip giving you the opportunity to
press Enter and accept the rest of the paragraph. If
you do not want to enter this paragraph, simply keep
typing and ignore the screen tip. If, for some reason,
the screen tip doesn’t appear, it is possible
AutoComplete has been turned off. Here are
instructions to turn it on (or off).
Turn on or off AutoComplete
1. On the Insert menu, point to AutoText, and
then click AutoText.
2. Select or clear the Show AutoComplete tip
for AutoText and dates check box.
After you select the check box, Microsoft
Word will display a ScreenTip when you type
the first few characters of a date or AutoText
entry, at which point you can insert the entry
or continue typing.
Introduction to Microsoft Word 2000 Page 31 June 1999
University of North Texas Computing Center HelpDesk Support Services
Using the Thesaurus
TOOLS,
LANGUAGE,
THESAURUS
The Thesaurus command can help you add flavor and
punch to your documents. Select the word you want
to change, then open the Thesaurus dialog box by
choosing Tools, Language, Thesaurus. You’ll see a
dialog box as follows:
The Meanings section of the dialog box lists
available meanings and parts of speech for the
selected word.
Pick the meaning of interest, and you’ll see a
corresponding list of synonyms in the box to the right
of the Meanings list.
1. Clicking on the word places it in the Replace with
box.
2. If you click the Replace button at this point, the
new word will replace the selected one in your
document.
3. To look for other words instead, click the Look
Up button for additional choices.
4. Clicking the cancel button closes the Thesaurus
without changing your selected word.
Introduction to Microsoft Word 2000 Page 32 June 1999
University of North Texas Computing Center HelpDesk Support Services
Establishing the Look of a Page
Setting Up Document
Pages
File, Page Setup
To work with the overall look of the document, you
can change the page setup. Page Setup is divided
into four parts: Margins, Paper Size, Paper Source,
and Layout. Select FILE, PAGE SETUP for the
following screen:
Margins will change for Top of form, bottom, left
and right. It also adjusts the page for binding width,
or gutter. The adjustment can be made to where text
begins after the header and before the footer.
Paper Size screen is as follows:
Introduction to Microsoft Word 2000 Page 33 June 1999
University of North Texas Computing Center HelpDesk Support Services
The adjustments can be made for different forms, as
well as orientation of printing.
Paper Source helps with particular printer needs, as
to which bin to feed from for the first page and other
pages.
The Layout screen provides the following
information.
Introduction to Microsoft Word 2000 Page 34 June 1999
University of North Texas Computing Center HelpDesk Support Services
Creating Headers and
Footers
Headers and footers are places to put repetitive
information in a document’s top and bottom margins.
Simple text, graphics, stylized text, dates, and
automatic page numbering can all be included in
headers and footers.
You can specify identical headers and footers on all
pages in your document, or you can specify different
contents for each section of the document. Odd and
even pages can have different designs if you wish.
Header and footer editing always takes place in Page
Layout view. You work right in the header and
footer area of your document after double-clicking to
undim it.
To enter a header that repeats on all pages in your
document:
1. Choose View, Header and Footer.
2. The Header and Footer toolbar is displayed.
3. Create and edit header text as you would any
other. You can paste graphics, apply styles, and
otherwise format your work normally.
4. Use the automatic page-number, time-stamping,
and date-stamping features.
5. Double-click in the main document to return to
Introduction to Microsoft Word 2000 Page 35 June 1999
University of North Texas Computing Center HelpDesk Support Services
work there.
Create Footers the same way, except that you work
in a Footer window.
Once created, you can double-click in the
header/footer area to edit.
Page Numbers in
Headers and Footers
Using the Toolbar:
1. Open the header or footer by double-clicking on it
in Page Layout view.
2. Click on the page numbering button in the
Header/Footer toolbar. Word will insert a
number in your header or footer at the insertion
point.
3. Page numbers can be stylized, repositioned,
surrounded with borders, accompanied by text,
and otherwise embellished.
Using Insert - Page Numbers:
1. Place the insertion point in the section you want
to number.
2. Display the Page Numbers dialog box by
choosing INSERT, PAGE NUMBERS.
3. Word suggests placing page numbers in the
bottom-right corner of your document (1/2” from
the bottom and right edges of the paper), but you
can specify different positions with the Position
and Alignment drop-down menus. Watch the
Preview area as you work.
4. Choose whether you want a page number on the
first page by clicking to add or remove the
corresponding X.
5. Either click OK or click on the Format button to
review other page numbering options.
Introduction to Microsoft Word 2000 Page 36 June 1999
University of North Texas Computing Center HelpDesk Support Services
Format - Changing the Appearance of
Characters, Paragraphs, and Documents
AutoFormat AutoFormat inspects your document and suggests
formatting changes that you can accept or reject or let
the program change it without asking. You can use it
on newly typed documents, or on old Word or non-
Word text files.
Choose Format, AutoFormat. To see what options
are preset, select Options.
You can make adjustments from this list of options if
necessary. Select OK, or Cancel, and proceed with
the check of the document. If you selected the
“review” option, you will be able to review the format
changes that have been applied.
Introduction to Microsoft Word 2000 Page 37 June 1999
University of North Texas Computing Center HelpDesk Support Services
Style Gallery You can also select different styles from the Style
Gallery to change the overall appearance of the
document by selecting Format, Style …
The Style Gallery lets you see how the different
styles will affect the actual memo. You can browse
through the different template styles and pick the one
best suited.
To apply styles from the formatting toolbar:
1. Either place the insertion point in a paragraph or
select several paragraphs.
2. Scroll through the drop-down style list on the
Formatting toolbar to pick the desired style.
3. Click on a style name to apply it to the selected
text. You text will be reformatted using the
selected style.
Use EDIT, UNDO if you don’t like the results.
Formatting Characters Characters are altered by changing the font size and
appearance. This can be applied to one character or
a selected group of characters. In addition to using
Introduction to Microsoft Word 2000 Page 38 June 1999
University of North Texas Computing Center HelpDesk Support Services
the toolbars and the pull-down menus, there are also
shortcut keyboard selections you can make.
Formatting Paragraphs A Word paragraph can be a single text character, a
graphic, or even a blank line consisting only of the
paragraph mark which appears in your document
when you press the Enter key. Each Word paragraph
in your document can be uniquely formatted and
need not contain text.
To modify the appearance of a single paragraph,
simple place the insertion point anywhere in the
paragraph (with the mouse, point and click). To
modify multiple paragraphs, select all or parts of
each paragraph to be changed.
Choose Format, Paragraph to reach the Paragraph
dialog box. This box lets you:
• Precisely specify inter-line spacing (Single,
Introduction to Microsoft Word 2000 Page 39 June 1999
University of North Texas Computing Center HelpDesk Support Services
double, etc.)
• Precisely specify inter-paragraph spacing (space
before and after paragraphs)
• Dictate exact indentation measurements
• Turn off line numbering for specific paragraphs
• Specify text alignment (left, centered, right, or
justified)
• Specify text flow guidelines (widows, orphans,
etc.)
Introduction to Microsoft Word 2000 Page 40 June 1999
University of North Texas Computing Center HelpDesk Support Services
Insert – Sharing Information from other
Programs
INSERT Command
Introduction to Microsoft Word 2000 Page 41 June 1999
University of North Texas Computing Center HelpDesk Support Services
SYMBOL
Insert symbols or
special characters
You can insert special characters, international
characters, and symbols by using the Symbol
command on the Insert menu. To quickly insert a
symbol that you use frequently, assign the symbol to a
shortcut key. Word automatically replaces some key
combinations with symbols.
Introduction to Microsoft Word 2000 Page 42 June 1999
University of North Texas Computing Center HelpDesk Support Services
Insert common
typographical
characters
1. Click where you want to insert the character.
2. On the Insert menu, click Symbol, and then click
the Special Characters tab.
3. Double-click the character you want to insert.
Insert symbols not on
the keyboard
1. Click where you want to insert the symbol.
2. On the Insert menu, click Symbol, and then click
the Symbols tab.
3. Double-click the symbol or character you want to
insert.
Create arrows, faces,
and other symbols
automatically
You can add the following commonly used symbols
to your document by typing corresponding characters
or character combinations. For example, you can
create J by typing :) or :-)
Type To create
(c) ©
(r) ®
(tm) ™
... …
--> à
:) or :-) J
:| or :-| K
:( or :-( L
<-- ß
<== ç
<=> ó
==> è
Notes
You can remove AutoCorrect entries if you don't want
to replace key combinations with symbols.
You can add your own symbols or correct typing
mistakes by clicking AutoCorrect.
Type international
characters
To produce Press
à, è, ì, ò, ù CTRL+` (ACCENT GRAVE),
Introduction to Microsoft Word 2000 Page 43 June 1999
University of North Texas Computing Center HelpDesk Support Services
À, È, Ì, Ò, Ù the letter
á, é, í, ó, ú, ý CTRL+' (APOSTROPHE),
Á, É, Í, Ó, Ú, Ý the letter
â, ê, î, ô, û CTRL+SHIFT+^ (CARET),
Â, Ê, Î, Ô, Û the letter
ã, ñ, õ CTRL+SHIFT+~ (TILDE),
Ã, Ñ, Õ the letter
ä, ë, ï, ö, ü, ÿ CTRL+SHIFT+: (COLON),
Ä, Ë, Ï, Ö, Ü, Ÿ the letter
å, Å CTRL+SHIFT+@, a or A
æ, Æ CTRL+SHIFT+&, a or A
œ, Œ CTRL+SHIFT+&, o or O
ç, Ç CTRL+, (COMMA), c or C
ð, Ð CTRL+' (APOSTROPHE),d or D
ø, Ø CTRL+/, o or O
¿ ALT+CTRL+SHIFT+?
¡ ALT+CTRL+SHIFT+!
ß CTRL+SHIFT+&, s
Introduction to Microsoft Word 2000 Page 44 June 1999
University of North Texas Computing Center HelpDesk Support Services
Assign a symbol to a
shortcut key
1. On the Insert menu, click Symbol.
2. Click the tab with the symbol or character you
want.
3. Click the symbol or character you want.
4. Click Shortcut Key.
5. In the Press new shortcut key box, type the key
combination you want to use.
6. Click Assign.
INSERT - FILE
Insert a second
document into an open
document
1. Click where you want to insert the second
document.
2. On the Insert menu, click File.
3. In the File name box, enter the name of the file you
want to insert.
Insert a Microsoft Excel
File as a Table
1. Click where you want to insert the Excel table.
2. On the Insert menu, click File.
3. In the File name box, enter the name of the Excel
spreadsheet you want to insert.
4. You will be asked if you want the entire
workbook, worksheet, or range to be included for
the Excel spreadsheet.
Introduction to Microsoft Word 2000 Page 45 June 1999
University of North Texas Computing Center HelpDesk Support Services
Introduction to Microsoft Word 2000 Page 46 June 1999
University of North Texas Computing Center HelpDesk Support Services
INSERT, OBJECT
Insert a Microsoft Excel
worksheet or chart into
a Word document
Word provides several ways to insert Microsoft Excel
data into a Word document.
1. Copy and paste a worksheet or chart.
2. Insert the worksheet or chart as a linked object
or embedded object.
The main differences between linking and embedding
are where the data is stored and how it is updated after
you place it in the document:
Create a new embedded
Microsoft Excel
worksheet or chart
1. Click in the document where you want to place the
embedded object.
2. On the Insert menu, click Object, and then click the
Create New tab.
3. In the Object type box, click the type of object you
want to create.
4. To display the embedded object as an icon (for
example, if others are going to view the document
online) select the Display as icon check box.
5. To prevent the embedded object from being
displayed as a drawing object that you can position
in front of or behind text and other objects, clear
the Float over text check box.
Notes
Introduction to Microsoft Word 2000 Page 47 June 1999
University of North Texas Computing Center HelpDesk Support Services
• Only programs that are installed on your computer
and that support linked and embedded objects
appear in the Object type box.
• When you click Microsoft Excel Worksheet in the
Object type box, an entire workbook is inserted
into your document. The document displays only
one worksheet at a time. To display a different
worksheet, double-click the Microsoft Excel
object, and then click a different worksheet.
Introduction to Microsoft Word 2000 Page 48 June 1999
University of North Texas Computing Center HelpDesk Support Services
INSERT, PICTURE There are many alternatives for inserting a picture,
including Clip Art, from a file, using AutoShapes,
WordArt, direct from a scanner, or a chart. The most
common use of inserting a picture is from the ClipArt
library that comes with the Microsoft Office suite.
About working with
pictures in a document
Word comes with its own set of pictures in the Clip
Gallery. The Clip Gallery includes a wide variety of
clip art that makes it easy for you to dress up your
documents with professionally designed images. You'll
find everything from maps to people and from
buildings to scenic backgrounds.
It's easy to select a picture. Just point to Picture on the
Insert menu, click Clip Art, and then click the Clip Art
or Pictures tab.
The Clip Gallery includes a handy Find feature to help
you locate just the right images for your document.
You can also insert pictures and scanned photographs
(called imported art or graphics) from other programs
and locations.
Introduction to Microsoft Word 2000 Page 49 June 1999
University of North Texas Computing Center HelpDesk Support Services
To insert a picture from another program, click Picture
on the Insert menu, and then click From File.
When you select a picture, the Picture toolbar appears
with options you can use to crop the picture, add a
border to it, and adjust its brightness and contrast.
To insert a scanned photograph, click Picture on the
Insert menu, and then click From Scanner. The image
appears in Microsoft Photo Editor, a program you can
use to edit the picture.
You can also draw your own pictures by using options
on the Drawing toolbar
You can create special text effects by using the new
WordArt button on the Drawing toolbar, and you can
use additional features, such as 3-D effects and
textured fills.
Word recognizes a wide variety of picture formats.
Because all Office programs share the same graphics
filters, if you installed a graphics filter when you
installed another Office program (PowerPoint or
Microsoft Excel, for example) you can use that same
filter in Word.
Introduction to Microsoft Word 2000 Page 50 June 1999
University of North Texas Computing Center HelpDesk Support Services
TOOLS, OPTIONS, Changing the Defaults
TOOLS, OPTIONS,
View
Change the view options
To customize the way Word displays your document,
select options on the View tab (Tools menu, Options
command). For example, you can display or hide
items in your document (such as graphics, animated
text, and field codes) or screen elements (such as
scroll bars).
The options that are available on the View tab
depend on which view you're in. For example, in
page layout view and online layout view, you can
speed up scrolling by hiding graphics and displaying
picture placeholders instead.
TOOLS, OPTIONS,
General
1. The General tab option lets you set some overall
operations of Word that apply to all documents in
all views.
Introduction to Microsoft Word 2000 Page 51 June 1999
University of North Texas Computing Center HelpDesk Support Services
Introduction to Microsoft Word 2000 Page 52 June 1999
University of North Texas Computing Center HelpDesk Support Services
TOOLS, OPTIONS, Edit The Edit tab lets you set editing options that affect
editing in all documents and in all views.
TOOLS, OPTIONS,
Print
Using the Print tab options, you can control how a
document is printed and what elements in the
document are printed.
TOOLS, OPTIONS,
Save
The Save tab lets you set the options for saving your
documents (including automatic saving) and for
saving the Normal template.
Introduction to Microsoft Word 2000 Page 53 June 1999
University of North Texas Computing Center HelpDesk Support Services
Introduction to Microsoft Word 2000 Page 54 June 1999
University of North Texas Computing Center HelpDesk Support Services
TOOLS, OPTIONS,
Spelling and Grammar
You set the options for proofreading a document in
the Spelling & Grammar tab. Some examples are:
1. Check Spelling As You Type (automatically
checks your spelling as you type and underlines
with a red sawtooth underline words not found in
any active dictionaries.)
2. Check Grammar As You Type (Turn off if you do
not want to automatically check grammar during
proofreading.)
3. Check Grammar With Spelling (Tells Word to
check the spelling in each sentence before
checking the grammar to ensure that Word isn't
trying to make grammatical and stylistic sense of a
sentense that contains misspelled words.)
4. Show Readability Statistics
Introduction to Microsoft Word 2000 Page 55 June 1999
University of North Texas Computing Center HelpDesk Support Services
TOOLS, OPTIONS,
Track Changes
The options on the Track Changes tab let you decide
how WORD MARKS CHANGES TO A
DOCUMENT. The Tools Highlight Changes
command controls tracking changes.
TOOLS, OPTIONS,
User Information
The User Information tab displays information about
the user, who is normally the person registered to use
the software.
Introduction to Microsoft Word 2000 Page 56 June 1999
University of North Texas Computing Center HelpDesk Support Services
TOOLS, OPTIONS,
Compatibility
On the Compatibility tab, you can set special
conversion and display options for documents created
in earlier versions of Word or in other word
processing program.
TOOLS, OPTIONS, File
Locations
Word needs to know where to find the files it needs
and where to store saved files. The locations of files
are initially established during Setup, when you install
the Word Program or add components.
Introduction to Microsoft Word 2000 Page 57 June 1999
University of North Texas Computing Center HelpDesk Support Services
APPENDIX A
Function key
Press To
F1 Get online Help or the Office Assistant
F2 Move text or graphics
F3 Insert an AutoText entry (after Word displays the
entry)
F4 Repeat the last action
F5 Choose the Go To command (Edit menu)
F6 Go to next pane or frame
F7 Choose the Spelling command (Tools menu)
F8 Extend a selection
F9 Update selected fields
F10 Activate the menu bar
F11 Go to the next field
F12 Choose the Save As command (File menu)
SHIFT+Function key
Press To
SHIFT+F1 Start context-sensitive Help or reveal formatting
SHIFT+F2 Copy text
SHIFT+F3 Change the case of letters
SHIFT+F4 Repeat a Find or Go To action
SHIFT+F5 Move to a previous revision
SHIFT+F6 Go to the previous pane or frame
SHIFT+F7 Choose the Thesaurus command (Tools menu,
Language submenu)
SHIFT+F8 Shrink a selection
SHIFT+F9 Switch between a field code and its result
SHIFT+F10 Display a shortcut menu
SHIFT+F11 Go to the previous field
SHIFT+F12 Choose the Save command (File menu)
Introduction to Microsoft Word 2000 Page 58 June 1999
University of North Texas Computing Center HelpDesk Support Services
CTRL+Function key
Press To
CTRL+F2 Choose the Print Preview command (File menu)
CTRL+F3 Cut to the Spike
CTRL+F4 Close the window
CTRL+F5 Restore the document window size
CTRL+F6 Go to the next window
CTRL+F7 Choose the Move command (Control menu)
CTRL+F8 Choose the Size command (document Control menu)
CTRL+F9 Insert an empty field
CTRL+F10 Maximize the document window
CTRL+F11 Lock a field
CTRL+F12 Choose the Open command (File menu)
CTRL+SHIFT+Function key
Press To
CTRL+SHIFT+F3 Insert the contents of the Spike
CTRL+SHIFT+F5 Edit a bookmark
CTRL+SHIFT+F6 Go to the previous window
CTRL+SHIFT+F7 Update linked information in a Word
source document
CTRL+SHIFT+F8 Extend a selection or block (then press
an arrow key)
CTRL+SHIFT+F9 Unlink a field
CTRL+SHIFT+F10 Activate the ruler
CTRL+SHIFT+F11 Unlock a field
CTRL+SHIFT+F12 Choose the Print command (File menu)
ALT+Function key
Press To
ALT+F1 Go to the next field
ALT+F3 Create an AutoText entry
ALT+F4 Quit Word
ALT+F5 Restore the program window size
ALT+F7 Find the next misspelling or grammatical error. The
Check spelling as you type check box must be
selected (Tools menu, Options dialog box,
Introduction to Microsoft Word 2000 Page 59 June 1999
University of North Texas Computing Center HelpDesk Support Services
Spelling & Grammar tab).
ALT+F8 Run a macro
ALT+F9 Switch between all field codes and their results
ALT+F10 Maximize the program window
ALT+F11 Display Microsoft Visual Basic code
ALT+SHIFT+Function key
Press To
ALT+SHIFT+F1 Go to the previous field
ALT+SHIFT+F2 Choose the Save command
(File menu)
ALT+SHIFT+F9 Run GOTOBUTTON or MACROBUTTON
from the field that displays the field results
ALT+SHIFT+F11 Display Microsoft Visual Studio code
CTRL+ALT+Function key
To Press
CTRL+ALT+F1 Display Microsoft System Information
CTRL+ALT+F2 Open command
(File menu)
Introduction to Microsoft Word 2000 Page 60 June 1999
University of North Texas Computing Center HelpDesk Support Services
Quick reference to some common shortcut keys
Press To
CTRL+SHIFT+SPACEBAR Create a nonbreaking space
CTRL+HYPHEN Create a nonbreaking hyphen
CTRL+B Make letters bold
CTRL+I Make letters italic
CTRL+U Make letters underline
CTRL+SHIFT+< Decrease font size
CTRL+SHIFT+> Increase font size
CTRL+Q Remove paragraph formatting
CTRL+SPACEBAR Remove character formatting
CTRL+C Copy the selected text or object
CTRL+X Cut the selected text or object
CTRL+V Paste text or an object
CTRL+Z Undo the last action
CTRL+Y Redo the last action
Introduction to Microsoft Word 2000 Page 61 June 1999
University of North Texas Computing Center HelpDesk Support Services
Index
AutoCorrect, 27, 28, 41
AutoFormat, 27, 35
AutoText, 27, 28
Capitalization, 24
Center, 11
Copy, 20
Cursor Movement, 8
Cut, 20
Delete, 14
Document
New, 7
Edit
Full Screen, 3
File
Save, 10
Font, 19
Header, 33, 34
Help, 4, 5, 6
About, 5, 6
Contents and Index, 5
Detect and Repair, 6
Web, 6
WordPerfect, 6
Insert
Date, 9
File, 10, 11, 19, 22, 31, 43, 47, 54
Object, 44
Page Numbers, 34
Picture, 47
Symbol, 40, 41, 42
Menu Bar, 2
Page Setup
Look, 31
Print
File, 11
Ruler Bar, 3, 17
Screen Layout, 1
Scroll Bar, 3
Select
Rectangular Area, 14
Text, 13
Status Bar, 3
Style, 36
Tabs, 3, 16, 17
Template, 22
Thesaurus, 30
Title Bar, 2
Tool Bars, 2
Tools, 22, 25, 27, 28, 30, 49, 53
Grammar Checker, 25
Introduction to Microsoft Word 2000 Page 62 June 1999
University of North Texas Computing Center HelpDesk Support Services

More Related Content

What's hot

Software and hardware presentation
Software and hardware presentationSoftware and hardware presentation
Software and hardware presentationnjabulo madonsela
 
Apresentacao institucional PC Sistemas (Completa)
Apresentacao institucional PC Sistemas (Completa)Apresentacao institucional PC Sistemas (Completa)
Apresentacao institucional PC Sistemas (Completa)PC Sistemas
 
system software and application software
system software and application softwaresystem software and application software
system software and application softwareTallat Satti
 
Presentation on computer
Presentation on computerPresentation on computer
Presentation on computerNausad Ahamed
 
Introduction To Computers
Introduction To ComputersIntroduction To Computers
Introduction To ComputersMayank kumar
 
Computers Hardware and Software ( Modern Technology)
Computers Hardware and Software ( Modern Technology)Computers Hardware and Software ( Modern Technology)
Computers Hardware and Software ( Modern Technology)Shahzaib Mahesar
 
Presentation on Basic Computer
Presentation on Basic ComputerPresentation on Basic Computer
Presentation on Basic Computerrimplebaggan
 
Computer Presentation
Computer PresentationComputer Presentation
Computer PresentationMayank kumar
 
Six major types of information systems
Six major types of information systemsSix major types of information systems
Six major types of information systemsMohanraj V
 

What's hot (12)

Software and hardware presentation
Software and hardware presentationSoftware and hardware presentation
Software and hardware presentation
 
Landforms of India
Landforms of IndiaLandforms of India
Landforms of India
 
Apresentacao institucional PC Sistemas (Completa)
Apresentacao institucional PC Sistemas (Completa)Apresentacao institucional PC Sistemas (Completa)
Apresentacao institucional PC Sistemas (Completa)
 
system software and application software
system software and application softwaresystem software and application software
system software and application software
 
Presentation on computer
Presentation on computerPresentation on computer
Presentation on computer
 
Introduction To Computers
Introduction To ComputersIntroduction To Computers
Introduction To Computers
 
Presentation on input devices
Presentation on input devicesPresentation on input devices
Presentation on input devices
 
Computer basics
Computer basicsComputer basics
Computer basics
 
Computers Hardware and Software ( Modern Technology)
Computers Hardware and Software ( Modern Technology)Computers Hardware and Software ( Modern Technology)
Computers Hardware and Software ( Modern Technology)
 
Presentation on Basic Computer
Presentation on Basic ComputerPresentation on Basic Computer
Presentation on Basic Computer
 
Computer Presentation
Computer PresentationComputer Presentation
Computer Presentation
 
Six major types of information systems
Six major types of information systemsSix major types of information systems
Six major types of information systems
 

Viewers also liked

Microsoft office 2000 presentation
Microsoft office 2000 presentationMicrosoft office 2000 presentation
Microsoft office 2000 presentationIstoričar-Historian
 
Microsoft word presentation
Microsoft word presentationMicrosoft word presentation
Microsoft word presentationegirshovich
 
2000, April - Microsoft Office 2000
2000, April  - Microsoft Office 20002000, April  - Microsoft Office 2000
2000, April - Microsoft Office 2000Monowarah Gallie
 
2000, October - MS Word 2000
2000, October - MS Word 20002000, October - MS Word 2000
2000, October - MS Word 2000Monowarah Gallie
 
Microsoft® Office 2007 Tutorial
Microsoft® Office 2007 TutorialMicrosoft® Office 2007 Tutorial
Microsoft® Office 2007 TutorialSusan Mortensen
 
Makalah microsoft word
Makalah microsoft wordMakalah microsoft word
Makalah microsoft wordZaiyin Kinri
 
Parts of the ms word 2013 screen and
Parts of the ms word 2013 screen andParts of the ms word 2013 screen and
Parts of the ms word 2013 screen andJesus Obenita Jr.
 
Microsoft Word Home tab Presentation
Microsoft Word Home tab PresentationMicrosoft Word Home tab Presentation
Microsoft Word Home tab PresentationTanveer Ahmed
 
Parts of m.s word
Parts of m.s wordParts of m.s word
Parts of m.s wordJohn Lloyd
 
Word 2007 Presentation
Word 2007 PresentationWord 2007 Presentation
Word 2007 PresentationKristen T
 
01 microsoft office word 2007 (introduction and parts)
01 microsoft office word 2007 (introduction and parts)01 microsoft office word 2007 (introduction and parts)
01 microsoft office word 2007 (introduction and parts)benchhood
 
Function of microsoft word
Function of microsoft wordFunction of microsoft word
Function of microsoft wordAIMS Education
 

Viewers also liked (20)

Microsoft office 2000 presentation
Microsoft office 2000 presentationMicrosoft office 2000 presentation
Microsoft office 2000 presentation
 
Windows 2000
Windows 2000Windows 2000
Windows 2000
 
Windows 2000 Presentation
Windows 2000 PresentationWindows 2000 Presentation
Windows 2000 Presentation
 
Microsoft Office
Microsoft OfficeMicrosoft Office
Microsoft Office
 
Microsoft word presentation
Microsoft word presentationMicrosoft word presentation
Microsoft word presentation
 
2000, April - Microsoft Office 2000
2000, April  - Microsoft Office 20002000, April  - Microsoft Office 2000
2000, April - Microsoft Office 2000
 
2000, October - MS Word 2000
2000, October - MS Word 20002000, October - MS Word 2000
2000, October - MS Word 2000
 
Ms word 2007
Ms word 2007Ms word 2007
Ms word 2007
 
Microsoft® Office 2007 Tutorial
Microsoft® Office 2007 TutorialMicrosoft® Office 2007 Tutorial
Microsoft® Office 2007 Tutorial
 
Makalah ms. word 2007
Makalah ms. word 2007Makalah ms. word 2007
Makalah ms. word 2007
 
Parts Of M S Word
Parts Of  M S  WordParts Of  M S  Word
Parts Of M S Word
 
Makalah microsoft word
Makalah microsoft wordMakalah microsoft word
Makalah microsoft word
 
MAKALAH MICROSOFT WORD 2007
MAKALAH MICROSOFT WORD 2007MAKALAH MICROSOFT WORD 2007
MAKALAH MICROSOFT WORD 2007
 
Parts of the ms word 2013 screen and
Parts of the ms word 2013 screen andParts of the ms word 2013 screen and
Parts of the ms word 2013 screen and
 
Microsoft Word Home tab Presentation
Microsoft Word Home tab PresentationMicrosoft Word Home tab Presentation
Microsoft Word Home tab Presentation
 
Parts of m.s word
Parts of m.s wordParts of m.s word
Parts of m.s word
 
Word 2007 Presentation
Word 2007 PresentationWord 2007 Presentation
Word 2007 Presentation
 
01 microsoft office word 2007 (introduction and parts)
01 microsoft office word 2007 (introduction and parts)01 microsoft office word 2007 (introduction and parts)
01 microsoft office word 2007 (introduction and parts)
 
Function of microsoft word
Function of microsoft wordFunction of microsoft word
Function of microsoft word
 
Introduction to microsoft word 2007
Introduction to microsoft word 2007Introduction to microsoft word 2007
Introduction to microsoft word 2007
 

Similar to Microsoft Word 2000 Introduction Guide

First7124911 visual-cpp-and-mfc-programming
First7124911 visual-cpp-and-mfc-programmingFirst7124911 visual-cpp-and-mfc-programming
First7124911 visual-cpp-and-mfc-programmingxmeszeus
 
EveryonePrint 4.0 installation guide - EN
EveryonePrint 4.0 installation guide - ENEveryonePrint 4.0 installation guide - EN
EveryonePrint 4.0 installation guide - ENEveryonePrint
 
Ug recording excelmacros
Ug recording excelmacrosUg recording excelmacros
Ug recording excelmacrosHarry Adnan
 
Mikrobasic pic pro_manual_v101
Mikrobasic pic pro_manual_v101Mikrobasic pic pro_manual_v101
Mikrobasic pic pro_manual_v101HUILLCAH
 
Java : How to Program - 7e
Java : How to Program - 7eJava : How to Program - 7e
Java : How to Program - 7eCHIH-PEI WEN
 
Java how to_program__7th_edition
Java how to_program__7th_editionJava how to_program__7th_edition
Java how to_program__7th_editionABDUmomo
 
Virtuoso schematic composer user guide
Virtuoso schematic composer user guideVirtuoso schematic composer user guide
Virtuoso schematic composer user guidentuzxy
 
Outlook 2007 Tips and Tricks
Outlook 2007 Tips and TricksOutlook 2007 Tips and Tricks
Outlook 2007 Tips and Tricksoutlookbill
 
BricsCAD V13 User Guide
BricsCAD V13 User GuideBricsCAD V13 User Guide
BricsCAD V13 User GuideBricsys
 
BizTalk Practical Course Preview
BizTalk Practical Course PreviewBizTalk Practical Course Preview
BizTalk Practical Course PreviewMoustafaRefaat
 
Enterprise portal development cookbook
Enterprise portal development cookbookEnterprise portal development cookbook
Enterprise portal development cookbookAhmed Farag
 
Mikroc pro avr_manual_v100
Mikroc pro avr_manual_v100Mikroc pro avr_manual_v100
Mikroc pro avr_manual_v100EEMPROM
 

Similar to Microsoft Word 2000 Introduction Guide (20)

First7124911 visual-cpp-and-mfc-programming
First7124911 visual-cpp-and-mfc-programmingFirst7124911 visual-cpp-and-mfc-programming
First7124911 visual-cpp-and-mfc-programming
 
An introduction-to-tkinter
An introduction-to-tkinterAn introduction-to-tkinter
An introduction-to-tkinter
 
EveryonePrint 4.0 installation guide - EN
EveryonePrint 4.0 installation guide - ENEveryonePrint 4.0 installation guide - EN
EveryonePrint 4.0 installation guide - EN
 
Ug recording excelmacros
Ug recording excelmacrosUg recording excelmacros
Ug recording excelmacros
 
Word03p1
Word03p1Word03p1
Word03p1
 
cs-2002-01
cs-2002-01cs-2002-01
cs-2002-01
 
R Exts
R ExtsR Exts
R Exts
 
Mikrobasic pic pro_manual_v101
Mikrobasic pic pro_manual_v101Mikrobasic pic pro_manual_v101
Mikrobasic pic pro_manual_v101
 
Java : How to Program - 7e
Java : How to Program - 7eJava : How to Program - 7e
Java : How to Program - 7e
 
Java how to_program__7th_edition
Java how to_program__7th_editionJava how to_program__7th_edition
Java how to_program__7th_edition
 
Connect now
Connect nowConnect now
Connect now
 
Dynamics AX/ X++
Dynamics AX/ X++Dynamics AX/ X++
Dynamics AX/ X++
 
Tortoise svn 1.7-en
Tortoise svn 1.7-enTortoise svn 1.7-en
Tortoise svn 1.7-en
 
Virtuoso schematic composer user guide
Virtuoso schematic composer user guideVirtuoso schematic composer user guide
Virtuoso schematic composer user guide
 
Ug893 vivado-ide
Ug893 vivado-ideUg893 vivado-ide
Ug893 vivado-ide
 
Outlook 2007 Tips and Tricks
Outlook 2007 Tips and TricksOutlook 2007 Tips and Tricks
Outlook 2007 Tips and Tricks
 
BricsCAD V13 User Guide
BricsCAD V13 User GuideBricsCAD V13 User Guide
BricsCAD V13 User Guide
 
BizTalk Practical Course Preview
BizTalk Practical Course PreviewBizTalk Practical Course Preview
BizTalk Practical Course Preview
 
Enterprise portal development cookbook
Enterprise portal development cookbookEnterprise portal development cookbook
Enterprise portal development cookbook
 
Mikroc pro avr_manual_v100
Mikroc pro avr_manual_v100Mikroc pro avr_manual_v100
Mikroc pro avr_manual_v100
 

More from sumatipuri

Powerpoint 2007 tutorial
Powerpoint 2007 tutorialPowerpoint 2007 tutorial
Powerpoint 2007 tutorialsumatipuri
 
Excel 2007 tutorial
Excel 2007 tutorialExcel 2007 tutorial
Excel 2007 tutorialsumatipuri
 
Office 2007 Introduction
Office 2007 IntroductionOffice 2007 Introduction
Office 2007 Introductionsumatipuri
 
Microsoft Excel
Microsoft ExcelMicrosoft Excel
Microsoft Excelsumatipuri
 
Chapter 20 co c-ppt
Chapter 20 co c-pptChapter 20 co c-ppt
Chapter 20 co c-pptsumatipuri
 
Classification of computersdoc
Classification of computersdocClassification of computersdoc
Classification of computersdocsumatipuri
 
Intro to computer fundamentals
Intro to computer fundamentalsIntro to computer fundamentals
Intro to computer fundamentalssumatipuri
 
Chapter 08 secondary storage
Chapter 08 secondary storageChapter 08 secondary storage
Chapter 08 secondary storagesumatipuri
 
Chapter 08 secondary storage
Chapter 08 secondary storageChapter 08 secondary storage
Chapter 08 secondary storagesumatipuri
 
Chapter 09 io devices
Chapter 09 io devicesChapter 09 io devices
Chapter 09 io devicessumatipuri
 

More from sumatipuri (14)

Powerpoint 2007 tutorial
Powerpoint 2007 tutorialPowerpoint 2007 tutorial
Powerpoint 2007 tutorial
 
Excel 2007 tutorial
Excel 2007 tutorialExcel 2007 tutorial
Excel 2007 tutorial
 
Office 2007 Introduction
Office 2007 IntroductionOffice 2007 Introduction
Office 2007 Introduction
 
Microsoft Excel
Microsoft ExcelMicrosoft Excel
Microsoft Excel
 
Chapter 20 co c-ppt
Chapter 20 co c-pptChapter 20 co c-ppt
Chapter 20 co c-ppt
 
Classification of computersdoc
Classification of computersdocClassification of computersdoc
Classification of computersdoc
 
MS DOS
MS DOSMS DOS
MS DOS
 
Windows xp
Windows xpWindows xp
Windows xp
 
Intro to computer fundamentals
Intro to computer fundamentalsIntro to computer fundamentals
Intro to computer fundamentals
 
Chapter 08 secondary storage
Chapter 08 secondary storageChapter 08 secondary storage
Chapter 08 secondary storage
 
Chapter 08 secondary storage
Chapter 08 secondary storageChapter 08 secondary storage
Chapter 08 secondary storage
 
Chapter 09 io devices
Chapter 09 io devicesChapter 09 io devices
Chapter 09 io devices
 
Windows xp
Windows xpWindows xp
Windows xp
 
Msc 2 ppt
Msc 2 pptMsc 2 ppt
Msc 2 ppt
 

Microsoft Word 2000 Introduction Guide

  • 1. Microsoft Word 2000 Introduction June 1999 University of North Texas Computing Center HelpDesk Support Services Introduction to Microsoft Word 2000
  • 2. Microsoft Word 2000 Introduction Page i June 1999 University of North Texas Computing Center HelpDesk Support Services Table of Contents Screen Layout ...............................................................................................1 Title Bar.....................................................................................................2 Menu..........................................................................................................2 Toolbars.....................................................................................................2 Ruler Bar....................................................................................................3 Scroll Bars..................................................................................................3 Status Bar...................................................................................................3 Full Screen Edit..........................................................................................3 Using Help....................................................................................................4 Microsoft Word Help .................................................................................5 Contents and Index.....................................................................................5 What’s This?..............................................................................................6 Microsoft on the Web.................................................................................6 WordPerfect Help.......................................................................................6 Detect and Repair.......................................................................................6 About Microsoft Word ...............................................................................6 Word Processing Basics................................................................................7 Insertion Point Movement...........................................................................8 Inserting Today’s Date ...............................................................................9 Saving the Document..................................................................................9 File, Save .................................................................................................10 File, Save As ............................................................................................10 Printing a Document.................................................................................10 Print to a File............................................................................................11 Centering Text..........................................................................................11 Add Title to Memo...................................................................................11 Change the font for the entire document....................................................12 Selecting Text...........................................................................................13 Select Word...........................................................................................13 Select Entire Line ..................................................................................13 Select Entire Sentence ...........................................................................13 Select Entire Paragraph..........................................................................14 Select Entire Document .........................................................................14 Selecting Rectangular Areas ..................................................................14
  • 3. Microsoft Word 2000 Introduction Page ii June 1999 University of North Texas Computing Center HelpDesk Support Services Deleting Text............................................................................................14 Undo ........................................................................................................14 Redo.........................................................................................................15 Replacing Text .........................................................................................15 Using Tabs ...............................................................................................16 Setting Tab Stops with the Ruler Bar .....................................................17 Setting Tab Stops with the Tabs Dialog Box..........................................17 Changing the Fonts...................................................................................19 Practice – Change GoodDeed memo.........................................................19 Cut, Copy and Paste .................................................................................20 Edit: Cut................................................................................................20 Edit: Copy .............................................................................................20 Edit: Paste .............................................................................................21 Specific Tools .............................................................................................22 Creating a New Document (File, New).....................................................22 Templates.................................................................................................22 Changing the Capitalization of Text..........................................................24 Spelling and Grammar Checker ...............................................................25 Grammar Checker ....................................................................................25 Inserting Text with AutoCorrect ...............................................................27 Inserting Text with AutoText....................................................................28 Using the Thesaurus .................................................................................30 Establishing the Look of a Page...................................................................31 Setting Up Document Pages .....................................................................31 File, Page Setup........................................................................................31 Creating Headers and Footers...................................................................33 Page Numbers in Headers and Footers......................................................34 Format – Changing the Appearance of Characters, Paragraphs, and Documents.........................................................................35 AutoFormat ..............................................................................................35 Style Gallery.............................................................................................36 Formatting Characters ..............................................................................36 Formatting Paragraphs..............................................................................37 Insert – Sharing Information from other Programs .......................................39 Insert Command .......................................................................................39
  • 4. Microsoft Word 2000 Introduction Page iii June 1999 University of North Texas Computing Center HelpDesk Support Services Symbol – Insert symbols or special characters ..........................................40 Insert common typographical characters ................................................41 Insert symbols not on the keyboard........................................................41 Create arrows, faces, and other symbols automatically...........................41 Type international characters .................................................................42 Assign a symbol to a shortcut key..........................................................42 Insert File .................................................................................................43 Insert a second document into an open document...................................43 Insert a Microsoft Excel File as a Table .................................................43 Insert Object.............................................................................................44 Insert a Microsoft Excel Worksheet or chart into a Word document.......44 Create a new embedded MS Excel Worksheet or chart..........................44 Insert Picture ............................................................................................46 About Working with Pictures in a Document .........................................47 Tools, Options -- Changing the Defaults......................................................49 View ........................................................................................................49 General.....................................................................................................50 Edit ..........................................................................................................50 Print .........................................................................................................51 Save .........................................................................................................51 Spelling and Grammar..............................................................................52 Track Changes..........................................................................................53 User Information ......................................................................................53 Compatibility............................................................................................54 File Locations...........................................................................................54 Appendix A.................................................................................................55 Function Key Charts.................................................................................55 Quick Reference to some Common Shortcut Keys....................................59 Index...........................................................................................................60
  • 5. Introduction to Microsoft Word 2000 Page 1 June 1999 University of North Texas Computing Center HelpDesk Support Services Introduction to Microsoft Word 2000 Welcome to Microsoft Word 2000. This program is designed to make your word processing needs easy to accomplish. Let’s jump in and see how this is done. Screen Layout Title Bar Rulers Menu Toolbars Page Up Page Down Browse By Button Scroll Up/Down Scroll Left/Right Status Bar View Screen Types
  • 6. Introduction to Microsoft Word 2000 Page 2 June 1999 University of North Texas Computing Center HelpDesk Support Services Title Bar At the very top of the screen is the Title Bar. If the Title Bar is colored, it designates the active window. On the left side of the title bar is the Word Icon. On the right side of the title bar is the minimize button, the maximize or restore button, and the Exit “X”. Menu The second line is the menu. Use the mouse to click on the option desired, or ALT key plus the underlined character of the option for keyboard access to the menu. Toolbars The next line has toolbars. Word provides over a dozen different toolbars, although you’ll normally display only two or three at any one time. Microsoft’s “factory settings” display only the Standard and Formatting toolbars. The other toolbars include those listed at the left. You can display any available toolbar by right- clicking on any toolbar displayed on your screen and selecting the toolbar from the drop-down menu that appears. Placing the mouse pointer on the icon brings up a word description of what the icon does. The Toolbars provide a quicker access to functions normally found in the menu, maybe buried under several selections. You can select or unselect Toolbars by choosing View, Toolbar. or by clicking on the toolbar with the right mouse button and unselecting, or selecting from the list.
  • 7. Introduction to Microsoft Word 2000 Page 3 June 1999 University of North Texas Computing Center HelpDesk Support Services Ruler Bar The Ruler Bar allows for quick changes to the Left and Right Margins, as well as Tabs. Clicking on the icon in the far left side of the Ruler Bar will change the type of Tab. Scroll Bars The Scroll Bars allow quick movement both Vertically (on the right side of the document window, and Horizontally (at the bottom of the document window). Included on the Vertical scroll bar are the Page Up and Page Down icons. Included on the Horizontal scroll bar are the icons to change to the different ways to view the document: Normal, Page Layout, and Outline Views. Status Bar The bottom line of the document window is the Status Bar. The Status Bar will show Page location, cursor location, time of day, etc. It is always present unless you choose the Full Screen view. Full Screen Edit BUT, for those wanting a “clean screen” with nothing else showing, select View, and then Full Screen. To change back, click on the icon at the bottom of the screen that says “FULL” or press the ESCape key to return to the normal screen.
  • 8. Introduction to Microsoft Word 2000 Page 4 June 1999 University of North Texas Computing Center HelpDesk Support Services Using HELP!! Help is accessed by selecting Help from the menu bar. This is done either with the mouse (point and click) or using the ALT + H key from the keyboard. Once Help is selected, several options appear in the menu:
  • 9. Introduction to Microsoft Word 2000 Page 5 June 1999 University of North Texas Computing Center HelpDesk Support Services Microsoft Word Help The Microsoft Assistant is there to help you. Or you can hide it and just use the regular Help by pressing F1 function key or selecting Help. The earlier graphic shows the normal Help Screen complete with Contents, Answer Wizard, and Index. See an explanation for using Contents and Index in the next row. Contents and Index Contents is set up like a book with chapters and articles within a chapter. When trying to learn all you can about something, this will be a good way to cruise articles about this item. The Index shows a comprehensive list of functions. It is designed for those who know what they want to do (the terminology) and just want to go directly to the “how to” without a lot of extra reading. When pointing at a feature, the mouse should
  • 10. Introduction to Microsoft Word 2000 Page 6 June 1999 University of North Texas Computing Center HelpDesk Support Services change to a hand. Select with the hand icon, and additional information about the topic will appear. What’s This? After selecting “What’s This”, the cursor changes to show a question mark along with the arrow. You can now point to any icon, or character on the screen. The dialog box will then tell you what this icon is for. Microsoft on the Web Pointers to the Microsoft Web Pages. WordPerfect Help WordPerfect Help provides crossover training for WordPerfect users. The program will show the function name in WordPerfect, the WP key used, and Word’s interpretation of this function. Detect and Repair Detect and Repair will automatically find and fix errors in this application. During this process you may be asked to provide the installation source (the CD or the location on your network drive that original software is stored) and/or exit open applications. It will also give you the option to restore any shortcuts while repairing. About Microsoft Word This will give you the version, and release of Word 2000 you are working with so you can share that with those trying to help you with your software. Sometimes the solution is updating your software if you are having a strange bug.
  • 11. Introduction to Microsoft Word 2000 Page 7 June 1999 University of North Texas Computing Center HelpDesk Support Services Word Processing Basics Creating a Document - Type the following text. Use Backspace key if you make a mistake. The University has a commitment for service that has led to the development of an Office of Outstanding Good Works. In this capacity, the Council would like to remind everyone working at the University to go out of their way to be nice to everyone. Sometimes this will mean swallowing comments, but that adjustment will have to be made to have a reputation of excellence in this regard. I will let you know when the final approval is given for the start of compliance to begin. We on the council look forward to this becoming a great success. • Never use the spacebar to center or otherwise position text. Use the Center- alignment button on the Standard toolbar instead. • Don’t use the spacebar to make columns. Instead use tabs, Word’s multicolumn features, or tables. • Do not press ENTER repeatedly to start a new page. Instead use Word’s Insert Page Break command.
  • 12. Introduction to Microsoft Word 2000 Page 8 June 1999 University of North Texas Computing Center HelpDesk Support Services Insertion Point Movement You can quickly move to another location in your document by using the mouse and the scroll bars. With keys, the document scrolls automatically when you move the insertion point. To move the insertion point by using the mouse: 1. Using the scroll bars, scroll until you reach the location you want. 2. Click the location where you want to position the insertion point.
  • 13. Introduction to Microsoft Word 2000 Page 9 June 1999 University of North Texas Computing Center HelpDesk Support Services Move the cursor to the top of the paragraph you just typed. Add two blank lines by pressing Enter twice. Move cursor to top of document by pressing Ctrl + Home. Add the memo heading. TO: All Deans and Department Heads FROM: Executive Council of Good Works DATE: SUBJECT: Being Good Deed Doers
  • 14. Introduction to Microsoft Word 2000 Page 10 June 1999 University of North Texas Computing Center HelpDesk Support Services Inserting Today’s Date To insert the current date, move the cursor to the Date line, and press END. Select INSERT, Date and Time, and then the date that is formatted the way you desire. Saving the Document Save the file with the name “Good Deed Doers” by selecting FILE, SAVE, and typing the entire file name. Because Windows 95 supports long file names, you can be creative up to 255 characters. Press Enter or select OK when finished typing the name.
  • 15. Introduction to Microsoft Word 2000 Page 11 June 1999 University of North Texas Computing Center HelpDesk Support Services File, Save FILE, SAVE is used the first time you save the file, and anytime you want to save all the changes you are making. The Ctrl+S keyboard shortcut is a convenient way to save without visiting the File menu. File, Save As FILE, SAVE AS is used when you want to save the existing file, but with a different name or file TYPE. To change the file Type, click the icon after Save File as Type: to see the different types. These include MS-DOS text, WordPerfect, MS Word 6.0/95, Word 2.x version, etc. When saved as MS- DOS text, it is in ASCII format and can be read by any package. Printing a Document Printing is handled through the File menu. Select File, Print, OK. To Preview on the screen before printing: Select File, Print Preview. When finished previewing, select CLOSE.
  • 16. Introduction to Microsoft Word 2000 Page 12 June 1999 University of North Texas Computing Center HelpDesk Support Services Print to a File Printing to a File: 1. Edit and polish document as usual. 2. Consider printing a paper copy. 3. Select FILE, PRINT. 4. Check the “Print to File” box in the Print dialog box. 5. Click OK. You’ll see the Print to File dialog box. 6. Pick a folder from the folder list. 7. Name the file in the File Name box. 8. Click OK to create the file. Centering Text Word is preset to align text flush left with the left margin. However you have the options.. To center selected text: 1. Highlight the text to be centered. 2. On the Formatting Toolbar, select Center. Add Title to Memo We need to add a title to our Good Deed memo. Move the cursor to the top of the document, press enter 3 times to add a couple of lines. Move the cursor back to the top and type UNIVERSITY MEMO. To center or align text: 1. Select the line or paragraph you want to center or align. Quick Tip to select a line: Click the mouse once in the blank left margin area to select an entire line. Click twice to select a paragraph, click three times to select the entire document. 2. On the formatting toolbar, click the button for the
  • 17. Introduction to Microsoft Word 2000 Page 13 June 1999 University of North Texas Computing Center HelpDesk Support Services alignment you want. Change the font for the entire document To change the font for the entire document, you must first select it. In our “Good Deed Doers” document, we can do this by : 1. Position cursor at the beginning of the document (the title) in the far left margin. 2. Click the mouse button 3 times in quick succession. (Click one moves the cursor, click two, selects the entire paragraph, and click three the entire document). 3. Now go to the format toolbar and the font size (usually 10 or 12) and press the down arrow key next to the number. Change it to 14 point. 4. The entire document should be a bigger font. While the document is highlighted, you can also select other functions, like changing all text to bold, italics, color of text to red, etc.
  • 18. Introduction to Microsoft Word 2000 Page 14 June 1999 University of North Texas Computing Center HelpDesk Support Services Selecting Text Word lets you do a lot with text after you’ve typed it. You can change its appearance, move it around, delete it, and copy it. The first step is always to select the text you want to work with. You can drag your mouse pointer over the text while holding down the primary mouse button. There are shortcuts for selecting individual words, lines, sentences, and paragraphs. Select Word Double-click anywhere on a word to select the entire word and the space that follows it. To select adjacent words, drag after double-clicking on the first word of interest. Entire words will be selected when you drag this way. Select Entire Line 1. Move the mouse pointer to the selection bar (an invisible strip running down the extreme left edge of the document window). The mouse pointer will change from the I-beam to an arrow. 2. Click the primary mouse button only once. The entire line to the right of where you’ve clicked will be selected. 3. Continue dragging down to select additional lines. Select Entire Sentence 1. Hold down the Ctrl key while you click anywhere in the sentence of interest. 2. This also selects the sentence’s punctuation mark and the space following the sentence, if there is one. 3. Drag after you click this way to select additional sentences.
  • 19. Introduction to Microsoft Word 2000 Page 15 June 1999 University of North Texas Computing Center HelpDesk Support Services Select Entire Paragraph 1. Triple-click anywhere in the paragraph after pointing to the paragraph. 2. Using the Selection Bar, move the mouse pointer to the selection bar (the invisible strip running down the extreme left edge of the document window). The pointer will become an arrow. 3. Double-click. The adjacent paragraph will be selected. Select Entire Document 1. Move mouse pointer to the selection bar at the left edge of the document and the pointer will become an arrow. 2. Hold down the Ctrl key and click. The entire document will be selected. Alternately, triple- click on the selection bar to select the whole document. Selecting Rectangular Areas 1. Hold down Alt key while you drag to mouse to select rectangular areas (like columns in a tabbed list). Deleting Text Press Backspace key immediately after typing character. Select test, and press Delete. Use Clear command on Edit menu to delete single character or select text, the Edit,Clear. Undo The exact name of the Undo choice on the Edit menu changes as you work. It remembers which steps you last took, and so can sometimes say Undo Typing, Undo Formatting, Undo Sort, etc. There are three ways to Undo. 1. Edit, Undo reverses your last action. Choose Edit, Undo again to reverse the action before that, and so on.
  • 20. Introduction to Microsoft Word 2000 Page 16 June 1999 University of North Texas Computing Center HelpDesk Support Services 2. If you press Ctrl + Z repeatedly, it will reverse previous actions. 3. The Undo toolbar button and its associated drop- down list menu let you undo multiple actions in sequence. Redo Use the Redo command to undo an Undo. To redo your last action only, choose Edit, Redo. You can also press the keyboard shortcut F4, or click the Redo button on the Standard toolbar. Replacing Text Combine the steps of deleting unwanted text, positioning the insertion point, and inserting replacement text. 1. Highlight the unwanted text. 2. Start typing. The old text disappears, and the new text appears across the screen as you type.
  • 21. Introduction to Microsoft Word 2000 Page 17 June 1999 University of North Texas Computing Center HelpDesk Support Services Using Tabs For creating lists in columns, the easiest way is to create a table. But to create quick, relatively simple lists, tabs can be very useful. Word offers five specialized types of tab stops: 1. Left - Text typed at these tab stops bumps up against the left edge of the stop. 2. Center - Center your text around the tab stop. 3. Right - Position whatever you type to the left of the tab stop. This is a great way to type long lists of numbers and have them line up. 4. Decimal - Align columns of numbers on the decimal point and are perfect for simple financial reports. 5. Bar - Creates nice, thin vertical lines that separate columns. You can only specify bar tabs from the Tabs dialog box. The bar is not an actual tab stop (you can’t use them to place text), but they can be placed and moved like stops.
  • 22. Introduction to Microsoft Word 2000 Page 18 June 1999 University of North Texas Computing Center HelpDesk Support Services Setting Tab Stops with the Ruler Bar You can set custom tabs as you type or you can use the standard 1/2” tabs initially and then go back to fine tune. Here are the general steps. 1. With the ruler in view, click the button at the left edge of the horizontal ruler repeatedly until it shows the icon for the desired tab stop type (Left, Right, Decimal, or Center.) 2. Click on the ruler where you want to place a tab stop. If you make a mistake, drag the stop off the ruler and try again. 3. When you type, press the Tab key to move the insertion point to the new tab positions. To move tab stops before you’ve entered text, simply point to the stop you need and drag to the right or left. If you have already entered text that uses the tab stops you want to move, first select all of that text before moving the tab stop. Setting Tab Stops with the Tabs Dialog Box Although using the ruler is easy, you may want to use the Tabs dialog box for some projects. It provides ways to set tab stops precisely and it offers some additional tab-related options. Select FORMAT, TABS, or select FORMAT, PARAGRAPH, TABS. Remember to select all the intended text and paragraph markers before you move tab stops.
  • 23. Introduction to Microsoft Word 2000 Page 19 June 1999 University of North Texas Computing Center HelpDesk Support Services You can only add Tab Leader characters from the Tabs dialog box. Leader characters make it easy to read wide, sparsely populated lines without losing your place. Word’s leader characters are dots, dashes, and solid lines. To create leaders, follow these steps: 1. Select the paragraph(s) to be used. 2. Click on the tab where you want the leaders. 3. Choose the leader style you desire from the Tabs dialog box. 4. Click OK.
  • 24. Introduction to Microsoft Word 2000 Page 20 June 1999 University of North Texas Computing Center HelpDesk Support Services Changing the Fonts To change the font with the mouse, you can either select from Format, Font and choose from the displayed menu, or you can use the Format Toolbar (the one showing the name of the font currently being used, as well as the font size), and make selections directly from it. You can also select an item and choose from the toolbar icons; B to bold, I to italicize, or U to underline. To practice, change the GoodDeed memo using these font changes. 1. Change to a different font for the entire document (use 3 clicks in the margin to select the entire document). 2. Change the font size for the heading to 24 pt. 3. Bold the major headings (TO:, FROM:, DATE:, and SUBJECT:). 4. Bold and italicize the office name “Office of Outstanding Good Works”. 5. Use File, Save to save all your changes to disk.
  • 25. Introduction to Microsoft Word 2000 Page 21 June 1999 University of North Texas Computing Center HelpDesk Support Services Cut, Copy and Paste The Cut, Copy and Paste features use the Windows Clipboard to store information temporarily. By placing information on the Clipboard, you can move and copy text and graphics from one location to another. Information remains in Clipboard until Windows is exited, or another text or graphics replaces the existing block. With Office 2000, you can store up to 12 items in Clipboard at a time. Edit: Cut When you cut text and graphics, you remove it and place it on the Clipboard. To Cut Data or Graphic: 1. Select the information. 2. Choose Edit, Cut. (or the scissors icon, or Ctrl- X) Information is moved to the Clipboard. Edit: Copy When you copy text, you place only a copy of the text and graphics on the Clipboard without removing the original.
  • 26. Introduction to Microsoft Word 2000 Page 22 June 1999 University of North Texas Computing Center HelpDesk Support Services To Copy Data or Graphic: 1. Select the information 2. Choose Edit, Copy. (or the Copy icon, or Ctrl-C) A copy of the information is moved to the Clipboard with original information still in place. Edit: Paste When you paste text, you retrieve a copy from the Clipboard and insert it into the active document window at the insertion point. You can paste the text in the same document window, another document, or another program. To Paste Data or Graphic: 1. Move cursor to insertion point. 2. Choose Edit, Paste. (or the Paste icon, or Ctrl-V) A copy of the information is inserted at cursor location with copy still in Clipboard. Specific Tools Creating a New Document File, New When you start Word, a new, blank document named DOCUMENT1 opens. To begin working on it, just start typing. You do not have to type and format each new document from scratch. You can save time by using one of the supplied templates for common documents such as letters and memos. To see the templates available to use, select FILE, NEW. The screen above will appear showing different types of predesigned letter formats. There are several categories of templates that may fit your specific need – look at letters and memos that are formatted for formal, contemporary, or casual looks. There are preformatted pages for Fax cover
  • 27. Introduction to Microsoft Word 2000 Page 23 June 1999 University of North Texas Computing Center HelpDesk Support Services sheets, and publication layouts. You can also create your own templates from one of the predefined templates by opening it as a template instead of a document. Any changes you make will be saved as a new template when you save and rename.
  • 28. Introduction to Microsoft Word 2000 Page 24 June 1999 University of North Texas Computing Center HelpDesk Support Services Templates To start a new document from a template: 1. From the File menu, choose New. 2. Under New, select the Document option button. 3. In the Template box, do one of the following: To create a new document from an existing template, select the template that you want to use and then choose OK. Word gives the new document a temporary name, such as Document2, until you save it with a unique filename. You can change templates just as you would any other Word document. The only difference is one additional stop you must take when saving your work. 1. Use FILE, NEW to open the template to be changed. 2. Make the changes, such as adding your logo and other embellishments. 3. Print out a sample and check your work. 4. When satisfied, choose FILE, SAVE AS. 5. Type the exact same file name as the old template
  • 29. Introduction to Microsoft Word 2000 Page 25 June 1999 University of North Texas Computing Center HelpDesk Support Services if you want to replace the old template, or type a new file name if you want to keep both the old and new. Make sure to type the extension .DOT if you choose a new filename.
  • 30. Introduction to Microsoft Word 2000 Page 26 June 1999 University of North Texas Computing Center HelpDesk Support Services Changing the Capitalization of Text You can quickly change the capitalization of text without retyping, making selected text all lowercase or all uppercase letters, capitalizing only the first letter of each word, capitalizing the first word of a selection, or switching existing uppercase letters to lowercase letters or vice versa. To change the capitalization of text: 1. Select the text to be changed. 2. From the Format menu, choose Change Case. 3. Choose from the options provided, then choose the OK button. You can also change the capitalization of text by using the keyboard. Select the text. Press Shift+F3 until the text has the capitalization you want. Spelling and Grammar Checker TOOLS, SPELLING AND GRAMMAR Start the Spelling checker with the F7 shortcut or by picking Tools, Spelling and Grammar. The spelling dialog box appears (If there are no mistakes in the text, you won’t see the dialog box.) Grammar Checker The Grammar checker runs at the same time. Unless you select a portion of your document, Word will check the whole thing. Once suggestions have been made to improve the grammar, if you have marked that you want this in your Spelling and Grammar options, you will see
  • 31. Introduction to Microsoft Word 2000 Page 27 June 1999 University of North Texas Computing Center HelpDesk Support Services statistics relating to this document. These statistics include: Counts - number of words, characters, paragraphs, and sentences. Averages - Average number of sentences per paragraph, words per sentence and characters per word. Readability - the percentage of sentences written in passive voice, as well as other readability indexes. Flesch Reading Ease - computes readability based on the average number of syllables per word and the average number of words per sentence. The higher the score (0-100), the greater the number of people who can readily understand the document. Flesch-Kincaid Grade Level - computes readability based on average number of syllables per word and the average number of words per sentence. The score in this case indicates a grade-school level.
  • 32. Introduction to Microsoft Word 2000 Page 28 June 1999 University of North Texas Computing Center HelpDesk Support Services Inserting Text with AutoCorrect TOOLS, AUTOCORRECT Tools, AutoCorrect opens a four part tab menu to set up AutoCorrect, AutoFormat As You Type, AutoText, and AutoFormat. AutoCorrect moves into action every time you press the spacebar, the Tab key, or the Enter key after entering a letter or a word. If the previous word is stored as an AutoCorrect entry, AutoCorrect changes it; if it is not stored as an AutoCorrect entry, nothing happens. It can also cause confusion if you don’t realize the settings will catch and correct such things as catching two initial caps, capitalizing the first word of a sentence, and replacing words as you type that have been set up in auto correct.
  • 33. Introduction to Microsoft Word 2000 Page 29 June 1999 University of North Texas Computing Center HelpDesk Support Services Inserting Text with AutoText AutoText is the way to store and retrieve “boilerplate” text, graphics, etc. To create an AutoText item, first highlight the item, then choose Tools, AutoCorrect, AutoText. A suggested name will be given (names can be up to 32 characters and spaces), or you can give your own name. Click the Add button. For example, when referring to our university, we typically have to describe where we are in relation to Dallas. So an Autotext item could be the following paragraph: The University of North Texas is located 35 miles north of the Dallas/Fort Worth Metroplex on I-35. Select this paragraph, and then select Tools, AutoCorrect, AUTOTEXT. Keep the default name and select ADD.
  • 34. Introduction to Microsoft Word 2000 Page 30 June 1999 University of North Texas Computing Center HelpDesk Support Services Now when you start typing “The University” you should see a screen tip giving you the opportunity to press Enter and accept the rest of the paragraph. If you do not want to enter this paragraph, simply keep typing and ignore the screen tip. If, for some reason, the screen tip doesn’t appear, it is possible AutoComplete has been turned off. Here are instructions to turn it on (or off). Turn on or off AutoComplete 1. On the Insert menu, point to AutoText, and then click AutoText. 2. Select or clear the Show AutoComplete tip for AutoText and dates check box. After you select the check box, Microsoft Word will display a ScreenTip when you type the first few characters of a date or AutoText entry, at which point you can insert the entry or continue typing.
  • 35. Introduction to Microsoft Word 2000 Page 31 June 1999 University of North Texas Computing Center HelpDesk Support Services Using the Thesaurus TOOLS, LANGUAGE, THESAURUS The Thesaurus command can help you add flavor and punch to your documents. Select the word you want to change, then open the Thesaurus dialog box by choosing Tools, Language, Thesaurus. You’ll see a dialog box as follows: The Meanings section of the dialog box lists available meanings and parts of speech for the selected word. Pick the meaning of interest, and you’ll see a corresponding list of synonyms in the box to the right of the Meanings list. 1. Clicking on the word places it in the Replace with box. 2. If you click the Replace button at this point, the new word will replace the selected one in your document. 3. To look for other words instead, click the Look Up button for additional choices. 4. Clicking the cancel button closes the Thesaurus without changing your selected word.
  • 36. Introduction to Microsoft Word 2000 Page 32 June 1999 University of North Texas Computing Center HelpDesk Support Services Establishing the Look of a Page Setting Up Document Pages File, Page Setup To work with the overall look of the document, you can change the page setup. Page Setup is divided into four parts: Margins, Paper Size, Paper Source, and Layout. Select FILE, PAGE SETUP for the following screen: Margins will change for Top of form, bottom, left and right. It also adjusts the page for binding width, or gutter. The adjustment can be made to where text begins after the header and before the footer. Paper Size screen is as follows:
  • 37. Introduction to Microsoft Word 2000 Page 33 June 1999 University of North Texas Computing Center HelpDesk Support Services The adjustments can be made for different forms, as well as orientation of printing. Paper Source helps with particular printer needs, as to which bin to feed from for the first page and other pages. The Layout screen provides the following information.
  • 38. Introduction to Microsoft Word 2000 Page 34 June 1999 University of North Texas Computing Center HelpDesk Support Services Creating Headers and Footers Headers and footers are places to put repetitive information in a document’s top and bottom margins. Simple text, graphics, stylized text, dates, and automatic page numbering can all be included in headers and footers. You can specify identical headers and footers on all pages in your document, or you can specify different contents for each section of the document. Odd and even pages can have different designs if you wish. Header and footer editing always takes place in Page Layout view. You work right in the header and footer area of your document after double-clicking to undim it. To enter a header that repeats on all pages in your document: 1. Choose View, Header and Footer. 2. The Header and Footer toolbar is displayed. 3. Create and edit header text as you would any other. You can paste graphics, apply styles, and otherwise format your work normally. 4. Use the automatic page-number, time-stamping, and date-stamping features. 5. Double-click in the main document to return to
  • 39. Introduction to Microsoft Word 2000 Page 35 June 1999 University of North Texas Computing Center HelpDesk Support Services work there. Create Footers the same way, except that you work in a Footer window. Once created, you can double-click in the header/footer area to edit. Page Numbers in Headers and Footers Using the Toolbar: 1. Open the header or footer by double-clicking on it in Page Layout view. 2. Click on the page numbering button in the Header/Footer toolbar. Word will insert a number in your header or footer at the insertion point. 3. Page numbers can be stylized, repositioned, surrounded with borders, accompanied by text, and otherwise embellished. Using Insert - Page Numbers: 1. Place the insertion point in the section you want to number. 2. Display the Page Numbers dialog box by choosing INSERT, PAGE NUMBERS. 3. Word suggests placing page numbers in the bottom-right corner of your document (1/2” from the bottom and right edges of the paper), but you can specify different positions with the Position and Alignment drop-down menus. Watch the Preview area as you work. 4. Choose whether you want a page number on the first page by clicking to add or remove the corresponding X. 5. Either click OK or click on the Format button to review other page numbering options.
  • 40. Introduction to Microsoft Word 2000 Page 36 June 1999 University of North Texas Computing Center HelpDesk Support Services Format - Changing the Appearance of Characters, Paragraphs, and Documents AutoFormat AutoFormat inspects your document and suggests formatting changes that you can accept or reject or let the program change it without asking. You can use it on newly typed documents, or on old Word or non- Word text files. Choose Format, AutoFormat. To see what options are preset, select Options. You can make adjustments from this list of options if necessary. Select OK, or Cancel, and proceed with the check of the document. If you selected the “review” option, you will be able to review the format changes that have been applied.
  • 41. Introduction to Microsoft Word 2000 Page 37 June 1999 University of North Texas Computing Center HelpDesk Support Services Style Gallery You can also select different styles from the Style Gallery to change the overall appearance of the document by selecting Format, Style … The Style Gallery lets you see how the different styles will affect the actual memo. You can browse through the different template styles and pick the one best suited. To apply styles from the formatting toolbar: 1. Either place the insertion point in a paragraph or select several paragraphs. 2. Scroll through the drop-down style list on the Formatting toolbar to pick the desired style. 3. Click on a style name to apply it to the selected text. You text will be reformatted using the selected style. Use EDIT, UNDO if you don’t like the results. Formatting Characters Characters are altered by changing the font size and appearance. This can be applied to one character or a selected group of characters. In addition to using
  • 42. Introduction to Microsoft Word 2000 Page 38 June 1999 University of North Texas Computing Center HelpDesk Support Services the toolbars and the pull-down menus, there are also shortcut keyboard selections you can make. Formatting Paragraphs A Word paragraph can be a single text character, a graphic, or even a blank line consisting only of the paragraph mark which appears in your document when you press the Enter key. Each Word paragraph in your document can be uniquely formatted and need not contain text. To modify the appearance of a single paragraph, simple place the insertion point anywhere in the paragraph (with the mouse, point and click). To modify multiple paragraphs, select all or parts of each paragraph to be changed. Choose Format, Paragraph to reach the Paragraph dialog box. This box lets you: • Precisely specify inter-line spacing (Single,
  • 43. Introduction to Microsoft Word 2000 Page 39 June 1999 University of North Texas Computing Center HelpDesk Support Services double, etc.) • Precisely specify inter-paragraph spacing (space before and after paragraphs) • Dictate exact indentation measurements • Turn off line numbering for specific paragraphs • Specify text alignment (left, centered, right, or justified) • Specify text flow guidelines (widows, orphans, etc.)
  • 44. Introduction to Microsoft Word 2000 Page 40 June 1999 University of North Texas Computing Center HelpDesk Support Services Insert – Sharing Information from other Programs INSERT Command
  • 45. Introduction to Microsoft Word 2000 Page 41 June 1999 University of North Texas Computing Center HelpDesk Support Services SYMBOL Insert symbols or special characters You can insert special characters, international characters, and symbols by using the Symbol command on the Insert menu. To quickly insert a symbol that you use frequently, assign the symbol to a shortcut key. Word automatically replaces some key combinations with symbols.
  • 46. Introduction to Microsoft Word 2000 Page 42 June 1999 University of North Texas Computing Center HelpDesk Support Services Insert common typographical characters 1. Click where you want to insert the character. 2. On the Insert menu, click Symbol, and then click the Special Characters tab. 3. Double-click the character you want to insert. Insert symbols not on the keyboard 1. Click where you want to insert the symbol. 2. On the Insert menu, click Symbol, and then click the Symbols tab. 3. Double-click the symbol or character you want to insert. Create arrows, faces, and other symbols automatically You can add the following commonly used symbols to your document by typing corresponding characters or character combinations. For example, you can create J by typing :) or :-) Type To create (c) © (r) ® (tm) ™ ... … --> à :) or :-) J :| or :-| K :( or :-( L <-- ß <== ç <=> ó ==> è Notes You can remove AutoCorrect entries if you don't want to replace key combinations with symbols. You can add your own symbols or correct typing mistakes by clicking AutoCorrect. Type international characters To produce Press à, è, ì, ò, ù CTRL+` (ACCENT GRAVE),
  • 47. Introduction to Microsoft Word 2000 Page 43 June 1999 University of North Texas Computing Center HelpDesk Support Services À, È, Ì, Ò, Ù the letter á, é, í, ó, ú, ý CTRL+' (APOSTROPHE), Á, É, Í, Ó, Ú, Ý the letter â, ê, î, ô, û CTRL+SHIFT+^ (CARET), Â, Ê, Î, Ô, Û the letter ã, ñ, õ CTRL+SHIFT+~ (TILDE), Ã, Ñ, Õ the letter ä, ë, ï, ö, ü, ÿ CTRL+SHIFT+: (COLON), Ä, Ë, Ï, Ö, Ü, Ÿ the letter å, Å CTRL+SHIFT+@, a or A æ, Æ CTRL+SHIFT+&, a or A œ, Œ CTRL+SHIFT+&, o or O ç, Ç CTRL+, (COMMA), c or C ð, Ð CTRL+' (APOSTROPHE),d or D ø, Ø CTRL+/, o or O ¿ ALT+CTRL+SHIFT+? ¡ ALT+CTRL+SHIFT+! ß CTRL+SHIFT+&, s
  • 48. Introduction to Microsoft Word 2000 Page 44 June 1999 University of North Texas Computing Center HelpDesk Support Services Assign a symbol to a shortcut key 1. On the Insert menu, click Symbol. 2. Click the tab with the symbol or character you want. 3. Click the symbol or character you want. 4. Click Shortcut Key. 5. In the Press new shortcut key box, type the key combination you want to use. 6. Click Assign. INSERT - FILE Insert a second document into an open document 1. Click where you want to insert the second document. 2. On the Insert menu, click File. 3. In the File name box, enter the name of the file you want to insert. Insert a Microsoft Excel File as a Table 1. Click where you want to insert the Excel table. 2. On the Insert menu, click File. 3. In the File name box, enter the name of the Excel spreadsheet you want to insert. 4. You will be asked if you want the entire workbook, worksheet, or range to be included for the Excel spreadsheet.
  • 49. Introduction to Microsoft Word 2000 Page 45 June 1999 University of North Texas Computing Center HelpDesk Support Services
  • 50. Introduction to Microsoft Word 2000 Page 46 June 1999 University of North Texas Computing Center HelpDesk Support Services INSERT, OBJECT Insert a Microsoft Excel worksheet or chart into a Word document Word provides several ways to insert Microsoft Excel data into a Word document. 1. Copy and paste a worksheet or chart. 2. Insert the worksheet or chart as a linked object or embedded object. The main differences between linking and embedding are where the data is stored and how it is updated after you place it in the document: Create a new embedded Microsoft Excel worksheet or chart 1. Click in the document where you want to place the embedded object. 2. On the Insert menu, click Object, and then click the Create New tab. 3. In the Object type box, click the type of object you want to create. 4. To display the embedded object as an icon (for example, if others are going to view the document online) select the Display as icon check box. 5. To prevent the embedded object from being displayed as a drawing object that you can position in front of or behind text and other objects, clear the Float over text check box. Notes
  • 51. Introduction to Microsoft Word 2000 Page 47 June 1999 University of North Texas Computing Center HelpDesk Support Services • Only programs that are installed on your computer and that support linked and embedded objects appear in the Object type box. • When you click Microsoft Excel Worksheet in the Object type box, an entire workbook is inserted into your document. The document displays only one worksheet at a time. To display a different worksheet, double-click the Microsoft Excel object, and then click a different worksheet.
  • 52. Introduction to Microsoft Word 2000 Page 48 June 1999 University of North Texas Computing Center HelpDesk Support Services INSERT, PICTURE There are many alternatives for inserting a picture, including Clip Art, from a file, using AutoShapes, WordArt, direct from a scanner, or a chart. The most common use of inserting a picture is from the ClipArt library that comes with the Microsoft Office suite. About working with pictures in a document Word comes with its own set of pictures in the Clip Gallery. The Clip Gallery includes a wide variety of clip art that makes it easy for you to dress up your documents with professionally designed images. You'll find everything from maps to people and from buildings to scenic backgrounds. It's easy to select a picture. Just point to Picture on the Insert menu, click Clip Art, and then click the Clip Art or Pictures tab. The Clip Gallery includes a handy Find feature to help you locate just the right images for your document. You can also insert pictures and scanned photographs (called imported art or graphics) from other programs and locations.
  • 53. Introduction to Microsoft Word 2000 Page 49 June 1999 University of North Texas Computing Center HelpDesk Support Services To insert a picture from another program, click Picture on the Insert menu, and then click From File. When you select a picture, the Picture toolbar appears with options you can use to crop the picture, add a border to it, and adjust its brightness and contrast. To insert a scanned photograph, click Picture on the Insert menu, and then click From Scanner. The image appears in Microsoft Photo Editor, a program you can use to edit the picture. You can also draw your own pictures by using options on the Drawing toolbar You can create special text effects by using the new WordArt button on the Drawing toolbar, and you can use additional features, such as 3-D effects and textured fills. Word recognizes a wide variety of picture formats. Because all Office programs share the same graphics filters, if you installed a graphics filter when you installed another Office program (PowerPoint or Microsoft Excel, for example) you can use that same filter in Word.
  • 54. Introduction to Microsoft Word 2000 Page 50 June 1999 University of North Texas Computing Center HelpDesk Support Services TOOLS, OPTIONS, Changing the Defaults TOOLS, OPTIONS, View Change the view options To customize the way Word displays your document, select options on the View tab (Tools menu, Options command). For example, you can display or hide items in your document (such as graphics, animated text, and field codes) or screen elements (such as scroll bars). The options that are available on the View tab depend on which view you're in. For example, in page layout view and online layout view, you can speed up scrolling by hiding graphics and displaying picture placeholders instead. TOOLS, OPTIONS, General 1. The General tab option lets you set some overall operations of Word that apply to all documents in all views.
  • 55. Introduction to Microsoft Word 2000 Page 51 June 1999 University of North Texas Computing Center HelpDesk Support Services
  • 56. Introduction to Microsoft Word 2000 Page 52 June 1999 University of North Texas Computing Center HelpDesk Support Services TOOLS, OPTIONS, Edit The Edit tab lets you set editing options that affect editing in all documents and in all views. TOOLS, OPTIONS, Print Using the Print tab options, you can control how a document is printed and what elements in the document are printed. TOOLS, OPTIONS, Save The Save tab lets you set the options for saving your documents (including automatic saving) and for saving the Normal template.
  • 57. Introduction to Microsoft Word 2000 Page 53 June 1999 University of North Texas Computing Center HelpDesk Support Services
  • 58. Introduction to Microsoft Word 2000 Page 54 June 1999 University of North Texas Computing Center HelpDesk Support Services TOOLS, OPTIONS, Spelling and Grammar You set the options for proofreading a document in the Spelling & Grammar tab. Some examples are: 1. Check Spelling As You Type (automatically checks your spelling as you type and underlines with a red sawtooth underline words not found in any active dictionaries.) 2. Check Grammar As You Type (Turn off if you do not want to automatically check grammar during proofreading.) 3. Check Grammar With Spelling (Tells Word to check the spelling in each sentence before checking the grammar to ensure that Word isn't trying to make grammatical and stylistic sense of a sentense that contains misspelled words.) 4. Show Readability Statistics
  • 59. Introduction to Microsoft Word 2000 Page 55 June 1999 University of North Texas Computing Center HelpDesk Support Services TOOLS, OPTIONS, Track Changes The options on the Track Changes tab let you decide how WORD MARKS CHANGES TO A DOCUMENT. The Tools Highlight Changes command controls tracking changes. TOOLS, OPTIONS, User Information The User Information tab displays information about the user, who is normally the person registered to use the software.
  • 60. Introduction to Microsoft Word 2000 Page 56 June 1999 University of North Texas Computing Center HelpDesk Support Services TOOLS, OPTIONS, Compatibility On the Compatibility tab, you can set special conversion and display options for documents created in earlier versions of Word or in other word processing program. TOOLS, OPTIONS, File Locations Word needs to know where to find the files it needs and where to store saved files. The locations of files are initially established during Setup, when you install the Word Program or add components.
  • 61. Introduction to Microsoft Word 2000 Page 57 June 1999 University of North Texas Computing Center HelpDesk Support Services APPENDIX A Function key Press To F1 Get online Help or the Office Assistant F2 Move text or graphics F3 Insert an AutoText entry (after Word displays the entry) F4 Repeat the last action F5 Choose the Go To command (Edit menu) F6 Go to next pane or frame F7 Choose the Spelling command (Tools menu) F8 Extend a selection F9 Update selected fields F10 Activate the menu bar F11 Go to the next field F12 Choose the Save As command (File menu) SHIFT+Function key Press To SHIFT+F1 Start context-sensitive Help or reveal formatting SHIFT+F2 Copy text SHIFT+F3 Change the case of letters SHIFT+F4 Repeat a Find or Go To action SHIFT+F5 Move to a previous revision SHIFT+F6 Go to the previous pane or frame SHIFT+F7 Choose the Thesaurus command (Tools menu, Language submenu) SHIFT+F8 Shrink a selection SHIFT+F9 Switch between a field code and its result SHIFT+F10 Display a shortcut menu SHIFT+F11 Go to the previous field SHIFT+F12 Choose the Save command (File menu)
  • 62. Introduction to Microsoft Word 2000 Page 58 June 1999 University of North Texas Computing Center HelpDesk Support Services CTRL+Function key Press To CTRL+F2 Choose the Print Preview command (File menu) CTRL+F3 Cut to the Spike CTRL+F4 Close the window CTRL+F5 Restore the document window size CTRL+F6 Go to the next window CTRL+F7 Choose the Move command (Control menu) CTRL+F8 Choose the Size command (document Control menu) CTRL+F9 Insert an empty field CTRL+F10 Maximize the document window CTRL+F11 Lock a field CTRL+F12 Choose the Open command (File menu) CTRL+SHIFT+Function key Press To CTRL+SHIFT+F3 Insert the contents of the Spike CTRL+SHIFT+F5 Edit a bookmark CTRL+SHIFT+F6 Go to the previous window CTRL+SHIFT+F7 Update linked information in a Word source document CTRL+SHIFT+F8 Extend a selection or block (then press an arrow key) CTRL+SHIFT+F9 Unlink a field CTRL+SHIFT+F10 Activate the ruler CTRL+SHIFT+F11 Unlock a field CTRL+SHIFT+F12 Choose the Print command (File menu) ALT+Function key Press To ALT+F1 Go to the next field ALT+F3 Create an AutoText entry ALT+F4 Quit Word ALT+F5 Restore the program window size ALT+F7 Find the next misspelling or grammatical error. The Check spelling as you type check box must be selected (Tools menu, Options dialog box,
  • 63. Introduction to Microsoft Word 2000 Page 59 June 1999 University of North Texas Computing Center HelpDesk Support Services Spelling & Grammar tab). ALT+F8 Run a macro ALT+F9 Switch between all field codes and their results ALT+F10 Maximize the program window ALT+F11 Display Microsoft Visual Basic code ALT+SHIFT+Function key Press To ALT+SHIFT+F1 Go to the previous field ALT+SHIFT+F2 Choose the Save command (File menu) ALT+SHIFT+F9 Run GOTOBUTTON or MACROBUTTON from the field that displays the field results ALT+SHIFT+F11 Display Microsoft Visual Studio code CTRL+ALT+Function key To Press CTRL+ALT+F1 Display Microsoft System Information CTRL+ALT+F2 Open command (File menu)
  • 64. Introduction to Microsoft Word 2000 Page 60 June 1999 University of North Texas Computing Center HelpDesk Support Services Quick reference to some common shortcut keys Press To CTRL+SHIFT+SPACEBAR Create a nonbreaking space CTRL+HYPHEN Create a nonbreaking hyphen CTRL+B Make letters bold CTRL+I Make letters italic CTRL+U Make letters underline CTRL+SHIFT+< Decrease font size CTRL+SHIFT+> Increase font size CTRL+Q Remove paragraph formatting CTRL+SPACEBAR Remove character formatting CTRL+C Copy the selected text or object CTRL+X Cut the selected text or object CTRL+V Paste text or an object CTRL+Z Undo the last action CTRL+Y Redo the last action
  • 65. Introduction to Microsoft Word 2000 Page 61 June 1999 University of North Texas Computing Center HelpDesk Support Services Index AutoCorrect, 27, 28, 41 AutoFormat, 27, 35 AutoText, 27, 28 Capitalization, 24 Center, 11 Copy, 20 Cursor Movement, 8 Cut, 20 Delete, 14 Document New, 7 Edit Full Screen, 3 File Save, 10 Font, 19 Header, 33, 34 Help, 4, 5, 6 About, 5, 6 Contents and Index, 5 Detect and Repair, 6 Web, 6 WordPerfect, 6 Insert Date, 9 File, 10, 11, 19, 22, 31, 43, 47, 54 Object, 44 Page Numbers, 34 Picture, 47 Symbol, 40, 41, 42 Menu Bar, 2 Page Setup Look, 31 Print File, 11 Ruler Bar, 3, 17 Screen Layout, 1 Scroll Bar, 3 Select Rectangular Area, 14 Text, 13 Status Bar, 3 Style, 36 Tabs, 3, 16, 17 Template, 22 Thesaurus, 30 Title Bar, 2 Tool Bars, 2 Tools, 22, 25, 27, 28, 30, 49, 53 Grammar Checker, 25
  • 66. Introduction to Microsoft Word 2000 Page 62 June 1999 University of North Texas Computing Center HelpDesk Support Services