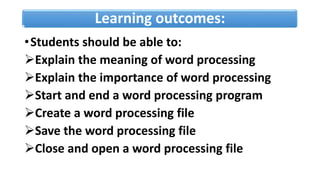
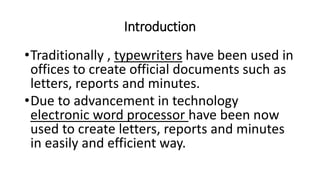
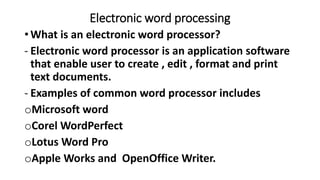
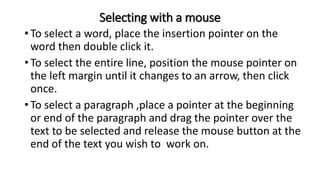
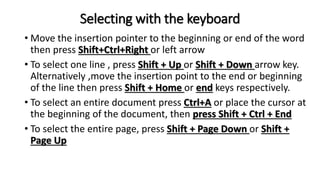
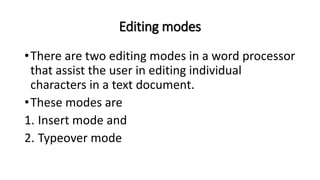
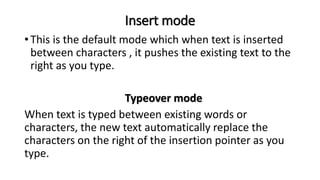
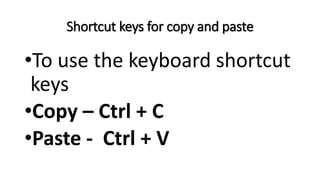
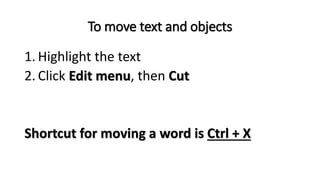
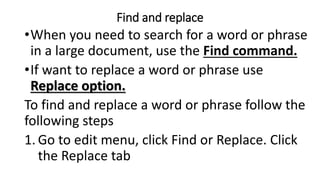
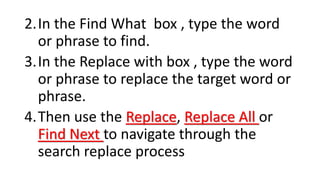
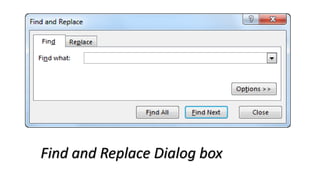
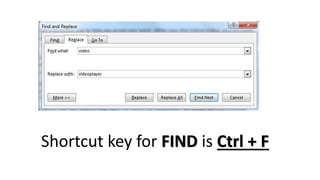
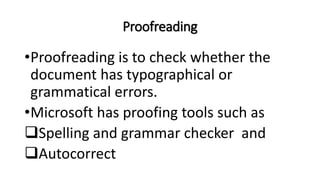
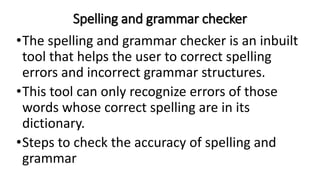
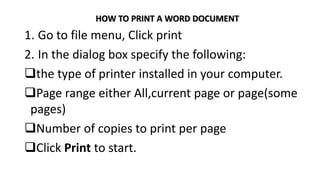
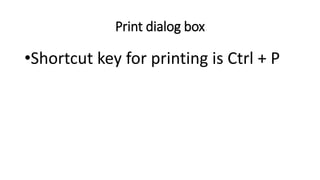
WORD PROCESSING
Presbyterian Seminary
Learning outcomes:
•Students should be able to:
Explain the meaning of word processing
Explain the importance of word processing
Start and end a word processing program
Create a word processing file
Save the word processing file
Close and open a word processing file
Introduction
•Traditionally , typewriters have been used in
offices to create official documents such as
letters, reports and minutes.
•Due to advancement in technology
electronic word processor have been now
used to create letters, reports and minutes
in easily and efficient way.
Electronic word processing
• What is an electronic word processor?
- Electronic word processor is an application software
that enable user to create , edit , format and print
text documents.
- Examples of common word processor includes
oMicrosoft word
oCorel WordPerfect
oLotus Word Pro
oApple Works and OpenOffice Writer.
What is word processing?
•Word processing is the art of creating,
saving, editing, formatting and printing text
and graphic documents using an electronic
word processor.
Advantages of electronic word processors
1. Documents can be stored for future
2. Typing using a electronic word processor is
easier and efficient due to automated features
such as word wrap, auto text and
autocomplete.
3. Has superior editing tools such as thesaurus,
autocorrect, spelling and grammar checkers.
4. Has predefine features for generating headers,
footers, indexes, footnotes and references.
5. Has superior document formatting features
such as underlining, bolding, italicization and
different colors formatting.
6. Have ability to create and import tables, text
and graphics from other programs.
7. With electronic processing it is possible to print
multiple copies once.
Purpose of word processing
•Mostly word processors are used
for writing letters, reports, projects,
books, essays, memos, curriculum
vitae and other text documents.
Review questions
1.What is a word processor ?
2.State the purpose of word processing.
3.Name four functions performed by a
word processor.
Microsoft Word screen layout
•Toolbars: These are rows of buttons or icons that
represent commands.
•Rulers: The Microsoft word provides the user with vertical
and horizontal onscreen rulers that help user set tabs and
idents
Procedures to make a ruler visible
 click the view menu option
On the drop down menu that appears, click Ruler a
checkmark or tick will appear next to show that the ruler
is displayed on the screen.
•Status bar: is the communication channel
between the user and the application program.
It displays the current page number and other
interactivities like saving, opening, background
printing cursor position etc.
Scroll bars and buttons: are horizontal and vertical
bars on the borders of a window that the user
drags to scroll upward, downwards, to the right or
left of a document.
•Menu bar: provides the user with group of
commands.
Each command has a drop list with command
used to create or manipulate a document.
•Title bar: indicates the task currently running.
On its right are the minimize, restore and close
buttons.
•Document window : this is a working area
where a document is created.
Start and End a word processing program
•There are a number of ways in which you can
start Microsoft word. To launch word 2016 from
the start menu proceed as follows
1. Click on the start menu
2. point to All programs
3. Click Microsoft office 2016
4. click word 2016
Ending word processing program
•On the right Conner of the opened word
processing program click close button to end the
program.
SAVING A DOCUMENT
•Before you create the document there is need to
save it even before you finish so that you do not
lose substantial amount of work in case of power
failure.
•To save a document for the first time follow the
following procedure
1. On the File menu, click Save As. Or click on the
Save button on the Standard toolbar.
2. In the File name box, type a unique name for
the document.
3. Select a location or drive you want to save in.
4. Click save.
SAVING THE FILE IN A DIFFERENT FORMAT
1. On the File menu, click Save As. Or click on the
Save button on the Standard toolbar.
2. In the File name box, type a unique name for the
document.
3. Click the down arrow on the right of save as type
list box and choose a file type.
4. Click save.
Protecting a document with a password
•A password is a combination of characters that
prevents other users from opening and changing
a document without permission.
•If a document is protected by a password , only
the person who knows the password can open
the document or edit it.
•The following are the steps on how to save a
document with a password.
1. Create or open the document you want to
protect
2. On the file menu choose Save As
3. Click the down arrow on the Tools button in
the save as dialog box.
4. Click Security Options
5. Type in a password in the password to open.
6. Then click OK.
•A password is case sensitive always note the
combinations of characters used.
CLOSING THE CURRENT DOCUMENT.
Closing a document means unloading the current active
document from memory so that the user can create or
open another without necessarily exiting from Word.
1. Click File Menu
2. Click Close.(alternatively press Ctrl +F4)
3. Save document changes if prompted.
Opening an existing document
1. Click the File menu, click Open command or on
the standard toolbar click the open button.
Alternatively press Ctrl+ O key combination on
the keyboard.
2. Select a drive or folder where the file is saved.
3. In the File name box, type or select the name
of the document you want to open.
4. Click the open button.
Editing and Formatting
•Editing means making necessary changes to an existing
document.
•Editing a documents include using delete, insert, and
overtype/overwrite commands.
•Also Microsoft Word provides the user with inbuilt tools
such as the spelling and grammar checker, thesaurus,
undo, redo, find and replace, etc.
Block operation
•Highlighting a block of text
The purpose of selecting or highlighting text is to
enable the user to manipulate the selected block of
text.
There are two ways to do this.
1. By selecting a block of text using the mouse .
2. By selecting a block of text using keyboard.
Selecting with a mouse
• To select a word, place the insertion pointer on the
word then double click it.
• To select the entire line, position the mouse pointer on
the left margin until it changes to an arrow, then click
once.
• To select a paragraph ,place a pointer at the beginning
or end of the paragraph and drag the pointer over the
text to be selected and release the mouse button at the
end of the text you wish to work on.
Selecting with the keyboard
• Move the insertion pointer to the beginning or end of the word
then press Shift+Ctrl+Right or left arrow
• To select one line , press Shift + Up or Shift + Down arrow key.
Alternatively ,move the insertion point to the end or beginning
of the line then press Shift + Home or end keys respectively.
• To select an entire document press Ctrl+A or place the cursor at
the beginning of the document, then press Shift + Ctrl + End
• To select the entire page, press Shift + Page Down or Shift +
Page Up
Editing modes
•There are two editing modes in a word processor
that assist the user in editing individual
characters in a text document.
•These modes are
1. Insert mode and
2. Typeover mode
Insert mode
• This is the default mode which when text is inserted
between characters , it pushes the existing text to the
right as you type.
Typeover mode
When text is typed between existing words or
characters, the new text automatically replace the
characters on the right of the insertion pointer as you
type.
• To switch between typeover and insert mode simply press the insert
key on the keyboard.
Restoring deleted text
•To restore text means to bring back or
return to existence the deleted text.
•To restore text that has just been deleted in
the current word processing session.
•Click the Edit menu
•Then click the Undo command.
Copying and moving text and object
•Copying text means creating a duplicate
of text or an object.
•Moving means changing the position of
a text or an object in a document.
•How to copy and move a text or objects in
Microsoft Word?
1. Highlight the text you want to copy
2. Click edit menu, then copy command or
simply click the copy button on the standard
toolbar.
3. Position the insertion pointer where you
want to paste the text.
4. Click Edit menu then Paste or simply click the
Paste button on the standard toolbar.
Shortcut keys for copy and paste
•To use the keyboard shortcut
keys
•Copy – Ctrl + C
•Paste - Ctrl + V
To move text and objects
1. Highlight the text
2. Click Edit menu, then Cut
Shortcut for moving a word is Ctrl + X
Find and replace
•When you need to search for a word or phrase
in a large document, use the Find command.
•If want to replace a word or phrase use
Replace option.
To find and replace a word or phrase follow the
following steps
1. Go to edit menu, click Find or Replace. Click
the Replace tab
2.In the Find What box , type the word
or phrase to find.
3.In the Replace with box , type the word
or phrase to replace the target word or
phrase.
4.Then use the Replace, Replace All or
Find Next to navigate through the
search replace process
Find and Replace Dialog box
Shortcut key for FIND is Ctrl + F
Proofreading
•Proofreading is to check whether the
document has typographical or
grammatical errors.
•Microsoft has proofing tools such as
Spelling and grammar checker and
Autocorrect
Spelling and grammar checker
•The spelling and grammar checker is an inbuilt
tool that helps the user to correct spelling
errors and incorrect grammar structures.
•This tool can only recognize errors of those
words whose correct spelling are in its
dictionary.
•Steps to check the accuracy of spelling and
grammar
1. Click Tools menu option
2. Click Spelling and grammar on the drop
down menu
3. Words that do not match in the custom
dictionary are highlighted for correction.
The lower plane of the dialog box suggests to
the user a list of suggested correct words.
Spelling and grammar checker dial box
•Change button: click Change button to correct only
the highlighted incorrect word.
•Change All: to correct all the occurrences of the
misspelled words
•Ignore once: to retain the highlighted word and
continue.
•Ignore All: to retain all occurrences of the same word
or phrase in the document from another language.
•Add to Dictionary: to add the word into the custom
dictionary
Autocorrect
•The autocorrect automatically detects wrongly spelled or
capitalized words and replaces them with the correct
word.
•Turning on/off autocorrect
1. Click tool Menu, then Autocorrect Options.
2. To turn on auto correction, select the “Replace text as
you type”
3. In the Replace box, type the commonly misspelled word.
4. In the with box, type the correct spelling for the word
5. Click OK to close the dialog box.
Thesaurus
•This is an editing tool that helps the user
find words or phrases with similar
meaning(synonyms) or opposite
meaning (antonyms) to the one
selected.
Steps to use the thesaurus
1.Select a word or a phrase
2.Click Tools menu, then point to Language
3.Click Thesaurus
4.Choose an alternative word or phrase to
be used and click INSERT.
Undo and Redo
•Undo reverses the most recently executed
command while redo reverts back to the
cancelled action.
•Shortcut keys for
Undo is Ctrl + Z
Redo is Ctrl + Y
Autocomplete and Auto text
•The autocomplete feature displays a complete word
when the user types the first few characters of the
word.
•This enables the user to type faster by simply
accepting the suggested word if indeed he/she
intend to type it.
•To accept the suggestion, simply press the Enter key.
Formatting word document
•Formatting refers to enhancing the
appearance of a document.
•Text formatting features includes
changing
Font Type
Font style
Font size
Changing text color
Underlining
Bolding
Italicizing
Making character subscript or
superscript
•Bolding text: making the text appear darker then
other text
•Underline text : placing a line at the base or bottom
of a word or phrase
•Italicizing text: to make the text appear slant
forward.
•Changing font color: changing the font appearance
by appearing in different color.
•By default font color is black.
Using keyboard shortcut
To bold press Ctrl+ B
To italicize press Ctrl + I
To underline press Ctrl + U
Changing case
•Sentence case: All the first characters in
a sentence are in uppercase (capital
letters)
•Lowercase : All characters appear in
lowercase ( small letters)
•Uppercase: All characters appear in
uppercase (capitalized)
•Title case : All the first characters of each
word in a sentence appear in uppercase.
•Toggle case: it changes upper cases to lower
cases and vice versa.
Line spacing
•Line spacing refers to the vertical distance
between lines of text.
•The default line spacing is single spacing.
•Character spacing refers to the space between
the characters in the text.
•Steps to change line spacing :
1. Highlight the required text
2. Go to format menu, click Paragraph .
3. Click the down arrow from the line spacing
list and select the spacing required
4. Click OK to effect the changes.
Bullets and numbering
•Bullets and numbers are used to create ordered lists.
Steps to add bullets or numbers
1. Highlight the text or position your cursor at the
beginning of the text
2. On the format menu, click Bullets and numbers.
3. In the dialogue box , click Bulleted, Numbered or Outline
Numbered tab.
4. Select the type of bullets or numbering, then click OK.
Page orientation
•Page orientation refers to the positioning of the page in
relation to the text.
•There are two types of page orientation
Portrait
Text and graphics are printed with longest side placed
vertically.
Landscape
Text and graphics objects are placed with longest side
placed horizontally.
Page layout
•Specify how text will be placed on the page from
the margins.
•By default, text starts from the top margin.
How to change the layout
1. Go to File menu, choose page setup
2. Click on the Layout tab
3. Set the desired layout
4. Click OK
Headers and footers
•Headers are text that appears at the top
margin of every page of a document.
•Footers are text that appears at the
bottom margin of every page of a
document.
How to insert headers and footers
1.Click insert menu
2.Go to header/footer
3.Click an arrow to choose format of the
header/footer you want
4.Type in header/footer ,then close
header/footer.
Inserting page number
•Page number are used to organize a
large document for ease of
reference.
How to insert page number
1.Click insert menu
2.Click Page numbers
3. In the position box, choose either to position your
page number at the top of page or at the bottom
of the page.
4. Alignment box: specify whether to align page
number to the left, center or right of page.
5. NB: if you don’t want a number on the first page,
uncheck the show number on the first page check
box and then click OK.
PRINTING WORD DOCUMENTS
•The main purpose of any word processor is to
create documents for distribution.
•A document can be distributed electronically via
e-mail or as a printed hard copy.
•Printing means to convert softcopy to hardcopy.
•In order to print your computer must be
connected to printer.
Print preview
•Print preview shows the user how the document will
look like after printing.
•Therefore it is very important that you confirm by
print preview before printing your documents.
•Steps to print preview
1. Go to file menu , select Print preview
2. Click the close button or Esc key to return to your
document.
Alternatively
•Click print Preview button on
the Standard Toolbar
HOW TO PRINT A WORD DOCUMENT
1. Go to file menu, Click print
2. In the dialog box specify the following:
the type of printer installed in your computer.
Page range either All,current page or page(some
pages)
Number of copies to print per page
Click Print to start.
Print dialog box
•Shortcut key for printing is Ctrl + P
Document views
•There are five document view types
Draft view
Web layout
Print layout
Reading layout
Outline view
•Print layout view -Standard documents, such as
letters, memos, and reports, are often written
and edited in Print Layout view.
• One advantage of working in this view is its
adherence to WYSIWYG (what you see is what
you get).
•Web view -Use Web Layout view to
create, view, and edit pages as
they'll appear online when opened
in a browser.

Word processing

  • 1.
  • 2.
    Learning outcomes: •Students shouldbe able to: Explain the meaning of word processing Explain the importance of word processing Start and end a word processing program Create a word processing file Save the word processing file Close and open a word processing file
  • 3.
    Introduction •Traditionally , typewritershave been used in offices to create official documents such as letters, reports and minutes. •Due to advancement in technology electronic word processor have been now used to create letters, reports and minutes in easily and efficient way.
  • 4.
    Electronic word processing •What is an electronic word processor? - Electronic word processor is an application software that enable user to create , edit , format and print text documents. - Examples of common word processor includes oMicrosoft word oCorel WordPerfect oLotus Word Pro oApple Works and OpenOffice Writer.
  • 5.
    What is wordprocessing? •Word processing is the art of creating, saving, editing, formatting and printing text and graphic documents using an electronic word processor.
  • 6.
    Advantages of electronicword processors 1. Documents can be stored for future 2. Typing using a electronic word processor is easier and efficient due to automated features such as word wrap, auto text and autocomplete. 3. Has superior editing tools such as thesaurus, autocorrect, spelling and grammar checkers.
  • 7.
    4. Has predefinefeatures for generating headers, footers, indexes, footnotes and references. 5. Has superior document formatting features such as underlining, bolding, italicization and different colors formatting. 6. Have ability to create and import tables, text and graphics from other programs. 7. With electronic processing it is possible to print multiple copies once.
  • 8.
    Purpose of wordprocessing •Mostly word processors are used for writing letters, reports, projects, books, essays, memos, curriculum vitae and other text documents.
  • 9.
    Review questions 1.What isa word processor ? 2.State the purpose of word processing. 3.Name four functions performed by a word processor.
  • 10.
  • 12.
    •Toolbars: These arerows of buttons or icons that represent commands. •Rulers: The Microsoft word provides the user with vertical and horizontal onscreen rulers that help user set tabs and idents Procedures to make a ruler visible  click the view menu option On the drop down menu that appears, click Ruler a checkmark or tick will appear next to show that the ruler is displayed on the screen.
  • 13.
    •Status bar: isthe communication channel between the user and the application program. It displays the current page number and other interactivities like saving, opening, background printing cursor position etc. Scroll bars and buttons: are horizontal and vertical bars on the borders of a window that the user drags to scroll upward, downwards, to the right or left of a document.
  • 14.
    •Menu bar: providesthe user with group of commands. Each command has a drop list with command used to create or manipulate a document. •Title bar: indicates the task currently running. On its right are the minimize, restore and close buttons. •Document window : this is a working area where a document is created.
  • 15.
    Start and Enda word processing program •There are a number of ways in which you can start Microsoft word. To launch word 2016 from the start menu proceed as follows 1. Click on the start menu 2. point to All programs 3. Click Microsoft office 2016 4. click word 2016
  • 16.
    Ending word processingprogram •On the right Conner of the opened word processing program click close button to end the program.
  • 17.
    SAVING A DOCUMENT •Beforeyou create the document there is need to save it even before you finish so that you do not lose substantial amount of work in case of power failure. •To save a document for the first time follow the following procedure
  • 18.
    1. On theFile menu, click Save As. Or click on the Save button on the Standard toolbar. 2. In the File name box, type a unique name for the document. 3. Select a location or drive you want to save in. 4. Click save.
  • 19.
    SAVING THE FILEIN A DIFFERENT FORMAT 1. On the File menu, click Save As. Or click on the Save button on the Standard toolbar. 2. In the File name box, type a unique name for the document. 3. Click the down arrow on the right of save as type list box and choose a file type. 4. Click save.
  • 20.
    Protecting a documentwith a password •A password is a combination of characters that prevents other users from opening and changing a document without permission. •If a document is protected by a password , only the person who knows the password can open the document or edit it. •The following are the steps on how to save a document with a password.
  • 21.
    1. Create oropen the document you want to protect 2. On the file menu choose Save As 3. Click the down arrow on the Tools button in the save as dialog box. 4. Click Security Options 5. Type in a password in the password to open. 6. Then click OK.
  • 22.
    •A password iscase sensitive always note the combinations of characters used. CLOSING THE CURRENT DOCUMENT. Closing a document means unloading the current active document from memory so that the user can create or open another without necessarily exiting from Word. 1. Click File Menu 2. Click Close.(alternatively press Ctrl +F4) 3. Save document changes if prompted.
  • 23.
    Opening an existingdocument 1. Click the File menu, click Open command or on the standard toolbar click the open button. Alternatively press Ctrl+ O key combination on the keyboard. 2. Select a drive or folder where the file is saved. 3. In the File name box, type or select the name of the document you want to open. 4. Click the open button.
  • 24.
    Editing and Formatting •Editingmeans making necessary changes to an existing document. •Editing a documents include using delete, insert, and overtype/overwrite commands. •Also Microsoft Word provides the user with inbuilt tools such as the spelling and grammar checker, thesaurus, undo, redo, find and replace, etc.
  • 25.
    Block operation •Highlighting ablock of text The purpose of selecting or highlighting text is to enable the user to manipulate the selected block of text. There are two ways to do this. 1. By selecting a block of text using the mouse . 2. By selecting a block of text using keyboard.
  • 26.
    Selecting with amouse • To select a word, place the insertion pointer on the word then double click it. • To select the entire line, position the mouse pointer on the left margin until it changes to an arrow, then click once. • To select a paragraph ,place a pointer at the beginning or end of the paragraph and drag the pointer over the text to be selected and release the mouse button at the end of the text you wish to work on.
  • 27.
    Selecting with thekeyboard • Move the insertion pointer to the beginning or end of the word then press Shift+Ctrl+Right or left arrow • To select one line , press Shift + Up or Shift + Down arrow key. Alternatively ,move the insertion point to the end or beginning of the line then press Shift + Home or end keys respectively. • To select an entire document press Ctrl+A or place the cursor at the beginning of the document, then press Shift + Ctrl + End • To select the entire page, press Shift + Page Down or Shift + Page Up
  • 28.
    Editing modes •There aretwo editing modes in a word processor that assist the user in editing individual characters in a text document. •These modes are 1. Insert mode and 2. Typeover mode
  • 29.
    Insert mode • Thisis the default mode which when text is inserted between characters , it pushes the existing text to the right as you type. Typeover mode When text is typed between existing words or characters, the new text automatically replace the characters on the right of the insertion pointer as you type.
  • 30.
    • To switchbetween typeover and insert mode simply press the insert key on the keyboard.
  • 31.
    Restoring deleted text •Torestore text means to bring back or return to existence the deleted text. •To restore text that has just been deleted in the current word processing session. •Click the Edit menu •Then click the Undo command.
  • 32.
    Copying and movingtext and object •Copying text means creating a duplicate of text or an object. •Moving means changing the position of a text or an object in a document. •How to copy and move a text or objects in Microsoft Word?
  • 33.
    1. Highlight thetext you want to copy 2. Click edit menu, then copy command or simply click the copy button on the standard toolbar. 3. Position the insertion pointer where you want to paste the text. 4. Click Edit menu then Paste or simply click the Paste button on the standard toolbar.
  • 34.
    Shortcut keys forcopy and paste •To use the keyboard shortcut keys •Copy – Ctrl + C •Paste - Ctrl + V
  • 35.
    To move textand objects 1. Highlight the text 2. Click Edit menu, then Cut Shortcut for moving a word is Ctrl + X
  • 36.
    Find and replace •Whenyou need to search for a word or phrase in a large document, use the Find command. •If want to replace a word or phrase use Replace option. To find and replace a word or phrase follow the following steps 1. Go to edit menu, click Find or Replace. Click the Replace tab
  • 37.
    2.In the FindWhat box , type the word or phrase to find. 3.In the Replace with box , type the word or phrase to replace the target word or phrase. 4.Then use the Replace, Replace All or Find Next to navigate through the search replace process
  • 38.
    Find and ReplaceDialog box
  • 39.
    Shortcut key forFIND is Ctrl + F
  • 40.
    Proofreading •Proofreading is tocheck whether the document has typographical or grammatical errors. •Microsoft has proofing tools such as Spelling and grammar checker and Autocorrect
  • 41.
    Spelling and grammarchecker •The spelling and grammar checker is an inbuilt tool that helps the user to correct spelling errors and incorrect grammar structures. •This tool can only recognize errors of those words whose correct spelling are in its dictionary. •Steps to check the accuracy of spelling and grammar
  • 42.
    1. Click Toolsmenu option 2. Click Spelling and grammar on the drop down menu 3. Words that do not match in the custom dictionary are highlighted for correction. The lower plane of the dialog box suggests to the user a list of suggested correct words.
  • 43.
    Spelling and grammarchecker dial box
  • 44.
    •Change button: clickChange button to correct only the highlighted incorrect word. •Change All: to correct all the occurrences of the misspelled words •Ignore once: to retain the highlighted word and continue. •Ignore All: to retain all occurrences of the same word or phrase in the document from another language. •Add to Dictionary: to add the word into the custom dictionary
  • 45.
    Autocorrect •The autocorrect automaticallydetects wrongly spelled or capitalized words and replaces them with the correct word. •Turning on/off autocorrect 1. Click tool Menu, then Autocorrect Options. 2. To turn on auto correction, select the “Replace text as you type” 3. In the Replace box, type the commonly misspelled word. 4. In the with box, type the correct spelling for the word 5. Click OK to close the dialog box.
  • 46.
    Thesaurus •This is anediting tool that helps the user find words or phrases with similar meaning(synonyms) or opposite meaning (antonyms) to the one selected.
  • 47.
    Steps to usethe thesaurus 1.Select a word or a phrase 2.Click Tools menu, then point to Language 3.Click Thesaurus 4.Choose an alternative word or phrase to be used and click INSERT.
  • 48.
    Undo and Redo •Undoreverses the most recently executed command while redo reverts back to the cancelled action. •Shortcut keys for Undo is Ctrl + Z Redo is Ctrl + Y
  • 49.
    Autocomplete and Autotext •The autocomplete feature displays a complete word when the user types the first few characters of the word. •This enables the user to type faster by simply accepting the suggested word if indeed he/she intend to type it. •To accept the suggestion, simply press the Enter key.
  • 50.
    Formatting word document •Formattingrefers to enhancing the appearance of a document. •Text formatting features includes changing Font Type Font style Font size
  • 51.
  • 52.
    •Bolding text: makingthe text appear darker then other text •Underline text : placing a line at the base or bottom of a word or phrase •Italicizing text: to make the text appear slant forward. •Changing font color: changing the font appearance by appearing in different color. •By default font color is black.
  • 53.
    Using keyboard shortcut Tobold press Ctrl+ B To italicize press Ctrl + I To underline press Ctrl + U
  • 54.
    Changing case •Sentence case:All the first characters in a sentence are in uppercase (capital letters) •Lowercase : All characters appear in lowercase ( small letters) •Uppercase: All characters appear in uppercase (capitalized)
  • 55.
    •Title case :All the first characters of each word in a sentence appear in uppercase. •Toggle case: it changes upper cases to lower cases and vice versa.
  • 56.
    Line spacing •Line spacingrefers to the vertical distance between lines of text. •The default line spacing is single spacing. •Character spacing refers to the space between the characters in the text. •Steps to change line spacing : 1. Highlight the required text
  • 57.
    2. Go toformat menu, click Paragraph . 3. Click the down arrow from the line spacing list and select the spacing required 4. Click OK to effect the changes.
  • 58.
    Bullets and numbering •Bulletsand numbers are used to create ordered lists. Steps to add bullets or numbers 1. Highlight the text or position your cursor at the beginning of the text 2. On the format menu, click Bullets and numbers. 3. In the dialogue box , click Bulleted, Numbered or Outline Numbered tab. 4. Select the type of bullets or numbering, then click OK.
  • 59.
    Page orientation •Page orientationrefers to the positioning of the page in relation to the text. •There are two types of page orientation Portrait Text and graphics are printed with longest side placed vertically. Landscape Text and graphics objects are placed with longest side placed horizontally.
  • 60.
    Page layout •Specify howtext will be placed on the page from the margins. •By default, text starts from the top margin. How to change the layout 1. Go to File menu, choose page setup 2. Click on the Layout tab 3. Set the desired layout 4. Click OK
  • 61.
    Headers and footers •Headersare text that appears at the top margin of every page of a document. •Footers are text that appears at the bottom margin of every page of a document. How to insert headers and footers
  • 62.
    1.Click insert menu 2.Goto header/footer 3.Click an arrow to choose format of the header/footer you want 4.Type in header/footer ,then close header/footer.
  • 63.
    Inserting page number •Pagenumber are used to organize a large document for ease of reference. How to insert page number 1.Click insert menu 2.Click Page numbers
  • 64.
    3. In theposition box, choose either to position your page number at the top of page or at the bottom of the page. 4. Alignment box: specify whether to align page number to the left, center or right of page. 5. NB: if you don’t want a number on the first page, uncheck the show number on the first page check box and then click OK.
  • 65.
    PRINTING WORD DOCUMENTS •Themain purpose of any word processor is to create documents for distribution. •A document can be distributed electronically via e-mail or as a printed hard copy. •Printing means to convert softcopy to hardcopy. •In order to print your computer must be connected to printer.
  • 66.
    Print preview •Print previewshows the user how the document will look like after printing. •Therefore it is very important that you confirm by print preview before printing your documents. •Steps to print preview 1. Go to file menu , select Print preview 2. Click the close button or Esc key to return to your document.
  • 67.
    Alternatively •Click print Previewbutton on the Standard Toolbar
  • 68.
    HOW TO PRINTA WORD DOCUMENT 1. Go to file menu, Click print 2. In the dialog box specify the following: the type of printer installed in your computer. Page range either All,current page or page(some pages) Number of copies to print per page Click Print to start.
  • 69.
    Print dialog box •Shortcutkey for printing is Ctrl + P
  • 70.
    Document views •There arefive document view types Draft view Web layout Print layout Reading layout Outline view
  • 71.
    •Print layout view-Standard documents, such as letters, memos, and reports, are often written and edited in Print Layout view. • One advantage of working in this view is its adherence to WYSIWYG (what you see is what you get).
  • 72.
    •Web view -UseWeb Layout view to create, view, and edit pages as they'll appear online when opened in a browser.