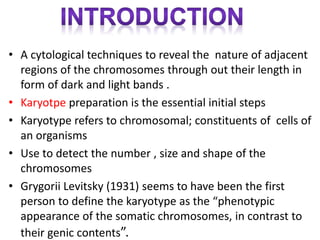
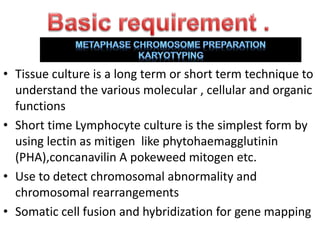
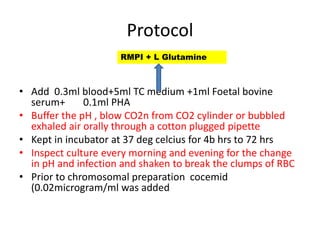
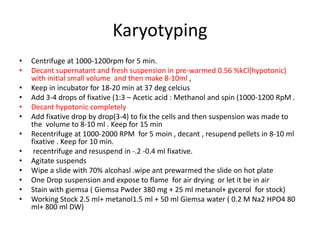
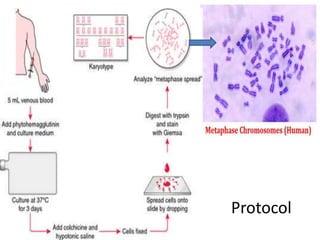
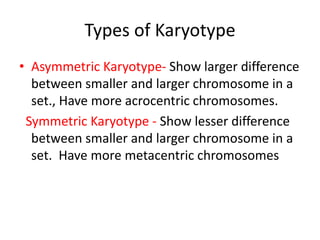
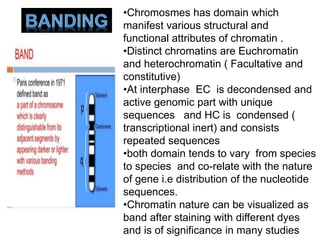
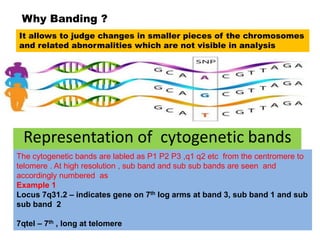
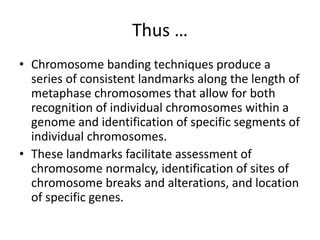
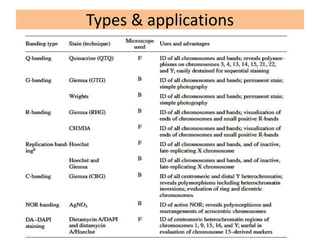
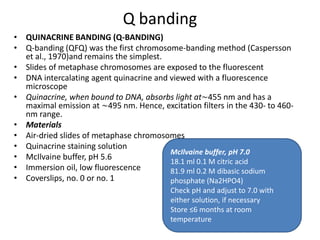
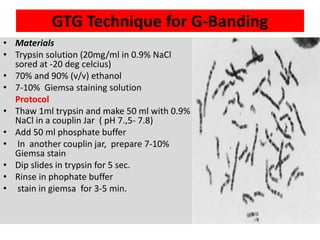
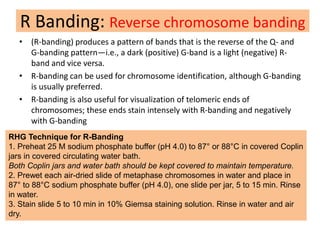
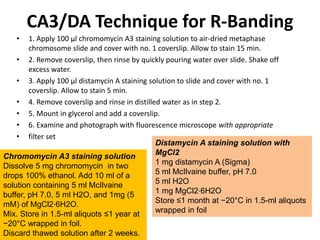
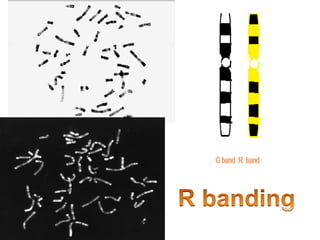
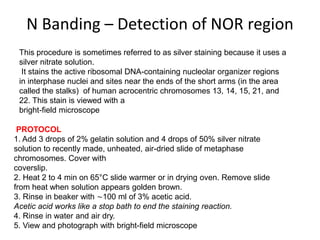
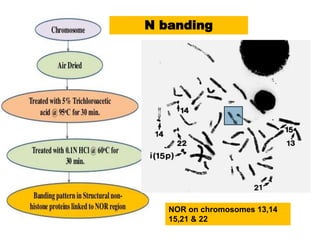
A cytological technique to detect the nature of adjacent chromosomal regions by using different staining technique assisted with some pre treatment of metaphase chromosomes prepared on the slides
Fluorescent in situ hybridization (FISH) is a cytogenetic technique that can be used to detect and localize the presence or absence of specific DNA sequences on chromosomes.
A chromosome abnormality, disorder, anomaly, aberration, or mutation is a missing, extra, or irregular portion of chromosomal DNA. It can be from an atypical number of chromosomes or a structural abnormality in one or more chromosomes
Definition
Centromere Particular chromosome complement of an individual or a related group of individuals, as defined by the chromosome size, morphology, and number –Karyotype.
Karyotype
CLASSIFICATION OF CHROMOSOMES FORKARYOTYPING
Types of karyotype
Asymmetric Karyotype
• Show larger difference
between smaller and
larger chromosome in a
set.
• Have more acrocentric
chromosomes.
• Have relatively
advanced feature.
Symmetric Karyotype
Show lesser difference
between smaller and
larger chromosome in a
set.
• Have more metacentric
chromosomes.
• Have no relatively
advanced feature
Procedure of karyotyping
SPECIMENS USED
Types of banding
G-banding
R-banding
c-banding
Q-banding
T-banding
Karyotype Detects Various Chromosome Abnormalities
Aneuploidy
Deletions
Duplications
Translocations
Idiogram
Advantages of Karyotyping
Disadvantages:
Introduction
Genetics of somatic cell
Somatic cell genetics
Somatic cell nuclear transfer
Somatic cell hybridization
Mapping human genes by using human rodent hybrids
In medical application
Production of monoclonal antibodies by using hybridoma technology
Conclusion
References
RNA, DNA Isolation and cDNA synthesis.pptxASJADRAZA10
Isolation, quantification of nucleic acids from wheat and synthesis of cDNA.
Introduction
List of Genotypes
DNA Isolation (CTAB method)
Qualitative check of DNA- Gel electrophoresis
Quantitative test of DNA- Spectrophotometer
Protocol for RNA Isolation
RNA Confirmation
Normalization of RNA
cDNA Synthesis
Protocol for DNA Isolation of plant
50-100mg (2-3) young leaves were collected, then washed with tap water followed by distilled water in petri dish.
Leaves were ground using ethanol sterilized mortar pestle for 15-20 sec, by taking 1mL extraction buffer.
1mL (1000μL) of extraction buffer was again added to collect paste from mortar pestle & then transferred to the 2 mL micro centrifuge tube.
The sample in the tube is incubated at 65°C in water bath for 35-45 mins. (Contents in the tube was mixed by inverting at an interval for 5-10 mins)
The tubes were cooled for 10 minutes in ice.
The sample of equal vol (2mL) was centrifuged @14,000 rpm for 10 mins.
After that the supernatant was transferred to new 2 mL centrifuge tube and equal volume (as of sample) of chloroform: Isoamyl alcohol (24:1) was added.
Then mixed gently for 5-7 mins by inverting the tubes.
Again centrifuged for 10 mins @10,000 rpm
After centrifugation, three layers were observed in the tube.
a) aqueous phase i.e. DNA+RNA
b) protein coagulate
c) organic phase i.e. Chloroform
Again the supernatant (aqueous phase) was collected in 1.5mL tube and equal volume of ice-cold isopropanol was added and stored in -20°C overnight.
Following day, tubes were again centrifuged @10,000rpm for 10 mins.
The supernatant was discarded without disturbing the DNA pellet.
70% ethanol is taken and 0.5mL of it was added to the sample and mixed by tapping for 5 mins.
Again centrifuged @10,000rpm for 10 mins and the supernatant was discarded.
Pellet (DNA Precipitate) was air dried for 10 mins.
Then dissolved in 50μL TE-1X Buffer and the sample was stored at -20°C.
1g of analytical grade Agarose was weighed.
100 mL of autoclaved 1X TBE was added in flask.
Now heated on the oven until the solution becomes transparent.
Solution was allowed to cool down to 60℃.
2 μL of Ethidium Bromide (EtBr) is added in the flask.
Melted agarose gel was poured into the casting tray along with comb.
Any bubble in the gel was removed.
After solidification of gel, comb was removed gently and then running buffer was added in the electrophoretic tank.
Once gel got solidified, it was transferred it into gel tank.
A parafilm was taken and on it 2μL loading dye and 3μL sample was taken, gently mixed with the pipette tip only.
Then the mixture (sample +loading dye) was loaded into the well.
Then electrophoretic unit was run at 90 volt for 50-55 mins.
After that gel was put into the Gel Doc to see the DNA band
(using UV light).
Bright colour band were observed as in the figure.
Few (100-150mg) young leaves were ground into fine powder using liquid Nitrogen.
It is generally recognized that stained fecal films are the single most productive means of stool examination for intestinal protozoa. The permanent stained smear facilitates detection and identification of cysts and trophozoites and affords a permanent record of the protozoa encountered. Small protozoa, missed by wet mount examinations (of either unconcentrated or concentrated samples) are often seen on the stained smear. The Wheatley Trichrome technique for fecal specimens is a modification of Gomori's original staining procedure for tissue. It is a rapid, simple procedure, which produces uniformly well-stained smears of the intestinal protozoa, human cells, yeast, and artifact material.
Biol 390 – Lab 8 Restriction Digest and Gel Electrophoresis .docxmoirarandell
Biol 390 – Lab 8 Restriction Digest and Gel Electrophoresis
2
Objective
· Digest DNA of pGLO plasmid using restriction endonuclease enzymes.
· Run an agarose gel to separate the DNA fragments.
Background
Restriction enzymes cut DNA at specific sites generating a number of different sized fragments. The size of the fragments will depend on the number of sites the plasmid has and the specific enzyme used. The number of fragments can be predicted by viewing the map of the plasmid
Gel electrophoresis is a means of separating DNA in an electrical field. DNA is negatively charged and so will move to the anode (+). Larger fragments will move slower through the agarose matrix than the smaller molecules. Agarose is a polysaccharide polymer derived from seaweed: it is a purified from agar by removing the agaropectin component. Fragments are visualized using ethidium bromide, which will glow orange when exposed to UV light.
Materials
Restriction digest
· Restriction enzymes: Nhe1 and EcoR1 (New England Biolabs) – (KEEP ON ICE)
· Plasmid prepared in lab 7
· NanoDrop Lite spectrophotometer
· Microfuge tubes – Sterile
· 37 C degree bath – block heater
· Sterile 10ul and 200ul tips
· Bleach bottles for cleaning bench
· 10X NE Cut Smart Buffer – comes with enzyme
· Nitrile gloves
· Sterile DI water
· Shaved ice
· Ice block for enzymes
Gel Electrophoresis
· Agarose
· Sterile miliQ Water
· 15 well comb
· 50x TAE buffer
· DNA ladder – diluted in sample buffer (1 KB)
· Gel loading dye
· Gel electrophoresis chamber
· Power supply
· Ethidium bromide
· Gel Sys – visualization system
_______________________________________________
Procedure
Restriction Digest of plasmid DNA
· Safety: Wear nitrile gloves – prevent DNAase from your hands affecting the reaction and protect yourself from ethidium bromide
· Clean the bench with bleach - prevents exogenous enzymes interfering you’re your digests.
· Use the NanoDrop to determine the amount of DNA in your plasmid prep. Use this information to calculate how much sample you need to pipette into the reaction mix.
· Label an Eppendorf tube ‘+’ and another ‘-‘
· Make up a reaction mix in both tubes as follows for one of your plasmid samples
· add 1ug of DNA from your plasmid prep
· 5ul of 10X NE Cut Smart Buffer
· Sterile DI water to make the reaction mix to 50ul
For the + tube
· DNA
x ul
· 10X NE Cut Smart Buffer
5ul
· Nhe1 (add last to + tube)
1ul
· EcoR1 (add last to + tube)
1ul
· Sterile DI water
To make final volume to 50ul
· Add the restriction enzymes last to the + tube ONLY
· Repeat with the other two plasmid samples
For the – tube
· DNA
x ul
· 10X NE Buffer
5ul
· Nhe1
None
· EcoR1
None
· Sterile DI water
To make final volume to 50ul
· Do not add any enzyme to the ‘-‘ tube
· Repeat with the other two plasmid samples
· Mix the tubes by flicking – DO NOT VORTEX
· Give a 5 second spin in the centrifuge to bring the contents to the bottom
· Incu.
The extraction of DNA involves three main steps that are cell lysis, protein separation, and DNA purification. Cell lysis is usually performed by incubation of cell in buffer containing detergent and protease. Cellular proteins are salted out or phase separated using organic solvents. Finally DNA is isolated and purified either by alcohol precipitation or adsorption with silica and elution.
DNA extraction is an important step in molecular assays and plays a vital role in obtaining highresolution results in gel-based systems, particularly in the case of cereals with high content of interfering components in the early steps of DNA extraction.This is a rapid miniprep DNA extraction method, optimized for rice, which was achieved via creating some modifications in present DNA extraction methods, especially in first step of breaking down and lyses of cell wall, and the use of cheap and frequent chemicals, found in every lab, in the next steps. The normal quality and quantity was obtained by the method. The PCR based assays also revealed the efficiency of the method.
The advantages of this method are: 1- it is applicable with both dry and fresh samples, 2- no need to large weight samples, 3- no need to liquid nitrogen and 4- easy, rapid and applicable in every laboratory.
Transgenic animal production and its applicationkishoreGupta17
A genetically modified animal with the heterologous gene of interest being inserted for the purpose of biopharming or make a diseased model to study the consequences of disease and its probable therapy
for cloning and expression of exogenous gene or gene throthrough vector it must be introduced into the host cell through transformation , ,transduction, electroporation gene gun etc.
A genetically engineered DNA molecule from bacteria , phage or yeast to carry foreign DNA for the purpose of cloning and expression of the inserted DNA of interest in RDT
The Roman Empire A Historical Colossus.pdfkaushalkr1407
The Roman Empire, a vast and enduring power, stands as one of history's most remarkable civilizations, leaving an indelible imprint on the world. It emerged from the Roman Republic, transitioning into an imperial powerhouse under the leadership of Augustus Caesar in 27 BCE. This transformation marked the beginning of an era defined by unprecedented territorial expansion, architectural marvels, and profound cultural influence.
The empire's roots lie in the city of Rome, founded, according to legend, by Romulus in 753 BCE. Over centuries, Rome evolved from a small settlement to a formidable republic, characterized by a complex political system with elected officials and checks on power. However, internal strife, class conflicts, and military ambitions paved the way for the end of the Republic. Julius Caesar’s dictatorship and subsequent assassination in 44 BCE created a power vacuum, leading to a civil war. Octavian, later Augustus, emerged victorious, heralding the Roman Empire’s birth.
Under Augustus, the empire experienced the Pax Romana, a 200-year period of relative peace and stability. Augustus reformed the military, established efficient administrative systems, and initiated grand construction projects. The empire's borders expanded, encompassing territories from Britain to Egypt and from Spain to the Euphrates. Roman legions, renowned for their discipline and engineering prowess, secured and maintained these vast territories, building roads, fortifications, and cities that facilitated control and integration.
The Roman Empire’s society was hierarchical, with a rigid class system. At the top were the patricians, wealthy elites who held significant political power. Below them were the plebeians, free citizens with limited political influence, and the vast numbers of slaves who formed the backbone of the economy. The family unit was central, governed by the paterfamilias, the male head who held absolute authority.
Culturally, the Romans were eclectic, absorbing and adapting elements from the civilizations they encountered, particularly the Greeks. Roman art, literature, and philosophy reflected this synthesis, creating a rich cultural tapestry. Latin, the Roman language, became the lingua franca of the Western world, influencing numerous modern languages.
Roman architecture and engineering achievements were monumental. They perfected the arch, vault, and dome, constructing enduring structures like the Colosseum, Pantheon, and aqueducts. These engineering marvels not only showcased Roman ingenuity but also served practical purposes, from public entertainment to water supply.
Instructions for Submissions thorugh G- Classroom.pptxJheel Barad
This presentation provides a briefing on how to upload submissions and documents in Google Classroom. It was prepared as part of an orientation for new Sainik School in-service teacher trainees. As a training officer, my goal is to ensure that you are comfortable and proficient with this essential tool for managing assignments and fostering student engagement.
Model Attribute Check Company Auto PropertyCeline George
In Odoo, the multi-company feature allows you to manage multiple companies within a single Odoo database instance. Each company can have its own configurations while still sharing common resources such as products, customers, and suppliers.
Unit 8 - Information and Communication Technology (Paper I).pdfThiyagu K
This slides describes the basic concepts of ICT, basics of Email, Emerging Technology and Digital Initiatives in Education. This presentations aligns with the UGC Paper I syllabus.
Operation “Blue Star” is the only event in the history of Independent India where the state went into war with its own people. Even after about 40 years it is not clear if it was culmination of states anger over people of the region, a political game of power or start of dictatorial chapter in the democratic setup.
The people of Punjab felt alienated from main stream due to denial of their just demands during a long democratic struggle since independence. As it happen all over the word, it led to militant struggle with great loss of lives of military, police and civilian personnel. Killing of Indira Gandhi and massacre of innocent Sikhs in Delhi and other India cities was also associated with this movement.
Acetabularia Information For Class 9 .docxvaibhavrinwa19
Acetabularia acetabulum is a single-celled green alga that in its vegetative state is morphologically differentiated into a basal rhizoid and an axially elongated stalk, which bears whorls of branching hairs. The single diploid nucleus resides in the rhizoid.
Honest Reviews of Tim Han LMA Course Program.pptxtimhan337
Personal development courses are widely available today, with each one promising life-changing outcomes. Tim Han’s Life Mastery Achievers (LMA) Course has drawn a lot of interest. In addition to offering my frank assessment of Success Insider’s LMA Course, this piece examines the course’s effects via a variety of Tim Han LMA course reviews and Success Insider comments.
How to Make a Field invisible in Odoo 17Celine George
It is possible to hide or invisible some fields in odoo. Commonly using “invisible” attribute in the field definition to invisible the fields. This slide will show how to make a field invisible in odoo 17.
2024.06.01 Introducing a competency framework for languag learning materials ...Sandy Millin
http://sandymillin.wordpress.com/iateflwebinar2024
Published classroom materials form the basis of syllabuses, drive teacher professional development, and have a potentially huge influence on learners, teachers and education systems. All teachers also create their own materials, whether a few sentences on a blackboard, a highly-structured fully-realised online course, or anything in between. Despite this, the knowledge and skills needed to create effective language learning materials are rarely part of teacher training, and are mostly learnt by trial and error.
Knowledge and skills frameworks, generally called competency frameworks, for ELT teachers, trainers and managers have existed for a few years now. However, until I created one for my MA dissertation, there wasn’t one drawing together what we need to know and do to be able to effectively produce language learning materials.
This webinar will introduce you to my framework, highlighting the key competencies I identified from my research. It will also show how anybody involved in language teaching (any language, not just English!), teacher training, managing schools or developing language learning materials can benefit from using the framework.
2. • A cytological techniques to reveal the nature of adjacent
regions of the chromosomes through out their length in
form of dark and light bands .
• Karyotpe preparation is the essential initial steps
• Karyotype refers to chromosomal; constituents of cells of
an organisms
• Use to detect the number , size and shape of the
chromosomes
• Grygorii Levitsky (1931) seems to have been the first
person to define the karyotype as the “phenotypic
appearance of the somatic chromosomes, in contrast to
their genic contents”.
3. • Tissue culture is a long term or short term technique to
understand the various molecular , cellular and organic
functions
• Short time Lymphocyte culture is the simplest form by
using lectin as mitigen like phytohaemagglutinin
(PHA),concanavilin A pokeweed mitogen etc.
• Use to detect chromosomal abnormality and
chromosomal rearrangements
• Somatic cell fusion and hybridization for gene mapping
4. Protocol
• Add 0.3ml blood+5ml TC medium +1ml Foetal bovine
serum+ 0.1ml PHA
• Buffer the pH , blow CO2n from CO2 cylinder or bubbled
exhaled air orally through a cotton plugged pipette
• Kept in incubator at 37 deg celcius for 4b hrs to 72 hrs
• Inspect culture every morning and evening for the change
in pH and infection and shaken to break the clumps of RBC
• Prior to chromosomal preparation cocemid
(0.02microgram/ml was added
RMPI + L Glutamine
5. Karyotyping
• Centrifuge at 1000-1200rpm for 5 min.
• Decant supernatant and fresh suspension in pre-warmed 0.56 %kCl(hypotonic)
with initial small volume and then make 8-10ml ,
• Keep in incubator for 18-20 min at 37 deg celcius
• Add 3-4 drops of fixative (1:3 – Acetic acid : Methanol and spin (1000-1200 RpM .
• Decant hypotonic completely
• Add fixative drop by drop(3-4) to fix the cells and then suspension was made to
the volume to 8-10 ml . Keep for 15 min
• Recentrifuge at 1000-2000 RPM for 5 moin , decant , resupend pellets in 8-10 ml
fixative . Keep for 10 min.
• recentrifuge and resuspend in -.2 -0.4 ml fixative.
• Agitate suspends
• Wipe a slide with 70% alcohasl .wipe ant prewarmed the slide on hot plate
• One Drop suspension and expose to flame for air drying or let it be in air
• Stain with giemsa ( Giemsa Pwder 380 mg + 25 ml metanol+ gycerol for stock)
• Working Stock 2.5 ml+ metanol1.5 ml + 50 ml Giemsa water ( 0.2 M Na2 HPO4 80
ml+ 800 ml DW)
7. Types of Karyotype
• Asymmetric Karyotype- Show larger difference
between smaller and larger chromosome in a
set., Have more acrocentric chromosomes.
Symmetric Karyotype - Show lesser difference
between smaller and larger chromosome in a
set. Have more metacentric chromosomes
8. •Chromosmes has domain which
manifest various structural and
functional attributes of chromatin .
•Distinct chromatins are Euchromatin
and heterochromatin ( Facultative and
constitutive)
•At interphase EC is decondensed and
active genomic part with unique
sequences and HC is condensed (
transcriptional inert) and consists
repeated sequences
•both domain tends to vary from species
to species and co-relate with the nature
of gene i.e distribution of the nucleotide
sequences.
•Chromatin nature can be visualized as
band after staining with different dyes
and is of significance in many studies
9. Why Banding ?
It allows to judge changes in smaller pieces of the chromosomes
and related abnormalities which are not visible in analysis
Representation of cytogenetic bands
The cytogenetic bands are labled as P1 P2 P3 ,q1 q2 etc from the centromere to
telomere . At high resolution , sub band and sub sub bands are seen and
accordingly numbered as
Example 1
Locus 7q31.2 – indicates gene on 7th log arms at band 3, sub band 1 and sub
sub band 2
7qtel – 7th , long at telomere
10. Thus …
• Chromosome banding techniques produce a
series of consistent landmarks along the length of
metaphase chromosomes that allow for both
recognition of individual chromosomes within a
genome and identification of specific segments of
individual chromosomes.
• These landmarks facilitate assessment of
chromosome normalcy, identification of sites of
chromosome breaks and alterations, and location
of specific genes.
13. Q banding
• QUINACRINE BANDING (Q-BANDING)
• Q-banding (QFQ) was the first chromosome-banding method (Caspersson
et al., 1970)and remains the simplest.
• Slides of metaphase chromosomes are exposed to the fluorescent
• DNA intercalating agent quinacrine and viewed with a fluorescence
microscope
• Quinacrine, when bound to DNA, absorbs light at∼455 nm and has a
maximal emission at ∼495 nm. Hence, excitation filters in the 430- to 460-
nm range.
• Materials
• Air-dried slides of metaphase chromosomes
• Quinacrine staining solution
• McIlvaine buffer, pH 5.6
• Immersion oil, low fluorescence
• Coverslips, no. 0 or no. 1
McIlvaine buffer, pH 7.0
18.1 ml 0.1 M citric acid
81.9 ml 0.2 M dibasic sodium
phosphate (Na2HPO4)
Check pH and adjust to 7.0 with
either solution, if necessary
Store ≤6 months at room
temperature
14. Protocol for Q banding
• 1.Place air-dried slide of metaphase chromosomes in a
Couplin jar containing quinacrine staining solution, 5
min at room temperature.
• 2. Rinse slide by dipping several times into Coplin jar
filled with water. Discard rinse water, refill jar with with
fresh water, and repeat rinse. Air dry slide.
• Slide can be stored dry after this step for weeksin
backellite box to protect from light.
• 3. Mount slide using McIlvaine buffer, pH 5.6.
• Add a coverslip and gently squeeze excess buffer from
under coverslip by blotting gently with paper towel.
15. GTG Technique for G-Banding
• Materials
• Trypsin solution (20mg/ml in 0.9% NaCl
sored at -20 deg celcius)
• 70% and 90% (v/v) ethanol
• 7-10% Giemsa staining solution
Protocol
• Thaw 1ml trypsin and make 50 ml with 0.9%
NaCl in a couplin Jar ( pH 7.,5- 7.8)
• Add 50 ml phosphate buffer
• In another couplin jar, prepare 7-10%
Giemsa stain
• Dip slides in trypsin for 5 sec.
• Rinse in phophate buffer
• stain in giemsa for 3-5 min.
16. R Banding: Reverse chromosome banding
• (R-banding) produces a pattern of bands that is the reverse of the Q- and
G-banding pattern—i.e., a dark (positive) G-band is a light (negative) R-
band and vice versa.
• R-banding can be used for chromosome identification, although G-banding
is usually preferred.
• R-banding is also useful for visualization of telomeric ends of
chromosomes; these ends stain intensely with R-banding and negatively
with G-banding
RHG Technique for R-Banding
1. Preheat 25 M sodium phosphate buffer (pH 4.0) to 87° or 88°C in covered Coplin
jars in covered circulating water bath.
Both Coplin jars and water bath should be kept covered to maintain temperature.
2. Prewet each air-dried slide of metaphase chromosomes in water and place in
87° to 88°C sodium phosphate buffer (pH 4.0), one slide per jar, 5 to 15 min. Rinse
in water.
3. Stain slide 5 to 10 min in 10% Giemsa staining solution. Rinse in water and air
dry.
17. CA3/DA Technique for R-Banding
• 1. Apply 100 μl chromomycin A3 staining solution to air-dried metaphase
chromosome slide and cover with no. 1 coverslip. Allow to stain 15 min.
• 2. Remove coverslip, then rinse by quickly pouring water over slide. Shake off
excess water.
• 3. Apply 100 μl distamycin A staining solution to slide and cover with no. 1
coverslip. Allow to stain 5 min.
• 4. Remove coverslip and rinse in distilled water as in step 2.
• 5. Mount in glycerol and add a coverslip.
• 6. Examine and photograph with fluorescence microscope with appropriate
• filter set
Distamycin A staining solution with
MgCl2
1 mg distamycin A (Sigma)
5 ml McIlvaine buffer, pH 7.0
5 ml H2O
1 mg MgCl2⋅6H2O
Store ≤1 month at −20°C in 1.5-ml aliquots
wrapped in foil
Chromomycin A3 staining solution
Dissolve 5 mg chromomycin in two
drops 100% ethanol. Add 10 ml of a
solution containing 5 ml McIlvaine
buffer, pH 7.0, 5 ml H2O, and 1mg (5
mM) of MgCl2⋅6H2O.
Mix. Store in 1.5-ml aliquots ≤1 year at
−20°C wrapped in foil.
Discard thawed solution after 2 weeks.
18.
19. 5%Ba(OH)2
Dip the slides in 0.2NHCl in a couplin jar for 30 ‘ followed by
two rinse in DW
Air dry and put in Ba ( OH)2 at 50 deg celcius for 1 to 5 ‘
Rinse in two for change in DW
Dry and keep in 2XSSC inside water bath at 60 deg celcius fotr
1-2hrs
Rinse in water and stain with giemsa for 15-20 mi. Mount in
DPX
20. N Banding – Detection of NOR region
This procedure is sometimes referred to as silver staining because it uses a
silver nitrate solution.
It stains the active ribosomal DNA-containing nucleolar organizer regions
in interphase nuclei and sites near the ends of the short arms (in the area
called the stalks) of human acrocentric chromosomes 13, 14, 15, 21, and
22. This stain is viewed with a
bright-field microscope
PROTOCOL
1. Add 3 drops of 2% gelatin solution and 4 drops of 50% silver nitrate
solution to recently made, unheated, air-dried slide of metaphase
chromosomes. Cover with
coverslip.
2. Heat 2 to 4 min on 65°C slide warmer or in drying oven. Remove slide
from heat when solution appears golden brown.
3. Rinse in beaker with ∼100 ml of 3% acetic acid.
Acetic acid works like a stop bath to end the staining reaction.
4. Rinse in water and air dry.
5. View and photograph with bright-field microscope