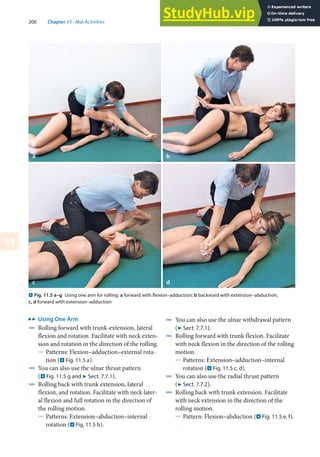
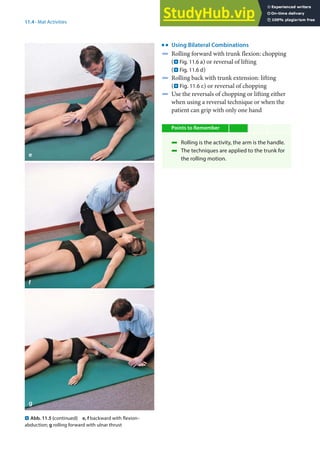
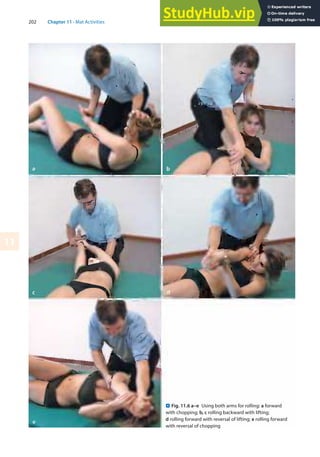
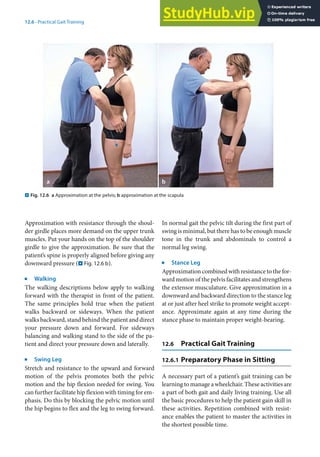
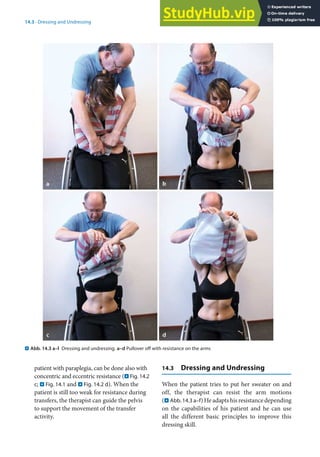
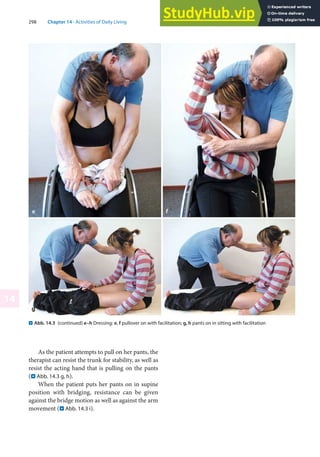
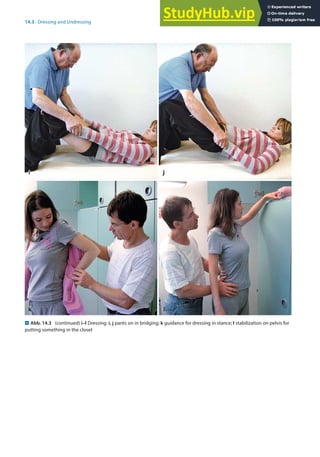
Downloaded 93 times


![2
23
2.6 · Visual Stimulus
Definition
The verbal command tells the patient what to
do and when to do it.
The therapist must always bear in mind that the
command is given to the patient, not to the body
part being treated. Preparatory instructions need to
be clear and concise, without unnecessary words.
They may be combined with passive movement and
visual control from the patient to teach the desired
movement.
The timing of the command is important to co-
ordinate the patient’s reactions with the therapist’s
hands and resistance. It guides the start of move-
ment and muscle contractions. It helps give the
patient corrections for motion or stability.
Timing of the command is also very important
when using the stretch reflex. The initial command
should come immediately before the stretch the
muscle chain to coordinate the patient’s conscious
effort with the reflex response (Evarts and Tannji
1974). The action command is repeated to urge
greater effort or redirect the motion.
In reversal techniques, proper timing between
verbal commands and muscle activity is important
when we change the direction of the resistance. A
preparatory command should be given with the
therapist changing hand and an action command
should be given with the therapist applying resis-
tance in the new direction.
The volume with which the command is given
can affect the strength of the resulting muscle con-
tractions (Johansson et al. 1983). The therapist
should give a louder command when a strong
muscle contraction is desired and use a softer and
calmer tone when the goal is relaxation or relief of
pain.
The command is divided into three parts:
1. Preparation: readies the patient for action
2. Action: tells the patient to start the action
3. Correction: tells the patient how to correct and
modify the action.
The repetition, the type of command, as well as the
correction of the movement contribute to the at-
tentiveness of the patient. Furthermore, the patient
is inspired to exert more effort or correct his move-
ment. For example, the command for the lower ex-
tremity pattern of flexion–adduction–external rota-
tion with knee flexion might be [preparation]
»ready, and«; [action] »now pull your leg up and in«;
[correction] »keep pulling your toes up« (to correct
lack of dorsiflexion).
Points to Remember
For elderly patients, the visual input can be
more important than the verbal input (Gentile
1987; Lee and Lishman 1975).
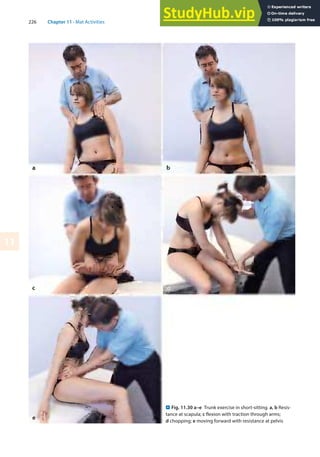
2.6 Visual Stimulus
Definition
Visual feedback promotes muscular activity,
by helping with coordination, strength, and
stability.
Therapeutic Goals
4 The therapist receives visual information as to
whether the applied stimulus was appropriate for
the task, or whether it was too intensive or even
caused pain.
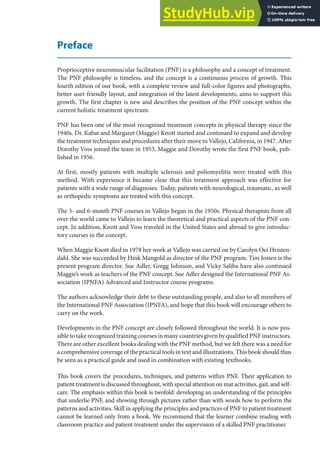
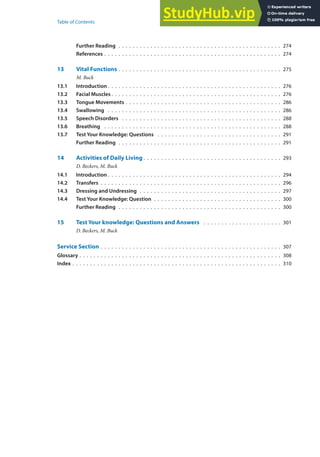
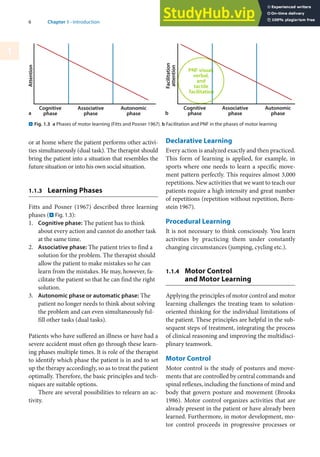
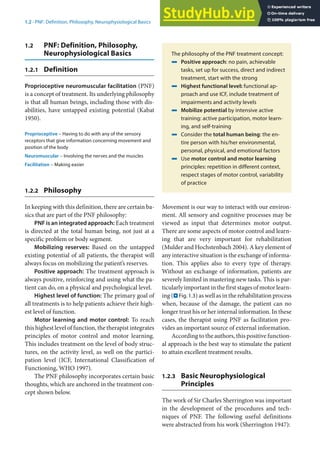
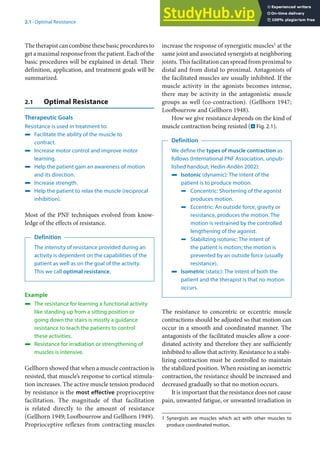
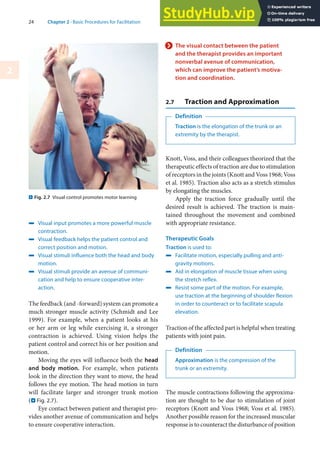
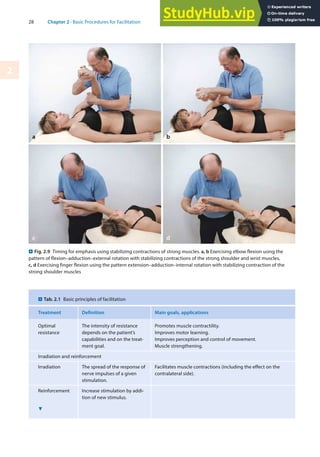
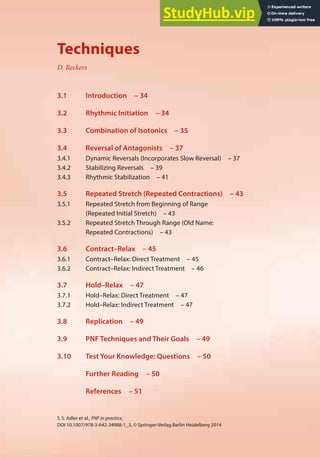
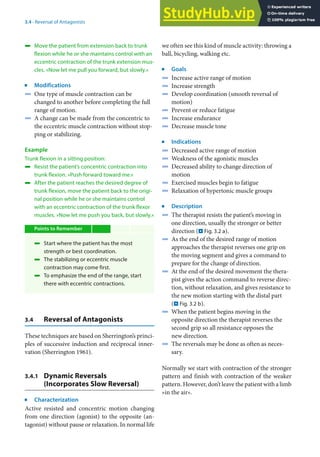
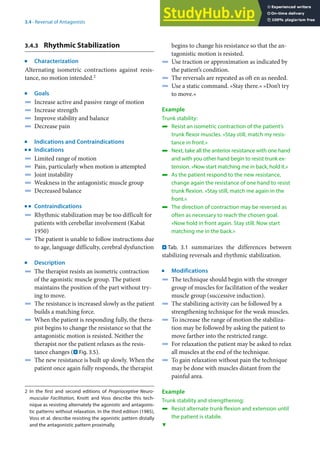
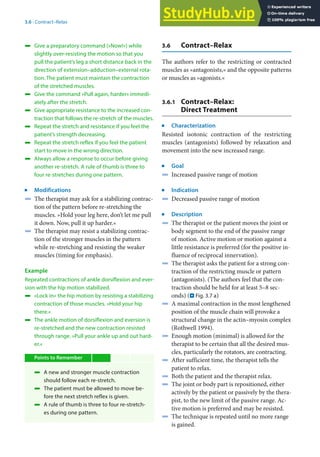
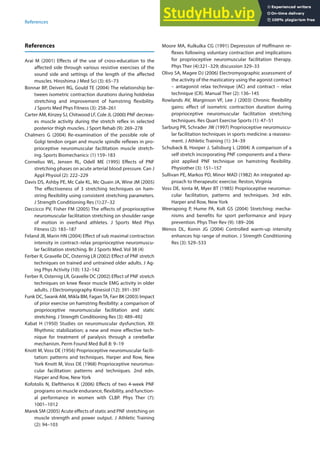
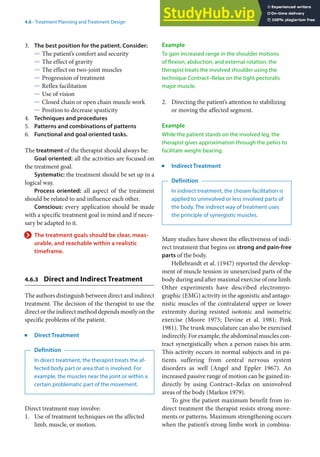
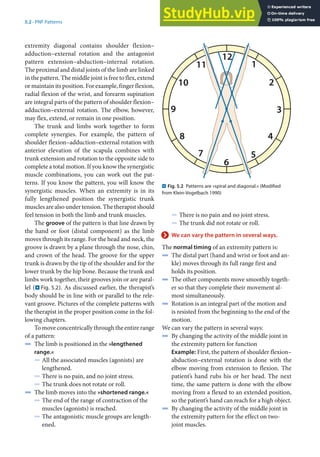
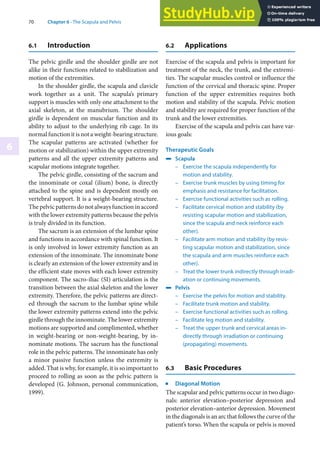
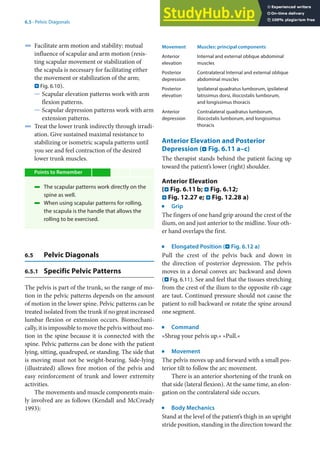
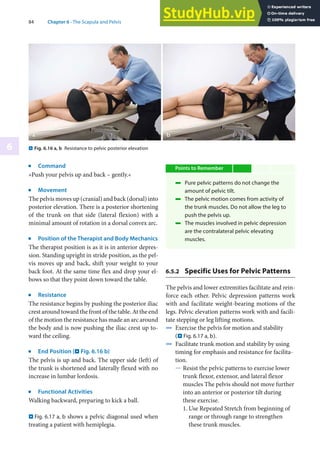
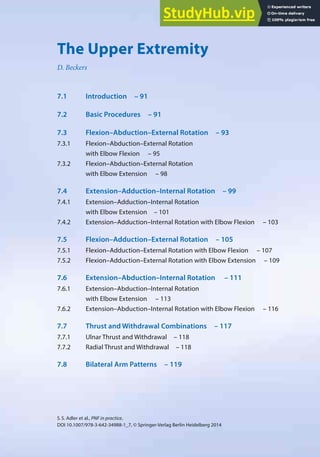
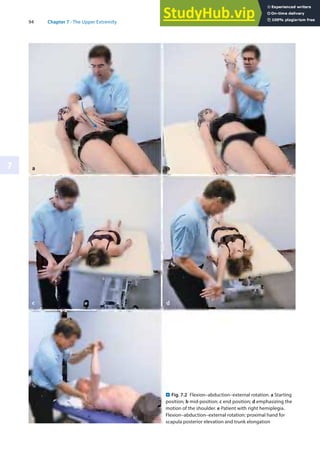
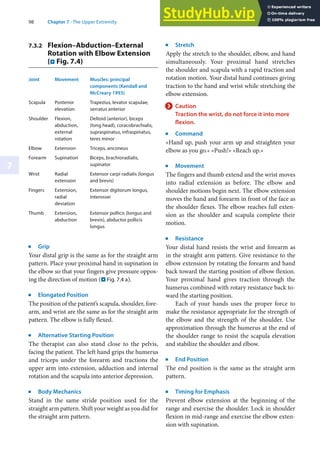
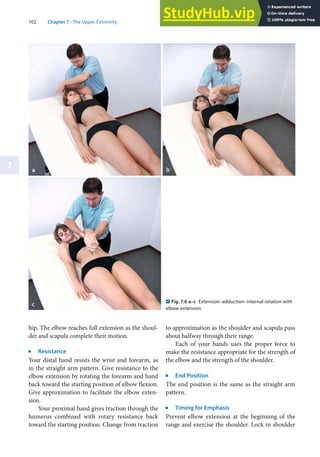
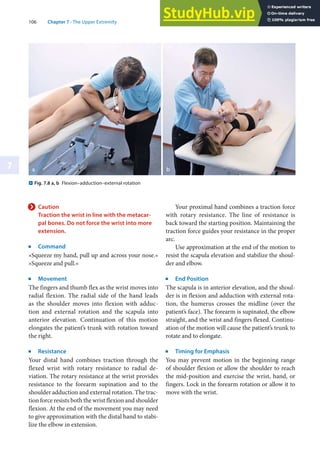
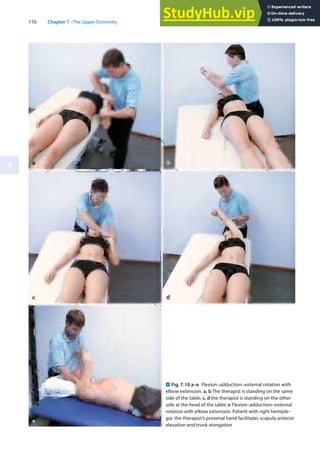
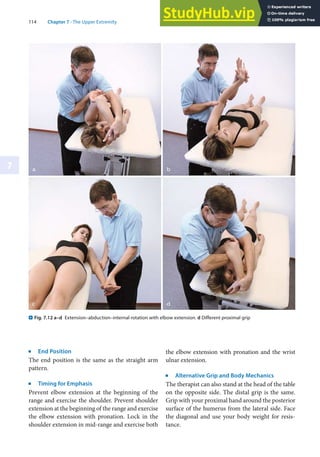
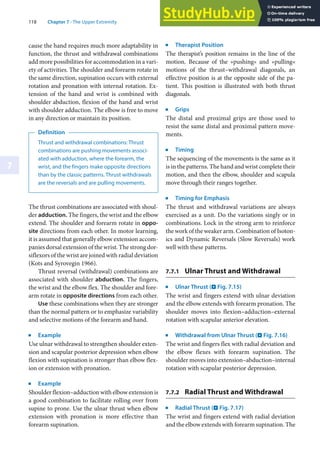
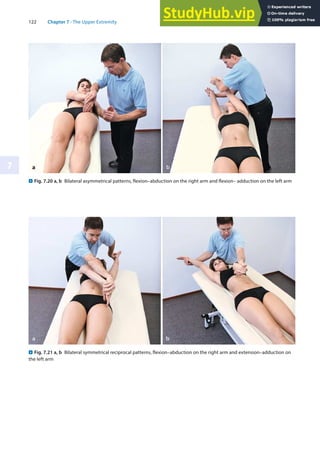
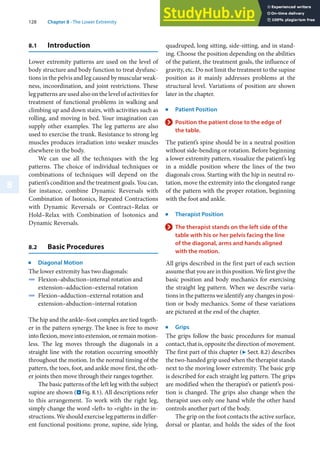
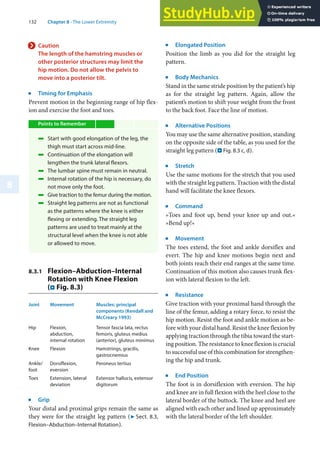
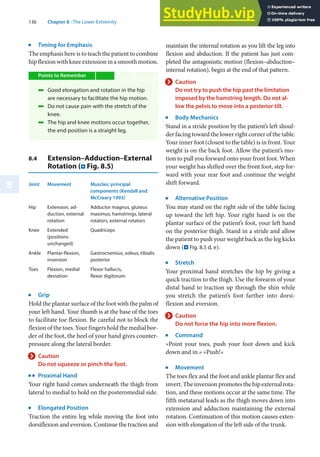
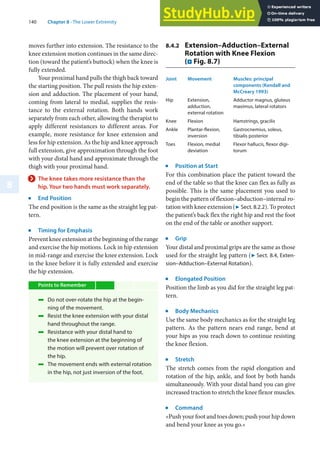
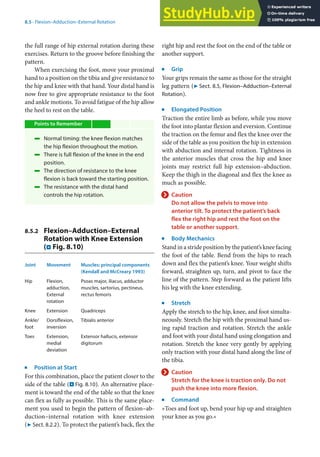
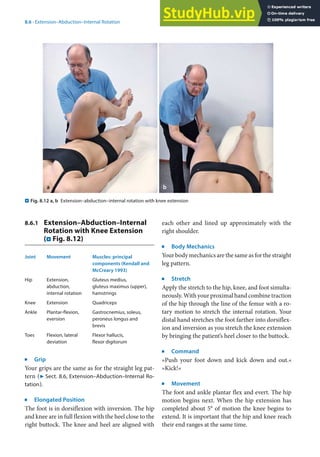
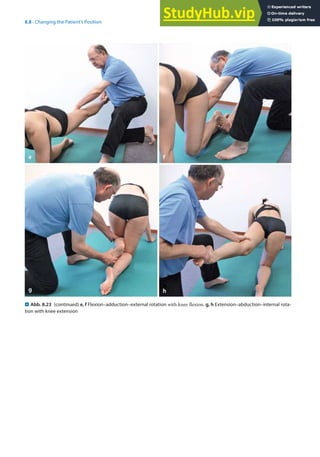
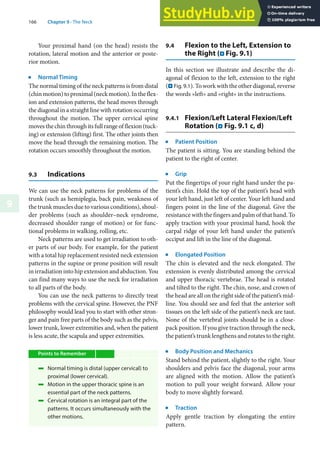
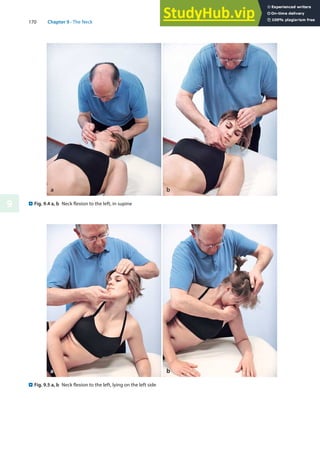
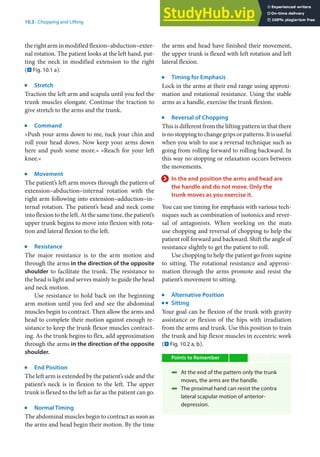
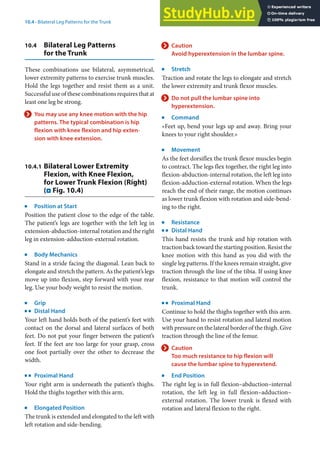
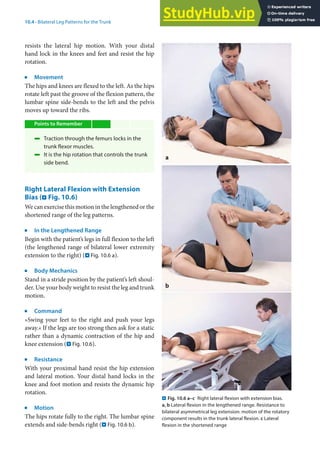
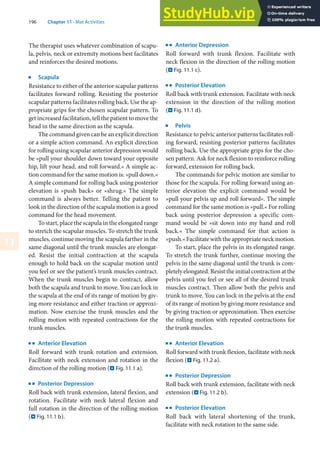
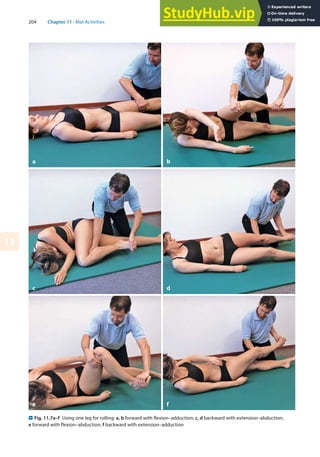
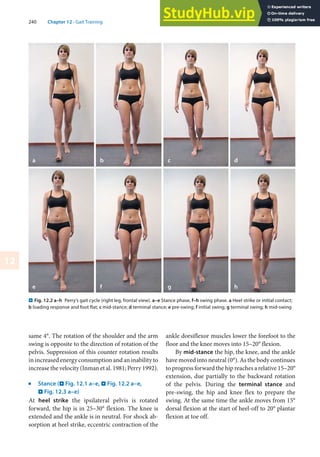
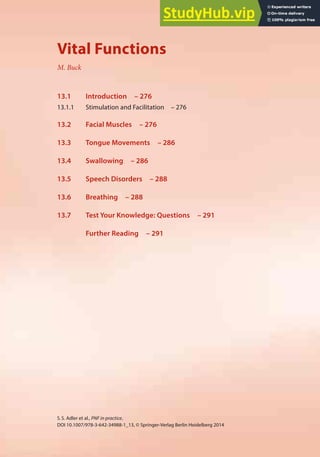
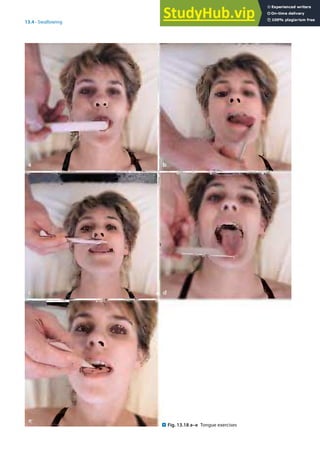
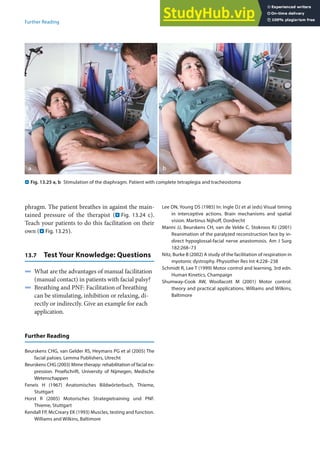
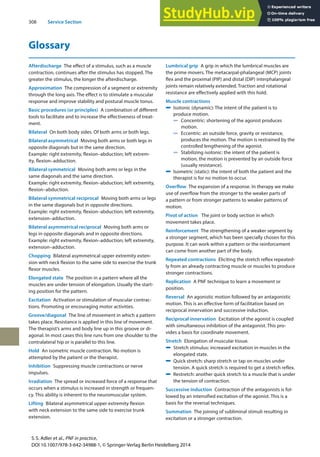
. Fig. 2.6 Positioning of the therapist’s body for the leg
pattern flexion–abduction–internal rotation
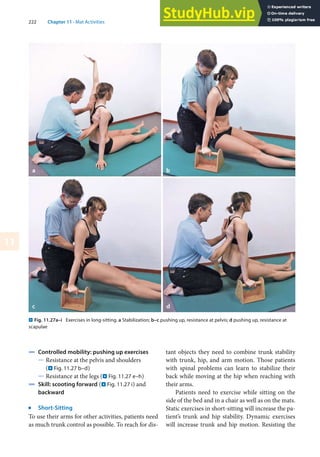
6](https://image.slidesharecdn.com/anillustratedguidepnfinpracticefourthedition-230805192459-547ae622/85/An-Illustrated-Guide-PNF-In-Practice-Fourth-Edition-33-320.jpg)


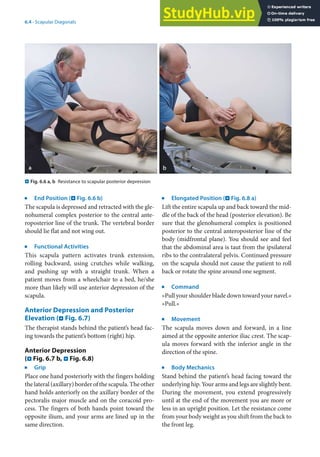

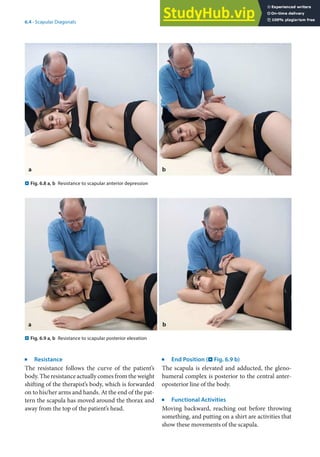


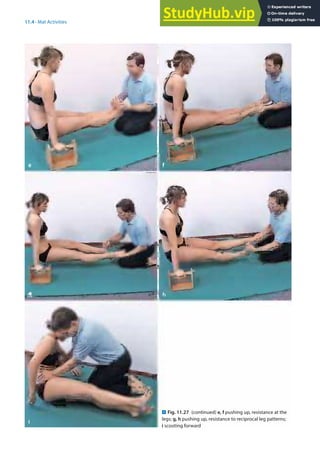
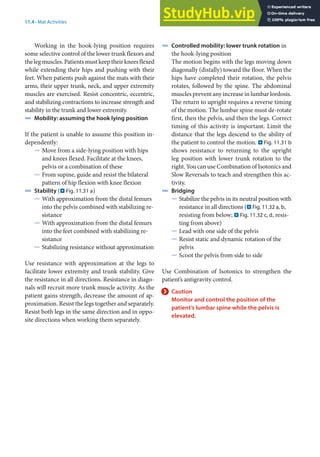
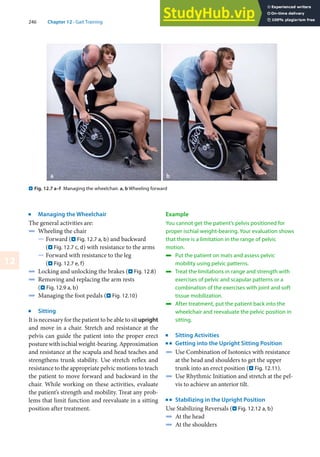
![234 Chapter 11 · Mat Activities
11
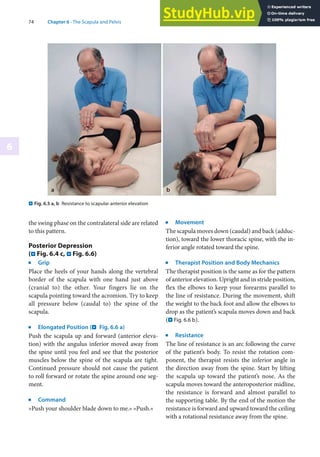
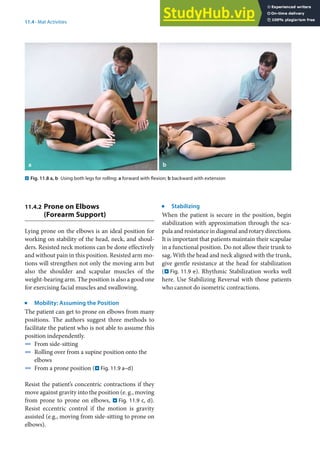
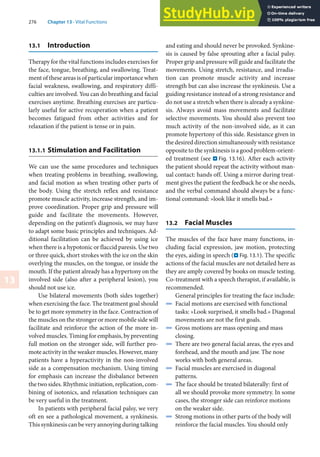
j
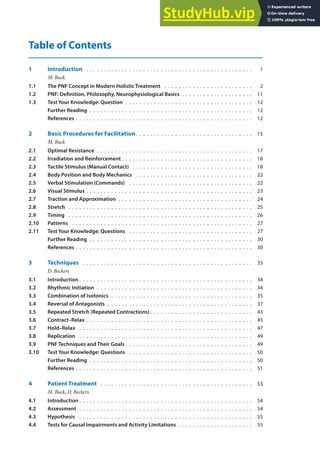
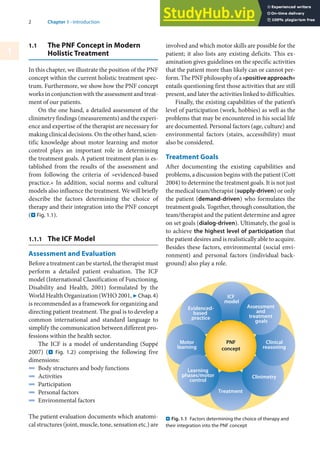
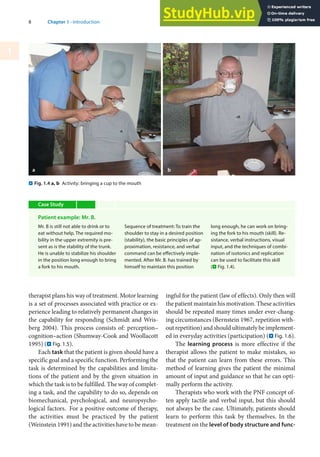
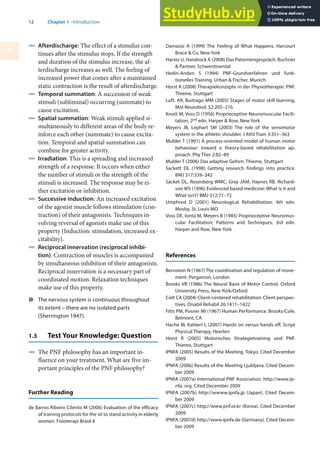
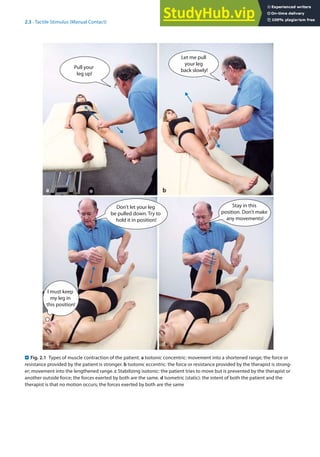
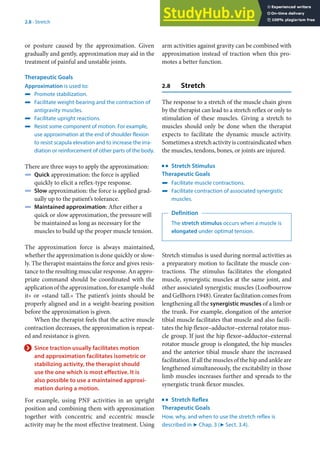
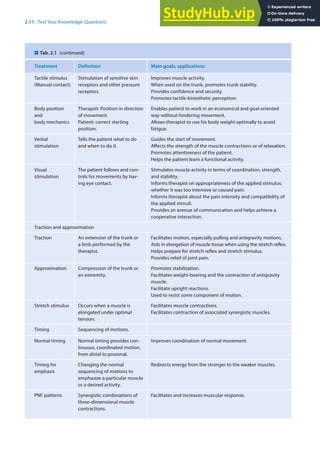
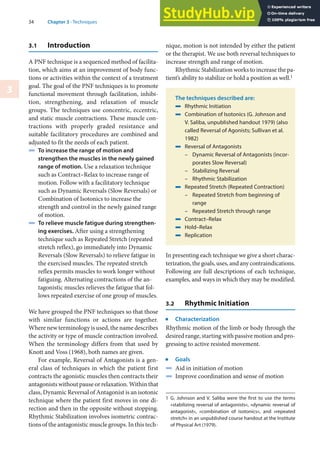
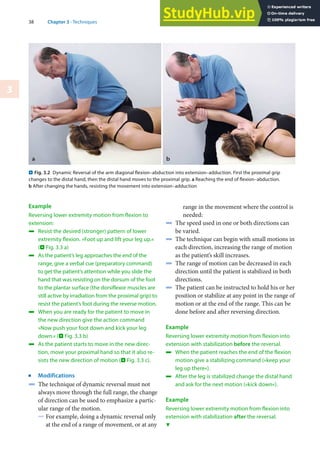
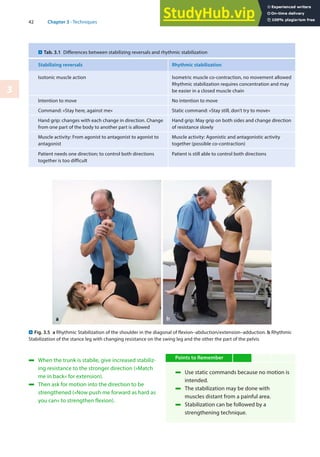
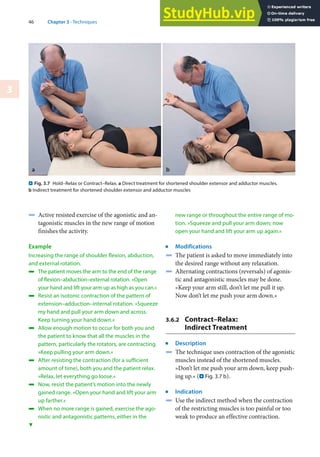
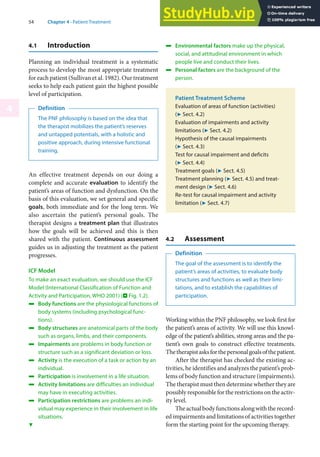
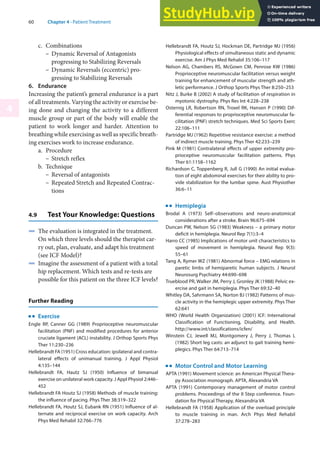
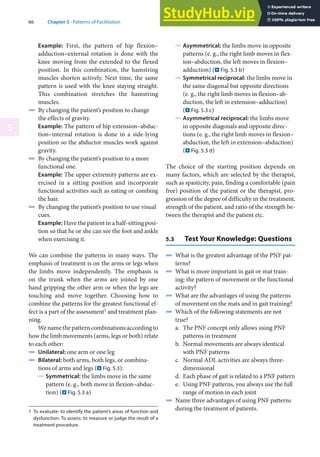
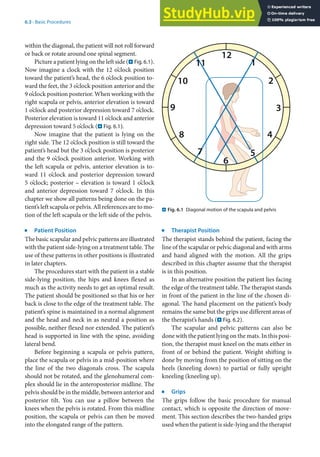
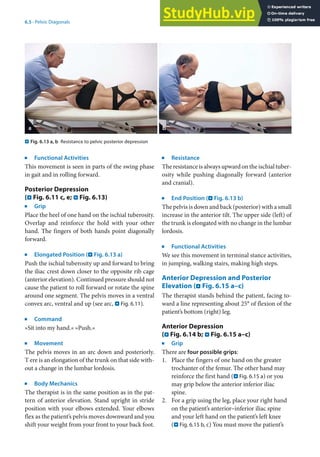
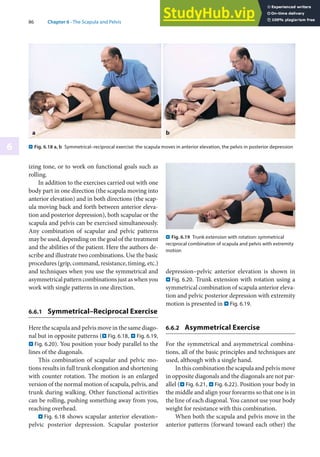
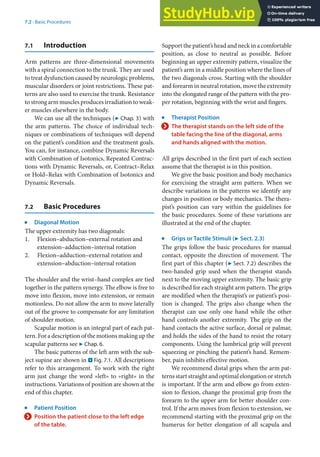
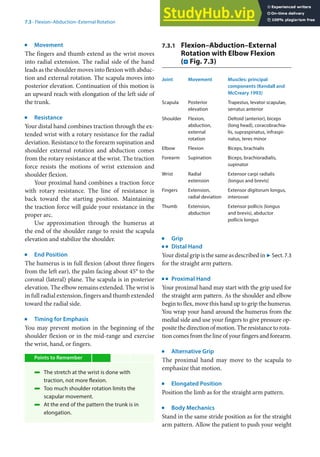
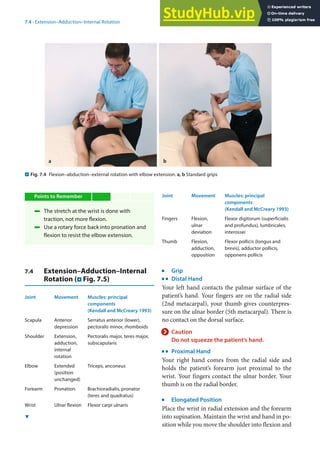
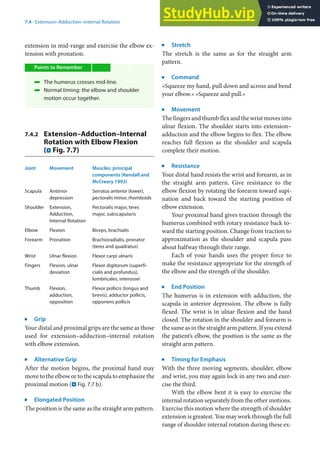
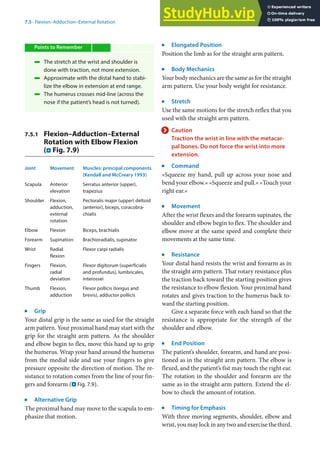
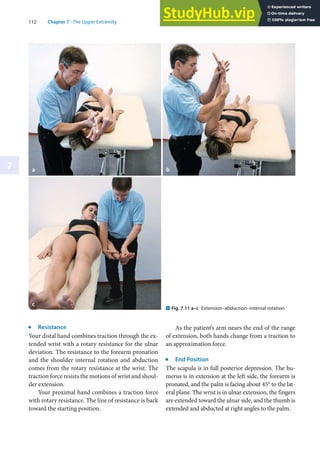
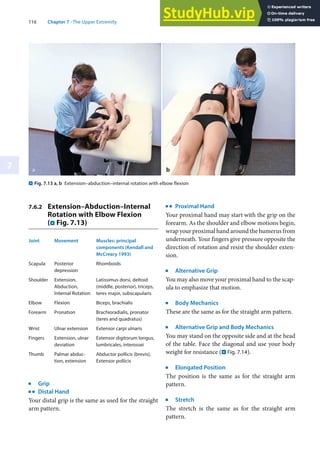
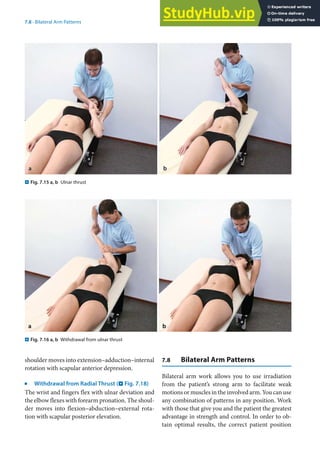
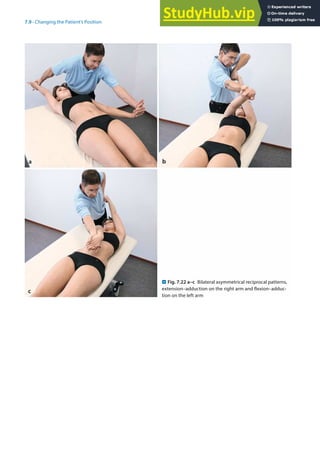
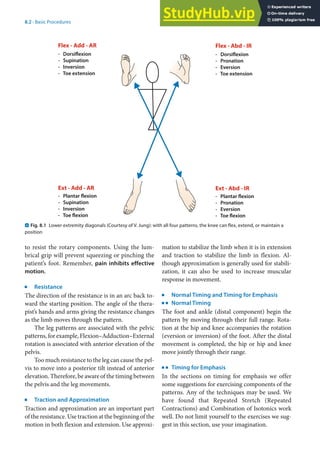
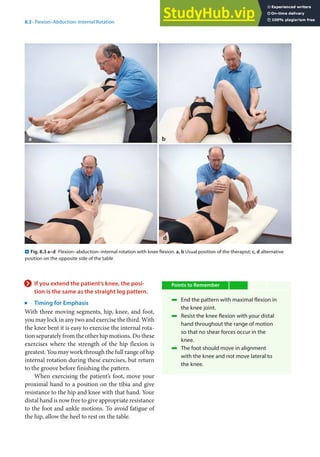
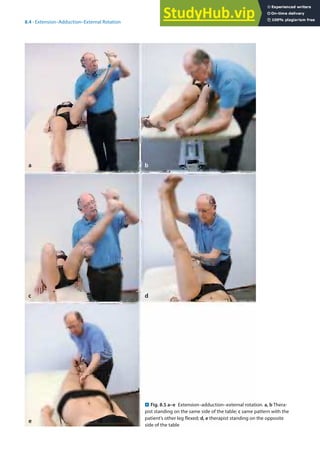
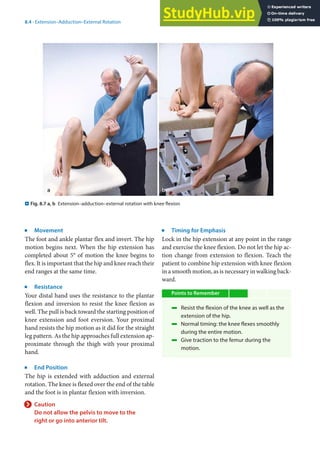
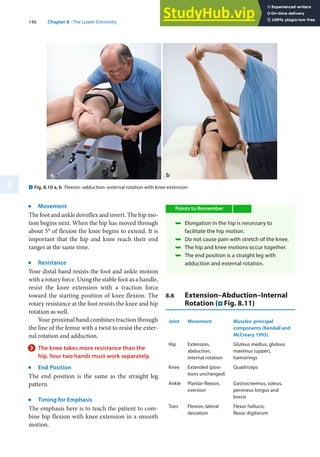
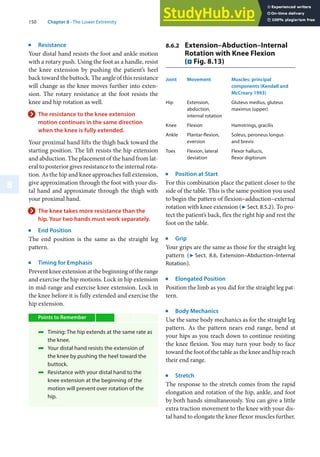
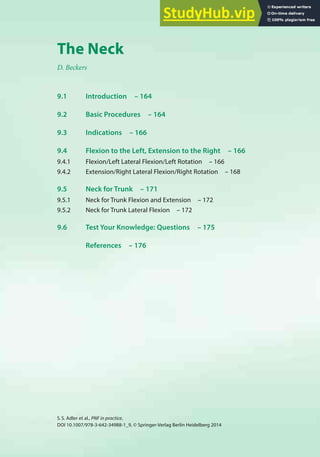
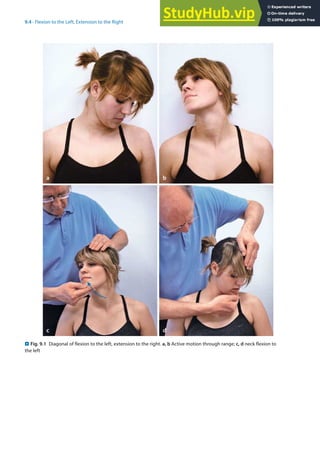
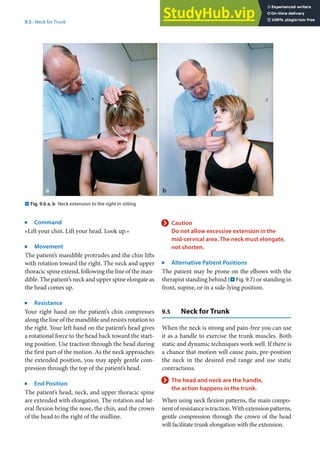
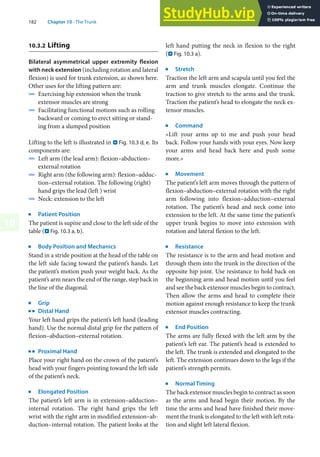
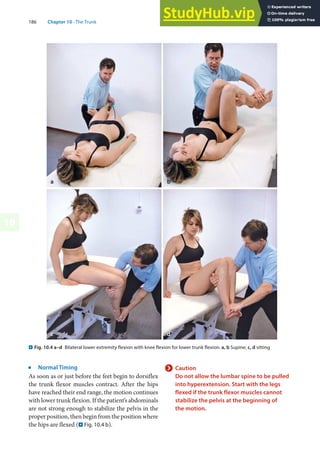
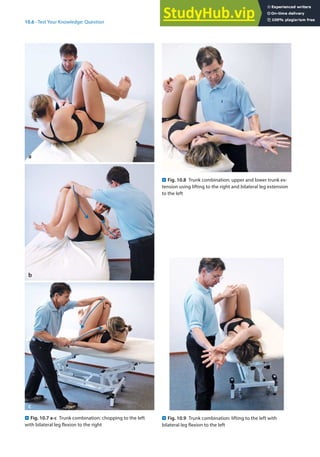
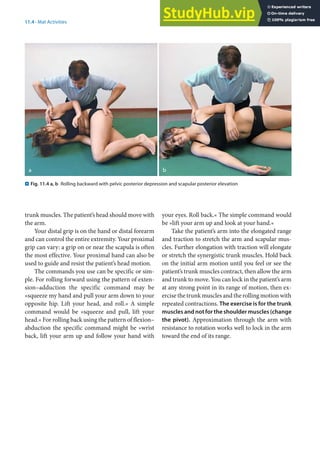
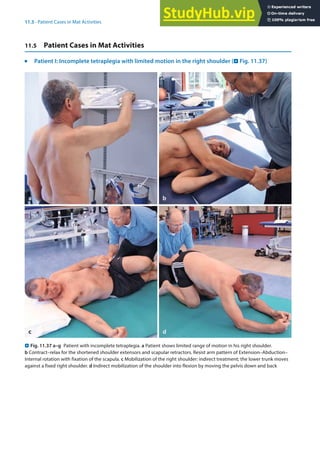
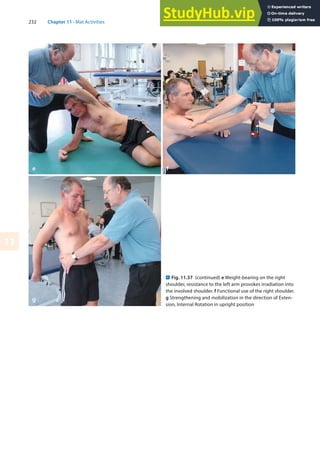
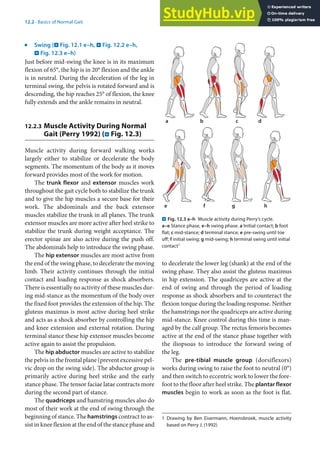
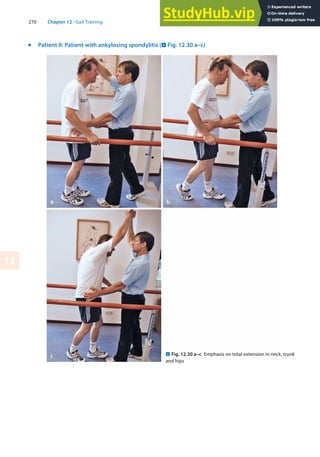
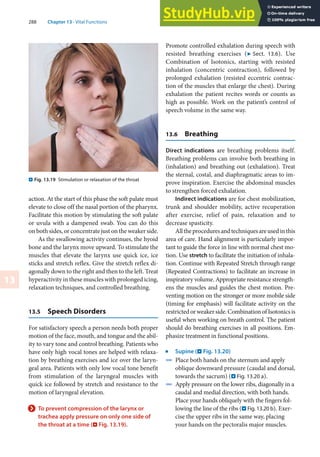
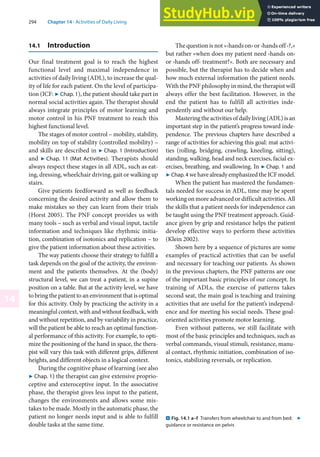
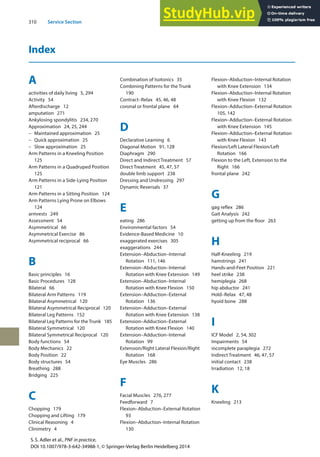
Patient III: Ankylosing spondylitis (Spondylitis ankylopoetica)1 (. Fig. 11.39)
1 Ankylosing spondylitis: The form of rheumatoid arthritis affecting the spine. It occurs predominantly in young males and
produces pain and stiffness as a result of inflammation of the sacroiliac, intervertebral, and costovertebral joints. Aetiology
is unknown. [On-line Medical Dictionary (OMD), Academic Medical Publishing & Cancer WEB 1997–1998].
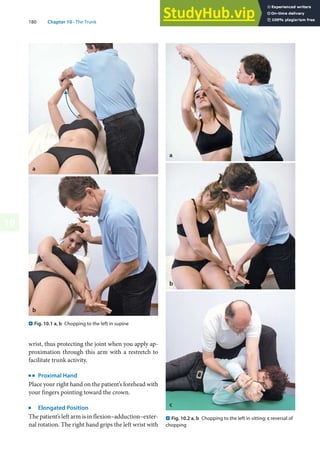
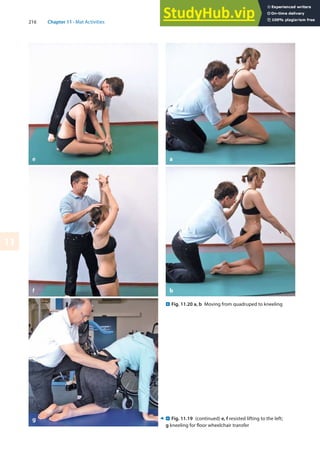
. Fig. 11.39 a–c Bridging. b Bridging combined with lifting
to the right; c kneeling with lifting
a b
c](https://image.slidesharecdn.com/anillustratedguidepnfinpracticefourthedition-230805192459-547ae622/85/An-Illustrated-Guide-PNF-In-Practice-Fourth-Edition-240-320.jpg)


![274 Chapter 12 · Gait Training
12
12.8 Test Your Knowledge: Questions
4 Which muscles are working eccentrically
during the loading response?
4 Why do we use exaggerated exercises in our
PNF gait training?
4 Give five examples of how to use different PNF
techniques in gait or in mat activities.
Further Reading
k
Posture Control and Movement
Finley FR, Cody KA (1969) Locomotive characteristics of
urban pedestrians. Arch Phys Med Rehabil 51:423–426
Gahery Y, Massion J (1981) Co-ordination between posture
and movement. Trends Neurosci 4:199–202
Nashner LM (1980) Balance adjustments of humans per-
turbed while walking. J Neurophysiol 44:650–664
Nashner LM (1982) Adaptation of human movement to
altered environments. Trends Neurosci 5:358–361
Nashner LM, Woollacott M (1979) The organization of rapid
postural adjustments of standing humans: an experi-
mental-conceptual model. In: Talbott RE, Humphrey DR
(eds) Posture and movement. Raven, New York
Woollacott MH, Shumway-Cook A (1990) Changes in posture
control across the life span – a systems approach. Phys
Ther 70:799–807
k
Gait
Göz-Neumann K (2003) Gehen verstehen, Ganganalyse in der
physiotherapie. Thieme Verlag, Stuttgart
Horst R (2005) Motorisches Strategietraining und PNF.
Thieme Verlag, Stuttgart
Inman VT, Ralston HJ, Todd F (1981) Human walking. Williams
and Wilkins, Baltimore
Kettelkamp DB, Johnson RJ, Schmidt GL, et al (1970) An elec-
trogoniometric study of knee motion in normal gait.
J Bone Joint Surg [A] 52:775–790
Lehmann JF (1990) Gait analysis, diagnosis and manage-
ment. In: Krusens handbook of physical medicine and
rehabilitation, Saunders, Philadelphia, pp 108–125
Lehmann JF (1990) Lower extremity orthotics. In: Krusens
Handbook of physical medicine and rehabilitation.
Saunders, Philadelphia, pp 602–646
Mann RA, Hagy JL, White V, Liddell D (1979) The initiation of
gait. J Bone Joint Surg [A] 61:232–239
McFadyen BJ, Winter DA (1988) An integrated biomechanical
analysis of normal stair ascent and descent. J Biomech
21:733–744
Murray MP, Kory RC, Sepic SB (1970) Walking patterns of
normal women. Arch Phys Med Rehabil 51:637–650
Murray MP, Drought AB, Kory RC (1964) Walking patterns of
normal men. J Bone Joint Surg [A] 46:335–360
Nashner LM (1976) Adapting reflexes controlling the human
posture. Exp Brain Res 26:59–72
Pohl M, Mehrholz J, Ritschel C, Rückriem S (2002) Speed de-
pendent treadmill training in ambulatory hemiparetic
stroke patients: A RCT. Stroke (33): 553–558
Smidt G (1990) Gait in rehabilitation. Churchill Livingstone,
New York
Sutherland DH (1966) An electromyographic study of the
plantar flexors of the ankle in normal walking on the
level. J Bone Joint Surg [A] 48:66–71
Sutherland DH, Cooper L, Daniel D (1980) The role of the an-
kle plantar flexors in normal walking. J Bone Joint Surg
[A] 62:354–363
Sutherland DH, Olshen R, Cooper L, Woo SLY (1980) The de-
velopment of mature gait. J Bone Joint Surg 62:336–353
Wang RY (1994) The effect of proprioceptive neuromuscular
facilitation in case of patients with hemiplegia of long
and short duration. Phys Ther 1994 (12): 25–32
Winter D (1989) The biomechanics and motor control of
human gait. University of Waterloo Press, Waterloo
Wittle M (1991) Gait analysis: an introduction. Butterworth-
Heinemann, Oxford
Yigiter K, Sener G, Erbahceci F, BayarK, Ülger ÖG, Akodogan S
(2002) A comparison of traditional prosthetic training
versus PNF resistive gait training with trans-femoral am-
putees. Prosthet Orthot Int (26): 213–217
References
Adler SS (1976) Influence of »Joint Approximation« on lower
extremity extensor muscles: an EMG study. Unpublished
thesis presented at APTA annual conference, New Orleans
Beckers D, Deckers J (1997) Ganganalyse und Gangschulung,
Springer Verlag, Berlin Heidelberg New York
Eberhart HD, Inman VT, Bresler B (1954) The principal elements
in human locomotion. In: Klopteg PE, Wilson PD (eds)
Human limbs and their substitutes. McGraw-Hill, New York
Horak FB, Nashner LM (1986) Central programming of pos-
tural movements: adaptation to altered support-surface
configurations. J Neurophysiol 55 (6):1369–1381
Inman VT, Ralston HJ, Todd F (1981) Human walking. Williams
& Wilkins, Baltimore
Lerner-Frankiel MB, Vargas S, Brown M, Krusell L (1986) Func-
tional community ambulation: what are your criteria?
Clin Management 6 (2):12–15
Murray MP, Drought AB, Kory RC (1964) Walking patterns of
normal men. J Bone Joint Surg [A]:335–360
Nuzik S, Lamb R, VanSant A, Hirt S (1986) Sit-to-stand move-
ment pattern, a kinematic study. Phys Ther 66 (11):
1708–1713
Perry J (1992) Gait analysis, normal and pathological func-
tion. Slack, NJ
Podsiadlo D et al (1991) The timed »Up and go«: a test of basic
functional mobility for elderly persons. American Geriat-
rics Society 39:142–148](https://image.slidesharecdn.com/anillustratedguidepnfinpracticefourthedition-230805192459-547ae622/85/An-Illustrated-Guide-PNF-In-Practice-Fourth-Edition-280-320.jpg)


This document provides an illustrated guide to proprioceptive neuromuscular facilitation (PNF) in practice. It is the fourth edition of the guide, which has been fully revised with updated content and full-color illustrations. The guide aims to describe the position of PNF within the current holistic treatment spectrum and provide a practical resource for understanding and applying PNF principles and techniques. It covers PNF procedures, techniques, and patterns as well as their application to patient treatment, with a focus on developing readers' understanding and skills. The authors hope this guide will encourage others to continue advancing the PNF approach to physical therapy.


