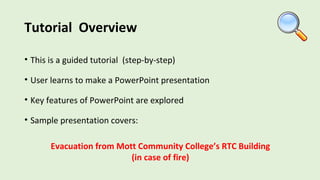
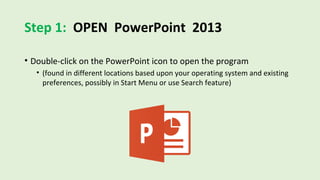
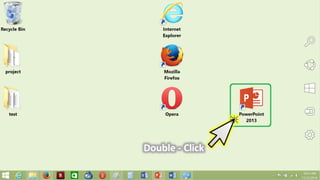
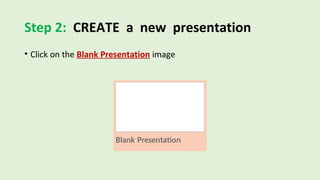
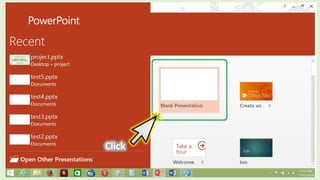
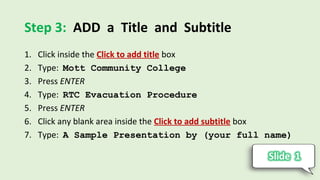
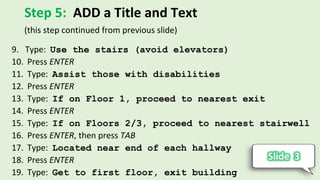
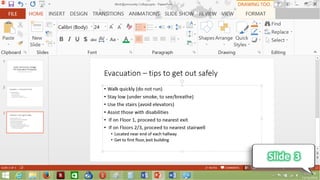
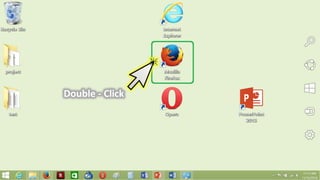
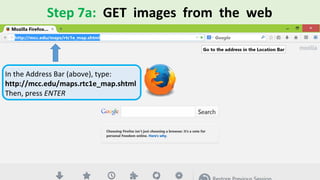
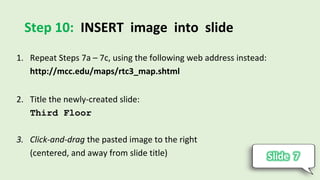
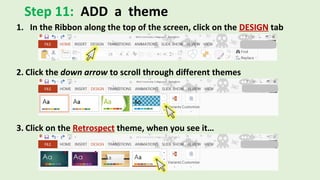
A Guided Tutorial on PowerPoint 2013
Audience: MapIt, Inc.
Presenter: Ryan Canfield
What is PowerPoint?
• Program created by Microsoft Corporation
• Assists with making seamless presentations
• Very popular with students and professionals
• Sold in stores / Available for download
• Latest version is 2013
Tutorial Overview
• This is a guided tutorial (step-by-step)
• User learns to make a PowerPoint presentation
• Key features of PowerPoint are explored
• Sample presentation covers:
Evacuation from Mott Community College’s RTC Building
(in case of fire)
• Computer
• Internet connection
• Web browser
• (such as Internet Explorer, Mozilla Firefox, or Google Chrome)
• Microsoft PowerPoint 2013
• (other versions will work, but variations in software may be confusing)
• Familiarity with these concepts and tasks:
• Powering on a computer / Logging into an account
• Navigating a Windows operating system / Browsing the Web
• Using a keyboard and mouse:
• Typing … Clicking (aka: Left-Clicking) … Hovering …
• Double-Clicking … Right-Clicking … Scrolling … Dragging … Etc.
1. POWER-ON the computer
2. MAKE SURE the keyboard, mouse, and monitor are functional
3. VIEW the desktop screen … see next slide
Step 1: OPEN PowerPoint 2013
• Double-click on the PowerPoint icon to open the program
• (found in different locations based upon your operating system and existing
preferences, possibly in Start Menu or use Search feature)
Step 2: CREATE a new presentation
• Click on the Blank Presentation image
Step 3: ADD a Title and Subtitle
1. Click inside the Click to add title box
2. Type: Mott Community College
3. Press ENTER
4. Type: RTC Evacuation Procedure
5. Press ENTER
6. Click any blank area inside the Click to add subtitle box
7. Type: A Sample Presentation by (your full name)
Step 4: ADD a Title and Text
1. Click the New Slide icon
2. Click inside the Click to add title box
3. Type: Evacuation – in the event of a fire
4. Click any blank area inside the Click to add text box
5. Type: Evacuate the RTC if:
6. Press ENTER, then press TAB.
(this step is continued on next slide)
Step 4: ADD a Title and Text
7. Type: You see or smell smoke
8. Press ENTER
9. Type: You see fire or flames
10. Press ENTER
11. Type: You hear the fire alarm ringing
12. Press ENTER
13. Type: Someone alerts you to the presence of fire
(this step is continued from previous slide)
Step 5: ADD a Title and Text
1. Click the New Slide icon
2. Click inside the Click to add title box
3. Type: Evacuation – tips to get out safely
4. Click any blank area inside the Click to add text box
5. Type: Walk quickly (do not run)
6. Press ENTER
7. Type: Stay low (under smoke, to see/breathe)
8. Press ENTER
(this step continued on next slide)
Step 5: ADD a Title and Text
9. Type: Use the stairs (avoid elevators)
10. Press ENTER
11. Type: Assist those with disabilities
12. Press ENTER
13. Type: If on Floor 1, proceed to nearest exit
14. Press ENTER
15. Type: If on Floors 2/3, proceed to nearest stairwell
16. Press ENTER, then press TAB
17. Type: Located near end of each hallway
18. Press ENTER
19. Type: Get to first floor, exit building
(this step continued from previous slide)
Step 6: OPEN your web browser
• Double-click on your favorite browser icon to open the program
• (found in different locations based upon your operating system and existing
preferences, possibly in Start Menu or use Search feature)
• In this demonstration, we will use Mozilla Firefox
• (but you can choose another)
Step 7a: GET images from the web
In the Address Bar (above), type:
http://mcc.edu/maps.rtc1e_map.shtml
Then, press ENTER
Step 7b: GET images from the web
HOVER mouse pointer over floorplan image,
RIGHT-CLICK on this image,
CLICK on “Copy Image” from dropdown menu
Step 7c: INSERT image into slide
1. Return to PowerPoint, view the last slide…
2. Click the New Slide icon
3. Click inside the Click to add title box
4. Type: First Floor - EAST
5. Right-Click any blank area inside the Click to add text box
6. In the dropdown menu, look for “Paste Options”
7. Click on the center option: Keep Source Formatting (K)
… the image copied from the webpage will appear …
Step 8: INSERT image into slide
1. Repeat Steps 7a – 7c, using the following web address instead:
http://mcc.edu/maps/rtc1w_map.shtml
2. Title the newly-created slide:
First Floor – WEST
3. Click-and-drag the pasted image to the right
(centered, and away from slide title)
Step 9: INSERT image into slide
1. Repeat Steps 7a – 7c, using the following web address instead:
http://mcc.edu/maps/rtc2_map.shtml
2. Title the newly-created slide:
Second Floor
3. Click-and-drag the pasted image to the right
(centered, and away from slide title)
Step 10: INSERT image into slide
1. Repeat Steps 7a – 7c, using the following web address instead:
http://mcc.edu/maps/rtc3_map.shtml
2. Title the newly-created slide:
Third Floor
3. Click-and-drag the pasted image to the right
(centered, and away from slide title)
Step 11: ADD a theme
1. In the Ribbon along the top of the screen, click on the DESIGN tab
2. Click the down arrow to scroll through different themes
3. Click on the Retrospect theme, when you see it…
1. Click here
2. Click here
3. Click here
Step 12: ADD animated slide transitions
1. Using the left pane, return to the very first slide
2. In the Ribbon at the top of screen, click on the TRANSITIONS tab
3. Click on Push and make sure “On Mouse Click” is checked
4. Repeat this process for every remaining slide …
Step 13a: CREATE a slideshow
• In the Ribbon along the top of the screen, click the FILE tab
Step 13b: CREATE a slideshow
• In the File menu screen, click on Save as
Step 13c: CREATE a slideshow
• At the “Save as” dialog box, follow these instructions:
1. Type: Sample Presentation
2. Select .PPS from dropdown menu
3. Click the “Save” button
You have now created your own slideshow in PowerPoint!
Training End Users - How to Make a PowerPoint Presentation

Training End Users - How to Make a PowerPoint Presentation

  • 1.
    A Guided Tutorialon PowerPoint 2013 Audience: MapIt, Inc. Presenter: Ryan Canfield
  • 2.
    What is PowerPoint? •Program created by Microsoft Corporation • Assists with making seamless presentations • Very popular with students and professionals • Sold in stores / Available for download • Latest version is 2013
  • 3.
    Tutorial Overview • Thisis a guided tutorial (step-by-step) • User learns to make a PowerPoint presentation • Key features of PowerPoint are explored • Sample presentation covers: Evacuation from Mott Community College’s RTC Building (in case of fire)
  • 4.
    • Computer • Internetconnection • Web browser • (such as Internet Explorer, Mozilla Firefox, or Google Chrome) • Microsoft PowerPoint 2013 • (other versions will work, but variations in software may be confusing)
  • 5.
    • Familiarity withthese concepts and tasks: • Powering on a computer / Logging into an account • Navigating a Windows operating system / Browsing the Web • Using a keyboard and mouse: • Typing … Clicking (aka: Left-Clicking) … Hovering … • Double-Clicking … Right-Clicking … Scrolling … Dragging … Etc.
  • 6.
    1. POWER-ON thecomputer 2. MAKE SURE the keyboard, mouse, and monitor are functional 3. VIEW the desktop screen … see next slide
  • 8.
    Step 1: OPENPowerPoint 2013 • Double-click on the PowerPoint icon to open the program • (found in different locations based upon your operating system and existing preferences, possibly in Start Menu or use Search feature)
  • 10.
    Step 2: CREATEa new presentation • Click on the Blank Presentation image
  • 12.
    Step 3: ADDa Title and Subtitle 1. Click inside the Click to add title box 2. Type: Mott Community College 3. Press ENTER 4. Type: RTC Evacuation Procedure 5. Press ENTER 6. Click any blank area inside the Click to add subtitle box 7. Type: A Sample Presentation by (your full name)
  • 14.
    Step 4: ADDa Title and Text 1. Click the New Slide icon 2. Click inside the Click to add title box 3. Type: Evacuation – in the event of a fire 4. Click any blank area inside the Click to add text box 5. Type: Evacuate the RTC if: 6. Press ENTER, then press TAB. (this step is continued on next slide)
  • 15.
    Step 4: ADDa Title and Text 7. Type: You see or smell smoke 8. Press ENTER 9. Type: You see fire or flames 10. Press ENTER 11. Type: You hear the fire alarm ringing 12. Press ENTER 13. Type: Someone alerts you to the presence of fire (this step is continued from previous slide)
  • 17.
    Step 5: ADDa Title and Text 1. Click the New Slide icon 2. Click inside the Click to add title box 3. Type: Evacuation – tips to get out safely 4. Click any blank area inside the Click to add text box 5. Type: Walk quickly (do not run) 6. Press ENTER 7. Type: Stay low (under smoke, to see/breathe) 8. Press ENTER (this step continued on next slide)
  • 18.
    Step 5: ADDa Title and Text 9. Type: Use the stairs (avoid elevators) 10. Press ENTER 11. Type: Assist those with disabilities 12. Press ENTER 13. Type: If on Floor 1, proceed to nearest exit 14. Press ENTER 15. Type: If on Floors 2/3, proceed to nearest stairwell 16. Press ENTER, then press TAB 17. Type: Located near end of each hallway 18. Press ENTER 19. Type: Get to first floor, exit building (this step continued from previous slide)
  • 20.
    Step 6: OPENyour web browser • Double-click on your favorite browser icon to open the program • (found in different locations based upon your operating system and existing preferences, possibly in Start Menu or use Search feature) • In this demonstration, we will use Mozilla Firefox • (but you can choose another)
  • 22.
    Step 7a: GETimages from the web In the Address Bar (above), type: http://mcc.edu/maps.rtc1e_map.shtml Then, press ENTER
  • 23.
    Step 7b: GETimages from the web HOVER mouse pointer over floorplan image, RIGHT-CLICK on this image, CLICK on “Copy Image” from dropdown menu
  • 24.
    Step 7c: INSERTimage into slide 1. Return to PowerPoint, view the last slide… 2. Click the New Slide icon 3. Click inside the Click to add title box 4. Type: First Floor - EAST 5. Right-Click any blank area inside the Click to add text box 6. In the dropdown menu, look for “Paste Options” 7. Click on the center option: Keep Source Formatting (K) … the image copied from the webpage will appear …
  • 26.
    Step 8: INSERTimage into slide 1. Repeat Steps 7a – 7c, using the following web address instead: http://mcc.edu/maps/rtc1w_map.shtml 2. Title the newly-created slide: First Floor – WEST 3. Click-and-drag the pasted image to the right (centered, and away from slide title)
  • 28.
    Step 9: INSERTimage into slide 1. Repeat Steps 7a – 7c, using the following web address instead: http://mcc.edu/maps/rtc2_map.shtml 2. Title the newly-created slide: Second Floor 3. Click-and-drag the pasted image to the right (centered, and away from slide title)
  • 30.
    Step 10: INSERTimage into slide 1. Repeat Steps 7a – 7c, using the following web address instead: http://mcc.edu/maps/rtc3_map.shtml 2. Title the newly-created slide: Third Floor 3. Click-and-drag the pasted image to the right (centered, and away from slide title)
  • 32.
    Step 11: ADDa theme 1. In the Ribbon along the top of the screen, click on the DESIGN tab 2. Click the down arrow to scroll through different themes 3. Click on the Retrospect theme, when you see it…
  • 33.
    1. Click here 2.Click here 3. Click here
  • 34.
    Step 12: ADDanimated slide transitions 1. Using the left pane, return to the very first slide 2. In the Ribbon at the top of screen, click on the TRANSITIONS tab 3. Click on Push and make sure “On Mouse Click” is checked 4. Repeat this process for every remaining slide …
  • 35.
    Step 13a: CREATEa slideshow • In the Ribbon along the top of the screen, click the FILE tab
  • 36.
    Step 13b: CREATEa slideshow • In the File menu screen, click on Save as
  • 37.
    Step 13c: CREATEa slideshow • At the “Save as” dialog box, follow these instructions: 1. Type: Sample Presentation 2. Select .PPS from dropdown menu 3. Click the “Save” button You have now created your own slideshow in PowerPoint!