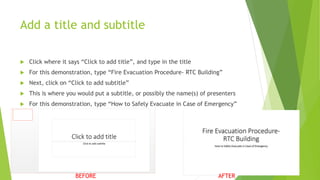
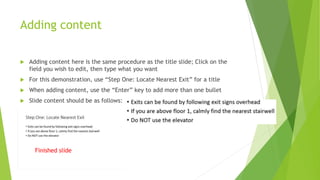
Basics of Microsoft
PowerPoint
Creating a PowerPoint for evacuation procedure
Open the program and begin the
presentation
 Once PowerPoint is open, create a new presentation by clicking on “Blank
Presentation”
 You could choose a theme, but for the purpose of this demonstration we’re
using a blank one
Add a title and subtitle
 Click where it says “Click to add title”, and type in the title
 For this demonstration, type “Fire Evacuation Procedure- RTC Building”
 Next, click on “Click to add subtitle”
 This is where you would put a subtitle, or possibly the name(s) of presenters
 For this demonstration, type “How to Safely Evacuate in Case of Emergency”
BEFORE AFTER
Create a new slide
 To create a new slide, it’s as simple as clicking the “New Slide” button at the
top left
 By clicking the drop-down menu, you can create other types of slides, but for
this presentation, just click the icon itself, which automatically creates a
“Title and Content” slide
Adding content
 Adding content here is the same procedure as the title slide; Click on the
field you wish to edit, then type what you want
 For this demonstration, use “Step One: Locate Nearest Exit” for a title
 When adding content, use the “Enter” key to add more than one bullet
 Slide content should be as follows:
Finished slide
Inserting Pictures
 For the next slide, click on the drop-down box from “New Slide”, and choose
the “Comparison” slide
 This slide’s title should be “Evacuation Routes”
 The smaller subtitles should say “Third Floor” and “Second Floor”,
respectively
Inserting Pictures (Cont’d)
 To acquire the pictures, go to the following link:
http://www.mcc.edu/maps/rtc1e_map.shtml
 Right click on, then select “save picture as” for the first, second, and third
floor pictures (the first floor has two sections, the east and west). Save them
to the desktop for now.
 Go back to the PowerPoint, and click on “Insert” at the top. From here, click
on “Pictures”. Use the file explorer to find the third floor picture, and select
it.
 Repeat the process for the second floor picture.
Inserting Pictures (Cont’d 2)
 Drag the small handles on the picture to the desired size
The finished slide
Adding More Information
 Add another “Comparison” slide using the same procedure as last time
 “Evacuation Routes” for the title, “First Floor East” and “First Floor West” for
the subtitles
 Insert the respective pictures
The finished slide
Finishing Up Content
 Add a new slide, and be sure to use the drop-down to select “Title and
Content” slide, as otherwise it will add another of the last slide you used (in
this case, a “Comparison” slide)
 Type “In Conclusion” for the title, for the content, add as follows:
Colors and Themes
 Looks a little dull, doesn’t it? We’re going to add a theme.
 A theme is a preset color and background combination that allows you to
quickly make professional looking presentations.
 To add a theme, click on the “Design” tab at the top, then just select
whichever them you like
 For this demonstration, we’re going to choose the “Ion” theme
Conclusion
 And there you have it! A professional looking PowerPoint presentation, about
how to evacuate safely from the RTC building at Mott Community College.
 To view your work, you can press “F5” on your keyboard, then click to
advance.

Basics of microsoft powerpoint

  • 1.
    Basics of Microsoft PowerPoint Creatinga PowerPoint for evacuation procedure
  • 2.
    Open the programand begin the presentation  Once PowerPoint is open, create a new presentation by clicking on “Blank Presentation”  You could choose a theme, but for the purpose of this demonstration we’re using a blank one
  • 3.
    Add a titleand subtitle  Click where it says “Click to add title”, and type in the title  For this demonstration, type “Fire Evacuation Procedure- RTC Building”  Next, click on “Click to add subtitle”  This is where you would put a subtitle, or possibly the name(s) of presenters  For this demonstration, type “How to Safely Evacuate in Case of Emergency” BEFORE AFTER
  • 4.
    Create a newslide  To create a new slide, it’s as simple as clicking the “New Slide” button at the top left  By clicking the drop-down menu, you can create other types of slides, but for this presentation, just click the icon itself, which automatically creates a “Title and Content” slide
  • 5.
    Adding content  Addingcontent here is the same procedure as the title slide; Click on the field you wish to edit, then type what you want  For this demonstration, use “Step One: Locate Nearest Exit” for a title  When adding content, use the “Enter” key to add more than one bullet  Slide content should be as follows: Finished slide
  • 6.
    Inserting Pictures  Forthe next slide, click on the drop-down box from “New Slide”, and choose the “Comparison” slide  This slide’s title should be “Evacuation Routes”  The smaller subtitles should say “Third Floor” and “Second Floor”, respectively
  • 7.
    Inserting Pictures (Cont’d) To acquire the pictures, go to the following link: http://www.mcc.edu/maps/rtc1e_map.shtml  Right click on, then select “save picture as” for the first, second, and third floor pictures (the first floor has two sections, the east and west). Save them to the desktop for now.  Go back to the PowerPoint, and click on “Insert” at the top. From here, click on “Pictures”. Use the file explorer to find the third floor picture, and select it.  Repeat the process for the second floor picture.
  • 8.
    Inserting Pictures (Cont’d2)  Drag the small handles on the picture to the desired size The finished slide
  • 9.
    Adding More Information Add another “Comparison” slide using the same procedure as last time  “Evacuation Routes” for the title, “First Floor East” and “First Floor West” for the subtitles  Insert the respective pictures The finished slide
  • 10.
    Finishing Up Content Add a new slide, and be sure to use the drop-down to select “Title and Content” slide, as otherwise it will add another of the last slide you used (in this case, a “Comparison” slide)  Type “In Conclusion” for the title, for the content, add as follows:
  • 11.
    Colors and Themes Looks a little dull, doesn’t it? We’re going to add a theme.  A theme is a preset color and background combination that allows you to quickly make professional looking presentations.  To add a theme, click on the “Design” tab at the top, then just select whichever them you like  For this demonstration, we’re going to choose the “Ion” theme
  • 12.
    Conclusion  And thereyou have it! A professional looking PowerPoint presentation, about how to evacuate safely from the RTC building at Mott Community College.  To view your work, you can press “F5” on your keyboard, then click to advance.