SlideShare a Scribd company logo
Sensors and Microcontroller – Mohamed Albanna
All system has an input device, control unit and output device as
shown in figure 1. Once the system is set, it controls the input data and
observes the resulting effects on the output that relate to the input.
Figure 1: Simple Input / Output block diagram
Sensors are used to perform an input data to the control unit.
They sense a physical change in some characteristic, and convert them
into an electrical signal. Devices which perform an output function are
generally called Actuators, for example buzzer, alarm, lamp or motor.
Both sensors and actuators are collectively known as Transducers
because they are used to convert energy of one kind into energy of
another kind. The inputs and outputs can be used with many different
Transducers to solve problems of practical situations in an easy way.
Transducer = Sensor + Signal conditioning circuit
Figure 2: Block diagram of typical system
A microcontroller is a single integrated circuit contains four or
five separate integrated circuits: A microcontroller system can be
viewed as a system that reads from (monitors) inputs, performs
processing and writes to (controls) outputs. Microcontrollers are
useful to the extent that they communicate with other devices, such
as sensors, motors, switches, keypads, displays, memory and even
other micro-controllers. They can be used as the brain to control a
large variety of products. However it is very common to add
additional external components, such as a voltage regulator,
capacitors, LEDs, motor driver, timing crystals, RS232, etc to the
basic IC. The block diagram of typical system is shown in figure 2.
I) Types of Sensors:
1) Digital Sensors (button/switch)
The simplest form of sensor is a manually operated push button
or toggle switch (Simple 1-bit digital sensors) which allows control
over current flow in a circuit and can only exist in one of two states:
open or closed. Most buttons/switches have either two or three
terminals. When we press the button or flip the switch contacts
between the terminals are made and/or broken. The details of what
happens depend on the exact configuration of the button/switch.
A single pole, single throw (SPST) switch is the simplest kind. A
double pole, single throw switch is slightly more complicated. They
look like this:
Figure 3: Single pole, Single throw (SPST) switch
To use a SPST switch, we attach a voltage source to one terminal
of the switch. When we flip the switch a connection is made between
the two terminals, which means that current can now flow from one
terminal to the other. By hooking up a button between a +5V voltage
source and the input pin on a microcontroller we can sense whether
the button is pressed or not. When it's not pressed, the
microcontroller will see no voltage on its input pin (0). But when it's
pressed it'll see +5V (1). (Sometimes we need a "pull down resistor"
on the pin so that the pin really sees ground when the button isn't
pressed.) Examples of these sensors might be limit switches, IR
proximity detectors, high gain photo-detectors (light sensors), or push
buttons.
Binary on/off switching type sensors are very easy to integrate
simply by having a pull-up or pull-down resistor connected to the
switch output. Digital ports are like analog ports, but with only 1 bit
(21
= 2) hence a resolution of 2 - on and off. Digital ports for that
reason are rarely used for sensors, except for maybe on/off switches.
Send a high 5V signal to turn something on, or a low 0V to turn
something off.
2) Analogue sensors
Analogue sensors measure a continuous signal, such as the
position of a knob, the light level in the room, or the distance of an
object from a sensor. They produce a variable output, which may be
voltage, resistance or current. In microcontroller systems, they are
usually converted into a voltage in a range suitable for an input
comparator (high/low detection) or analogue to digital conversion,
which convert the measured voltage into frequency, or transmit the
binary form of the measurement in a standard serial format. Suitable
signal conditioning may be needed using amplifiers, filters and so on,
to produce a clean signal, controlling noise, drift, interference and so
on, with the required output range.
Figure 4: Analog I/O interface
Most microprocessors contain several ADCs. Most ADCs are 8-
or 10- bit, meaning they use 8 or 10 bits to represent the entire range
(from 0 to Vcc) meaning they have a range of 256 (28
= 256).
The analog signal is measured after a predefined period of time
passes. At each time period, the voltage is recorded as a number. This
number then defines a signal of 0's and 1's.
For example, suppose a sensor reads 0V to an 8 bit ADC. This
would give us a digital output of 0. 5V would be 255. Now suppose a
sensor gave an output of 2.9V, Doing the math:
2.9V/5V = X/255 X = 2.9*255/5 = 148
Note that the sensor output does not exceed the digital logic
voltage (usually 0V→5V). Then plug that output directly to the analog
port.
Based on the principle of working the sensors are divided into:
1- Resistor type: A sensor whose resistance changes with the input
signal i.e. based on the variation of the resistance of the sensor
element, the physical parameter is detected. For example: Themistor,
Platinum resistance thermometer or Thermocouple etc. are used to
measure the temperature with respect to the variation in the
resistance of the material.
In the case of a thermistor the temperature is given by
Rt = R0.e β (1/T - 1/T
0
)
Here, β is the constant of the thermistor.
Rt is the resistance of the thermistor at a temperature t.
The variation of resistance of a thermistor with temperature is
given by the following graph.
Figure 5: Resistance vs Temperature graph
A strain gauge is a thin metal foil that changes resistance with
applied strain. The changes of resistance associated with strain gauges
are small and present measurement situation. A Wheatstone bridge
arrangement is commonly used to measure the small changes in
resistance associated with strain gauges.
2- Capacitive type Sensors:
These sensors work on the principle of variation of capacitance
with the external input signal. The basic operation of capacitive type
sensors can be seen from the familiar equation for a parallel-plate
capacitor.
C = Kε0 A /d
Here K is the dielectric constant of the material,
ε0 is the permittivity of the free space and
d is the distance between the parallel plates and
A is the area of cross section.
The capacitive type sensors are used to detect the physical
parameters like Humidity or pressure or proximity etc.
3- Inductive type Sensors:
These sensors are based on the principle that the inductance of a
coil varies with the change input signal. For example, if a permeable
core is inserted into an inductor the net inductance is increases. The
best example is the LVDT (Linear Variable Differential Transducer)
which is used to measure displacements accurately.
II) Sensor characteristics
Figure 6: Sensor chacteristics graph.
Sensors have certain characteristics which should be specified in
the data sheet: The meaning of some of these is illustrated in Figure 6.
1) Sensitivity: The ideal sensor characteristic is shown in the
characteristic y = m1x. The sensor has a large change in its output for
a small change in its input; that is, it has high sensitivity. If the sensor
has low sensitivity (y = m2x), an amplifier may be needed to bring the
output up to the required level.
2) Offset: means, that over range for which the sensors are
useful, the lowest output has a large positive constant added (y = m3x +
c). This has to be subtracted in the amplifier interface to bring the
output back into the required range, where maximum resolution can
be obtained.
Temperature sensors tend to behave in this way, as their
characteristic often has its origin at absolute zero (-273 degrees
Centigrade). The sensor may have offset and negative sensitivity, such
as the silicon diode temperature characteristic (y = -m4x + c2).
3) Linearity: a perfect straight line, so that the output is exactly
proportional to the input. The deviation from linearity is usually
expressed as a maximum percentage error over the specified range,
but care must be taken to establish whether this is a constant over the
range, or a proportion of the output level. These two cases are
illustrated by the dotted lines in Figure 4, above, indicating the
possible error due to non-linearity and other factors.
4) Reference Level: If the sensitivity is specified, we still need to
know a pair of reference values to place the characteristic. In a
temperature sensing resistor (TSR), this may be given as the reference
resistance at 25 degrees Centigrade (e.g. 1 kΩ). The sensitivity may
then be quoted as the resistance ratio "the proportional change over
100 degree Centigrade. For a TSR, this is typically 1.37. This means
that at 125 degree Centigrade, the resistance of the 1 kΩ sensor will be
1.37 kΩ.
5) Transfer Function: Linear sensors are easier to interface for
absolute measurement purposes, but some that are non-linear may
have other advantages. The thermistor, for example, has a negative
exponential characteristic, but it has high sensitivity, so is often used
to detect whether a temperature is outside an acceptable range. If the
sensor is to be used for measurement, the transfer function must be
known precisely in order to design the interface to produce the correct
output.
6) Error: Many factors may contribute to sensor error:
limitations in linearity, accuracy, resolution, stability and so on.
Accuracy is evaluated by comparison with a standard.
A temperature of 25 degrees Centigrade is only meaningful if
Celsius is an agreed scale, in this case based on the freezing and
boiling points of water.
7) Resolution is the degree of precision in the measurement:
25.00 degrees Centigrade (+/-0.005) is a more accurate
measurement that 25 degrees Centigrade (+/-0.5). Poor stability may
appear as drift, a change in the sensor output over time. This may be
caused by short-term heating effects when the circuit is first switched
on, or the sensor performance may deteriorate over the long term.
Recalibration of accurate measurement systems is often required
at specified intervals, by comparing the output with one that is known
to be correct. Interdependence in the sensor may also be significant;
for example, the output of a humidity sensor may change with
temperature, so this incidental variable must be controlled so that the
required output is not affected.
III) Nature of Sensor Technique (use a voltage divider)
The switches act as variable resistors or produce a varying
voltage dependant on their input. Thus many sensors are simple
resistive devices in the sense that they vary their electrical resistance
based on the magnitude of the received stimulus from the
environment. Converting a resistance to a voltage; involves the use of
a voltage divider circuit, which has two resistors in series to divide the
input voltage by the ratio of the resistances. This is shown in Figure 7.
Th
On
the resi
over to
built in
Th
the volt
Vout to b
This cir
the seco
when th
to 0 V.
If
If
If
will be a
Th
output V
he divisio
nce the o
istance o
invert
either o
Fig
he senso
tage divi
become
rcuit deli
ond circu
he switch
Rbottom >
Rbottom =
Rbottom <
across R
he choic
Voltage
Figu
on of the
output o
of the se
the acti
of two wa
gure 8: T
r can be
ider. Th
zero ex
ivers a m
uit, the p
h is oper
>> Rtop, t
= Rtop the
<< Rtop,
Rtop.
e is dete
Vout:
ure 7: Vo
e voltage
(1
of the vol
ensor. Th
on of th
ays:
The two t
e at the
he pull d
cept wh
maximum
pull up
rated. Pr
then
en
then
ermined
oltage di
e is accor
1)
ltage div
he resist
he Volta
types vol
top (Rto
down res
en the p
m voltag
resistor
ressing t
d by whe
ivider cir
rding to
vider is k
tor and
age divid
ltage divi
op) or at
sistor in
push but
ge when t
forces V
the switc
.
0. Mo
en we w
rcuit.
the follo
known, w
sensor c
der. The
ider circu
t the bot
n the firs
tton swi
the switc
Vout to m
ch conne
.
ost of th
want larg
owing fo
we can c
can be s
e circuit
uits
ttom (Rb
st circui
itch is op
ch is pre
maximum
ects Vout
he input
ge value
ormula:
calculate
swapped
t can be
bottom) of
it forces
perated.
essed. In
m except
directly
voltage
for the
e
d
e
f
s
.
n
t
y
e
e
1- If we want a large Vout when the sensor has a small resistance,
we put the sensor at the top (Rtop).
2- If we want large Vout when the sensor has a large resistance,
we put the sensor at the bottom (Rbottom).
The above points play important role while making dark/light
sensor.
1. Variable resistors sensors:
Force-sensitive resistors, and thermistors are variable resistors,
also photocell is a variable resistor, which produces a resistance
proportional to the amount of light it senses. The variable resistor
(Light-Dependent Resistor LDR) which has a high resistance when
dark and a low resistance when brightly lit will enable us to adjust the
output voltage Vout for a given resistance of the sensor to set the exact
brightness level in dark and light sensor circuits. If one of the fixed
resistors in figure (8) circuit is replaced with a variable resistance
(Light-Dependent Resistor LDR), the output voltage is proportional to
the change in resistance of the variable resistor. As the level of
illumination on LDR increases, its resistance falls.
With Rtop variable and Rbottom fixed, we note that the equation
given for output voltage Vout is not a linear function. For very small
changes in resistance, this equation approaches linear, and for large
changes in resistance has more curvature.
Figure 9: Automatic dark and light sensor
1- If the LDR is at the top (near +VS), Vout will be low in the dark
and high in bright light. As the light level increases and LDR meets the
lowest threshold resistance the output voltage is large when the
resistance of LDR is low. This voltage would enough for a transistor to
turn on a LED. Hence, this circuit automatically turns on the LED D1
and works as Automatic Light sensor.
2- If the LDR is at the bottom (near 0V), Vout will be high in the
dark and low in bright light. As the light level decreases and LDR
meets t
when th
transist
on the L
It
Rbottom, V
Ex
and 200
In
2.
A
high vo
divider
Rtop po
(NTC),
upon th
1/T
Th
measur
data. T
specifie
resistan
Figu
In
other re
solve th
the maxi
he resist
tor to tur
LED D1 a
is most
Vin and V
xample:
0 Ω in th
the shad
Temper
sensor u
oltage w
with th
sition. T
decrease
he tempe
T = A + B
he consta
ements
They are
d for ea
nce in oh
ure 10: A
the circ
esistance
he next eq
imum th
tance of
rn on a L
and wor
t linear
Vout, we c
If the L
he shade,
de, Vout w
rature se
used in a
when hot
e Negati
Thermist
es as the
erature a
B x lnRto
ants, A,
of resist
e called
ach devic
hms.
A voltage
cuit of fi
e. To fin
quation.
hreshold
LDR is
LED. He
rks as Au
at the p
can deri
LDR has
, and wh
will be:
ensors:
a fire ala
t condit
ive temp
tor (Tem
temper
and the r
op + C x l
B and C
tance, o
the Stei
ce. T is t
divider u
gure 10,
nd the va
.
d resistan
high. T
ence, thi
utomatic
point wh
ive Rtop u
a resist
hen the L
arm wan
ions are
perature
mperatu
ature ris
resistanc
ln3
top
C can be
r they c
inhart–H
the temp
uses ther
, we mea
alue of t
nce the
his volta
is circuit
c Dark se
here Rtop
using the
tance of
LDR is in
.
.
nts a circ
e detecte
e coeffici
ure - Se
ses. The
ce of a th
(2)
determi
can be c
Hart par
perature
rmistor a
asure Vo
he senso
output
age wou
t automa
ensor.
p = Rbott
e followin
0.5 kΩ,
n the ligh
.
.
cuit whic
ed. We
ient NTC
ensitive R
output v
hermisto
ined fro
calculate
rameter
e in Kelv
as temper
out and k
or resista
voltage
ld enoug
atically s
tom. If w
ng formu
, in brig
ht, Vout w
.
ch will d
need a
C resisto
Resistor
voltage d
or is give
m exper
ed from
rs, and m
vin and
rature se
now Vin
ance we
is large
gh for a
switches
we know
ula:
ht light,
will be:
deliver a
voltage
or in the
r) has a
depends
en by
rimental
tabular
must be
R is the
ensor
and the
have to
e
a
s
w
,
a
e
e
a
s
l
r
e
e
e
o
On
tempera
3.
Th
the base
intensit
conduct
current
As
configu
travelin
resistor
Th
current
10 milli
to one o
this wa
(using t
line on t
4.
M
given a
that tra
a)
In
that is
emitting
mean;
nce we
ature ex
Light se
he light
e region
y of the
tivity of
ts to flow
s shown
ration s
ng throu
r. This vo
Figure
he light
t that ca
iamps. N
of the LE
ay we co
the phot
the boar
Motion
Motion de
area. An
ansforms
Infra-R
frared (
longer t
g IR ray
there a
have t
pression
ensor (Ph
falling o
of a tra
light de
the tran
w throug
n in Fi
similar
ugh the
oltage is
11: Phot
emittin
n flow th
Normally
ED outpu
ould use
totransis
rd (norm
detector
etection i
n electro
s the det
Red (IR)
(IR) is a
than visi
ys and re
re two-p
the sens
n above t
hototran
on a pho
ansistor,
etermine
nsistor. G
gh the co
igure 11,
to the v
resistor
measur
totransis
g eleme
hrough
y the em
ut ports
e the sa
stor with
mal opera
rs:
is the ac
nic mot
ection of
Proximi
an electr
ible ligh
eceiving
piece el
sor resi
to calcul
nsistor):
ototrans
effective
es the ef
Greater
llector-e
, the p
voltage
r causes
ed as the
stor and I
ent (LED
the devi
mitter is a
if we wa
me sens
h the em
ation wit
ction of s
tion dete
f motion
ity Senso
romagne
ht. IR se
the refl
lements
stance,
late the t
istor cre
ely prov
ffective b
amount
emitter l
phototran
divider.
a voltag
e output
Infrared
D) uses
ice to the
always o
anted to
sor to d
mitter of
th the em
sensing p
ector co
n into an
ors
etic spec
nsor wo
lected ra
transmi
then w
tempera
eates cha
viding ba
base dri
ts of ligh
eads.
nsistor
. The v
ge drop
t of the d
d Emitter
a resist
e proper
on, but it
control
detect th
ff) and t
mitter on
physical
ntains a
electric
ctrum a
orks on t
ay by a
itter (in
we can
ture.
arge car
ase curre
ve and t
ht cause
is wire
ariable
in the
device.
r Circuit
tor to li
r value o
t could b
it separa
he startin
then to f
n).
l movem
a motion
signal.
at a wav
the prin
receiver
nfrared-e
use the
rriers in
ent. The
thus the
greater
ed in a
current
pull-up
imit the
of about
be wired
ately. In
ng light
follow a
ment in a
n sensor
velength
nciple of
r. That’s
emitting
e
n
e
e
r
a
t
e
t
d
n
t
a
a
r
h
f
s
g
diode) and receiver (infrared-sensitive phototransistor or photodiode)
as shown in Figure 12.
Figure 12: Basic principle of Active infrared motion detector operation
The sensor send infrared light through IR-LEDs, then the light
reflected by any object in front of the sensor, another IR-LED
detecting the reflected IR light and perform the task of a voltage
divider. An electrical property of Light Emitting Diodes (LEDs)
produces a voltage difference across its leads when it is subjected to
light. The greater the intensity of IR light hitting IR receiver, the
lower the resistance of IR receiver and hence the output voltage of
voltage divider will decreased.
The phototransistor detector will measure the amount of light
from the emitter scattered or reflected by a surface (when other
factors, such as the distance from the sensor to the surface, are held
constant). The phototransistor has peak sensitivity at the wavelength
of the emitter (a near-visible infrared), but is also sensitive to visible
light and infrared light emitted by visible light sources. For this
reason, the device should be shielded from ambient lighting as much
as possible in order to obtain reliable results.
A reflectance sensor can be used to detect features drawn on a
surface or segments on a wheel used to encode rotations of a shaft. It is
important to remember that the reflectivity measurement indicates
the surface's reflectivity at a particular wavelength of light (the near-
visible infrared). In general, surfaces that absorb visible light (making
them appear dark to the eye) will absorb infrared light as well.
b) Passive Infrared (PIR) motion detectors
Passive Infrared (PIR) motion detectors detect the movements of
the objects with identical temperature and measures infrared (IR)
light radiating from objects in its field of view and automatically
activated the systems. A passive infrared (PIR) sensor measures
infrared light emitted from objects that generate heat, and therefore
infrared radiation, in its field of view. The sensor is actually split into
two halves so as to detect not the radiation itself, but the change in
condition that occurs when a target enters its field. These changes in
the amount of infrared radiation on the element in turn change the
voltages generated, which are measured by an on-board amplifier.
When a person/animal comes into their environment, one half will
intercept the IR, causing a positive change between the two halves.
Once the entity passes through, there is a negative differential change.
It is these change pulses that are detected by the PIR sensor. When
motion is detected the PIR sensor outputs a high signal on its output
pin, which can either be read by an µC or drive a transistor to switch
a higher current load. The block diagram of the PIR based security
system is given below:
Figure 13: Block diagram of PIR based security system
The Dual Beam type of PIR sensor will not detect any moving
objects less than specific height, activated when both upper and lower
beams detect a moving object. It will respond and activated the alarm
only when detect a human or vehicles moved in or out of its range and
obstruct its beams. When only the lower or the upper zone detects a
moving object, the unit is not activated.
Figure (14) Dual beam PIR sensor
IV) Sensing elements
1) Position and distance sensors
a- Potentiometer:
Linear Potentiometer Rotary Potentiometer
A potentiometer is a simple knob that works as a voltage divider
with two variable resistors. Potentiometers are either linear or
logarithmic (audio). When using a linear potentiometer Vout will
change linearly as the knob is turned. When using a log potentiometer
Vout will change logarithmically as the knob is turned.
A potentiometer has three terminals (or legs), which correspond
to Vin, Vout and ground in the voltage divider diagram. We hook +V up
to the first leg (Vin), ground up to the third leg (ground) and use the
middle leg as output (Vout). As you turn the knob on the potentiometer
the voltage on the middle leg will get bigger/smaller.
Potentiometers are very useful for setting parameters, like the
speed of a process or the brightness of a light. They're also good for
measuring the rotational angle of an object about an axis.
b- LVDT: A linear variable differential transformer (LVDT) uses
electromagnetic coils to detect the position of a mild steel rod which
forms a mobile core. The input coils are driven by an ac signal, and
the rod position controls the amount of flux linked to the output coil,
giving a variable peak-to-peak output. It needs a high-frequency ac -
supply.
c- Capacitor: If considered as a pair of flat plates, separated by
an air gap, a small change in the gap will give a large change in the
capacitance, since they are inversely proportional; if the gap is
doubled, the capacitance is halved. If an insulator is partially inserted,
the capacitance also changes. This can make a simple but effective
level sensor for insulating materials such as oil, powder and granules.
A pair of vertical plates is all that is required. However, actually
measuring resulting small changes in capacitance is not so
straightforward. A high-frequency sensing signal may need to be
converted into clean direct voltage for input to a digital controller.
Capacitor plate separation Capacitor Dielectric
d- Ultrasonic: The speed of sound travelling over a few meters
and reflecting from a solid object gives the kind of delay, in
milliseconds, which is suitable for measurement by a hardware timer
in a microcontroller. A short burst of high-frequency sound (e.g. 40
kHz) is transmitted, and should be finished by the time the reflection
returns, avoiding the signals being confused by the receiver.
2) Speed sensors
a- Digital: The speed or position of a dc motor cannot be
controlled accurately without feedback. Digital feedback from the
incremental encoder is the most common method in processor
systems, since the output from the opto-detector is easily converted
into a TTL (transistor-transistor logic) signal. The position relative to
a known start position is calculated by counting the encoder pulses,
and the speed can then readily be determined from the pulse
frequency. This can be used to control the dynamic behavior of the
motor, by accelerating and decelerating to provide optimum speed,
accuracy and output power.
Magnetic flux
b- Analogue: For analogue feedback of speed, a tacho-generator
can be used; this is essentially a permanent magnet dc motor run as a
generator. An output voltage is generated which is proportional to the
speed of rotation. The voltage induced in the armature is proportional
to the velocity at which the windings cut across the field.
If the tachometer is attached to the output shaft of a motor
controlled using PWM, the tachometer voltage can be converted by
the MCU and used to modify the PWM output to the motor, giving
closed loop speed control. Alternatively, an incremental encoder can
be used, and the motor output controlled such that a set input
frequency is obtained from the encoder.
3) Temperature sensors
a- Diode: The forward voltage drop of a silicon diode junction is
usually estimated as 0.6 V.
Silicon diode sensor
However, this depends on the junction temperature; the voltage
falls by 2 mV/C° as the temperature rises, as the charge carriers gain
thermal energy, and need less electrical energy to cross the junction.
b- Metals: Metals have a reasonably linear temperature
coefficient of resistance over limited ranges. Metal film resistors are
produced which operate up to about 150°C, with platinum sensors
working up to 600°C. The temperature coefficient is typically
0.3%/C°. If the resistance at the reference temperature is, say, 1 kΩ,
the resistance change over 100°C would be 300-400 Ω.
A constant current is needed to convert the resistance change
into a linear voltage change. If a 1 kΩ temperature-sensing resistor is
supplied with a constant 1 mA, the voltage at the reference
temperature, 25°C, would be 1.00 V, and the change at 125°C would
be 370 mV, taking it to 1.37 V.
Metal resistance temperature sensor
c- Thermocouple: Higher temperatures may be measured using a
thermocouple to convert temperature to voltage. This is simply a
junction of two dissimilar metals, which produces a battery effect,
producing a small EMF. They rely on Seebeck effect which states
that a junction of different metals will generate a voltage that is
proportional to the temperature of the metals. The voltage is
proportional to temperature, but has a large offset, since it depends on
absolute temperature. This is compensated for by a cold junction,
connected in series, with the opposite polarity, and maintained at a
known lower temperature (say 0°C). The difference of voltage is then
due to the temperature difference between the cold and hot junctions.
Vd=Vh-Vc
Thermocouple
The temperature range of a thermocouple depends on the type
of metals that make up the thermocouple. There are some industry
standard types as shown in the table:
Type Range (Celsius) Range (Fahrenheit) Features
E 95-900°C 200-1650°F Highest Output
J 95-760°C 200-1400°F
K 95-1260°C 200-2300°F
T 0-350°C 32-660°F
Thermocouples give out voltages in the range of micro volts so
the output of a thermocouple must be amplified before it can be
converted into a digital value.
d- Thermistor: Temperature dependant semiconductor resistors
(Thermistors) are thermally sensitive resistors and have, according
to type, a negative (NTC), or positive (PTC) resistance / temperature
coefficient. They are made from a single piece of semiconductor
material, where the charge carrier mobility, therefore the resistance,
depends on temperature. The response is exponential, giving a
relatively large change for a small change in temperature, and a
particularly high sensitivity. Unfortunately, it is non-linear, so is
difficult to convert for precise measurement purposes.
The thermistor therefore tends to be used as a safety sensor, to
detect if a component such as a motor or transformer is overheating.
Thermistor
e- RTD’s: Also called Platinum RTD, because it is typically made
of platinum. A change in temperature causes a change in resistance of
platinum. Within a limited range, the resistance of metals increases in
proportion to the temperature as defined by the formula:
Rt = Ro[1+α(t-to)]
where:
Rt = resistance at temperature t
Ro = resistance at a standard temperature to
α = temperature coefficient of resistance (Cº-1
)
Typical readings for platinum are 100 Ω at 0 Celsius and 139 Ω
at 100.
RTD’s require a constant current source, such as 1mA. Such a
low current keeps the self heating to a minimum.
f- Semiconductor Temperature Sensors:
If measurement or control is needed in the range of around room
temperature, an integrated sensor and amplifier such as the LM35 is a
versatile device which is easy to interface.
Integrated temperature sensor
4) Strain sensors.
A temperature-stable alloy conductor is folded (‫)ﻣﻠﻔﻮف‬ onto a
flexible substrate which lengthens (‫)ﻳﻄﻮل‬ when the gauge is stretched
(strained). The resistance increases as the conductor becomes longer
and thinner. This can be used to measure small changes in the shape
of mechanical components, and hence the forces exerted upon them.
The strain gauge can measure displacement by the same means.
Strain Guage
The change in the resistance is rather small, maybe less than 1%.
This sits on top of an unstrained resistance of typically 120 Ω. To
detect the change, while eliminating the fixed resistance, four gauges
are connected in a bridge arrangement and a differential voltage is
measured.
The gauges are fixed to opposite sides of the mechanical
component, such that opposing pairs are in compression and tension.
This provides maximum differential voltage for a given strain. All the
gauges are subject to the same temperature, eliminating this
incidental effect on the metal conductors. A constant voltage is
supplied through the bridge, and the difference voltage fed to a high
gain, high input impedance amplifier.
Pressure sensor
Care must be taken in arranging the input connections, as the
gauges will be highly susceptible (‫)ﺣﺴﺎس‬ to interference. The amplifier
should be placed as near as possible to the gauges, and connected with
screened leads, and plenty of signal decoupling. The output must then
be scaled to suit the MCU ADC input.
A pressure sensor is generally a variable resistor that changes
resistance based on how hard it is pressed. They are also known as
Force Sensing Resistors or FSRs. often we use an FSR as the variable
resistor in a voltage divider circuit. By using one FSR and one fixed
resistor and hooking Vout to an A/D converter we can give the
microcontroller some idea of how much pressure is being put on the
FSR. If we don't have an A/D converter handy, there's a simple RC
time circuit that you can use to do more-or-less the same thing.
5) Humidity sensors
There are various methods of measuring humidity, which is the
proportion of water vapour in air, quoted as a percentage. The
electrical properties of an absorbent material change with humidity,
and the variation in conductivity or capacitance, can be measured.
Humidity sensor
6) Light sensors
There are numerous sensors for measuring light intensity:
phototransistor, photodiode, light-dependent resistor (LDR, or
cadmium disulphide cell), photovoltaic cell and so on. The
phototransistor is commonly used in digital applications, in opto-
isolators, proximity detectors, wireless data links and slotted wheel
detectors. It has built-in gain, so is more sensitive than the photodiode.
The most common light sensor is the photo sensor. It works like
a variable resistor with a value that changes based on how much light
it receives.
Light dependent resistor LDR Phototransistor
Photo sensors are used in much the same way as pressure
sensors. If we hook one up to a microcontroller via a voltage divider
(or RC time) circuit, the microcontroller can sense how much light is
falling on the device.
A beam breaker is a non-physical switch or trigger. The simplest
way to make one is to aim a cheap laser pointer at a photo-sensor,
when the beam is broken, the resistance of the photo-resistor changes.
If the photo resistor is hooked up to a microcontroller, it can sense
whether the beam is intact or broken.
Proximity Sensors
There are a variety of ways to implement proximity sensing. The
most common are infrared and ultrasound. They're both usually used
as packaged devices that hook up to a microcontroller via one or more
digital I/O lines.
Infra-red (IR) light tends to be used to minimize interference
from visible light sources, such as fluorescent lights. The LDR is more
likely to be used for visible light, as its response is linear (when plotted
log R vs. log L) over a wide range, and it has a high sensitivity in the
visible frequencies.
An infrared sensor works by sending out pulses of infrared
(invisible) light. It then tries to detect reflections of that light from
nearby objects. If it detects a reflection then it assumes that there's an
object nearby and puts out a digital "1". Otherwise it puts out a "0".
An ultrasonic proximity detector works by putting out ultrasonic
(in audible) pulses of sound. It then measures the length of time it
takes those pulses to hit nearby objects and return as echos, the longer
the time, the farther away the object. Ultrasonic proximity detectors
are good for measuring short distances.
Actuators:
1- LEDs (Light Emitting Diodes)
They work just like regular diodes, except that they give off light
when we put current through them. The brightness of the light is
determined by the amount of current. If we put too much current
through a LED it will blow up. To limit the current through a LED we
use a current limiting resistor. As so:
If the LED specs say it can only handle 20 milliamps of current
(0.02 Amps), and the voltage source is at +5V, what's the smallest
current limiting resistor we can use? R = V/I = 5/.02 = 250 Ω
2-
A
microco
directly
3-
A
When w
dependi
starting
motors,
4-
W
need so
won't h
microco
can use
sound g
pie
Th
both wa
piezo el
element
PWM w
V)
motor
motor
ontroller
y. We ha
solenoid
solenoid
we energ
ing on th
g point (
, solenoid
speaker
We can't g
ome sort
have en
ontroller
them to
generatin
ezo elem
hey can
ays: defo
lement t
t directl
waveform
)Microco
Figure
r transf
rs can't
ve to use
d
d is kind
gize a sol
he type.
(usually
ds can't
r
generally
t of amp
nough p
rs aren't
o genera
ng device
ment spea
be used
orm the
akes ver
ly to a p
m by tog
ontroller
e 15: Sen
fers ele
provid
e some a
d of like a
lenoid its
When w
via a sp
be drive
y hook s
plifier in
power t
t fast eno
te simpl
es (CD p
aker
as speak
ceramic
ry little p
pin on a
ggling th
r to Sens
nsor plug
ectrical
de enoug
additiona
a cross b
s shaft is
we de-en
pring or
en direct
speak di
n betwee
to drive
ough to p
e bleeps
players o
kers, sin
c and it p
power to
a microc
at pin on
sor Inter
g and Sen
energy
gh curr
al circuit
between
s either p
ergize it
other re
tly by a m
irectly to
en them,
e the s
put out
s and buz
or sampl
nce the p
puts out
o drive i
controlle
n and off
rfacing T
nsor inpu
y into
rent to
try to po
a speak
pushed i
t, the sha
eturn me
microco
o a micr
, as the
speaker
high-qua
zzes, or
lers.)
piezo ele
a voltag
it. We ca
er and t
ff (from +
Techniq
ut port ci
motion
drive a
ower the
ker and a
in or pul
aft retur
echanism
ntroller.
rocontrol
microco
directly
ality sou
to contr
ectric eff
ge. As a s
an hook
then gen
+5V to g
ques
ircuitry
. Most
a motor
e motor.
a motor.
lled out,
rns to its
m). Like
.
ller. We
ontroller
y. Most
und. But
rol other
fect goes
speaker,
k a piezo
nerate a
ground).
t
r
.
,
s
e
e
r
t
t
r
s
,
o
a
Th
1-
is plugg
resistor
the defa
output v
2-
of the a
Fi
When t
supply
connect
current
In
need to
translat
which i
conveni
1-
1)
An
Also kn
he resisto
It provi
ged in. W
r provide
ault out
value of
It used
nalog se
gure 16
the switc
by the p
ted direc
t to flow
order to
o specify
te the ou
is in the
ient conv
Inputs/O
Analog
nalog Po
nown as
or is use
ides a de
When not
es a 5 V
tput valu
a digita
as part
ensors.
shows h
ch is ope
pull-up r
ctly to g
through
Figu
o design
y the p
utput of
e right r
version f
Outputs
Fi
Input P
orts are
s an ana
ed for tw
efault va
thing is p
olt bias
ue of an
l port is
of the vo
how a s
en, the s
resistor.
ground,
h the resi
ure 16: T
n the inte
erforma
f the sen
ange for
factor to
s Interfa
igure 17
Ports
necessar
alog to
wo reason
alue for t
plugged
voltage
n analog
0 or log
oltage di
witch is
sensor in
When t
generati
istor and
Touch Sw
erface be
ance of
nsor int
r the am
o be used
cing
7: Analog
ry to con
digital
ns:
the senso
into the
on the s
g port is
gic False.
ivider ci
s wired
nput is
the switc
ing a 0 V
d switch
witch Cir
etween a
a linear
to a suit
mplifier
d in the A
g Interfa
nnect se
converte
or input
e sensor p
sensor in
s 255, w
.
ircuit req
to a sen
connecte
ch is clos
Volt sign
.
rcuit
a sensor
r ampli
table inp
to hand
ADC.
ace
ensors to
er (ADC
when no
port the
nput line
while the
quired f
nsor inp
ed to th
sed, the
nal and
and the
ifier wh
put for
dle and a
o our con
C), they
o sensor
e pull-up
e. Thus,
default
for some
ut port.
e 5 Volt
input is
causing
e µC, we
ich will
the µC,
allows a
ntroller.
receive
r
,
t
e
.
t
s
g
e
l
,
a
.
e
analog signals and convert them to a digital number within a certain
numerical range. The analog signal is measured after a predefined
period of time passes. At each time period, the voltage is recorded as a
number. This number then defines a signal of 0's and 1's.
Most microcontrollers today are 8 bit, meaning they have a
range of 256 (2^8 = 256). There are a few that are 10 bit, 12 bit, and
even 32 bit, but as we increase precision we also need a much faster
processor.
For example, suppose a sensor reads 0V to an 8 bit ADC. This
would give us a digital output of 0. 5V would be 255. Now suppose a
sensor gave an output of 2.9V, doing the math:
2.9V/5V = X/255 → X = (2.9*255)/5 = 148
This bit range could also be seen as a resolution. Higher
resolutions mean higher accuracy, but occasionally can mean slower
processing and more susceptibility (‫)ﺗﺎﺛﺮ‬ to noise. For example, suppose
we had a 3 bit controller which has a range of 2^3 = 8. Then we have a
distance sensor that outputted a number 0 → 7 (a total of 8) that
represents the distance between our robot and the wall. If our sensor
can see only 8 feet, then we get a resolution of 1 bit per foot (8
resolution / 8 feet = 1). But then suppose we have an 8 bit controller,
we would get 256/8 = 32 ~ 1 bit per centimeter - way more accurate
and useful! With the 3 bit controller, we could not tell the difference
between 1 inch and 11 inches.
The sensor output must not exceed our digital logic voltage
(usually 0V → 5V), and then plug that output directly to the analog
port.
2) Digital I/O Ports
Digital ports are like analog ports, but with only 1 bit (2^1 = 2)
hence a resolution of 2 - on and off. Digital ports for that reason are
rarely used for sensors; except for maybe on/off switches. We can use
them to control motors or LED's. Send a high 5V signal to turn
something on, or a low 0V to turn something off. Or if we want to have
an LED at only half brightness, or a motor at half speed, send a
square wave. Square waves are like turning something on and off so
fast.
3) Serial Communication and Timers
A serial connection on a microcontroller is very useful for
communication. We can use it to program the controller from a
computer, and to output data from the controller to a computer (great
for debugging), or even to operate other electronics such as digital
video cameras. Usually the microcontroller would require an external
IC to handle everything, such as an RS232. I^2C (pronounced 'I-
squared-C') is also useful for communicating. It's actually somewhat
complicated, but usually the manufacturer has simplified it.
A timer is the method by which the microcontroller measures the
passing of time - such as for a clock, sonar, a pause/wait command,
timer interrupts, etc.
4) Motor Driver
To run a dc motor we need to either have an H-Bridge or a
Motor Driver IC. The IC is great for small robots that do not exceed 1
or 2 amps per motor and the rated motor voltage is not higher than
about 12V. The homemade H-Bridge would need to be used if we
wanted to exceed those specs with a heat sink onto the motor driver.
2- Standard Interfacing Circuits
1) Output Device Interfacing
Many output devices will require a transistor switching circuit.
In most cases a Darlington pair formed from two transistors is ideal.
Note that it is usual to connect a back EMF suppression diode
across the output device. This is essential with devices such as relays,
solenoids and motors which create a back EMF when power is
switched off.
A relay can be used to switch higher power devices such as
motors and solenoids. If desired, the relay can be powered by a
separate power supply, so, for instance, 12V solenoids can be
controlled by the microcontroller. Note the use of a back EMF
suppression diode across the relay contacts. This is to prevent damage
to the transistor when the relay switches off.
1. Output Device 1 - Light Emitting Diode (LED)
The microcontroller can sink (“absorb”) or source (“give out”) a
small amount of current, which means that an LED can be connected
directly to the output pin. A series resistor (value 330R) is also
required to limit the current.
LED connected to Ground Rail.
To switch on LED - high 1
To switch off LED - low 1
LED connected to Power Rail.
To switch on LED - low 1
To switch off LED - high 1
Bi-colour LEDs often contain both green and red LEDs
connected in ‘inverse parallel’. This means if current flows one way
through the device the LED lights green, and if current flows the other
way the LED lights red.
To switch on LED in red - high 0 low 1
To switch on LED in green - low 0 high 1
To switch off LED - low 0 low 1 or, high 0 high 1
2. Output Device 2 - Signal Lamp
To interface a signal lamp the standard transistor interfacing
circuit is used. Note that:
If a different power supply is used for the signal lamp, the 0V
rails of each power supply must be connected to provide a common
reference.
If a battery is used as the power supply, it is worth remembering
that LEDs draw much less current than lamps. Therefore, if a simple
‘indicator’ is required, a LED will be a better solution than a lamp as
the batteries will last far longer.
To switch on Lamp - high 1
To switch off Lamp - low 1
3. Output Device 3 – Buzzer
To interface a buzzer the standard transistor interfacing circuit
is used. Note that:
If a different power supply is used for the buzzer, the 0V rails of
each power supply must be connected to provide a common reference.
If a battery is used as the power supply, it is worth remembering
that piezo sounders draw much less current than buzzers. Buzzers
also just have one ‘tone’, whereas a piezo sounder is able to create
sounds of many different tones.
To switch on buzzer - high 1
To switch off buzzer - low 1
4. Output Devices 4 - Piezo Sounder & Speaker
Buzzers produce a noise when power is applied, but a piezo or
speaker requires a pulsed signal to generate the noise. Fortunately this
is very easy to generate from the microcontroller by using the BASIC
‘sound’ command.
5. Output Devices 5 - Solar & dc “Toy” Motors
There are a number of ways motors can be interfaced to the
microcontroller.
This circuit uses a Darlington transistor to switch the motor on
and off. This circuit will work with ‘solar’ motors, but may not
function correctly with cheap dc ‘toy’ motors. This is because this type
of motor introduces a lot of electrical ‘noise’ on to the power rails.
This noise can affect the microcontroller, and in some cases can
completely stop the control program functioning. Electrical noise can
be reduced by soldering suppression capacitors across the motor
contacts, as shown. Use a 220 nF polyester (non polarized) capacitor.
Power MOSFETs can be used instead of Darlington transistor
pairs to switch medium power devices. Note that it is usual to connect
a back EMF suppression diode across the output device. This is
essential with devices such as relays, solenoids and motors which
create a back EMF when power is switched off.
If a number of output devices are being controlled it may be
necessary to use a number of output transistors. In this case it will
often be more convenient to use a ULN2003 Darlington driver IC.
This is simply a 16 pin ‘chip’ that contains 7 darlington transistors
similar in value to the BCX38C. The ‘chip’ also contains internal back
EMF suppression diodes and so no external diodes are required.
On many occasions it may be necessary to control two motors. A
convenient and cheap approach would be to use a motor driver IC
such as the L293D. This IC will allow control of two dc motors, using
four data lines from the microcontroller. Naturally, if only one motor
is to be controlled then only two output lines are used.
Both inputs low- motor halt
First output high, second output low - motor forward
First output low, second output high - motor reverse
Both inputs high - motor halt
Changing the states of the input pins has the effect of altering the
direction of current flow through the motor, as shown below.
Note that the L293D will become warm with continuous use. A
heat sink bonded onto the top of the chip will help keep it cool.
One way to prevent electrical noise affecting the microcontroller
is to use separate power supplies for the ‘control’ electronics and the
motor. For example, a PP3 battery may be chosen to power the
microcontroller and 4xAA cells to power the motors. Naturally it will
be necessary to ‘link’ the two circuits so that the motor can be
controlled. A relay is an ideal component to do this.
The above circuit will only switch the motor on and off. If the
motor is required to run in both directions (forwards and reverse),
two relays can be used as shown.
6. Output Device 6 - Unipolar stepper motor
Stepper motors are very accurate motors that are commonly
used in computer disk drives, printers and clocks. Unlike dc motors,
which spin round freely when power is applied, stepper motors
require that their power supply be continuously pulsed in specific
patterns. For each pulse, the stepper motor moves around one ‘step’,
often 7.5 degrees (giving 48 steps in a full revolution).
Unipolar motors usually have four coils which are switched on
and off in a particular sequence. Bipolar motors have two coils in
which the current flow is reversed in a similar sequence. As the
stepper motor operates at 12V, the standard transistor circuit is
required to switch each coil. As the coils create a back EMF when
switched off, a suppression diode on each coil is required. The table
below show the four different steps required to make the motor turn.
Step Coil 1 Coil 2 Coil 3 Coil 4
1 1 0 1 0
2 1 0 0 1
3 0 1 0 1
4 0 1 1 0
1 1 0 1 0
Look carefully at the table, and notice that a pattern is visible.
Coil 2 is always the opposite (or logical NOT) of coil 1. The same
applies for coils 3 and 4. It is therefore possible to cut down the
number of microcontroller pins required to just two by the use of two
additional NOT gates. Fortunately the Darlington driver IC ULN2003
can be used to provide both the NOT and Darlington driver circuits.
Look at table, which just shows coil 1 and coil 3.
Step Coil 1 Coil 3 change
1 1 1 coil 3
2 1 0 Coil 1
3 0 0 Coil 3
4 0 1 Coil 1
1 1 1
Notice the change from step 1 to step 2, just coil 3 changes. Then
look at the next change - just coil 1 change. In fact the two coils take it
‘in turns’ to change from high to low and back again. This high-low-
high changing can be described as ‘toggling’ state. This makes the
programming very simple by using the BASIC toggle command.
Steps: Toggle 1 Toggle pin 1
Pause 200 Wait 200 ms
Toggle 2 Toggle pin 2
Pause 200 Wait 200 ms
Goto steps Loop
Note: If stepper motor ‘wobbles’, try adjusting wire polarity.
7. Output Device 7 - Bipolar Stepper motor
The bipolar stepper motor has two coils that must be controlled
so that the current flows in different directions through the coils in a
certain order. The changing magnetic fields that these coils create
cause the rotor of the motor to move around in steps.
The circuit that is normally used to control one of the coils is
shown below. Notices how there are four ‘control’ transistors that are
switched on in ‘pairs’. Therefore with two coils there are four control
transistor pairs (Q1-Q4) which must be switched on and off in a
certain sequence.
Notice that as the coils create a back EMF when switched off 8
suppression diodes (4 on each coil) are also required.
The table below show the four different steps required to make
the motor turn.
Step Q 1 Q 2 Q 3 Q 4
1 1 0 1 0
2 1 0 0 1
3 0 1 0 1
4 0 1 1 0
1 1 0 1 0
Fortunately the motor driver L293D has been specifically
designed to provide this transistor switching circuit. The L293D
contains all 8 transistors and diodes within one 16 pin package.
Four pins from the microcontroller are connected to the four
transistor ‘pairs’ via IC pins 2, 7, 10 and 15.
This sample procedure makes the motor spin 100 steps to the left
and then 100 steps to the right by using two sub-procedures. l step
causes the motor to move one step to the left, r step causes the motor
to move one step to the right.
8. Output Device 8 - Radio Control Servo
Servos are used in most radio controlled cars and planes to
control the steering mechanism. They are accurate devices that always
rotate the same amount for a given signal, and so are ideal for use in
many automated machines.
Servos can be driven directly via the ‘servo' command, or via
pulls out commands. A typical servo has just three connection wires,
normally red, black and white (or yellow). The red wire is the 5V
supply, the black wire is the 0V supply, and the white (or yellow) wire
is for the positioning signal.
Unfortunately servos require a large current (up to 1A) and also
introduce a large amount of noise on to the power rail. Therefore in
most cases the servo should be powered from a separate power supply,
as shown below. Remember that when using two power supplies the
two 0V rails must be joined to provide a common reference point.
9. Output Device 9 – Counter module
The Counter Module is a numeric LCD display module that can
be used to show a ‘counter’ value. To increment the counter a pulse
(between 1 and 1.5V) must be applied to the counter pad 3. As the
microcontroller operates at 5V a potential divider formed from
resistors must be used to reduce the microcontroller output signal to
1.5V. As the counter uses its own, internal, 1.5V battery, the two 0V
rails must also be connected.
To reset the counter, a second potential divider is added and
connected to pin 2.
10. Output Device 10 - Seven Segment Display
A seven segment display contains seven LED ‘bars’ that can be
lit up in different combinations to show the ten digits 0 to 9. In theory
each 'bar' could be connected to one microcontroller output pin, but
this would use up 7 of the 8 available pins.
A better solution is to use a dedicated integrated circuit, such as
the CMOS 4511B to control the seven segment display. This IC
controls the seven segment display according to the binary ‘code’ on
the four data lines. This system uses four pins rather than 7.
NOTE - Seven segment displays are available in two types, called
‘common cathode’ and ‘common anode’. The following circuits will
only work with a ‘common cathode’ type display. Use the
manufacturer’s datasheet to determine the pin out arrangement of the
LED bars.
Another possible solution is to use the CMOS 4026B to control
the seven segment display. This system uses just two pins to control
the display. The reset pin is used to reset the display to 0, the clock pin
is then used to increment the digit up from 0. This means to display
the digit ‘4’ it is necessary to reset and then pulse the clock line 4
times. In reality this means that the display shows the digits 0-1-2-3-4,
but, as they are clocked extremely rapidly, the human eye cannot see
the changes, and so the number ‘4’ seems to appear immediately!
This system can be expanded to two digits by adding a second
4026B IC and a second seven segment display, as shown in the
diagram below. No changes to the code are required, just give the
variable b1 a value between 0 and 99 and the number will be displayed
on the two displays when sub-procedure ‘clock’ is called.
11. Output Device 11 - Solenoid & Solenoid Valves
A solenoid consists of a steel plunger inside an electric coil which
is wrapped around a tube. When the coil is energized a magnetic field
is created, and this draws the plunger into the tube. When the coil is
de-energized a spring pushes the plunger back out of the tube.
To control a solenoid the standard MOSFET circuit is used. The
isonic-solenoid valve can be used to control air flow through a
pneumatic system. Isonic-valves are ideal for battery operated
products as operate at a low voltage and draw much less current than
traditional solenoid valves. The standard transistor switching circuit
can be used to drive the isonic-valve.
To switch the solenoid on - high 1
To switch the solenoid off - low 1
12. Output Device 12 - Smart Wire & Smart Springs
Shape Memory Alloy wire or springs are ‘smart’ materials that
can be used to create mechanical actuation (movement). When an
electric current is passed through the wire it heats up and so contracts
with a large pulling force. When the current is removed the wire cools
and so expands again (a ‘traditional’ steel spring is sometimes used to
pull the smart wire/spring taut as it cools).
Smart wire or springs draw a relatively large current, and so the
standard FET interfacing circuit should be used to interface to the
microcontroller.
To make the wire / spring contract - high 1
To allow the wire / spring to expand again - low 1
2) Input Device Interfacing
1. Input Device 1 – Switches
There are a large variety of switches available, but the majority
all have two ‘contacts’ which are either ‘open' (off) or ‘closed’ (on).
The two circuits shown below can be used with almost all switches.
With this circuit the input pin is low when the switch is open and
high when the switch is closed.
Goto ‘jump’ when switch is open: if pin0 = 0 then jump
Goto ‘jump’ when switch is closed: if pin0 = 1 then jump
With this circuit the input pin is high when the switch is open
and low when the switch is closed.
Goto ‘jump’ when switch is open: if pin0 = 1 then jump
Goto ‘jump’ when switch is closed: if pin0 = 0 then jump
Switch Bounce (‫ارﺟﺎع‬ ‫)ﻣﻔﺘﺎح‬
All mechanical switches ‘bounce’ when the switch opens or
closes. This means that the switch contacts ‘bounce’ against each other
before settling. As the microcontroller operates so quickly it is possible
that in some programs the microcontroller may register 2 or 3 of these
‘bounces’ instead of just registering one ‘push’.
The simplest way to de-bounce a circuit is to simply add time
delays (pause 100) after the (if) ... command. If the section of code
after the push is quite long this time delay will occur naturally (as the
other code commands are carried out) and so is unnecessary. However
if the code does not have a long delay, a pause command can be used
instead.
2. Input Device 2 - Potentiometer
A potentiometer (or ‘variable resistor’) has a spindle (‫)ﻣﻐﺰل‬ that
can be moved to change the resistance value of the potentiometer. This
can be used to measure rotational or linear movement.
The read ADC command is used to measure the value of the
resistance by carrying out an Analogue to Digital Conversion. The
value of the resistance is given a ‘value’ between 0 and 255 which is
then stored in a variable. After storing the reading in the variable, the
(if) ... then command can be used to perform different functions.
3. Input Device 3 - Light Dependant Resistor (LDR)
A Light Dependant Resistor (LDR) is a resistor that changes in
value according to the light falling on it. A commonly used device, the
ORP-12, has a high resistance in the dark, and a low resistance in the
light. Connecting the LDR to the microcontroller is very straight
forward, but some software ‘calibrating’ is required.
It should be remembered that the LDR response is not linear,
and so the readings will not change in exactly the same way as with a
potentiometer. In general there is a larger resistance change at
brighter light levels. This can be compensated for in the software by
using a smaller range at darker light levels.
4. Input Device 4 - Thermistor
A thermistor is a resistor that changes in value according to its
heat. In actual fact all resistors change in value as they heat up or cool
down, but thermistors are manufactured to show a large resistance
change. Connecting the thermistor to the microcontroller is very
straight forward, but some software ‘calibrating’ is required.
It should be remembered that the thermistor response is not
linear, and so the readings will not change in exactly the same way as
with a potentiometer. In general there is a larger resistance change at
lower temperatures. This can be compensated for in the software by
using a smaller range at higher temperatures.
3) Advanced Component Interfacing
1. Advanced Interfacing 1 - LCD Display
A Liquid Crystal Display is an electronic device that can be used
to show numbers or text. There are two main types of LCD display,
numeric displays (used in watches, calculators etc) and alphanumeric
text displays (often used in devices such as photocopiers and mobile
telephones).
The display is made up of a number of shaped ‘crystals’. In
numeric displays these crystals are shaped into ‘bars’, and in
alphanumeric displays the crystals are simply arranged into patterns
of ‘dots’. Each crystal has an individual electrical connection so that
each crystal can be controlled independently. When the crystal is ‘off’
(i.e. when no current is passed through the crystal) the crystal reflect
the same amount of light as the background material, and so the
crystals cannot be seen. However when the crystal has an electric
current passed through it, it changes shape and so absorbs more light.
This makes the crystal appear darker to the human eye - and so the
shape of the dot or bar can be seen against the background.
It is important to realize the difference between a LCD display
and an LED display. An LED display (often used in clock radios) is
made up of a number of LEDs which actually give off light (and so can
be seen in the dark). An LCD display only reflects light, and so cannot
be seen in the dark.
There are three main ways of interfacing LCDs to
microcontrollers.
1) Serial LCD firmware chip
2) Serial LCD Module with onboard firmware chip
3) Direct Connection
Standard LCD Sub-Procedures (Direct Connection)
Before the sub-procedures are studied, it is important to
understand how the LCD module operates. It has two modes of
operation, which are called ‘character’ mode and ‘instruction’ mode.
The RS pin (pin 2) controls the mode - when high the LCD is in
character mode, when low the LCD is in instruction mode.
The character or instruction is sent as a 4 bit binary number
down the data lines (pins 7-4). Every time the Enable pin (pin 3) is
‘pulsed’ the LCD reads the data lines and prints the character (or
carries out the instruction) which is given by the number on the data
lines. This is not quite the whole story, as each character or
instruction is actually made up of an 8 bit number, which contains a
table of all the character and instruction codes. As there are only four
data lines, this 8 bit number is split into two ‘halves’ which are sent
one after the other. The two halves are called the ‘high nibble’ and the
‘low nibble’.
This means that two nibbles are transmitted down the data lines
for each character.
2. Advanced Interfacing 2 - Serial Interfacing to a Computer
As all computers use the same ASCII code for transmitting and
receiving characters it is relatively easy to program the
microcontroller to ‘talk’ to any type of computer. All that is needed is
a suitable cable and some very simple electronic circuits.
a- Connecting to the Computer
The system we will use requires just three wires between the
computer and the microcontroller. The ground wire provides a
common reference, the RX wire sends signals from the computer to
the microcontroller, and the TX wire sends signals from the
microcontroller to the computer. The best way to make a serial cable
is to buy a serial ‘extension’ cable and cut it in half. This will give two
cables with a suitable connector at each end. The diagrams below
show the various wiring connections required.
b- Computer Communication Software
There are various different protocols that can be used for serial
communication, and it is important that both the computer and the
microcontroller use the same setting. The 2400, N, 8, 1 protocol is used
here, which means baud speed 2400, no parity, 8 data bits and one
stop bit. This baud speed is quite slow by modern standards, but is
quite sufficient for the majority of project work tasks. All ‘hand
shaking’ (hardware or software) must also be disabled.
This system requires just three wires between the computer and
the microcontroller. Strictly speaking RS232 serial voltages should be
at ±15V, but the standard 5V from the on-board 5V regulator will be
used here. This is not the industry standard, but works perfectly OK
with the majority of computers. This is the circuit that will be used use
for serial communication.
To provide true RS232 voltages another integrated circuit is
required. The most common IC used is the MAX232, which has on-
board voltage boosters to create the required voltage swing. If this
setting is used it is necessary to change the N2400 (negative) in all the
serial software commands to T2400 (true positive). ONLY USE ONE
OF THESE TWO CIRCUIT OPTIONS!
VI) Practical application
1) Interfacing of temperature Sensor LM 35:
The LM35 series sensors are precision integrated-circuit
temperature sensors, whose output voltage is linearly proportional to
the Centigrade temperature. It gives 10mV of output voltage for every
1 Cº. The LM35 does not require any external calibration or trimming
to provide typical accuracies of ±¼ Cº at room temperature and ±¾ Cº
over a full -55 to +150 Cº temperature range. The LM35's low output
impedance, linear output, and precise inherent calibration make
interfacing to readout or control circuitry especially easy. It can be
used with single power supplies, or with dual supplies. As it draws
only 60 µA from its supply, it has very low self-heating, less than 0.1
Cº in still air. The LM35 is rated to operate over a -55° to + 150 Cº
temperature ranges. LM35 is a three terminal IC with Vcc, Ground
and Vout.
The LM 35 IC gives a 10 mV analog output voltage for every
degree Celsius change in temperature. The Output of the temperature
sensor is analog in nature. So, with proper circuitry an ADC chip is
used as shown below.
As shown in the circuit ADC 0809 (8-input channel system) is
used to convert the analog voltage into its equivalent digital voltage.
For this necessary signal conditioning circuit is developed using an
operational amplifier. A clock signal of 100 KHz is applied. The
voltage drop across the LM Zener is buffered by an op-amp LM 741
to produce a Vcc and Vref of around 5V to 12V for the A/D converter.
With this reference voltage the A/D converter will have 256 steps of 20
mV each. Since the temperature sensor signal is amplified by 2, each
degree Celsius of temperature change will produce an output change
of 20 mV, or one step on the A/D converter. This gives us a resolution
of 1 Cº, which is about the typical accuracy of the sensor. The
advantage of using Vref as Vcc for the device is that this voltage will not
have the switching noise that the digital Vcc lines have. The control
inputs and data outputs of the ADC are connected to the Ports of the
Microcontroller as shown in the circuit.
A relay is used to control the temperature. When the
temperature of the bath is reached a set temperature, the
microcontroller sends a High bit to the relay so that the Relay will
switch off the power supply to the heater and automatically the
temperature starts decreasing. The vice-versa takes place when the
temperature falls below the set value.
A 2x16 LCD module is interfaced to the Microcontroller to
display the temperature. Suitable program is developed to control and
measure the temperature. The temperature at which the water bath is
to be maintained is set as (TS). The measured temperature is
compared with this TS and if measured temperature is higher than the
set temperature, a signal is sent to the relay to switch-off the power.
Otherwise the power is switched on. This temperature is displayed on
the LCD module.
2) Interfacing of Humidity Sensor:
A humidity sensor measures the relative humidity and expressed
as a percent (RH %). It is the ratio of actual moisture in the air to the
highest amount of moisture in air can hold at that temperature.
Humidity sensors are of three types, Resistive, Capacitive, and
Thermal Conductivity sensing. The most common type of humidity
sensor used is the “capacitive sensor.” The sensor is composed of two
metal plates with a non-conductive polymer film between them. The
film collects moisture from the air, and the moisture causes minute
changes in the voltage between the two plates. The changes in voltage
are used to know the amount of moisture in the air.
The SY-HS-220 series Humidity sensor is based on capacitive
technology. This module converts relative humidity to output voltage.
Its operating voltage is 5V dc.
The circuit details of the humidity sensor are given in Fig. below.
This is a three pin IC sensor. Among the three pins one is (B)
connected to ground, (R) is to +5 V and (W) gives the analog output
voltage based on the humidity levels.
The interfacing of Humidity sensor with 8051 microcontroller
using ADC0809 is shown below.
3) Interfacing of Pressure Sensor:
Pressure Sensors convert absolute atmospheric pressure into a
linear, proportional voltage, which may be used in any meteorological
application. Pressure sensors can be classified in terms of pressure
ranges they measure, temperature ranges of operation, and most
importantly the type of pressure they measure. In terms of pressure
type, pressure sensors can be divided into five categories.
• Absolute pressure sensor
This sensor measures the pressure relative to perfect vacuum
pressure (0 PSI or no pressure). Atmospheric pressure is 101.325 kPa
(14.7 PSI) at sea level with reference to vacuum.
• Gauge pressure sensor
It can be calibrated to measure the pressure relative to a given
atmospheric pressure at a given location. A tire pressure gauge is an
example of gauge pressure indication. When the tire pressure gauge
reads 0 PSI, there is really 14.7 PSI (atmospheric pressure) in the tire.
• Vacuum pressure sensor
This sensor is used to measure pressure less than the
atmospheric pressure at a given location. This has the potential to
cause some confusion as industry may refer to a vacuum sensor as one
which is referenced to either atmospheric pressure (i.e. measure
Negative gauge pressure) or relative to absolute vacuum.
• Differential pressure sensor
This sensor measures the difference between two or more
pressures introduced as inputs to the sensing unit, for example,
measuring the pressure drop across an oil filter. Differential pressure
is also used to measure flow or level in pressurized vessels.
• Sealed pressure sensor
This sensor is the same as the gauge pressure sensor except that
it is previously calibrated by manufacturers to measure pressure
relative to sea level pressure.
The NPC-1220 is a solid state IC Pressure Sensor used to
measure pressure. It is intended for printed circuit board mounting
and available as an 8-pin DIP chip. The circuit connections of this
pressure sensor are given below.
To interface the pressure sensor with a microcontroller, a signal
conditioning circuit is necessary. The signal conditioning of the
pressure sensor consists of LM324 operational amplifiers, which are
high gain, internally frequency compensated amplifiers designed
specifically to operate from a single power supply over a wide voltage
range. The analog output voltage of the sensor is given to ADC. The
pressure sensor generates 0 to 50 mV of output voltage for a 0 to 15
psi pressure range.
The interfacing circuit of the Pressure sensor NPC1220 to the
Microcontroller using ADC0809 is shown below.
4) Interfacing of Proximity Sensor:
A proximity sensor is used to detect an object when the object
approaches within the detection range of the sensor. Proximity sensors
are mainly used for detecting the approach of metal objects. There are
various types of proximity sensors that are used for detecting the
presence or absence of an object. The design of a proximity sensor can
be based on principles like variable reluctance, eddy current loss,
saturated core, and Hall effect etc.
Common types of non-contact proximity sensors include
inductive proximity sensors, capacitive proximity sensors, ultrasonic
proximity sensors, and photoelectric sensors. Hall-effect sensors detect
a change in a polarity of a magnetic field. Variable reluctance sensors
typically include a U-type core and coils wound around the core legs.
Inductive proximity sensors have a lossy resonant circuit (oscillator)
at the input side whose loss resistance can be changed by the
proximity of an electrically conductive medium.
The VCNL 4010 is a fully integrated proximity and ambient light
sensor. It includes a signal processing IC and features standard I2
C
communication interface. This IC sensor has a built-in infrared
emitter and photo-pin-diode for proximity function. The maximum
Proximity distance of this sensor is up to 200 mm. This sensor has
excellent temperature compensation, robust refresh rate setting
without any external RC low-pass filter. The block diagram of the
sensor is shown below in figure above. The interfacing of the
proximity sensor and signal conditioning also is shown bellow.
The interfacing is done using two wired I2
C technique. The SCL
and SDA signals are connected to the port 1.0 and port 1.1 pins of the
microcontroller. After detecting the object the sensor sends an
interrupt signal to the microcontroller. Since the Sensor is a digital IC,
its output is in digital form. So, no ADC is required and the output
voltage can be directly given to the microcontroller.
5) Interfacing of Flow Sensor:
A flow sensor is a device for sensing the rate or quantity of fluid
flow whether it be a gas, steam, liquid or solid. Flow sensor
configurations are available for use in liquids or gases with flow rates
from ultra low flow sensing to fast transient flow sensors. The flow
rate is determined directly by measuring the liquid's velocity or the
change in kinetic energy. Velocity depends on the pressure differential
that is forcing the liquid through a pipe. Because the pipe's cross-
sectional area is known and remains constant, the average velocity is
an indication of the flow rate. Flow sensors are sometimes related to
sensors called veloci-meters that measure speed of fluids flowing
through them, these use units like ft/sec. A very basic relationship for
determining the fluid's flow rate in such cases is: Q = VXA
where Q is the liquid flow through the pipe;
V = average velocity of the flow;
A = cross-sectional area of the pipe.
There are three basic types of flow sensors and flow meters.
Mass flow sensors measure flow rate in terms of the mass of the fluid
substance, Volumetric flow sensors measure flow rate in terms of how
much of the material is flowing, Velocity flow sensors measure flow
rate as in terms of how fast the material is moving.
An effective way to measure the flow rate through a pipe is to
place some type of restriction within the pipe and to measure the
pressure difference between the low velocity, high-pressure upstream
section, and the high-velocity, low-pressure downstream section. One
common method is the use of an orifice plate as shown below.
The volumetric flow rate (Q) is given by
Where
A1 = Area of pipe upstream from restriction
A2 = Flow area of pipe at restriction
p1 = pressure upstream from restriction
p2 = pressure at restriction
ρ = density of fluid
C = correction factor for energy losses
The differential pressure sensors
The SDPx108 series sensors are a high-performance sensors,
specially designed for air flow measurements. The SDPx108 sensor
provides an analog output signal with a range of 0 - 4 V. The simple
differential pressure sensor used to measure flow rate is shown below.
It is a 3-pin CMOS IC, whose output is at the pin 3. It has on
chip ADC and on chip DAC.
Interfacing Circuit: The output of the sensor is applied to the
ADC 0809 and this digital output is given to the ports of the
Microcontroller.
The analog output of the sensor is applied to channel 0 (IN0) of
the ADC and the output of the ADC is given to the Port 1 of the
microcontroller as shown in the diagram. A 2X16 LCD module is
interfaced to the microcontroller to display the flow rate.

More Related Content

What's hot

Smart sensors
Smart sensorsSmart sensors
Smart sensors
Supriya Gorai
 
Basics of Sensors & Transducers
Basics of Sensors & TransducersBasics of Sensors & Transducers
Basics of Sensors & Transducers
Burdwan University
 
Working Principals of Various Sensors
Working Principals of Various SensorsWorking Principals of Various Sensors
Working Principals of Various Sensors
Muhammad Irtiza
 
Digital modulation techniques...
Digital modulation techniques...Digital modulation techniques...
Digital modulation techniques...
Nidhi Baranwal
 
Sensors and actuators
Sensors and actuatorsSensors and actuators
Sensors and actuatorsnazibhmd
 
Digital voltmeter (DVM) and its Classification
Digital voltmeter (DVM) and its ClassificationDigital voltmeter (DVM) and its Classification
Digital voltmeter (DVM) and its Classification
ST. MARTIN'S ENGINEERING COLLEGE
 
Digital transducer
Digital transducerDigital transducer
Digital transducer
ShuaibMalik11
 
Smart sensors and their Application
Smart sensors and their ApplicationSmart sensors and their Application
Smart sensors and their Application
Yash Kant
 
Scada architecture
Scada architectureScada architecture
Scada architecture
invincibleneo
 
Sensors
SensorsSensors
ADC & DAC
ADC & DACADC & DAC
ADC & DAC
wewe mahir
 
PLC - Programmable Logic Controller
PLC - Programmable Logic ControllerPLC - Programmable Logic Controller
PLC - Programmable Logic Controller
Mahesh Vadhavaniya profmjv
 
(D/A) and (A/D)conversion
(D/A) and (A/D)conversion(D/A) and (A/D)conversion
(D/A) and (A/D)conversion
Praveen Kumar
 
Pulse width modulation (PWM)
Pulse width modulation (PWM)Pulse width modulation (PWM)
Pulse width modulation (PWM)
amar pandey
 
Sensors
SensorsSensors
Electronic Measurement and Instrumentation
Electronic Measurement and InstrumentationElectronic Measurement and Instrumentation
Electronic Measurement and Instrumentation
Manipal University Jaipur
 
Sensor interfacing in 8051
Sensor interfacing in 8051Sensor interfacing in 8051
Sensor interfacing in 8051
Irfan Ahmad
 
Sensor Characteristics and Selection
Sensor Characteristics and Selection Sensor Characteristics and Selection
Sensor Characteristics and Selection
Engr.Dr.Abdul Rehman Abbasi
 
PLC (PROGRAMMABLE LOGIC CONTROLLER)
PLC (PROGRAMMABLE LOGIC CONTROLLER)PLC (PROGRAMMABLE LOGIC CONTROLLER)
PLC (PROGRAMMABLE LOGIC CONTROLLER)
Manoj Gowda K
 

What's hot (20)

Smart sensors
Smart sensorsSmart sensors
Smart sensors
 
Basics of Sensors & Transducers
Basics of Sensors & TransducersBasics of Sensors & Transducers
Basics of Sensors & Transducers
 
Working Principals of Various Sensors
Working Principals of Various SensorsWorking Principals of Various Sensors
Working Principals of Various Sensors
 
Digital modulation techniques...
Digital modulation techniques...Digital modulation techniques...
Digital modulation techniques...
 
Sensors and actuators
Sensors and actuatorsSensors and actuators
Sensors and actuators
 
Digital voltmeter (DVM) and its Classification
Digital voltmeter (DVM) and its ClassificationDigital voltmeter (DVM) and its Classification
Digital voltmeter (DVM) and its Classification
 
Digital transducer
Digital transducerDigital transducer
Digital transducer
 
Smart sensors and their Application
Smart sensors and their ApplicationSmart sensors and their Application
Smart sensors and their Application
 
Actuators.ppt
Actuators.pptActuators.ppt
Actuators.ppt
 
Scada architecture
Scada architectureScada architecture
Scada architecture
 
Sensors
SensorsSensors
Sensors
 
ADC & DAC
ADC & DACADC & DAC
ADC & DAC
 
PLC - Programmable Logic Controller
PLC - Programmable Logic ControllerPLC - Programmable Logic Controller
PLC - Programmable Logic Controller
 
(D/A) and (A/D)conversion
(D/A) and (A/D)conversion(D/A) and (A/D)conversion
(D/A) and (A/D)conversion
 
Pulse width modulation (PWM)
Pulse width modulation (PWM)Pulse width modulation (PWM)
Pulse width modulation (PWM)
 
Sensors
SensorsSensors
Sensors
 
Electronic Measurement and Instrumentation
Electronic Measurement and InstrumentationElectronic Measurement and Instrumentation
Electronic Measurement and Instrumentation
 
Sensor interfacing in 8051
Sensor interfacing in 8051Sensor interfacing in 8051
Sensor interfacing in 8051
 
Sensor Characteristics and Selection
Sensor Characteristics and Selection Sensor Characteristics and Selection
Sensor Characteristics and Selection
 
PLC (PROGRAMMABLE LOGIC CONTROLLER)
PLC (PROGRAMMABLE LOGIC CONTROLLER)PLC (PROGRAMMABLE LOGIC CONTROLLER)
PLC (PROGRAMMABLE LOGIC CONTROLLER)
 

Viewers also liked

Sensors-Interfacing Techniques
Sensors-Interfacing TechniquesSensors-Interfacing Techniques
Sensors-Interfacing Techniques
Dr.YNM
 
Interfacing methods of microcontroller
Interfacing methods of microcontrollerInterfacing methods of microcontroller
Interfacing methods of microcontrollerDiwaker Pant
 
Microcontroller 8051 and its interfacing
Microcontroller 8051 and its interfacingMicrocontroller 8051 and its interfacing
Microcontroller 8051 and its interfacing
Ankur Mahajan
 
microcontroller based temperature sensor
microcontroller based temperature sensormicrocontroller based temperature sensor
microcontroller based temperature sensorDerrick D'souza
 
8051 Microcontroller Notes
8051 Microcontroller Notes8051 Microcontroller Notes
8051 Microcontroller NotesDr.YNM
 
Speed checker on highway using 8051
Speed checker on highway using 8051Speed checker on highway using 8051
Speed checker on highway using 8051
Rkrishna Mishra
 
Interfacing LCD with 8051 Microcontroller
Interfacing LCD with 8051 MicrocontrollerInterfacing LCD with 8051 Microcontroller
Interfacing LCD with 8051 Microcontroller
Pantech ProLabs India Pvt Ltd
 
Question paper with solution the 8051 microcontroller based embedded systems...
Question paper with solution  the 8051 microcontroller based embedded systems...Question paper with solution  the 8051 microcontroller based embedded systems...
Question paper with solution the 8051 microcontroller based embedded systems...
manishpatel_79
 
8051 MICROCONTROLLER
8051 MICROCONTROLLER 8051 MICROCONTROLLER
8051 MICROCONTROLLER
THANDAIAH PRABU
 
Interfacing Stepper motor with 8051
Interfacing Stepper motor with 8051Interfacing Stepper motor with 8051
Interfacing Stepper motor with 8051
Pantech ProLabs India Pvt Ltd
 
Embedded c programming guide e book atmel 8051 / 89c51 /89c52
Embedded c programming guide e book atmel 8051 / 89c51 /89c52Embedded c programming guide e book atmel 8051 / 89c51 /89c52
Embedded c programming guide e book atmel 8051 / 89c51 /89c52
Raghav Shetty
 
Microcontroller 8051
Microcontroller 8051Microcontroller 8051
Microcontroller 8051Rashmi
 
Intro to Arduino
Intro to ArduinoIntro to Arduino
Intro to Arduino
avikdhupar
 
Ppt for automatic plant irrigation system
Ppt for automatic plant irrigation systemPpt for automatic plant irrigation system
Ppt for automatic plant irrigation systemstk25
 
Ottawa Co Model Wind Turbine Ord
Ottawa Co Model Wind Turbine OrdOttawa Co Model Wind Turbine Ord
Ottawa Co Model Wind Turbine Ord
buildingplace
 
Final Documentation - Full
Final Documentation - FullFinal Documentation - Full
Final Documentation - FullEmeel Gayed
 
Fyp slide presentation muiz
Fyp slide presentation muizFyp slide presentation muiz
Fyp slide presentation muizMuhd Mu'izuddin
 

Viewers also liked (20)

Sensors-Interfacing Techniques
Sensors-Interfacing TechniquesSensors-Interfacing Techniques
Sensors-Interfacing Techniques
 
Interfacing methods of microcontroller
Interfacing methods of microcontrollerInterfacing methods of microcontroller
Interfacing methods of microcontroller
 
Microcontroller 8051 and its interfacing
Microcontroller 8051 and its interfacingMicrocontroller 8051 and its interfacing
Microcontroller 8051 and its interfacing
 
microcontroller based temperature sensor
microcontroller based temperature sensormicrocontroller based temperature sensor
microcontroller based temperature sensor
 
8051 Microcontroller Notes
8051 Microcontroller Notes8051 Microcontroller Notes
8051 Microcontroller Notes
 
Speed checker on highway using 8051
Speed checker on highway using 8051Speed checker on highway using 8051
Speed checker on highway using 8051
 
Interfacing LCD with 8051 Microcontroller
Interfacing LCD with 8051 MicrocontrollerInterfacing LCD with 8051 Microcontroller
Interfacing LCD with 8051 Microcontroller
 
Question paper with solution the 8051 microcontroller based embedded systems...
Question paper with solution  the 8051 microcontroller based embedded systems...Question paper with solution  the 8051 microcontroller based embedded systems...
Question paper with solution the 8051 microcontroller based embedded systems...
 
8051 MICROCONTROLLER
8051 MICROCONTROLLER 8051 MICROCONTROLLER
8051 MICROCONTROLLER
 
Complex Sensors
Complex SensorsComplex Sensors
Complex Sensors
 
Interfacing Stepper motor with 8051
Interfacing Stepper motor with 8051Interfacing Stepper motor with 8051
Interfacing Stepper motor with 8051
 
Embedded c programming guide e book atmel 8051 / 89c51 /89c52
Embedded c programming guide e book atmel 8051 / 89c51 /89c52Embedded c programming guide e book atmel 8051 / 89c51 /89c52
Embedded c programming guide e book atmel 8051 / 89c51 /89c52
 
Microcontroller 8051
Microcontroller 8051Microcontroller 8051
Microcontroller 8051
 
Intro to Arduino
Intro to ArduinoIntro to Arduino
Intro to Arduino
 
Ppt for automatic plant irrigation system
Ppt for automatic plant irrigation systemPpt for automatic plant irrigation system
Ppt for automatic plant irrigation system
 
Secured vehicle control system
Secured vehicle control systemSecured vehicle control system
Secured vehicle control system
 
Capstone Project
Capstone ProjectCapstone Project
Capstone Project
 
Ottawa Co Model Wind Turbine Ord
Ottawa Co Model Wind Turbine OrdOttawa Co Model Wind Turbine Ord
Ottawa Co Model Wind Turbine Ord
 
Final Documentation - Full
Final Documentation - FullFinal Documentation - Full
Final Documentation - Full
 
Fyp slide presentation muiz
Fyp slide presentation muizFyp slide presentation muiz
Fyp slide presentation muiz
 

Similar to Sensors and microcontroller interfacing

CHapter 4 -Signal Conditioning.pptxyyhhhj
CHapter 4 -Signal Conditioning.pptxyyhhhjCHapter 4 -Signal Conditioning.pptxyyhhhj
CHapter 4 -Signal Conditioning.pptxyyhhhj
teddiyfentaw
 
Mecha-Lec-2-Sensors & Signal Processings.pptx
Mecha-Lec-2-Sensors & Signal Processings.pptxMecha-Lec-2-Sensors & Signal Processings.pptx
Mecha-Lec-2-Sensors & Signal Processings.pptx
hailegebreselassie24
 
Sensors for Biomedical Devices and systems
Sensors for Biomedical Devices and systemsSensors for Biomedical Devices and systems
Sensors for Biomedical Devices and systems
Gunjan Patel
 
SENSORS_AND_INST.UNIT_1_REG_17__Presentation.ppt
SENSORS_AND_INST.UNIT_1_REG_17__Presentation.pptSENSORS_AND_INST.UNIT_1_REG_17__Presentation.ppt
SENSORS_AND_INST.UNIT_1_REG_17__Presentation.ppt
SenthilKumarP45
 
Emotional Stress Indicator and Digital Thermometer-Project-8thsem
Emotional Stress Indicator and Digital Thermometer-Project-8thsemEmotional Stress Indicator and Digital Thermometer-Project-8thsem
Emotional Stress Indicator and Digital Thermometer-Project-8thsem
kaushikbandopadhyay
 
PLC input and output devices
PLC input and output devices PLC input and output devices
PLC input and output devices
Ameen San
 
Lv side distributed power factor correction system
Lv side distributed power factor correction systemLv side distributed power factor correction system
Lv side distributed power factor correction system
eSAT Publishing House
 
Mechatronics study material-Question Bank.pdf
Mechatronics study material-Question Bank.pdfMechatronics study material-Question Bank.pdf
Mechatronics study material-Question Bank.pdf
RajaSekaran923497
 
Eee 326 measurement and instrumentations
Eee 326 measurement and instrumentationsEee 326 measurement and instrumentations
Eee 326 measurement and instrumentations
abba adua
 
Transducers and Data Aquisition Systems.pdf
Transducers and Data Aquisition Systems.pdfTransducers and Data Aquisition Systems.pdf
Transducers and Data Aquisition Systems.pdf
Shiny Christobel
 
Sensors and transducer
Sensors and transducerSensors and transducer
Sensors and transducer
Saumya Ranjan Behura
 
cn3-Sensors and Transducers-12.ppt
cn3-Sensors and Transducers-12.pptcn3-Sensors and Transducers-12.ppt
cn3-Sensors and Transducers-12.ppt
Mathsmaster,Potostudy
 
Assignment2
Assignment2Assignment2
Assignment2
vishal pawde
 
Sensor
SensorSensor
Sensor
SensorSensor
Lec 8,9,10 (interfacing)
Lec 8,9,10 (interfacing)Lec 8,9,10 (interfacing)
Lec 8,9,10 (interfacing)
Mohamed Atef
 
TRANSDUCERS CONVERTS ENERGY FROM ONE FORM TO ANOTHER
TRANSDUCERS CONVERTS ENERGY FROM ONE FORM TO ANOTHERTRANSDUCERS CONVERTS ENERGY FROM ONE FORM TO ANOTHER
TRANSDUCERS CONVERTS ENERGY FROM ONE FORM TO ANOTHER
Samueljidayi
 
Ammeter and voltmeter
Ammeter and voltmeterAmmeter and voltmeter
Ammeter and voltmeter
Hemin Patel
 
UNIT- I.pptx
UNIT- I.pptxUNIT- I.pptx

Similar to Sensors and microcontroller interfacing (20)

CHapter 4 -Signal Conditioning.pptxyyhhhj
CHapter 4 -Signal Conditioning.pptxyyhhhjCHapter 4 -Signal Conditioning.pptxyyhhhj
CHapter 4 -Signal Conditioning.pptxyyhhhj
 
Mecha-Lec-2-Sensors & Signal Processings.pptx
Mecha-Lec-2-Sensors & Signal Processings.pptxMecha-Lec-2-Sensors & Signal Processings.pptx
Mecha-Lec-2-Sensors & Signal Processings.pptx
 
Sensors for Biomedical Devices and systems
Sensors for Biomedical Devices and systemsSensors for Biomedical Devices and systems
Sensors for Biomedical Devices and systems
 
SENSORS_AND_INST.UNIT_1_REG_17__Presentation.ppt
SENSORS_AND_INST.UNIT_1_REG_17__Presentation.pptSENSORS_AND_INST.UNIT_1_REG_17__Presentation.ppt
SENSORS_AND_INST.UNIT_1_REG_17__Presentation.ppt
 
Emotional Stress Indicator and Digital Thermometer-Project-8thsem
Emotional Stress Indicator and Digital Thermometer-Project-8thsemEmotional Stress Indicator and Digital Thermometer-Project-8thsem
Emotional Stress Indicator and Digital Thermometer-Project-8thsem
 
PLC input and output devices
PLC input and output devices PLC input and output devices
PLC input and output devices
 
Lv side distributed power factor correction system
Lv side distributed power factor correction systemLv side distributed power factor correction system
Lv side distributed power factor correction system
 
Mechatronics study material-Question Bank.pdf
Mechatronics study material-Question Bank.pdfMechatronics study material-Question Bank.pdf
Mechatronics study material-Question Bank.pdf
 
Eee 326 measurement and instrumentations
Eee 326 measurement and instrumentationsEee 326 measurement and instrumentations
Eee 326 measurement and instrumentations
 
Transducers and Data Aquisition Systems.pdf
Transducers and Data Aquisition Systems.pdfTransducers and Data Aquisition Systems.pdf
Transducers and Data Aquisition Systems.pdf
 
Sensors and transducer
Sensors and transducerSensors and transducer
Sensors and transducer
 
cn3-Sensors and Transducers-12.ppt
cn3-Sensors and Transducers-12.pptcn3-Sensors and Transducers-12.ppt
cn3-Sensors and Transducers-12.ppt
 
Assignment2
Assignment2Assignment2
Assignment2
 
measurments
measurmentsmeasurments
measurments
 
Sensor
SensorSensor
Sensor
 
Sensor
SensorSensor
Sensor
 
Lec 8,9,10 (interfacing)
Lec 8,9,10 (interfacing)Lec 8,9,10 (interfacing)
Lec 8,9,10 (interfacing)
 
TRANSDUCERS CONVERTS ENERGY FROM ONE FORM TO ANOTHER
TRANSDUCERS CONVERTS ENERGY FROM ONE FORM TO ANOTHERTRANSDUCERS CONVERTS ENERGY FROM ONE FORM TO ANOTHER
TRANSDUCERS CONVERTS ENERGY FROM ONE FORM TO ANOTHER
 
Ammeter and voltmeter
Ammeter and voltmeterAmmeter and voltmeter
Ammeter and voltmeter
 
UNIT- I.pptx
UNIT- I.pptxUNIT- I.pptx
UNIT- I.pptx
 

More from mohamed albanna

Effects of Electromagnetic Field (EMF) On Implantable Medical Devices (IMD)
Effects of Electromagnetic Field (EMF) On Implantable Medical Devices (IMD)Effects of Electromagnetic Field (EMF) On Implantable Medical Devices (IMD)
Effects of Electromagnetic Field (EMF) On Implantable Medical Devices (IMD)
mohamed albanna
 
Изследване и проектиране на Хетеропреходни Биполярни SiGe Транзистори
Изследване и проектиране  на Хетеропреходни Биполярни SiGe ТранзисториИзследване и проектиране  на Хетеропреходни Биполярни SiGe Транзистори
Изследване и проектиране на Хетеропреходни Биполярни SiGe Транзистори
mohamed albanna
 
Analog electronic circuit
Analog electronic circuitAnalog electronic circuit
Analog electronic circuit
mohamed albanna
 
Design of resonance amplifier work at very high frequency bulgarian
Design of resonance amplifier work at very high frequency bulgarianDesign of resonance amplifier work at very high frequency bulgarian
Design of resonance amplifier work at very high frequency bulgarianmohamed albanna
 
Wideband Amplifier with SiGe Transistors: Parameters and Noise Characteristic...
Wideband Amplifier with SiGe Transistors: Parameters and Noise Characteristic...Wideband Amplifier with SiGe Transistors: Parameters and Noise Characteristic...
Wideband Amplifier with SiGe Transistors: Parameters and Noise Characteristic...mohamed albanna
 
Npn transistor with poli Si Emitter bulgarian
Npn transistor with poli Si Emitter bulgarianNpn transistor with poli Si Emitter bulgarian
Npn transistor with poli Si Emitter bulgarianmohamed albanna
 
High-Speed Heterojunction Bipolar Transistors with SiGe Base partI bulgarian
High-Speed Heterojunction Bipolar Transistors with SiGe Base partI bulgarianHigh-Speed Heterojunction Bipolar Transistors with SiGe Base partI bulgarian
High-Speed Heterojunction Bipolar Transistors with SiGe Base partI bulgarianmohamed albanna
 
High-Speed Heterojunction bipolar transistors with SiGe base. Part II bulgarian
High-Speed Heterojunction bipolar transistors with SiGe base. Part II bulgarianHigh-Speed Heterojunction bipolar transistors with SiGe base. Part II bulgarian
High-Speed Heterojunction bipolar transistors with SiGe base. Part II bulgarianmohamed albanna
 
Drift and hall mobility of hole carriers in strained sige films grown on (001...
Drift and hall mobility of hole carriers in strained sige films grown on (001...Drift and hall mobility of hole carriers in strained sige films grown on (001...
Drift and hall mobility of hole carriers in strained sige films grown on (001...mohamed albanna
 
Uhf si ge hbt amplifier parameters and noise characteristics
Uhf si ge hbt amplifier parameters and noise characteristicsUhf si ge hbt amplifier parameters and noise characteristics
Uhf si ge hbt amplifier parameters and noise characteristicsmohamed albanna
 
Si ge нвт technology and parameters frequency response and current gain
Si ge нвт technology and parameters frequency response and current gainSi ge нвт technology and parameters frequency response and current gain
Si ge нвт technology and parameters frequency response and current gainmohamed albanna
 
Design procedures of bipolar low noise amplifier at radio frequency using s p...
Design procedures of bipolar low noise amplifier at radio frequency using s p...Design procedures of bipolar low noise amplifier at radio frequency using s p...
Design procedures of bipolar low noise amplifier at radio frequency using s p...mohamed albanna
 
Design of an improved transistor performance for rf application using bipole3
Design of an improved transistor performance for rf application using bipole3Design of an improved transistor performance for rf application using bipole3
Design of an improved transistor performance for rf application using bipole3mohamed albanna
 

More from mohamed albanna (15)

Effects of Electromagnetic Field (EMF) On Implantable Medical Devices (IMD)
Effects of Electromagnetic Field (EMF) On Implantable Medical Devices (IMD)Effects of Electromagnetic Field (EMF) On Implantable Medical Devices (IMD)
Effects of Electromagnetic Field (EMF) On Implantable Medical Devices (IMD)
 
Изследване и проектиране на Хетеропреходни Биполярни SiGe Транзистори
Изследване и проектиране  на Хетеропреходни Биполярни SiGe ТранзисториИзследване и проектиране  на Хетеропреходни Биполярни SiGe Транзистори
Изследване и проектиране на Хетеропреходни Биполярни SiGe Транзистори
 
Analog electronic circuit
Analog electronic circuitAnalog electronic circuit
Analog electronic circuit
 
Design of resonance amplifier work at very high frequency bulgarian
Design of resonance amplifier work at very high frequency bulgarianDesign of resonance amplifier work at very high frequency bulgarian
Design of resonance amplifier work at very high frequency bulgarian
 
Wideband Amplifier with SiGe Transistors: Parameters and Noise Characteristic...
Wideband Amplifier with SiGe Transistors: Parameters and Noise Characteristic...Wideband Amplifier with SiGe Transistors: Parameters and Noise Characteristic...
Wideband Amplifier with SiGe Transistors: Parameters and Noise Characteristic...
 
Npn transistor with poli Si Emitter bulgarian
Npn transistor with poli Si Emitter bulgarianNpn transistor with poli Si Emitter bulgarian
Npn transistor with poli Si Emitter bulgarian
 
High-Speed Heterojunction Bipolar Transistors with SiGe Base partI bulgarian
High-Speed Heterojunction Bipolar Transistors with SiGe Base partI bulgarianHigh-Speed Heterojunction Bipolar Transistors with SiGe Base partI bulgarian
High-Speed Heterojunction Bipolar Transistors with SiGe Base partI bulgarian
 
High-Speed Heterojunction bipolar transistors with SiGe base. Part II bulgarian
High-Speed Heterojunction bipolar transistors with SiGe base. Part II bulgarianHigh-Speed Heterojunction bipolar transistors with SiGe base. Part II bulgarian
High-Speed Heterojunction bipolar transistors with SiGe base. Part II bulgarian
 
Drift and hall mobility of hole carriers in strained sige films grown on (001...
Drift and hall mobility of hole carriers in strained sige films grown on (001...Drift and hall mobility of hole carriers in strained sige films grown on (001...
Drift and hall mobility of hole carriers in strained sige films grown on (001...
 
Uhf si ge hbt amplifier parameters and noise characteristics
Uhf si ge hbt amplifier parameters and noise characteristicsUhf si ge hbt amplifier parameters and noise characteristics
Uhf si ge hbt amplifier parameters and noise characteristics
 
Si ge нвт technology and parameters frequency response and current gain
Si ge нвт technology and parameters frequency response and current gainSi ge нвт technology and parameters frequency response and current gain
Si ge нвт technology and parameters frequency response and current gain
 
Design procedures of bipolar low noise amplifier at radio frequency using s p...
Design procedures of bipolar low noise amplifier at radio frequency using s p...Design procedures of bipolar low noise amplifier at radio frequency using s p...
Design procedures of bipolar low noise amplifier at radio frequency using s p...
 
Design of an improved transistor performance for rf application using bipole3
Design of an improved transistor performance for rf application using bipole3Design of an improved transistor performance for rf application using bipole3
Design of an improved transistor performance for rf application using bipole3
 
Design procedures of bipolar low noise amplifier at radio frequency using s p...
Design procedures of bipolar low noise amplifier at radio frequency using s p...Design procedures of bipolar low noise amplifier at radio frequency using s p...
Design procedures of bipolar low noise amplifier at radio frequency using s p...
 
Design of an improved transistor performance for rf application using bipole3
Design of an improved transistor performance for rf application using bipole3Design of an improved transistor performance for rf application using bipole3
Design of an improved transistor performance for rf application using bipole3
 

Recently uploaded

J.Yang, ICLR 2024, MLILAB, KAIST AI.pdf
J.Yang,  ICLR 2024, MLILAB, KAIST AI.pdfJ.Yang,  ICLR 2024, MLILAB, KAIST AI.pdf
J.Yang, ICLR 2024, MLILAB, KAIST AI.pdf
MLILAB
 
AP LAB PPT.pdf ap lab ppt no title specific
AP LAB PPT.pdf ap lab ppt no title specificAP LAB PPT.pdf ap lab ppt no title specific
AP LAB PPT.pdf ap lab ppt no title specific
BrazilAccount1
 
Planning Of Procurement o different goods and services
Planning Of Procurement o different goods and servicesPlanning Of Procurement o different goods and services
Planning Of Procurement o different goods and services
JoytuBarua2
 
Water Industry Process Automation and Control Monthly - May 2024.pdf
Water Industry Process Automation and Control Monthly - May 2024.pdfWater Industry Process Automation and Control Monthly - May 2024.pdf
Water Industry Process Automation and Control Monthly - May 2024.pdf
Water Industry Process Automation & Control
 
Standard Reomte Control Interface - Neometrix
Standard Reomte Control Interface - NeometrixStandard Reomte Control Interface - Neometrix
Standard Reomte Control Interface - Neometrix
Neometrix_Engineering_Pvt_Ltd
 
power quality voltage fluctuation UNIT - I.pptx
power quality voltage fluctuation UNIT - I.pptxpower quality voltage fluctuation UNIT - I.pptx
power quality voltage fluctuation UNIT - I.pptx
ViniHema
 
CME397 Surface Engineering- Professional Elective
CME397 Surface Engineering- Professional ElectiveCME397 Surface Engineering- Professional Elective
CME397 Surface Engineering- Professional Elective
karthi keyan
 
Nuclear Power Economics and Structuring 2024
Nuclear Power Economics and Structuring 2024Nuclear Power Economics and Structuring 2024
Nuclear Power Economics and Structuring 2024
Massimo Talia
 
Design and Analysis of Algorithms-DP,Backtracking,Graphs,B&B
Design and Analysis of Algorithms-DP,Backtracking,Graphs,B&BDesign and Analysis of Algorithms-DP,Backtracking,Graphs,B&B
Design and Analysis of Algorithms-DP,Backtracking,Graphs,B&B
Sreedhar Chowdam
 
一比一原版(IIT毕业证)伊利诺伊理工大学毕业证成绩单专业办理
一比一原版(IIT毕业证)伊利诺伊理工大学毕业证成绩单专业办理一比一原版(IIT毕业证)伊利诺伊理工大学毕业证成绩单专业办理
一比一原版(IIT毕业证)伊利诺伊理工大学毕业证成绩单专业办理
zwunae
 
Gen AI Study Jams _ For the GDSC Leads in India.pdf
Gen AI Study Jams _ For the GDSC Leads in India.pdfGen AI Study Jams _ For the GDSC Leads in India.pdf
Gen AI Study Jams _ For the GDSC Leads in India.pdf
gdsczhcet
 
AKS UNIVERSITY Satna Final Year Project By OM Hardaha.pdf
AKS UNIVERSITY Satna Final Year Project By OM Hardaha.pdfAKS UNIVERSITY Satna Final Year Project By OM Hardaha.pdf
AKS UNIVERSITY Satna Final Year Project By OM Hardaha.pdf
SamSarthak3
 
DESIGN A COTTON SEED SEPARATION MACHINE.docx
DESIGN A COTTON SEED SEPARATION MACHINE.docxDESIGN A COTTON SEED SEPARATION MACHINE.docx
DESIGN A COTTON SEED SEPARATION MACHINE.docx
FluxPrime1
 
space technology lecture notes on satellite
space technology lecture notes on satellitespace technology lecture notes on satellite
space technology lecture notes on satellite
ongomchris
 
Hybrid optimization of pumped hydro system and solar- Engr. Abdul-Azeez.pdf
Hybrid optimization of pumped hydro system and solar- Engr. Abdul-Azeez.pdfHybrid optimization of pumped hydro system and solar- Engr. Abdul-Azeez.pdf
Hybrid optimization of pumped hydro system and solar- Engr. Abdul-Azeez.pdf
fxintegritypublishin
 
Governing Equations for Fundamental Aerodynamics_Anderson2010.pdf
Governing Equations for Fundamental Aerodynamics_Anderson2010.pdfGoverning Equations for Fundamental Aerodynamics_Anderson2010.pdf
Governing Equations for Fundamental Aerodynamics_Anderson2010.pdf
WENKENLI1
 
在线办理(ANU毕业证书)澳洲国立大学毕业证录取通知书一模一样
在线办理(ANU毕业证书)澳洲国立大学毕业证录取通知书一模一样在线办理(ANU毕业证书)澳洲国立大学毕业证录取通知书一模一样
在线办理(ANU毕业证书)澳洲国立大学毕业证录取通知书一模一样
obonagu
 
一比一原版(UofT毕业证)多伦多大学毕业证成绩单如何办理
一比一原版(UofT毕业证)多伦多大学毕业证成绩单如何办理一比一原版(UofT毕业证)多伦多大学毕业证成绩单如何办理
一比一原版(UofT毕业证)多伦多大学毕业证成绩单如何办理
ydteq
 
ethical hacking-mobile hacking methods.ppt
ethical hacking-mobile hacking methods.pptethical hacking-mobile hacking methods.ppt
ethical hacking-mobile hacking methods.ppt
Jayaprasanna4
 
Railway Signalling Principles Edition 3.pdf
Railway Signalling Principles Edition 3.pdfRailway Signalling Principles Edition 3.pdf
Railway Signalling Principles Edition 3.pdf
TeeVichai
 

Recently uploaded (20)

J.Yang, ICLR 2024, MLILAB, KAIST AI.pdf
J.Yang,  ICLR 2024, MLILAB, KAIST AI.pdfJ.Yang,  ICLR 2024, MLILAB, KAIST AI.pdf
J.Yang, ICLR 2024, MLILAB, KAIST AI.pdf
 
AP LAB PPT.pdf ap lab ppt no title specific
AP LAB PPT.pdf ap lab ppt no title specificAP LAB PPT.pdf ap lab ppt no title specific
AP LAB PPT.pdf ap lab ppt no title specific
 
Planning Of Procurement o different goods and services
Planning Of Procurement o different goods and servicesPlanning Of Procurement o different goods and services
Planning Of Procurement o different goods and services
 
Water Industry Process Automation and Control Monthly - May 2024.pdf
Water Industry Process Automation and Control Monthly - May 2024.pdfWater Industry Process Automation and Control Monthly - May 2024.pdf
Water Industry Process Automation and Control Monthly - May 2024.pdf
 
Standard Reomte Control Interface - Neometrix
Standard Reomte Control Interface - NeometrixStandard Reomte Control Interface - Neometrix
Standard Reomte Control Interface - Neometrix
 
power quality voltage fluctuation UNIT - I.pptx
power quality voltage fluctuation UNIT - I.pptxpower quality voltage fluctuation UNIT - I.pptx
power quality voltage fluctuation UNIT - I.pptx
 
CME397 Surface Engineering- Professional Elective
CME397 Surface Engineering- Professional ElectiveCME397 Surface Engineering- Professional Elective
CME397 Surface Engineering- Professional Elective
 
Nuclear Power Economics and Structuring 2024
Nuclear Power Economics and Structuring 2024Nuclear Power Economics and Structuring 2024
Nuclear Power Economics and Structuring 2024
 
Design and Analysis of Algorithms-DP,Backtracking,Graphs,B&B
Design and Analysis of Algorithms-DP,Backtracking,Graphs,B&BDesign and Analysis of Algorithms-DP,Backtracking,Graphs,B&B
Design and Analysis of Algorithms-DP,Backtracking,Graphs,B&B
 
一比一原版(IIT毕业证)伊利诺伊理工大学毕业证成绩单专业办理
一比一原版(IIT毕业证)伊利诺伊理工大学毕业证成绩单专业办理一比一原版(IIT毕业证)伊利诺伊理工大学毕业证成绩单专业办理
一比一原版(IIT毕业证)伊利诺伊理工大学毕业证成绩单专业办理
 
Gen AI Study Jams _ For the GDSC Leads in India.pdf
Gen AI Study Jams _ For the GDSC Leads in India.pdfGen AI Study Jams _ For the GDSC Leads in India.pdf
Gen AI Study Jams _ For the GDSC Leads in India.pdf
 
AKS UNIVERSITY Satna Final Year Project By OM Hardaha.pdf
AKS UNIVERSITY Satna Final Year Project By OM Hardaha.pdfAKS UNIVERSITY Satna Final Year Project By OM Hardaha.pdf
AKS UNIVERSITY Satna Final Year Project By OM Hardaha.pdf
 
DESIGN A COTTON SEED SEPARATION MACHINE.docx
DESIGN A COTTON SEED SEPARATION MACHINE.docxDESIGN A COTTON SEED SEPARATION MACHINE.docx
DESIGN A COTTON SEED SEPARATION MACHINE.docx
 
space technology lecture notes on satellite
space technology lecture notes on satellitespace technology lecture notes on satellite
space technology lecture notes on satellite
 
Hybrid optimization of pumped hydro system and solar- Engr. Abdul-Azeez.pdf
Hybrid optimization of pumped hydro system and solar- Engr. Abdul-Azeez.pdfHybrid optimization of pumped hydro system and solar- Engr. Abdul-Azeez.pdf
Hybrid optimization of pumped hydro system and solar- Engr. Abdul-Azeez.pdf
 
Governing Equations for Fundamental Aerodynamics_Anderson2010.pdf
Governing Equations for Fundamental Aerodynamics_Anderson2010.pdfGoverning Equations for Fundamental Aerodynamics_Anderson2010.pdf
Governing Equations for Fundamental Aerodynamics_Anderson2010.pdf
 
在线办理(ANU毕业证书)澳洲国立大学毕业证录取通知书一模一样
在线办理(ANU毕业证书)澳洲国立大学毕业证录取通知书一模一样在线办理(ANU毕业证书)澳洲国立大学毕业证录取通知书一模一样
在线办理(ANU毕业证书)澳洲国立大学毕业证录取通知书一模一样
 
一比一原版(UofT毕业证)多伦多大学毕业证成绩单如何办理
一比一原版(UofT毕业证)多伦多大学毕业证成绩单如何办理一比一原版(UofT毕业证)多伦多大学毕业证成绩单如何办理
一比一原版(UofT毕业证)多伦多大学毕业证成绩单如何办理
 
ethical hacking-mobile hacking methods.ppt
ethical hacking-mobile hacking methods.pptethical hacking-mobile hacking methods.ppt
ethical hacking-mobile hacking methods.ppt
 
Railway Signalling Principles Edition 3.pdf
Railway Signalling Principles Edition 3.pdfRailway Signalling Principles Edition 3.pdf
Railway Signalling Principles Edition 3.pdf
 

Sensors and microcontroller interfacing

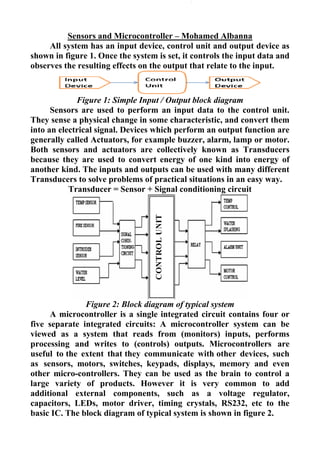
  • 1. Sensors and Microcontroller – Mohamed Albanna All system has an input device, control unit and output device as shown in figure 1. Once the system is set, it controls the input data and observes the resulting effects on the output that relate to the input. Figure 1: Simple Input / Output block diagram Sensors are used to perform an input data to the control unit. They sense a physical change in some characteristic, and convert them into an electrical signal. Devices which perform an output function are generally called Actuators, for example buzzer, alarm, lamp or motor. Both sensors and actuators are collectively known as Transducers because they are used to convert energy of one kind into energy of another kind. The inputs and outputs can be used with many different Transducers to solve problems of practical situations in an easy way. Transducer = Sensor + Signal conditioning circuit Figure 2: Block diagram of typical system A microcontroller is a single integrated circuit contains four or five separate integrated circuits: A microcontroller system can be viewed as a system that reads from (monitors) inputs, performs processing and writes to (controls) outputs. Microcontrollers are useful to the extent that they communicate with other devices, such as sensors, motors, switches, keypads, displays, memory and even other micro-controllers. They can be used as the brain to control a large variety of products. However it is very common to add additional external components, such as a voltage regulator, capacitors, LEDs, motor driver, timing crystals, RS232, etc to the basic IC. The block diagram of typical system is shown in figure 2.
  • 2. I) Types of Sensors: 1) Digital Sensors (button/switch) The simplest form of sensor is a manually operated push button or toggle switch (Simple 1-bit digital sensors) which allows control over current flow in a circuit and can only exist in one of two states: open or closed. Most buttons/switches have either two or three terminals. When we press the button or flip the switch contacts between the terminals are made and/or broken. The details of what happens depend on the exact configuration of the button/switch. A single pole, single throw (SPST) switch is the simplest kind. A double pole, single throw switch is slightly more complicated. They look like this: Figure 3: Single pole, Single throw (SPST) switch To use a SPST switch, we attach a voltage source to one terminal of the switch. When we flip the switch a connection is made between the two terminals, which means that current can now flow from one terminal to the other. By hooking up a button between a +5V voltage source and the input pin on a microcontroller we can sense whether the button is pressed or not. When it's not pressed, the microcontroller will see no voltage on its input pin (0). But when it's pressed it'll see +5V (1). (Sometimes we need a "pull down resistor" on the pin so that the pin really sees ground when the button isn't pressed.) Examples of these sensors might be limit switches, IR proximity detectors, high gain photo-detectors (light sensors), or push buttons. Binary on/off switching type sensors are very easy to integrate simply by having a pull-up or pull-down resistor connected to the switch output. Digital ports are like analog ports, but with only 1 bit (21 = 2) hence a resolution of 2 - on and off. Digital ports for that reason are rarely used for sensors, except for maybe on/off switches. Send a high 5V signal to turn something on, or a low 0V to turn something off.
  • 3. 2) Analogue sensors Analogue sensors measure a continuous signal, such as the position of a knob, the light level in the room, or the distance of an object from a sensor. They produce a variable output, which may be voltage, resistance or current. In microcontroller systems, they are usually converted into a voltage in a range suitable for an input comparator (high/low detection) or analogue to digital conversion, which convert the measured voltage into frequency, or transmit the binary form of the measurement in a standard serial format. Suitable signal conditioning may be needed using amplifiers, filters and so on, to produce a clean signal, controlling noise, drift, interference and so on, with the required output range. Figure 4: Analog I/O interface Most microprocessors contain several ADCs. Most ADCs are 8- or 10- bit, meaning they use 8 or 10 bits to represent the entire range (from 0 to Vcc) meaning they have a range of 256 (28 = 256). The analog signal is measured after a predefined period of time passes. At each time period, the voltage is recorded as a number. This number then defines a signal of 0's and 1's. For example, suppose a sensor reads 0V to an 8 bit ADC. This would give us a digital output of 0. 5V would be 255. Now suppose a sensor gave an output of 2.9V, Doing the math: 2.9V/5V = X/255 X = 2.9*255/5 = 148 Note that the sensor output does not exceed the digital logic voltage (usually 0V→5V). Then plug that output directly to the analog port. Based on the principle of working the sensors are divided into: 1- Resistor type: A sensor whose resistance changes with the input signal i.e. based on the variation of the resistance of the sensor element, the physical parameter is detected. For example: Themistor, Platinum resistance thermometer or Thermocouple etc. are used to
  • 4. measure the temperature with respect to the variation in the resistance of the material. In the case of a thermistor the temperature is given by Rt = R0.e β (1/T - 1/T 0 ) Here, β is the constant of the thermistor. Rt is the resistance of the thermistor at a temperature t. The variation of resistance of a thermistor with temperature is given by the following graph. Figure 5: Resistance vs Temperature graph A strain gauge is a thin metal foil that changes resistance with applied strain. The changes of resistance associated with strain gauges are small and present measurement situation. A Wheatstone bridge arrangement is commonly used to measure the small changes in resistance associated with strain gauges. 2- Capacitive type Sensors: These sensors work on the principle of variation of capacitance with the external input signal. The basic operation of capacitive type sensors can be seen from the familiar equation for a parallel-plate capacitor. C = Kε0 A /d Here K is the dielectric constant of the material, ε0 is the permittivity of the free space and d is the distance between the parallel plates and A is the area of cross section. The capacitive type sensors are used to detect the physical parameters like Humidity or pressure or proximity etc. 3- Inductive type Sensors: These sensors are based on the principle that the inductance of a coil varies with the change input signal. For example, if a permeable core is inserted into an inductor the net inductance is increases. The best example is the LVDT (Linear Variable Differential Transducer) which is used to measure displacements accurately.
  • 5. II) Sensor characteristics Figure 6: Sensor chacteristics graph. Sensors have certain characteristics which should be specified in the data sheet: The meaning of some of these is illustrated in Figure 6. 1) Sensitivity: The ideal sensor characteristic is shown in the characteristic y = m1x. The sensor has a large change in its output for a small change in its input; that is, it has high sensitivity. If the sensor has low sensitivity (y = m2x), an amplifier may be needed to bring the output up to the required level. 2) Offset: means, that over range for which the sensors are useful, the lowest output has a large positive constant added (y = m3x + c). This has to be subtracted in the amplifier interface to bring the output back into the required range, where maximum resolution can be obtained. Temperature sensors tend to behave in this way, as their characteristic often has its origin at absolute zero (-273 degrees Centigrade). The sensor may have offset and negative sensitivity, such as the silicon diode temperature characteristic (y = -m4x + c2). 3) Linearity: a perfect straight line, so that the output is exactly proportional to the input. The deviation from linearity is usually expressed as a maximum percentage error over the specified range, but care must be taken to establish whether this is a constant over the range, or a proportion of the output level. These two cases are illustrated by the dotted lines in Figure 4, above, indicating the possible error due to non-linearity and other factors. 4) Reference Level: If the sensitivity is specified, we still need to know a pair of reference values to place the characteristic. In a temperature sensing resistor (TSR), this may be given as the reference
  • 6. resistance at 25 degrees Centigrade (e.g. 1 kΩ). The sensitivity may then be quoted as the resistance ratio "the proportional change over 100 degree Centigrade. For a TSR, this is typically 1.37. This means that at 125 degree Centigrade, the resistance of the 1 kΩ sensor will be 1.37 kΩ. 5) Transfer Function: Linear sensors are easier to interface for absolute measurement purposes, but some that are non-linear may have other advantages. The thermistor, for example, has a negative exponential characteristic, but it has high sensitivity, so is often used to detect whether a temperature is outside an acceptable range. If the sensor is to be used for measurement, the transfer function must be known precisely in order to design the interface to produce the correct output. 6) Error: Many factors may contribute to sensor error: limitations in linearity, accuracy, resolution, stability and so on. Accuracy is evaluated by comparison with a standard. A temperature of 25 degrees Centigrade is only meaningful if Celsius is an agreed scale, in this case based on the freezing and boiling points of water. 7) Resolution is the degree of precision in the measurement: 25.00 degrees Centigrade (+/-0.005) is a more accurate measurement that 25 degrees Centigrade (+/-0.5). Poor stability may appear as drift, a change in the sensor output over time. This may be caused by short-term heating effects when the circuit is first switched on, or the sensor performance may deteriorate over the long term. Recalibration of accurate measurement systems is often required at specified intervals, by comparing the output with one that is known to be correct. Interdependence in the sensor may also be significant; for example, the output of a humidity sensor may change with temperature, so this incidental variable must be controlled so that the required output is not affected. III) Nature of Sensor Technique (use a voltage divider) The switches act as variable resistors or produce a varying voltage dependant on their input. Thus many sensors are simple resistive devices in the sense that they vary their electrical resistance based on the magnitude of the received stimulus from the environment. Converting a resistance to a voltage; involves the use of a voltage divider circuit, which has two resistors in series to divide the input voltage by the ratio of the resistances. This is shown in Figure 7.
  • 7. Th On the resi over to built in Th the volt Vout to b This cir the seco when th to 0 V. If If If will be a Th output V he divisio nce the o istance o invert either o Fig he senso tage divi become rcuit deli ond circu he switch Rbottom > Rbottom = Rbottom < across R he choic Voltage Figu on of the output o of the se the acti of two wa gure 8: T r can be ider. Th zero ex ivers a m uit, the p h is oper >> Rtop, t = Rtop the << Rtop, Rtop. e is dete Vout: ure 7: Vo e voltage (1 of the vol ensor. Th on of th ays: The two t e at the he pull d cept wh maximum pull up rated. Pr then en then ermined oltage di e is accor 1) ltage div he resist he Volta types vol top (Rto down res en the p m voltag resistor ressing t d by whe ivider cir rding to vider is k tor and age divid ltage divi op) or at sistor in push but ge when t forces V the switc . 0. Mo en we w rcuit. the follo known, w sensor c der. The ider circu t the bot n the firs tton swi the switc Vout to m ch conne . ost of th want larg owing fo we can c can be s e circuit uits ttom (Rb st circui itch is op ch is pre maximum ects Vout he input ge value ormula: calculate swapped t can be bottom) of it forces perated. essed. In m except directly voltage for the e d e f s . n t y e e
  • 8. 1- If we want a large Vout when the sensor has a small resistance, we put the sensor at the top (Rtop). 2- If we want large Vout when the sensor has a large resistance, we put the sensor at the bottom (Rbottom). The above points play important role while making dark/light sensor. 1. Variable resistors sensors: Force-sensitive resistors, and thermistors are variable resistors, also photocell is a variable resistor, which produces a resistance proportional to the amount of light it senses. The variable resistor (Light-Dependent Resistor LDR) which has a high resistance when dark and a low resistance when brightly lit will enable us to adjust the output voltage Vout for a given resistance of the sensor to set the exact brightness level in dark and light sensor circuits. If one of the fixed resistors in figure (8) circuit is replaced with a variable resistance (Light-Dependent Resistor LDR), the output voltage is proportional to the change in resistance of the variable resistor. As the level of illumination on LDR increases, its resistance falls. With Rtop variable and Rbottom fixed, we note that the equation given for output voltage Vout is not a linear function. For very small changes in resistance, this equation approaches linear, and for large changes in resistance has more curvature. Figure 9: Automatic dark and light sensor 1- If the LDR is at the top (near +VS), Vout will be low in the dark and high in bright light. As the light level increases and LDR meets the lowest threshold resistance the output voltage is large when the resistance of LDR is low. This voltage would enough for a transistor to turn on a LED. Hence, this circuit automatically turns on the LED D1 and works as Automatic Light sensor. 2- If the LDR is at the bottom (near 0V), Vout will be high in the dark and low in bright light. As the light level decreases and LDR
  • 9. meets t when th transist on the L It Rbottom, V Ex and 200 In 2. A high vo divider Rtop po (NTC), upon th 1/T Th measur data. T specifie resistan Figu In other re solve th the maxi he resist tor to tur LED D1 a is most Vin and V xample: 0 Ω in th the shad Temper sensor u oltage w with th sition. T decrease he tempe T = A + B he consta ements They are d for ea nce in oh ure 10: A the circ esistance he next eq imum th tance of rn on a L and wor t linear Vout, we c If the L he shade, de, Vout w rature se used in a when hot e Negati Thermist es as the erature a B x lnRto ants, A, of resist e called ach devic hms. A voltage cuit of fi e. To fin quation. hreshold LDR is LED. He rks as Au at the p can deri LDR has , and wh will be: ensors: a fire ala t condit ive temp tor (Tem temper and the r op + C x l B and C tance, o the Stei ce. T is t divider u gure 10, nd the va . d resistan high. T ence, thi utomatic point wh ive Rtop u a resist hen the L arm wan ions are perature mperatu ature ris resistanc ln3 top C can be r they c inhart–H the temp uses ther , we mea alue of t nce the his volta is circuit c Dark se here Rtop using the tance of LDR is in . . nts a circ e detecte e coeffici ure - Se ses. The ce of a th (2) determi can be c Hart par perature rmistor a asure Vo he senso output age wou t automa ensor. p = Rbott e followin 0.5 kΩ, n the ligh . . cuit whic ed. We ient NTC ensitive R output v hermisto ined fro calculate rameter e in Kelv as temper out and k or resista voltage ld enoug atically s tom. If w ng formu , in brig ht, Vout w . ch will d need a C resisto Resistor voltage d or is give m exper ed from rs, and m vin and rature se now Vin ance we is large gh for a switches we know ula: ht light, will be: deliver a voltage or in the r) has a depends en by rimental tabular must be R is the ensor and the have to e a s w , a e e a s l r e e e o
  • 10. On tempera 3. Th the base intensit conduct current As configu travelin resistor Th current 10 milli to one o this wa (using t line on t 4. M given a that tra a) In that is emitting mean; nce we ature ex Light se he light e region y of the tivity of ts to flow s shown ration s ng throu r. This vo Figure he light t that ca iamps. N of the LE ay we co the phot the boar Motion Motion de area. An ansforms Infra-R frared ( longer t g IR ray there a have t pression ensor (Ph falling o of a tra light de the tran w throug n in Fi similar ugh the oltage is 11: Phot emittin n flow th Normally ED outpu ould use totransis rd (norm detector etection i n electro s the det Red (IR) (IR) is a than visi ys and re re two-p the sens n above t hototran on a pho ansistor, etermine nsistor. G gh the co igure 11, to the v resistor measur totransis g eleme hrough y the em ut ports e the sa stor with mal opera rs: is the ac nic mot ection of Proximi an electr ible ligh eceiving piece el sor resi to calcul nsistor): ototrans effective es the ef Greater llector-e , the p voltage r causes ed as the stor and I ent (LED the devi mitter is a if we wa me sens h the em ation wit ction of s tion dete f motion ity Senso romagne ht. IR se the refl lements stance, late the t istor cre ely prov ffective b amount emitter l phototran divider. a voltag e output Infrared D) uses ice to the always o anted to sor to d mitter of th the em sensing p ector co n into an ors etic spec nsor wo lected ra transmi then w tempera eates cha viding ba base dri ts of ligh eads. nsistor . The v ge drop t of the d d Emitter a resist e proper on, but it control detect th ff) and t mitter on physical ntains a electric ctrum a orks on t ay by a itter (in we can ture. arge car ase curre ve and t ht cause is wire ariable in the device. r Circuit tor to li r value o t could b it separa he startin then to f n). l movem a motion signal. at a wav the prin receiver nfrared-e use the rriers in ent. The thus the greater ed in a current pull-up imit the of about be wired ately. In ng light follow a ment in a n sensor velength nciple of r. That’s emitting e n e e r a t e t d n t a a r h f s g
  • 11. diode) and receiver (infrared-sensitive phototransistor or photodiode) as shown in Figure 12. Figure 12: Basic principle of Active infrared motion detector operation The sensor send infrared light through IR-LEDs, then the light reflected by any object in front of the sensor, another IR-LED detecting the reflected IR light and perform the task of a voltage divider. An electrical property of Light Emitting Diodes (LEDs) produces a voltage difference across its leads when it is subjected to light. The greater the intensity of IR light hitting IR receiver, the lower the resistance of IR receiver and hence the output voltage of voltage divider will decreased. The phototransistor detector will measure the amount of light from the emitter scattered or reflected by a surface (when other factors, such as the distance from the sensor to the surface, are held constant). The phototransistor has peak sensitivity at the wavelength of the emitter (a near-visible infrared), but is also sensitive to visible light and infrared light emitted by visible light sources. For this reason, the device should be shielded from ambient lighting as much as possible in order to obtain reliable results. A reflectance sensor can be used to detect features drawn on a surface or segments on a wheel used to encode rotations of a shaft. It is important to remember that the reflectivity measurement indicates the surface's reflectivity at a particular wavelength of light (the near- visible infrared). In general, surfaces that absorb visible light (making them appear dark to the eye) will absorb infrared light as well. b) Passive Infrared (PIR) motion detectors Passive Infrared (PIR) motion detectors detect the movements of the objects with identical temperature and measures infrared (IR) light radiating from objects in its field of view and automatically activated the systems. A passive infrared (PIR) sensor measures infrared light emitted from objects that generate heat, and therefore infrared radiation, in its field of view. The sensor is actually split into two halves so as to detect not the radiation itself, but the change in condition that occurs when a target enters its field. These changes in the amount of infrared radiation on the element in turn change the voltages generated, which are measured by an on-board amplifier.
  • 12. When a person/animal comes into their environment, one half will intercept the IR, causing a positive change between the two halves. Once the entity passes through, there is a negative differential change. It is these change pulses that are detected by the PIR sensor. When motion is detected the PIR sensor outputs a high signal on its output pin, which can either be read by an µC or drive a transistor to switch a higher current load. The block diagram of the PIR based security system is given below: Figure 13: Block diagram of PIR based security system The Dual Beam type of PIR sensor will not detect any moving objects less than specific height, activated when both upper and lower beams detect a moving object. It will respond and activated the alarm only when detect a human or vehicles moved in or out of its range and obstruct its beams. When only the lower or the upper zone detects a moving object, the unit is not activated. Figure (14) Dual beam PIR sensor IV) Sensing elements 1) Position and distance sensors a- Potentiometer: Linear Potentiometer Rotary Potentiometer A potentiometer is a simple knob that works as a voltage divider with two variable resistors. Potentiometers are either linear or logarithmic (audio). When using a linear potentiometer Vout will change linearly as the knob is turned. When using a log potentiometer Vout will change logarithmically as the knob is turned.
  • 13. A potentiometer has three terminals (or legs), which correspond to Vin, Vout and ground in the voltage divider diagram. We hook +V up to the first leg (Vin), ground up to the third leg (ground) and use the middle leg as output (Vout). As you turn the knob on the potentiometer the voltage on the middle leg will get bigger/smaller. Potentiometers are very useful for setting parameters, like the speed of a process or the brightness of a light. They're also good for measuring the rotational angle of an object about an axis. b- LVDT: A linear variable differential transformer (LVDT) uses electromagnetic coils to detect the position of a mild steel rod which forms a mobile core. The input coils are driven by an ac signal, and the rod position controls the amount of flux linked to the output coil, giving a variable peak-to-peak output. It needs a high-frequency ac - supply. c- Capacitor: If considered as a pair of flat plates, separated by an air gap, a small change in the gap will give a large change in the capacitance, since they are inversely proportional; if the gap is doubled, the capacitance is halved. If an insulator is partially inserted, the capacitance also changes. This can make a simple but effective level sensor for insulating materials such as oil, powder and granules. A pair of vertical plates is all that is required. However, actually measuring resulting small changes in capacitance is not so straightforward. A high-frequency sensing signal may need to be converted into clean direct voltage for input to a digital controller. Capacitor plate separation Capacitor Dielectric d- Ultrasonic: The speed of sound travelling over a few meters and reflecting from a solid object gives the kind of delay, in milliseconds, which is suitable for measurement by a hardware timer in a microcontroller. A short burst of high-frequency sound (e.g. 40 kHz) is transmitted, and should be finished by the time the reflection returns, avoiding the signals being confused by the receiver. 2) Speed sensors
  • 14. a- Digital: The speed or position of a dc motor cannot be controlled accurately without feedback. Digital feedback from the incremental encoder is the most common method in processor systems, since the output from the opto-detector is easily converted into a TTL (transistor-transistor logic) signal. The position relative to a known start position is calculated by counting the encoder pulses, and the speed can then readily be determined from the pulse frequency. This can be used to control the dynamic behavior of the motor, by accelerating and decelerating to provide optimum speed, accuracy and output power. Magnetic flux b- Analogue: For analogue feedback of speed, a tacho-generator can be used; this is essentially a permanent magnet dc motor run as a generator. An output voltage is generated which is proportional to the speed of rotation. The voltage induced in the armature is proportional to the velocity at which the windings cut across the field. If the tachometer is attached to the output shaft of a motor controlled using PWM, the tachometer voltage can be converted by the MCU and used to modify the PWM output to the motor, giving closed loop speed control. Alternatively, an incremental encoder can be used, and the motor output controlled such that a set input frequency is obtained from the encoder. 3) Temperature sensors a- Diode: The forward voltage drop of a silicon diode junction is usually estimated as 0.6 V. Silicon diode sensor However, this depends on the junction temperature; the voltage
  • 15. falls by 2 mV/C° as the temperature rises, as the charge carriers gain thermal energy, and need less electrical energy to cross the junction. b- Metals: Metals have a reasonably linear temperature coefficient of resistance over limited ranges. Metal film resistors are produced which operate up to about 150°C, with platinum sensors working up to 600°C. The temperature coefficient is typically 0.3%/C°. If the resistance at the reference temperature is, say, 1 kΩ, the resistance change over 100°C would be 300-400 Ω. A constant current is needed to convert the resistance change into a linear voltage change. If a 1 kΩ temperature-sensing resistor is supplied with a constant 1 mA, the voltage at the reference temperature, 25°C, would be 1.00 V, and the change at 125°C would be 370 mV, taking it to 1.37 V. Metal resistance temperature sensor c- Thermocouple: Higher temperatures may be measured using a thermocouple to convert temperature to voltage. This is simply a junction of two dissimilar metals, which produces a battery effect, producing a small EMF. They rely on Seebeck effect which states that a junction of different metals will generate a voltage that is proportional to the temperature of the metals. The voltage is proportional to temperature, but has a large offset, since it depends on absolute temperature. This is compensated for by a cold junction, connected in series, with the opposite polarity, and maintained at a known lower temperature (say 0°C). The difference of voltage is then due to the temperature difference between the cold and hot junctions. Vd=Vh-Vc Thermocouple The temperature range of a thermocouple depends on the type of metals that make up the thermocouple. There are some industry standard types as shown in the table:
  • 16. Type Range (Celsius) Range (Fahrenheit) Features E 95-900°C 200-1650°F Highest Output J 95-760°C 200-1400°F K 95-1260°C 200-2300°F T 0-350°C 32-660°F Thermocouples give out voltages in the range of micro volts so the output of a thermocouple must be amplified before it can be converted into a digital value. d- Thermistor: Temperature dependant semiconductor resistors (Thermistors) are thermally sensitive resistors and have, according to type, a negative (NTC), or positive (PTC) resistance / temperature coefficient. They are made from a single piece of semiconductor material, where the charge carrier mobility, therefore the resistance, depends on temperature. The response is exponential, giving a relatively large change for a small change in temperature, and a particularly high sensitivity. Unfortunately, it is non-linear, so is difficult to convert for precise measurement purposes. The thermistor therefore tends to be used as a safety sensor, to detect if a component such as a motor or transformer is overheating. Thermistor e- RTD’s: Also called Platinum RTD, because it is typically made of platinum. A change in temperature causes a change in resistance of platinum. Within a limited range, the resistance of metals increases in proportion to the temperature as defined by the formula: Rt = Ro[1+α(t-to)] where: Rt = resistance at temperature t Ro = resistance at a standard temperature to α = temperature coefficient of resistance (Cº-1 ) Typical readings for platinum are 100 Ω at 0 Celsius and 139 Ω at 100.
  • 17. RTD’s require a constant current source, such as 1mA. Such a low current keeps the self heating to a minimum. f- Semiconductor Temperature Sensors: If measurement or control is needed in the range of around room temperature, an integrated sensor and amplifier such as the LM35 is a versatile device which is easy to interface. Integrated temperature sensor 4) Strain sensors. A temperature-stable alloy conductor is folded (‫)ﻣﻠﻔﻮف‬ onto a flexible substrate which lengthens (‫)ﻳﻄﻮل‬ when the gauge is stretched (strained). The resistance increases as the conductor becomes longer
  • 18. and thinner. This can be used to measure small changes in the shape of mechanical components, and hence the forces exerted upon them. The strain gauge can measure displacement by the same means. Strain Guage The change in the resistance is rather small, maybe less than 1%. This sits on top of an unstrained resistance of typically 120 Ω. To detect the change, while eliminating the fixed resistance, four gauges are connected in a bridge arrangement and a differential voltage is measured. The gauges are fixed to opposite sides of the mechanical component, such that opposing pairs are in compression and tension. This provides maximum differential voltage for a given strain. All the gauges are subject to the same temperature, eliminating this incidental effect on the metal conductors. A constant voltage is supplied through the bridge, and the difference voltage fed to a high gain, high input impedance amplifier. Pressure sensor Care must be taken in arranging the input connections, as the gauges will be highly susceptible (‫)ﺣﺴﺎس‬ to interference. The amplifier should be placed as near as possible to the gauges, and connected with screened leads, and plenty of signal decoupling. The output must then be scaled to suit the MCU ADC input. A pressure sensor is generally a variable resistor that changes resistance based on how hard it is pressed. They are also known as
  • 19. Force Sensing Resistors or FSRs. often we use an FSR as the variable resistor in a voltage divider circuit. By using one FSR and one fixed resistor and hooking Vout to an A/D converter we can give the microcontroller some idea of how much pressure is being put on the FSR. If we don't have an A/D converter handy, there's a simple RC time circuit that you can use to do more-or-less the same thing. 5) Humidity sensors There are various methods of measuring humidity, which is the proportion of water vapour in air, quoted as a percentage. The electrical properties of an absorbent material change with humidity, and the variation in conductivity or capacitance, can be measured. Humidity sensor 6) Light sensors There are numerous sensors for measuring light intensity: phototransistor, photodiode, light-dependent resistor (LDR, or cadmium disulphide cell), photovoltaic cell and so on. The phototransistor is commonly used in digital applications, in opto- isolators, proximity detectors, wireless data links and slotted wheel detectors. It has built-in gain, so is more sensitive than the photodiode. The most common light sensor is the photo sensor. It works like a variable resistor with a value that changes based on how much light it receives. Light dependent resistor LDR Phototransistor Photo sensors are used in much the same way as pressure sensors. If we hook one up to a microcontroller via a voltage divider (or RC time) circuit, the microcontroller can sense how much light is falling on the device.
  • 20. A beam breaker is a non-physical switch or trigger. The simplest way to make one is to aim a cheap laser pointer at a photo-sensor, when the beam is broken, the resistance of the photo-resistor changes. If the photo resistor is hooked up to a microcontroller, it can sense whether the beam is intact or broken. Proximity Sensors There are a variety of ways to implement proximity sensing. The most common are infrared and ultrasound. They're both usually used as packaged devices that hook up to a microcontroller via one or more digital I/O lines. Infra-red (IR) light tends to be used to minimize interference from visible light sources, such as fluorescent lights. The LDR is more likely to be used for visible light, as its response is linear (when plotted log R vs. log L) over a wide range, and it has a high sensitivity in the visible frequencies. An infrared sensor works by sending out pulses of infrared (invisible) light. It then tries to detect reflections of that light from nearby objects. If it detects a reflection then it assumes that there's an object nearby and puts out a digital "1". Otherwise it puts out a "0". An ultrasonic proximity detector works by putting out ultrasonic (in audible) pulses of sound. It then measures the length of time it takes those pulses to hit nearby objects and return as echos, the longer the time, the farther away the object. Ultrasonic proximity detectors are good for measuring short distances. Actuators: 1- LEDs (Light Emitting Diodes) They work just like regular diodes, except that they give off light when we put current through them. The brightness of the light is determined by the amount of current. If we put too much current through a LED it will blow up. To limit the current through a LED we use a current limiting resistor. As so: If the LED specs say it can only handle 20 milliamps of current (0.02 Amps), and the voltage source is at +5V, what's the smallest current limiting resistor we can use? R = V/I = 5/.02 = 250 Ω
  • 21. 2- A microco directly 3- A When w dependi starting motors, 4- W need so won't h microco can use sound g pie Th both wa piezo el element PWM w V) motor motor ontroller y. We ha solenoid solenoid we energ ing on th g point ( , solenoid speaker We can't g ome sort have en ontroller them to generatin ezo elem hey can ays: defo lement t t directl waveform )Microco Figure r transf rs can't ve to use d d is kind gize a sol he type. (usually ds can't r generally t of amp nough p rs aren't o genera ng device ment spea be used orm the akes ver ly to a p m by tog ontroller e 15: Sen fers ele provid e some a d of like a lenoid its When w via a sp be drive y hook s plifier in power t t fast eno te simpl es (CD p aker as speak ceramic ry little p pin on a ggling th r to Sens nsor plug ectrical de enoug additiona a cross b s shaft is we de-en pring or en direct speak di n betwee to drive ough to p e bleeps players o kers, sin c and it p power to a microc at pin on sor Inter g and Sen energy gh curr al circuit between s either p ergize it other re tly by a m irectly to en them, e the s put out s and buz or sampl nce the p puts out o drive i controlle n and off rfacing T nsor inpu y into rent to try to po a speak pushed i t, the sha eturn me microco o a micr , as the speaker high-qua zzes, or lers.) piezo ele a voltag it. We ca er and t ff (from + Techniq ut port ci motion drive a ower the ker and a in or pul aft retur echanism ntroller. rocontrol microco directly ality sou to contr ectric eff ge. As a s an hook then gen +5V to g ques ircuitry . Most a motor e motor. a motor. lled out, rns to its m). Like . ller. We ontroller y. Most und. But rol other fect goes speaker, k a piezo nerate a ground). t r . , s e e r t t r s , o a
  • 22. Th 1- is plugg resistor the defa output v 2- of the a Fi When t supply connect current In need to translat which i conveni 1- 1) An Also kn he resisto It provi ged in. W r provide ault out value of It used nalog se gure 16 the switc by the p ted direc t to flow order to o specify te the ou is in the ient conv Inputs/O Analog nalog Po nown as or is use ides a de When not es a 5 V tput valu a digita as part ensors. shows h ch is ope pull-up r ctly to g through Figu o design y the p utput of e right r version f Outputs Fi Input P orts are s an ana ed for tw efault va thing is p olt bias ue of an l port is of the vo how a s en, the s resistor. ground, h the resi ure 16: T n the inte erforma f the sen ange for factor to s Interfa igure 17 Ports necessar alog to wo reason alue for t plugged voltage n analog 0 or log oltage di witch is sensor in When t generati istor and Touch Sw erface be ance of nsor int r the am o be used cing 7: Analog ry to con digital ns: the senso into the on the s g port is gic False. ivider ci s wired nput is the switc ing a 0 V d switch witch Cir etween a a linear to a suit mplifier d in the A g Interfa nnect se converte or input e sensor p sensor in s 255, w . ircuit req to a sen connecte ch is clos Volt sign . rcuit a sensor r ampli table inp to hand ADC. ace ensors to er (ADC when no port the nput line while the quired f nsor inp ed to th sed, the nal and and the ifier wh put for dle and a o our con C), they o sensor e pull-up e. Thus, default for some ut port. e 5 Volt input is causing e µC, we ich will the µC, allows a ntroller. receive r , t e . t s g e l , a . e
  • 23. analog signals and convert them to a digital number within a certain numerical range. The analog signal is measured after a predefined period of time passes. At each time period, the voltage is recorded as a number. This number then defines a signal of 0's and 1's. Most microcontrollers today are 8 bit, meaning they have a range of 256 (2^8 = 256). There are a few that are 10 bit, 12 bit, and even 32 bit, but as we increase precision we also need a much faster processor. For example, suppose a sensor reads 0V to an 8 bit ADC. This would give us a digital output of 0. 5V would be 255. Now suppose a sensor gave an output of 2.9V, doing the math: 2.9V/5V = X/255 → X = (2.9*255)/5 = 148 This bit range could also be seen as a resolution. Higher resolutions mean higher accuracy, but occasionally can mean slower processing and more susceptibility (‫)ﺗﺎﺛﺮ‬ to noise. For example, suppose we had a 3 bit controller which has a range of 2^3 = 8. Then we have a distance sensor that outputted a number 0 → 7 (a total of 8) that represents the distance between our robot and the wall. If our sensor can see only 8 feet, then we get a resolution of 1 bit per foot (8 resolution / 8 feet = 1). But then suppose we have an 8 bit controller, we would get 256/8 = 32 ~ 1 bit per centimeter - way more accurate and useful! With the 3 bit controller, we could not tell the difference between 1 inch and 11 inches. The sensor output must not exceed our digital logic voltage (usually 0V → 5V), and then plug that output directly to the analog port. 2) Digital I/O Ports Digital ports are like analog ports, but with only 1 bit (2^1 = 2) hence a resolution of 2 - on and off. Digital ports for that reason are rarely used for sensors; except for maybe on/off switches. We can use them to control motors or LED's. Send a high 5V signal to turn something on, or a low 0V to turn something off. Or if we want to have an LED at only half brightness, or a motor at half speed, send a square wave. Square waves are like turning something on and off so fast. 3) Serial Communication and Timers A serial connection on a microcontroller is very useful for communication. We can use it to program the controller from a computer, and to output data from the controller to a computer (great
  • 24. for debugging), or even to operate other electronics such as digital video cameras. Usually the microcontroller would require an external IC to handle everything, such as an RS232. I^2C (pronounced 'I- squared-C') is also useful for communicating. It's actually somewhat complicated, but usually the manufacturer has simplified it. A timer is the method by which the microcontroller measures the passing of time - such as for a clock, sonar, a pause/wait command, timer interrupts, etc. 4) Motor Driver To run a dc motor we need to either have an H-Bridge or a Motor Driver IC. The IC is great for small robots that do not exceed 1 or 2 amps per motor and the rated motor voltage is not higher than about 12V. The homemade H-Bridge would need to be used if we wanted to exceed those specs with a heat sink onto the motor driver. 2- Standard Interfacing Circuits 1) Output Device Interfacing Many output devices will require a transistor switching circuit. In most cases a Darlington pair formed from two transistors is ideal. Note that it is usual to connect a back EMF suppression diode across the output device. This is essential with devices such as relays, solenoids and motors which create a back EMF when power is switched off.
  • 25. A relay can be used to switch higher power devices such as motors and solenoids. If desired, the relay can be powered by a separate power supply, so, for instance, 12V solenoids can be controlled by the microcontroller. Note the use of a back EMF suppression diode across the relay contacts. This is to prevent damage to the transistor when the relay switches off. 1. Output Device 1 - Light Emitting Diode (LED) The microcontroller can sink (“absorb”) or source (“give out”) a small amount of current, which means that an LED can be connected directly to the output pin. A series resistor (value 330R) is also required to limit the current. LED connected to Ground Rail. To switch on LED - high 1 To switch off LED - low 1 LED connected to Power Rail. To switch on LED - low 1 To switch off LED - high 1 Bi-colour LEDs often contain both green and red LEDs connected in ‘inverse parallel’. This means if current flows one way through the device the LED lights green, and if current flows the other way the LED lights red. To switch on LED in red - high 0 low 1 To switch on LED in green - low 0 high 1 To switch off LED - low 0 low 1 or, high 0 high 1
  • 26. 2. Output Device 2 - Signal Lamp To interface a signal lamp the standard transistor interfacing circuit is used. Note that: If a different power supply is used for the signal lamp, the 0V rails of each power supply must be connected to provide a common reference. If a battery is used as the power supply, it is worth remembering that LEDs draw much less current than lamps. Therefore, if a simple ‘indicator’ is required, a LED will be a better solution than a lamp as the batteries will last far longer. To switch on Lamp - high 1 To switch off Lamp - low 1 3. Output Device 3 – Buzzer To interface a buzzer the standard transistor interfacing circuit is used. Note that: If a different power supply is used for the buzzer, the 0V rails of each power supply must be connected to provide a common reference. If a battery is used as the power supply, it is worth remembering that piezo sounders draw much less current than buzzers. Buzzers also just have one ‘tone’, whereas a piezo sounder is able to create sounds of many different tones. To switch on buzzer - high 1 To switch off buzzer - low 1 4. Output Devices 4 - Piezo Sounder & Speaker Buzzers produce a noise when power is applied, but a piezo or speaker requires a pulsed signal to generate the noise. Fortunately this
  • 27. is very easy to generate from the microcontroller by using the BASIC ‘sound’ command. 5. Output Devices 5 - Solar & dc “Toy” Motors There are a number of ways motors can be interfaced to the microcontroller. This circuit uses a Darlington transistor to switch the motor on and off. This circuit will work with ‘solar’ motors, but may not function correctly with cheap dc ‘toy’ motors. This is because this type of motor introduces a lot of electrical ‘noise’ on to the power rails. This noise can affect the microcontroller, and in some cases can completely stop the control program functioning. Electrical noise can be reduced by soldering suppression capacitors across the motor contacts, as shown. Use a 220 nF polyester (non polarized) capacitor. Power MOSFETs can be used instead of Darlington transistor pairs to switch medium power devices. Note that it is usual to connect
  • 28. a back EMF suppression diode across the output device. This is essential with devices such as relays, solenoids and motors which create a back EMF when power is switched off. If a number of output devices are being controlled it may be necessary to use a number of output transistors. In this case it will often be more convenient to use a ULN2003 Darlington driver IC. This is simply a 16 pin ‘chip’ that contains 7 darlington transistors similar in value to the BCX38C. The ‘chip’ also contains internal back EMF suppression diodes and so no external diodes are required. On many occasions it may be necessary to control two motors. A convenient and cheap approach would be to use a motor driver IC such as the L293D. This IC will allow control of two dc motors, using four data lines from the microcontroller. Naturally, if only one motor is to be controlled then only two output lines are used. Both inputs low- motor halt First output high, second output low - motor forward First output low, second output high - motor reverse Both inputs high - motor halt Changing the states of the input pins has the effect of altering the direction of current flow through the motor, as shown below. Note that the L293D will become warm with continuous use. A heat sink bonded onto the top of the chip will help keep it cool. One way to prevent electrical noise affecting the microcontroller is to use separate power supplies for the ‘control’ electronics and the
  • 29. motor. For example, a PP3 battery may be chosen to power the microcontroller and 4xAA cells to power the motors. Naturally it will be necessary to ‘link’ the two circuits so that the motor can be controlled. A relay is an ideal component to do this. The above circuit will only switch the motor on and off. If the motor is required to run in both directions (forwards and reverse), two relays can be used as shown. 6. Output Device 6 - Unipolar stepper motor Stepper motors are very accurate motors that are commonly used in computer disk drives, printers and clocks. Unlike dc motors, which spin round freely when power is applied, stepper motors require that their power supply be continuously pulsed in specific patterns. For each pulse, the stepper motor moves around one ‘step’, often 7.5 degrees (giving 48 steps in a full revolution).
  • 30. Unipolar motors usually have four coils which are switched on and off in a particular sequence. Bipolar motors have two coils in which the current flow is reversed in a similar sequence. As the stepper motor operates at 12V, the standard transistor circuit is required to switch each coil. As the coils create a back EMF when switched off, a suppression diode on each coil is required. The table below show the four different steps required to make the motor turn. Step Coil 1 Coil 2 Coil 3 Coil 4 1 1 0 1 0 2 1 0 0 1 3 0 1 0 1 4 0 1 1 0 1 1 0 1 0 Look carefully at the table, and notice that a pattern is visible. Coil 2 is always the opposite (or logical NOT) of coil 1. The same applies for coils 3 and 4. It is therefore possible to cut down the number of microcontroller pins required to just two by the use of two additional NOT gates. Fortunately the Darlington driver IC ULN2003 can be used to provide both the NOT and Darlington driver circuits. Look at table, which just shows coil 1 and coil 3. Step Coil 1 Coil 3 change 1 1 1 coil 3 2 1 0 Coil 1 3 0 0 Coil 3 4 0 1 Coil 1 1 1 1
  • 31. Notice the change from step 1 to step 2, just coil 3 changes. Then look at the next change - just coil 1 change. In fact the two coils take it ‘in turns’ to change from high to low and back again. This high-low- high changing can be described as ‘toggling’ state. This makes the programming very simple by using the BASIC toggle command. Steps: Toggle 1 Toggle pin 1 Pause 200 Wait 200 ms Toggle 2 Toggle pin 2 Pause 200 Wait 200 ms Goto steps Loop Note: If stepper motor ‘wobbles’, try adjusting wire polarity. 7. Output Device 7 - Bipolar Stepper motor The bipolar stepper motor has two coils that must be controlled so that the current flows in different directions through the coils in a certain order. The changing magnetic fields that these coils create cause the rotor of the motor to move around in steps. The circuit that is normally used to control one of the coils is shown below. Notices how there are four ‘control’ transistors that are switched on in ‘pairs’. Therefore with two coils there are four control transistor pairs (Q1-Q4) which must be switched on and off in a certain sequence. Notice that as the coils create a back EMF when switched off 8 suppression diodes (4 on each coil) are also required. The table below show the four different steps required to make the motor turn. Step Q 1 Q 2 Q 3 Q 4 1 1 0 1 0 2 1 0 0 1 3 0 1 0 1 4 0 1 1 0 1 1 0 1 0 Fortunately the motor driver L293D has been specifically
  • 32. designed to provide this transistor switching circuit. The L293D contains all 8 transistors and diodes within one 16 pin package. Four pins from the microcontroller are connected to the four transistor ‘pairs’ via IC pins 2, 7, 10 and 15. This sample procedure makes the motor spin 100 steps to the left and then 100 steps to the right by using two sub-procedures. l step causes the motor to move one step to the left, r step causes the motor to move one step to the right. 8. Output Device 8 - Radio Control Servo Servos are used in most radio controlled cars and planes to control the steering mechanism. They are accurate devices that always rotate the same amount for a given signal, and so are ideal for use in many automated machines. Servos can be driven directly via the ‘servo' command, or via pulls out commands. A typical servo has just three connection wires, normally red, black and white (or yellow). The red wire is the 5V supply, the black wire is the 0V supply, and the white (or yellow) wire is for the positioning signal. Unfortunately servos require a large current (up to 1A) and also introduce a large amount of noise on to the power rail. Therefore in most cases the servo should be powered from a separate power supply, as shown below. Remember that when using two power supplies the two 0V rails must be joined to provide a common reference point. 9. Output Device 9 – Counter module The Counter Module is a numeric LCD display module that can be used to show a ‘counter’ value. To increment the counter a pulse
  • 33. (between 1 and 1.5V) must be applied to the counter pad 3. As the microcontroller operates at 5V a potential divider formed from resistors must be used to reduce the microcontroller output signal to 1.5V. As the counter uses its own, internal, 1.5V battery, the two 0V rails must also be connected. To reset the counter, a second potential divider is added and connected to pin 2. 10. Output Device 10 - Seven Segment Display A seven segment display contains seven LED ‘bars’ that can be lit up in different combinations to show the ten digits 0 to 9. In theory each 'bar' could be connected to one microcontroller output pin, but this would use up 7 of the 8 available pins. A better solution is to use a dedicated integrated circuit, such as the CMOS 4511B to control the seven segment display. This IC controls the seven segment display according to the binary ‘code’ on the four data lines. This system uses four pins rather than 7. NOTE - Seven segment displays are available in two types, called ‘common cathode’ and ‘common anode’. The following circuits will only work with a ‘common cathode’ type display. Use the manufacturer’s datasheet to determine the pin out arrangement of the LED bars.
  • 34. Another possible solution is to use the CMOS 4026B to control the seven segment display. This system uses just two pins to control the display. The reset pin is used to reset the display to 0, the clock pin is then used to increment the digit up from 0. This means to display the digit ‘4’ it is necessary to reset and then pulse the clock line 4 times. In reality this means that the display shows the digits 0-1-2-3-4, but, as they are clocked extremely rapidly, the human eye cannot see the changes, and so the number ‘4’ seems to appear immediately! This system can be expanded to two digits by adding a second 4026B IC and a second seven segment display, as shown in the diagram below. No changes to the code are required, just give the variable b1 a value between 0 and 99 and the number will be displayed on the two displays when sub-procedure ‘clock’ is called. 11. Output Device 11 - Solenoid & Solenoid Valves A solenoid consists of a steel plunger inside an electric coil which is wrapped around a tube. When the coil is energized a magnetic field is created, and this draws the plunger into the tube. When the coil is de-energized a spring pushes the plunger back out of the tube. To control a solenoid the standard MOSFET circuit is used. The isonic-solenoid valve can be used to control air flow through a
  • 35. pneumatic system. Isonic-valves are ideal for battery operated products as operate at a low voltage and draw much less current than traditional solenoid valves. The standard transistor switching circuit can be used to drive the isonic-valve. To switch the solenoid on - high 1 To switch the solenoid off - low 1 12. Output Device 12 - Smart Wire & Smart Springs Shape Memory Alloy wire or springs are ‘smart’ materials that can be used to create mechanical actuation (movement). When an electric current is passed through the wire it heats up and so contracts with a large pulling force. When the current is removed the wire cools and so expands again (a ‘traditional’ steel spring is sometimes used to pull the smart wire/spring taut as it cools). Smart wire or springs draw a relatively large current, and so the standard FET interfacing circuit should be used to interface to the microcontroller. To make the wire / spring contract - high 1
  • 36. To allow the wire / spring to expand again - low 1 2) Input Device Interfacing 1. Input Device 1 – Switches There are a large variety of switches available, but the majority all have two ‘contacts’ which are either ‘open' (off) or ‘closed’ (on). The two circuits shown below can be used with almost all switches. With this circuit the input pin is low when the switch is open and high when the switch is closed. Goto ‘jump’ when switch is open: if pin0 = 0 then jump Goto ‘jump’ when switch is closed: if pin0 = 1 then jump With this circuit the input pin is high when the switch is open and low when the switch is closed. Goto ‘jump’ when switch is open: if pin0 = 1 then jump Goto ‘jump’ when switch is closed: if pin0 = 0 then jump Switch Bounce (‫ارﺟﺎع‬ ‫)ﻣﻔﺘﺎح‬ All mechanical switches ‘bounce’ when the switch opens or closes. This means that the switch contacts ‘bounce’ against each other before settling. As the microcontroller operates so quickly it is possible that in some programs the microcontroller may register 2 or 3 of these ‘bounces’ instead of just registering one ‘push’. The simplest way to de-bounce a circuit is to simply add time delays (pause 100) after the (if) ... command. If the section of code after the push is quite long this time delay will occur naturally (as the other code commands are carried out) and so is unnecessary. However if the code does not have a long delay, a pause command can be used instead.
  • 37. 2. Input Device 2 - Potentiometer A potentiometer (or ‘variable resistor’) has a spindle (‫)ﻣﻐﺰل‬ that can be moved to change the resistance value of the potentiometer. This can be used to measure rotational or linear movement. The read ADC command is used to measure the value of the resistance by carrying out an Analogue to Digital Conversion. The value of the resistance is given a ‘value’ between 0 and 255 which is then stored in a variable. After storing the reading in the variable, the (if) ... then command can be used to perform different functions. 3. Input Device 3 - Light Dependant Resistor (LDR) A Light Dependant Resistor (LDR) is a resistor that changes in value according to the light falling on it. A commonly used device, the ORP-12, has a high resistance in the dark, and a low resistance in the light. Connecting the LDR to the microcontroller is very straight forward, but some software ‘calibrating’ is required. It should be remembered that the LDR response is not linear, and so the readings will not change in exactly the same way as with a potentiometer. In general there is a larger resistance change at brighter light levels. This can be compensated for in the software by using a smaller range at darker light levels. 4. Input Device 4 - Thermistor A thermistor is a resistor that changes in value according to its heat. In actual fact all resistors change in value as they heat up or cool down, but thermistors are manufactured to show a large resistance change. Connecting the thermistor to the microcontroller is very
  • 38. straight forward, but some software ‘calibrating’ is required. It should be remembered that the thermistor response is not linear, and so the readings will not change in exactly the same way as with a potentiometer. In general there is a larger resistance change at lower temperatures. This can be compensated for in the software by using a smaller range at higher temperatures. 3) Advanced Component Interfacing 1. Advanced Interfacing 1 - LCD Display A Liquid Crystal Display is an electronic device that can be used to show numbers or text. There are two main types of LCD display, numeric displays (used in watches, calculators etc) and alphanumeric text displays (often used in devices such as photocopiers and mobile telephones). The display is made up of a number of shaped ‘crystals’. In numeric displays these crystals are shaped into ‘bars’, and in alphanumeric displays the crystals are simply arranged into patterns of ‘dots’. Each crystal has an individual electrical connection so that each crystal can be controlled independently. When the crystal is ‘off’ (i.e. when no current is passed through the crystal) the crystal reflect the same amount of light as the background material, and so the crystals cannot be seen. However when the crystal has an electric current passed through it, it changes shape and so absorbs more light. This makes the crystal appear darker to the human eye - and so the shape of the dot or bar can be seen against the background. It is important to realize the difference between a LCD display and an LED display. An LED display (often used in clock radios) is made up of a number of LEDs which actually give off light (and so can be seen in the dark). An LCD display only reflects light, and so cannot be seen in the dark. There are three main ways of interfacing LCDs to microcontrollers. 1) Serial LCD firmware chip 2) Serial LCD Module with onboard firmware chip
  • 39. 3) Direct Connection Standard LCD Sub-Procedures (Direct Connection) Before the sub-procedures are studied, it is important to understand how the LCD module operates. It has two modes of operation, which are called ‘character’ mode and ‘instruction’ mode. The RS pin (pin 2) controls the mode - when high the LCD is in character mode, when low the LCD is in instruction mode. The character or instruction is sent as a 4 bit binary number down the data lines (pins 7-4). Every time the Enable pin (pin 3) is ‘pulsed’ the LCD reads the data lines and prints the character (or carries out the instruction) which is given by the number on the data lines. This is not quite the whole story, as each character or instruction is actually made up of an 8 bit number, which contains a table of all the character and instruction codes. As there are only four data lines, this 8 bit number is split into two ‘halves’ which are sent one after the other. The two halves are called the ‘high nibble’ and the ‘low nibble’. This means that two nibbles are transmitted down the data lines for each character. 2. Advanced Interfacing 2 - Serial Interfacing to a Computer As all computers use the same ASCII code for transmitting and receiving characters it is relatively easy to program the microcontroller to ‘talk’ to any type of computer. All that is needed is a suitable cable and some very simple electronic circuits. a- Connecting to the Computer The system we will use requires just three wires between the computer and the microcontroller. The ground wire provides a common reference, the RX wire sends signals from the computer to
  • 40. the microcontroller, and the TX wire sends signals from the microcontroller to the computer. The best way to make a serial cable is to buy a serial ‘extension’ cable and cut it in half. This will give two cables with a suitable connector at each end. The diagrams below show the various wiring connections required. b- Computer Communication Software There are various different protocols that can be used for serial communication, and it is important that both the computer and the microcontroller use the same setting. The 2400, N, 8, 1 protocol is used here, which means baud speed 2400, no parity, 8 data bits and one stop bit. This baud speed is quite slow by modern standards, but is quite sufficient for the majority of project work tasks. All ‘hand shaking’ (hardware or software) must also be disabled. This system requires just three wires between the computer and the microcontroller. Strictly speaking RS232 serial voltages should be at ±15V, but the standard 5V from the on-board 5V regulator will be used here. This is not the industry standard, but works perfectly OK with the majority of computers. This is the circuit that will be used use for serial communication. To provide true RS232 voltages another integrated circuit is
  • 41. required. The most common IC used is the MAX232, which has on- board voltage boosters to create the required voltage swing. If this setting is used it is necessary to change the N2400 (negative) in all the serial software commands to T2400 (true positive). ONLY USE ONE OF THESE TWO CIRCUIT OPTIONS! VI) Practical application 1) Interfacing of temperature Sensor LM 35: The LM35 series sensors are precision integrated-circuit temperature sensors, whose output voltage is linearly proportional to the Centigrade temperature. It gives 10mV of output voltage for every 1 Cº. The LM35 does not require any external calibration or trimming to provide typical accuracies of ±¼ Cº at room temperature and ±¾ Cº over a full -55 to +150 Cº temperature range. The LM35's low output impedance, linear output, and precise inherent calibration make interfacing to readout or control circuitry especially easy. It can be used with single power supplies, or with dual supplies. As it draws only 60 µA from its supply, it has very low self-heating, less than 0.1 Cº in still air. The LM35 is rated to operate over a -55° to + 150 Cº temperature ranges. LM35 is a three terminal IC with Vcc, Ground and Vout. The LM 35 IC gives a 10 mV analog output voltage for every degree Celsius change in temperature. The Output of the temperature sensor is analog in nature. So, with proper circuitry an ADC chip is used as shown below.
  • 42. As shown in the circuit ADC 0809 (8-input channel system) is used to convert the analog voltage into its equivalent digital voltage. For this necessary signal conditioning circuit is developed using an operational amplifier. A clock signal of 100 KHz is applied. The voltage drop across the LM Zener is buffered by an op-amp LM 741 to produce a Vcc and Vref of around 5V to 12V for the A/D converter. With this reference voltage the A/D converter will have 256 steps of 20 mV each. Since the temperature sensor signal is amplified by 2, each degree Celsius of temperature change will produce an output change of 20 mV, or one step on the A/D converter. This gives us a resolution of 1 Cº, which is about the typical accuracy of the sensor. The advantage of using Vref as Vcc for the device is that this voltage will not have the switching noise that the digital Vcc lines have. The control inputs and data outputs of the ADC are connected to the Ports of the Microcontroller as shown in the circuit. A relay is used to control the temperature. When the temperature of the bath is reached a set temperature, the microcontroller sends a High bit to the relay so that the Relay will switch off the power supply to the heater and automatically the temperature starts decreasing. The vice-versa takes place when the temperature falls below the set value. A 2x16 LCD module is interfaced to the Microcontroller to display the temperature. Suitable program is developed to control and measure the temperature. The temperature at which the water bath is to be maintained is set as (TS). The measured temperature is compared with this TS and if measured temperature is higher than the set temperature, a signal is sent to the relay to switch-off the power. Otherwise the power is switched on. This temperature is displayed on the LCD module. 2) Interfacing of Humidity Sensor: A humidity sensor measures the relative humidity and expressed as a percent (RH %). It is the ratio of actual moisture in the air to the highest amount of moisture in air can hold at that temperature. Humidity sensors are of three types, Resistive, Capacitive, and Thermal Conductivity sensing. The most common type of humidity sensor used is the “capacitive sensor.” The sensor is composed of two metal plates with a non-conductive polymer film between them. The film collects moisture from the air, and the moisture causes minute
  • 43. changes in the voltage between the two plates. The changes in voltage are used to know the amount of moisture in the air. The SY-HS-220 series Humidity sensor is based on capacitive technology. This module converts relative humidity to output voltage. Its operating voltage is 5V dc. The circuit details of the humidity sensor are given in Fig. below. This is a three pin IC sensor. Among the three pins one is (B) connected to ground, (R) is to +5 V and (W) gives the analog output voltage based on the humidity levels. The interfacing of Humidity sensor with 8051 microcontroller using ADC0809 is shown below. 3) Interfacing of Pressure Sensor: Pressure Sensors convert absolute atmospheric pressure into a linear, proportional voltage, which may be used in any meteorological application. Pressure sensors can be classified in terms of pressure ranges they measure, temperature ranges of operation, and most
  • 44. importantly the type of pressure they measure. In terms of pressure type, pressure sensors can be divided into five categories. • Absolute pressure sensor This sensor measures the pressure relative to perfect vacuum pressure (0 PSI or no pressure). Atmospheric pressure is 101.325 kPa (14.7 PSI) at sea level with reference to vacuum. • Gauge pressure sensor It can be calibrated to measure the pressure relative to a given atmospheric pressure at a given location. A tire pressure gauge is an example of gauge pressure indication. When the tire pressure gauge reads 0 PSI, there is really 14.7 PSI (atmospheric pressure) in the tire. • Vacuum pressure sensor This sensor is used to measure pressure less than the atmospheric pressure at a given location. This has the potential to cause some confusion as industry may refer to a vacuum sensor as one which is referenced to either atmospheric pressure (i.e. measure Negative gauge pressure) or relative to absolute vacuum. • Differential pressure sensor This sensor measures the difference between two or more pressures introduced as inputs to the sensing unit, for example, measuring the pressure drop across an oil filter. Differential pressure is also used to measure flow or level in pressurized vessels. • Sealed pressure sensor This sensor is the same as the gauge pressure sensor except that it is previously calibrated by manufacturers to measure pressure relative to sea level pressure.
  • 45. The NPC-1220 is a solid state IC Pressure Sensor used to measure pressure. It is intended for printed circuit board mounting and available as an 8-pin DIP chip. The circuit connections of this pressure sensor are given below. To interface the pressure sensor with a microcontroller, a signal conditioning circuit is necessary. The signal conditioning of the pressure sensor consists of LM324 operational amplifiers, which are high gain, internally frequency compensated amplifiers designed specifically to operate from a single power supply over a wide voltage range. The analog output voltage of the sensor is given to ADC. The pressure sensor generates 0 to 50 mV of output voltage for a 0 to 15 psi pressure range. The interfacing circuit of the Pressure sensor NPC1220 to the Microcontroller using ADC0809 is shown below.
  • 46. 4) Interfacing of Proximity Sensor: A proximity sensor is used to detect an object when the object approaches within the detection range of the sensor. Proximity sensors are mainly used for detecting the approach of metal objects. There are various types of proximity sensors that are used for detecting the presence or absence of an object. The design of a proximity sensor can be based on principles like variable reluctance, eddy current loss, saturated core, and Hall effect etc. Common types of non-contact proximity sensors include inductive proximity sensors, capacitive proximity sensors, ultrasonic proximity sensors, and photoelectric sensors. Hall-effect sensors detect a change in a polarity of a magnetic field. Variable reluctance sensors typically include a U-type core and coils wound around the core legs. Inductive proximity sensors have a lossy resonant circuit (oscillator) at the input side whose loss resistance can be changed by the proximity of an electrically conductive medium. The VCNL 4010 is a fully integrated proximity and ambient light sensor. It includes a signal processing IC and features standard I2 C communication interface. This IC sensor has a built-in infrared emitter and photo-pin-diode for proximity function. The maximum Proximity distance of this sensor is up to 200 mm. This sensor has excellent temperature compensation, robust refresh rate setting without any external RC low-pass filter. The block diagram of the sensor is shown below in figure above. The interfacing of the proximity sensor and signal conditioning also is shown bellow.
  • 47. The interfacing is done using two wired I2 C technique. The SCL and SDA signals are connected to the port 1.0 and port 1.1 pins of the microcontroller. After detecting the object the sensor sends an interrupt signal to the microcontroller. Since the Sensor is a digital IC, its output is in digital form. So, no ADC is required and the output voltage can be directly given to the microcontroller. 5) Interfacing of Flow Sensor: A flow sensor is a device for sensing the rate or quantity of fluid flow whether it be a gas, steam, liquid or solid. Flow sensor configurations are available for use in liquids or gases with flow rates from ultra low flow sensing to fast transient flow sensors. The flow rate is determined directly by measuring the liquid's velocity or the change in kinetic energy. Velocity depends on the pressure differential that is forcing the liquid through a pipe. Because the pipe's cross- sectional area is known and remains constant, the average velocity is an indication of the flow rate. Flow sensors are sometimes related to sensors called veloci-meters that measure speed of fluids flowing through them, these use units like ft/sec. A very basic relationship for determining the fluid's flow rate in such cases is: Q = VXA where Q is the liquid flow through the pipe; V = average velocity of the flow; A = cross-sectional area of the pipe.
  • 48. There are three basic types of flow sensors and flow meters. Mass flow sensors measure flow rate in terms of the mass of the fluid substance, Volumetric flow sensors measure flow rate in terms of how much of the material is flowing, Velocity flow sensors measure flow rate as in terms of how fast the material is moving. An effective way to measure the flow rate through a pipe is to place some type of restriction within the pipe and to measure the pressure difference between the low velocity, high-pressure upstream section, and the high-velocity, low-pressure downstream section. One common method is the use of an orifice plate as shown below. The volumetric flow rate (Q) is given by Where A1 = Area of pipe upstream from restriction A2 = Flow area of pipe at restriction p1 = pressure upstream from restriction p2 = pressure at restriction ρ = density of fluid C = correction factor for energy losses The differential pressure sensors The SDPx108 series sensors are a high-performance sensors, specially designed for air flow measurements. The SDPx108 sensor provides an analog output signal with a range of 0 - 4 V. The simple differential pressure sensor used to measure flow rate is shown below.
  • 49. It is a 3-pin CMOS IC, whose output is at the pin 3. It has on chip ADC and on chip DAC. Interfacing Circuit: The output of the sensor is applied to the ADC 0809 and this digital output is given to the ports of the Microcontroller. The analog output of the sensor is applied to channel 0 (IN0) of the ADC and the output of the ADC is given to the Port 1 of the microcontroller as shown in the diagram. A 2X16 LCD module is interfaced to the microcontroller to display the flow rate.