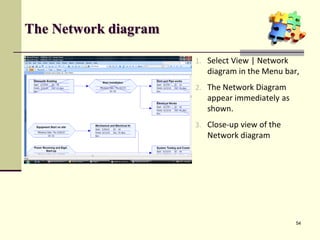
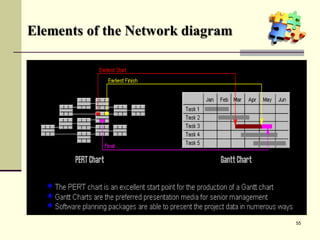
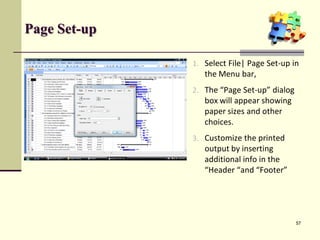
Microsoft
®
Project 2007
Training
Module 1: The Basic
Welcome
This training module was created by: Eng’r Sid Calayag
 Credentials:
• Trained in Planning and Scheduling using Primavera
• Experienced in using Harvard Project Manager and MS Project since version 3
• Trained in Project Management and Quality Management System
• Regular Trainer for Taikisha Philippines Inc.
• Certified Lead auditor for ISO 9001:2000 and ISO 9001:2008
• Practiced Project Management (local and abroad)
• Published major training materials in the internet on the following subjects:
• Guidelines for Project Kick-off Meeting
• Quality in Construction Works
• Improve Project Performance Using 5S Concept
• QA/QC Concept, Roles and Responsibilities in TPI Organization
• Quality Improvement Using Root Cause Analysis
• Practical Auditing
• Upgrade QMS System to ISO 9001:2008
• Introduction to Cleanroom Technology
2
Course Objectives
 This Microsoft Project course gives delegates an
introduction to project management and to the
concepts of planning and scheduling using Microsoft
Project 2007. Delegates on this training will learn
how to identify, organize and manage the tasks and
resources required to complete a project under the
constraints of time and cost to achieve a final project
target.
4
Course contents
• Lesson 1: Project Management
• Concept of Project Management
• Key Metrics and Success Factors
• PERT and CPM
• Lesson 2: Microsoft Project
• Planning the Project
• Task Entry and Linking
• Updating the Project
• Working with your views
• Printing and Reporting
5
 Project Management
• Commonly used terms
• Concept of Project Management
• Key metrics to Project Management
• Key Success Factors
• The Critical Path / PERT Chart
Lesson 1
Commonly used terms
 Activity – a specific project task that requires resources
and time to complete
 Baseline – the original approved plan
 Crash - in CPM, an activity can be conducted at a normal
pace or at an expedited pace at a greater cost
 Critical - an activity or event that if delayed will delay
project completion
 Critical path – the series of activities that determines the
duration of a project. It is the longest path through the
project.
7
Commonly used terms
 Deliverables- any measurable, tangible, verifiable
outcome, result, or item that must be produced to
complete a project
 Fast tracking – a method of shortening the critical path by
carrying out activities in parallel
 Gantt chart – a manner of illustrating multiple time-based
activities on a horizontal time scale
 PERT – Program Evaluation and Review Technique chart
depict task, duration, and dependency information in a
network form.
8
Initiation
Planning
Execution
Closure
Concept of Project Management
Management
• Project termination
• Team Development
• Organization Commitment
• Scope Definition
• Activity Definition
• Schedule Development/Cost
Estimating/Resource Planning
Execution
and Control
Process
• Information Distribution
• Update Project
• Performance Reporting
• Project Close-out
• Administrative close-out
• Project completion
Planning
Process
Closure
Process
Initiation
Process
9
Unique, one-time operations designed to
accomplish a specific set of objectives in a limited
time frame.
Build A
A Done
Build B
B Done
Build C
C Done
Build D
Ship
JAN FEB MAR APR MAY JUN
On time!
Projects
10
Key metrics and success factors
 The Key Metrics
• Time
• Cost
• Performance objectives
 The Key Success Factors
• Top-down commitment
• Having a capable project manager
• Having time to plan
• Careful tracking and control
• Good communications 11
Project Management
 What are the tools?
• Work breakdown structure
• Network diagram
• Gantt charts
12
Project X
Level 1
Level 2
Level 3
Level 4
MAR APR MAY JUN JUL AUG SEP OCT NOV DEC
Locate new
facilities
Interview staff
Hire and train staff
Select and order
furniture
Remodel and
install phones
Move in/startup
Gantt Chart
Project Manager
Responsible for: Work Quality
Human Resources Time
Communications Costs
13
Review Lesson 1-a
What are the key metrics?
• ____
• ____
• Performance ___________
What are the Key Success Factors?
• Top-down __________
• Having a _______ project _______
• Having ____ to plan
• Careful tracking and _______
• Good ______________.
What are the key metrics?
• Time
• ____
• Performance ___________
What are the Key Success Factors?
• Top-down __________
• Having a _______ project _______
• Having ____ to plan
• Careful tracking and _______
• Good ______________.
What are the key metrics?
• Time
• Cost
• Performance ___________
What are the Key Success Factors?
• Top-down __________
• Having a _______ project _______
• Having ____ to plan
• Careful tracking and _______
• Good ______________.
What are the key metrics?
• Time
• Cost
• Performance objectives
What are the Key Success Factors?
• Top-down __________
• Having a _______ project _______
• Having ____ to plan
• Careful tracking and _______
• Good ______________.
What are the key metrics?
• Time
• Cost
• Performance objectives
What are the Key Success Factors?
• Top-down commitment
• Having a ______ project _______
• Having ____ to plan
• Careful tracking and _______
• Good ______________.
What are the key metrics?
• Time
• Cost
• Performance objectives
What are the Key Success Factors?
• Top-down commitment
• Having a capable project manager
• Having ____ to plan
• Careful tracking and _______
• Good ______________.
What are the key metrics?
• Time
• Cost
• Performance objectives
What are the Key Success Factors?
• Top-down commitment
• Having a capable project manager
• Having time to plan
• Careful tracking and _______
• Good ______________.
What are the key metrics?
• Time
• Cost
• Performance objectives
What are the Key Success Factors?
• Top-down commitment
• Having a capable project manager
• Having time to plan
• Careful tracking and control
• Good ______________.
What are the key metrics?
• Time
• Cost
• Performance objectives
What are the Key Success Factors?
• Top-down commitment
• Having a capable project manager
• Having time to plan
• Careful tracking and control
• Good communications 14

Critical Path /“Pert” Charts
PERT: Program Evaluation and
Review Technique
CPM: Critical Path Method
• Graphically displays project activities
• Estimates how long the project will take
• Indicates most critical activities
• Show where delays will not affect project
PERT and CPM
The Network Diagram
• Network (precedence) diagram
• Activity-on-arrow (AOA)
• Activity-on-node (AON)
• Activities
• Events
The Network Diagram (cont’d)
 Path
• Sequence of activities that leads from the starting
node to the finishing node
 Critical path
• The longest path; determines expected project
duration
 Critical activities
• Activities on the critical path
 Slack
• Allowable slippage for path; the difference between
the length of path and the length of critical path
Project Network – Activity on Arrow
1
2
3
4
5 6
Locate
facilities
Order
furniture
Furniture
setup
Interview
Hire and
train
Remodel
Move
in
AOA
Project Network – Activity on Node
1
2
3
5
6
Locate
facilities
Order
furniture
Furniture
setup
Interview
Remodel
Move
in
4
Hire and
train
7S
AON
AOA vs. AON
1
2
3
5
6
Locate
facilities
Order
furniture
Furniture
setup
Interview
Remodel
Move
in
4
Hire and
train
7S
AON
1
2
3
4
5 6
Locate
facilities
Order
furniture
Furniture
setup
Interview
Hire and
train
Remodel
Move
in
AOA
Network Conventions
a
b
c a
b
c
a
b
c
d
a
b
c
Dummy
activity
Time Estimates
 Deterministic
• Time estimates that are fairly certain
 Probabilistic
• Estimates of times that allow for variation
Probabilistic Estimates
Activity
start
Optimistic
time
Most likely
time (mode)
Pessimistic
time
to tptm te
Expected Time
te = to + 4tm +tp
6
te = expected time
to = optimistic time
tm = most likely time
tp = pessimistic time
Example 1
3-4-5
d
3-5-7
e
5-7-9
f
2-4-6
b
4-6-8
h
Optimistic
time
Most likely
time
Pessimistic
time
Review Lesson 1 - b
1
2
3
4
5 6
8 weeks
6 weeks
3 weeks
4 weeks
9 weeks
11 weeks
1 week
Move in
Deterministic
time estimates
PATH LENGTH SLACK
1-2-3-4-5-6
1-2-5-6
1-3-5-6
29
PATH LENGTH SLACK
1-2-3-4-5-6
1-2-5-6
1-3-5-6
Solution to Review Lesson 1 - b
PATH LENGTH SLACK
1-2-3-4-5-6 18 2
1-2-5-6
1-3-5-6
PATH LENGTH SLACK
1-2-3-4-5-6 18 2
1-2-5-6 20 0
1-3-5-6
PATH LENGTH SLACK
1-2-3-4-5-6 18 2
1-2-5-6 20 0
1-3-5-6 14 6
PATH LENGTH SLACK
1-2-3-4-5-6 18 2
1-2-5-6 20 0
1-3-5-6 14 6
Critical Path
Solution to Review Lesson 1 - b
PATH LENGTH SLACK
1-2-3-4-5-6 18 2
1-2-5-6 20 0
1-3-5-6 14 6
Critical Path
1
2
3
4
5 6
8 weeks
6 weeks
3 weeks
4 weeks
9 weeks
11 weeks
1 week
Move in
Deterministic
time estimates
Pert Chart
 tasks a and b can start simultaneously
 task c can start after a is complete
 task d can start after b is complete
 c and d must complete before e can begin
0
A
B
C&D E
a
b
c
d
e
The CRITICAL PATH is the longest continuous path of activities through a project that
determines the project end date. 33
Review Lesson 1 - c:
Draw a Pert Chart for this job
Task Title Duration Precedence
a. start 0 -
b. think 1 a
c. plan 2 b
d. procrastinate 5 a
e. assign to someone else 1 c,d
f. hide 3 e
g. finish 1 e
h. grab credit 1 f,g
34
A B C&D E F F&G
D
a b
d
c e f
G
g
0
1 2
5
1 3
1
Critical Path = A D E F H slack in B C, G
H
1
C
Task Title Duration Precedence
a. start 0 -
b. think 1 a
c. plan 2 b
d. procrastinate 5 a
e. assign to someone else 1 c,d
f. hide 3 e
g. finish 1 e
h. grab credit 1 f,g
35
Solution to Review Lesson 1 - c
Lesson 2: Microsoft Project
• Starting Microsoft Project
• The Screen
• The Default View
• Views and Tables
• Menus
• The Tool Bar
Starting Microsoft
Project
1. Run MS Project by opening it in
“All Programs”
• Select MS Project (usually in
the same group where other
MS Office applications are
located.
37
1. Default View
The Screen
3. You may add or delete some
of the Toolbar in the Screen
from this menu.
2. Change the Default
View :
• Choose View,
Toolbar, Project
Guide .
38
Planning the Project
• Where to Begin
• Defining the Project
• Setting the project start date
• Complete the Project Plan
• The base calendar
• Save the New Project File
Planning the project
 Where to Begin
1. Start MS Project
2. Choose the Define
Project in the Task
Wizard
3. Follow succeeding
instructions
40
Planning the Project
 Define the project
1. Choose “Define general
working time” in the
Wizard
2. Choose standard time
for a regular 8 hour
work day
3. Customize it to suit
your needs.
4. Follow succeeding
instruction
41
Task Entry and Linking
• Creating Milestone,
• Task Relationships
• Linking Tasks
• Editing the Task Information
• Formatting the Gantt Chart
• Highlighting the critical path
Create Milestone, Link and Relationship
 When you enter a task or import
a number of tasks, they have a
duration of one day as a default
To create milestone, select the task/s
considered as milestone and then
right click. Select Task Information.
Put a check mark on Milestone.
To create subtask, select the task
considered and then select
Project/Outline/Indent in the Menu
Link the selected tasks by selecting
Edit/Link task in the Menu.
NOTE:
All task are automatically link by
Finish (a task) to Start (another task).
43
Edit the Duration, Start or End Date as
needed.
Editing Task Information
 You can view
information regarding
a task by selecting the
task and then right
click.
44
A Task Information will
appear showing several
tabs where you can add,
delete, or edit
information regarding
Resources, Predecessors,
etc.
Formatting the Gantt Chart
 Select Format/Gantt
Chart Wizard in the
Menu
45
You can format the Gantt
Chart view by using the
Gantt chart Wizard
Follow the instruction in
the Wizard
Highlighting the critical path
 Select Format/Gantt
Chart Wizard in the
Menu
46
You can also highlight
the critical path in the
Gantt Chart view by
using the Wizard
Follow the instruction in
the Wizard
Updating the Project
• Setting the baseline
• Update the project
• Tracking Progress
Setting the Baseline
1. Select Tools/Tracking the
Menu Bar
2. A dialog box appears
where you are given a
choice to “Set a
Baseline” for the whole
project or for the
selected task only.
48
Update the project
1. Select Tools/Tracking the
Menu Bar
2. A dialog box appears where
you are given several
choices to update the
project.
49
Update each task in a project
1. Highlight a column where you
want to insert another
column.
2. Select Insert | Column in the
Menu bar, or
3. Right click and then select
“Insert column”.
4. In the “Column definition”
dialog box , choose
“%Complete”. Then select
“OK”.
5. Update each task in the new
column.
50
Tracking Progress
1. Select Tools | Tracking |
Progress Line in the Menu
bar
2. In the “Progress Line” dialog
box , choose “always display
current progress line” and “At
current date”. Then select
“OK”.
3. A red vertical line will appear
showing the status of the
project.
51
Sample of a project with tracking
52
Network Diagram
• View the Network Diagram
• Elements of the Network Diagram
The Network diagram
1. Select View | Network
diagram in the Menu bar,
2. The Network Diagram
appear immediately as
shown.
3. Close-up view of the
Network diagram
54
55
Elements of the Network diagram
56
Printing and Reporting
• Page Setup
• Reports Setup
Page Set-up
1. Select File| Page Set-up in
the Menu bar,
2. The “Page Set-up” dialog
box will appear showing
paper sizes and other
choices.
3. Customize the printed
output by inserting
additional info in the
“Header “and “Footer”
57
Action Reflection
“Failure to plan is planning to fail”
END OF TRAINING
FOR MODULE 1
60

Ms project training ver 01

  • 1.
  • 2.
    Welcome This training modulewas created by: Eng’r Sid Calayag  Credentials: • Trained in Planning and Scheduling using Primavera • Experienced in using Harvard Project Manager and MS Project since version 3 • Trained in Project Management and Quality Management System • Regular Trainer for Taikisha Philippines Inc. • Certified Lead auditor for ISO 9001:2000 and ISO 9001:2008 • Practiced Project Management (local and abroad) • Published major training materials in the internet on the following subjects: • Guidelines for Project Kick-off Meeting • Quality in Construction Works • Improve Project Performance Using 5S Concept • QA/QC Concept, Roles and Responsibilities in TPI Organization • Quality Improvement Using Root Cause Analysis • Practical Auditing • Upgrade QMS System to ISO 9001:2008 • Introduction to Cleanroom Technology 2
  • 3.
    Course Objectives  ThisMicrosoft Project course gives delegates an introduction to project management and to the concepts of planning and scheduling using Microsoft Project 2007. Delegates on this training will learn how to identify, organize and manage the tasks and resources required to complete a project under the constraints of time and cost to achieve a final project target. 4
  • 4.
    Course contents • Lesson1: Project Management • Concept of Project Management • Key Metrics and Success Factors • PERT and CPM • Lesson 2: Microsoft Project • Planning the Project • Task Entry and Linking • Updating the Project • Working with your views • Printing and Reporting 5
  • 5.
     Project Management •Commonly used terms • Concept of Project Management • Key metrics to Project Management • Key Success Factors • The Critical Path / PERT Chart Lesson 1
  • 6.
    Commonly used terms Activity – a specific project task that requires resources and time to complete  Baseline – the original approved plan  Crash - in CPM, an activity can be conducted at a normal pace or at an expedited pace at a greater cost  Critical - an activity or event that if delayed will delay project completion  Critical path – the series of activities that determines the duration of a project. It is the longest path through the project. 7
  • 7.
    Commonly used terms Deliverables- any measurable, tangible, verifiable outcome, result, or item that must be produced to complete a project  Fast tracking – a method of shortening the critical path by carrying out activities in parallel  Gantt chart – a manner of illustrating multiple time-based activities on a horizontal time scale  PERT – Program Evaluation and Review Technique chart depict task, duration, and dependency information in a network form. 8
  • 8.
    Initiation Planning Execution Closure Concept of ProjectManagement Management • Project termination • Team Development • Organization Commitment • Scope Definition • Activity Definition • Schedule Development/Cost Estimating/Resource Planning Execution and Control Process • Information Distribution • Update Project • Performance Reporting • Project Close-out • Administrative close-out • Project completion Planning Process Closure Process Initiation Process 9
  • 9.
    Unique, one-time operationsdesigned to accomplish a specific set of objectives in a limited time frame. Build A A Done Build B B Done Build C C Done Build D Ship JAN FEB MAR APR MAY JUN On time! Projects 10
  • 10.
    Key metrics andsuccess factors  The Key Metrics • Time • Cost • Performance objectives  The Key Success Factors • Top-down commitment • Having a capable project manager • Having time to plan • Careful tracking and control • Good communications 11
  • 11.
    Project Management  Whatare the tools? • Work breakdown structure • Network diagram • Gantt charts 12 Project X Level 1 Level 2 Level 3 Level 4 MAR APR MAY JUN JUL AUG SEP OCT NOV DEC Locate new facilities Interview staff Hire and train staff Select and order furniture Remodel and install phones Move in/startup Gantt Chart
  • 12.
    Project Manager Responsible for:Work Quality Human Resources Time Communications Costs 13
  • 13.
    Review Lesson 1-a Whatare the key metrics? • ____ • ____ • Performance ___________ What are the Key Success Factors? • Top-down __________ • Having a _______ project _______ • Having ____ to plan • Careful tracking and _______ • Good ______________. What are the key metrics? • Time • ____ • Performance ___________ What are the Key Success Factors? • Top-down __________ • Having a _______ project _______ • Having ____ to plan • Careful tracking and _______ • Good ______________. What are the key metrics? • Time • Cost • Performance ___________ What are the Key Success Factors? • Top-down __________ • Having a _______ project _______ • Having ____ to plan • Careful tracking and _______ • Good ______________. What are the key metrics? • Time • Cost • Performance objectives What are the Key Success Factors? • Top-down __________ • Having a _______ project _______ • Having ____ to plan • Careful tracking and _______ • Good ______________. What are the key metrics? • Time • Cost • Performance objectives What are the Key Success Factors? • Top-down commitment • Having a ______ project _______ • Having ____ to plan • Careful tracking and _______ • Good ______________. What are the key metrics? • Time • Cost • Performance objectives What are the Key Success Factors? • Top-down commitment • Having a capable project manager • Having ____ to plan • Careful tracking and _______ • Good ______________. What are the key metrics? • Time • Cost • Performance objectives What are the Key Success Factors? • Top-down commitment • Having a capable project manager • Having time to plan • Careful tracking and _______ • Good ______________. What are the key metrics? • Time • Cost • Performance objectives What are the Key Success Factors? • Top-down commitment • Having a capable project manager • Having time to plan • Careful tracking and control • Good ______________. What are the key metrics? • Time • Cost • Performance objectives What are the Key Success Factors? • Top-down commitment • Having a capable project manager • Having time to plan • Careful tracking and control • Good communications 14
  • 14.
  • 15.
    PERT: Program Evaluationand Review Technique CPM: Critical Path Method • Graphically displays project activities • Estimates how long the project will take • Indicates most critical activities • Show where delays will not affect project PERT and CPM
  • 16.
    The Network Diagram •Network (precedence) diagram • Activity-on-arrow (AOA) • Activity-on-node (AON) • Activities • Events
  • 17.
    The Network Diagram(cont’d)  Path • Sequence of activities that leads from the starting node to the finishing node  Critical path • The longest path; determines expected project duration  Critical activities • Activities on the critical path  Slack • Allowable slippage for path; the difference between the length of path and the length of critical path
  • 18.
    Project Network –Activity on Arrow 1 2 3 4 5 6 Locate facilities Order furniture Furniture setup Interview Hire and train Remodel Move in AOA
  • 19.
    Project Network –Activity on Node 1 2 3 5 6 Locate facilities Order furniture Furniture setup Interview Remodel Move in 4 Hire and train 7S AON
  • 20.
    AOA vs. AON 1 2 3 5 6 Locate facilities Order furniture Furniture setup Interview Remodel Move in 4 Hireand train 7S AON 1 2 3 4 5 6 Locate facilities Order furniture Furniture setup Interview Hire and train Remodel Move in AOA
  • 21.
  • 22.
    Time Estimates  Deterministic •Time estimates that are fairly certain  Probabilistic • Estimates of times that allow for variation
  • 23.
  • 24.
    Expected Time te =to + 4tm +tp 6 te = expected time to = optimistic time tm = most likely time tp = pessimistic time
  • 25.
  • 26.
    Review Lesson 1- b 1 2 3 4 5 6 8 weeks 6 weeks 3 weeks 4 weeks 9 weeks 11 weeks 1 week Move in Deterministic time estimates PATH LENGTH SLACK 1-2-3-4-5-6 1-2-5-6 1-3-5-6
  • 27.
    29 PATH LENGTH SLACK 1-2-3-4-5-6 1-2-5-6 1-3-5-6 Solutionto Review Lesson 1 - b PATH LENGTH SLACK 1-2-3-4-5-6 18 2 1-2-5-6 1-3-5-6 PATH LENGTH SLACK 1-2-3-4-5-6 18 2 1-2-5-6 20 0 1-3-5-6 PATH LENGTH SLACK 1-2-3-4-5-6 18 2 1-2-5-6 20 0 1-3-5-6 14 6 PATH LENGTH SLACK 1-2-3-4-5-6 18 2 1-2-5-6 20 0 1-3-5-6 14 6 Critical Path
  • 28.
    Solution to ReviewLesson 1 - b PATH LENGTH SLACK 1-2-3-4-5-6 18 2 1-2-5-6 20 0 1-3-5-6 14 6 Critical Path 1 2 3 4 5 6 8 weeks 6 weeks 3 weeks 4 weeks 9 weeks 11 weeks 1 week Move in Deterministic time estimates
  • 29.
    Pert Chart  tasksa and b can start simultaneously  task c can start after a is complete  task d can start after b is complete  c and d must complete before e can begin 0 A B C&D E a b c d e The CRITICAL PATH is the longest continuous path of activities through a project that determines the project end date. 33
  • 30.
    Review Lesson 1- c: Draw a Pert Chart for this job Task Title Duration Precedence a. start 0 - b. think 1 a c. plan 2 b d. procrastinate 5 a e. assign to someone else 1 c,d f. hide 3 e g. finish 1 e h. grab credit 1 f,g 34
  • 31.
    A B C&DE F F&G D a b d c e f G g 0 1 2 5 1 3 1 Critical Path = A D E F H slack in B C, G H 1 C Task Title Duration Precedence a. start 0 - b. think 1 a c. plan 2 b d. procrastinate 5 a e. assign to someone else 1 c,d f. hide 3 e g. finish 1 e h. grab credit 1 f,g 35 Solution to Review Lesson 1 - c
  • 32.
    Lesson 2: MicrosoftProject • Starting Microsoft Project • The Screen • The Default View • Views and Tables • Menus • The Tool Bar
  • 33.
    Starting Microsoft Project 1. RunMS Project by opening it in “All Programs” • Select MS Project (usually in the same group where other MS Office applications are located. 37
  • 34.
    1. Default View TheScreen 3. You may add or delete some of the Toolbar in the Screen from this menu. 2. Change the Default View : • Choose View, Toolbar, Project Guide . 38
  • 35.
    Planning the Project •Where to Begin • Defining the Project • Setting the project start date • Complete the Project Plan • The base calendar • Save the New Project File
  • 36.
    Planning the project Where to Begin 1. Start MS Project 2. Choose the Define Project in the Task Wizard 3. Follow succeeding instructions 40
  • 37.
    Planning the Project Define the project 1. Choose “Define general working time” in the Wizard 2. Choose standard time for a regular 8 hour work day 3. Customize it to suit your needs. 4. Follow succeeding instruction 41
  • 38.
    Task Entry andLinking • Creating Milestone, • Task Relationships • Linking Tasks • Editing the Task Information • Formatting the Gantt Chart • Highlighting the critical path
  • 39.
    Create Milestone, Linkand Relationship  When you enter a task or import a number of tasks, they have a duration of one day as a default To create milestone, select the task/s considered as milestone and then right click. Select Task Information. Put a check mark on Milestone. To create subtask, select the task considered and then select Project/Outline/Indent in the Menu Link the selected tasks by selecting Edit/Link task in the Menu. NOTE: All task are automatically link by Finish (a task) to Start (another task). 43 Edit the Duration, Start or End Date as needed.
  • 40.
    Editing Task Information You can view information regarding a task by selecting the task and then right click. 44 A Task Information will appear showing several tabs where you can add, delete, or edit information regarding Resources, Predecessors, etc.
  • 41.
    Formatting the GanttChart  Select Format/Gantt Chart Wizard in the Menu 45 You can format the Gantt Chart view by using the Gantt chart Wizard Follow the instruction in the Wizard
  • 42.
    Highlighting the criticalpath  Select Format/Gantt Chart Wizard in the Menu 46 You can also highlight the critical path in the Gantt Chart view by using the Wizard Follow the instruction in the Wizard
  • 43.
    Updating the Project •Setting the baseline • Update the project • Tracking Progress
  • 44.
    Setting the Baseline 1.Select Tools/Tracking the Menu Bar 2. A dialog box appears where you are given a choice to “Set a Baseline” for the whole project or for the selected task only. 48
  • 45.
    Update the project 1.Select Tools/Tracking the Menu Bar 2. A dialog box appears where you are given several choices to update the project. 49
  • 46.
    Update each taskin a project 1. Highlight a column where you want to insert another column. 2. Select Insert | Column in the Menu bar, or 3. Right click and then select “Insert column”. 4. In the “Column definition” dialog box , choose “%Complete”. Then select “OK”. 5. Update each task in the new column. 50
  • 47.
    Tracking Progress 1. SelectTools | Tracking | Progress Line in the Menu bar 2. In the “Progress Line” dialog box , choose “always display current progress line” and “At current date”. Then select “OK”. 3. A red vertical line will appear showing the status of the project. 51
  • 48.
    Sample of aproject with tracking 52
  • 49.
    Network Diagram • Viewthe Network Diagram • Elements of the Network Diagram
  • 50.
    The Network diagram 1.Select View | Network diagram in the Menu bar, 2. The Network Diagram appear immediately as shown. 3. Close-up view of the Network diagram 54
  • 51.
    55 Elements of theNetwork diagram
  • 52.
    56 Printing and Reporting •Page Setup • Reports Setup
  • 53.
    Page Set-up 1. SelectFile| Page Set-up in the Menu bar, 2. The “Page Set-up” dialog box will appear showing paper sizes and other choices. 3. Customize the printed output by inserting additional info in the “Header “and “Footer” 57
  • 54.
    Action Reflection “Failure toplan is planning to fail”
  • 55.