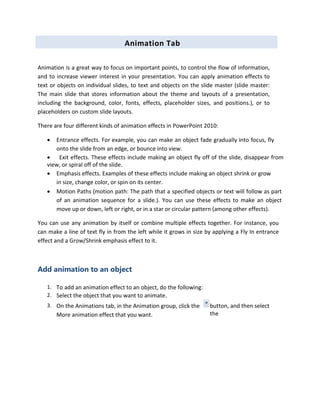
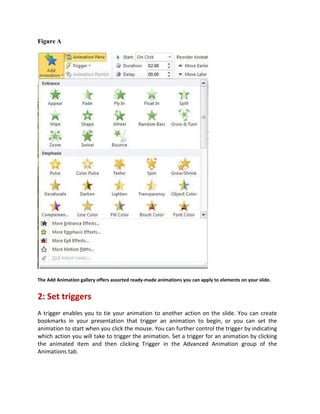
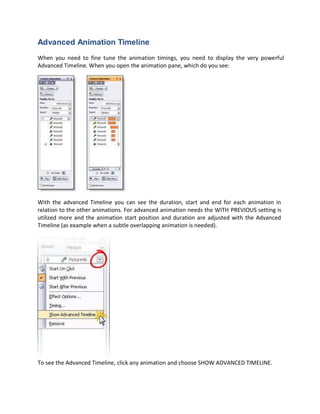
SlideShare a Scribd company logo
Animation Tab
Animation is a great way to focus on important points, to control the flow of information,
and to increase viewer interest in your presentation. You can apply animation effects to
text or objects on individual slides, to text and objects on the slide master (slide master:
The main slide that stores information about the theme and layouts of a presentation,
including the background, color, fonts, effects, placeholder sizes, and positions.), or to
placeholders on custom slide layouts.
There are four different kinds of animation effects in PowerPoint 2010:
 Entrance effects. For example, you can make an object fade gradually into focus, fly
onto the slide from an edge, or bounce into view.
 Exit effects. These effects include making an object fly off of the slide, disappear from
view, or spiral off of the slide.
 Emphasis effects. Examples of these effects include making an object shrink or grow
in size, change color, or spin on its center.
 Motion Paths (motion path: The path that a specified objects or text will follow as part
of an animation sequence for a slide.). You can use these effects to make an object
move up or down, left or right, or in a star or circular pattern (among other effects).
You can use any animation by itself or combine multiple effects together. For instance, you
can make a line of text fly in from the left while it grows in size by applying a Fly In entrance
effect and a Grow/Shrink emphasis effect to it.
Add animation to an object
1. To add an animation effect to an object, do the following:
2. Select the object that you want to animate.
3. On the Animations tab, in the Animation group, click the
More animation effect that you want.
button, and then select
the
NOTES
 If you do not see the entrance, exit, emphasis, or motion path animation affect that you want,
click More Entrance Effects, More Emphasis Effects, More Exit Effects, or More Motion Paths.
 After you have applied an animation to an object or text, the animated items are labeled on
the slide with a non-printing numbered tag, displayed near the text or object. The tag
appears only in Normal view when the Animations tab is selected or the Animation task
pane is visible
Apply multiple animation effects to a single object
To apply multiple animations onto the same object, do the following:
1. Select the text or object that you want to add multiple animations.
2. On the Animations tab, in the Advanced Animation group, click Add Animation.
View a list of animations currently on the slide
You can view the list of all the animations on the slide in the Animation task pane. The
Animation task pane shows important information about an animation effect, such as the
type of effect, the order of multiple effects in relation to one another, the name of the object
affected, and the duration of the effect.
To open the Animation task pane, on the Animations tab, in the Advanced Animation group,
click Animation Pane.
4. In the task pane, numbers indicate the order in which the animation effects play. The
numbers in the task pane correspond to the non-printing numbered tags that are
displayed on the slide.
5. Timelines represent the duration of the effects.
6. Icons represent the type of animation effect. In this example, it is an Exit effect.
7. Select an item in the list to see the menu icon (down arrow), and then click the icon
to reveal the menu.
Set the effect options, timing, or order for an
animation
 To set the effect options for an animation, on the Animations tab, in the Animation group,
click the arrow to the right of Effect Options and click the option that you want.
 You can specify the start, duration, or delay timing for an animation on the Animations tab.
To set the start timing for an animation, in the Timing group, click the arrow to the right
of the
Start menu and select the timing that you want.
To set the duration of how long the animation will run, in the Timing group, enter the
number of seconds that you want in the Duration box.
To set a delay before the animation begins, in the Timing group, enter the number of
seconds that you want in the Delay box.
 To reorder an animation in the list, in the Animation task pane, select the animation that you
want to reorder, and on the Animations tab, in the Timing group, under Reorder Animation,
either select Move
Earlier to make the animation occur before another animation in the list or select Move Later
to make the animation occur after another animation in the list.
Test your animation effect
After you add one or more animation effects, to validate that they work, do the following:
 On the Animations tab, in the Preview group, click Preview.
Five tips for creating animations in PowerPoint 2010
Takeaway: If you’ve struggled in the past with PowerPoint’s animation tools, you may find the
situation has improved with the latest version. Here are a few easy ways to create animation effects
with PowerPoint 2010.
In previous versions of PowerPoint, animating elements on the screen was in equal parts (to me, at
least) amusing and annoying. I loved it when the items did their little swirls or faded into view at
just the right time. But I fussed and fumed over that one word bubble that would never arrive on
cue. Now in PowerPoint 2010, the animation feature is easier — and goes farther — with just a few
clicks of the mouse. Here’s a small taste of these improvements.
1: Use ready-made animations
The Add Animation gallery presents simple animations you can easily apply to items on your
slide. Simply click the element you want to animate, click the Animation tab, and click Add
Animation. The gallery (Figure A) shows a number of simple animations that control the way
objects enter, exit, appear, and disappear on your slides.
Figure A
The Add Animation gallery offers assorted ready-made animations you can apply to elements on your slide.
2: Set triggers
A trigger enables you to tie your animation to another action on the slide. You can create
bookmarks in your presentation that trigger an animation to begin, or you can set the
animation to start when you click the mouse. You can further control the trigger by indicating
which action you will take to trigger the animation. Set a trigger for an animation by clicking
the animated item and then clicking Trigger in the Advanced Animation group of the
Animations tab.
3: Use the Animation Painter
It’s not unheard of to spend hours trying to get everything in your presentation animated
perfectly. Getting things to move at the right speed, in the right order, and ending in the right
sequence used to be a pretty tricky business. Now you can automate the animation sequences
you like by using the Animation Painter. Available in the Advanced Animation group, the
Animation Painter works like the Format Painter tool. You click the element with the animation
you want to copy, click Animation Painter, and then drag the pointer over the item you want to
receive the animation settings. PowerPoint does the rest.
4: Let the timeline help you out
The timeline appears at the bottom of the Animation Pane to help you see how the animations
are unfolding on your slide. You can use the timeline to gauge the entry and exit of various
items and to determine whether you want to change the time or sequence of events. Each
individual animation also shows the length of time it requires by displaying a small time
segment to the right of each animation entry. You can scroll along the timeline by clicking the
arrows at either end or click the Seconds control to Zoom In or Zoom Out and change the
increments of time you are working with (Figure B). This can help you fine-tune the animations
so that the motion occurs precisely when you want it to.
Figure B
You can change the increments on the timeline to fine-tune the animation of elements on your slide.
5: See it all in the Animation Pane
The Animation Pane (Figure C) brings together all kinds of information and tools for you to use
as you organize, order, and time the animation features you add to elements on your slides.
Display the Animation Pane by clicking the Animation tab and choosing Animation Pane in the
Advanced Animation group. The task pane lets you preview the animation (click Play), reorder
animations, and see where they fall on the timeline. You can also access options related to each
animation by clicking its arrow and choosing the tool you want to use. You can set options,
control time, or even remove the animation if you like.
Figure C
The Animation Pane brings together all the settings you may want to change for individual animations.
Advanced Animation Timeline
When you need to fine tune the animation timings, you need to display the very powerful
Advanced Timeline. When you open the animation pane, which do you see:
With the advanced Timeline you can see the duration, start and end for each animation in
relation to the other animations. For advanced animation needs the WITH PREVIOUS setting is
utilized more and the animation start position and duration are adjusted with the Advanced
Timeline (as example when a subtle overlapping animation is needed).
To see the Advanced Timeline, click any animation and choose SHOW ADVANCED TIMELINE.
Recording a Voice Narration in PowerPoint
You might want to add narration to a presentation in the following cases:
 For a Web-based presentation
 For archiving a meeting so that presenters can review it later and hear comments made
during the presentation
 For self-running slide show presentations
Your computer must be equipped with a sound card, microphone, and speakers for you to
record and hear a narration. You can record the narration before you run a presentation,
or record it during the presentation and include audience comments in the recording.
If you don't want narration throughout the presentation, you can record comments on selected
slides. When you're finished recording a narration, a sound icon appears on each slide where
you've recorded. You can either click the icon to play the sound, or set up the sound to play
automatically.
Because voice narration takes precedence over other sounds, if you've inserted another sound
to play automatically in the presentation, it gets overridden by the narration.
Automatic slide timings
As you record, Microsoft PowerPoint records the amount of time you take on each slide. You
can choose to save these slide timings with the narration, or you can set slide timings
separately. Slide timings are especially useful if you want the presentation to run through
automatically. You can turn them off when you don't want the presentation to use them.
Embed or link the narration
You have a choice to either link or embed the narration.
 If you embed the narration, the narration sound file becomes part of the presentation
and it travels with the presentation. However, embedding the narration results in a large
file size.
 If you want the file size to be smaller, you can link the narration. The file is then stored
where you specify on your hard drive and plays with the presentation. If you present the
show on a different computer, you must carry the linked sound file with you and install it
on that computer. A linked file will also play faster.
Accompany the narration with notes
Because audience needs and computer equipment varies, consider accompanying your
narration with notes. This benefits anyone who is deaf or hard of hearing or whose computer
lacks a sound card. If you save the presentation as a Web page (.htm file), the notes will appear
beneath each slide as it displays. If you save it as a presentation (.ppt) file, you can print out the
notes and make them available to your audience.
Instructions
1. Prepare the PPTX slides with all the animation effects that you want to include;
2. Prepare notes for each slide with your narration;
3. Take a printout of your notes and mark the places in the text where you want to click
for the animation effects to start during the slide show presentation;
4. Make mp3 files with your narration for each slide using the notes.
5. From the "Insert" panel, insert audio files in the slides
6. Open the "Animation Pane" in the "Animations" panel
a. Move the audio file to the top of the list of effects. Make sure that the
animation effect for the audio file is set to "Play."
b. From the top-down menu for the audio file in the Animation Pane, click "StartWith
Previous." The audio file order number should show "0."
c. Select from the top-down menu "Effect Options" and change "Stop playing" to "After
current slide."
7. Click "Record Slide Show" in the "Slide Show" panel. Use the marks in the printed
notes to click and start the animation effects and advance to the next slide while
listening to the narration.
In PowerPoint 2010 you have an option to save the slide show with the animations and
narrations as a high-quality Windows media Video (.wmv) file, played back on computers
even if PowerPoint is not installed. To do that, click "Share" and then under
'File Types" select "Create a Video."
Transitions Tab
 Add visual/sound effects defying slide transition
 Options for the slide transition: On Mouse Click or Enter time
 Tool to set transition Duration
 To apply changes to all slides:

More Related Content

What's hot

Lesson 3 advanced word processing skills
Lesson 3 advanced word processing skillsLesson 3 advanced word processing skills
Lesson 3 advanced word processing skills
EmmanuelaSernicul
 
Lesson 4- Developing ict content for specific purposes
Lesson 4- Developing ict content for specific purposesLesson 4- Developing ict content for specific purposes
Lesson 4- Developing ict content for specific purposes
Juvywen
 
ICT as a Platform for Change
ICT as a Platform for Change ICT as a Platform for Change
ICT as a Platform for Change
Grayzon Gonzales, LPT
 
9 Interactive Multimedia
9 Interactive Multimedia9 Interactive Multimedia
9 Interactive Multimedia
Teodoro Llanes II
 
Ict project-for-social-change
Ict project-for-social-changeIct project-for-social-change
Ict project-for-social-change
ella_rexjune
 
Basic Principles Of Graphics and Layout
Basic Principles Of Graphics and LayoutBasic Principles Of Graphics and Layout
Basic Principles Of Graphics and Layout
Deoky5799
 
4 Advance Word Processing Skill
4 Advance Word Processing Skill4 Advance Word Processing Skill
4 Advance Word Processing Skill
Teodoro Llanes II
 
The Advance Spreadsheet Skills
The Advance Spreadsheet SkillsThe Advance Spreadsheet Skills
The Advance Spreadsheet Skills
RjDela2
 
Interactive Multimedia - Empowerment Technologies
 Interactive Multimedia - Empowerment Technologies Interactive Multimedia - Empowerment Technologies
Interactive Multimedia - Empowerment Technologies
Mark Jhon Oxillo
 
Ms powerpoint 2013
Ms powerpoint 2013Ms powerpoint 2013
Ms powerpoint 2013
Noor Azman Muhammad
 
Principles and Basic Techniques of Image Manipulation
Principles and Basic Techniques of Image ManipulationPrinciples and Basic Techniques of Image Manipulation
Principles and Basic Techniques of Image Manipulation
Maria Eloisa Blanza
 
7 Imaging and Design for the Online Environment
7 Imaging and Design for the Online Environment7 Imaging and Design for the Online Environment
7 Imaging and Design for the Online Environment
Teodoro Llanes II
 
Imaging and Design for Online Environment
Imaging and Design for Online EnvironmentImaging and Design for Online Environment
Imaging and Design for Online Environment
Richard Meriveles
 
Interactive Multimedia
Interactive MultimediaInteractive Multimedia
Interactive MultimediaJason Hando
 
Advanced Presentation Skills - Empowerment Technologies
Advanced Presentation Skills - Empowerment TechnologiesAdvanced Presentation Skills - Empowerment Technologies
Advanced Presentation Skills - Empowerment Technologies
Mark Jhon Oxillo
 
PowerPoint Lesson 3: Advanced Slide Design
PowerPoint Lesson 3: Advanced Slide DesignPowerPoint Lesson 3: Advanced Slide Design
PowerPoint Lesson 3: Advanced Slide Design
Novus Business and IT Training Program
 
Powerpoint 2013 tutorial
Powerpoint 2013 tutorial Powerpoint 2013 tutorial
Powerpoint 2013 tutorial
18goodm
 
11 Developing ICT Project for Social Change
11 Developing ICT Project for Social Change11 Developing ICT Project for Social Change
11 Developing ICT Project for Social Change
Teodoro Llanes II
 
[EMPOWERMENT TECHNOLOGIES]-ADVANCED PRESENTATION SKILLS
[EMPOWERMENT TECHNOLOGIES]-ADVANCED PRESENTATION SKILLS[EMPOWERMENT TECHNOLOGIES]-ADVANCED PRESENTATION SKILLS
[EMPOWERMENT TECHNOLOGIES]-ADVANCED PRESENTATION SKILLS
JazzyNF
 
12 Publishing and Sustaining for ICT Project
12 Publishing and Sustaining for ICT Project12 Publishing and Sustaining for ICT Project
12 Publishing and Sustaining for ICT Project
Teodoro Llanes II
 

What's hot (20)

Lesson 3 advanced word processing skills
Lesson 3 advanced word processing skillsLesson 3 advanced word processing skills
Lesson 3 advanced word processing skills
 
Lesson 4- Developing ict content for specific purposes
Lesson 4- Developing ict content for specific purposesLesson 4- Developing ict content for specific purposes
Lesson 4- Developing ict content for specific purposes
 
ICT as a Platform for Change
ICT as a Platform for Change ICT as a Platform for Change
ICT as a Platform for Change
 
9 Interactive Multimedia
9 Interactive Multimedia9 Interactive Multimedia
9 Interactive Multimedia
 
Ict project-for-social-change
Ict project-for-social-changeIct project-for-social-change
Ict project-for-social-change
 
Basic Principles Of Graphics and Layout
Basic Principles Of Graphics and LayoutBasic Principles Of Graphics and Layout
Basic Principles Of Graphics and Layout
 
4 Advance Word Processing Skill
4 Advance Word Processing Skill4 Advance Word Processing Skill
4 Advance Word Processing Skill
 
The Advance Spreadsheet Skills
The Advance Spreadsheet SkillsThe Advance Spreadsheet Skills
The Advance Spreadsheet Skills
 
Interactive Multimedia - Empowerment Technologies
 Interactive Multimedia - Empowerment Technologies Interactive Multimedia - Empowerment Technologies
Interactive Multimedia - Empowerment Technologies
 
Ms powerpoint 2013
Ms powerpoint 2013Ms powerpoint 2013
Ms powerpoint 2013
 
Principles and Basic Techniques of Image Manipulation
Principles and Basic Techniques of Image ManipulationPrinciples and Basic Techniques of Image Manipulation
Principles and Basic Techniques of Image Manipulation
 
7 Imaging and Design for the Online Environment
7 Imaging and Design for the Online Environment7 Imaging and Design for the Online Environment
7 Imaging and Design for the Online Environment
 
Imaging and Design for Online Environment
Imaging and Design for Online EnvironmentImaging and Design for Online Environment
Imaging and Design for Online Environment
 
Interactive Multimedia
Interactive MultimediaInteractive Multimedia
Interactive Multimedia
 
Advanced Presentation Skills - Empowerment Technologies
Advanced Presentation Skills - Empowerment TechnologiesAdvanced Presentation Skills - Empowerment Technologies
Advanced Presentation Skills - Empowerment Technologies
 
PowerPoint Lesson 3: Advanced Slide Design
PowerPoint Lesson 3: Advanced Slide DesignPowerPoint Lesson 3: Advanced Slide Design
PowerPoint Lesson 3: Advanced Slide Design
 
Powerpoint 2013 tutorial
Powerpoint 2013 tutorial Powerpoint 2013 tutorial
Powerpoint 2013 tutorial
 
11 Developing ICT Project for Social Change
11 Developing ICT Project for Social Change11 Developing ICT Project for Social Change
11 Developing ICT Project for Social Change
 
[EMPOWERMENT TECHNOLOGIES]-ADVANCED PRESENTATION SKILLS
[EMPOWERMENT TECHNOLOGIES]-ADVANCED PRESENTATION SKILLS[EMPOWERMENT TECHNOLOGIES]-ADVANCED PRESENTATION SKILLS
[EMPOWERMENT TECHNOLOGIES]-ADVANCED PRESENTATION SKILLS
 
12 Publishing and Sustaining for ICT Project
12 Publishing and Sustaining for ICT Project12 Publishing and Sustaining for ICT Project
12 Publishing and Sustaining for ICT Project
 

Viewers also liked

MS PowerPoint 2010 tutorial 6
MS PowerPoint 2010 tutorial 6MS PowerPoint 2010 tutorial 6
MS PowerPoint 2010 tutorial 6Khalfan Alshuaili
 
MS PowerPoint 2010 tutorial 3
MS PowerPoint 2010 tutorial 3MS PowerPoint 2010 tutorial 3
MS PowerPoint 2010 tutorial 3Khalfan Alshuaili
 
MS PowerPoint 2010 tutorial 4
MS PowerPoint 2010 tutorial 4MS PowerPoint 2010 tutorial 4
MS PowerPoint 2010 tutorial 4Khalfan Alshuaili
 
Ms access 2010
Ms access 2010Ms access 2010
Ms access 2010
Alsufaacademy
 
how to learn power point 2010
how to learn power point 2010how to learn power point 2010
how to learn power point 2010
Lahirudulajrox
 

Viewers also liked (20)

MS PowerPoint 2010 tutorial 6
MS PowerPoint 2010 tutorial 6MS PowerPoint 2010 tutorial 6
MS PowerPoint 2010 tutorial 6
 
MS Word 2010 tutorial 2
MS Word 2010 tutorial 2MS Word 2010 tutorial 2
MS Word 2010 tutorial 2
 
MS Word 2010 tutorial 4
MS Word 2010 tutorial 4MS Word 2010 tutorial 4
MS Word 2010 tutorial 4
 
MS Word 2010 tutorial 1
MS Word 2010 tutorial 1MS Word 2010 tutorial 1
MS Word 2010 tutorial 1
 
MS PowerPoint 2010 tutorial 3
MS PowerPoint 2010 tutorial 3MS PowerPoint 2010 tutorial 3
MS PowerPoint 2010 tutorial 3
 
MS Access 2010 tutorial 5
MS Access 2010 tutorial 5MS Access 2010 tutorial 5
MS Access 2010 tutorial 5
 
MS Excel 2010 tutorial 2
MS Excel 2010 tutorial 2MS Excel 2010 tutorial 2
MS Excel 2010 tutorial 2
 
MS Access 2010 tutorial 3
MS Access 2010 tutorial 3MS Access 2010 tutorial 3
MS Access 2010 tutorial 3
 
MS Access 2010 tutorial 4
MS Access 2010 tutorial 4MS Access 2010 tutorial 4
MS Access 2010 tutorial 4
 
MS PowerPoint 2010 tutorial 4
MS PowerPoint 2010 tutorial 4MS PowerPoint 2010 tutorial 4
MS PowerPoint 2010 tutorial 4
 
MS Access 2010 tutorial 6
MS Access 2010 tutorial 6MS Access 2010 tutorial 6
MS Access 2010 tutorial 6
 
MS Access 2010 tutorial 2
MS Access 2010 tutorial 2MS Access 2010 tutorial 2
MS Access 2010 tutorial 2
 
MS Access 2010 tutorial 1
MS Access 2010 tutorial 1MS Access 2010 tutorial 1
MS Access 2010 tutorial 1
 
Ms access 2010
Ms access 2010Ms access 2010
Ms access 2010
 
how to learn power point 2010
how to learn power point 2010how to learn power point 2010
how to learn power point 2010
 
MS Word 2010 tutorial 5
MS Word 2010 tutorial 5MS Word 2010 tutorial 5
MS Word 2010 tutorial 5
 
MS Excel 2010 tutorial 3
MS Excel 2010 tutorial 3MS Excel 2010 tutorial 3
MS Excel 2010 tutorial 3
 
MS Excel 2010 tutorial 4
MS Excel 2010 tutorial 4MS Excel 2010 tutorial 4
MS Excel 2010 tutorial 4
 
MS Excel 2010 tutorial 1
MS Excel 2010 tutorial 1MS Excel 2010 tutorial 1
MS Excel 2010 tutorial 1
 
MS Word 2010 tutorial 6
MS Word 2010 tutorial 6MS Word 2010 tutorial 6
MS Word 2010 tutorial 6
 

Similar to MS PowerPoint 2010 tutorial 5

Advanced Power Point
Advanced Power PointAdvanced Power Point
Advanced Power Point
Cassie Romero
 
Powerpoint 2016 transitions animations timing the presentation
Powerpoint 2016 transitions animations timing the presentationPowerpoint 2016 transitions animations timing the presentation
Powerpoint 2016 transitions animations timing the presentation
David Raudales
 
Grade 4 Computer
Grade 4 Computer Grade 4 Computer
Grade 4 Computer
Joel Linquico
 
Animations-vs-Transitionlguffififfyfhcohcogxog
Animations-vs-TransitionlguffififfyfhcohcogxogAnimations-vs-Transitionlguffififfyfhcohcogxog
Animations-vs-Transitionlguffififfyfhcohcogxog
giyu72623
 
Shdhhhs
ShdhhhsShdhhhs
Shdhhhs
Venir1
 
Lesson 14 animating text and objects
Lesson 14   animating text and objectsLesson 14   animating text and objects
Lesson 14 animating text and objectsguevarra_2000
 
Lesson 14 animating text and objects
Lesson 14   animating text and objectsLesson 14   animating text and objects
Lesson 14 animating text and objectsguevarra_2000
 
Lesson 14 animating text and objects
Lesson 14   animating text and objectsLesson 14   animating text and objects
Lesson 14 animating text and objectsguevarra_2000
 
Technology Toolbox Power Point (Beginner And Intermediate)
Technology Toolbox   Power Point (Beginner And Intermediate)Technology Toolbox   Power Point (Beginner And Intermediate)
Technology Toolbox Power Point (Beginner And Intermediate)Walkersville Middle School
 
Edtech PP.
Edtech PP.Edtech PP.
Edtech PP.
rnoval1030
 
Presentation1
Presentation1Presentation1
Presentation1
Salim Al-jafari
 
Animation in powerpoint part 1
Animation in powerpoint part 1Animation in powerpoint part 1
Animation in powerpoint part 1
JAIDEVPAUL
 
Design project for school
Design project for schoolDesign project for school
Design project for school
Bailey Tarvin
 
Lesson One Fourth Quarter First Year High School Running A Presentation
Lesson One Fourth Quarter First Year High School Running A PresentationLesson One Fourth Quarter First Year High School Running A Presentation
Lesson One Fourth Quarter First Year High School Running A PresentationPerry Mallari
 
Applying Transition and Animation in Powerpoint
Applying Transition and Animation in Powerpoint Applying Transition and Animation in Powerpoint
Applying Transition and Animation in Powerpoint
Sharad Dubey
 
Features Of PowerPoint
Features Of PowerPointFeatures Of PowerPoint
Features Of PowerPoint
Udit Mittal
 

Similar to MS PowerPoint 2010 tutorial 5 (20)

Advanced Power Point
Advanced Power PointAdvanced Power Point
Advanced Power Point
 
Tutorial
TutorialTutorial
Tutorial
 
Powerpoint 2016 transitions animations timing the presentation
Powerpoint 2016 transitions animations timing the presentationPowerpoint 2016 transitions animations timing the presentation
Powerpoint 2016 transitions animations timing the presentation
 
Grade 4 Computer
Grade 4 Computer Grade 4 Computer
Grade 4 Computer
 
What is Powerpoint
What is PowerpointWhat is Powerpoint
What is Powerpoint
 
Animations-vs-Transitionlguffififfyfhcohcogxog
Animations-vs-TransitionlguffififfyfhcohcogxogAnimations-vs-Transitionlguffififfyfhcohcogxog
Animations-vs-Transitionlguffififfyfhcohcogxog
 
Shdhhhs
ShdhhhsShdhhhs
Shdhhhs
 
Lesson 14 animating text and objects
Lesson 14   animating text and objectsLesson 14   animating text and objects
Lesson 14 animating text and objects
 
Lesson 14 animating text and objects
Lesson 14   animating text and objectsLesson 14   animating text and objects
Lesson 14 animating text and objects
 
Lesson 14 animating text and objects
Lesson 14   animating text and objectsLesson 14   animating text and objects
Lesson 14 animating text and objects
 
Technology Toolbox Power Point (Beginner And Intermediate)
Technology Toolbox   Power Point (Beginner And Intermediate)Technology Toolbox   Power Point (Beginner And Intermediate)
Technology Toolbox Power Point (Beginner And Intermediate)
 
Microsoft power point 2007
Microsoft power point 2007Microsoft power point 2007
Microsoft power point 2007
 
Edtech PP.
Edtech PP.Edtech PP.
Edtech PP.
 
Presentation1
Presentation1Presentation1
Presentation1
 
Animation in powerpoint part 1
Animation in powerpoint part 1Animation in powerpoint part 1
Animation in powerpoint part 1
 
Design project for school
Design project for schoolDesign project for school
Design project for school
 
Lesson One Fourth Quarter First Year High School Running A Presentation
Lesson One Fourth Quarter First Year High School Running A PresentationLesson One Fourth Quarter First Year High School Running A Presentation
Lesson One Fourth Quarter First Year High School Running A Presentation
 
Applying Transition and Animation in Powerpoint
Applying Transition and Animation in Powerpoint Applying Transition and Animation in Powerpoint
Applying Transition and Animation in Powerpoint
 
Microsoft® Office
Microsoft® OfficeMicrosoft® Office
Microsoft® Office
 
Features Of PowerPoint
Features Of PowerPointFeatures Of PowerPoint
Features Of PowerPoint
 

More from Khalfan Alshuaili

MS PowerPoint 2010 tutorial 2
MS PowerPoint 2010 tutorial 2MS PowerPoint 2010 tutorial 2
MS PowerPoint 2010 tutorial 2Khalfan Alshuaili
 
MS PowerPoint 2010 tutorial 1
MS PowerPoint 2010 tutorial 1MS PowerPoint 2010 tutorial 1
MS PowerPoint 2010 tutorial 1Khalfan Alshuaili
 
Impact of web ct on learning
Impact of  web ct on learningImpact of  web ct on learning
Impact of web ct on learning
Khalfan Alshuaili
 

More from Khalfan Alshuaili (6)

MS Word 2010 tutorial 3
MS Word 2010 tutorial 3MS Word 2010 tutorial 3
MS Word 2010 tutorial 3
 
MS PowerPoint 2010 tutorial 2
MS PowerPoint 2010 tutorial 2MS PowerPoint 2010 tutorial 2
MS PowerPoint 2010 tutorial 2
 
MS PowerPoint 2010 tutorial 1
MS PowerPoint 2010 tutorial 1MS PowerPoint 2010 tutorial 1
MS PowerPoint 2010 tutorial 1
 
MS Excel 2010 tutorial 6
MS Excel 2010 tutorial 6MS Excel 2010 tutorial 6
MS Excel 2010 tutorial 6
 
MS Excel 2010 tutorial 5
MS Excel 2010 tutorial 5MS Excel 2010 tutorial 5
MS Excel 2010 tutorial 5
 
Impact of web ct on learning
Impact of  web ct on learningImpact of  web ct on learning
Impact of web ct on learning
 

Recently uploaded

Unit 8 - Information and Communication Technology (Paper I).pdf
Unit 8 - Information and Communication Technology (Paper I).pdfUnit 8 - Information and Communication Technology (Paper I).pdf
Unit 8 - Information and Communication Technology (Paper I).pdf
Thiyagu K
 
Synthetic Fiber Construction in lab .pptx
Synthetic Fiber Construction in lab .pptxSynthetic Fiber Construction in lab .pptx
Synthetic Fiber Construction in lab .pptx
Pavel ( NSTU)
 
Students, digital devices and success - Andreas Schleicher - 27 May 2024..pptx
Students, digital devices and success - Andreas Schleicher - 27 May 2024..pptxStudents, digital devices and success - Andreas Schleicher - 27 May 2024..pptx
Students, digital devices and success - Andreas Schleicher - 27 May 2024..pptx
EduSkills OECD
 
Phrasal Verbs.XXXXXXXXXXXXXXXXXXXXXXXXXX
Phrasal Verbs.XXXXXXXXXXXXXXXXXXXXXXXXXXPhrasal Verbs.XXXXXXXXXXXXXXXXXXXXXXXXXX
Phrasal Verbs.XXXXXXXXXXXXXXXXXXXXXXXXXX
MIRIAMSALINAS13
 
special B.ed 2nd year old paper_20240531.pdf
special B.ed 2nd year old paper_20240531.pdfspecial B.ed 2nd year old paper_20240531.pdf
special B.ed 2nd year old paper_20240531.pdf
Special education needs
 
Overview on Edible Vaccine: Pros & Cons with Mechanism
Overview on Edible Vaccine: Pros & Cons with MechanismOverview on Edible Vaccine: Pros & Cons with Mechanism
Overview on Edible Vaccine: Pros & Cons with Mechanism
DeeptiGupta154
 
Chapter 3 - Islamic Banking Products and Services.pptx
Chapter 3 - Islamic Banking Products and Services.pptxChapter 3 - Islamic Banking Products and Services.pptx
Chapter 3 - Islamic Banking Products and Services.pptx
Mohd Adib Abd Muin, Senior Lecturer at Universiti Utara Malaysia
 
The Art Pastor's Guide to Sabbath | Steve Thomason
The Art Pastor's Guide to Sabbath | Steve ThomasonThe Art Pastor's Guide to Sabbath | Steve Thomason
The Art Pastor's Guide to Sabbath | Steve Thomason
Steve Thomason
 
Palestine last event orientationfvgnh .pptx
Palestine last event orientationfvgnh .pptxPalestine last event orientationfvgnh .pptx
Palestine last event orientationfvgnh .pptx
RaedMohamed3
 
PART A. Introduction to Costumer Service
PART A. Introduction to Costumer ServicePART A. Introduction to Costumer Service
PART A. Introduction to Costumer Service
PedroFerreira53928
 
Operation Blue Star - Saka Neela Tara
Operation Blue Star   -  Saka Neela TaraOperation Blue Star   -  Saka Neela Tara
Operation Blue Star - Saka Neela Tara
Balvir Singh
 
Instructions for Submissions thorugh G- Classroom.pptx
Instructions for Submissions thorugh G- Classroom.pptxInstructions for Submissions thorugh G- Classroom.pptx
Instructions for Submissions thorugh G- Classroom.pptx
Jheel Barad
 
Home assignment II on Spectroscopy 2024 Answers.pdf
Home assignment II on Spectroscopy 2024 Answers.pdfHome assignment II on Spectroscopy 2024 Answers.pdf
Home assignment II on Spectroscopy 2024 Answers.pdf
Tamralipta Mahavidyalaya
 
CLASS 11 CBSE B.St Project AIDS TO TRADE - INSURANCE
CLASS 11 CBSE B.St Project AIDS TO TRADE - INSURANCECLASS 11 CBSE B.St Project AIDS TO TRADE - INSURANCE
CLASS 11 CBSE B.St Project AIDS TO TRADE - INSURANCE
BhavyaRajput3
 
Mule 4.6 & Java 17 Upgrade | MuleSoft Mysore Meetup #46
Mule 4.6 & Java 17 Upgrade | MuleSoft Mysore Meetup #46Mule 4.6 & Java 17 Upgrade | MuleSoft Mysore Meetup #46
Mule 4.6 & Java 17 Upgrade | MuleSoft Mysore Meetup #46
MysoreMuleSoftMeetup
 
How to Make a Field invisible in Odoo 17
How to Make a Field invisible in Odoo 17How to Make a Field invisible in Odoo 17
How to Make a Field invisible in Odoo 17
Celine George
 
The Challenger.pdf DNHS Official Publication
The Challenger.pdf DNHS Official PublicationThe Challenger.pdf DNHS Official Publication
The Challenger.pdf DNHS Official Publication
Delapenabediema
 
How to Create Map Views in the Odoo 17 ERP
How to Create Map Views in the Odoo 17 ERPHow to Create Map Views in the Odoo 17 ERP
How to Create Map Views in the Odoo 17 ERP
Celine George
 
TESDA TM1 REVIEWER FOR NATIONAL ASSESSMENT WRITTEN AND ORAL QUESTIONS WITH A...
TESDA TM1 REVIEWER  FOR NATIONAL ASSESSMENT WRITTEN AND ORAL QUESTIONS WITH A...TESDA TM1 REVIEWER  FOR NATIONAL ASSESSMENT WRITTEN AND ORAL QUESTIONS WITH A...
TESDA TM1 REVIEWER FOR NATIONAL ASSESSMENT WRITTEN AND ORAL QUESTIONS WITH A...
EugeneSaldivar
 
Digital Tools and AI for Teaching Learning and Research
Digital Tools and AI for Teaching Learning and ResearchDigital Tools and AI for Teaching Learning and Research
Digital Tools and AI for Teaching Learning and Research
Vikramjit Singh
 

Recently uploaded (20)

Unit 8 - Information and Communication Technology (Paper I).pdf
Unit 8 - Information and Communication Technology (Paper I).pdfUnit 8 - Information and Communication Technology (Paper I).pdf
Unit 8 - Information and Communication Technology (Paper I).pdf
 
Synthetic Fiber Construction in lab .pptx
Synthetic Fiber Construction in lab .pptxSynthetic Fiber Construction in lab .pptx
Synthetic Fiber Construction in lab .pptx
 
Students, digital devices and success - Andreas Schleicher - 27 May 2024..pptx
Students, digital devices and success - Andreas Schleicher - 27 May 2024..pptxStudents, digital devices and success - Andreas Schleicher - 27 May 2024..pptx
Students, digital devices and success - Andreas Schleicher - 27 May 2024..pptx
 
Phrasal Verbs.XXXXXXXXXXXXXXXXXXXXXXXXXX
Phrasal Verbs.XXXXXXXXXXXXXXXXXXXXXXXXXXPhrasal Verbs.XXXXXXXXXXXXXXXXXXXXXXXXXX
Phrasal Verbs.XXXXXXXXXXXXXXXXXXXXXXXXXX
 
special B.ed 2nd year old paper_20240531.pdf
special B.ed 2nd year old paper_20240531.pdfspecial B.ed 2nd year old paper_20240531.pdf
special B.ed 2nd year old paper_20240531.pdf
 
Overview on Edible Vaccine: Pros & Cons with Mechanism
Overview on Edible Vaccine: Pros & Cons with MechanismOverview on Edible Vaccine: Pros & Cons with Mechanism
Overview on Edible Vaccine: Pros & Cons with Mechanism
 
Chapter 3 - Islamic Banking Products and Services.pptx
Chapter 3 - Islamic Banking Products and Services.pptxChapter 3 - Islamic Banking Products and Services.pptx
Chapter 3 - Islamic Banking Products and Services.pptx
 
The Art Pastor's Guide to Sabbath | Steve Thomason
The Art Pastor's Guide to Sabbath | Steve ThomasonThe Art Pastor's Guide to Sabbath | Steve Thomason
The Art Pastor's Guide to Sabbath | Steve Thomason
 
Palestine last event orientationfvgnh .pptx
Palestine last event orientationfvgnh .pptxPalestine last event orientationfvgnh .pptx
Palestine last event orientationfvgnh .pptx
 
PART A. Introduction to Costumer Service
PART A. Introduction to Costumer ServicePART A. Introduction to Costumer Service
PART A. Introduction to Costumer Service
 
Operation Blue Star - Saka Neela Tara
Operation Blue Star   -  Saka Neela TaraOperation Blue Star   -  Saka Neela Tara
Operation Blue Star - Saka Neela Tara
 
Instructions for Submissions thorugh G- Classroom.pptx
Instructions for Submissions thorugh G- Classroom.pptxInstructions for Submissions thorugh G- Classroom.pptx
Instructions for Submissions thorugh G- Classroom.pptx
 
Home assignment II on Spectroscopy 2024 Answers.pdf
Home assignment II on Spectroscopy 2024 Answers.pdfHome assignment II on Spectroscopy 2024 Answers.pdf
Home assignment II on Spectroscopy 2024 Answers.pdf
 
CLASS 11 CBSE B.St Project AIDS TO TRADE - INSURANCE
CLASS 11 CBSE B.St Project AIDS TO TRADE - INSURANCECLASS 11 CBSE B.St Project AIDS TO TRADE - INSURANCE
CLASS 11 CBSE B.St Project AIDS TO TRADE - INSURANCE
 
Mule 4.6 & Java 17 Upgrade | MuleSoft Mysore Meetup #46
Mule 4.6 & Java 17 Upgrade | MuleSoft Mysore Meetup #46Mule 4.6 & Java 17 Upgrade | MuleSoft Mysore Meetup #46
Mule 4.6 & Java 17 Upgrade | MuleSoft Mysore Meetup #46
 
How to Make a Field invisible in Odoo 17
How to Make a Field invisible in Odoo 17How to Make a Field invisible in Odoo 17
How to Make a Field invisible in Odoo 17
 
The Challenger.pdf DNHS Official Publication
The Challenger.pdf DNHS Official PublicationThe Challenger.pdf DNHS Official Publication
The Challenger.pdf DNHS Official Publication
 
How to Create Map Views in the Odoo 17 ERP
How to Create Map Views in the Odoo 17 ERPHow to Create Map Views in the Odoo 17 ERP
How to Create Map Views in the Odoo 17 ERP
 
TESDA TM1 REVIEWER FOR NATIONAL ASSESSMENT WRITTEN AND ORAL QUESTIONS WITH A...
TESDA TM1 REVIEWER  FOR NATIONAL ASSESSMENT WRITTEN AND ORAL QUESTIONS WITH A...TESDA TM1 REVIEWER  FOR NATIONAL ASSESSMENT WRITTEN AND ORAL QUESTIONS WITH A...
TESDA TM1 REVIEWER FOR NATIONAL ASSESSMENT WRITTEN AND ORAL QUESTIONS WITH A...
 
Digital Tools and AI for Teaching Learning and Research
Digital Tools and AI for Teaching Learning and ResearchDigital Tools and AI for Teaching Learning and Research
Digital Tools and AI for Teaching Learning and Research
 

MS PowerPoint 2010 tutorial 5

  • 1. Animation Tab Animation is a great way to focus on important points, to control the flow of information, and to increase viewer interest in your presentation. You can apply animation effects to text or objects on individual slides, to text and objects on the slide master (slide master: The main slide that stores information about the theme and layouts of a presentation, including the background, color, fonts, effects, placeholder sizes, and positions.), or to placeholders on custom slide layouts. There are four different kinds of animation effects in PowerPoint 2010:  Entrance effects. For example, you can make an object fade gradually into focus, fly onto the slide from an edge, or bounce into view.  Exit effects. These effects include making an object fly off of the slide, disappear from view, or spiral off of the slide.  Emphasis effects. Examples of these effects include making an object shrink or grow in size, change color, or spin on its center.  Motion Paths (motion path: The path that a specified objects or text will follow as part of an animation sequence for a slide.). You can use these effects to make an object move up or down, left or right, or in a star or circular pattern (among other effects). You can use any animation by itself or combine multiple effects together. For instance, you can make a line of text fly in from the left while it grows in size by applying a Fly In entrance effect and a Grow/Shrink emphasis effect to it. Add animation to an object 1. To add an animation effect to an object, do the following: 2. Select the object that you want to animate. 3. On the Animations tab, in the Animation group, click the More animation effect that you want. button, and then select the
  • 2. NOTES  If you do not see the entrance, exit, emphasis, or motion path animation affect that you want, click More Entrance Effects, More Emphasis Effects, More Exit Effects, or More Motion Paths.  After you have applied an animation to an object or text, the animated items are labeled on the slide with a non-printing numbered tag, displayed near the text or object. The tag appears only in Normal view when the Animations tab is selected or the Animation task pane is visible Apply multiple animation effects to a single object To apply multiple animations onto the same object, do the following: 1. Select the text or object that you want to add multiple animations. 2. On the Animations tab, in the Advanced Animation group, click Add Animation. View a list of animations currently on the slide You can view the list of all the animations on the slide in the Animation task pane. The Animation task pane shows important information about an animation effect, such as the type of effect, the order of multiple effects in relation to one another, the name of the object affected, and the duration of the effect. To open the Animation task pane, on the Animations tab, in the Advanced Animation group, click Animation Pane.
  • 3. 4. In the task pane, numbers indicate the order in which the animation effects play. The numbers in the task pane correspond to the non-printing numbered tags that are displayed on the slide. 5. Timelines represent the duration of the effects. 6. Icons represent the type of animation effect. In this example, it is an Exit effect. 7. Select an item in the list to see the menu icon (down arrow), and then click the icon to reveal the menu. Set the effect options, timing, or order for an animation  To set the effect options for an animation, on the Animations tab, in the Animation group, click the arrow to the right of Effect Options and click the option that you want.  You can specify the start, duration, or delay timing for an animation on the Animations tab. To set the start timing for an animation, in the Timing group, click the arrow to the right of the Start menu and select the timing that you want. To set the duration of how long the animation will run, in the Timing group, enter the number of seconds that you want in the Duration box. To set a delay before the animation begins, in the Timing group, enter the number of seconds that you want in the Delay box.  To reorder an animation in the list, in the Animation task pane, select the animation that you want to reorder, and on the Animations tab, in the Timing group, under Reorder Animation, either select Move
  • 4. Earlier to make the animation occur before another animation in the list or select Move Later to make the animation occur after another animation in the list. Test your animation effect After you add one or more animation effects, to validate that they work, do the following:  On the Animations tab, in the Preview group, click Preview. Five tips for creating animations in PowerPoint 2010 Takeaway: If you’ve struggled in the past with PowerPoint’s animation tools, you may find the situation has improved with the latest version. Here are a few easy ways to create animation effects with PowerPoint 2010. In previous versions of PowerPoint, animating elements on the screen was in equal parts (to me, at least) amusing and annoying. I loved it when the items did their little swirls or faded into view at just the right time. But I fussed and fumed over that one word bubble that would never arrive on cue. Now in PowerPoint 2010, the animation feature is easier — and goes farther — with just a few clicks of the mouse. Here’s a small taste of these improvements. 1: Use ready-made animations The Add Animation gallery presents simple animations you can easily apply to items on your slide. Simply click the element you want to animate, click the Animation tab, and click Add Animation. The gallery (Figure A) shows a number of simple animations that control the way objects enter, exit, appear, and disappear on your slides.
  • 5. Figure A The Add Animation gallery offers assorted ready-made animations you can apply to elements on your slide. 2: Set triggers A trigger enables you to tie your animation to another action on the slide. You can create bookmarks in your presentation that trigger an animation to begin, or you can set the animation to start when you click the mouse. You can further control the trigger by indicating which action you will take to trigger the animation. Set a trigger for an animation by clicking the animated item and then clicking Trigger in the Advanced Animation group of the Animations tab.
  • 6. 3: Use the Animation Painter It’s not unheard of to spend hours trying to get everything in your presentation animated perfectly. Getting things to move at the right speed, in the right order, and ending in the right sequence used to be a pretty tricky business. Now you can automate the animation sequences you like by using the Animation Painter. Available in the Advanced Animation group, the Animation Painter works like the Format Painter tool. You click the element with the animation you want to copy, click Animation Painter, and then drag the pointer over the item you want to receive the animation settings. PowerPoint does the rest. 4: Let the timeline help you out The timeline appears at the bottom of the Animation Pane to help you see how the animations are unfolding on your slide. You can use the timeline to gauge the entry and exit of various items and to determine whether you want to change the time or sequence of events. Each individual animation also shows the length of time it requires by displaying a small time segment to the right of each animation entry. You can scroll along the timeline by clicking the arrows at either end or click the Seconds control to Zoom In or Zoom Out and change the increments of time you are working with (Figure B). This can help you fine-tune the animations so that the motion occurs precisely when you want it to. Figure B You can change the increments on the timeline to fine-tune the animation of elements on your slide. 5: See it all in the Animation Pane The Animation Pane (Figure C) brings together all kinds of information and tools for you to use as you organize, order, and time the animation features you add to elements on your slides. Display the Animation Pane by clicking the Animation tab and choosing Animation Pane in the Advanced Animation group. The task pane lets you preview the animation (click Play), reorder animations, and see where they fall on the timeline. You can also access options related to each animation by clicking its arrow and choosing the tool you want to use. You can set options, control time, or even remove the animation if you like.
  • 7. Figure C The Animation Pane brings together all the settings you may want to change for individual animations.
  • 8. Advanced Animation Timeline When you need to fine tune the animation timings, you need to display the very powerful Advanced Timeline. When you open the animation pane, which do you see: With the advanced Timeline you can see the duration, start and end for each animation in relation to the other animations. For advanced animation needs the WITH PREVIOUS setting is utilized more and the animation start position and duration are adjusted with the Advanced Timeline (as example when a subtle overlapping animation is needed). To see the Advanced Timeline, click any animation and choose SHOW ADVANCED TIMELINE.
  • 9. Recording a Voice Narration in PowerPoint You might want to add narration to a presentation in the following cases:  For a Web-based presentation  For archiving a meeting so that presenters can review it later and hear comments made during the presentation  For self-running slide show presentations Your computer must be equipped with a sound card, microphone, and speakers for you to record and hear a narration. You can record the narration before you run a presentation, or record it during the presentation and include audience comments in the recording. If you don't want narration throughout the presentation, you can record comments on selected slides. When you're finished recording a narration, a sound icon appears on each slide where you've recorded. You can either click the icon to play the sound, or set up the sound to play automatically. Because voice narration takes precedence over other sounds, if you've inserted another sound to play automatically in the presentation, it gets overridden by the narration. Automatic slide timings As you record, Microsoft PowerPoint records the amount of time you take on each slide. You can choose to save these slide timings with the narration, or you can set slide timings separately. Slide timings are especially useful if you want the presentation to run through automatically. You can turn them off when you don't want the presentation to use them. Embed or link the narration You have a choice to either link or embed the narration.  If you embed the narration, the narration sound file becomes part of the presentation and it travels with the presentation. However, embedding the narration results in a large file size.  If you want the file size to be smaller, you can link the narration. The file is then stored where you specify on your hard drive and plays with the presentation. If you present the show on a different computer, you must carry the linked sound file with you and install it on that computer. A linked file will also play faster. Accompany the narration with notes Because audience needs and computer equipment varies, consider accompanying your narration with notes. This benefits anyone who is deaf or hard of hearing or whose computer lacks a sound card. If you save the presentation as a Web page (.htm file), the notes will appear beneath each slide as it displays. If you save it as a presentation (.ppt) file, you can print out the notes and make them available to your audience.
  • 10. Instructions 1. Prepare the PPTX slides with all the animation effects that you want to include; 2. Prepare notes for each slide with your narration; 3. Take a printout of your notes and mark the places in the text where you want to click for the animation effects to start during the slide show presentation; 4. Make mp3 files with your narration for each slide using the notes. 5. From the "Insert" panel, insert audio files in the slides 6. Open the "Animation Pane" in the "Animations" panel a. Move the audio file to the top of the list of effects. Make sure that the animation effect for the audio file is set to "Play." b. From the top-down menu for the audio file in the Animation Pane, click "StartWith Previous." The audio file order number should show "0." c. Select from the top-down menu "Effect Options" and change "Stop playing" to "After current slide." 7. Click "Record Slide Show" in the "Slide Show" panel. Use the marks in the printed notes to click and start the animation effects and advance to the next slide while listening to the narration. In PowerPoint 2010 you have an option to save the slide show with the animations and narrations as a high-quality Windows media Video (.wmv) file, played back on computers even if PowerPoint is not installed. To do that, click "Share" and then under 'File Types" select "Create a Video."
  • 11. Transitions Tab  Add visual/sound effects defying slide transition  Options for the slide transition: On Mouse Click or Enter time  Tool to set transition Duration  To apply changes to all slides: