Downloaded 108 times
![Vidya Vikas Educational Trust (R),
Vidya Vikas Polytechnic
27-128, Mysore - Bannur Road Alanahally,Alanahally Post, Mysuru, Karnataka 570028
Praperd by: Mr Thanmay J.S, H.O.D Mechanical Engineering VVETP, Mysore Page 1 of 28
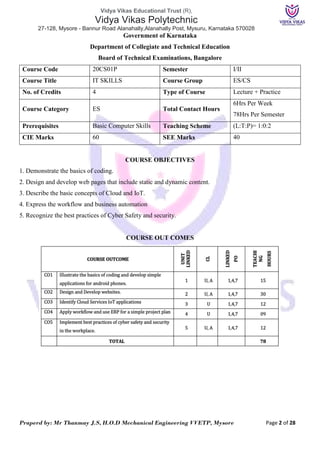
Department of Mechanical Engineering
Laboratory Manual
Subject : IT SKILLS [Common subject]
Subject Code : 20CS01P
Semester : 2nd
Semester
Branch : Mechanical Engineering [General]
Name of the Student: …………………………………………….
Register Number: …………………………………………….
Branch: …………………………………………….](https://image.slidesharecdn.com/itskilllabmanual20cs01p-220503145250/85/IT-Skill-Lab-Manual-20CS01P-pdf-1-320.jpg)
![Vidya Vikas Educational Trust (R),
Vidya Vikas Polytechnic
27-128, Mysore - Bannur Road Alanahally,Alanahally Post, Mysuru, Karnataka 570028
Praperd by: Mr Thanmay J.S, H.O.D Mechanical Engineering VVETP, Mysore Page 1 of 28
Department of Mechanical Engineering
Laboratory Manual
Subject : IT SKILLS [Common subject]
Subject Code : 20CS01P
Semester : 2nd
Semester
Branch : Mechanical Engineering [General]
Name of the Student: …………………………………………….
Register Number: …………………………………………….
Branch: …………………………………………….](https://image.slidesharecdn.com/itskilllabmanual20cs01p-220503145250/75/IT-Skill-Lab-Manual-20CS01P-pdf-1-2048.jpg)
![Vidya Vikas Educational Trust (R),
Vidya Vikas Polytechnic
27-128, Mysore - Bannur Road Alanahally,Alanahally Post, Mysuru, Karnataka 570028
Praperd by: Mr Thanmay J.S, H.O.D Mechanical Engineering VVETP, Mysore Page 4 of 28
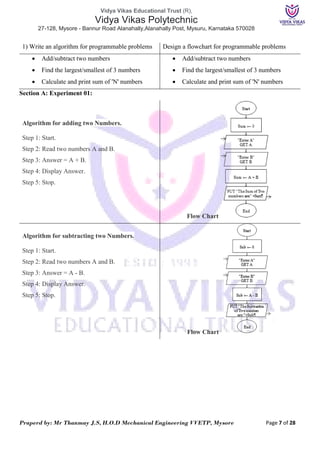
Section A: Using Raptor
Raptor Overview [Download Link: https://raptor.martincarlisle.com/]
Raptor is a simple-to-use problem solving tool that enables the user to generate executable flowcharts. Raptor
was written for students being introduced to the computing discipline in order to develop problem solving
skills and improve algorithmic thinking. The primary window consists of four main areas:
The Symbols area in the upper left presents the 6 primary graphical symbols that can be used in Raptor:
• The assignment symbol is used to give a variable a numeric or string value.
• The call symbol is used to make calls to outside procedures, such as graphics routines.
• The input symbol is used for getting input from the user.
• The output symbol is used to display text to the Master Console.
• The selection structure is used for decision making.
• The loop structure is used for iteration and repetition.
The area immediately below the Symbols area is the Watch Window. This area allows the user to view the
current contents of any ’variables and arrays as the flowchart is executing. The large, white area to the right
is the primary Workspace. Users can build their flowcharts in this area and watch them update as they execute.
The workspace is tabbed. Most flowcharts have a single tab named "main”, but programmer-defined sub charts
appear as tabs in the workspace. The final area is the menu and toolbar. This area allows the user to change
settings and control the view' and execution of individual flowcharts.
Adding Symbols to a Flowchart
To build a flowchart, left click on a symbol in the Symbol Window. Move the mouse to the place in the
flowchart where the symbol belongs. You may need to move the cursor slightly to find an insertion point.
When the cursor is at an insertion point, the cursor will change to . When the left mouse button is
clicked at an insertion point, the selected symbol is added to the existing flowchart at the specified location.](https://image.slidesharecdn.com/itskilllabmanual20cs01p-220503145250/85/IT-Skill-Lab-Manual-20CS01P-pdf-4-320.jpg)

![Vidya Vikas Educational Trust (R),
Vidya Vikas Polytechnic
27-128, Mysore - Bannur Road Alanahally,Alanahally Post, Mysuru, Karnataka 570028
Praperd by: Mr Thanmay J.S, H.O.D Mechanical Engineering VVETP, Mysore Page 10 of 28
Section B: Using Scratch
Scratch Overview: [Download Link: https://scratch.mit.edu/download]
Scratch is a block based programming language that is perfect for making games, animations, interactive
stories and other visually rich programs. Scratch provided a friendly introduction to the kind of creative
problem solving that programmers do all the time. Scratch is easier to use than most other programming
languages for a number of reasons:
• You don’t have to remember or type any commands: they’re all on screen, so you can just drag and drop
them.
• Commands fit together like jigsaw pieces, so there are strong visual hints about how you can combine them.
• Error messages are rare. Because Scratch commands lock together, programs always make some kind of
sense. It is possible to still write programs with logical errors in, if they don’t do what you expected, but
Scratch guides you to write things that work, rather than nagging you when they don’t.
• The commands are color-coded and categorized, so you can easily find a command when you need it.
• The commands in Scratch simplify common activities in games, such as testing whether a missile has hit an
alien (collision detection), or rotating a character on screen.
The main parts of the Scratch screen are:
Stage: This is where you can see your animations and games in action. When Scratch starts, there’s a large
orange cat in the middle of the Stage. In Scratch 2.0, the Stage is on the left, whereas in Scratch 1.4, the Stage
is on the right.
Sprite List: The cat is a ‘sprite’, which is like a character or object in a game. Your project might include lots
of sprites, such as the player’s spaceship, invading aliens and a missile. In the Sprite List, you can see all the
sprites that are in your project, and click them to switch between them. In both versions of Scratch, the Sprite
List is underneath the Stage.](https://image.slidesharecdn.com/itskilllabmanual20cs01p-220503145250/85/IT-Skill-Lab-Manual-20CS01P-pdf-10-320.jpg)
![Vidya Vikas Educational Trust (R),
Vidya Vikas Polytechnic
27-128, Mysore - Bannur Road Alanahally,Alanahally Post, Mysuru, Karnataka 570028
Praperd by: Mr Thanmay J.S, H.O.D Mechanical Engineering VVETP, Mysore Page 12 of 28
Section B: Experiment 01: Design and create simple game using scratch [Jumping Game / Pong Game]
Step 01: Select a spirit of your choice
Step 02: Chose a suitable back ground
Step 03: Make it Jump with sound
Step 04: Make Moving obstacles
Step 05: Make it stop
Stop at Touch Reset if stuck](https://image.slidesharecdn.com/itskilllabmanual20cs01p-220503145250/85/IT-Skill-Lab-Manual-20CS01P-pdf-12-320.jpg)
![Vidya Vikas Educational Trust (R),
Vidya Vikas Polytechnic
27-128, Mysore - Bannur Road Alanahally,Alanahally Post, Mysuru, Karnataka 570028
Praperd by: Mr Thanmay J.S, H.O.D Mechanical Engineering VVETP, Mysore Page 14 of 28
Section C: Webpage Designing
[Hyper Text Markup Language] HTML overview
HTML stands for Hyper Text Markup Language
HTML is the standard markup language for creating Web pages
HTML describes the structure of a Web page
HTML consists of a series of elements
HTML elements tell the browser how to display the content
HTML elements label pieces of content such as "this is a heading", "this is a paragraph", "this is a link",etc.
Structure of HTML
Learn HTML Using Notepad or Text Edit
Web pages can be created and modified by using professional HTML editors.
However, for learning HTML we recommend a simple text editor like Notepad (PC) or TextEdit (Mac).
We believe in that using a simple text editor is a good way to learn HTML.
Follow the steps below to create your first web page with Notepad or TextEdit.
Step 1: Open Notepad (PC)
Windows 8 or later:
Open the Start Screen (the window symbol at the bottom left on your screen). Type Notepad.
Windows 7 or earlier:
Open Start > Programs > Accessories > Notepad
Step 2: Write Some HTML
Write or copy the following HTML code into Notepad:](https://image.slidesharecdn.com/itskilllabmanual20cs01p-220503145250/85/IT-Skill-Lab-Manual-20CS01P-pdf-14-320.jpg)

![Vidya Vikas Educational Trust (R),
Vidya Vikas Polytechnic
27-128, Mysore - Bannur Road Alanahally,Alanahally Post, Mysuru, Karnataka 570028
Praperd by: Mr Thanmay J.S, H.O.D Mechanical Engineering VVETP, Mysore Page 19 of 28
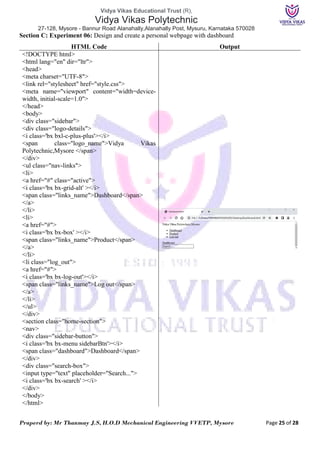
Section C: Experiment 02: Design and create webpage for your wish list (What you want to do). Also list
challenges and opportunities along with images to present your dreams (List ordered and unordered, Image,
table)
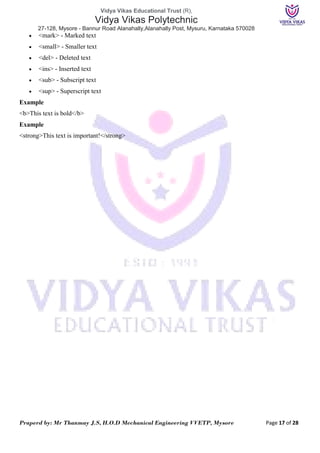
Program in Note Pad [Ordered List] Output in HTML
<!DOCTYPE html>
<html lang="en">
<head>
<title>HTML Ordered List</title>
</head>
<body>
<h2>HTML Ordered List</h2>
<ol>
<li>Fasten your seatbelt</li>
<li>Starts the car's engine</li>
<li>Look around and go</li>
</ol>
<hr>
</body>
</html>
Program in Note Pad [Unordered List] Output in HTML
<!DOCTYPE html>
<html lang="en">
<head>
<title>HTML Unordered List</title>
</head>
<body>
<h2>HTML Unordered List</h2>
<ul>
<li>Chocolate Cake</li>
<li>Black Forest Cake</li>
<li>Pineapple Cake</li>
</ul>
<hr>
</body>
</html>
Program in Note Pad [Inserting Images] Output in HTML
<!DOCTYPE html>
<html>
<body>
<h2>HTML Monkey Image</h2>
<img src="Monkey.jpg" alt="Trulli" width="600"
height="333">
</body>
</html>
Note: A file named “Monkey.jpg” should be in same
location](https://image.slidesharecdn.com/itskilllabmanual20cs01p-220503145250/85/IT-Skill-Lab-Manual-20CS01P-pdf-19-320.jpg)
![Vidya Vikas Educational Trust (R),
Vidya Vikas Polytechnic
27-128, Mysore - Bannur Road Alanahally,Alanahally Post, Mysuru, Karnataka 570028
Praperd by: Mr Thanmay J.S, H.O.D Mechanical Engineering VVETP, Mysore Page 20 of 28
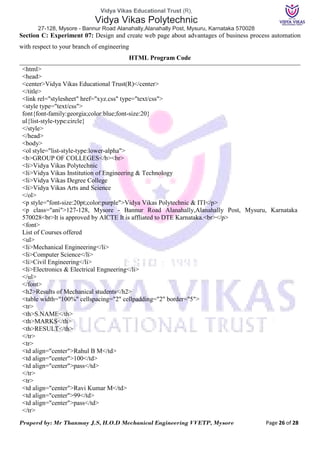
Program in Note Pad [Inserting Table] Output in HTML
<!DOCTYPE html>
<html lang="en">
<head>
<title>HTML Table with Collapsed
Borders</title>
<style>
table {
border-collapse: collapse;
}
table, th, td {
border: 1px solid black;
}
th, td {
padding: 10px;
}
th {
text-align: left;
}
</style>
</head>
<body>
<h2>Table with Collapsed Borders</h2>
<table>
<tr>
<th>No.</th>
<th>Name</th>
<th>Register Number</th>
</tr>
<tr>
<td>1</td>
<td>Rahul B M</td>
<td>456ME21001</td>
</tr>
<tr>
<td>2</td>
<td>Ravikumar M</td>
<td>456ME21002</td>
</tr>
<tr>
<td>3</td>
<td>Vikas Gowda</td>
<td>456ME21004</td>
</tr>
</table>
</body>
</html](https://image.slidesharecdn.com/itskilllabmanual20cs01p-220503145250/85/IT-Skill-Lab-Manual-20CS01P-pdf-20-320.jpg)
![Vidya Vikas Educational Trust (R),
Vidya Vikas Polytechnic
27-128, Mysore - Bannur Road Alanahally,Alanahally Post, Mysuru, Karnataka 570028
Praperd by: Mr Thanmay J.S, H.O.D Mechanical Engineering VVETP, Mysore Page 21 of 28
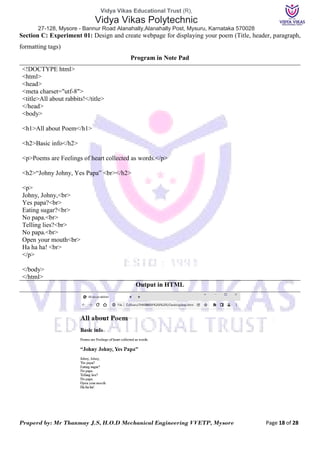
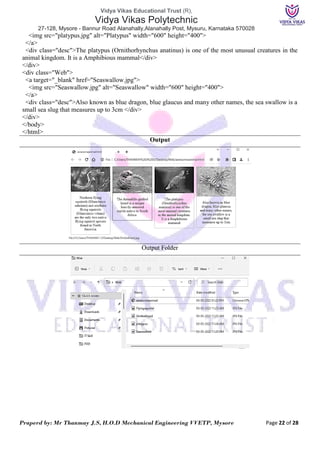
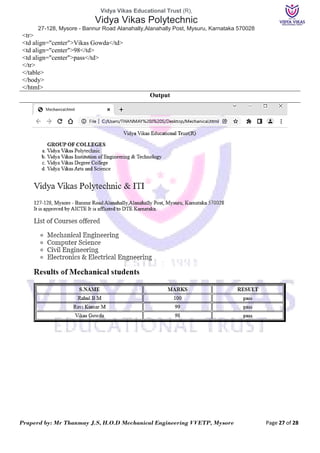
Section C: Experiment 03: Design and create webpage using HTML and CSS [Cascading Style Sheets] about
an awesome animal (Use necessary CSS tags)
Flyingsquirrel.jpg Girdledlizard.jpg platypus.jpg Seaswallow.jpg
HTML and CSS Program
<!DOCTYPE html>
<html>
<head>
<style>
div.Web {
margin: 5px;
border: 1px solid #ccc;
float: left;
width: 180px;
}
div.Web:hover {
border: 1px solid #777;
}
div.Web img {
width: 100%;
height: auto;
}
div.desc {
padding: 15px;
text-align: center;
}
</style>
</head>
<body>
<div class="Web">
<a target="_blank" href="Flyingsquirrel.jpg">
<img src="Flyingsquirrel.jpg" alt="Flyingsquirrel" width="600" height="400">
</a>
<div class="desc">Northern flying squirrels (Glaucomys sabrinus) and southern flying squirrels
(Glaucomys volans) are the only two native flying squirrel species found in North America.</div>
</div>
<div class="Web">
<a target="_blank" href="Girdledlizard.jpg">
<img src="Girdledlizard.jpg" alt="Girdledlizard" width="600" height="400">
</a>
<div class="desc">The Armadillo girdled lizard is a unique heavily-armored reptile native to South
Africa.</div>
</div>
<div class="Web">
<a target="_blank" href="platypus.jpg">](https://image.slidesharecdn.com/itskilllabmanual20cs01p-220503145250/85/IT-Skill-Lab-Manual-20CS01P-pdf-21-320.jpg)
![Vidya Vikas Educational Trust (R),
Vidya Vikas Polytechnic
27-128, Mysore - Bannur Road Alanahally,Alanahally Post, Mysuru, Karnataka 570028
Praperd by: Mr Thanmay J.S, H.O.D Mechanical Engineering VVETP, Mysore Page 23 of 28
Section C: Experiment 04: Design and create web page for a travel book/recipe book with more than 1 pages,
Main Recipe Book HTML[recipe.html] Output
<!DOCTYPE html>
<html lang="en">
<head>
<title>Recipe Book</title>
<meta charset="UTF-8">
<meta name="viewport" content="width=device-
width, initial-scale=1">
<link rel="stylesheet"
href="https://www.w3schools.com/w3css/4/w3.css">
</head>
<body class="w3-content">
<div class="w3-container">
<h1>Recipe</h1>
<p>Table of Contents</p>
<p><a href="Book1.htm">1. Chicken Fry</a></p>
<p>2. Fish Fry</p>
<p>3. Chicken Kabab</p>
<p>4. Biryani</p>
<p>5. Chicken Chilly Chops</p>
</div>
</body>
</html>
Page 01 extension [Book1.htm] Output
<!DOCTYPE html>
<html lang="en">
<head>
<body class="w3-content">
<div class="w3-container">
<h1>1. Chicken Fry</h1>
<h3>Items Required.</h3>
<ul>
<li>Chicken 1 kg</li>
<li>Chicken Fry Masala</li>
<li>Onion</li>
<li>Ginger garlic paste</li>
<li>Cooking oil</li>
<li>Pan</li>
</ul>
<p>Cooking Method:</p>
<ul>
<li>Ask the Chicken which Masala it needs?</li>
<li>Dont cry while cutting Onion</li>
<li>Dont eat Too much</li>
<li>check your weight after eating</li>
<li>See Doctor if there is any stomach upset</li>
</ul>
</div>
</body>
</html>](https://image.slidesharecdn.com/itskilllabmanual20cs01p-220503145250/85/IT-Skill-Lab-Manual-20CS01P-pdf-23-320.jpg)


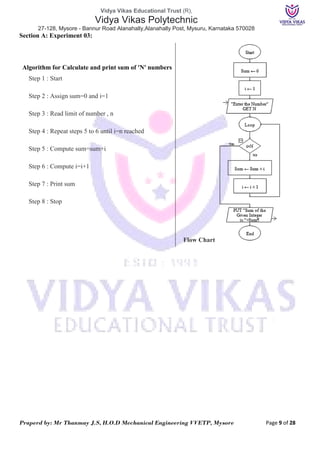
The document is a laboratory manual for an IT skills course in the Mechanical Engineering department of Vidya Vikas Polytechnic, covering basics of coding, web page design, and concepts of cloud and IoT. It includes practical exercises using Raptor and Scratch for algorithm development and game creation, as well as guidelines for designing web pages. Key course objectives include coding fundamentals, workflow automation, and cyber safety best practices.