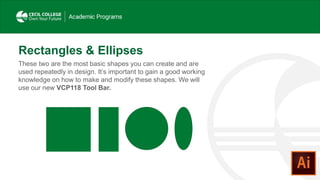
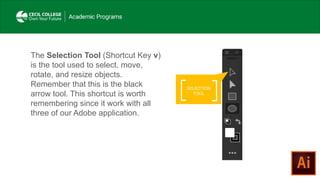
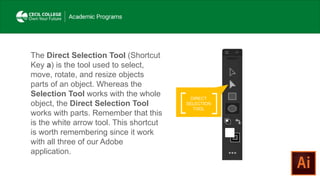
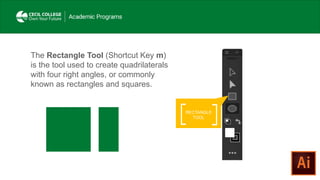
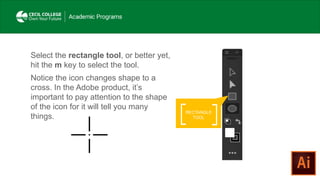
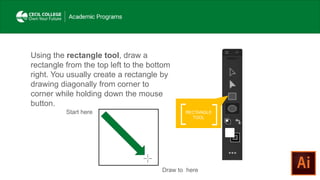
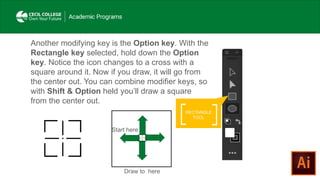
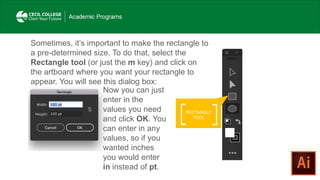
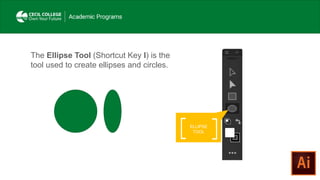
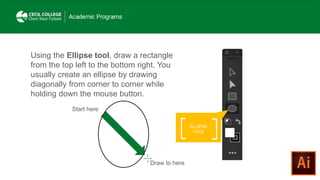
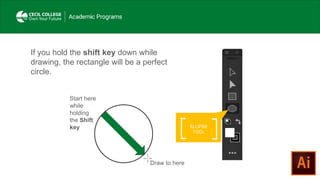
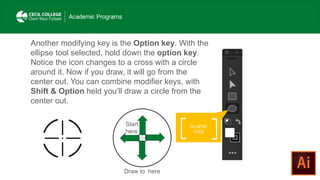
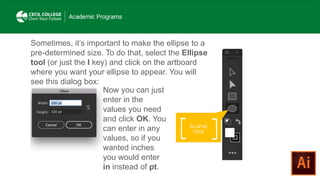
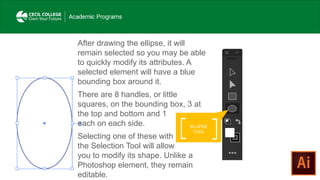
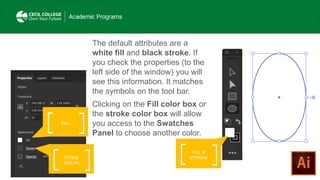
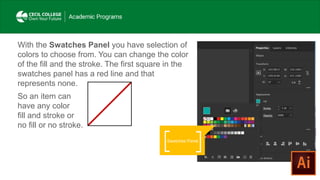
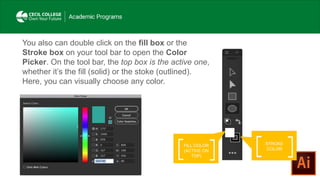
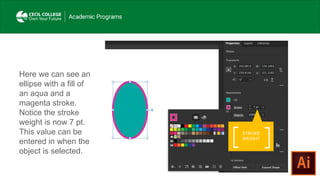
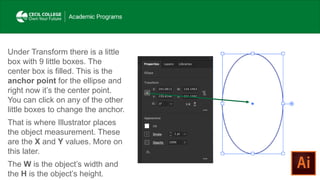
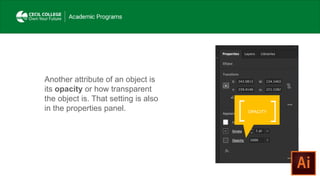
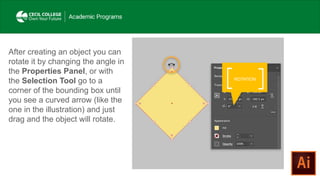
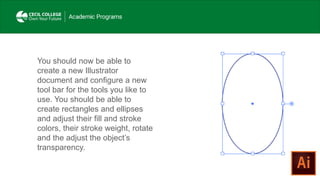
The document discusses the basic shapes tool in Illustrator - the rectangle and ellipse tools. It explains how to create rectangles and ellipses using these tools, and how to modify the shapes by using modifier keys to draw perfect squares and circles. It also discusses how to set the size, change colors, adjust stroke weight and opacity, rotate objects, and select and modify anchor points and dimensions. The overall focus is on learning the basic functions of the rectangle and ellipse tools to create and modify simple shapes in Illustrator.
Adobe Illustrator: 6 Essential Tips and ToolsNguyet Minh
Adobe Illustrator allows full control and editing of an artwork. Since it is so customizable, many potentials of what you can do with just simple tools are not so obvious. Let's go through the 6 tools in Illustrator you might not know.
Adobe Illustrator CS6 was used to demonstrate.
This presentation outlines the difference between vectors and bitmaps and how to use the pen tool to create a vector Illustration.
Learn more about this lesson including VIDEO TUTORIALS at DigitalArtTeacher.com
toolbars and axis , how to import file from autocad to sketchup , basic tools of sketchup , how to extrude walls , how to make a window (quick way ) , how to see dimensions, commands - position camera, walk and look around. All this can be learned in this presentation. A guide for beginners.
How to Make a Web 2.0 Play Button in Adobe Illustrator CS6ZillionDesigns
Check out our extremely easy step-by-step guide to making a Play Button in Adobe Illustrator. We promise our guide helps you learn how to create 3D buttons without a design generator no matter what their shape. Visit our blog for more tips and tutorials. http//www.zilliondesigns.com/blog
Corel Draw Beginner Tutorial: How to Make a New Product FlyerFlyer Tutor
Recreate this New Product Flyer while learning how to use the Corel Draw Interface with this step by step illustrated tutorial. Perform document setup, delete nodes, mirror image, convert to bitmap, gaussian blur, gradient, text on a path, crop images, fountain fill, line spacing and more.
Introduction to Adobe Illustrator Basics. Adobe Illustrator lessons (high school level). Explains the difference between bitmap and jpeg. Explains the uses of Adobe Illustrator in the Graphic Design market.
Transforming Brand Perception and Boosting Profitabilityaaryangarg12
In today's digital era, the dynamics of brand perception, consumer behavior, and profitability have been profoundly reshaped by the synergy of branding, social media, and website design. This research paper investigates the transformative power of these elements in influencing how individuals perceive brands and products and how this transformation can be harnessed to drive sales and profitability for businesses.
Through an exploration of brand psychology and consumer behavior, this study sheds light on the intricate ways in which effective branding strategies, strategic social media engagement, and user-centric website design contribute to altering consumers' perceptions. We delve into the principles that underlie successful brand transformations, examining how visual identity, messaging, and storytelling can captivate and resonate with target audiences.
Methodologically, this research employs a comprehensive approach, combining qualitative and quantitative analyses. Real-world case studies illustrate the impact of branding, social media campaigns, and website redesigns on consumer perception, sales figures, and profitability. We assess the various metrics, including brand awareness, customer engagement, conversion rates, and revenue growth, to measure the effectiveness of these strategies.
The results underscore the pivotal role of cohesive branding, social media influence, and website usability in shaping positive brand perceptions, influencing consumer decisions, and ultimately bolstering sales and profitability. This paper provides actionable insights and strategic recommendations for businesses seeking to leverage branding, social media, and website design as potent tools to enhance their market position and financial success.
Dive into the innovative world of smart garages with our insightful presentation, "Exploring the Future of Smart Garages." This comprehensive guide covers the latest advancements in garage technology, including automated systems, smart security features, energy efficiency solutions, and seamless integration with smart home ecosystems. Learn how these technologies are transforming traditional garages into high-tech, efficient spaces that enhance convenience, safety, and sustainability.
Ideal for homeowners, tech enthusiasts, and industry professionals, this presentation provides valuable insights into the trends, benefits, and future developments in smart garage technology. Stay ahead of the curve with our expert analysis and practical tips on implementing smart garage solutions.
Expert Accessory Dwelling Unit (ADU) Drafting ServicesResDraft
Whether you’re looking to create a guest house, a rental unit, or a private retreat, our experienced team will design a space that complements your existing home and maximizes your investment. We provide personalized, comprehensive expert accessory dwelling unit (ADU)drafting solutions tailored to your needs, ensuring a seamless process from concept to completion.
Between Filth and Fortune- Urban Cattle Foraging Realities by Devi S Nair, An...Mansi Shah
This study examines cattle rearing in urban and rural settings, focusing on milk production and consumption. By exploring a case in Ahmedabad, it highlights the challenges and processes in dairy farming across different environments, emphasising the need for sustainable practices and the essential role of milk in daily consumption.
You could be a professional graphic designer and still make mistakes. There is always the possibility of human error. On the other hand if you’re not a designer, the chances of making some common graphic design mistakes are even higher. Because you don’t know what you don’t know. That’s where this blog comes in. To make your job easier and help you create better designs, we have put together a list of common graphic design mistakes that you need to avoid.
2. Rectangles & Ellipses
These two are the most basic shapes you can create and are
used repeatedly in design. It’s important to gain a good working
knowledge on how to make and modify these shapes. We will
use our new VCP118 Tool Bar.
3. SELECTION
TOOL
The Selection Tool (Shortcut Key v)
is the tool used to select, move,
rotate, and resize objects.
Remember that this is the black
arrow tool. This shortcut is worth
remembering since it work with all
three of our Adobe application.
4. DIRECT
SELECTION
TOOL
The Direct Selection Tool (Shortcut
Key a) is the tool used to select,
move, rotate, and resize objects
parts of an object. Whereas the
Selection Tool works with the whole
object, the Direct Selection Tool
works with parts. Remember that this
is the white arrow tool. This shortcut
is worth remembering since it work
with all three of our Adobe
application.
5. RECTANGLE
TOOL
The Rectangle Tool (Shortcut Key m)
is the tool used to create quadrilaterals
with four right angles, or commonly
known as rectangles and squares.
6. RECTANGLE
TOOL
Select the rectangle tool, or better yet,
hit the m key to select the tool.
Notice the icon changes shape to a
cross. In the Adobe product, it’s
important to pay attention to the shape
of the icon for it will tell you many
things.
7. RECTANGLE
TOOL
Using the rectangle tool, draw a
rectangle from the top left to the bottom
right. You usually create a rectangle by
drawing diagonally from corner to
corner while holding down the mouse
button.
Start here
Draw to here
8. RECTANGLE
TOOL
If you hold the shift key down (this is
known as a modifier key) while drawing,
the rectangle will be a perfect square.
May also notice small number next to
the cursor, this is a feedback on the
cursor.
Start here
while
holding
the Shift
key
Draw to here
9. RECTANGLE
TOOL
Another modifying key is the Option key. With the
Rectangle key selected, hold down the Option
key. Notice the icon changes to a cross with a
square around it. Now if you draw, it will go from
the center out. You can combine modifier keys, so
with Shift & Option held you’ll draw a square
from the center out.
Start here
Draw to here
10. RECTANGLE
TOOL
Sometimes, it’s important to make the rectangle to
a pre-determined size. To do that, select the
Rectangle tool (or just the m key) and click on
the artboard where you want your rectangle to
appear. You will see this dialog box:
Now you can just
enter in the
values you need
and click OK. You
can enter in any
values, so if you
wanted inches
you would enter
in instead of pt.
12. Select the ellipse tool, or better yet, hit
the l key to select the tool.
Notice the icon changes shape to a
cross like before with the rectangle tool.
ELLIPSE
TOOL
13. Using the Ellipse tool, draw a rectangle
from the top left to the bottom right. You
usually create an ellipse by drawing
diagonally from corner to corner while
holding down the mouse button.
Start here
ELLIPSE
TOOL
Draw to here
14. If you hold the shift key down while
drawing, the rectangle will be a perfect
circle.
Start here
while
holding
the Shift
key
Draw to here
ELLIPSE
TOOL
15. Another modifying key is the Option key. With the
ellipse tool selected, hold down the option key.
Notice the icon changes to a cross with a circle
around it. Now if you draw, it will go from the
center out. You can combine modifier keys, with
Shift & Option held you’ll draw a circle from the
center out.
Start
here
Draw to here
ELLIPSE
TOOL
16. Sometimes, it’s important to make the ellipse to a
pre-determined size. To do that, select the Ellipse
tool (or just the l key) and click on the artboard
where you want your ellipse to appear. You will
see this dialog box:
Now you can just
enter in the
values you need
and click OK. You
can enter in any
values, so if you
wanted inches
you would enter
in instead of pt.
ELLIPSE
TOOL
17. After drawing the ellipse, it will
remain selected so you may be able
to quickly modify its attributes. A
selected element will have a blue
bounding box around it.
There are 8 handles, or little
squares, on the bounding box, 3 at
the top and bottom and 1
each on each side.
Selecting one of these with
the Selection Tool will allow
you to modify its shape. Unlike a
Photoshop element, they remain
editable.
ELLIPSE
TOOL
18. The default attributes are a
white fill and black stroke. If
you check the properties (to the
left side of the window) you will
see this information. It matches
the symbols on the tool bar.
Clicking on the Fill color box or
the stroke color box will allow
you access to the Swatches
Panel to choose another color.
FILL &
STROKE
FILL
STOKE
COLOR
19. With the Swatches Panel you have selection of
colors to choose from. You can change the color
of the fill and the stroke. The first square in the
swatches panel has a red line and that
represents none.
So an item can
have any color
fill and stroke or
no fill or no stroke.
Swatches Panel
20. You also can double click on the fill box or the
Stroke box on your tool bar to open the Color
Picker. On the tool bar, the top box is the active one,
whether it’s the fill (solid) or the stoke (outlined).
Here, you can visually choose any color.
FILL COLOR
(ACTIVE ON
TOP)
STROKE
COLOR
21. Here we can see an
ellipse with a fill of
an aqua and a
magenta stroke.
Notice the stroke
weight is now 7 pt.
This value can be
entered in when the
object is selected.
STROKE
WEIGHT
22. Under Transform there is a little
box with 9 little boxes. The
center box is filled. This is the
anchor point for the ellipse and
right now it’s the center point.
You can click on any of the other
little boxes to change the anchor.
That is where Illustrator places
the object measurement. These
are the X and Y values. More on
this later.
The W is the object’s width and
the H is the object’s height.
23. Another attribute of an object is
its opacity or how transparent
the object is. That setting is also
in the properties panel. OPACITY
24. After creating an object you can
rotate it by changing the angle in
the Properties Panel, or with
the Selection Tool go to a
corner of the bounding box until
you see a curved arrow (like the
one in the illustration) and just
drag and the object will rotate.
ROTATION
25. You should now be able to
create a new Illustrator
document and configure a new
tool bar for the tools you like to
use. You should be able to
create rectangles and ellipses
and adjust their fill and stroke
colors, their stroke weight, rotate
and the adjust the object’s
transparency.