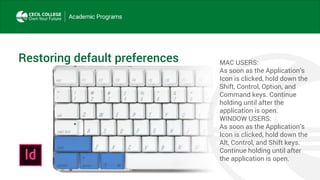
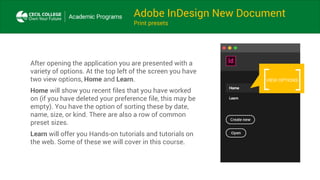
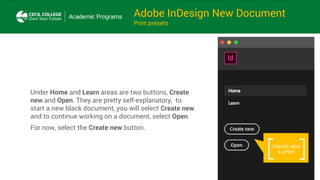
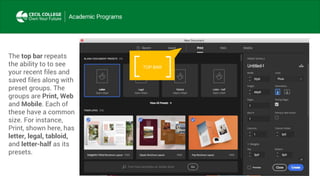
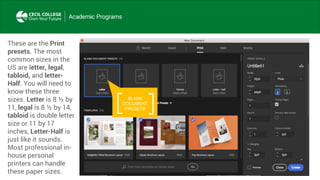
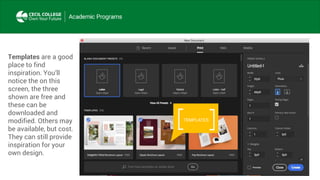
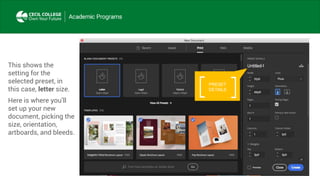
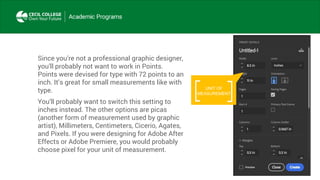
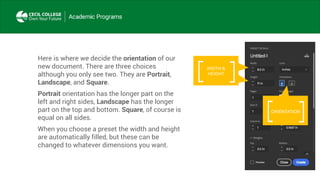
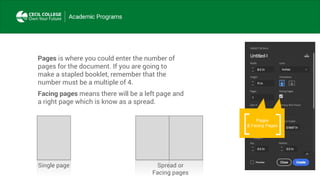
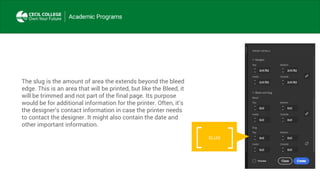
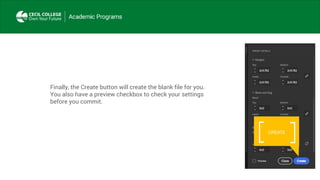
Creating a new file
InDesign
InDesign document
creation
Overview
Restoring default preferences
The preference fire controls how command settings appear on your
screen when you open Adobe InDesign program. Each time you quit
Adobe InDesign the position of panels and certain command settings
are recorded in difference preference files. If you want to restore the
tools and settings to their original default settings, you will need to
delete the preference file. Adobe InDesign will create a new one the
next time you start the program and save.
Restoring default preferences MAC USERS:
As soon as the Application’s
Icon is clicked, hold down the
Shift, Control, Option, and
Command keys. Continue
holding until after the
application is open.
WINDOW USERS:
As soon as the Application’s
Icon is clicked, hold down the
Alt, Control, and Shift keys.
Continue holding until after
the application is open.
Adobe InDesign New Document
Print presets
After opening the application you are presented with a
variety of options. At the top left of the screen you have
two view options, Home and Learn.
Home will show you recent files that you have worked
on (if you have deleted your preference file, this may be
empty). You have the option of sorting these by date,
name, size, or kind. There are also a row of common
preset sizes.
Learn will offer you Hands-on tutorials and tutorials on
the web. Some of these we will cover in this course.
VIEW OPTIONS
Adobe InDesign New Document
Print presets
Under Home and Learn areas are two buttons, Create
new and Open. They are pretty self-explanatory, to
start a new black document, you will select Create new
and to continue working on a document, select Open.
For now, select the Create new button.
CREATE NEW
& OPEN
TOP BARYou should see a
screen similar to this.
The Template area
might be different
since this is updated
regularly. There are 4
major areas, the top
bar, the Blank
Document Presents,
Templates, and on the
far right, Present
Details.
BLANK
DOCUMENT
PRESETS
TEMPLATES
PRESET
DETAILS
TOP BAR
The top bar repeats
the ability to to see
your recent files and
saved files along with
preset groups. The
groups are Print, Web
and Mobile. Each of
these have a common
size. For instance,
Print, shown here, has
letter, legal, tabloid,
and letter-half as its
presets.
These are the Print
presets. The most
common sizes in the
US are letter, legal,
tabloid, and letter-
Half. You will need to
know these three
sizes. Letter is 8 ½ by
11, legal is 8 ½ by 14,
tabloid is double letter
size or 11 by 17
inches, Letter-Half is
just like it sounds.
Most professional in-
house personal
printers can handle
these paper sizes.
BLANK
DOCUMENT
PRESETS
Templates are a good
place to find
inspiration. You’ll
notice the on this
screen, the three
shown are free and
these can be
downloaded and
modified. Others may
be available, but cost.
They can still provide
inspiration for your
own design.
TEMPLATES
This shows the
setting for the
selected preset, in
this case, letter size.
Here is where you’ll
set up your new
document, picking the
size, orientation,
artboards, and bleeds.
PRESET
DETAILS
Since you’re not a professional graphic designer,
you’ll probably not want to work in Points.
Points were devised for type with 72 points to an
inch. It’s great for small measurements like with
type.
You’ll probably want to switch this setting to
inches instead. The other options are picas
(another form of measurement used by graphic
artist), Millimeters, Centimeters, Cicerio, Agates,
and Pixels. If you were designing for Adobe After
Effects or Adobe Premiere, you would probably
choose pixel for your unit of measurement.
UNIT OF
MEASUREMENT
Here is where we decide the orientation of our
new document. There are three choices
although you only see two. They are Portrait,
Landscape, and Square.
Portrait orientation has the longer part on the
left and right sides, Landscape has the longer
part on the top and bottom. Square, of course is
equal on all sides.
When you choose a preset the width and height
are automatically filled, but these can be
changed to whatever dimensions you want.
ORIENTATION
WIDTH &
HEIGHT
Pages is where you could enter the number of
pages for the document. If you are going to
make a stapled booklet, remember that the
number must be a multiple of 4.
Facing pages means there will be a left page and
a right page which is know as a spread.
Pages
& Facing Pages
Single page Spread or
Facing pages
Start is requesting what page number will this
document start at. It doesn’t have to be 1, but any
number. Later, when making a book, you might want to
do chapters which will start in the middle of the book
and not at page 1.
Primary Text Frame is asking if you want a text frame
on the document. This is where the text will reside, and
can always be added or changed later.
START &
PRIMARY TEXT
FRAME
Your document can have multiple Columns per page,
and you would set that number here. The Column
Gutter is the space in between the columns. All of
these setting can be modified or changed later once
the document is opened.
COLUMN &
COLUMN
GUTTER
Margins are the areas between the edge of the page and the
text box on the page. They can be equal on or four sides, or
different. The linked chain icon on the right means if you
change on value, they will all change. Click on the chain icon
to provide different values in each box.
On a Page it will be Top, Bottom, Left, and Right. On a Spread
(like this) it will read Top, Bottom, Inside, and Outside.
MARGINS
The bleed is the amount of area the extends beyond the
document edge. It's difficult for printing equipment to apply
ink up to the cut edge of a sheet of paper. So an extra .125"
(3mm) margin is typically added on each side of the design,
enabling the background color, graphic, or image to extend
past (i.e., "bleed off") the paper's final trim edge. This extra
bleed area will be cut off the printed sheet.
BLEED
The illustration on the left shows a page printed with bleed, before
trimming. will be 8.75" x 11.25" before being trimmed to a finished size of
8.5" x 11". The illustration on the left shows a page printed with bleed,
before trimming. When trimmed, the finished piece will have color or
graphic content extending to the finished, cut edge on all four sides. The
illustration on the right shows a page designed without any bleed. When
trimmed, the finished piece will have an unprinted border on all four
sides.
The slug is the amount of area the extends beyond the bleed
edge. This is an area that will be printed, but like the Bleed, it
will be trimmed and not part of the final page. Its purpose
would be for additional information for the printer. Often, it’s
the designer’s contact information in case the printer needs
to contact the designer. It might also contain the date and
other important information.
SLUG
Finally, the Create button will create the blank file for you.
You also have a preview checkbox to check your settings
before you commit.
CREATE

Creating an in InDesign document

  • 1.
    Creating a newfile InDesign
  • 2.
  • 3.
    Restoring default preferences Thepreference fire controls how command settings appear on your screen when you open Adobe InDesign program. Each time you quit Adobe InDesign the position of panels and certain command settings are recorded in difference preference files. If you want to restore the tools and settings to their original default settings, you will need to delete the preference file. Adobe InDesign will create a new one the next time you start the program and save.
  • 4.
    Restoring default preferencesMAC USERS: As soon as the Application’s Icon is clicked, hold down the Shift, Control, Option, and Command keys. Continue holding until after the application is open. WINDOW USERS: As soon as the Application’s Icon is clicked, hold down the Alt, Control, and Shift keys. Continue holding until after the application is open.
  • 5.
    Adobe InDesign NewDocument Print presets After opening the application you are presented with a variety of options. At the top left of the screen you have two view options, Home and Learn. Home will show you recent files that you have worked on (if you have deleted your preference file, this may be empty). You have the option of sorting these by date, name, size, or kind. There are also a row of common preset sizes. Learn will offer you Hands-on tutorials and tutorials on the web. Some of these we will cover in this course. VIEW OPTIONS
  • 6.
    Adobe InDesign NewDocument Print presets Under Home and Learn areas are two buttons, Create new and Open. They are pretty self-explanatory, to start a new black document, you will select Create new and to continue working on a document, select Open. For now, select the Create new button. CREATE NEW & OPEN
  • 7.
    TOP BARYou shouldsee a screen similar to this. The Template area might be different since this is updated regularly. There are 4 major areas, the top bar, the Blank Document Presents, Templates, and on the far right, Present Details. BLANK DOCUMENT PRESETS TEMPLATES PRESET DETAILS
  • 8.
    TOP BAR The topbar repeats the ability to to see your recent files and saved files along with preset groups. The groups are Print, Web and Mobile. Each of these have a common size. For instance, Print, shown here, has letter, legal, tabloid, and letter-half as its presets.
  • 9.
    These are thePrint presets. The most common sizes in the US are letter, legal, tabloid, and letter- Half. You will need to know these three sizes. Letter is 8 ½ by 11, legal is 8 ½ by 14, tabloid is double letter size or 11 by 17 inches, Letter-Half is just like it sounds. Most professional in- house personal printers can handle these paper sizes. BLANK DOCUMENT PRESETS
  • 10.
    Templates are agood place to find inspiration. You’ll notice the on this screen, the three shown are free and these can be downloaded and modified. Others may be available, but cost. They can still provide inspiration for your own design. TEMPLATES
  • 11.
    This shows the settingfor the selected preset, in this case, letter size. Here is where you’ll set up your new document, picking the size, orientation, artboards, and bleeds. PRESET DETAILS
  • 12.
    Since you’re nota professional graphic designer, you’ll probably not want to work in Points. Points were devised for type with 72 points to an inch. It’s great for small measurements like with type. You’ll probably want to switch this setting to inches instead. The other options are picas (another form of measurement used by graphic artist), Millimeters, Centimeters, Cicerio, Agates, and Pixels. If you were designing for Adobe After Effects or Adobe Premiere, you would probably choose pixel for your unit of measurement. UNIT OF MEASUREMENT
  • 13.
    Here is wherewe decide the orientation of our new document. There are three choices although you only see two. They are Portrait, Landscape, and Square. Portrait orientation has the longer part on the left and right sides, Landscape has the longer part on the top and bottom. Square, of course is equal on all sides. When you choose a preset the width and height are automatically filled, but these can be changed to whatever dimensions you want. ORIENTATION WIDTH & HEIGHT
  • 14.
    Pages is whereyou could enter the number of pages for the document. If you are going to make a stapled booklet, remember that the number must be a multiple of 4. Facing pages means there will be a left page and a right page which is know as a spread. Pages & Facing Pages Single page Spread or Facing pages
  • 15.
    Start is requestingwhat page number will this document start at. It doesn’t have to be 1, but any number. Later, when making a book, you might want to do chapters which will start in the middle of the book and not at page 1. Primary Text Frame is asking if you want a text frame on the document. This is where the text will reside, and can always be added or changed later. START & PRIMARY TEXT FRAME
  • 16.
    Your document canhave multiple Columns per page, and you would set that number here. The Column Gutter is the space in between the columns. All of these setting can be modified or changed later once the document is opened. COLUMN & COLUMN GUTTER
  • 17.
    Margins are theareas between the edge of the page and the text box on the page. They can be equal on or four sides, or different. The linked chain icon on the right means if you change on value, they will all change. Click on the chain icon to provide different values in each box. On a Page it will be Top, Bottom, Left, and Right. On a Spread (like this) it will read Top, Bottom, Inside, and Outside. MARGINS
  • 18.
    The bleed isthe amount of area the extends beyond the document edge. It's difficult for printing equipment to apply ink up to the cut edge of a sheet of paper. So an extra .125" (3mm) margin is typically added on each side of the design, enabling the background color, graphic, or image to extend past (i.e., "bleed off") the paper's final trim edge. This extra bleed area will be cut off the printed sheet. BLEED The illustration on the left shows a page printed with bleed, before trimming. will be 8.75" x 11.25" before being trimmed to a finished size of 8.5" x 11". The illustration on the left shows a page printed with bleed, before trimming. When trimmed, the finished piece will have color or graphic content extending to the finished, cut edge on all four sides. The illustration on the right shows a page designed without any bleed. When trimmed, the finished piece will have an unprinted border on all four sides.
  • 19.
    The slug isthe amount of area the extends beyond the bleed edge. This is an area that will be printed, but like the Bleed, it will be trimmed and not part of the final page. Its purpose would be for additional information for the printer. Often, it’s the designer’s contact information in case the printer needs to contact the designer. It might also contain the date and other important information. SLUG
  • 20.
    Finally, the Createbutton will create the blank file for you. You also have a preview checkbox to check your settings before you commit. CREATE