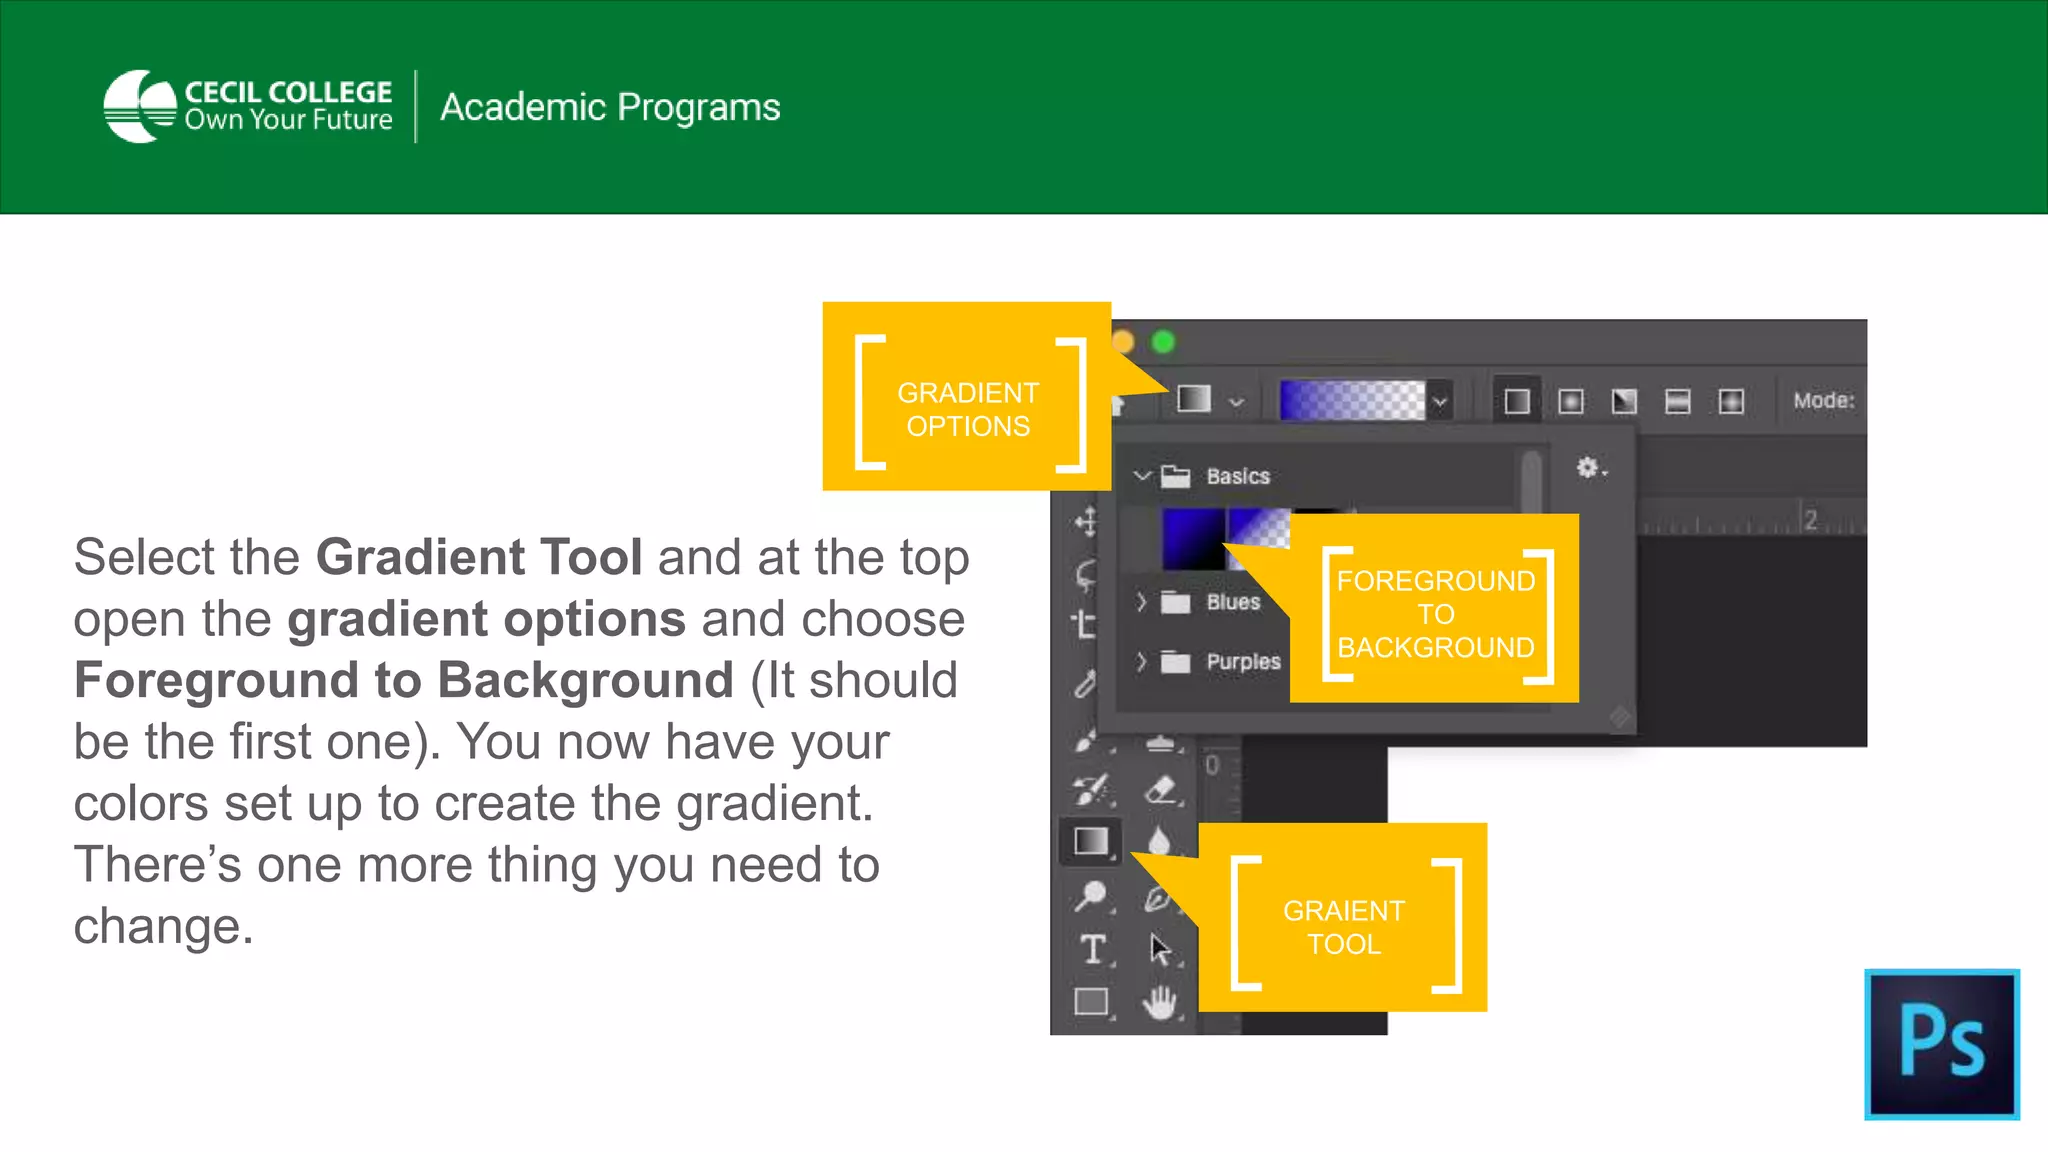
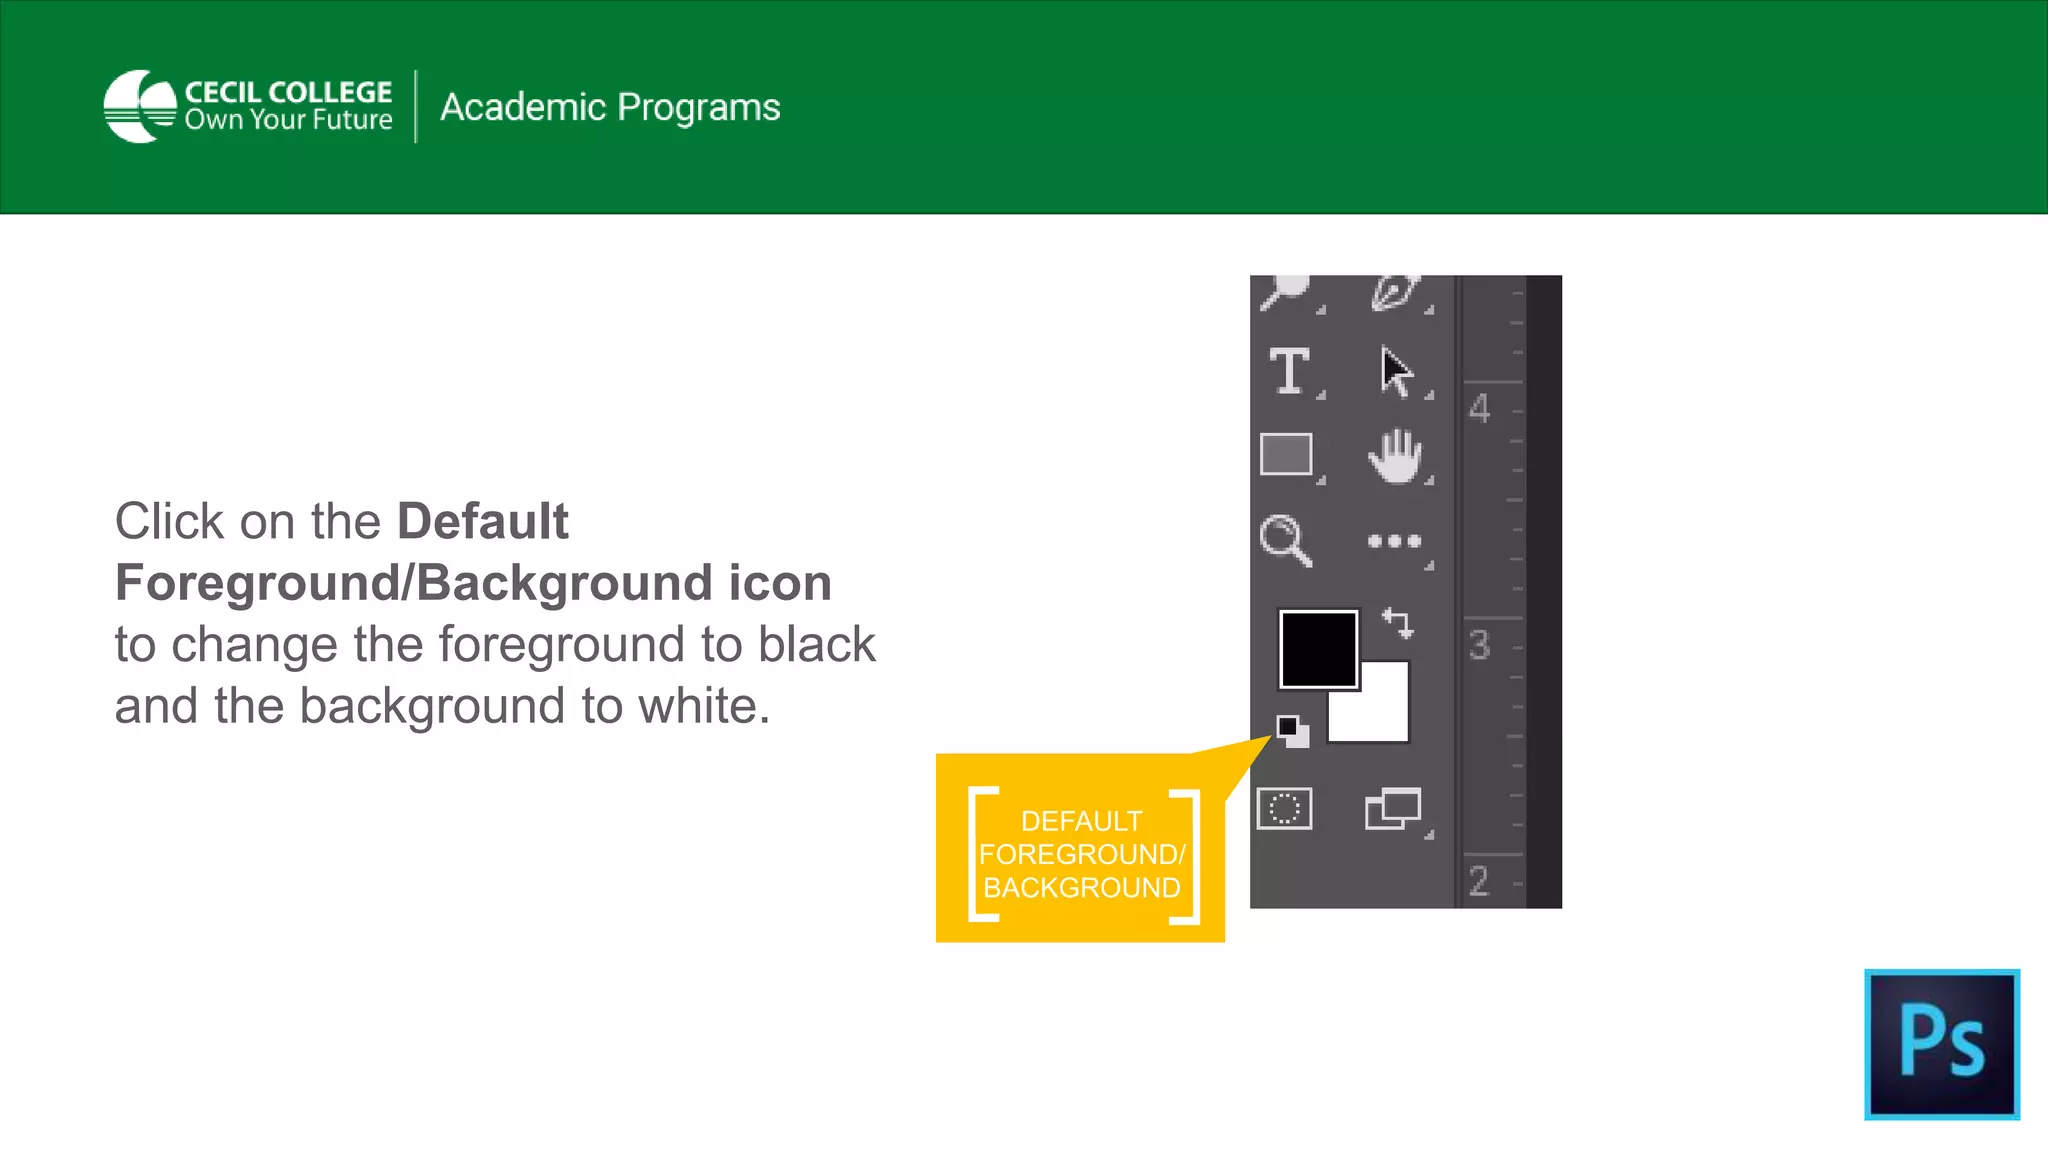
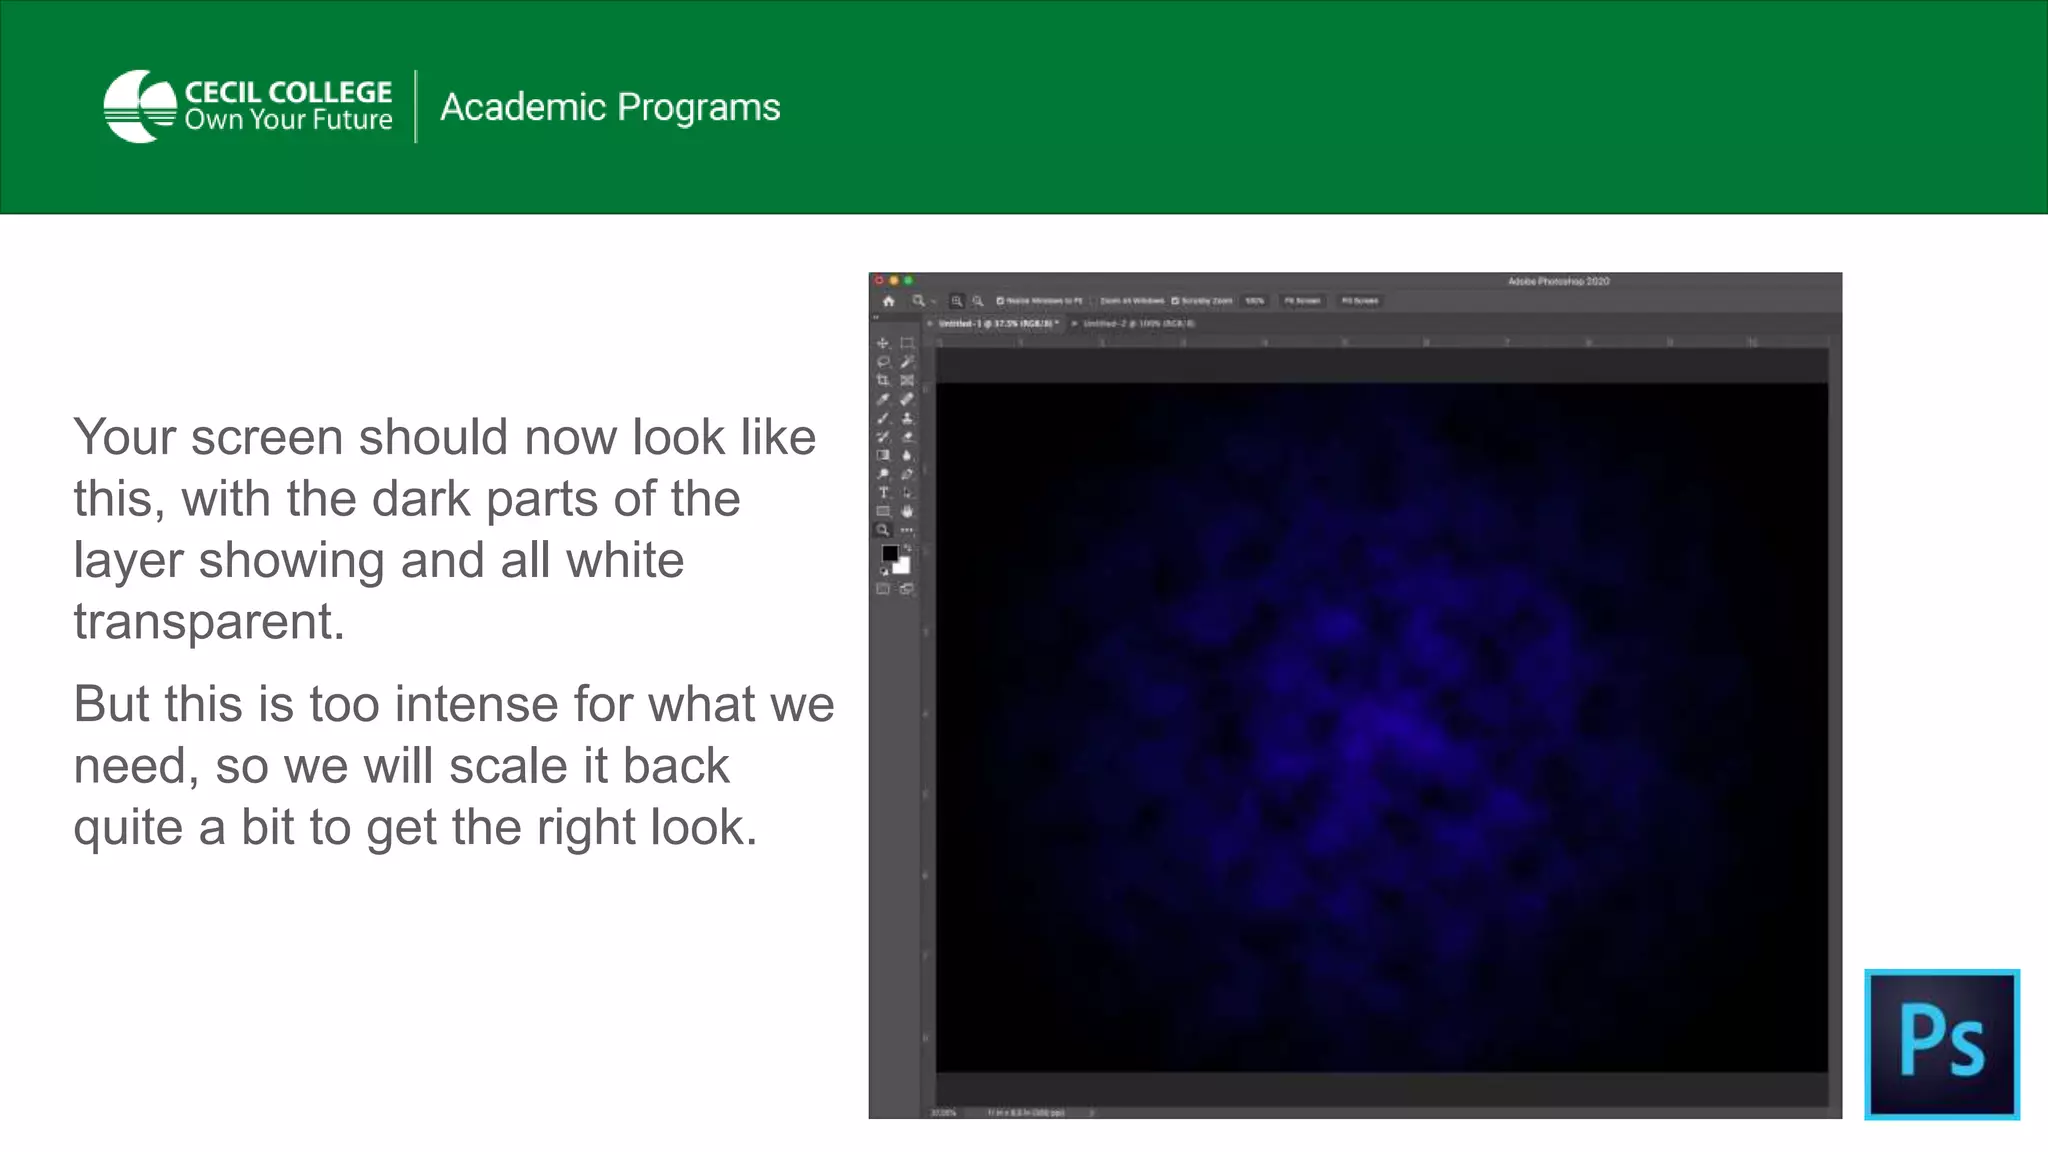
This document provides instructions for creating a gradient background in Photoshop using the gradient tool. It describes setting the foreground and background colors to dark blue and black. A radial gradient is dragged from the center to the right edge of the document. A new layer is filled with white and the Clouds filter is applied, then the layer mode is set to Multiply. Finally, noise is added at 20% to soften the artificial look of the background.
This is a step-by-step guide to producing a magazine cover with a variety of effects designed to give students an overview of filters and blending options. All the assets are included and there is also a link to the completed .psd file. Please also see my Simple Magazine Cover Photoshop tutorial. Adapted from a tutorial I found online.
Easy to Follow PhotoShop Magazine Tutorialmrballantyne
This resource contains a step by step guide on how to produce a simple magazine cover in Photoshop. Assets are included on tes at http://www.tes.co.uk/teaching-resource/Simple-Magazine-Cover-PhotoShop-Tutorial-6446607/ as are ideas for extension activities. Note that this requires some knowledge of Photoshop before teaching! Please also see my advanced magazine tutorial.
Graphics Experts Ltd is the right solution for all of your graphic design needs. We offer affordable, professional services that encompass everything from image masking, shadow creation, web image optimization, and clipping path to image manipulation, image retouching, color adjustments, photo editing, vehicle enhancement, and even illustration.
Photo retouching tips and tricks in photoshopRemon Mia
If you want to redefine the foreground and background colors, use the Eyedropper tool to select the foreground color, and then switch the position with the background color, maybe by using the shortcut X, and pick up the next color. But there is an easier way. First, define the foreground color just as you’re accustomed to, but then define the background color by holding the Alt/Option key. Instead of changing the foreground color, you’ll redefine the background color with just one click.
https://goo.gl/pwqYM7
How to Turn a Picture Into a Line Drawing in PhotoshopZenith Clipping
To transform a photograph into a line drawing in Photoshop, you don’t need it to appear as though you did it in Photoshop, you’ll need to focus on detail and set up your picture appropriately before you apply any channels.
Can AI do good? at 'offtheCanvas' India HCI preludeAlan Dix
Invited talk at 'offtheCanvas' IndiaHCI prelude, 29th June 2024.
https://www.alandix.com/academic/talks/offtheCanvas-IndiaHCI2024/
The world is being changed fundamentally by AI and we are constantly faced with newspaper headlines about its harmful effects. However, there is also the potential to both ameliorate theses harms and use the new abilities of AI to transform society for the good. Can you make the difference?
Expert Accessory Dwelling Unit (ADU) Drafting ServicesResDraft
Whether you’re looking to create a guest house, a rental unit, or a private retreat, our experienced team will design a space that complements your existing home and maximizes your investment. We provide personalized, comprehensive expert accessory dwelling unit (ADU)drafting solutions tailored to your needs, ensuring a seamless process from concept to completion.
7 Alternatives to Bullet Points in PowerPointAlvis Oh
So you tried all the ways to beautify your bullet points on your pitch deck but it just got way uglier. These points are supposed to be memorable and leave a lasting impression on your audience. With these tips, you'll no longer have to spend so much time thinking how you should present your pointers.
Book Formatting: Quality Control Checks for DesignersConfidence Ago
This presentation was made to help designers who work in publishing houses or format books for printing ensure quality.
Quality control is vital to every industry. This is why every department in a company need create a method they use in ensuring quality. This, perhaps, will not only improve the quality of products and bring errors to the barest minimum, but take it to a near perfect finish.
It is beyond a moot point that a good book will somewhat be judged by its cover, but the content of the book remains king. No matter how beautiful the cover, if the quality of writing or presentation is off, that will be a reason for readers not to come back to the book or recommend it.
So, this presentation points designers to some important things that may be missed by an editor that they could eventually discover and call the attention of the editor.
2. Backgrounds
When you design in Photoshop, you have a lot of raster
tools to work with. Often the sight of a completely white
screen tends to intimidate most students. We will create
a very simple background using the gradient tool and
bend a soft pattern into it.
4. COLOR
SETTINGS
After your document is open double
click on the foreground color
swatch and change it to a dark blue
as shown.
FOREGROUND
COLOR
SWATCH
5. DRAG TO
HERE
Now, change the background color
swatch to black. You can do this
quickly by dragging to the lower left
corner of the gradated color box.
BACKGROUND
COLOR
SWATCH
Drag down
6. Select the Gradient Tool and at the top
open the gradient options and choose
Foreground to Background (It should
be the first one). You now have your
colors set up to create the gradient.
There’s one more thing you need to
change. GRAIENT
TOOL
FOREGROUND
TO
BACKGROUND
GRADIENT
OPTIONS
8. With the Gradient Tool
click in the center of the
document and drag to the
right edge. Holding down
the Shift key to constraint
the movement to
horizontal. Once you get
to the edge release the
mouse button, and then
the Shift key.
9. Your document should look like
this with the blue in the center
and the edges should be black.
10. NEW
LAYERIn the layers panel, click on the Create
a New Layer icon along the bottom.
This will create a new layer above the
background. The icon shows a
checkerboard, meaning it’s an empty
layer with nothing in it.
CREATE A
NEW LAYER
11. Click on the Default
Foreground/Background icon
to change the foreground to black
and the background to white.
DEFAULT
FOREGROUND/
BACKGROUND
12. LAYER FILLED
WITH WHITE
Press the Command
and Delete Keys to fill
the layer with the
background color
(White). The layer is now
filled with white. Since
nothing was selected,
everything was filled.
13. With the new layer still
selected, go to
Filter/Render/Clouds.
14. That filter should create
a look similar to this.
This is a great filter for
creating a random
pattern and is used a lot.
15. With that layer sill selected, change
the layer’s mode to Multiply.
Multiply will keep the darker
shades and make white
transparent. LAYER
MODE
16. This is great when you need to
make something darker to your
image. It’s also great if you have
line artwork for it will make all of the
white transparent allowing you to
add color below that layer.
17. Your screen should now look like
this, with the dark parts of the
layer showing and all white
transparent.
But this is too intense for what we
need, so we will scale it back
quite a bit to get the right look.
18. In the Layer’s Panel, adjust the
new layer’s Opacity to 25% which
will soften the effect, so it won’t be
so harsh.
LAYER”S
OPACITY
19. Your screen should now look like
this, with the dark parts of the
layer showing mush lighter, and
all white transparent.
20. Finally, so that the background
doesn’t look too artificial, we’ll
introduce some noise into the
image.
Go to Filter/Noise/Add Noise…
21. For the Noise setting, adjust the
amount to 20% so it’s not real
noticeable, and check the
Monochromatic box because
we don’t want to introduce any
color to the equation.
AMOUNT
MONOCHROMATIC
22. Your file should look like this.
The noise may not be too
noticeable, but it’s there.
This concludes creating one type
of background in Photoshop.
Next week we’ll add more to the
file.