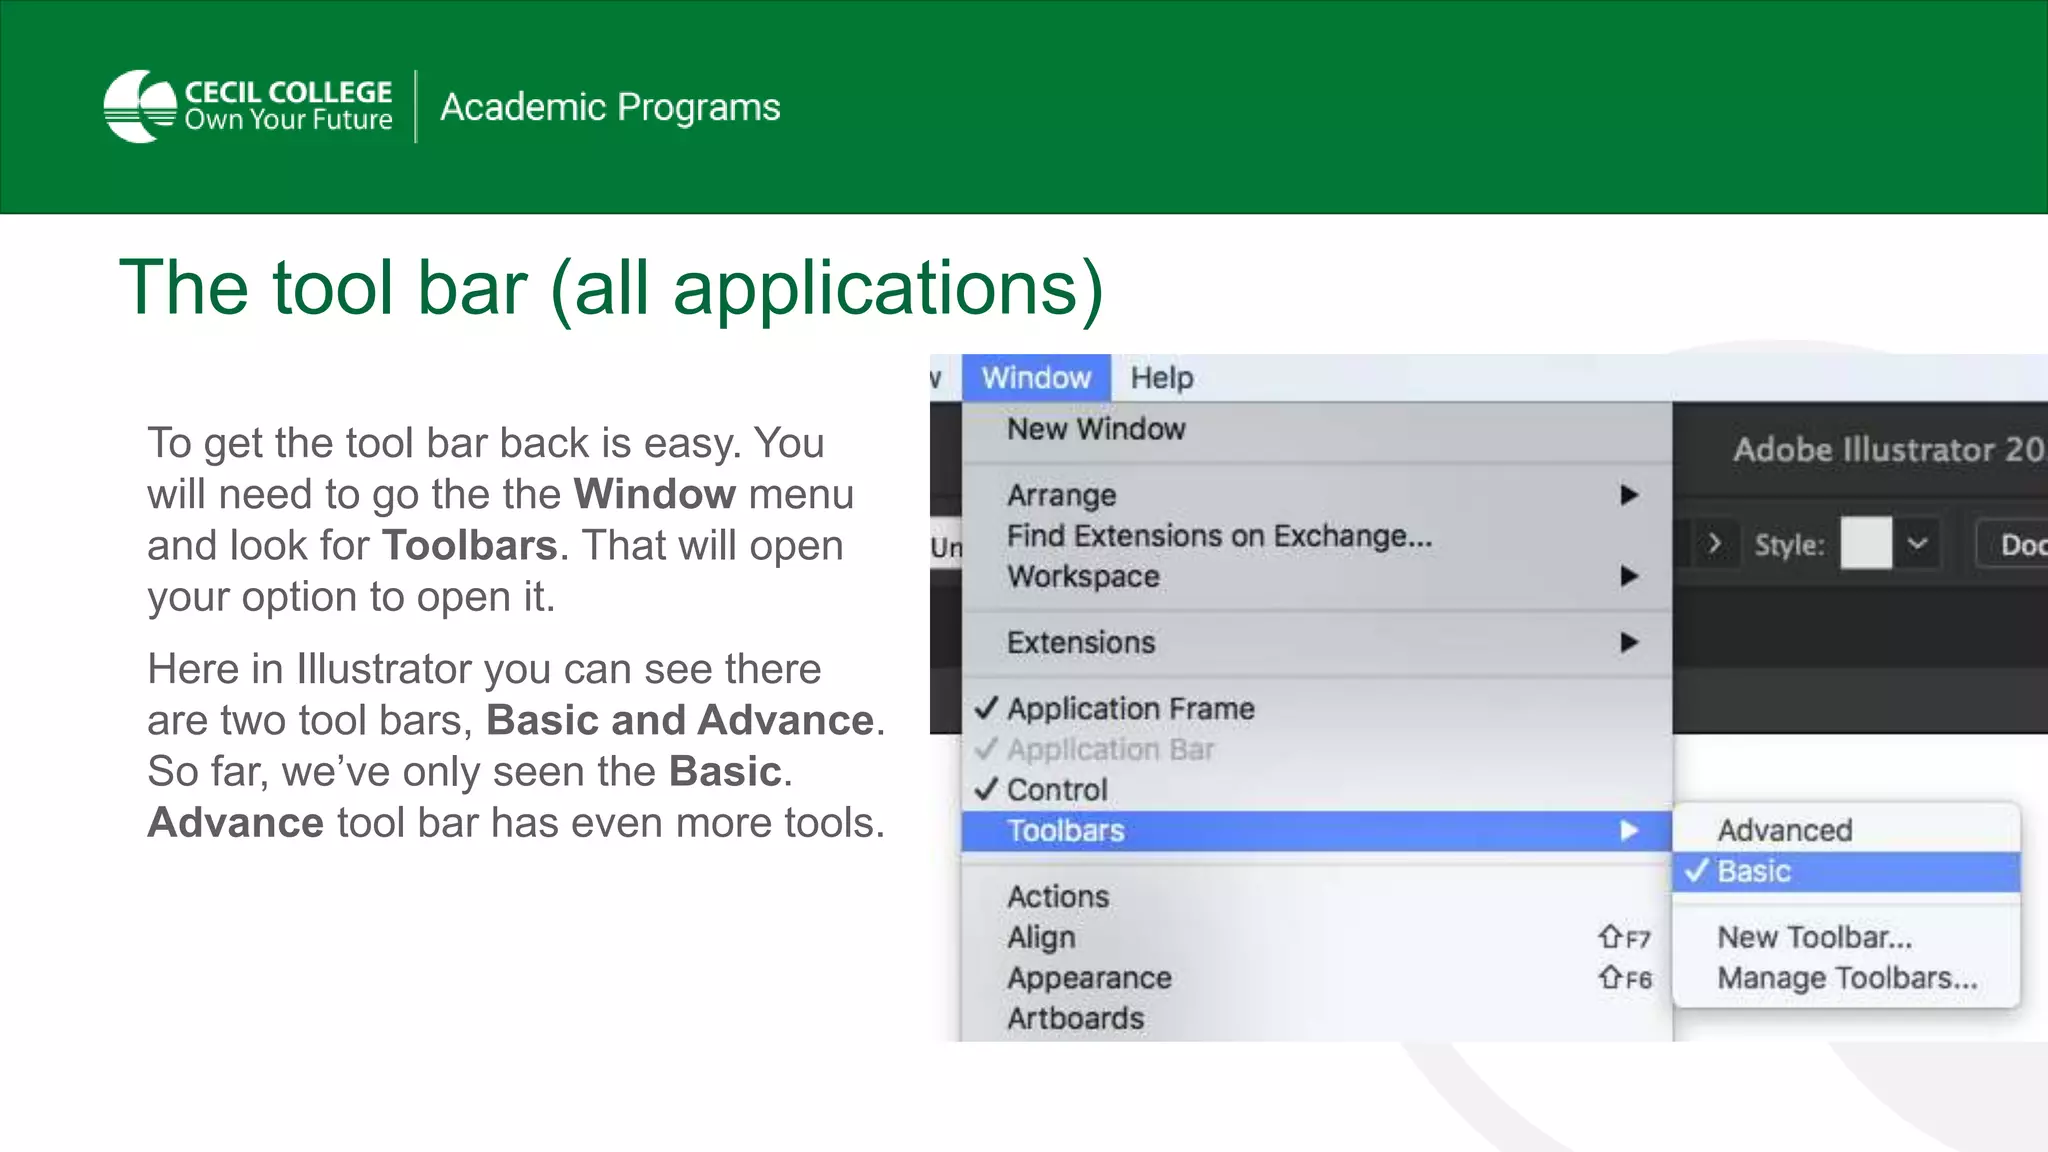
Exploring the Workspace
Illustrator | InDesign | Photoshop
Creative Cloud Applications’
Workspace
Overview
Creative Cloud Application’s Workspace
You create and manipulate your documents and files using
various elements, such panels, bars, and windows. Any
arrangement of the elements is called a workspace. When you
first start an application, you’ll see the default workspace, which
you can customize for the task you perform. You can create and
save multiple workspaces–one for editing and another for
viewing, for example–and switch among them.
Adobe Illustrator CC Classroom in a Book
Adobe Illustrator Workspace
Essential Workspace
APPLICATION
BAR
The application bar across
the top by default contains
application controls, the
workspace switcher, and
Search. Note that on
Windows, the menu items
appear inline with the
application bar.
Adobe Illustrator CC Classroom in a Book
Adobe Illustrator Workspace
Essential Workspace
PANELS
Panels help you monitor and
modify your work. Certain
panels are displayed by
choosing it from the Window
menu.
Adobe Illustrator CC Classroom in a Book
Adobe Illustrator Workspace
Essential Workspace
TOOLS
The Tools Panel contain tools
for creating and editing
images, artwork, page
elements, and more. Related
tools are grouped together.
Adobe Illustrator CC Classroom in a Book
Adobe Illustrator Workspace
Essential Workspace
DOCUMENT
WINDOW
The Document
Window
displays the
file(s) you’re
working on.
Adobe Illustrator CC Classroom in a
Book
Adobe Illustrator Workspace
Essential Workspace
STATUS
BAR
The Status Bar appears
at the lower left edge of
the document window. It
displays information,
zooming, and navigation
controls.
Adobe Illustrator CC Classroom in a Book
Adobe Illustrator Workspace
Essential Workspace
Creative Cloud Application’s Workspace
You‘ll notice that as you open Adobe Illustrator, InDesign, or
Photoshop they all look very similar. Following are the three
applications using Essential Workspace. The major components
are almost identical with a few modification for each application.
APPLICATION
BAR
PANELS
TOOLS
DOCUMENT
WINDOW
STATUS
BAR
Adobe Illustrator Workspace
Essential Workspace
APPLICATION
BAR
PANELS
TOOLS
DOCUMENT
WINDOW
STATUS
BAR
Adobe InDesign Workspace
Essential Workspace
APPLICATION
BAR
PANELS
TOOLS
DOCUMENT
WINDOW
STATUS
BAR
Adobe Photoshop Workspace
Essential Workspace
The Tool Bar
Overview
The tool bar
This will be the most used part of the application for
it contains all the items to create whatever you want
on your document. Here are the tool bars for
Illustrator, InDesign, and Photoshop. As you can
see, they are very similar,
and some of the tools are
on both or all of the tool
bars. Think of the tool bar
as a tool belt for a
construction worker;
all your tools in one
place and easy to reach.
The tool bar (all applications)
Sometimes you might be working on a
laptop and using a small screen. Since
the tool bar is so long, it becomes hard
to use on smaller screens. To
compensate for this you can view the
tools to a two-column layout.
At the top of the tool
bar is a double >>.
When you select that
the tool bar becomes
a double column for
you.
The Illustrator tool bar
Illustrator is unique in that you can
create multiple tool bars to cut down on
having so many options. As you can
see there’s a lot of tools here in the
standard default tool bar. Since we are
new to Illustrator, lets build a new tool
bar to cover the tools slowly and
individually. Open Illustrator and follow
along to make a new tool bar.
The tool bar (all applications)
If you pull the tool bar away, by clicking on the top and
pulling it, you can make the tool bar a floating panel.
A floating panel and be place anywhere in the
window and will remain there until you move it or dock
it. Drag your tool bar to undock it and make it a floating
panel.
Notice on the the image of the floating tool bar the X in
the top left? If you click that you will close the tool bar.
Sometimes that happens and the tool bar disappears.
Go ahead and click it. Your tool bar should now be
gone.
The tool bar (all applications)
To get the tool bar back is easy. You
will need to go the the Window menu
and look for Toolbars. That will open
your option to open it.
Here in Illustrator you can see there
are two tool bars, Basic and Advance.
So far, we’ve only seen the Basic.
Advance tool bar has even more tools.
The Illustrator tool bar
OK, let make a new friendly tool bar.
Go back to Window/ Toolbars/ and
select New Tool bar…
The Illustrator tool bar
OK, let make a new friendly tool bar.
1. Go back to Window/ Toolbars/
and select New Tool bar…
2. Replace the name with VCP118.
3. Select OK.
The making a new Illustrator tool bar
You should now see an empty tool bar
appear. We will now add our tools to
this.
Click on the three dots at the bottom.
The making a new Illustrator tool bar
This will bring up all the tools
available for the new tool bar.
The making a new Illustrator tool bar
Select the Selection Tool, it will
be the very top tool and will look
like a black arrow.
Drag the icon of the tool over to
the new tool bar (there will be an
empty box with a plus symbol
there for it.)
The making a new Illustrator tool bar
Drag the icon of the Direct
Selection Tool over to the new
tool bar (there will be an area that
will open up when you bring the
mouse cursor right under the
Direct Selection tool icon.) You
can drop the tool there.
The making a new Illustrator tool bar
Repeat the process for the
Rectangle tool and the Ellipse
tool. Your tool bar should now look
like this.
The making a new Illustrator tool bar
At the bottom of the tool panel,
you see an area that reads show:.
Click on the first icon which is the
foreground, background tool.
That will add it to your new tool
bar.
Your new tool bar show look like
this. Good job in following along. If
you are having issues, watch the
video on section 2 which creates
this tool bar.

Exploring the workspace part 1

  • 1.
  • 2.
  • 3.
    Creative Cloud Application’sWorkspace You create and manipulate your documents and files using various elements, such panels, bars, and windows. Any arrangement of the elements is called a workspace. When you first start an application, you’ll see the default workspace, which you can customize for the task you perform. You can create and save multiple workspaces–one for editing and another for viewing, for example–and switch among them. Adobe Illustrator CC Classroom in a Book
  • 4.
  • 5.
    APPLICATION BAR The application baracross the top by default contains application controls, the workspace switcher, and Search. Note that on Windows, the menu items appear inline with the application bar. Adobe Illustrator CC Classroom in a Book Adobe Illustrator Workspace Essential Workspace
  • 6.
    PANELS Panels help youmonitor and modify your work. Certain panels are displayed by choosing it from the Window menu. Adobe Illustrator CC Classroom in a Book Adobe Illustrator Workspace Essential Workspace
  • 7.
    TOOLS The Tools Panelcontain tools for creating and editing images, artwork, page elements, and more. Related tools are grouped together. Adobe Illustrator CC Classroom in a Book Adobe Illustrator Workspace Essential Workspace
  • 8.
    DOCUMENT WINDOW The Document Window displays the file(s)you’re working on. Adobe Illustrator CC Classroom in a Book Adobe Illustrator Workspace Essential Workspace
  • 9.
    STATUS BAR The Status Barappears at the lower left edge of the document window. It displays information, zooming, and navigation controls. Adobe Illustrator CC Classroom in a Book Adobe Illustrator Workspace Essential Workspace
  • 10.
    Creative Cloud Application’sWorkspace You‘ll notice that as you open Adobe Illustrator, InDesign, or Photoshop they all look very similar. Following are the three applications using Essential Workspace. The major components are almost identical with a few modification for each application.
  • 11.
  • 12.
  • 13.
  • 14.
  • 15.
    The tool bar Thiswill be the most used part of the application for it contains all the items to create whatever you want on your document. Here are the tool bars for Illustrator, InDesign, and Photoshop. As you can see, they are very similar, and some of the tools are on both or all of the tool bars. Think of the tool bar as a tool belt for a construction worker; all your tools in one place and easy to reach.
  • 16.
    The tool bar(all applications) Sometimes you might be working on a laptop and using a small screen. Since the tool bar is so long, it becomes hard to use on smaller screens. To compensate for this you can view the tools to a two-column layout. At the top of the tool bar is a double >>. When you select that the tool bar becomes a double column for you.
  • 17.
    The Illustrator toolbar Illustrator is unique in that you can create multiple tool bars to cut down on having so many options. As you can see there’s a lot of tools here in the standard default tool bar. Since we are new to Illustrator, lets build a new tool bar to cover the tools slowly and individually. Open Illustrator and follow along to make a new tool bar.
  • 18.
    The tool bar(all applications) If you pull the tool bar away, by clicking on the top and pulling it, you can make the tool bar a floating panel. A floating panel and be place anywhere in the window and will remain there until you move it or dock it. Drag your tool bar to undock it and make it a floating panel. Notice on the the image of the floating tool bar the X in the top left? If you click that you will close the tool bar. Sometimes that happens and the tool bar disappears. Go ahead and click it. Your tool bar should now be gone.
  • 19.
    The tool bar(all applications) To get the tool bar back is easy. You will need to go the the Window menu and look for Toolbars. That will open your option to open it. Here in Illustrator you can see there are two tool bars, Basic and Advance. So far, we’ve only seen the Basic. Advance tool bar has even more tools.
  • 20.
    The Illustrator toolbar OK, let make a new friendly tool bar. Go back to Window/ Toolbars/ and select New Tool bar…
  • 21.
    The Illustrator toolbar OK, let make a new friendly tool bar. 1. Go back to Window/ Toolbars/ and select New Tool bar… 2. Replace the name with VCP118. 3. Select OK.
  • 22.
    The making anew Illustrator tool bar You should now see an empty tool bar appear. We will now add our tools to this. Click on the three dots at the bottom.
  • 23.
    The making anew Illustrator tool bar This will bring up all the tools available for the new tool bar.
  • 24.
    The making anew Illustrator tool bar Select the Selection Tool, it will be the very top tool and will look like a black arrow. Drag the icon of the tool over to the new tool bar (there will be an empty box with a plus symbol there for it.)
  • 25.
    The making anew Illustrator tool bar Drag the icon of the Direct Selection Tool over to the new tool bar (there will be an area that will open up when you bring the mouse cursor right under the Direct Selection tool icon.) You can drop the tool there.
  • 26.
    The making anew Illustrator tool bar Repeat the process for the Rectangle tool and the Ellipse tool. Your tool bar should now look like this.
  • 27.
    The making anew Illustrator tool bar At the bottom of the tool panel, you see an area that reads show:. Click on the first icon which is the foreground, background tool. That will add it to your new tool bar. Your new tool bar show look like this. Good job in following along. If you are having issues, watch the video on section 2 which creates this tool bar.